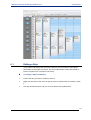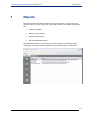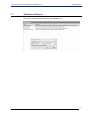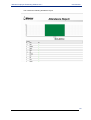
1
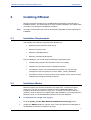
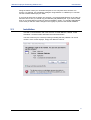
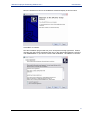
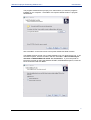
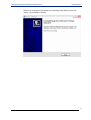
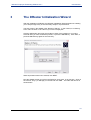
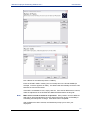
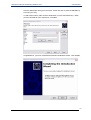
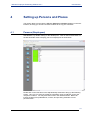
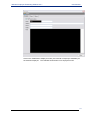
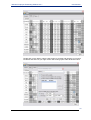
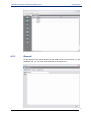
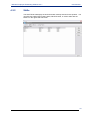
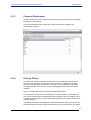
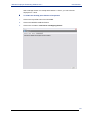
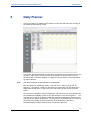
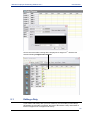
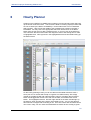
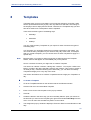
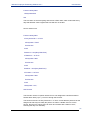
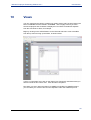
DRoster Employee Scheduling Software 2.2.1
User Manual
DRoster Employee Scheduler User Manual
© Copyright 2006
Kappix
DRoster Employee Scheduling Software 2.2.1
User Manual
Contents
1
Introduction ......................................................................................................................................... 3
2
Installing DRoster ............................................................................................................................... 4
2.1
2.2
2.3
Installation Requirements......................................................................................................... 4
Installation Modes .................................................................................................................... 4
Installation ................................................................................................................................ 5
3
The DRoster Initialization Wizard.................................................................................................... 10
4
Setting up Persons and Places ....................................................................................................... 13
4.1
4.2
5
Daily Planner ..................................................................................................................................... 21
5.1
6
Editing a Duty ......................................................................................................................... 22
Hourly Planner .................................................................................................................................. 24
6.1
7
Persons (Employees) ............................................................................................................. 13
Places (Job Functions) ........................................................................................................... 16
4.2.1 General......................................................................................................................... 17
4.2.2 Shifts ............................................................................................................................ 18
4.2.3 Persons (Employees)................................................................................................... 19
4.2.4 Overlap Places ............................................................................................................. 19
Editing a Duty ......................................................................................................................... 25
Reports .............................................................................................................................................. 26
7.1
7.2
7.3
7.4
Attendance Report ................................................................................................................. 27
Duties by Places (Employees by Job Function) Report ......................................................... 29
Persons Duty Report .............................................................................................................. 31
Non-Manned Duties Report.................................................................................................... 33
8
Templates .......................................................................................................................................... 34
9
The Rule Engine................................................................................................................................ 36
9.1
9.2
9.3
9.4
9.5
10
How the Rule Engine Works .................................................................................................. 36
Defining a Rule ....................................................................................................................... 36
Variables, Functions and Objects in the Rule Engine ............................................................ 38
Debugging a Rule................................................................................................................... 38
Validating a Rule .................................................................................................................... 38
Views.................................................................................................................................................. 39
Trademarks
All trademarks are hereby acknowledged.
Kappix and the Kappix logo, whether or not appearing with the trademark symbol, are registered trademarks of
Kappix Software.
© Copyright 2006
Kappix
DRoster Employee Scheduling Software 2.2.1
1
User Manual
Introduction
We at Kappix are happy to provide you with DRoster, a powerful employee shift
scheduling system, as one of our many tools to help you manage your
organization/business.
The DRoster Employee Scheduler User Manual will enable you to get an overview
of scheduling essentials and basic functions you require to automate your employee
scheduling.
Now let’s get started!
3
DRoster Employee Scheduling Software 2.2.1
2
User Manual
Installing DRoster
DRoster Employee Scheduler is a 5.86 MB Windows application equipped with an
installation wizard. This wizard makes for quick program installation. The wizard takes
you step by step through the installation procedure.
Note:
2.1
It is highly recommended you close all unnecessary applications before beginning the
installation.
Installation Requirements
The software and hardware requirements for DRoster are:
•
Operating system Windows 2000 and up.
•
Minimum Pentium lll 550.
•
Minimum of 256 MB memory.
•
Minimum of 50 MB free disk space.
Prior to installation, you should verify the following configurations exist:
2.2
•
DRoster setup program must be able to write to the registry.
•
DRoster uses port 3050 to listen to database requests.
•
Permissions: ‘admin’ is recommended for permissions or any user with
privileges to enter the registry keys under "HKEY_LOCAL_MACHINE”
•
Permission to enter new services such as the Firebird service, which must be
enabled and running for DRoster to operate.
Installation Modes
DRoster supports any network requirement you might need. It ranges from stand
alone to any number of computers. DRoster includes a multi-user option. The
installation is the same as that for a single user. To switch to multi-users, all that is
required is a minor change in the registry after initial installation. This change will point
DRoster to work on a shared database instead of on the local database.
To implement this change in the registry:
1.
Go to the [HKEY_LOCAL_MACHINE\SOFTWARE\DRoster\Settings] section.
2.
Update the "DBPath" key with a proper value. That value will be the location/path of
the database file which is accessible to all users.
4
DRoster Employee Scheduling Software 2.2.1
User Manual
Doing the above means you can define the path on one computer which all users can
access. For example, two scheduling managers using DRoster on 2 different pc’s can then
see the schedule made up by the other.
If you want to share files so others can see them, you should install DRoster on the other pc
and from time to time you should copy the DRoster.gdb (database) file. If you want to share
them on a regular basis this means a network installation. Again, you should install DRoster
on the other pc and then make changes in the registry to point it to the shared database.
2.3
Installation
Included on the distribution CD is the selection to install DRoster, labeled “Install
Scheduler”. Click the button and follow the instructions below.
The first screen may be a security warning indicating that the publisher can not be
verified. If this screen displays, simply click RUN to continue.
5
DRoster Employee Scheduling Software 2.2.1
User Manual
Next, the welcome screen for the installation wizard will display as shown below.
Click NEXT to continue.
Now the installation program will ask you to accept the licensing agreement. Please
read the end user license agreement and click on the radio button labeled “I ACCEPT
THE AGREEMENT” if you want to continue with installation. Click NEXT to continue.
6
DRoster Employee Scheduling Software 2.2.1
User Manual
The program wizard will then prompt you to select where you want the programs
installed on your computer. Click NEXT to accept the default location c:\program
files\DRoster.
Also click NEXT on the next screen to accept the default start folder location.
The Wizard will then prompt you to create desktop icons or a quick launch icon. If you
want these options, click the checkbox and then click NEXT. We recommend you
check the “CREATE DESKTOP ICON” for convenience. If you would prefer to
launch the program by using the Windows START, PROGRAMS sequence, leave the
boxes unchecked and click NEXT.
7
DRoster Employee Scheduling Software 2.2.1
User Manual
Now the Wizard is ready to install the program files. Click INSTALL.
You will then see the progress bar display the loading sequence.
8
DRoster Employee Scheduling Software 2.2.1
User Manual
When all of the programs are loaded, the Completing Setup Wizard screen will
display. Click FINISH to continue.
9
DRoster Employee Scheduling Software 2.2.1
3
User Manual
The DRoster Initialization Wizard
After the installation of DRoster, the DRoster Initialization Wizard will launch enabling
you to step through many of the necessary setups in a quick fashion.
The first screen in the Wizard is the “Names of Places”. In this context, it is referring
to the Job Functions or Job Titles of your store’s employees.
Click the ADD button and enter the job titles of each of the positions in your store.
Click OK after you have entered the job title, or press the ENTER key. Click ADD, or
press the ENTER key again for the next entry.
When all positions have been entered, click NEXT.
Now the Wizard will ask you to fill in the Shifts for each place, or job function. Click on
the “Places” entry (i.e. Manager) on the left and click ADD. The editor will launch as
shown below.
10
DRoster Employee Scheduling Software 2.2.1
User Manual
Pick a Name for the shift and press the TAB key.
Enter the START TIME in military (24 hour format) time in the format HHMM (for
example, 12:00 am appears as 2400). The Wizard will automatically insert the colon
between the hours and minutes.
If the shift is a standard 8 hours, simply click OK. If the shift is different than 8 hours,
make the adjustment in the HOURS and MINUTES fields before clicking OK.
Note:
Make sure to include all shifts for all positions. Each position can have different
shift names, times and durations from any other job function giving you flexibility in
scheduling and manpower coverage. Click NEXT when completed.
After all Shifts have been entered, the Wizard will prompt you to enter your
employees.
11
DRoster Employee Scheduling Software 2.2.1
User Manual
Click the ADD button and type in the name. Either click OK or press the ENTER key
to accept your entry.
To add another name, either click the ADD button or press the ENTER key. When
you have entered all of the employees, click NEXT.
Congratulations, you have completed the DRoster initialization wizard. Click FINISH.
12
DRoster Employee Scheduling Software 2.2.1
4
User Manual
Setting up Persons and Places
This section takes you through the DRoster Persons and Places Modules on the user
interface, showing you how to use these modules to set up your schedules.
4.1
Persons (Employees)
Start DRoster, by double clicking on the desktop icon. Click on the Persons button on
the left hand side menu to display your list of employees as show below.
Double click on the first name in the alphabetically sorted list to bring up the following
screen. Here you can enter the employee information such as address, phone and
cell phone numbers. You may also enter notes in the NOTES section. Notes can
include anything from qualifications, courses, and upcoming seminars to more
personal notes.
13
DRoster Employee Scheduling Software 2.2.1
User Manual
Click on the TIMES tab to display an entire year calendar of employee availability for
the selected employee. The calendar shown below is for employee ALICE.
14
DRoster Employee Scheduling Software 2.2.1
User Manual
Double click on any date or select a date range by pressing and dragging your mouse
left button and then use your right mouse click to bring up the editor as shown below.
15
DRoster Employee Scheduling Software 2.2.1
User Manual
From the Person Availability Times screen, you can indicate the days the employee is
not available (i.e. on vacation), or hours of the day that they are unavailable (i.e.
school hours). This will automatically prevent you from scheduling this person during
a time or day that they are unable to work.
Now click on the PLACES tab. For this employee (ALICE), it indicates all of the job
functions available. If the employee can work multiple job functions, place a check
mark in all appropriate checkboxes by clicking on the box. Click on the check again to
clear the check mark. Continue this activity for all employees and CLOSE the form
when completed.
4.2
Places (Job Functions)
Now click on the PLACES button on the left hand side menu. This brings up the screen as shown below.
16
DRoster Employee Scheduling Software 2.2.1
4.2.1
User Manual
General
Double clicking on the entries will bring up the detail screen as shown below. On the
GENERAL tab, you can enter notes pertaining to the job function.
17
DRoster Employee Scheduling Software 2.2.1
4.2.2
User Manual
Shifts
The SHIFTS tab will display the shift information already entered for this position. You
can ADD new shifts, EDIT existing shifts, DELETE shifts, or COPY shifts with the
buttons on the right hand side menu.
18
DRoster Employee Scheduling Software 2.2.1
4.2.3
User Manual
Persons (Employees)
On the Persons tab, you can select/view the listing of all employees who are qualified
for this job function (Place).
In the example shown below, Alice, Bill, Jim and Sean are all qualified to be
scheduled as Cashier 1.
4.2.4
Overlap Places
As a protective measure, DRoster will not allow you to assign the same person to
more than one duty (Place) at any given time. Therefore, by default, the Overlap
function is disabled in the OFF position. However, there are situations that require
overlapping places. In such cases, use the Overlap places feature to override this
restriction.
Here is a scenario that might require the Overlap places feature.
If, for example, your store has 1 manager and 2 cashiers (cashier A and cashier B)
you can use Overlap places to determine that an employee who is a manager can be
a cashier at the same time. You can also determine that you won't allow cashier A to
overlap cashier B.
The difference between scheduling with Overlap and without is that if you do not use
the Overlap places you MUST have 3 employees for each shift, but when you define
19
DRoster Employee Scheduling Software 2.2.1
User Manual
that a manager 'Place' can overlap with cashier A ‘Place”, you can have two
employees in 1 shift.
To enable the Overlap place feature to ON position
1.
Click on the top VIEW menu from OPTIONS.
2.
Click on the MISCELLANEOUS menu.
3.
Click on the checkbox “Use Places overlapping feature”.
20
DRoster Employee Scheduling Software 2.2.1
5
User Manual
Daily Planner
Click on the DAILY PLANNER menu selection on the left hand side menu to bring up
the following shift planning screen.
The START DATE is defaulted to today’s date, as indicated in the selection box on the
top menu. Also located on the top menu is the duration of the schedule. You can
choose between a WEEK, MONTH, or 3 MONTH view by clicking on the appropriate
top menu selection.
Note:
The dates are shown in International format (DD/MM).
Now let’s begin our scheduling activity. First, left click on today’s cell (31/08, for
st
August 31 ) for Cashier 1 Shift 1 to select the cell. Now either click the NEW DUTY
button from the top menu, or right click in the cell to bring up the screen as shown
below.
Now click on the dropdown menu for PERSON. This will show you all employees who
st
are qualified and available to work on the date selected, in this case August 31 . You
may also enter notes in the field provided and check the APPROVED checkbox if the
schedule for this person is approved. You may leave it unchecked until you verify that
this person can actually work this shift and it will be displayed on the DAILY
PLANNER with a red flag indicating it has not yet been approved.
21
DRoster Employee Scheduling Software 2.2.1
User Manual
st
Here is the screen after entering all the employees for August 31 . Note the red
entries indicating unapproved schedules.
5.1
Editing a Duty
If you need to edit a duty after you have created it, you can modify or edit a duty’s
parameters such as start or end time, the Person allocated to a duty and whether a
Person is approved or not approved for a duty.
22
DRoster Employee Scheduling Software 2.2.1
User Manual
To change a duty’s parameters
1.
Point to the duty you want to modify to select it.
2.
Right-click and select “edit” from the pop-up menu or double-click on the duty to open
it.
3.
The duty window will open and you can now edit the duties parameters.
23
DRoster Employee Scheduling Software 2.2.1
6
User Manual
Hourly Planner
Clicking on the HOURLY PLANNER menu selection from the left hand menu will bring
up the screen as shown below. This function is ideal for entering employee tasks that
are not covered by the DAILY PLANNER (i.e. those tasks which are not a standard
shift in length). Here we see the details of the scheduling we entered in the DAILY
PLANNER. You may click in the appropriate start time cell and click on the NEW
button from the top menu to add a schedule event, or you may click in the start time
cell, hold down the left mouse button and drag the mouse to the ending time to make
a highlighted block. Now right click in the highlighted block and click NEW to bring up
the editor screen.
On this hourly planning screen you can see that we scheduled Annette to work 3
hours prior to her normal shift to help us organize our QSR inventory. We simply
clicked on the 0600 (6 AM) cell under the QSR1 column, held down the left mouse
button and dragged the mouse to the end time of 0900, and released the mouse
button. This highlighted a block. We then right clicked on the block and brought up
the editor to enter Annette as the person we wanted to work. You can also tell that
this new task is unapproved as the flag is red. Once we confirm with Annette that she
can come in early, we can check the APPROVED checkbox to turn the flag to green.
24
DRoster Employee Scheduling Software 2.2.1
6.1
User Manual
Editing a Duty
If you need to edit a duty after you have created it, you can modify or edit a duty’s
parameters such as start or end time, the Person allocated to a duty and whether a
Person is approved or not approved for a duty.
To change a duty’s parameters
1.
Point to the duty you want to modify to select it.
2.
Right-click and select “edit” from the pop-up menu or double-click on the duty to open
it.
3.
The duty window will open and you can now edit the duty’s parameters.
25
DRoster Employee Scheduling Software 2.2.1
7
User Manual
Reports
DRoster Employee Scheduler includes out-of-the-box reports. You can export the
reports in txt, htm, rtf, xls, tiff, gif, bmp, jpeg, PDF formats. The available report types
are:
•
Attendance Report
•
Duties by Places Report
•
Persons Duties Report
•
Non-manned Duties Report
The REPORTS button on the left hand side menu launches the following screen
showing the four reports that are available and a brief description of each report.
26
DRoster Employee Scheduling Software 2.2.1
7.1
User Manual
Attendance Report
Select the date range desired and click OK. DD/MM/YYYY
27
DRoster Employee Scheduling Software 2.2.1
User Manual
This creates the following attendance report.
28
DRoster Employee Scheduling Software 2.2.1
7.2
User Manual
Duties by Places (Employees by Job Function) Report
Select the date range desires, and indicate which Job Function you want to include in
the report.
29
DRoster Employee Scheduling Software 2.2.1
User Manual
This is the resulting report.
30
DRoster Employee Scheduling Software 2.2.1
7.3
User Manual
Persons Duty Report
Select the date range and the Persons (Employees) that you want to include on the
report.
31
DRoster Employee Scheduling Software 2.2.1
User Manual
This is the resulting report. Note that the report is separated by employee, indicates a
start and stop time and job function along with the length of the shift worked. It also
provides a total of the number of hours scheduled during the reporting period for each
employee, and a graph depicting the percentage of hours worked.
32
DRoster Employee Scheduling Software 2.2.1
7.4
User Manual
Non-Manned Duties Report
This report will show you any Job Functions that have not been filled during the
reporting period.
33
DRoster Employee Scheduling Software 2.2.1
8
User Manual
Templates
Templates save you time in scheduling your employees because, most often, shifts
tend to repeat themselves day by day. The only data for a shift that could change is
the employee who is deployed for that shift. Therefore, the Templates help you save
time when shifts have a fixed pattern and are repetitive.
There are three basic types of scheduling days:
•
weekdays
•
weekends
•
holidays
You can create as many Templates as you require for each of those three types of
scheduling days.
In a Template, you can define duties (but not assign employees to the duties). You
can create as many Templates as you need for every day of the week, for example.
After you create a template, you can choose which of those Templates to apply to a
specific day.
Note:
Because there is no option to assign employees to duties through the Template
feature, Persons will appear as not available (n/a) on the planner.
Here is a scenario for which you might wish to create a Template.
Your store has 3 duties: a kitchen, a dining hall, a cleaner. You require 4 shifts in the
kitchen, 4 shifts in the dining hall and 2 shifts for the cleaners. This comes to a total of
10 shifts per day. Instead of entering those shifts daily, you can define a weekday
Template and apply it for every day of the week.
This section describes how to create a Template and how to apply the Template to a
day.
To Create a Template
1.
Go to the Templates Module on the left hand side of the DRoster window.
2.
Click the File menu and select New Template.
3.
Enter a name for the new template on the pop-up window.
4.
Click OK.
5.
Create the duties in the same way you did in the Daily Planner: point your mouse to
the time slot you need on the Template grid, right-click and select New Duty from the
menu. You can also click the New Duty button on the toolbar.
6.
The Assignment pop-up window is displayed. Enter the Start Time and Duration of the
duty.
34
DRoster Employee Scheduling Software 2.2.1
7.
User Manual
Click OK.
To Apply a Template to a Day
1.
Click the Daily Planner button from the Modules pane on the left-hand side of the
DRoster window.
2.
Click the Templates button on the toolbar to get a drop-down list of names of all the
Templates you have created.
3.
Select the Template from the list of names. The Applying Template pop-up window is
displayed.
4.
Click the radio button to select the days or set the date range you need to apply the
template to.
5.
Click OK.
35
DRoster Employee Scheduling Software 2.2.1
9
User Manual
The Rule Engine
DRoster's rule engine is your way to validate your schedules to prevent costly errors
and conflicting shifts. The Rule Engine gives you scheduling flexibility and enables
you to create complex schedules.
DRoster's validation system does not only make sure you do not assign an employee
to a duty when that employee is not available (DRoster validates when you select the
employee to assign), but also makes sure that many other rules are not violated in
your roster.
Rules are unique to an organization/business/store, labor laws in your state, your
staffing needs and employee requests. For example, while Store A requires a rule that
an employee cannot work more than 40 weekly hours, another might require a rule
that an employee cannot work two or more consecutive weekends. Another rule could
dictate that an employee must have a 10 hour break between 2 shifts. Yet another
rule could ensure that a certain employee is not assigned to duties after 4 p.m. unless
it is a weekend.
By creating such rules in the Rule Engine, you can ensure scheduling that is
consistent with those exceptions.
DRoster’s Rule Engine lets you define almost any rule you can think of, and then it
checks every duty in your roster against the rules you defined.
Note:
9.1
The Rule Engine requires a basic knowledge of JavaScript or Visual Basic.
How the Rule Engine Works
DRoster's rule-based engine uses either JavaScript or Visual Basic to create and run
rules.
For best practice, it is recommended you break down a long rule into smaller rules.
For example, if you want to create a rule that a certain employee is scheduled after 4
p.m. and that there is a 10 hour break between 2 shifts, it is good practice to break
this one rule into its 2 components and create 2 rules.
When a duty needs to be checked, DRoster runs all the rules in the system against
this duty to see if this duty is valid.
9.2
Defining a Rule
A rule is a Boolean function named "IsDutyValid". Within this function you define the
validation. If the function returns “true”, it means that the duty is valid. If it returns
“false”, it means that the duty in invalid.
Let's start with a very simple rule:
36
DRoster Employee Scheduling Software 2.2.1
User Manual
Function IsDutyValid
IsDutyValid=false
end
This rule does not check anything and returns a false value, which means that every
duty that DRoster checks against that rule will turn out invalid.
Here is another rule:
Function IsDutyValid
If Duty.PersonID <> 3 Then
IsDutyValid = TRUE
Exit function
end if
StartHour = hour(Duty.StartTime)
If StartHour > 16 Then
IsDutyValid = false
Exit function
end if
EndHour = hour(Duty.StartTime)
If EndHour > 16 Then
IsDutyValid = false
Exit function
end if
IsDutyValid = true ;
end Function
This function checks if a person whose ID is 3 was assigned to a shift that starts or
finishes after 1600 (4 p.m.). Let's run through this function.
The function's first line "If Duty.PersonID <> 3 Then" checks that the person that was
assigned to that duty is actually the person we want to validate. If this is not the
person, then there is nothing more to check and it exists with a status of “true”,
meaning this duty is a valid duty.
37
DRoster Employee Scheduling Software 2.2.1
User Manual
If a Person number 3 is assigned to it, the rule engine will continue the checking.
In the line that reads "StartHour = hour(Duty.StartTime)", we put the hour when the
duty starts into a local variable and check that this variable is less than 16 (the latest
hour that this person can be assigned to). It then checks this condition "If StartHour >
16 Then".
If the result of the condition "StartHour>16" is “true” then the function returns a false
value (which means the duty is not valid) and exits. The same thing happens with the
"EndHour".
9.3
Variables, Functions and Objects in the Rule Engine
The following variables, functions and objects are accessible in the Rule Engine.
9.4
•
All JavaScript / VBScript are accessible.
•
Duty's parameters - Person Index, Place Index, Duty Length, Start time, End
time, duty's note.
•
Query - with this object you can get any information from the database. Look
at the right side of the rules editor "Script Element" to see what the query's
accessible methods are.
•
Tables - DRoster stores its data in the database. You, as a rule writer, have
fully access to it. Use the "Script Element" panel on the right to find out what
the tables structure are.
Debugging a Rule
Debugging a rule is a compulsory stage in developing a rule. To debug a rule you first
need to define a dummy duty and check the rule against it.
In the Rule Editor use the "Script" main menu to select "Set Duty parameters...." to
define the testing duty parameters. Use the "Test" button or click F9 to test your rule.
Use the "DebugOutput" function to print out any output you need:
DebugOutput(duty.StartHour)
9.5
Validating a Rule
To validate a rule, click on the "Validate" button on the Daily Planner Module or the
Hourly Planner Module.
38
DRoster Employee Scheduling Software 2.2.1
10
User Manual
Views
You can customize the views to include only certain places (Job Functions) during the
DAILY PLANNER and the HOURLY PLANNER. This is highly useful if you have
several employees and would like to display the Food Service schedules separate
from the Convenience Store, for example.
Begin by clicking on the VIEWS button on the left hand side menu. Now click NEW
from the top menu to bring up the editor, as shown below.
Type in a “View Name” then click on the Places (Job Functions) checkboxes that you
want to include in this custom view. Click OK when completed.
Now when you are in either the DAILY PLANNER or HOURLY PLANNER screens,
you can select your custom view from the dropdown under the VIEWS top menu.
39
DRoster Employee Scheduling Software 2.2.1
User Manual
Send your comments to Kappix
At Kappix, every effort is made to ensure that our documents are accurate and error free. If this is not the
case, we would appreciate it if you would take the time to contact Kappix using one of the methods listed
below. You can also contact us if there are any other comments that you would like to make, about this
or any other Kappix document.
You should include; your name and address, your comments and the page number or topic to which the
comment refers.
You can contact Kappix in any of the following ways:
•
By email: [email protected]
•
Through our website: www.kappix.com/support.htm
Comments
Name and contact email:
______________________________________
Company or Organization:
______________________________________
Address:
______________________________________
______________________________________
Document Title:
______________________________________
Document Number:
______________________________________
Page/Topic:
______________________________________
Comments:
______________________________________
______________________________________
______________________________________
______________________________________
______________________________________
______________________________________
______________________________________
40
DRoster Employee Scheduling Software 2.2.1
User Manual
This manual is copyrighted and all rights are reserved. This document may not, in whole or part, be
copied, photocopied, reproduced, translated or reduced to any electronic medium or machine-readable
form without the prior written consent of Kappix. All names, companies and data used in examples and
illustrations in this manual are fictitious unless otherwise noted.
Copyright
© 2006 Kappix
http://www.kappix.com
41