1
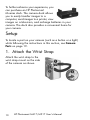
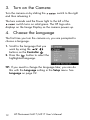
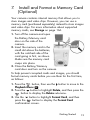
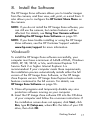
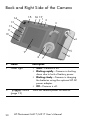
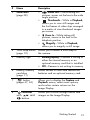
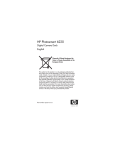
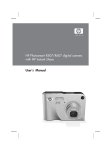
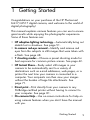
1 Getting Started
Congratulations on your purchase of the HP Photosmart
M417/M517 digital camera, and welcome to the world of
digital photography!
This manual explains camera features you can use to ensure
great results while enjoying the photographic experience.
Some of these features are:
• HP adaptive lighting technology—Automatically bring out
details lost in shadows. See page 51.
• In-camera red-eye removal—Identify and remove red
eyes from the subjects in still images that were taken with
a flash. See page 68.
• 7 shooting modes—Choose a preset shooting mode for
best exposure for common picture scenes. See page 42.
• HP Instant Share—Easily select still images in your
camera to be automatically sent to a variety of
destinations such as e-mail addresses, web pages, or a
printer the next time your camera is connected to a
computer. Your recipients can then view your images
without the burden of large file attachments. See
page 71.
• Direct print—Print directly from your camera to any
PictBridge-certified printer without having to connect to
your computer. See page 81.
• On-camera Help—Use on-screen instructions for help on
using camera features when you don’t have the manual
with you.
Getting Started
9
To further enhance your experience, you
can purchase an HP Photosmart
M-series dock. The camera dock allows
you to easily transfer images to a
computer, send images to a printer, view
images on a television, and recharge batteries in your
camera. The dock also provides a convenient home for
your camera.
Setup
To locate a part on your camera (such as a button or a light)
while following the instructions in this section, see Camera
Parts on page 19.
1. Attach the Wrist Strap
Attach the wrist strap to the
wrist strap mount on the side
of the camera as shown.
10
HP Photosmart M417/M517 User’s Manual
2. Install the Batteries
1. Open the Battery/Memory card
door on the side of the camera by
sliding the door toward the bottom
of the camera.
2. Insert the batteries as indicated
inside the door.
3. Close the Battery/Memory card
door by pushing the door down and
sliding the door toward the top of
the camera until the door latches.
For the performance of Alkaline,
Lithium, and NiMH batteries when used
with this camera, see Performance per Battery Type on
page 148. For hints on optimizing battery performance, see
Appendix A, Managing Batteries, starting on page145.
TIP: You can also use an optional HP AC power adapter to
power the camera. If you use rechargeable NiMH
batteries, you can recharge the batteries in the camera
using the optional HP AC power adapter or the optional
HP Photosmart M-series dock, or recharge the batteries
separately in the optional HP Photosmart Quick
Recharger. For more information, see Appendix B,
Purchasing Camera Accessories, starting on page155.
Getting Started
11
3. Turn on the Camera
Turn the camera on by sliding the
and then releasing it.
switch to the right
The lens extends and the Power light to the left of the
switch turns on solid green. The HP logo also
displays on the Image Display as the camera powers up.
4. Choose the Language
The first time you turn the camera on, you are prompted to
choose a language.
1. Scroll to the language that you
want by using the
buttons on the Controller
.
2. Press the
button to select the
highlighted language.
TIP: If you need to change the language later, you can do
this with the Language setting in the Setup menu. See
Language on page 92.
12
HP Photosmart M417/M517 User’s Manual
5. Set the Region
After choosing a language, you are prompted to choose the
continent where you live. The Language and Region settings
determine the defaults for the date format and the format of
the video signal for displaying camera images on a
television (see TV Configuration on page 91).
1. Scroll to the region that you
want by using the
buttons
on the Controller
.
2. Press the
button to select
the highlighted region.
6. Set the Date and Time
The camera has a clock that records the date and time at
which you take each picture. This information is recorded in
the image properties, which you can see when viewing the
image on your computer. You can also choose to have the
date and time imprinted on the image (see Date & Time
Imprint on page 53).
1. The first item highlighted is the
date and time format. If you
want to change the format,
use the
buttons. If the
date and time format is correct,
press the button to move to
the Date.
2. Adjust the highlighted selection using the
buttons.
3. Press the
buttons to move to the other selections.
4. Repeat steps 2 and 3 until the date and time are
set correctly.
Getting Started
13
5. Press the
button when you have entered the proper
values for the date and time. A confirmation screen
appears, asking if the correct date and time have been
button
set. If the date and time are correct, press the
to select Yes.
If the date and time are incorrect, press the
button to
highlight No, and then press the
button. The Date &
Time screen appears again. Repeat steps 1 through 6 to
set the correct date and time.
TIP: If you need to change the date and time settings later,
you can do this with the Date & Time setting in the Setup
Menu. See Date & Time on page 89.
14
HP Photosmart M417/M517 User’s Manual
7.
Install and Format a Memory Card
(Optional)
Your camera contains internal memory that allows you to
store images and video clips. However, you can use a
memory card (purchased separately) instead to store images
and video clips. For more information about supported
memory cards, see Storage on page 166.
1. Turn off the camera and open
the Battery/Memory card
door on the side of the
camera.
2. Insert the memory card in the
small slot above the batteries,
with the notched side of the
card going in first, as shown.
Make sure the memory card
snaps into place.
3. Close the Battery/Memory
card door and turn on the camera.
To help prevent corrupted cards and images, you should
format memory cards before you use them for the first time,
as follows:
1. Press the
button, then use the button to move to the
Playback Menu
.
2. Press the
button to highlight Delete, and then press the
button to display the Delete sub-menu.
3. Use the
button to highlight Format Card, and then
press the
button to display the Format Card
confirmation screen.
Getting Started
15
4. Press the
button to highlight Yes, and then press the
button to format the card.
Formatting Card... appears in the Image Display while
the camera is formatting the memory card. When the
camera has completed the formatting, the Total Images
Summary screen is displayed (see Total Images Summary
Screen on page 62).
To remove the memory card from the camera, first turn the
camera off. Then open the Battery/Memory card door, press
down on the top edge of the memory card, and it will spring
outward from the slot.
NOTE: When you install a memory card in the camera, all
new images and video clips will be stored on the card. To
use internal memory and view images stored there,
remove the memory card. You can also transfer images
from the internal memory to the memory card (see Move
Images to Card on page 93).
16
HP Photosmart M417/M517 User’s Manual
8. Install the Software
The HP Image Zone software allows you to transfer images
from the camera, and then view, edit, print, or e-mail them. It
also allows you to configure the HP Instant Share Menu on
the camera.
NOTE: If you do not install the HP Image Zone software, you
can still use the camera, but certain features will be
affected. For details, see Using Your Camera without
Installing the HP Image Zone Software on page 99.
NOTE: If you have trouble installing or using the HP Image
Zone software, see the HP Customer Support website:
www.hp.com/support for more information.
Windows®
To install the HP Image Zone software successfully, your
computer must have a minimum of 64MB of RAM, Windows
2000, XP, 98, 98 SE, or Me, and Internet Explorer 5.5
Service Pack 2 or higher. Internet Explorer 6 is
recommended. If your computer meets these requirements,
the installation process automatically installs either the full
version of the HP Image Zone Software, or the HP Image
Zone Express version. HP Image Zone Express lacks some
features contained in the full version. For details, see
HP Image Zone Software on page 96.
1. Close all programs and temporarily disable any virus
protection software running on your computer.
2. Insert the HP Image Zone software CD into the CD drive
of your computer and follow the on-screen instructions. If
the installation screen does not appear, click Start, click
Run, type D:\Setup.exe, where D is the letter of your CD
drive, then click OK.
Getting Started
17
3. When the HP Image Zone software has finished
installing, re-enable the virus protection software you
disabled in step 1.
Macintosh
The full version of the HP Image Zone software is always
installed on Macintosh computers.
1. Close all programs and temporarily disable any virus
protection software running on your computer.
2. Insert the HP Image Zone software CD into the CD drive
of your computer.
3. Double-click the CD icon on the computer desktop.
4. Double-click the installer icon, and then follow the
on-screen instructions to install the software.
5. When the HP Image Zone software has finished
installing, re-enable the virus protection software you
disabled in step 1.
User’s Manual on the CD
Copies of this User’s Manual in different languages are
located on the HP Image Zone software CD. To view the
User’s Manual:
1. Insert the HP Image Zone software CD into the CD drive
of your computer.
2. On Windows: Click View User’s Manual on the Main
page of the CD installation screen.
On Macintosh: Look in the readme file in the docs folder of
the HP Image Zone software CD to locate the User’s Manual
in your language.
18
HP Photosmart M417/M517 User’s Manual
Camera Parts
Refer to the pages in parentheses after the part names in the
following tables for more information about those parts.
Top of the Camera
1
2
#
Name
Description
1
Shutter
button
(pages 31,
33)
• Focuses and takes a picture.
• Records audio clips.
2
Video
button
(page 33)
Starts and stops recording a video clip.
Getting Started
19
Back and Right Side of the Camera
15
14
13
12
16 17
1 2
3
11
10
4
5
9
8
7
6
#
Name
Description
1
Power light
• Solid—Camera is on.
• Blinking rapidly—Camera is shutting
down due to lack of battery power.
• Blinking slowly—Camera is charging
the batteries using the optional HP AC
power adapter.
• Off—Camera is off.
2
20
(page 12)
switch
Turns the camera power on and off.
HP Photosmart M417/M517 User’s Manual
#
Name
Description
3
Zoom lever
(page 38)
•
4
Wrist strap mount
(page 10)
Allows you to attach a wrist strap to
the camera.
5
Memory light
• Blinking rapidly—Camera is writing to
either the internal memory or an
optional memory card that is installed.
• Off—Camera is not writing to memory.
6
Battery/Memory
card door
(page 11)
Allows access to insert and remove the
batteries and an optional memory card.
7
button
(pages 47, 65)
Allows you to display the Capture and
Playback menus, select menu options,
and confirm certain actions on the
Image Display.
8
with
Zoom Out—While taking still
pictures, zooms out the lens to the wide
angle position.
•
Thumbnails—While in Playback,
allows you to view still images and
the first frames of video clips arranged
in a matrix of nine thumbnail images
per screen.
•
Zoom In—While taking still
pictures, zooms in the lens to the
telephoto position.
•
Magnify—While in Playback,
allows you to magnify a still image.
Controller
buttons
and
Allows you to scroll through menus and
images on the Image Display.
Getting Started
21
#
Name
Description
9
Image Display
(page 34)
Allows you to frame pictures and video
clips using Live View and review them
afterward in Playback, and to view all
the menus.
10
/
HP Instant Share/
Print button
(page 71)
Turns the HP Instant Share Menu on and
off on the Image Display.
11
Allows you to select between the Normal,
Timer/Burst
button (pages 44, Self-Timer, Self-Timer - 2 Shots, and
Burst settings.
46)
12 MODE button
(page 42)
Allows you to select between different
shooting modes for taking still pictures.
13
Allows you to select between the different
flash settings.
Flash button
(page 40)
14 Viewfinder
(page 31)
22
Allows you to frame the subject of your
pictures or video clips.
HP Photosmart M417/M517 User’s Manual
#
Name
Description
15 Viewfinder lights
•
Solid red—Video is recording.
• AF solid green—When you press the
Shutter button halfway down, this light
turns on solid when the camera is
ready to take a picture (auto exposure
and auto focus are locked, and the
flash is ready). Or, when you press the
Shutter button all the way down to take
a picture, this light turns on solid to
indicate that auto exposure and auto
focus were successful.
• AF blinking green—When you press
the Shutter button halfway down or all
the way down, either a focus warning
occurred, the flash is still charging, or
the camera is still processing a picture.
• Both
and AF blinking—An error
has occurred that prevents the camera
from taking the picture.
16
Live View
button (page 34)
• Turns Live View on and off on the
Image Display.
• If the Image Display is off but the
camera is on, allows you to turn the
Image Display on.
• If a menu is open in the Image Display,
allows you to close the menu.
17
Playback
button (page 59)
• Turns Playback on and off on the
Image Display.
• Allows you to access the on-camera
demo (see page 29).
Getting Started
23
Front, Left Side, and Bottom of the
Camera
12
7
3
6
4
5
#
Name
Description
1
Microphone
(page 32)
Records audio clips that are attached to
still images and the audio portion of
video clips.
2
Self-Timer/Video
light (page 44)
Blinks during the countdown before taking
a picture or recording video when the
camera is set to Self-Timer or Self-Timer 2 shots. Also turns on solid when
recording video.
3
Flash
(page 40)
Provides additional light to improve
picture-taking.
24
HP Photosmart M417/M517 User’s Manual
#
Name
Description
4
Power
adapter
connector
Allows you to connect an optional HP AC
power adapter to the camera to either
operate the camera without batteries, or
recharge NiMH rechargeable batteries in
the camera.
5
USB
connector
(pages 79, 81)
Allows you to connect a USB cable from
the camera to a USB-enabled computer or
any PictBridge-certified printer.
6
Camera dock
connector
(page 155)
Allows you to connect the camera to the
optional Photosmart M-series dock.
7
Tripod mount
Allows you to mount the camera on
a tripod.
Camera States
Your camera has two main states that allow you to complete
certain tasks. Each of these states has an associated menu
that you can use to adjust camera settings or perform tasks in
that state. See the following section, Camera Menus.
• Capture—Allows you to take still pictures and record
video clips. For information about using Capture, see
Chapter 2, Taking Pictures and Recording Video Clips,
starting on page 31.
• Playback—Allows you to review the still images and
video clips that you capture. For information about using
Playback, see Chapter 3, Reviewing Images and Video
Clips, starting on page 59.
Getting Started
25