1
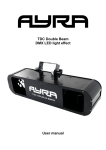
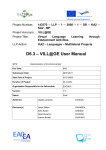
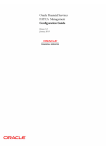
UERS’ MANUAL IP Dome Cameras the Hardware Before attempting to connect and use this dome camera, please read this manual carefully, and save this manual for the possible future use . User’s manual . 1 Safety Information Federal Communication Commission (FCC) Statement NOTE: This equipment has been tested and found to comply with the limits of a Class B digital device, pursuant to Part 15 of the FCC Rules. These limits are designed to provide reasonable protection against harmful interference when the equipment is operated in a commercial environment. This device generates, uses and can radiate radio frequency energy and, if not installed and used in accordance with the instruction manual, may cause harmful interference to radio communications. However, there is no guarantee that interference will not occur in a particular installation. If this equipment does cause harmful interference, the user is encouraged to try to correct the interference by on or more of the following measures: Reorient or relocate the receiving antenna. Increase the separation between the equipment and receiver. Correct the equipment into an output o a circuit different from that to which the receiver is connected Consult the dealer or an experienced radio / television technician for help FCC Caution: To assure continued compliance, any change or modification not expressly approved by the party responsible for compliance could void the user’s authority to operate this equipment. Notice for customers in Canada CAUTION This Class B digital apparatus meets all requirements of the Canadian Interference Causing Equipment Regulations. ATTENTION Cet appareil numerique de laclasse B respects toutes les exigencies du Reglement sur le materiel brouilleur du Canada . User’s manual . 2 Preface Congratulations to you for your purchasing of this world smallest and compact IP dome camera. It is in light weight and high performance. This camera is designed and manufactured to meet surveillance and observation requirements of today’s and future’s living standard. This manual covers three versions of the speed dome in the series. The main difference among them is the lens: standard, day & night and vari-focus, which can be verified by visual. These cameras, with high performance video server built in, can o o pan for 360 and tilt for 90 (75o when use vari-focus lens) which provide you the capability to view all the spots around the places where they are installed. The cameras also give you the capability to program your own surveillance tour by setting presets of view positions. The embedded server allows you to link this device to network without use PC, and access the camera via IE browser. You are also allowed for moving the lens manually. You may use these cameras for Internet / WAN, intranet or local networking surveillance. With the function given by the software, you will be able to control the camera for rotation, preset setup, recall and scan to form 24-hour surveillance from remote. We suggest that you read this manual carefully in order to use the dome properly. . User’s manual . 3 Features Compact Size Built in video server for direct networking applications Pan for 360o and tilt for 90o (75o when use vari-focus lens) Fast search speed of 300o per second M-JPEG compression with excellent video quality View position preset, up to 20 spots Support IE browser for remote view Resolution options to accommodate bandwidth variation Easy to mount --- Embedded or bracket mount Night vision capability (optional function) . User’s manual . 4 Hardware Construction Day & Night Version . User’s manual Vari-focus Version . 5 Day & Night Version --- The Light Source IR LED x 9 (light source in dark) Light Sensor (to turn LED on / off) The sensor will turn IR LED on when environment is dark (lower than 4 lux) Vari-focus Version --- To adjust the camera lens Step 2: Adjust The Focus Loosen this screw on lens side, then turn the lens until the most clear picture is acquired by visual. Tight the screw up again after the adjustment is done Step 1: Adjust View Angle (zoom) Loosen the screw on housing side, turn the zoom adjustment ring to the desired direction. “T” means to acquire the target in far. “W” means that you will see wider angle (bigger scope) . User’s manual . 6 Input, Output and Power Connections On IP Dome DC INPUT Use the supplied DC 12V / 1.5A adapter Video Out From Camera For local recording; To make it, connect this to a DVR or VCR. (use RCA to RCA / BNC cable) Ethernet Port; Connect it to the network Use RJ-45 connector Status Indicators . User’s manual . 7 Mount The Camera There are two ways to mount the camera. 1. 2. Mount the camera on wall through camera holder (bracket) Embed the camera into ceiling Caution: If you want to mount the dome to wooden wall, make sure the wood thickness is not less than 1/2 inch (1.3 cm). Hang The Camera on Wall with Camera Holder (bracket) The camera has a hole of 1/4” on the bottom cover, for camera holder mounting application: 1. 2. 3. 4. 5. 6. Get the camera holder Mount the camera holder onto the desired place by following the instructions given by the holder manual Get the camera body and mate the hole on its base to the screw on the camera holder. Turn the screw all the way in until it stops. Keep screw a little loss until the step 5 is finished Rotate the camera to find the best direction so that wires will not be bended during the wiring work Tighten the screw now . User’s manual . 8 Embed The Camera Into Ceiling or Wall The camera can be embedded into ceiling or wall with the assistance of the supplied decoration cover: 1. 2. 3. 4. 5. Drill a hole on the desired place with proper tools, in a diameter between 4-1/8 inches (10.5 cm) and 4-1/4 inches (11 cm) – make sure the hole is not too big nor too small Get the camera and put the decoration cover on. Rotate the camera body and make sure the camera body and decoration cover are locked completely Insert the camera body into the hole slowly. Make sure the wires get through first With the decoration cover touched to the mount surface, screw the cover onto the surface tightly through the three screw holes on the cover. . User’s manual . 9 Specification General Scan / Search o Navigation range Pan Tilt Search speed Programmable, o up to 300 / sec View Position Programmable, Max 20 positions Dwell time Programmable, Max 255 seconds Communication Protocol RS-485 Video Output Format NTSC or PAL (optional) Level 1.0 V (typical) Power Input DC 12 Connectivity Network Video Output RS-485 communication DC input jack RJ-45 ethernet connector RCA RJ-11 phone jack Operation Temperature 0 ~ 40℃ Humidity 20 ~ 90% RHD Temperature -20℃ ~ 70℃ Humidity 20 ~ 100% RHD Storage Certification FCC, CE (pending) In the box IP Dome camera User’s manual Power adapter Screw Pack . User’s manual 360 o 90 o 75 ( vari-focus lens) 1 set 1 set 1 set 1 set . 10 Optical System Standard version Day & Night Vari-focus Type of sensor CCD CCD CCD CCD resolution 380 lines 380 lines 480 lines fixed fixed Vari-focus 1.0 lux 0 lux 0.2 ~ 1.0 lux F 2.0 F 2.0 F 2.0 electronics electronics DC control 2 x ; manual -- -- Manual -- -- -- Yes -- Type of lens Light sensitivity Aperture size Iris control Optical zoom Focus adjustment IR illumination Measurement Standard version Day & Night Vari-focus Dimension D 102 102 128 ( cm ) H 160 160 168 Weight gm 454 474 674 Standard version Day & Night Vari-focus Operation Voltage 12V dc 12V dc 12V dc Current (mA; max) 850 1000 900 Power Requirement . User’s manual . 11 Appendix --- Accessory The following accessories might be needed during the system installation. Consult to your dealer or electronic technician for details if you need to. BNC to BNC Cable used for video signal connection; better noise immunity RCA to BNC converter to convert RCA plug to BNC plug; RCA to RCA extension jack for RCA cable length extension RJ-11 extension box for phone line wire extension or number (quantity) expansion RJ-11 extension socket for phone line length extending or number (quantity) expansion RJ-45 to RJ-45 extension jack to extend the length of the LAN cable RCA to RCA Video Cable To transmit video signal from the camera to DVR or VCR . User’s manual . 12