1
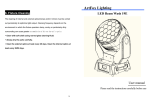
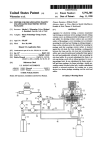
LED MOVING HEAD Led Spot Series LED Spot 150W RGBW Quad Color Mixing / without color wheel RG BWS PO T This product manual contains important information about the safe installation and use of this projector. Please read and follow these instructions carefully and keep this manual in a safe place for future reference. ARTFOX LIGHTING USER MANUAL Version 1.0 beta SAFE USAGE OF THE PROJECTOR TECHNICAL DATA POWER SUPPLIES Input Voltage: AC90 -240V 50-60Hz Power Consumption: 230W When unpacking and before disposing of the carton check there is no transportation damage before using the projector. Should there be any damage caused by transportation, consult your dealer and do not use the apparatus. LAMP SOURCE Red Buttery 150W RGBW LED Module 80,000 Hour Average LED Engine Life The projector is for indoor use only, IP20. Use only in dry locations. Keep this device away from rain and moisture, excessive heat, humidity and dust. Do not allow contact with water or any other liquids. COLOR SYSTEM RGBW Full Color ( without color wheel ) DO NOT mount the projector directly onto inammable surface EFFECTS SECTION 2 Gobo Wheels: One Fixed Gobo Wheel:7 gobos(5 mental+2 glasses)+open One Rotating Gobo wheel:7 gobos(5 mental+2 glasses)+open Electronic Focus High speed shake effect 3-facet rotating prism Mechanical shutter and adjustable speed strobe effect (1Hz~13Hz) Linear dimmer CONTROL AND PROGRAMMING Max 24 DMX 512 control channels DMX protocol signal: USITT DMX 512 Display: LCD Display Pan/Tilt Resolution: 16 bit DMX signal connection: 3 pole XLR input and output BODY Aluminium structure with die-cast plastic cover Two side handles for transportation Device locking PAN and TILT mechanisms for transportation and maintenance The projector is only intended for installation, operation and maintenance by qualied personnel. The projector must be installed in a location with adequate ventilation, at least 50cm from adjacent wall surfaces. Be sure that no ventilation slots are blocked. Do not project the beam onto inammable surfaces, minimum distance is 5m 5m Avoid direct exposure to the light from the lamp. The light is harmful to the eye. Do not attempt to dismantle and/or modify the projector in any way. Electrical connection must only be carried out by qualied personnel. Before installation, ensure that the voltage and frequency of power supply match the power requirements of the projector. It is essential that each projector is correctly earthed and that electrical installation conforms to all relevant standards. Do not connect this device to any other types of dimmer apparatus. Make sure that the power-cord is never crimped or damaged by sharp edges. Never let the power-cord come into contact with other cables. Only handle the power-cord by the plug. Never pull out the plug by tugging the power-cord. Keep a projector’s optical system clean. Do not touch LED lens with bare hands. MOVING BODY Travel: PAN = 540° TILT = 270° The projector should always be installed with a secondary safety xing. A safety cord is supplied for this; it should be attached as shown in “installing the projector” section. CONTROL MODE DMX512/Master-slave/Auto Shields and lens shall be changed if they have become visibly damaged to such an extent than their effectiveness is impaired, for example by cracks or deep scratches. COOLING SYSTEM Convective Fan Inside LED lamps should be replaced if damaged or having reached life limit. NET WEIGHT 14 Kg Exterior surface temperatures of the luminaire after 5 minutes operation is 55℃, when steady state is achieved 70℃, GROSS WEIGHT 16 Kg There is no user serviceable parts inside the projector, do not open the housing and never operate the projector with the covers removed. PACKING SIZE 72x45x43 (cm) If you have any questions, don’t hesitate to consult your dealer or manufacturer. Zoom 12° - 15° 14 3 140~149 10 12 18 Gobo 7 Shak From Slow To Fast Rotation Gobo 150~202 Forward Rotation Effect From Fast To Slow Wheel 203~255 Forward Rotation Effect From Slow To Fast 11 12 13 14 19 20 Gobo Rotation 0~127 Gobo Index 128~190 Gobo Forward Rotation From Fast To Slow 191~192 Stop Rotation 193~255 Gobo ReverseRotation From Slow To Fast 0~127 Prism Excluded Prism Insertion DMX TERMINATOR In the Controller mode, at the last xture in the chain, the DMX output has to be connected with a DMX terminator. This preventselectrical noise from disturbing and corrupting the DMX control signals. The DMX terminator is simply an XLR connector with a 120Ω(ohm) resistor connected across pins 2 and 3, which is then plugged into the output socket on the last projector in the chain. The connections are illustrated below. 1 2 3 120Ω DMX TERMINATOR CONNECTION Connect a 120Ω (OHM) resistor across pins 2 and 3 in an XLR plug and insert into the DMX out socket on the last unit in the chain. 128~255 Prism Inserted PIN2 0~127 0 - 540 Angle Degree Indel 128~190 Forward Rotation from Fast to Slow 13 15 21 PIN3 SETUP OPTIONS-PROJECTOR CONFIGURATION Prism Rotation 191~192 Stop 193~255 Reverse Rotation from Slow to Fast 14 15 16 17 22 23 Focus Call Program 0~255 Line Focus 0~50 No Function 51~100 Preset Program 1 101~150 Preset Program 2 151~200 Preset Program 3 201~255 Preset Program 4 Function 16 18 24 "Stay in a certain value for more than 5 seconds" 0~24 Unused 25~49 Reset: Effects 50~74 Unused 75~99 Reset: Pan Tilt 100~124 Unused 125~149 Reset: Complete 150~174 Unused 175~199 Unused 200~224 Unused 225~255 Unused 12 FUNC DOWN UP ENTER Projector conguration can be set conveniently via press button switch and LCD display. To browse or change its setup options, Press button ENTER to unlock panel. Menu will be displayed on the screen, each menu has it own sub-menu. Each menu has specic function, Please refer to “Operation Menu” for details. Press button UP or DOWN if you want to browse or change through the various Setup Options. Press button ENTER to save your settings or enter the next menu. Press button UP or DOWN to change values.(Add or subtract) Press button FUNC , it will return to the upper menu one by one. TO SET THE DMX START ADDRESS Each projector must be given a DMX start address so that the correct projector responds to the correct control signals. This DMX start address is the channel number from which the projector starts to “listen” to the digital control information being sent out from the controller. The xture have 3 DMX modes. There are simple mode, standard mode and extended mode. For example standard mode has 18 channels, so set the No. 1 projector’s address 001, No. 2 projector’s address 019, No. 3 projector’s address 037, No. 4 projector’s address 055 and so on. Launch the projector. Press button ENTER more than 5 seconds to unlock panel. Press button ENTER to display DMX address. Press button UP or DOWN , you can set the address. Press button ENTER to conrm, which means the projector has saved the Start Address automatically, when powered on next time, it will display the value saved last time. Press button UP or DOWN to change values.(Add or subtract) Press button FUNC , it will return to the upper menu one by one. 5 DMX PROTOCOL Level 1 Mode/Channel FUNCTION DESCRIPTION VALUE Short mode Standard mode Extended mode 1 1 1 Pan 0~255 Pan Moving 0 - 540 Degree 2 Pan Fine 0~255 Pan Fine Moving 3 Tilt 0~255 Tilt Moving 0 - 270 Degree 4 Tilt Fine 0~255 Tilt Fine Moving 3 5 Move Speed 0~255 Moving Speed From Fast To Slow 0~9 Shut Off (0%) 4 6 Dimmer 10~255 Line Dimmer 0~9 No Strobe 10~255 Strobe From Slow To Fast (1Hz - 25Hz) 2 3 4 5 6 7 8 2 5 6 7 8 9 10 7 Strobe 8 Red 0~255 8 Bit Red LED Stage Light 9 Red Fine 0~255 16 Bit Red Operation Mode 10 Green 0~255 8 Bit Green 11 Green Fine 0~255 16 Bit Green 12 Blue 0~255 8 Bit Blue 13 Blue Fine 0~255 16 Bit Blue 14 White 0~255 8 Bit White 15 White Fine 0~255 16 Bit White 0~9 No Function 10~24 Colour Temperature 2700K 25~39 Colour Temperature 3200K 40~54 Colour Temperature 4200K 55~69 Colour Temperature 5600K 70~84 Colour Temperature 8000K 85~99 R 100~114 R+G 115~129 G 130~144 G+B 145~159 B 160~174 B+R 175~255 Virtual Color Rainbow 16 Virtual Color 10 Level 2 Level 3 LED Stage Light Manual Operation Fixed Gobo Wheel LED Stage Light Manual Operation Fixed Gobo = 000 LED Stage Light Manual Operation Rot.Gobo Wheel LED Stage Light Manual Operation Rot.Gobo = 000 LED Stage Light Manual Operation Gobo Rotation LED Stage Light Manual Operation Gobo.Rot = 000 LED Stage Light Manual Operation Prism LED Stage Light Manual Operation Prism = 000 LED Stage Light Manual Operation Prism Rotation LED Stage Light Manual Operation Prism.Rot = 000 LED Stage Light Manual Operation Focus LED Stage Light Manual Operation Focus = 000 LED Stage Light Mode = DMX Mode LED Stage Light DMX Mode = Short Mode LED Stage Light DMX Mode = Standard Mode LED Stage Light DMX Mode = Extended Mode LED Stage Light Mode = Auto Mode LED Stage Light Select Program Program = x LED Stage Light Mode = Master Mode LED Stage Light Select Program Program = x LED Stage Light Mode = Slave SYNC Mode LED Stage Light Select Program Program = x LED Stage Light Mode = Slave SAME Mode LED Stage Light Option Settings LED Stage Light Option Pan Tilt Swap LED Stage Light Pan Tilt Swap =OFF LED Stage Light Pan Tilt Swap =ON LED Stage Light Pan Invert =OFF LED Stage Light Option Pan Invert LED Stage Light Pan Invert =ON 7 Level 4 Level 1 Level 1 LED Stage Light Tilt Invert =OFF LED Stage Light Adjust Fixed Gobo Wheel LED Stage Light Adjust Fixed Gobo = +000 LED Stage Light Tilt Invert =ON LED Stage Light Adjust Rot.Gobo Wheel LED Stage Light Adjust Rot.Gobo = +000 LED Stage Light Delay Off = Disable LED Stage Light Adjust Prism LED Stage Light Adjust Prism = +000 LED Stage Light Delay Off = Enable LED Stage Light Adjust Focus LED Stage Light Adjust Focus = +000 LED Stage Light Display Setup Delay Off LED Stage Light Display Invert = OFF LED Stage Light LED Stage Light Information Temperature LED Stage Light Display Invert = ON LED Stage Light Display Setup Language Fixture Hours LED Stage Light Access Code LED Stage Light Adjust 8 LED Stage Light Product ID = Y************ Product ID LED Stage Light View DMX Value Channel 001 = 000 LED Stage Light View DMX Value LED Stage Light Version =1.00F LED Stage Light Version LED Stage Light Access Code Code = 000 注:Code = 008 LED Stage Light Adjust Pan LED Stage Light Adjust Pan = +000 LED Stage Light Adjust Tilt LED Stage Light Adjust Tilt = +000 LED Stage Light Adjust Red LED Stage Light Adjust Red = +000 LED Stage Light Adjust Green LED Stage Light Adjust Green = +000 LED Stage Light Adjust Blue LED Stage Light Adjust Blue = +000 LED Stage Light Adjust White LED Stage Light Adjust White = +000 LED Stage Light Reset Hours =NO LED Stage Light Reset Hours =YES LED Stage Light Lost DMX =Hold Value LED Stage Light LED Stage Light Fixture Hours =00000 H LED Stage Light Language = English LED Stage Light Lost DMX =Clear Value LED Stage Light Option Lost DMX LED Stage Light Temperature =025C LED Stage Light LED Stage Light Language = 简体中文 Advanced Level 4 LED Stage Light Option Tilt Invert LED Stage Light Display Setup Display Invert LED Stage Light Level 3 Level 3 LED Stage Light Option Display Setup Level 4 Level 2 Level 2 LED Stage Light Load Defaults LED Stage Light Load Defaults =NO LED Stage Light Load Defaults =YES Note: There is only one Projector to be set as a Master in a signal Cable. If Master’s functions used, Please disable DMX control signal. When multiple projectors’ work together in synchronous control state, Parameters can be transmitted from the master projector to the slave projectors such as DMX channel mode, Display setting status and operation mode (User memory data is included). Before parameters transmitted, the projector which will send parameters should be set as a Master and others be as Slaves. 9 OPERATION MENU Level 1 Mode/Channel Level 2 Level 3 Level 4 Short mode Standard mode Extended mode FUNCTION 0~9 White (No Gobo) 10~19 Gobo 1 20~29 Gobo 2 30~39 Gobo 3 40~49 Gobo 4 50~59 Gobo 5 60~69 Gobo 6 70~79 Gobo 7 80~89 Gobo 1 Shak From Slow To Fast 90~99 Gobo 2 Shak From Slow To Fast 100~109 Gobo 3 Shak From Slow To Fast 110~119 Gobo 4 Shak From Slow To Fast 120~129 Gobo 5 Shak From Slow To Fast 130~139 Gobo 6 Shak From Slow To Fast 140~149 Gobo 7 Shak From Slow To Fast LED Stage Light Reset Pan & Tilt 150~202 Forward Rotation Effect From Fast To Slow LED Stage Light Reset Complete 0~9 White (No Gobo) 10~19 Gobo 1 20~29 Gobo 2 30~39 Gobo 3 40~49 Gobo 4 50~59 Gobo 5 60~69 Gobo 6 70~79 Gobo 7 LED Stage Light 150W LedSpot DMX Address = 001 LED Stage Light 150W LedSpot Auto = P01:S01 LED Stage Light 150W LedSpot Master = P01:S01 LED Stage Light 150W LedSpot Slave = P01:S01 LED Stage Light 150W LedSpot Slave same 9 11 17 LED Stage Light 150W LedSpot Music = P01:S01 LED Stage Light Address Setup LED Stage Light Address Setup Address = 001 LED Stage Light Reset LED Stage Light Reset Effects LED Stage Light Manual Operation DESCRIPTION VALUE Fixed Gobo Wheel 203~255 Forward Rotation Effect From Slow To Fast LED Stage Light Manual Operation Pan LED Stage Light Manual Operation Pan = 000 LED Stage Light Manual Operation Titl LED Stage Light Manual Operation Tilt = 000 LED Stage Light Manual Operation Red LED Stage Light Manual Operation Red = 000 LED Stage Light Manual Operation Green LED Stage Light Manual Operation Green = 000 LED Stage Light Manual Operation Blue LED Stage Light Manual Operation Blue = 000 LED Stage Light Manual Operation White LED Stage Light Manual Operation White = 000 LED Stage Light Manual Operation Strobe LED Stage Light Manual Operation Strobe = 000 6 10 12 18 Rotation Gobo 80~89 Wheel Gobo 1 Shak From Slow To Fast 90~99 Gobo 2 Shak From Slow To Fast 100~109 Gobo 3 Shak From Slow To Fast 110~119 Gobo 4 Shak From Slow To Fast 120~129 Gobo 5 Shak From Slow To Fast 130~139 Gobo 6 Shak From Slow To Fast 11 POWER SUPPLY-MAINS MAINTENANCE Connect the power cord as follows: L (live) =brown E (earth) =yellow/green N (neutral) =blue Use the plug provided to connect the mains power to the projector paying attention to the voltage and frequency marked on the panel of the projector. It is recommended that each projector be supplied separately so that they may be individually switched on and off. IMPORTANT It is essential that each projector is correctly earthed and the electrical installation conforms to all relevant standards. CONTROL CONNECTION DMX IN 1 2 1 3PIN 3 DMX IN 1 5 1 5PIN 4 PIN 1 2 3 DMX512 FUNCTION GND DATADATA+ 3 DMX OUT 5 2 2 3 4 3 PIN 1 2 3 4 5 DMX512 FUNCTION GND DATADATA+ N/C N/C Connection between controller and projector and between one projector and another must be made with a 2 core-screened cable, with each core having at least a 0.5mm diameter. Connection to and from the projector is via cannon 5 pin (which are included with the projector) or 3 pin XLR plugs and sockets. The XLR's are connected as shown in the gure above. Note: care should be taken to ensure that none of the pins touch the metallic body of the plug or each other. The body of the plug is not connected in any way. The projector accepts digital control signals in protocol DMX512 (1990). Connect the controller’s output to the rst xture’s input, and connect the rst xture’s output to the second xture’s input and connect the rest xtures in the same way. Eventually connect the last xture’s output to a DMX terminator as shown in the gure below. 120 Ohms Any maintenance work should only be carried out by qualied technicians. KEEPING THE PROJECTOR CLEAN DMX OUT 2 To prolong a Projector’s life, Regular maintenance should be done for its LED optical System to ensure that the system be in best operational condition. If the projector does not function, check the fuses on the power socket of the projector, if burned, they should only be replaced by fuses of the same specication. Should these be damaged call a qualied technician before replacement. The projector has thermal protection device that will switch off the projector in case of overheating, should this occur, check if the fans work normally or fan and fan shield are blocked by dust. If the projector not operational, call a qualied technician. After cleaned and repaired, the projector can be restarted. It denitely necessary to keep a projector clean for its reliable use. Cooling fans and their shield should be cleaned every 15days. LED lamps’lens and cover should be cleaned regularly for optimized light output. Cleaning frequency depends on how often a projector is used and its operational environment. A soft cloth and typical glass cleaning products should be used in cleaning. It is recommended to clean the external optics at least once every 20 days. Do not use any organic solvent, e.g. alcohol, to clean t housing of the apparatus. TROUBLESHOOTING PROBLEM ACTION The xture can not start > Check if the fuse on the power socket is broken or not. > Check the status of the fuse. The lamp works normal but the xture doesn’t respond to controller > Check if the xture’s start address is set properly. > Check if XLR signal cable is broken or not. The xture only functions intermittently > Make sure the fans work normally and if dirt blocks fans and fan screens. The beam appears dim and brightness decreases apparently > Check if the lamps reach the end of their lives. > Check if external and internal optical systems are clean or not. DMX512 DMX-controller 4 13 LED MOVING HEAD Led Spot Series LED Spot 150W RGBW 4-in-1 moving head light INDEX SAFE USAGE OF THE PROJECTOR 3 POWER SUPPLY-MAINS 4 CONTROL CONNECTION 4 DMX TERMINATOR 5 SETUP OPTIONS-PROJECTOR CONFIGURATION 5 TO SET THE DMX START ADDRESS 5 OPERATION MENU 6 DMX PROTOCOL 10 MAINTENANCE 13 KEEPING THE PROJECTOR CLEAN 13 TROUBLESHOOTING 13 TECHNICAL DATA 14 2