1
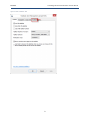
Leonardo da Vinci, Transfer of Innovation Project
“INOVATELL: INOVAtive Touchless tEchnologies in Lifelong Learning for people with severe disabilities”
Agreement No. LLP-LDV-TOI-2013-LT-0144
INOVATELL
Technology Solution
Documentation and User Manual
Version 1
2014 August
This project is funded with support from the European Commission. This publication
reflects the views only of the author, and the Commission cannot be held responsible for
any use which may be made of the information contained therein.
INOVATELL
Technology Solution Documentation and User Manual
Contents
Introduction .................................................................................................................................................. 3
Functionality of the Tool ........................................................................................................................... 3
Target audience for this Tool .................................................................................................................... 3
Target audience for this document .......................................................................................................... 3
Compatible hardware ............................................................................................................................... 3
Where to find the Tool.............................................................................................................................. 3
Setting up the environment .......................................................................................................................... 4
Room lighting ............................................................................................................................................ 4
Camera positioning ................................................................................................................................... 4
Screen size and resolution ........................................................................................................................ 4
On screen keyboard .................................................................................................................................. 7
Click indicator.......................................................................................................................................... 15
Screen lock, sleep settings ...................................................................................................................... 17
Power on/off limitations ......................................................................................................................... 26
Detection possibilities ................................................................................................................................. 27
Hand detection ....................................................................................................................................... 27
Head detection........................................................................................................................................ 27
Installing and starting to use the Tool ........................................................................................................ 28
Default screen ............................................................................................................................................. 29
Expanded screen ......................................................................................................................................... 31
2
INOVATELL
Technology Solution Documentation and User Manual
Introduction
Functionality of the Tool
This Tool allows using remote hand or head movement to control a cursor on computer screen and carry
out basic computer functions with it without using a physical mouse or keyboard. In such a way, this
Tool provides a touchless gesture based computer user interface.
The purpose of the Tool
The Tool aims to enable people with physical motor disabilities to access the computer for education,
communication and entertainment.
Target group of the Tool is persons with physical motor disabilities, who cannot use or face difficulties to
use standard keyboard or mouse because of restrictions in moving hands, typing, clicking mouse buttons,
etc.
This Tool may be used by persons in sitting or lying positions. In case of lying position additional
positioning hardware may be needed to set up the computer/tablet and camera.
Target audience for this document
This document is intended to the person who will setup the Tool. That may be the user him/herself, the
therapist, a personal caretaker or a family member.
The term “user” across the document refers to a user with disabilities, who will be using the Tool.
Compatible hardware
The Tool is meant for Windows 8 PCs and tablets (Windows RT version is not supported). There are no
format minimum technical requirements for the hardware to run this Tool. If PC or tablet is capable of
running Windows 8, it will be capable of running the Tool too. However, in case PC or tablet is generally
very slow in running Windows 8, this Tool will not perform well, since it will add to the overall use of
system resources.
Note for tablets, which do not have any external keyboards in their standard package. If no keyboard or
mouse has ever been connected to a tablet, when running this Tool user will not be able to see the
mouse pointer. For such tablets to display a mouse pointer either a Bluetooth keyboard or a Bluetooth
mouse has to be connected when using this Tool so that Windows would display mouse cursor/pointer
on screen all the time.
The Tool may work with Windows 7 and older Windows versions, but has not been tested with those
Windows versions and officially is not supported.
Where to find the Tool
The Tool may be downloaded from the following web address: www.reabilitacija.lt
3
INOVATELL
Technology Solution Documentation and User Manual
Setting up the environment
Room lighting
The Tool works in various lighting conditions; however, generally object detection algorithms perform
worse under extreme background light conditions and extreme contrast conditions. Thus, when
choosing the environment, it is advisable to choose a background, without lamps, windows with direct
sunlight, and other strong light sources behind the user.
Camera positioning
Either inbuilt camera or external camera may be used. In case there are two cameras connected to a
computer, you may choose which camera to use for the Tool in the Tool screen. Camera selector is
located with all the other settings under “More” button. However, the Tool does not have the ability to
identify each camera by the manufacturer name/model – in most situations the first camera in line will
be the default inbuilt camera and the second camera will be the one connected through USB. If there
are two or more cameras connected through USB, you might need to experiment to identify the right
one.
Inbuilt camera will be easier to set up, because it has a fixed central position in relation to the hardware
screen.
When setting up an external camera, which is placed on top of a monitor, on a desk, or other surface,
you need to be very careful with centering the camera. The camera has to be facing the detection object
(hand or head) directly and the initial hand or head detection has to place the mouse cursor in the
center of the screen. When camera is tilted too much to the left, right, up or down, the user will easily
go off-screen with the cursor in some screen directions and will experience difficulties reaching other
screen directions. Even a small tilt in camera placement different from directly facing the hand or the
head may result in large effects when controlling the user interface, thus this step is very important to
carry out properly.
Screen size and resolution
For users with very limited hand or head movements, the screen (especially full HD resolution screen)
might be too big to reach all four screen corners easily even with the most sensitive cursor movement.
For such users it is advisable to decrease the screen resolution in the Control panel (Figure 1-3):
4
INOVATELL
Technology Solution Documentation and User Manual
Figure 1. Select Display in Control Panel
5
INOVATELL
Technology Solution Documentation and User Manual
Figure 2. Select "Adjust resolution" in "Display" settings screen.
6
INOVATELL
Technology Solution Documentation and User Manual
Figure 3. Adjust the resolution.
There is no advisable resolution – it should be tested on case-by-case basis.
On screen keyboard
If user intents to type or use other keyboard commands, on screen keyboard should be enabled. There
are two options available by default (it will depend on specific computer and personal preferences,
which one works better):
1. Enable Touch Keyboard in properties of the Taskbar (Figure 4-8). Once it is enabled on the
Taskbar, it can easily be minimized and maximized.
7
INOVATELL
Technology Solution Documentation and User Manual
Figure 4. Right click on the taskbar and select "Properties".
8
INOVATELL
Technology Solution Documentation and User Manual
Figure 5. Select "Toolbars" tab.
9
INOVATELL
Technology Solution Documentation and User Manual
Figure 6. Check "Touch Keyboard" and click "Apply".
Figure 7. A keyboard icon will appear in the taskbar.
10
INOVATELL
Technology Solution Documentation and User Manual
Figure 8. Clicking the keyboard icon from the taskbar will open the keyboard.
2. Enable On Screen Keyboard in Ease of Access Center (Figure 9-11); however, if this keyboard is
closed, to open it again, user has to go to the Ease of Access Center again.
Figure 9. Open Control Panel and select "Ease of Access Center".
11
INOVATELL
Technology Solution Documentation and User Manual
Figure 10. Choose "Start On-Screen Keyboard".
Figure 11. A keyboard will appear on your screen. You might need to move the keyboard around the screen, so that it does not
cover up the taskbar - you need to be able to see the Tool icon on the taskbar all the time.
If user needs to perform operations involving pressing multiple buttons at the same time, it is advisable
to enable Sticky Keys (Figure 12-14):
12
INOVATELL
Technology Solution Documentation and User Manual
Figure 12. Open Control Panel and select "Ease of Access Center".
13
INOVATELL
Technology Solution Documentation and User Manual
Figure 13. Select "Make the keyboard easier to use".
14
INOVATELL
Technology Solution Documentation and User Manual
Figure 14. Check "Turn on Sticky Keys".
Click indicator
When cursor is located on the very right or bottom line of the screen, it becomes practically invisible (on
standard PC). Therefore, it is advisable to turn on additional click visualization in the Control panel
(Figure 15-16) (once it is turned on, pressing CTRL key on the keyboard will produce a round circle
around the location of the cursor):
15
INOVATELL
Technology Solution Documentation and User Manual
Figure 15. Open Control Panel and select "Mouse".
16
INOVATELL
Technology Solution Documentation and User Manual
Figure 16. In "Pointer Options" tab check "Show location of pointer when I press the CTRL key". Then click "Apply" and "OK".
Screen lock, sleep settings
In case computer settings allow it to lock, go to sleep and/or have a password protected wallpaper, user
will not be able to unlock the computer with the Tool (the Tool work only on active desktop). To avoid
such situations it is advisable to remove lock, sleep, timeout, hibernate functions in Control Panel.
Removing wallpaper password (Figure 17-19):
17
INOVATELL
Technology Solution Documentation and User Manual
Figure 17. Open Control Panel and select "Personalization".
18
INOVATELL
Technology Solution Documentation and User Manual
Figure 18. Click on "Screen Saver".
19
INOVATELL
Technology Solution Documentation and User Manual
Figure 19. Make sure that "None" is selected in the dropdown.
Removing password on wakeup (Figure 20-22):
20
INOVATELL
Technology Solution Documentation and User Manual
Figure 20. Open Control Panel and select "Power Options".
21
INOVATELL
Technology Solution Documentation and User Manual
Figure 21. Select "Require a password on wakeup".
22
INOVATELL
Technology Solution Documentation and User Manual
Figure 22. Make sure "Don't require a password" is selected.
Changing when computer turns off or sleeps (Figure 23-25):
23
INOVATELL
Technology Solution Documentation and User Manual
Figure 23. Open Control Panel and select "Power Options".
24
INOVATELL
Technology Solution Documentation and User Manual
Figure 24. Select either "Choose when to turn off the display" or "Change when the computer sleeps" - both will lead to the same
page.
Figure 25. Set both dropdowns to "Never".
Also, remove password protection. Even if computer locks, it will allow user to “wake up” the computer
with minimal effort of touching any keyboard key.
25
INOVATELL
Technology Solution Documentation and User Manual
Power on/off limitations
The Tool can be used to shut down the computer; however, the only way to power on the computer is
the physical Power button on the PC.
26
INOVATELL
Technology Solution Documentation and User Manual
Detection possibilities
The Tool is trained to detect a standard shaped hand or head.
Hand detection
A standard hand shape is fully-open-palm or close-to-fully-open-palm facing the camera directly. Finger
distinction is important for camera to detect the hand as an object. The threshold of how much palm
has to be open for detection depends on the actual hand shape, lighting, and other environmental
factors; thus, has to be tried on case-by-case basis. Once the hand is detected, there is more flexibility in
Control mode – even a hand in fist shape can be used to move cursor in most lighting environments.
Hand detection works with either right or left hand.
As an alternative setup (especially if the user is not able to hold a lifted hand), hand may be placed on a
plastic completely transparent table (or tray) surface and camera is mounted below this plastic surface.
When mounting the camera in this situation, the same conditions apply as described in “Camera
positioning” section for placing the camera.
Hand detection also works successfully when an open hand is placed on a table (palm facing the table)
or other flat surface and camera is located above the hand. In such case the camera frames should be
flipped in the Tool settings (under “More” button).
Head detection
A standard head shape is an oval shaped head with hairstyle or accessories that do not obstruct any
significant part of the face. E.g., hear bangs, caps, and hats, which hide a substantial part of the face,
might prevent head detection.
Wearing glasses does not impact the detection quality.
27
INOVATELL
Technology Solution Documentation and User Manual
Installing and starting to use the Tool
Install the tool from a provided link. Once installed, you will find this icon (Figure 26) on your desktop
screen.
Figure 26. The Tool icon.
Every time user wants to start using the Tool, he/she has to double click the icon to launch the Tool. The
Tool has two modes:
1. The tool launches in Detection mode – i.e. is trying to detect the hand or head (depending on
the chosen setting – default initial setting is the hand tracking). To start using the Tool user
needs to hold hand (open palm) or head in the camera vision field and it will be detected
automatically.
2. Once hand or head is detected, the Tool switches to the Control mode allowing to move the
cursor on screen and to make clicks. To move the cursor user simply needs to move the hand or
head in a desired direction. To make a click, the user needs to hold the hand or head steady in
the same position for a period of time indicated in the settings (default setting is 0.8 of a
second).
This Tool is set up to detect a hand or head automatically. The Tool does not need to be calibrated or
trained before starting to use it.
28
INOVATELL
Technology Solution Documentation and User Manual
Default screen
By default, the Tool opens in a minimized version (Figure 27):
Figure 27. The Tool in minimized version.
It consists of:
1. Camera window – camera will show the output of selected camera (inbuilt or external). Use this
window to check if hand/head is detected correctly. Correctly detected hand or head will appear
with a white rectangular around it:
2. Control mode selector to switch between Hand and Head control.
3. Click mode buttons, which allow to switch simple pointer click into alternative functions of
(clicking on the button activates one operation defined by specific button and then
automatically returns to standard left click):
a. Left – left click
b. 2X – double click
c. Right – right click
d. Cut – simple cut operation for objects, which do not need to be selected first, e.g., a file
(cursor needs to point directly to the object)
e. Copy – simple copy operation for objects, which do not need to be selected first, e.g., a
file (cursor needs to point directly to the object)
f. Paste – paste operation for a copied or cut object either by simple Cut, Copy, or Sel/Cut,
Sel/Copy
g. Sel/Cut – combined select and cut operation for objects, such as text, which need to be
selected first before cutting
h. Sel/Copy – combined select and copy operation for objects, such as text, which need to
be selected first before copying
29
INOVATELL
Technology Solution Documentation and User Manual
i.
Drag/Drop – allows to select an object with the first click, then drag it to the desired
location (both the origin and destination locations must be visible on one screen at the
same time) and place it at the desired location with the second click. In case of websites,
this function might work differently depending on the website functionality. For
instance, in Google Maps after the first click user can drag the map to the side if he/she
needs to see a location that does not fit on the screen – once desired location is visible,
making another click will cause the pointer will go back to default left click functionality.
4. Save button to save the selected operation mode (Hand or Head) and settings (under More). If
mode selection or settings are not saved, next time the Tool is opened, it will operate with the
last saved mode selection and settings.
5. More/Less button to open/close more detailed settings. Same settings screen is used for Hand
and Head operation mode. Each set of settings (Hand and Head) is saved with the same Save
button – both are stored without overwriting each other.
30
INOVATELL
Technology Solution Documentation and User Manual
Expanded screen
Expanded screen opens more settings to control the sensitivity of hand or head detection, sensitivity of
cursor movement, etc. (Figure 28):
Figure 28. The Tool in expanded version with all the settings visible.
6. Click timeout – indicates a duration how long user has to hold the hand/head steady in one
position to make a click. Checked “repeat” checkbox will cause the Tool to repeat the click
according to the click timeout duration as long as user keeps the cursor in the same position. By
default “repeat” checkbox is uncheck; thus, creating only one click in the same cursor position.
7. Idle timeout – detects if cursor is moving. In case cursor is not moving for an indicated time
period, the Tool will switch from Tracking mode (where user actively uses cursor), to the
Detection mode (user has to show hand or head to the camera again to start using cursor). By
default, idle timeout is disabled. “enabled” checkbox activates Idle timeout settings.
31
INOVATELL
Technology Solution Documentation and User Manual
8. Idle sensitivity – this setting relates to the Idle timeout. It determines how fast the cursor has to
be moved for the Tool to treat it as active. The larger setting value means that the cursor has to
be moved faster for the Tool to treat it as active.
9. Horizontal tracking sensitivity – determines how much the cursor moves on screen horizontally
with the same horizontal hand or head movement. The larger setting value means more
sensitivity, i.e. smaller hand movement will make larger cursor on screen. However, high
sensitivity will also make the cursor more “jumpy”; thus, needs to be used carefully.
10. Vertical tracking sensitivity – determines how much the cursor moves on screen vertically with
the same vertical hand or head movement. The larger setting value means more sensitivity, i.e.
smaller hand movement will make larger cursor on screen. However, high sensitivity will also
make the cursor more “jumpy”; thus, needs to be used carefully.
11. Detection scale – this setting determines how sensitive the hand or head detection is.
Recommended standard setting is 1.15-1.2. Only in cases where head or other objects are
detected instead of the hand, it is advisable to change this setting. When changing this setting, it
is important to remember that smaller number means more sensitive (precise) detection, but
also more processor resources are used (might impact performance of slower tablets).
12. Camera selection – in case there are several cameras connected to the computer, this
dropdown will provide a list of cameras (starting with the default inbuilt camera) and user can
select which camera to use for detection.
13. Flip frame – checking this checkbox will vertically flip the camera feed, this setting is used in a
setup, where camera positioned above the user’s hand (i.e. not detecting the palm).
32