1
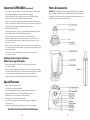
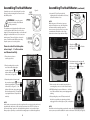
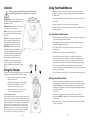
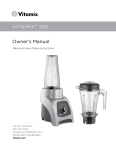
Owner’s
Manual
Do Not Operate The
HealthMaster Before
Reading This Entire Manual
FOR HOUSEHOLD USE ONLY.
Model: YD-2088E
120 VAC 60Hz 1200W
Contents
Warnings and Precautions
Warnings and Precautions 3
Specifications 3
Important Safeguards
Avoiding Serious Injury and Burns
While Processing Hot Liquids 4
Special Features 4
Parts & Accessories
5
Assembling the HealthMaster Controls
3-4
6-7
8
IMPORTANT Read this manual carefully and completely before attempting
to operate The HealthMaster. Failure to do so could result in serious personal injury.
• Children should not be permitted to operate this, or any other kitchen appliance
without the constant supervision of a qualified adult.
• Do not attempt any home repairs to this unit. Should the unit require repair, such
repair should only be performed by a qualified professional.
• Unit For Indoor Use Only. To reduce the risk of electric shock, never expose any
part of this appliance including the power cord, plug or motorized base to rain,
moisture or immersion in liquids of any kind.
• The unit has a polarized plug. One blade is narrower than the other and it will fit
only one way into an electrical outlet. Never force the plug into the outlet. If it
doesn’t fit after trying it one way and then reversing it … contact an electrician.
• Never use an adaptor or an extension cord.
• Never assemble, disassemble or handle the unit while it is plugged into an
electrical outlet. Keep unplugged when not in use.
• The HealthMaster comes equipped with a “pusher” utensil. This is the only utensil
you should ever use while operating this unit. Using other utensils may damage
the unit and cause possible personal injury.
• To prevent overheating, do not block any ventilation intake openings (see page 5).
WARNING Failure to follow these instructions can result in
death, fire, or electric shock.
Using the Tamper 8
Using Your HealthMaster
9
Using the Simmer/Heat Feature
9
Making Frozen Blends/Treats
9
Chopping with the HealthMaster
10
Troubleshooting
10
Cleaning and Maintenance
11
2
Specifications Model: YD-2088E 120 VAC 60Hz 1200W
Important SAFEGUARDS
Read these safeguards thoroughly before using this product.
Read all instructions before using.
• Use on a dry, stable surface.
• When preparing fresh baby food always consult with your physician (pediatrician)
before making any dietary changes. Certain fruits and vegetables are not
recommended for infants or young children due to immature digestive systems,
allergies, or other developmental reasons.
• When preparing fresh baby food, to prevent choking, always make sure all fruits
and vegetables are completely liquefied before feeding them to a baby.
• To avoid serious personal injury: Never remove the lid while the motor is running.
If something is stuck press the power OFF button, wait for motor to stop running
then remove the cap only, insert the tamper to dislodge stuck food. If food remains
stuck press the power OFF button, wait until motor stops and unit is unplugged
before disassembling and removing blocked food.
• Make sure the lid is attached properly and securely locked before pressing the
power ON button. Never operate the HealthMaster without the lid in place.
3
Important SAFEGUARDS (continued)
• Use the tamper only, never fingers or other utensils, to insert food into the pitcher.
• Never leave the HealthMaster unattended while motor is running.
• Never add food while motor is running. Press the power OFF button and wait
for the machine to stop, then add food and start machine again.
• We do not recommend pressing the power ON button when the pitcher is empty.
• Always use one hand to hold the pitcher handle as this unit operates at high speeds.
• Never put fruits with pits in the HealthMaster. Remove pits prior to
placing items into the pitcher.
• The maximum capacity is 70 ounces. Use significantly less with thicker ingredients.
• Do not fill pitcher more than 2/3 full when using the tamper.
• Do not use tamper for more than 25 seconds of continuous blending.
• When processing nut butters or foods that contain oil, do not process for more
than 2 minutes after mixture starts circulating freely. Over processing can cause
the motor to overheat.
• Always make sure the lid and EZ-lock cap are securely in the locked position before
use. Machine should not be running when cap is removed and ingredients are being
added with the tamper.
• Do not let cord come in contact with stove, other hot surfaces or hang over
edge of table or counter.
Parts & Accessories
IMPORTANT: Your HealthMaster has been shipped with the following components.
Check everything carefully before use. If any part is missing or has been damaged
in shipping do not use this product and contact shipper using the customer service
number located in the back of this owner’s manual.
Avoiding Serious Injury and Burns
While Processing Hot Liquids
• Make sure the lid and EZ-lock cap are securely in place and locked when
processing hot liquids.
• When processing hot liquids always start on LO speed (#1). Then increase rapidly to
the required speed for that recipe. Use caution when using hot liquids as steam may
escape from under the safety valve release located on the top of the cap.
• Always hold the pitcher securely by the handle while processing hot liquids.
Special Features
• Freeze ice cream/sorbets in seconds.
• 100% pure, fresh juice with all the fiber.
• Chops fresh ingredients for salads fast, using the variable speed control.
• Transparent pitcher helps you to see the ingredients processing.
• Make cheese sauces, soups, and more quickly and easily.
• Blends nutritious smoothies perfectly every time.
• Over 100 delicious nutritious recipes included, making your HealthMaster
even easier to use.
• Automatic Shut Off safety feature prevents the motor from overheating.
Save This User’s Manual For Future Reference
4
5
Assembling The HealthMaster
Unwind power cord to desired length. Secure the
leftover cord by returning the lever arms back to
the OPEN position.
RESET
BUTTON
Figure A
Assembling The HealthMaster (continued)
4. I nsert the E-Z Lock Cap into the Lid
(aligning the Cap’s tabs with the Lid’s slots)
and turn clockwise to lock.
WARNING:
Do not plug power
cord into electrical outlet until unit
is fully assembled.
NOTE:
While the power is ON and as air pressure
inside the Pitcher increases, the Safety Valve
will automatically be pushed upward to
release steam or pressure. Prior to use, make
certain that the Safety Valve is free of any
obstruction and moves up and down freely.
This appliance was designed with a built-in power
cord storage beneath the base. Store the excess
length of cord neatly underneath to avoid accidental
tipping of machine while in use. Do not unscrew
retaining arms. The arms fold in to release the
power cord. When in the OPEN position they
keep the power cord securely in place.
SAFETY
VALVE
TABS
Figure D
5. Align Arrow
on Lid
with Unlock Symbol
on Pitcher.
(See Figure D.)
Power to unit will not take place
unless steps 1 – 7 in this section
are followed carefully.
1. P
lace the motor base on
a stable, dry surface.
6. Push down into place and turn lid
clockwise to align Arrow
on Lid
with Lock Symbol
on Pitcher.
(See Figure E.)
Figure E
2. F irmly seat the pitcher onto the
motor base while aligning the
arrowhead symbol
on the
pitcher with the unlock symbol
on the base. (See Figure B.)
Figure B
3. R
otate the pitcher clockwise until
the arrowhead symbol
on the
pitcher aligns with the lock symbol
on the base (See Figure C.)… the
pitcher will lock into place and engage
the first safety interlock. (This appliance
is equipped with two Safety interlock
switches).
7. M
ake sure the unit is assembled properly before
connecting the power cord to the electrical outlet.
8. B
EFORE pushing the power ON button — hold the
top of the assembled unit to prevent tipping when
starting.
Figure C
9. A
fter pushing the power OFF button wait until
the blades completely stop spinning and unit is
unplugged before removing the cap, lid, or the pitcher.
NOTE:
At this point you may want to place the ingredients for processing into the unit. Insert
ingredients into the pitcher, soft foods first, harder items last. The E-Z Lock Cap can
be removed during operation to add additional ingredients or to insert the tamper.
Always replace cap when you are finished inserting tamper or additional ingredients.
NOTE:
Should the unit overheat during operation the motor will automatically shut off. To
restore power press the Reset Button located on the bottom of the unit (see Figure A).
6
7
Controls
Using Your HealthMaster
NOTE: This appliance is equipped with two safety “shut off” interlocks
that must be engaged before the unit will operate. (See steps 3 and 4).
ON/OFF Button: Push once for ON. Push once
for OFF. The button lights up RED when the
HealthMaster is ON.
SPEED Selection: Use the (+) and (-) buttons
to select the speed, 1 through 8.
TIME: Use the (+) and (-) buttons to select
the amount of time in minutes, 0 through
20 minutes.
PULSE: Press and release to get a single
burst of speed for each pulse until you
have achieved the desired results. The
button lights up blue when activated.
RUN/STOP: Press Run/Stop to start the
HealthMaster. If the speed and timer were
not set, the HealthMaster will run at speed 1.
The button lights up blue when activated.
You must press Run/Stop again to stop.
ICE: Pressing the Ice button causes the
HealthMaster to operate on a cycle of one
second on and 4 seconds off. The button
lights up blue when activated. Press Ice again
to stop.
Using the Tamper
The tamper is useful when preparing thick or frozen mixtures.
The tamper can be used while the machine is running.
1. Make sure lid is secure and locked in place.
2. Remove cap from lid.
3. Insert tamper through the opening in the lid.
4. Hold the pitcher handle with one hand,
grasp tamper with the other hand.
5. Move up and down or in a circular motion
to move contents around the blade.
Tips for Using the Tamper:
When preparing thick mixtures that don’t circulate freely, insert the
tamper and move in a circular motion. This will help remove any air or
ingredients trapped by the blade. Do not fill the pitcher more than 2/3
full when blending thick or frozen mixtures. We do not recommend
using the tamper for more than 25 continuous seconds. The lid
prevents the tamper from making direct contact with the blade.
NOTE: In the event the motor overheats during operation it will
automatically shut off. To restore power press the Reset Buttton
located on the bottom of the unit (see Figure A page 6).
8
• Always remove all stems and large pits such as peach, mango, apricot, etc.
before processing as these items can damage the blade and cause the motor
to malfunction.
• Thoroughly wash all fruits and vegetables before juicing to remove any dirt
or chemicals.
• Fruits and vegetables juice best when they are fresh and firm.
• Always serve fresh foods immediately. After just a few seconds they begin to
lose vitamin potency.
Using the Simmer/Heat Feature
1. A
dd liquids first, then carefully add the solids, avoiding splashing that could
cause personal injury when liquids are hot.
2. When adding hot liquid to the pitcher, let sit for 3–5 minutes with the cap
removed, allowing the steam escape.
3. S ecure lid and EZ-lock cap on the pitcher making sure both are in the
locked position.
4. P
ush the ON control button and then the RUN button.
5. S lowly increase the speed control from #1 to #8 (as specified by the
recipe). Let the machine run until desired consistency or temperature has
been reached. The average cook time is 6–8 minutes on HI. This will vary
depending on the texture of the ingredients and the starting temperature.
6. D
o not remove lid and EZ-lock cap until the power button is in the OFF
position and the unit has been unplugged. Wait for motor to shut off and the
blades to completely stop.
7. To open lid, first remove the EZ-lock cap to let steam escape then remove lid.
Making Frozen Blends/Treats
1. To make ice cream and sorbet, add liquids and soft ingredients (i.e. soft
fruits) first, then frozen ingredients. In order to make successful frozen treats
with the HealthMaster you must always follow the recommended ratio of
ingredients. 1 part liquid to 3–4 parts frozen ingredients. Changing this ratio
can damage the blades
or the motor.
2. P
lace the lid on and lock into place. Remove EZ-lock cap from lid and
insert tamper. NOTE: You will need to use the tamper to move ingredients
around quickly.
3. M
ake sure the speed control is on HI. Push the ON control button and blend
to desired consistency.
9
Chopping with the HealthMaster
The HealthMaster chops food to a fine texture quickly and easily for use in
salads, soups, and baking:
1. Place ingredients in the pitcher. Do not fill more than 1/4 full.
We recommend using smaller pieces when chopping.
1. P
ress OFF button and wait until the motor completely stops.
2. U
sing dry hands, unplug the power cord from electrical outlet.
3. D
isassemble the machine.
4. Wash pitcher, lid, cap, and blade in warm soapy water. Avoid injury, do not
handle blades with your fingers directly. Rinse and dry thoroughly before
first use.
2. Secure lid and cap.
3. Set to recommended speed.
4. Use the PULSE button until all ingredients have been processed.
NOTE: The speeds are approximate and vary depending on the ripeness of
ingredients when using fresh fruits and vegetables.
Recommended Speed Settings For Chopping
• Broccoli #3 –4
• Olives #2–3
• Carrots #3 –4
• Cauliflower #3 –4
• Potatoes #2–3
• Mushrooms #2–3
• Zucchini/Squash #3–4
• Onions #2–3
• Breadcrumbs #2–3
• Hard Boiled Eggs #3 –4
• Nuts #3
Troubleshooting
NOTE: The HealthMaster is a very powerful unit. When operating properly, the
motor gives off a loud but smooth sound that changes in pitch as the motor
speed is increased. This is normal.
Problem
Cleaning and Maintenance
Possible Reasons and Solution
Motor does not run
after ON control button
is pushed.
• Check to see if unit is plugged in.
• Pitcher or Cap is not in the “locked” position
• Check if all parts are assembled properly.
• Check if any food is causing blade to lock.
Normal Loud Smooth Sound
becomes unpleasant, more
pronounced and uneven,
producing erratic and
sometimes uncontrolled
unit vibration.
• Push power button to OFF immediately.
• Unplug unit and check for proper assembly.
• Reassemble and retry unit.
The unit shuts off
while in use.
• The auto shut off feature has been activated
due to overheating.
• Push OFF button, unplug unit, allow to cool
down for 30 minutes.
• Plug unit back in, push reset button beneath
base of unit, place upright and continue use.
5. Wipe base with a soft damp cloth or sponge. Never submerge base in
water. Do not spray with water or any other liquid. The motor base is NOT
dishwasher safe.
6. C
lean all other parts by filling the pitcher with warm soapy water and let the
machine run on HI for 1 minute, or simply wash by hand. A mild detergent
is recommended. Rinse well and dry thoroughly. All components are
dishwasher safe with the exception of the motor base.
Caution: Some commercial and foreign made dishwashers may reach internal
temperatures that are higher than machines made for home use by US
standards. Do not use these dishwashers with your HealthMaster. The higher
temperatures may cause damage to your unit voiding your warranty. Check
with your dishwasher manufacturer before using.
7. M
ake sure base and parts are completely dry before storing in a cool,
dry place.
8. N
ever use abrasive materials or cleansers to clean the main base or any of the
parts. This can scratch the finish causing permanent damage.
CAUTION: To avoid personal injury use caution while cleaning inside of
pitcher as blades are sharp. Handle carefully.
NOTE: In case of unit “shut off” caused by overheating during operation, press the
reset button located under the base of the unit.
10
11
OWNER’S MANUAL
Congratulations on your purchase of the HealthMaster.
We are very proud of the functional design and exceptional quality of this product.
Our manufacturing process is geared to deliver long years of product service to our
valued customers. Should you experience any problem with your purchase,
our dedicated customer service staff is here to serve you.
We are available at:
1-973-287-5167
or see our website at:
www.myhealthmaster.com
Distributed By:
Tristar Products, Inc.
Fairfield, NJ 07004
LWHM_DIG-INST_ENG_V5_090609