1
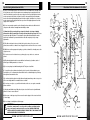
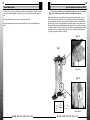
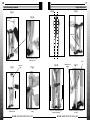
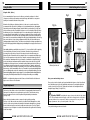
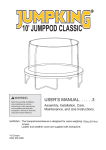
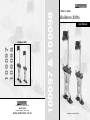
Axminster Devon EX13 5PH UK
01297 33656
(International Dialling +44 1297 33656)
w w w. a x m i n s t e r. c o . u k
100097 & 100098
100097
100098
Builders Stilts
100097 & 100098
Builders Stilts
User Manual
Order Nos. 100097 & 100098
02
15
Index of contents
Illustrated Parts List for the Stilts Continued
Page No.
Index of contents..............................................................................................................................................2
Specifications….………........……..…………..................................................................................................2
What’s in the Box………….………........……..…………....................................................................................3
General Safety Precautions............................................................................................................ 3
Specific Safety Instructions for Stilts............................................................................................. 4
Initial Assembly............................................................................................................................ 5,6
Initial Setting of the Leg Brace....................................................................................................... 7
Setting of the Heel Brace................................................................................................................8
Illustration of the Stilts.................................................................................................................... 9
Using the Stilts.............................................................................................................................. 10
Height Adjustment....................................................................................................................10,11
Routine Maintenance.................................................................................................................... 12
Illustrated Parts Breakdown for the Stilts.....................................................................................13
Illustrated Parts List for the Stilts............................................................................................ 14,15
Specification
Stilt height range
SAFE WEIGHT LIMIT
610mm to 1000mm Axminster Part No. 100097
450mm to 760mm Axminster Part No. 100098
225lb/pair (102kg/pair)
w w w. a x m i n s t e r. c o . u k
w w w. a x m i n s t e r. c o . u k
14
03
Illustrated Parts List for the Stilts
What’s in the Box
Quantity
Item
Model Number
2 No.
Stilts
100097 or 100098
2 No.
Lower Anchor Tube Struts
2 No.
Leg Brace Upper Tube Struts.
Having unpacked your Stilts, please check the contents against the 'What's in the box' list above.
If there are any pieces missing or damaged, contact our sales and servicing department in
accordance with the instructions laid down in our catalogue.
!
Please dispose of any unwanted packaging responsibly. A lot of the packaging
is bio-degradable.
General Safety Precautions
1. KEEP WORK AREA CLEAN... Cluttered areas invite injuries.
2. KEEP CHILDREN AWAY. All children should be kept away from the work area.
3.PRESCRIPTION MEDICATION. Read the warning labels on all medicines to determine if your judgment,
reflexes or equilibrium would be impaired. If there is any doubt, do not attempt to use the stilts.
4. USE EYE PROTECTION. Eye protection should conform to BSI specifications and provide protection
against flying debris from the front and the side. Eye protection should be worn when there is any risk of
foreign matter getting into the eyes.
5. USE EAR DEFENDERS. Repetitive high noise levels can damage hearing. If the work area in which you
are operating has excessively high noise levels, wear ear protection.
6. WEAR APPROPRIATE CLOTHING. Protective gloves and nonskid footwear/safety shoes are
recommended when working on site. Don't wear loose clothing or jewellry, they can get caught on
projecting objects. If you wear your hair in a long style, a safety helmet, hat, protective hair covering or even
a sweatband will help to minimise the chance of hair being caught up.
7. DO NOT OVERREACH. Keep proper footing and balance at all times, do not perform simian acrobatic
feats to get that little bit longer reach, especially when working from ladders, towers or on stilts, the extra
time required to reposition the tower or ladder or move to a more advantageous position is a good trade off
against a potentially crippling fall.
8. CHECK THE STILTS FOR DAMAGE. Before using the Stilts, check thoroughly for damage, any part that
seems damaged should be carefully checked to determine that it operates properly and will perform its
intended function. If there is any doubt, DO NOT USE, have the tool repaired and re-tested by a suitably
qualified person.
9. REPLACEMENT PARTS. When servicing, only fit the manufacturer’s approved spare parts.
10.STAY ALERT. Watch what you are doing and where you are going. Use common sense, do not use the
stilts if you are tired or subject to distraction; a strain, a torn muscle, a broken bone, is not a recommended
experience.
11. STORE IDLE EQUIPMENT. When not in use, the stilts should be cleaned, lightly oiled, and stored away
in a dry location to prevent the possibility of the steel components rusting. The storage position should be
out of reach of children.
w w w. a x m i n s t e r. c o . u k
w w w. a x m i n s t e r. c o . u k
04
13
Specific Safety Instructions for Stilts
Illustrated Parts Breakdown for the Stilts
A) Carry out a thorough inspection of the stilts before use. Check that all bolts are tight. Check
the leg struts are secure. Check the leg braces are undamaged and securely fastened to the
struts. Check that the leg and foot straps are not frayed or worn. Check that all pivotal actions
are free and smooth. Check the sole plate of the stilt is clean and will still provide adequate
traction. Check the height adjusting wing nut lock bolts are tight. Check there is no excessive
wear in the nylon bushes that guide the telescope action of the height adjustment. Check the
springs are in compression.
B) Do not carry out work operations on the stilts until you have achieved a sufficient level of
competence and confidence wearing them and walking on them.
C) Mount the stilts by securing the legs straps first, then the foot straps; similarly,
dismount the stilts by removing the foot straps first and then the leg straps. While in use
keep the straps tight at all times. Do not attempt to adjust stilts whilst wearing them, unless
assisted by a workmate. If you are unaided remove the stilts completely to carry out any
adjustments.
D) The stilts are designed to be used on firm, flat, dry, level surfaces. Do not use on soft
ground, uneven surfaces, or where it is wet, slippery, inclined or declined. Do not use on stairs.
E) While in use avoid any unguarded openings, e.g. drains, stairwells, floor heating vents, cable
or pipe ducts etc.,
F) Do not wear or use in a cluttered area, e.g. where pipes, ropes, cables etc., are strewn
around.
G) BE particularly attentive when in an area with low level hazards, e.g. furniture, stacks of
bricks, bags of building materials, tool boxes etc.
H) Do not carry heavy loads whilst wearing the stilts. They have a load limit.
I) Do not pick up objects that are lower than the level of your feet. Ask a workmate to pass
such objects to you, or dismount the stilts and lift the item to a suitable height to be picked up
when you have remounted the stilts.
J) Do not have the stilts adjusted too high, this would usually mean that you have to stoop to be
at the correct height, which is an unstable balance condition.
K) Do not lean over objects, e.g. scaffold, work benches, tables etc., once again, an unstable
balance condition.
L) Only take small distinct steps lifting the sole plate clear of the floor, and only walk forward,
perform a 'U' turn to reverse direction.
M) Do not run, or take large steps, this can cause the action springs to fall out and could lead
to serious injury.
N) Do not attempt to modify these stilts in anyway.
!
WARNING: The warnings, cautions, and instructions discussed in this
instruction manual cannot cover all possible conditions and situations that
may occur. It must be understood by the user that COMMON SENSE AND
CAUTION ARE FACTORS WHICH CANNOT BE BUILT INTO THIS PRODUCT. BUT
MUST BE SUPPLIED BY THE OPERATOR.
w w w. a x m i n s t e r. c o . u k
w w w. a x m i n s t e r. c o . u k
12
05
Routine Maintenance
I. Frequent, but not excessive, lubrication is required for best performance. Lubricate all moving
components with white graphite or silicon spray. Do not use any lubricant that will retain dirt or
grit.
II. Ensure that the stilts are free of burrs or dents. Keep them clean.
III. Carry out the damage check and assessment detailed in “Specific Safety Instructions for
Stilts”.
Specific Safety Instructions for Stilts
!
Please pay strict attention to the assembly instructions, in order to ensure that
you do not damage your stilts, and they are fully functional and safe.
Make sure the upper clamp is loosened off (See fig 1a), and remove the pre-fitted 1/4" x 1 1/2"
bolt from the anchor bracket (See fig 1 & 1b.). Insert the lower anchor tube strut through the
upper clamp and introduce into the anchor bracket. Re-insert the bolt and secure with the nyloc
nut.(See fig 2 & 2a) Secure only finger tight at this time. Fit the leg brace upper tube strut over
the lower tube strut and push down through the upper clamp (See Fig 3), orientate the leg brace
so that it faces inward, (See fig 3); 'nip' the bolts of the upper clamp sufficiently tightly to keep the
strut in place, but loose enough to allow the strut to be moved, both up and down and turned.
(See fig 4) Carry out this operation on both stilts.
Fig 1a
Fig 1
Upper clamp
Fig 1b
1/4" x 1 1/2 "
bolt
Anchor bracket
w w w. a x m i n s t e r. c o . u k
w w w. a x m i n s t e r. c o . u k
06
11
Initial Assembly Continued
Height Adjustment
Fig 8
Fig 2
Fig 9
Fig 2a
Lower anchor
tube strut
Captive nut
Remove the butterfly bolt & washer
Re-insert the bolt & secure
with a nyloc nut
Boss
Fig 3
Fit the leg brace tube over the
lower tube strut
Leg brace
tube
Fig 10
Fig 4
‘Nip’ the bolts of the upper
clamp
w w w. a x m i n s t e r. c o . u k
Extend or compress the leg by
pulling or pushing
Butterfly bolt &
washer
Fig 11
Introduce the butterfly bolt through
the boss
w w w. a x m i n s t e r. c o . u k
10
07
Using the Stilts
Initial Setting of the Leg Brace
Using the Stilts (Novice)
Fig 5
It is recommended that, if you are a novice stilt user, you have the assistance of a friend,
colleague etc., whilst you are learning to master their usage, and that the floor area you are
learning on is uncluttered, flat and level as possible.
Mount the stilts, (sitting on a high bench, table etc.), take care to secure the straps in the
recommended order (leg then foot). Holding on to a post/workmate/friend etc, stand upright.
Stand with your feet reasonably well apart (about the width of your shoulders) (See fig 8) and
achieve a balanced position. Check that the leg braces are in a comfortable position just above
the thickest part of your calf, and that the brace is in a comfortable position cradling the leg. If
necessary adjust the struts until this is so. Resume your balanced position, relax and examine
the vertical position of the stilts. If the stilts are leaning forward, correct this by rotating the leg
brace struts to the rear and refasten similarly if the stilt is tipped slightly backward, rotate the leg
brace strut to the front. Carry out these adjustments until the stilts are vertical whilst you are
standing upright and balanced. Note. The stilts are not articulated for sideways movement, keep
the stilts vertically upright in the left/right plane by maintaining the feet apart position discussed
above.
Start walking by taking a small distinct step, (about 2”-3”), do not scuff the foot, lift it completely
clear of the ground, put it down, (hold onto your friend’s shoulder to help your balance if
necessary), move the other leg to place the feet along side each other and resume your
balanced position. Take another small step, using the other foot, remember, small distinct step
foot clear of the ground; move the other foot up alongside, resume the balanced position. Do
this several times, alternating which foot you commence to walk with, not only will this get you
used to the feeling and movement required to maintain balance from each side, but you will
invariably discover that you feel more comfortable leading off with a particular foot. When you
are comfortable doing this and have discovered your 'favourite foot', attempt to walk several
strides; still small steps, still distinct, only this time do not seek to achieve the balance position
between steps, stride forward with the other foot. Thereafter, it is practise and familiarity. When
you can confidently walk on the stilts, examine the posture you adopt while walking, if you lean
forward while walking, tighten the upper spring; if you lean backward while walking tighten the
lower spring. This will help maintain the stilt in a vertical position whilst you are walking.
Fig 5b
Fig 5a
Tighten the bolts through
the upper clamp
Fig 5c
Fitting the leg brace above the
thickest part of the calf
Tighten the lower
anchor bolt
NOTE. Do not tighten the springs more that 15 turns, as this will 'choke' the stilt action and
impose excess stresses on the structures.
Wear your normal working footwear.
Height Adjustment
Place your foot onto the footplate, pull or push and twist the leg brace so that it is positioned
above the thickest part of your calf, and with the strap fastened, is comfortable against the
outside of your leg. (See fig 5 & 5a) Tighten the lower anchor bolt, and tighten the bolts
through the upper clamp. (See fig 5b & 5c)
The inner leg of the stilt has a series of holes drilled in it at approximately 50mm intervals. The
outer leg has a locating boss and a captive nut in opposite faces. The inner and outer leg
telescope together, and can be locked in position using the butterfly bolt and washer.
(See figs 9 & 11)
Remove the bolt and washer, extend or compress the leg, by pulling or pushing
(See figs 9 & 10). Make sure the same holes are selected and visible through the boss in the
outer face of the outer leg, introduce the butterfly bolt and washer, through the boss, through
the hole in the inner leg, and screw into the captive nut on the rear face. (See fig 9) Tighten
securely, but do not over tighten. As a double check stand the stilts together and see that they
are the same height.
w w w. a x m i n s t e r. c o . u k
!
Caution. DO NOT overtighten the upper clamp such that the tube struts
distort. This will weaken their integrity, reduce their strength, and could lead to
structural failure of the components, further, you may wish to carry out 'fine
tuning adjustments' after you actually walk on the stilts.
Carry out this setting procedure on both stilts.
w w w. a x m i n s t e r. c o . u k
08
09
Setting of the Heel Brace
Illustration of the Stilts
Leg brace
Leg strap
Fig 6
Fig 7
Ankle
Heel brace bracket
Upper leg
brace strut
Heel brace bracket
Foot Strap
Upper clamp
Fig 6a
Rear pivot
Lower anchor
tube strut
Springs
Make sure your ankle is vertically
above the rear pivot of the stilt
Lower anchor bolt
Butterfly bolt
Wear your normal working footwear
Position or re-position the heel brace (See fig 6a ) so that with the heel of your shoe/boot firmly
back against the bracket, your ankle joint is vertically above the rear pivot of the stilt. (See fig 6)
Rear pivot
Carry out this setting procedure on both stilts.
Stilt sole
w w w. a x m i n s t e r. c o . u k
w w w. a x m i n s t e r. c o . u k