1
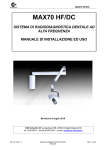
Installation Manual
RADIOVIDEOGRAPHY SENSOR
RX2 HP
Managing editor: Francesco Combe
IS RX2HP 0610 E
Revision of June 2010
CSN Industrie S.r.l – Via Aquileja, 43/B, 20092 Cinisello Balsamo – MI
Tel. +39 02 6186111 – Fax +39 02 6129 0676 – e-mail: [email protected]
INDEX
Page
1.
CSN IMAGE INSTALLATION with WINDOWS XP
2
2.
CSN IMAGE INSTALLATION with WINDOWS VISTA
5
3.
CSN IMAGE INSTALLATION with WINDOWS 7(32/64bit)
7
4. RX2 HP HARDWARE INSTALLATION
10
5. RX2 HP HARDWARE INSTALLATION with WINDOWS XP
11
6.
RX2 HP HARDWARE INSTALLATION with WINDOWS VISTA
17
7.
RX2 HP HARDWARE INSTALLATION with WINDOWS 7(32/64bit)
22
8.
RX2 HP CONFIGURATION AND USE
31
Page 1/38
Rx2 HP Radiovideography Sensor
Installation manual
IS RX2HP 0610 E – Revision: June 2010
1. CSN IMAGE INSTALLATION with WINDOWS XP
First, insert the CD, provided with the radio video X-Ray system, in your computer CD Unit, wait for a moment and
the installation menu will automatically start. This menu allows installing the CSN Image® Software.
Pic. 1
Select “Program Installation” from this menu; after that the program will show you the right code for the
installation.
Pic. 2
Click “Install” to proceed.
Rx2 HP Radiovideography Sensor
Installation manual
IS RX2HP 0610 E – Revision: June 2010
Page 2/38
Click on “Next” from the new window to start the installation procedure of CSN Image.
Pic. 3
During the software loading, a band of increments appears, indicating the installation state.
Pic. 4
Once the installation has been completed, a new window confirms the end of the software installation. Click on
“Finish”.
Pic. 5
Page 3/38
Rx2 HP Radiovideography Sensor
Installation manual
IS RX2HP 0610 E – Revision: June 2010
Now the computer could ask you to restart the operating system. In this case, click on “OK” to finish the software
installation.
Pic. 6
Otherwise, the main installation menu will automatically appear, click on “Finish” to return to the windows
desktop. The program is now installed and ready for the configuration and use.
Rx2 HP Radiovideography Sensor
Installation manual
IS RX2HP 0610 E – Revision: June 2010
Page 4/38
2. CSN IMAGE INSTALLATION with WINDOWS VISTA
To install the software with Windows Vista, first of all disable the User account system control.
From “Start” menu
(vista logo is positioned in the left lower part of the toll bar) select “Control Panel”.
Pic. 7
Now from Control Panel window, select “User Accounts”.
Pic. 8
Page 5/38
Rx2 HP Radiovideography Sensor
Installation manual
IS RX2HP 0610 E – Revision: June 2010
Now select your user account, then click on “Turn User Account Control on or off”.
Pic. 9
Unselect “Use User account Control (UAC) to help protect your computer”, then click on “OK”.
Pic. 10
Now restart your Operative system, and proceed with the CSN Image® software installation, following the
instructions in previous chapter (1).
Rx2 HP Radiovideography Sensor
Installation manual
IS RX2HP 0610 E – Revision: June 2010
Page 6/38
3. CSN IMAGE INSTALLATION WINDOWS 7 - 32 or 64 bit
To install the software with Windows 7 first of all disable the User account system control.
From Start menu
(logo of 7 is positioned in the left lower part of the bar select “Control Panel”.
Pic. 11
Then choose “Display small icones ”
Pic. 12
Page 7/38
Rx2 HP Radiovideography Sensor
Installation manual
IS RX2HP 0610 E – Revision: June 2010
Now from Control Panel window, select “User Accounts”.
.
Pic. 13
Now select the new user account you created and click on the left bar “Change User Account Control Setting”.
Pic. 14
Rx2 HP Radiovideography Sensor
Installation manual
IS RX2HP 0610 E – Revision: June 2010
Page 8/38
Now move the cursor down to the end where you see “Do not ever notify” and then press Ok.
Pic. 15
Now restart your Operative system, and proceed with the CSN Image® software installation, following the
instructions in previous chapter (1).
Page 9/38
Rx2 HP Radiovideography Sensor
Installation manual
IS RX2HP 0610 E – Revision: June 2010
4. RX2 HP HARDWARE INSTALLATION
The RX2 HP radio video X-Ray system consists of three parts: the sensor, the USB box and the USB cable.
Pic. 16
Pic. 17
USB Box
Sensor
Pic. 18
USB cable
Pic. 19
USB cable
First of all, it is necessary to connect all the components.
Connect the sensor
to the USB Box;
Pic. 20
- Connect the USB cable;
- In case the pc is not equipped with USB
port 2.0 or if the USB ports should not supply
enough current, the sensor should be used
with the power supply.
- When you connect the power supply, the
switch should not be moved towards the
internal part of USB box but towards the
external one.
Pic. 21
Then, connect the USB cable to your computer
USB port;
Pic. 22
Rx2 HP Radiovideography Sensor
Installation manual
IS RX2HP 0610 E – Revision: June 2010
Page 10/38
5. RX2 HP HARDWARE INSTALLATION with WINDOWS XP
(Some windows may be different if you use a PC or a laptop)
Connecting the USB cable to your computer (obviously the computer must be on and with the Operative System
already loaded) the wizard installation for a new hardware will appear. The computer needs a driver.
Insert the program CD ROM into the player or let it in if you haven’t take it off.
Pic. 23
On this window select the third voice “No, not this time” and Click on “Next”.
Pic. 24
Page 11/38
Rx2 HP Radiovideography Sensor
Installation manual
IS RX2HP 0610 E – Revision: June 2010
Now select the first voice “Install the software automatically” and now click on “Next”.
At the installation end, a window confirming the correct loading will appear. Click on “Finish” to definitely finish
the procedure.
Pic. 25
Clicking on the “Start” button, activate Panel Control, then select System. If the item doesn’t appear click on
Switch to Category View
Pic. 26
Rx2 HP Radiovideography Sensor
Installation manual
IS RX2HP 0610 E – Revision: June 2010
Pic. 27
Page 12/38
Now select Hardware and then Device Manager
Pic. 28
A new window with a new category named RX2 HP CCD SENSOR will appear.
Click on the “+” on the left of the item, then RX2 HP will appear below it (if the item is put in evidence by a
yellow question mark, the driver is not correctly loaded, install it again, following the “Sensor Installation Manual”).
Double click on the item in order to open the peripheric properties.
Page 13/38
Rx2 HP Radiovideography Sensor
Installation manual
IS RX2HP 0610 E – Revision: June 2010
Pic. 29
From the same menu, select the “+” to the left of the item Universal Serial Bus controller and a new item will
appear.
Pic. 30
Now the Hub USB and the trademark of the USB ports are displayed.
With reference to the trademarks of the USB ports, the certified ones for a proper operation of the sensor
without the power supply device are the Intel and Via Tech, maybe the sensor must be used connected to
the power supply device.
Rx2 HP Radiovideography Sensor
Installation manual
IS RX2HP 0610 E – Revision: June 2010
Page 14/38
Among the items, the item USB Root Hub will appear several times, double click on that item and deselect Allow
the computer to turn off this device to save power, then click on OK.
This operation must be repeated for all the USB Root Hub items.
Pic. 31
Now close all the opened windows and go back to the “Panel control”. Select “Power Options”.
Pic. 32
Page 15/38
Rx2 HP Radiovideography Sensor
Installation manual
IS RX2HP 0610 E – Revision: June 2010
In the following window, in all the fields select Never, then click on OK (this window may be different if you use a
PC or a laptop).
Pic. 33
The operative system configuration for the correct sensor operation now is completed.
Rx2 HP Radiovideography Sensor
Installation manual
IS RX2HP 0610 E – Revision: June 2010
Page 16/38
6. RX2 HP HARDWARE INSTALLATION with WINDOWS VISTA
(Some windows may be different if you use a PC or a laptop)
Connecting the USB cable to the computer (the computer must be turned on) a window informs you a new
hardware has been connected. This new hardware needs a driver.
Insert the CD-Rom in your CD player.
Choose the first voice “Locate and install driver software” and please wait a moment.
Pic. 34
When the Operative System found the Sensor, a window will appear informing you the Driver is not certificated.
Select the “Install this driver software anyway” function.
Pic. 35
Page 17/38
Rx2 HP Radiovideography Sensor
Installation manual
IS RX2HP 0610 E – Revision: June 2010
When the procedure has finished a window informing you the functioning of the sensor is correct will appear.
Click on “Close” button to ultimate the procedure.
Pic. 36
Now you must configurate your Operative System to optimize the Sensor RX2HP functioning.
Clicking on “Start” button, activate the function “Control panel” then click on “System”. If the item doesn’t
appear click on Switch to Category View)
Pic. 37
Pic. 37a
Rx2 HP Radiovideography Sensor
Installation manual
IS RX2HP 0610 E – Revision: June 2010
Pic. 37b
Page 18/38
After selecting “System”, please select “Device manager”.
Pic. 38
Now a new window with a new category named RX2 HP CCD SENSOR will appear.
Click on the “+” on the left of that item, then RX2 HP will appear below it (if the item is put in evidence by a
yellow question mark, the driver is not correctly loaded, install it again following the sensor Installation manual).
Double click on the item in order to open the device properties.
Pic. 39
Select “Driver” and check that the installed version is the 2.0.0.0 one. If yes, click “OK” to come back to the
previous display. Now the Hub usb and the trademark of the usb ports are displayed.
Page 19/38
Rx2 HP Radiovideography Sensor
Installation manual
IS RX2HP 0610 E – Revision: June 2010
With reference to the trademarks of the usb ports, the certified ones for a proper operation of the
sensor without the power supply device are the Intel and Via Tech, in case of Alì , Open or Sys ports,
maybe the sensor must be used connected to the power supply device.
Now close all the opened windows and go back the control panel function illustrated in the first page of this
manual.
Select “Power options“.
Pic. 40
In the following display, select “Change plan settings”.
Pic. 41
Rx2 HP Radiovideography Sensor
Installation manual
IS RX2HP 0610 E – Revision: June 2010
Page 20/38
Now select the item highlighted never and then click on “Save changes”.
Pic. 42
The operative system configuration for the correct sensor operation now is completed.
Page 21/38
Rx2 HP Radiovideography Sensor
Installation manual
IS RX2HP 0610 E – Revision: June 2010
7. RX2 HP HARDWARE INSTALLATION with WINDOWS 7 - 32 o 64 bit
(Some windows may be different if you use a PC or a laptop)
For all the Operative Systems 32 or 64bit the installation procedure is the same.
If the CD ROM of CSNImage program is still inserted in the player, you should start the Setup from the same CD,
otherwise, insert the CD into the player and wait for the window below to appear.
Pic. .43
Then click on Drivers and in the new windows that appears chose RX2 HP
Pic. .44
Rx2 HP Radiovideography Sensor
Installation manual
IS RX2HP 0610 E – Revision: June 2010
Page 22/38
At the end of the installation, click on Next.
Pic. 45
and then on Install.
Pic. 46
Page 23/38
Rx2 HP Radiovideography Sensor
Installation manual
IS RX2HP 0610 E – Revision: June 2010
A new window will appear where Windows informs that the sensor driver is not cerified
Chose the function “Instal the driver software anyway”.
Pic. 47
Wait for the end of the installation and click on Finish.
Pic. 48
Pic. 49
Rx2 HP Radiovideography Sensor
Installation manual
IS RX2HP 0610 E – Revision: June 2010
Page 24/38
Now a message will appear, confirming the successful sensor installation.
Once the sensor drivers have been loaded, you must configurate your Operative System to optimize the Sensor
RX2HP functioning.
Clicking on “Start” button, activate the function “Control panel” (pic.50) then click on “System”. (pic.52) If the
item doesn’t appear, click on Switch to Category View (pic.51) and select “View small icons”.
Pic. 50
Pic. 51
Pic. 52
Page 25/38
Rx2 HP Radiovideography Sensor
Installation manual
IS RX2HP 0610 E – Revision: June 2010
After selecting “System”, please select “Device manager”.
Pic. 53
Now a new window with will appear, within the item Controller USB (Universal serial bus) with a new
category named CSN Industrie RX2 HP (pic.54)
(if the item is highlighted by a yellow question mark, the driver is not correctly loaded, install it again following the
sensor Installation manual).
Pic. 54
Rx2 HP Radiovideography Sensor
Installation manual
IS RX2HP 0610 E – Revision: June 2010
Page 26/38
From the menu “Peripheric Managing” select the arrow you find on the left of the item Controller USB
(Universal Serial Bus), so you can see new items. (pic. 55)
Pic .55
Now the Hub usb and the trademark of the usb ports are displayed.
With reference to the trademarks of the usb ports, the certified ones for a proper operation of the
sensor without the power supply device are the Intel and Via Tech, in case of Alì , Open or Sys ports,
maybe the sensor must be used connected to the power supply device.
Within the items, the item USB root Hub will be displayed more than once, double click on this item and select
Power Management.
Page 27/38
Rx2 HP Radiovideography Sensor
Installation manual
IS RX2HP 0610 E – Revision: June 2010
In the following display, select Allow the computer to swich the peripheric device to save power than click
OK. (pic. 56)
Repeat the operation on all items Usb root Hub.
Pic. 56
Rx2 HP Radiovideography Sensor
Installation manual
IS RX2HP 0610 E – Revision: June 2010
Page 28/38
Now close all the opened windows and go back to the “Panel control” described in the first section of the
manual. Select “Power Options (pic. 57)
Pic. 57
In the next window click on su Option combination, to display the combination High performances.
Pic. 58
Then select High Performances and click on Change plan settings.
Page 29/38
Rx2 HP Radiovideography Sensor
Installation manual
IS RX2HP 0610 E – Revision: June 2010
Now selec Never in the highlighted items and press Save changes
Pic. 59
The operative system configuration for the correct sensor operation now is completed.
Rx2 HP Radiovideography Sensor
Installation manual
IS RX2HP 0610 E – Revision: June 2010
Page 30/38
8. RX2 HP CONFIGURATION AND USE
Click on “Start”, then “Programs”, “CSN Image” and then “CSN Image” again to run the program (or click
twices on “CSN Image” icon on the desktop).
Pic. 60
At the first run the program will show a window of first installation regarding the destination disk for the archives;
click on “OK” and wait.
Pic. 61
Now the software will ask you to select your language for the software start (not all the languages indicated are
available; in case of a language not available, the software will automatically start in English). Click on “OK” to go
with the installation.
Pic. 62
Immediately afterwards another window will appear, regarding the finally directory of the patient and images
archives; click on “Yes” and wait.
Pic. 63
Page 31/38
Rx2 HP Radiovideography Sensor
Installation manual
IS RX2HP 0610 E – Revision: June 2010
After this operation, an access verification window appears. Select “Admin” user and insert the default password
12345678.
Pic. 64
Now, a new window asks you to edit a new password and then click on “OK”.
Pic. 65
Edit again the new password and click on “Ok”.
After the password editing, the software informs it is necessary to follow the software registration procedure. Click
on OK in the demo reminder window.
Pic. 66
Rx2 HP Radiovideography Sensor
Installation manual
IS RX2HP 0610 E – Revision: June 2010
Page 32/38
IMPORTANT: NOTICE FOR REGISTRATION OF THE PROGRAMM.
When you have finished the installation of the program, you need to activate the software.
For the activation of the software you need to connect the sensor to the computer, and charge the driver of the
sensor (previus chapter )
When you have click on the OK button appears a new windows where you must write the name of the doctor (in
the first row) and the address of the dental cabinet (second row) will appear.
Pic. 67
If the sensor is connected to the computer, and the driver is charged click on the Rx2 HP button to activate the
license.
If the activation process is done a new window, with the successfully activation appears.
Click OK and the software is unlocked.
Pic. 68
Page 33/38
Rx2 HP Radiovideography Sensor
Installation manual
IS RX2HP 0610 E – Revision: June 2010
From the Main menu, select the Patient function on the left side.
Pic. 69
In this new window, select “New”; edit the patient name and surname; then click on Save.
Pic. 70
Rx2 HP Radiovideography Sensor
Installation manual
IS RX2HP 0610 E – Revision: June 2010
Page 34/38
After the patient registration, it is necessary to select the “Founded Patient” function and then click on “Images”.
Pic. 71
Now we’re ready to configure the RX2 HP sensor in the program.
From the new window please select the “Options” function on the left corner of this screen view.
Pic. 72
Page 35/38
Rx2 HP Radiovideography Sensor
Installation manual
IS RX2HP 0610 E – Revision: June 2010
In the new window, in “Options” category select in “File format” the item “CMP, JPEG (JPG)” and in “Maximum
colors” “16.777.216 (24 bits)”.
Pic. 73
Rx2 HP Radiovideography Sensor
Installation manual
IS RX2HP 0610 E – Revision: June 2010
Page 36/38
Then click on “Intraoral” function.
Select the “RX2 HP” sensor, new functions in the lower part of the display will automatically appear and one of
these is “Trigger mode 2: EDGE 1”.
Click on this field and select an other item (for example INT) and then select again ”EDGE 1”.
On the right of EDGE 1, a window previously hidden will appear, in which the sensor preheating will be highlighted
(the default value to be used with the Max 70 HF/DC x-ray unit is 900). In case of a different x-ray unit, set that
value on 0 in order to make the acquisition coherent with the set time on the x-ray unit.
Pic. 74
Page 37/38
Rx2 HP Radiovideography Sensor
Installation manual
IS RX2HP 0610 E – Revision: June 2010
Always in this function, select the “Enable automatic filters” button, and in this menu select: in filter 1 Average, in
filter 2 None and in filter 3 None, and then click on “OK”.
Pic. 75
If you want to apply an automatic filtering to the image, in the field “Add filter” select 3D effect, or other.
Back to the Main menu, click on “Intraoral”, on the upper bar of that window.
Pic. 76
In the lower left part of the screen, the sensor mode window appears. A red light indicates that the sensor isn’t
connected or the drivers aren’t correctly installed. A green light indicates the system is ready to acquire the X-Ray.
Pic. 77
Now the sensor is correctly configured both in the CSN Image software and in the operative system.
All the listed operations have been performed with software CSN Image version 3 service pack 10 rev 2.
All the software users with an older version are kindly invited to download the updating for the website
www.archimed.org.
For the program instructions, please refer to the “User Manual” enclosed in the installation CD-ROM packaging.
Rx2 HP Radiovideography Sensor
Installation manual
IS RX2HP 0610 E – Revision: June 2010
Page 38/38