1
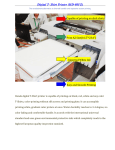
Otis Photo Lab Inkjet Printing Demo Otis Photography Lab Adam Ferriss Lab Manager [email protected] 310.665.6971 Soft Proofing and Prepress Before you begin printing, it is a good idea to set the proof color to match the printers color settings in order to gauge what the final printed image will look like. Go to View > Proof Setup > Custom Under Custom, choose the paper profile of the paper you will be using to print on. If you do not see your paper listed, ask a lab tech to download it for you. Rendering intent controls how color is compressed when it is out of the gamut and separated into CMYK or RGB profiles. The two options you will be using are “Relative Colorimetric” and “Perceptual”. Relative colorimetric attempts to maintain the relationships of in gamut colors even though it clips out of gamut colors. Original in gamut luminance values will be preserved. Perceptual rendering tries to preserve the relationship between out of gamut colors, even if it compromises the relationship of in gamut colors Leave the Black Point Compensation box checked. After selecting your color space, turn on the gamut warning to check which colors won’t reproduce accurately in print. You can toggle the gamut by going to View > Gamut Warning. Anything that is not reproducible appears in grey. Bright vivid colors, especially cyans, greens, and magentas are more likely to give you trouble. Select the out of gamut colors by going to Select > Color Range... and then change the drop down option to Out of Gamut. Once you have your out of gamut colors selected, you can use a combination of the Hue/Saturation, Selective Color, and Curves Adjustment Layers to bring the gamut back into something you are happy with. Resizing Bring up the image size dialogue by clicking on Image > Image Size or pressing Command+Option+i. Uncheck the Resample Image box and adjust the resolution(ppi). Generally speaking your resolution should be ¼ of your desired dpi. For example: If printing at 2880 dpi, set your ppi to 720 If printing at 1440 dpi, set your ppi to 300 or 360 Click OK then open up the image size dialogue again and this time check the Resample Image box. Without changing the resolution, adjust the image size to the dimensions that you plan on outputting the image to. Never Upsample! If you are downsampling, you may want to pull the drop down to Bicubic (sharper). Sharpening Once you have made all your color adjustments and adjusted the resolution and image size to their final dimensions you will need to sharpen your image to compensate for the added softness of the inkjet printer. Photoshop has a semiuseful filter built in for sharpening, the unsharp mask filter. The unsharp mask is a very broad filter and will equally sharpen all parts of the image. Ideally, we only want to sharpen areas of the image that go from dark edges to light edges. Duplicate your background layer and set the blending mode of the duplicate layer to overlay(more sharpening) or soft light(less sharpening). Go to Filter > Other > High Pass. Lower the pixel radius to somewhere between 0.5 3. You want the sharpening to be just barely perceptible on screen from a zoom of 50%. Always sharpen your image after you have resized it! Photoshop Dialogue To bring up the print dialogue in photoshop you can go to File>>Print or hit command+P There are a few more important settings that need to be tweaked before you can print. 1. Make sure the color handling is set to “Photoshop Manages Colors” 2. Select the printer profile that matches the paper you are printing with. 3. Set your rendering intent to “Relative Colorimetric” or “Perceptual”. 4. Check to make sure that your image is oriented correctly (landscape or portrait). Once all of these settings are correct hit “Print Settings” Printer Dialogue 1. Select the correct paper size from the list. If you do not see your paper size create a custom one by selecting “Manage Custom Sizes”. If you are using roll paper, create a custom size that corresponds with your print dimensions. +Remember that the 9900 can go no larger than 44” and the 4800 can go no larger than 17”. Also remember to add or delete a border if you want them. +If you are making a test print set the custom size to the dimensions of your test print. 2. Select “Printer Settings” from the next drop down. 3. Under page setup select sheet or roll paper. +Select the media type that is closest to your paper. 4. Make sure “AccuPhotoHDR” is selected under print mode. +If your document is in 16bits, check the 16 bit output button, otherwise leave it empty. +Set Color Mode to “OFF (No Color Management)” +Choose your output resolution (1440 if printing at 300dpi or 2880 if printing at 720dpi). 5. Super MicroWeave has the printer make twice as many passes and generally results in a slightly darker image. It’s up to you whether or not to use this. +“High Speed” means that the printer will spray ink on both left and right passes. There is no noticeable decline in print quality by leaving High Speed checked and your prints will come out twice as fast! +“Flip Horizontal” should be set to off. +Finest detail only affects vector files or rasterized text; it will not improve the quality of a photograph. Generally leave this unchecked. When you are finished hit save and then print! Print Costs A fee for printing is set up to pay for supply costs of ink and maintenance supplies. All printing transactions will be made through the TSS Digital Photo print cards that can be purchased on the 2nd floor business office. They may be purchased in increments of $10.00 or $20.00. Print costs can calculated by the following formulas: If you provide your own paper: Width * Height * 0.017 If you choose to use the photo lab’s paper: Width * Height * 0.025 The lab does not charge for test strips and prints. Ink is extremely expensive; please do not abuse this policy! Epson 9900 44” max width The Epson 9900 is a large format 2880dpi printer with 11 inks ( black, light black, light light black, matte black, cyan, light cyan, vivid magenta, vivid light magenta, orange, and green). Paper can be fed by roll or sheet → Need to select where your paper source is on the printer. Select correct paper type on printer Check which black is being used → Both matte and photo black are installed in the printer →Changing ink is wasteful and time consuming, please print in batches of one or the other. Do not switch back and forth. Loading roll paper 1. Open Cover and unlock lever and push to the left. 2. Rest the roll on top of the printer in the recessed area with the loose end of the paper coming over the top of the roll. 3. Remove the core adapters from the printer and insert them into both ends of the core. Push the blue levers down to lock them into place. 4. Load the right core adapter into the printer first, and then then move the sliding brace into the left core adapter. Pull down the blue lock to secure the paper. 5. Press the paper release button(top right grey) on the printer and feed paper into the printer until you see it emerge from the bottom. 6. Close the cover and press the release button again to secure. Press pause when prompted. Loading sheet paper 1. Press paper source button until sheet is selected. 2. Align the sheet with the right margin and feet it down into the paper until it meets resistance. 3. Press the down arrow to feed the paper. Useful/Related Links Adobe Prepress delivery pdf http://www.adobe.com/digitalimag/pdfs/phscs2ip_reproprep.pdf Lynda.com CS5: Prepress and printing http://www.otis.edu/goto.html?u=https://login.proxyserver.otis.edu/login?url=http://iplogin.lynda.com Epson 9900 User Manual pdf http://files.support.epson.com/pdf/pro79_/pro79_gd.pdf Epson 4800 User Manual pdf http://files.support.epson.com/pdf/pro48u/pro48ugd.pdf Terms to Know Gamut The complete set of colors that can be accurately represented in a certain color space, or output device. Color Space A set of all possible colors that can be made from Red, Green, and Blue. Rendering Intent When the gamut of source color space exceeds that of the destination, saturated colors are become clipped (inaccurately represented). The color management module can deal with this problem in several ways. The ICC specification includes four different rendering intents: absolute colorimetric, relative colorimetric, perceptual, and saturation. ICC profiles A set of data that characterizes a color input or output device, or a color space, according to standards set by the International Color Consortium (ICC) sRGB A standard RGB color space created cooperatively by HP and Microsoft in 1996 for use on monitors, printers, and the Internet. Only capable of 8 bit color. Most devices can display all sRGB colors so it is recommended to embed all images destined for web with sRGB. Adobe 1998 A fairly wide RGB color space developed by Adobe in 1998. This is the most commonly used space for high quality photo output and capable of 16bit color. Many devices cannot display all Adobe1998 colors; it is recommended that you convert to sRGB before uploading to web. proPhoto A very wide RGB color space developed by Kodak. Can take advantage of 16bit color. Not used very often because many displays cannot accurately display these colors, nor can our eyes detect them. Soft Proof The simulation of print color on a monitor used for gauging color accuracy. Hard Proof / Test Print An actual printed sample of a print going to press used for gauging color accuracy. Resample refers to the scaling of digital images. Different sampling modes can be used to control how hard or soft pixel edges will appear. Images can be “downsampled” made smaller, or “upsampled” or “interpolated” made bigger. Both are destructive processes and will result in changes in image quality. DPI Dots per inch A unit of measuring print resolution based on how many ink dots will fit in the span of an inch. PPI Pixels per inch / Resolution A unit of measuring digital image resolution based on how many pixels will fit in the span of an inch. Raster A dot matrix structure that represents the rectangular pixel grid of an image. Photoshop only uses raster images. Raster images cannot be scaled without a loss in quality. Vector The use of points, lines, shapes, and polygons to represent a digital image. Illustrator only uses vector graphics. Vectors can be scaled to any size without a loss in quality. Please ask lab tech for assistance with: Loading paper rolls Changing Ink Cartridges Paper Jams Maintenance Tank Warnings Please report all error messages to lab techs.