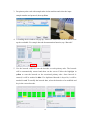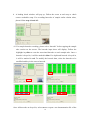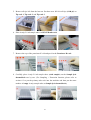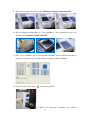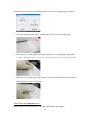
1
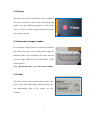
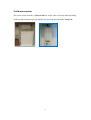
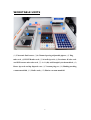
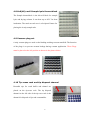
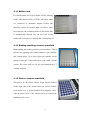
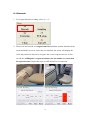
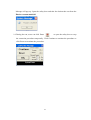
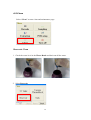
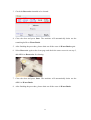
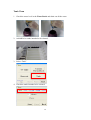
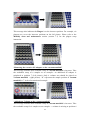
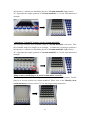
2014/05
PREFACE ............................................................................................................................... iv 1.1 Purpose of this manual ............................................................. iv SAFETY PRECAUTIONS ................................................................................................... iv 2.1 Normal use .................................................................................... v 2.2 Equipment assembling, carrying, and positioning requirements .... v 2.3 Ventilation requirement................................................................ vi 2.4 Additional equipment positioning requirements ........................... vi 2.5 Explanation of safety marks on the equipment ............................. vi 2.6 Biological safety ........................................................................... vi 2.7 Mechanical hazard ....................................................................... vii 2.8 Heat hazard ................................................................................. vii 2.9 Electrical hazard .......................................................................... vii EXTERNAL FEATURE ..................................................................................................... 1 3.1 Built-in touch screen ..................................................................... 1 3.2 Safety door .................................................................................... 1 3.3 Power ............................................................................................ 2 3.4 Automatic reagent feeder .............................................................. 2 3.5 Label ............................................................................................. 2 3.6 Side panel ...................................................................................... 3 3.7 Machine feet with wheels .............................................................. 3 3.8 Waste system ................................................................................ 4 WORKTABLE UNITS ...................................................................................................... 5 4.1 Six-channel spacing-adjustable pipette ......................................... 6 4.2 Ultrasonic fluid sensor ................................................................... 6 4.3 96-well tip rack ............................................................................. 6 4.4 Plug tube rack ............................................................................... 7 4.5 HCCEB tube rack ............................................................................ 7 4.6 PCR master mix tube rack ............................................................. 7 ii
4.7 Proteinase K tube rack .................................................................. 7 4.8 6x8(48)-well Sample lysis thermoblock ........................................ 8 4.9 Vacuum plug set ............................................................................ 8 4.10 Tip-reuse rack and tip disposal vent ............................................ 8 4.11 Buffer tank .................................................................................. 9 4.12 Binding-washing vacuum manifold .............................................. 9 4.13 Elution vacuum manifold ............................................................. 9 ACCEEORIES ................................................................................................................... 10 5.1 Elution tube ................................................................................. 10
5.2 Sample tube ................................................................................ 10
5.3 Column set .................................................................................. 10
5.4 Plug tube combination ................................................................. 11
5.5 PCR setup plate adaptor .............................................................. 11
SOFTWARE INTERFACE AND OPERATION ..................................................... 12 6.1 Barcode ....................................................................................... 13 6.2 Sampling ..................................................................................... 15 6.3 Extraction .................................................................................... 18 6.4 PCR Setup .................................................................................... 26 6.5 Clean ........................................................................................... 32 MAINTENANCE ............................................................................................................... 37 7.1 Daily clean and maintenance ....................................................... 37 7.2 Weekly clean and maintenance .................................................... 38 7.3 Monthly clean and maintenance ................................................... 39 TROUBLE SHOOTING ................................................................................................. 41 iii
PREFACE
1.1 Purpose of this manual
This operation manual is written for laboratory personnel and researchers who conduct
automated sampling, barcode reading, DNA/RNA extraction, and PCR setup using LabTurbo
48 Compact System (LabTurbo 48C).
SAFETY PRECAUTIONS
This manual contains information and warnings that must be followed by the user to ensure
safe operation of the LabTurbo workstation and to maintain the instrument in a safe condition.
Potential hazards that may harm the users or result in damage to the instrument are clearly
stated at the appropriate places throughout this manual.
Warning Notes
The following signs are used to warn the users against:
WARNING: Ignoring this symbol could be potentially lethal.
CAUTION: Ignoring this symbol may lead to physical injury and/or damage to the
machine or hardware options.
Before operating the machine, please read and follow the manual in detail.
iv
2.1 Normal use
WARNING: Improper use of the LabTurbo system may cause personal injuries and/or
damage to the instrument. The use of the machine should be under the instruction of trained
technical staff. Qualified personnel should follow the manual to operate the device.
WARNING: It is mandatory that suitable protective equipment must be worn at all
times when using the machine. The machine should be turned off when cleaning, repairing,
or lubricating.
CAUTION: In case of emergency, switch off the LabTurbo 48-Compact power located
on the front of the device.
CAUTION: We strongly recommend the users to use accessories and disposables of
LabTurbo 48-Compact. Non-LabTurbo accessories and disposables may result in damages of
the instrument.
CAUTION: Please do not eat, drink, smoke, apply cosmetics, or handle contact lenses
near the machine. Wash hands thoroughly after handling samples and reagents.
2.2 Equipment assembling, carrying, and positioning requirements
CAUTION: LabTurbo 48-Compact is a device manufactured and assembled in the
certified factory. There are no special requirements for the installation of the device. While
carrying the machine, make sure the passageways are clear of all obstructions. Instruction
must be received prior to any lifting applied.
CAUTION: The device should be placed and anchored securely on a sturdy pedestal
or platform.
v
2.3 Ventilation requirement
CAUTION: This device is equipped with a ventilation fan that allows the air to
circulate and removes stale air. Therefore, no additional environmental measurements are
required. A lab with appropriate ventilation is fine.
2.4 Additional equipment positioning requirements
WARNING: The main power cord of the device is on the right side of the equipment.
Be sure to keep the right side of the device at least 15cm from the wall or other obstacles.
2.5 Explanation of safety marks on the equipment
All of the signs on the equipment are marked according to the standard of IEC/EN/UL 61010.
2.6 Biological safety
WARNING: Assorted biological solutions and specimens from humans or animals
(carcasses, tissues, body fluid, etc) should be treated as potentially infectious. The users must
strictly follow waste disposal guidelines or consult the safety officer with regard to an
appropriate method for disinfection.
WARNING: Handle potentially-biohazardous samples with the greatest care and in
accordance with the required safety regulations.
WARNING: Used plastic wares, such as filtered tip and Eppendorf tubes, may have
caustic chemicals or biohazardous reagents remained. Such waste and disposals must be
properly collected and disposed in accordance with the local safety regulations.
vi
2.7 Mechanical hazard
WARNING: This machine has a safety door. Once the power of LabTurbo 48-Compact
is on, the user should not stretch into the workstation under any situations.
CAUTION: Please confirm that the metal rack for reuse tips is empty before using. If
there is any tip left before using, please press “Reset ".
2.8 Heat hazard
WARNING: The Thermoblock of LabTurbo 48-Compact can heat up to 80 °C. Be
aware of it when the heating step is undergoing. It is not allowed to use the Thermoblock
with volatile or flammable liquids.
WARNING: The maximum continuous operating time of the vacuum pump is 1 minute
to avoid overheating.
2.9 Electrical hazard
WARNING: Modification to any electrical components (wires, cables, circuit boards,
etc.) of LabTurbo 48-Compact by unauthorized personnel is prohibited. The opening of
covers or removal of parts is likely to expose dangerous voltages. Disconnect the machine
from all power sources before handling electrical parts of the machine.
vii
EXTERNAL FEATURE
LabTurbo 48 Compact is the “automated nucleic acid purification system with
innovative vacuum membrane column technology.” The externals of the main
workstation consist of several parts, including a built-in touch screen, a safety door, a
power button, a side ports, four machine feet with wheels, a pump system, and a
waste bottle.
3.1 Built-in touch screen
The sensitive built-in touch screen is on the top front
of the machine. This control panel equips with
Windows user interface. Once the panel is turned on,
the LabTurbo program will automatically activate,
and users can select the desired protocol to start. An
included stylus is the accessory of the touch panel.
3.2 Safety door
The main workstation of LabTurbo 48C has a safety door
to form a closed cabinet. This protects users from being
exposed to any risks or dangers when the machine is up
and running. It also isolates the worktable from the
external environment,
reducing
the
possibility of
contamination. If the safety door is opened while the
machine is functioning, the machine will pause.
1
3.3 Power
The red power switch is on the front of the workstation.
Press the red button to turn on the workstation and
directly enter the LabTurbo program. To turn off the
system, exit the LabTurbo program and then press the
power button directly.
3.4 Automatic reagent feeder
Five automatic reagent feeders are located on the inner
side of the safety door. They are the buffer supply for
the buffer tanks on the worktable. The buffer from the
left to the right is DLL/VLL, LTL/DRVL/RLL, CCEB,
EtOH and LW1. Note:Buffer label may vary from actual condition
3.5 Label The label consists of the product name, model, and
power rating. The serial number with the barcode and
the manufacturing date of the product are also
included.
2
3.6 Side panel
The side panel is located on the right façade of the machine. It contains the following:
A. LAN Control is for Internet connection or the remote control.
B USB Accessory is for the peripheral with the USB port such as the mouse,
keyboard or USB flash drive.
C. AC 110V/220V and ON/OFF are the main power switch and the power cord
socket. The fuse chamber is in between the main power switch and the power cord
socket.
NOTE: Voltage values on all pictures are for demonstration purpose only. Each
machine’s actual supply voltage may vary depending on its module.
3.7 Machine feet with wheels
The height of the machine feet is adjustable and
accompanied with the wheels. Manage the level of the
workstation by adjusting the height of the machine feet.
The wheel is only for short distance movement of the
workstation on the table, but not for transportation of
the machine on the ground.
3
3.8 Waste system
The waste system includes a Waste bottle for major waste collection during binding,
washing, and cleaning steps with liquid level detection function and a Trash can.
4
WORKTABLE UNITS
(1) Ultrasonic fluid sensor, (2) 6-Channel spacing-adjustable pipette, (3) Plug
tube rack, (4) HCCEB tube rack, (5) 96-well tip rack, (6) Proteinase K tube rack
and PCR master mix tube rack, (7) 6 × 8 (48)-well Sample lysis thermoblock, (8)
Reuse tip rack and tip disposal vent, (9) Vacuum plug set, (10) Binding-washing
vacuum manifold, (11) Buffer tank, (12) Elution vacuum manifold
5
Tip3 Tip2 4.1 Six-channel spacing-adjustable pipette
The pipette is equipped with 6 syringes and has adjustable
Tip1 tip spacing (9 mm and 18
mm), suitable for liquid transfer between microcentrifuge tubes and PCR tubes. The
working volume of the pipette is 5 - 1000 µl. The standard tip is the 1.1 ml filtered tip.
4.2 Ultrasonic fluid sensor
The ultrasonic fluid sensor detects any clogged membrane
after the steps of lysate binding and buffer washing. In
addition, it functions to check if the buffer is sufficient for
the extraction protocol and measures the sample level one by
one in the primary sample tube.
4.3 96-well tip rack
Three 96-well tip racks (from front to rear are Tip 1, Tip 2,
and Tip 3) are for three 96-well plate tips, which can be
1100 µl tips for extraction, or 300 µl tips and 96-well PCR
tube/plate adaptor for PCR setup. The metal pin on the lower
right of the rack top is a foolproof feature for mounting the
tip plates.
6
4.4 Plug tube rack
The plug tube rack is to accommodate five plug tubes. 4.5 HCCEB tube rack
The rack is for 2.0 ml 6-strip tubes (the tube is the
same as 6-strip sample tube) of hot column clean
elution buffer (HCCEB) in the extraction procedure.
4.6 PCR master mix tube rack
The rack is for two master mixes (M1/M2) used in PCR
setup.
4.7 Proteinase K tube rack
The rack is for 6 ml screw-capped tube of enzyme
proteinase K for extraction.
7
4.8 6x8(48)-well Sample lysis thermoblock
The Sample thermoblock is the 48-well block for sample
lysis and drying column. It can heat up to 80°C for heat
incubation. The notch on each row is a foolproof feature for
placing the 6-strip sample tube.
4.9 Vacuum plug set
6-strip vacuum plugs are used on the binding-washing vacuum manifold. The function
of the plugs is to prevent vacuum leakage during vacuum application. Those Plugs
must be placed on the left position as shown in the picture below.
4.10 Tip-reuse rack and tip disposal channel
Reusable tips for wash buffer and ethanol are
placed on the tip-reuse rack. The tip disposal
channel on the left side of the tip-reuse rack is the
channel for disposal of tips and consumables. 8
4.11 Buffer tank
Five buffer tanks are for lysis buffer, EtOH, washing
buffer, and elution buffer (CCEB). All buffer tanks
are connected to automatic reagent feeders and
therefore require no manual input of buffers. After
the extraction, the remaining buffer in the buffer tank
is automatically drained out. On the back of the
buffer tank is the place for placing the vacuum plug set.
4.12 Binding-washing vacuum manifold
Both binding and washing steps are performed here. This is
the unit for applying spin column adapters, spin columns,
and vacuum plugs. Up to forty-eight spin columns can be
placed on this unit. Connected below is the stable vacuum
system. The extra wells are for the accommodation of 7
vacuum plug sets.
4.13 Elution vacuum manifold
This unit is for 48 product elution. Eight airlocks located
on the right side of the elution block are used to control
each elution row. A plastic handrail with magnets comes
with the metal cover of the elution block for convenient
handling of the cover.
9
ACCEEORIES
5.1 Elution tube
6-strip elution tubes (2.0 ml), 1.5 ml Eppendorf
tube with caps, or 2.0 ml Eppendorf tube with
caps are placed on the Elution vacuum manifold
for elution product collection.
5.2 Sample tube
6-strip sample tubes (2.0 ml) are placed on the 48-well
Sample lysis thermoblock. The 6-strip caps can be
used for sample preservation in the 6-strip tubes.
5.3 Column set
The column set consists of spin columns and 6-strip
spin column adapters, which is placed on the
Binding-washing vacuum manifold for genomic
DNA/RNA and viral DNA/RNA extractions.
10
5.4 Plug tube combination
Five orange plug tubes are analogical to the column
set and are mounted on the Binding-washing
vacuum manifold to secure vacuum pressure during
vacuum application. They are used only for the last
row of CPU, where sample extraction takes place.
(e.g. the row of sample No.7). The machine will
setup the plug tube combination automatically
during the extraction.
5.5 PCR setup plate adaptor
For PCR setup function, put PCR tubes or plate on
the plate adaptor and apply them to the Tip rack 2
of the machine. It can accommodate 8-stripped,
12-stripped, or 96-well format tubes.
11
SOFTWARE INTERFACE AND OPERATION
Main menu
After machine startup, the computer will automatically launch the LabTurbo 48
compact system software and display the main menu page. The main menu includes
the options of all LabTurbo functions. Users can easily select the desired function to
start the operation.
Barcode: for reagent barcode tracking and documentation.
Sampling: for transferring sample from primary tubes or 2.0 ml screw tubes to
6-strip sample tubes.
Extraction: for nucleic acid extraction procedure.
PCR setup: for liquid-handling, PCR setup, or sample transferring.
Clean: for machine maintenance and UV sterilization.
Turn off: for turning off the machine.
12
6.1 Barcode
1. For reagent barcode recording, select Barcode.
2. Please scan the barcode on reagent bottle first and then scan the barcode on the
associated buffer reservoir. Once they are matched, the screen will display the
color and position to help users recognize the correct reagent reservoir. It also
records the refilling date, reagent lot number, kit lot number and extraction
kit expiration date. Repeat the steps to refill all buffers for extraction.
13
3. The reagent barcode information is automatically saved in the system. To obtain
an independent reagent barcode documentation file, please select Save to export
the data. The saved data format is txt file.
14
6.2 Sampling
1. For sampling from primary tubes or 2.0 ml screw tubes, select Sampling
2. Select “Sensor Detection” for using ultrasonic to detect the liquid level of blood
primary tubes (customization) and aspirate the sample with top-down motions.
Select “Equal Level” for using tip senor to detect the bottom of 2 ml screw tubes
and aspirate the sample from the bottom of each tube. User name or adapter name
can be keyed in by using keyboard or barcode scanning.
15
3. Put primary tube rack with sample tubes in the machine and select the input
sample number and protocol, then tap Next.
4. A Loading check window will pop up. Follow the instruction on the window to set
up the worktable. For sample barcode documentation function, tap “Barcode”.
5. Use the barcode reader to scan the barcode on each primary tube. The barcode
will be automatically entered and show on the screen. Follow the highlight in
yellow to scan the barcode on the associated primary tube. Once barcode is
entered, it will be marked in blue. If a duplicated barcode is keyed in, it will be
marked in red. To modify the barcode data, select the barcode to be modified and
key in the correct barcode.
16
6. Once all barcodes are keyed in, select save to export a txt documentation file of
the barcode, then select confirm to continue to the next step. (To redo the barcode
input step, select New to refresh the barcode input sheet and key in all barcodes
again). Check the box in front of keyboard to manually key in sample barcode.
7. Close the safety door. Press
to start the protocol.
8. When the sampling function is finished, the System Message will pop up. Open the
safety door to check if all the samples are transferred to 6-strip sample tubes and
take out the primary tube rack. Go back to the main menu to start extraction
procedure.
17
6.3 Extraction
1.
For DNA/RNA purification, select “Extraction”.
2. For extraction starting from 6-strip sample tubes, select “Extraction”.
For extraction starting from primary tubes with automatic sampling function, select
“Sampling + Extraction”.
3. Select the sample numbers and the protocol (e.g. HV-LGD3-In300-E100-V7.0E),
click “Next”. (LGD means the kit for extraction; In300 means the sample input
volume is 300 ul; E100 means the elution volume is 100 ul)
18
4. A loading check window will pop up. Follow the arrow at each step to check
correct worktable setup. For recording barcodes of sample and/or elution tubes,
please follow step 4-1 and 4-2.
4-1 For sample barcode recording, please select “barcode” before tapping the sample
tube section on the screen. The barcode input sheet will display. Follow the
highlight in yellow to scan the associated barcode on each sample tube. Once a
barcode is keyed in, it will be marked in blue. If a duplicated barcode is keyed in,
it will be marked in red. To modify the barcode data, select the barcode to be
modified and key in the correct barcode.
Once all barcodes are keyed in, select save to export a txt documentation file of the
19
barcode, then select confirm to continue to the next step. (To redo the barcode input
step, select New to refresh the barcode input sheet and key in all barcodes again).
Check the box in front of keyboard to manually key in sample barcode.
4-2 For elution tube barcode recording, please select “barcode” before tapping the
elution tube section on the screen. The barcode input sheet will display. Follow
the highlight in the yellow to scan the associated barcode on each elution tube.
Once a barcode is keyed in and matched, it will be marked in blue. To modify the
barcode, select the barcode to be modified and key in the correct barcode.
20
5. Remove all tips left from the last run. Put three new full 96-well tips (1100 µl) on
Tip rack 1, Tip rack 2, and Tip rack 3.
6. Place 6-strip 2.0 ml sample tubes on HCCEB tube rack.
7. Remove the cap of the proteinase K vial and put it in the Proteinase K rack.
8. Carefully place 6-strip 2.0 ml sample tubes (with samples) on the Sample lysis
thermoblock one by one. (For Sampling + Extraction function, please refer to
section 6.2 to put the primary tube rack into the machine and then put the same
number of empty 6-strip sample tubes to Sample lysis thermoblock.)
21
9. Place new column sets on the wells of Binding-washing vacuum manifold.
10. Insert 6-stripprd elution tubes (or 1.5 ml eppendorf / 2.0 ml eppendorf) one by one
into the rack of Elution vacuum manifold.
11. Once every worktable unit is checked and confirmed, ensure sufficient amount of
reagents in reagent reservoirs and empty the trash can, then click Next.
12. Close the safety door. Press
to start the protocol.
13. When the extraction completes, the System
22
Message will pop up. Open the safety door and take the elution tube out from the
Elution vacuum manifold.
14. During the run, users can click Pause
or open the safety door to stop
the extraction procedure temporarily. Click Continue to continue the procedure or
click Reset to terminate the procedure.
23
The following is the general control panel of LabTurbo 48 Compact program:
1. The Main Toolbar contains several shortcut buttons for convenient operation
of the machine.
2. The Protocol Window indicates the selected protocol for the procedure.
3. The Timer shows elapsed time or remaining time (count-down). It also
indicates the total and current steps of the protocol.
4. The Monitor indicates the current heater temperature and vacuum pressure of
the machine.
5. The Platform Configuration mirrors the worktable to the machine. The green
icons indicate the operating units at the current step.
24
1. Live: Click this button to initiate the camera to show the real-time view of the
worktable.
2. Pause: Click this button to pause the machine (same as opening the safety door).
3. Start: Click this button to start the procedure.
4. Reset: Click this button to reset the machine and move the robotic arm to original
position.
5. Menu: Click this button to go back to the main menu.
25
6.4 PCR Setup
1. For PCR preparation, select PCR Setup.
2. Select the type of PCR strip tube.
Note:The PCR setup operations are different for 8 and 12-strip tubes.
3. For adding master mix + elution (template) to PCR tubes, select “Master
Mix+Elution”.
26
4. Add the PCR barcode by the import function, barcode scanner, or keyboard. If
the barcodes are entered during Extraction (see section 4.1/4.2), it will
automatically display on the sheet. Select Renew to clean up the existing
barcode. Select Add New for adding new barcode or select Import for adding
barcode defined in a txt file. Choose Next to proceed.
5. Specify the sample number and select the PCR tube position (A1, B1, C1, D1,
E1, F1, G1, and H1) to define the starting position on the 96-well PCR
tube/plate adapter to dispense the template and the master mix. M1 stands for
the first master mix and M2 means the second master mix.
6. Define the master mix and elution volume for PCR preparation. Then choose
Next to proceed.
27
7. PCR setup loading check page will pop up. Follow the instructions to fill up Tip
rack 1 with 300 µl tips, place PCR tubes (plate or strip) on the 96-well PCR
tube/plate adapter, then mount the assembly on Tip rack 2.
Note:The PCR setup operations are different for 8-strip tube and 12-strip
tube. For 8-strip tube format, refer to the upper label for the tube
positioning. For 12-strip tube format, refer to the lower label for the tube
positioning.
8. The required volumes of master mix and template are indicated on the loading
check page. Apply sufficient amount of master mix on 2.0 ml screw tube and put
28
it on the master mix rack. Ensure that the elution tubes are placed on the
associated positions on the elution rack.
9. Close the safety door and press Start.
10. When the operation completes, the System Message will pop up.
29
11. For adding only Template to PCR tubes, select Elution Only.
12. Define the sample number and choose the PCR tube position (A1, B1, C1, D1,
E1, F1, G1, and H1). Define the elution volume and click Next.
13. Follow the PCR setup loading check.
30
14. Follow the instructions and fill up Tip rack 1 with 300 µl tips, place PCR tubes
(plate or strip) on the 96-well PCR tube/plate adapter, then mount the
assembly on Tip rack 2.
15. Close the safety door and press Start.
16. When the operation completes, the System Message will pop up.
31
6.5 Clean
Select “Clean” to enter clean and maintenance page.
Reservoir Clean
1. Check the waste level in the Waste Bottle and drain out all the waste.
2. Select Reservoir
32
3. Check the Reservoirs intended to be cleaned.
4. Close the door and press Start. The machine will automatically drain out the
remaining buffer to Waste Bottle.
5. After finishing the procedure, please drain out all the waste in Waste Bottle again.
6. Select Reservoir again at the clean page and check the same reservoirs on step 3,
add ddH2O to Reservoirs for cleaning.
7. Close the door and press Start. The machine will automatically drain out the
ddH2O to Waste Bottle.
8. After finishing the procedure, please drain out all the waste in Waste Bottle.
33
Tank Clean
1. Check the waste level in the Waste Bottle and drain out all the waste.
2. Add ddH2O to tanks intended to be cleaned.
3. Select “Tank”
4. Check the tanks intended to be cleaned.
34
5. Close the door and press “start”. The machine will automatically drain out the
ddH2O to Waste Bottle.
6. After finishing the procedure, please drain out all the waste in Waste Bottle.
Vacuum and thermoblock clean
1. Select “Vacuum/Thermoblock”
2. Place one 1100ul 96-well tips on Tip rack 1 and add 180 ml ddH2O on Tank 5.
3. Empty the Thermoblock and Binding-washing vacuum manifold.
35
4. Follow and check the instructions on the screen and click Start.
UV light clean
1. Select “UV light”.
2. Choose the UV light duration and click Start.
36
MAINTENANCE
7.1 Daily clean and maintenance
1. Collect all the tips left on the Tip racks for the next run.
2. Take out the Proteinase K vial and tighten the cap.
3. Wash the Elution Cover with tap water and air dry or wipe and dry with tissue
paper.
(Do not put in “Oven” or “autoclave” to dry)
4. Check the level of the trash can.
37
5. Check the waste level in the Waste Bottle and drain out the waste.
7.2 Weekly clean and maintenance
1. Add distilled water to each trough of Reagent tank.
2. Select clean tank function and choose the tank for cleaning.
3. Replace 6-strip tubes in HCCEB rack with a new one.
38
4. Check the level of waste bottle and trash can.
7.3 Monthly clean and maintenance
1. Clean each side of machine by using hand towel.
2. Check the level of waste bottle and trash can.
3. Choose “clean” and select “Vacuum+thermoblock”. Add 180 ml distill water into
Tank 5. Place one 96-well tip on Tip 1 rack.
39
4. (Optional) Wash Vacuum plug sets with tap water and air dry or wipe and dry with
tissue paper. Make sure to put seven Vacuum plug set back to the original
positions.
Six Vacuum plug sets should be placed on the left side of the Binding-washing
vacuum manifold.
One Vacuum plug set should be placed on the rear side of machine (behind
reagent tank).
40
TROUBLE SHOOTING
“DAQ connection error, software run the Demo Version”
This message indicates that the controller fails to connect to computer. Please turn off
the LabTurbo 48 Compact software and the machine. After all are turned off, switch
the main power off and on once, and then turn on the machine. If this message
remains, please contact our customer service.
“XY/ZW/T/Heater1/Heater2 connect error, checking the RS232USB connection”
This message indicates that the controller does not connect to computer. Please turn
off the LabTurbo 48 Compact software and the machine. After all are turned off,
switch the main power off and on once, and then turn on the machine again. If this
message remains, please contact our customer service.
“Kit has been stored over one year”
This message could show up during the startup of the LabTurbo program if the
current extraction kit is expired. The extraction kit can be stored for one year and
expiration date is shown on the top of extraction kit. Please replace the kit with a new
one, and scan the barcode on the new extraction kit under the “Barcode” page.
41
“XXX buffer has been stored over three months”
This message could show up during the startup of the LabTurbo program if one or
more buffer in the Reservoirs is stored over three months. Select OK to continue.
Please refer to section 6.1 to replace the expired buffer with a new one. XXX
represents LW1, CCEB, DLL, Proteinase K, etc.
“Close the door”
This message indicates that the door is opened. Check the sensor on the right side of
the door and make sure the door is closed. Please close the door and start the
procedure again. If this message remains, turn off the computer, switch the main
power off and on, and then restart the computer.
42
“Windows error (CCD connection failed), turn off the main power and restart
the system”
This system message indicates that the CCD camera is not successfully recognized by
the system computer through the USB interface. Please turn off the software and
restart the computer to let the computer recognize the CCD camera.
“Wrong plug tube setup”
This message may show at the beginning of the extraction. Check if the five plug tube
combinations are at the original positions. If the plug tube combinations are set up
correctly, click Cancel and the machine will continue the extraction procedure.
“Please fill Tip 1/2/3 Rack and install it correctly”
This message indicates that there are missing tips in one or more tip racks. Please
open the door and fill up the tip racks. After refill, close the door and select “OK”.
Remember to install all three tip racks for each run of extraction.
“Please add XXX buffer XXml into the buffer tank X”
This message indicates that the amount of a buffer is not enough in its Reservoir.
Please open the door to refill the buffer over the refill line. After refill, close the door
and select OK. XXX represents LW1/CCEB/DLL/Proteinase K, etc.
43
“Open the cap of proteinase K”
This message indicates that the cap of proteinase K vial is not opened. Please remove
the cap of proteinase K vial, put it back onto the rack, and then close the door to start
the procedure.
“Please add PK XXX ul into the enzyme bottle”
This message indicates the amount of Proteinase K is not enough. Take out the
Proteinase K vial and replenish it. Put the vial back and close the door, then select OK
to resume the procedure.
“Please add LW1 XXml into the buffer tank”
This message indicates that the amount of buffer is not enough in the reservoir.
Please open the door to refill reagent over the refill line. After refilling, close the door
and select “OK”.
“Missing elution cover, put it on elution manifold correctly”
This message indicates that the elution cover is missing. Put the elution cover back
correctly then click “OK” to resume the procedure.
44
“Take off carrier of Elution cover”
This message indicates that the handrail for elution cover was not removed. Remove
the carrier from elution cover then click “OK” to resume the procedure.
“Elution cover on wrong direction, put it on elution manifold correctly ”
This message indicates that the Elution cover is placed in the opposite direction. The
“Front” label should be placed toward the user.
“Remove the excessive column/SC-adaptor or Plugset at sample#”
This message indicates that the worktable setup at Vacuum manifold is incorrect.
Take the worktable setup of 6 samples as an example:an additional column set is
misplaced at position 7(left picture). Only 6 column sets should be placed at Vacuum
manifold (right picture). “#” represents the sample position at Vacuum manifold, or
7 in the aforementioned example.
45
This message also indicates the Plugset is at the incorrect position. For example, six
plugsets are set at the incorrect positions on the left picture. Please refer to the
Monthly clean and maintenance section (section 7.3) for the plugset setup
instruction.
“Removing the excessive SC-adaptor on the vacuum manifold”
This message indicates that worktable setup at Vacuum manifold is incorrect. Take
the worktable setup of 6 samples as an example:an additional SC-adaptor is
misplaced at position 7 (left picture). Only 6 column sets should be placed on
Vacuum manifold (right picture). “#” represents the sample position at Vacuum
manifold, or 7 in the aforementioned example.
“Add absent Column on the vacuum manifold”
This message indicates that worktable setup at Vacuum manifold is incorrect. Take
the worktable setup for 6 samples as an example:a column is missing at position 6
46
(left picture). 6 column sets should be placed on Vacuum manifold (right picture).
“#” represents the sample position at Vacuum manifold, or 6 in the aforementioned
example.
“Add absent Column/SC-adaptor on the vacuum manifold”
This message indicates that worktable setup at Vacuum manifold is incorrect. Take
the worktable setup of 6 samples as an example:a column set is missing at position 6
(left picture). 6 column sets should be placed on Vacuum manifold (right picture).
“#” represents the sample position at Vacuum manifold, or 6 in the aforementioned
example.
“Plug set miss, install plug set at wash-vacuum block correctly”
This message indicates that the Plugset is not at correct position (left picture). Put the
plug set at correct position on vacuum manifold. Please refer to the Monthly clean
and maintenance section (section 7.3) for the plugset setup instruction.
47
“Check the Target Bottom”
This message indicates that the columns, sample tubes, or elution cover are not set
properly. Please open the door and press the column sets or the sample tubes all the
way to the bottom to set them in right positions.
“Low vacuum pressure, switch off the waste bottle and try again”
Open the door of waste system and switch off the waste bottle.
“Remove the dropping Column Adaptor and then click Continue”
This message indicates that SC-adaptors fall on the worktable.
1. If the worktable is shown as the picture below (the robotic arm still holds the
column), please remove the SC-adaptor from worktable and put the columns into
the dry spots manually. Close the door and click continue.
48
2. If the worktable is shown as the picture below (the robotic arm has already
transferred the columns to the dry spots). Please remove the SC-adaptor from
worktable and click continue.
“Clean the waste bin”
Check and clean the Tip disposal vent at worktable and the Trash can.
“Low elu-vacuum, check all air plug in correct position”
1. Check the air plugs of the elution manifold. Press down the air plugs to the correct
position.
2. Close the door and click Yes.
3. If this message remains, please click No.
49
4. Another message will show up:“Spin down all column instead of vacuum”.
Open the door, take out all the columns, and use a centrifuge for elution.
5. Close the door and click OK to finish the extraction procedure.
“Low elu-vacuum, try again”
1. Open the door and make sure there are no missing columns on the Elution cover.
2. Close the door and click Yes to continue.
3. If this message remains, please click No.
4. Another message will show up:“Take row No:X columns out and used spin
down to elution”. “X” represents the row numbers of elution cover. The row
number could be No:1~8. Open the door, take out the columns, and use a
centrifuge for elution.
5. Close the door and click OK to continue.
“Run Time error”
This message indicates that the system is overloaded and the program will terminate
to prevent machine from doing anything wrong.
Once this message pops up, please record the current step first. This is very important
because once “ok” is clicked, the program will terminate automatically. To finish the
whole procedure, users can manually recover the worktable, restart the program, and
then continue from the terminated step to complete the extraction.
The worktable should be recovered manually to the original status as the following
steps:
1. Clean all remaining 6-strip sample tube, column set, and elution tube on the
worktable.
50
2. Replace a new 6-strip tube on HCCEB rack.
3. Restore all the Plug sets and put them back to the original positions.
4. Put Plug tubes back to the Plug tube rack.
5. Recover the worktable as shown in the picture below.
“Vending plug aging, replace a new vending plug at EtOH/LW1 position”
This message will pop up after the extraction is completed. User could not perform
51
the next run of extraction or sampling function until a new vending plug is replaced.
1. Check the number on the top of vending plug. Prepare a new vending plug.
2. Pull out the old vending plug and replace another new vending plug immediately.
Caution:Reagent will flow into the reagent tank when the vending plug is pulled.
3. Push the new vending plug to the bottom. Turn off LabTurbo software and turn on
again for the next run of extraction.
“X or Z or Y-Axis position error”
Please contact our customer service for more information and support.
52
Taigen Bioscience Corporation
3F, No. 150, Sec. 4th, Cheng-De Road. Shi-Lin District 111, Taipei
City, Taiwan
Phone: 886-2-28891136
Fax: 886-2-28836458
Website:www.labturbo.com
Email:[email protected]
53