1
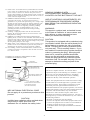
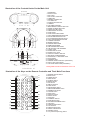
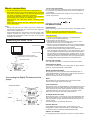
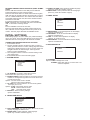
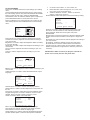
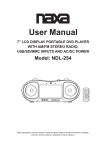
User Manual 7" LCD DISPLAY PORTABLE DVD PLAYER WITH AM/FM STEREO RADIO, USB/SD/MMC INPUTS AND AC/DC POWER Model: NDL-254 Before attempting to connect, operate or adjust this player, please read these instructions completely. Keep this manual in a safe place for future reference. 1 CAUTION SAFETY INSTRUCTIONS RISK OF ELECTRIC SHOCK DO NOT OPEN CAUTION: TO REDUCE THE RISK OF ELECTRIC SHOCK, DO NOT REMOVE THE COVER (OR BACK). NO USER-SERVICEABLE PARTS ARE INSIDE. REFER SERVICING TO QUALIFIED SERVICE PERSONNEL. This symbol is intended to alert the user to the presence of uninsulated “dangerous voltage” within the product’s enclosure that may be of sufficient magnitude to constitute a risk of electric shock to persons. 1. Read instructions – All the safety and operating instructions should be read before the appliance is operated. 2. Retain instructions - The safety and operating instructions should be retained for future reference. 3. Heed Warnings - All warnings and cautions on the appliance and in the operating instructions should be adhered to. 4. Follow instructions - All operating and use instructions should be followed. 5. Water and Moisture - The appliance should not be used near water, e.g. near a bathtub, washbowl, kitchen sink, laundry tub, in a wet basement, or near a swimming pool or the like. 6. Wall or Ceiling Mounting - The appliance should not be mounted to a wall or ceiling. This symbol is intended to alert the user to the presence of important operating and maintenance (servicing) instructions in the literature accompanying the appliance. 7. Ventilation - The appliance should be situated so that its location or position does not interfere with its proper ventilation. For example, the appliance should not be situated on a bed, sofa, rug or similar surface that may block the ventilation openings, or placed in a built-in installation, such as a bookcase or cabinet, that may impede the flow of air through the ventilation openings. 8. Heat - The appliance should be situated away from neat sources such as radiators, heat registers, stoves, or other appliances (including amplifiers) that produce heat. 9. Power Sources - The product should be operated only with the type of power supply indicated on the marking label. If you are not sure of the type of power supply to your home, consult your product dealer or local power company. For products intended to operate from battery power, or other sources, refer to the operation instructions. 10. Grounding Polarization - This product may be equipped with a polarized alternating current line plug (a plug having one blade wider than the other). This plug will fit into the power outlet only one way this is a safety feature. If you are unable to insert the plug fully into the outlet, try reversing the plug. If the plug should still fail to fit, contact your electrician to replace your obsolete outlet. Do not defeat the safety purpose of the polarized plug. 11. Power-Cord Protection - Power supply cords should be routed so that they are not likely to be walked on or pinched by items placed upon or against them, paying particular attention to cords at plugs, convenience receptacles, and the point where they exit from the appliance. 12. Cleaning - Unplug this product from the wall outlet before cleaning. Do not use liquid cleaners or aerosol cleaners. Use a damp cloth for cleaning. 13. Nonuse periods - The power cord of the appliance should be unplugged from the outlet when left when left unused for a long period of time. 14. Object and Liquid Entry - Care should be taken so that _objects do not fall and liquids are not spilled into the product case through product openings. 15. Damage Requiring Service - Unplug this product from the wall outlet and take it to qualified service personnel under the following conditions. a) When the power-supply cord or plug is damaged. b) If liquid has been spilled into, or objects have fallen into the product. c) If the product has been exposed to rain or water. d) If the product does not operate when used according to the operating instructions, adjust only those controls that are covered by the operating instructions. Improper adjustment of other controls may interfere with the product's normal operation. e) If the product has been dropped or damaged in any way. f) When the product exhibits a distinct change in performance this indicates a need for service. 16. Servicing - The user should not attempt to service the product beyond that described in the operating instruction. All servicing should be referred to qualified service personnel. WARNING: TO AVOID THE RISK OF ELECTRICAL SHOCK, ALWAYS MAKE SURE THE PRODUCT IS UNPLUGGED FROM THE ELECTRICAL OUTLET BEFORE RELOCATING, SERVICING, OR CLEANING IT. • Read and follow all instructions. Keep these instructions for future reference. Heed all warnings. • Do not use this product near water. • Do not ceiling- or wall-mount the product. • Do not block any ventilation openings. Install the product in accordance with the operating instructions. • Do not install the product near heat sources, such as radiators or other apparatus (including amplifiers) that produce heat. • Protect the power cord from being walked on or pinched, particularly at plugs, convenience receptacles, and the point where they exit the product. • Do not use attachments not recommended or sold by the product manufacturer, as a risk of fire, electrical shock, or serious personal injury may result. • Unplug the product during lightning storms or when unused for long periods of time. • Do not expose the product to dripping or splashing water. • Do not place objects filled with liquid (i.e., vases) on the product. • Do not place in or expose the product to direct sunlight, extreme heat, humid or dusty locations. • Never operate this product if it has a damaged Power Cord or plug, is not working properly, has been dropped, damaged, or exposed to moisture, water or other liquids. • Do not attempt to examine or repair this product yourself. Return the product to a service center for examination and repair. THESE IMPORTANT SAFETY INSTRUCTIONS ARE INCLUDED, AS APPLICABLE TO THE APPLIANCE, CONVEYING TO THE USER THE INFORMATION ITEMIZED BELOW 2 17. Power Lines - An outside antenna system should not be located 18. 19. 20. 21. 22. in the vicinity of overhead power lines, or other electric light or power circuits, or where it can fall into such power lines or circuits. When installing an outside antenna system, extreme care should be taken to keep from touching power lines or circuits as contact with them might be fatal. Outdoor Antenna Grounding – If an outside antenna is connected to the receiver, be sure the antenna system is grounded so as to provide some protection a g a i n s t voltage surges and built up static. Section 810 of the National Electrical Code ANSI/NEFA 70 provides 11forma.tion wJ.th respect to proper grounding of the mast and supporting structure, grounding conductress, location of antenna-discharge unit, size of grounding electrodes, and requirements for the grounding electrode (see figure). Cleaning – Unplug this product from the wall outlet before cleaning. Do not use liquid cleaners or aerosol cleaners. Use a damp cloth for cleaning. Lightning - For added protection for this product during a lightning storm, or when it is left unattended and unused for long periods of time, unplug it from the wall outlet and disconnect the antenna or cable system. This will prevent damage to the product due to lightning and power-line surges. Safety ·check - Upon completion of any service or repairs to tl1is product, ask the service technician to perform safety checks to determine that the product is in proper operation condition. Over-loading - Do not overload wall outlets, extension cords, or integral convenience receptacles as this can result in a risk of fir or electric shock. EXAMPLE OF ANTENNA GROUNDING AS PER NATIONAL ELECTRICAL CODE ANTENNA LEAD IN WIRE GRAPHIC SYMBOLS WITH SUPPLEMENTARY MARKINGS ARE LOCATED ON THE BOTTOM OF THE UNIT. USE OF CONTROLS, ADJUSTMENTS, OR PERFORMANCE PROCEDURE HEREIN MAY RESULT IN HAZARDOUS RADIATION EXPOSURE. WARNING: This product contains lead, a chemical known to the State of California to cause cancer and birth defects or other reproductive harm. Wash your hands after handling. CAUTION: This product is equipped with a polarized plug (one blade is wider than the other blade) as a safety feature to reduce the risk of electrical shock. This plug will fit into a polarized outlet only one way. This is a safety feature. If you are unable to insert the plug into the electrical outlet, try reversing the plug. If the plug still does not fit, contact a qualified electrician. Never use the plug with an extension cord unless the plug can be fully inserted into the extension cord. Do not alter the plug. Do not attempt to defeat the safety purpose of the polarized plug. IMPORTANT INFORMATION REQUIRED BY THE FCC GROUND CLAMP This device complies with Part 15 of the FCC Rules. Operation is subject to the following two conditions: (1) this device may not cause harmful interference; and (2) this device must accept any interference received, including interference that may cause undesirable operation. GROUNDING CONDUCTOR (NEC SECTION B10-21) GROUND CLAMPS POWER SERVICE GROUNDING ELECTRODE SYSTEM (NEC ART 250 PARTH) NEC NATIONAL ELECTRICAL CODE Do not apply oil or petroleum products to this product. CAUTION Invisible laser radiation will be emitted when the product is open and locks are defeated. Do not defeat the safety locks. 3 NOTE: This equipment has been tested ai1d found to comply with the limits for a Class B digital device, pursuant to Part 15 of the FCC Rules. These limits are designed to provide reasonable protection against harmful interference in a residential installation. This equipment generates, uses and can radiate radio frequency energy and, if not installed and used in accordance with the instructions, may cause harmful interference to radio elevation reception, which can be determined by turning the equipment off and on. The user is encouraged to try to correct the interference by one or more of the following measures: • Reorient or relocate the receiving antenna. • Increase the separation between the equipment and receiver. • Connect the equipment into an outlet on a circuit different from that to which the receiver is connected. • Consult the dealer or an experienced radio/TV technician for help. Illustration of the Controls/Jacks On the Main Unit 23 24 25 1 23 4 9 11 13 8 10 12 14 5 16 15 28 26 27 29 6 7 17 1. SPEAKERS 2. AUX-IN JACK 3. MIC JACK 4. MIC LEVEL CONTROL 5. USB PORT 6. SD/MMC CARD SLOT 7. TFT DISPLAY 8. FUNCTION CONTROL 9. HANDLE 10. VOLUME CONTROL 11. BASS BOOST ON/OFF BUTTON 12. MODE/TV MENU BUTTON 13. PREV/LEFT BUTTON 14. NEXT/RIGHT BUTTON 15. DVD DOOR 16. DVD DOOR OPEN AREA 17. FAST REWIND/DOWN BUTTON 18. STOP/USB/CARD BUTTON 19. PLAY/PAUSE/ENTER BUTTON 20. FAST FORWARD/UP BUTTON 21. TUNING CONTROL 22. BAND CONTROL 23. POWER INDICATOR 24. REMOTE SENSOR 25. FM STEREO INDICATOR 26. TELESCOPIC FM ANTENNA 27. VIDEO JACK 28. AUDIO RIGHT JACK 29. AUDIO LEFT JACK 30. DISPLAY ON/OFF SWITCH 31. BATTERY COMPARTMENT 32. EXTERNAL TV ANTENNA JACK 33. AC SOCKET 34. PHONES JACK 35. POWER ON/OFF SWITCH (OPTIONAL) 36. DC IN JACK (OPTIONAL) 37. VOLTAGE SELECTOR (OPTIONAL) 1 19 18 21 20 22 30 36 * Rating label is located at the bottom of the unit. 31 32 35 37 33 34 Illustration of the Keys on the Remote Controller and Their Main Functions 1. SCREEN OFF/ON button 2. MUTE button 3. P MODE button 4. GUIDE button 5. TV MENU button 6. REPEAT button 7. PLAY button 8. SUBTITLE button 9. AUDIO button 10. PAUSE/STEP button 11. ANGLE/PROGRAM button 12. ZOOM/SLOW button 13. TV/DVD button 14. MTS button 15. DISPLAY button 16. SETUP button 17. P/N button 18. NUMERIC buttons 19. DVD MENU button 20. STOP&DVD/USB/SD button 21. OK button 22. NAVIGATION buttons 23. TITLE button 24. NEXT/F.FWD button 25. PREV/ F.BWD button 26. SEARCH button 27. CC (Closed Captioning) button 15 16 1 17 2 3 18 4 5 19 6 7 8 20 21 22 9 23 10 11 12 13 14 24 25 26 27 4 RADIO OPERATION TV OPERATIONS TO PLAY THE RADIO GET STARTED 1. Rotate the FUNCTION CONTROL to the RADIO position, the POWER Indicator will light up. 2. Select the desired band with the BAND switch. 3. Tune to the desired station by rotating the TUNING control (Move the control back and forth until you get the strongest clearest sound). 4. The built-in AM antenna and external FM TELESCOPIC ANTENNA are directional. When receiving an FM broadcast, fully extend the TELESCOPIC ANTENNA and position for the best reception. For AM broadcasts, rotate the whole set until the best reception is heard. 5. Adjust the volume level to a comfortable listening level. 6. To turn off the radio, rotate the FUNCTION CONTROL to OFF position. NOTES: If a particular FM (STEREO) station is weak, or you hear too much background noise, try moving the position of the band selector switch to the FM (MONO) position. This can often result in a much clearer reception. When the band selector switch is set to FM STEREO and a stereo broadcast is being received, the FM STEREO indicator the unit will be light. Be sure the included TV antenna is connected to the set properly. Power on the unit. Rotate FUNCTION CONTROL to TV/DVD position, and press TV/DVD button on the remote or press and hold the MODE/TVMENU button on the unit to switch to TV mode. 1. Press TV MENU to enter the TV setup menu. Then scroll right to the Satellite Dish icon. Press OK on the remote control. 2. Then you will see ANTENNA. Be sure to choose AIR. Then scroll down to AUTO SCAN and press OK on the remote control • To view off air Free Digital TV channels: Change ANTENNA to read CATV, then follow the above. • To view CABLE TV channels, Choose CATV option. Select the proper Cable system and enter the Start to Scan option to begin auto scan for scanning channels. (Frequency range: 57 - 855 MHz) BASIC OPERATIONS SEARCH A PROGRAM Press FAST REWIND button or FAST FORWARD button on the unit or navigation up/down button on the remote once, the channel number changes. A desired channel can be reached using these two keys. NUMERIC button on the remote ca n facilitate you to select a specific channel. If the channel number exceeds 10, input first digital unit, then another digital unit; Note: this receiver can store the channels from 2~69, and the maximum of each channel has 8 programs. To select the desired programs by using - button and numeric buttons. Do as follows: To select CH 13 NO. 2 Press 1 and 3, then press +10 and input 2. Once the input is done, it will start broadcasting the selected channel immediately. STEREO HEADPHONE JACK A stereo headphone jack has been provided on the top of the unit so that you can listen to the unit without disturbing others. To use this jack, plug in the headphones/earphones (not included) and adjust the VOLUME control to a comfortable listening level. NOTE: When external headphones/earphones are connected, the sound to the unit's main speakers will be muted. AUXILIARY IN Your player can be used as a power amplifier to playback the programs from portable radio, TV set or Mp3 player or whatever provide this appliance is so designed that audio signal may be produced through a LINE-OUT jack or the like. Observe the following steps to connect the player to another appliance: 1. Power the player on using the supplied AC Power Cord. 2. Rotate the FUNCTION CONTROL to AUX-IN position. 3. Connect the appliance into the player's AUX-IN jack with supplied LINE-OUT cable of the appliance. 4. Power on the appliance and begin play. At this time you will be able to hear the sound produced from the programs the connected appliance is broadcasting. ADJUST AUDIO OUTPUT LANGUAGE During TV playback, press MTS button to adjust the audio output language. DISPLAY PROGRAM INFORMATION Press DISPLAY button to display current program information including current channel mode, resolution, current calendar and time, soundtrack mode. SET CLOSED CAPTION The CC button is used to set the closed caption mode. Press CC button repeatedly to set the CC mode (Off/On/CC on mute). MIC The MIC jack works in disc, USB and card mode. If you want to use the microphone for singing or speaking, please connect it to MIC jack. MUTE In TV mode, press MUTE button to shut off the audio output, press it again resume normal play. SOUND MODE During TV broadcasting, press AUDIO button repeatedly to switch sound mode among personal, standard, movie and music. PICTURE MODE In TV play mode, press P MODE button on the remote several times to select your desired picture mode (Personal, Standard, Dynamic, Soft) ELECTRONIC PROGRAM GUIDE Use GUIDE button to check information of the program guide for the past and future. The Information in the EPG depends on your signal provider. 5 12V DC JACK (OPTIONAL) DC 12V JACK (Center is positive) in 2mm (inner diameter) type for connection to an external power source of an AC adaptor or a car adaptor. Please make sure that the DC voltage is 12V and with correct polarity as per below. Basic connection It is recommended to be connected to a multi-system TV. Ensure that this player and other equipment to be connected to the unit are in the standby or off mode and disconnect the AC power cords before commencing connection. Do not block ventilation holes of any piece of the equipment and arrange them so that air can circulate freely. Read through the instructions before connecting other equipment. Ensure that you observe the color coding when connecting audio, video cables. Center pin is positive OPERATIONS Note: During DVD play, the TV volume may be at a lower level than during TV broadcasts, etc. If this is the case, adjust the volume to the desired level. If the DVD/CD player is connected to the TV through a video cassette recorder, the picture may not be played back normally with some DVDs. If this is the case, do not connect the player via the VCR. PREPARATION Before powering on the TV, be sure to set the rear display switch to on. Power on the TV set and select video input mode. Power on the audio system which is connected to the player. TO PLAY A DVD 1. Rotate the FUNCTION CONTROL to TV/DVD position. 2. Lift CD cover to open the disc tray. 3. Place a disc onto the disc tray. 4. Close the disc tray and press the Play button ( No. 7 on the Remote Control or No. 9 on the Main Unit.) 5. When a menu screen appears on the TV, move the navigation buttons or press the numeric buttons to select a preferred track number, then press OK button to start playback. 6. Turn the function switch to OFF position to turn off the unit. Note: Sometimes it is necessary to use TV/DVD button on the remote or MODE/TV MENU on the unit to switch to DVD mode. The procedures as following: Press TV/DVD button on the remote or press and hold MODE/TV MENU button on the unit until a prompt shows on the screen, then use navigation button to highlight DVD and press OK Button to enter DVD mode. Connecting to a stereo TV set To power outlet AC power cord RL To video input connector (yellow) To audio input connectors (red, white) Video/audio cable ADJUST THE VOLUME Turn VOLUME CONTROL to increase or reduce the volume. SKIP AHEAD OR BACK Press NEXT or PREV button once during play to skip a chapter (DVD) or a track (CD) ahead or backwards. RAPID ADVANCE/REVERSE During playback, press and hold FAST FORWARD button or FAST REWIND button several times to scan the disc forward or backward at X2, X4, X8, X20 normal speed. Press PLAY button to resume normal play. Connecting the Digital TV Antenna to the player MUTE During playback, press MUTE button to shut off the audio output, press it again resume normal play. STOP PLAYBACK Press STOP button during playback to stop playback; the player activates its resume function when STOP is pressed in STOP mode; press PLAY button again, playback resumes at the point it stopped previously; open the disc tray or press the STOP button one more time to clear the resume function. ANTENNA INPUT SLOW-MOTION PLAY (DVD) Press SLOW button on the remote control during playback, the disc will be played at 1/ 2 normal speed at first, each time this button is pressed, the play speed becomes slower (down to 1/7 normal speed.) Press PLAY button, normal play will resume. CABLE Optional REPEAT BUTTON Press REPEAT button during play, it will repeat play one chapter/title or repeat all (for DVD disc), or repeat play a track or all tracks (CD), or repeat the specified points (A-B). SWITCH TV SYSTEM During playback, press P/N button to switch TV system directly. 6 CHANGING SUBTITLE LANGUAGE (DVD ONLY) Press SUBTITLE button during playback, the subtitle language shown on the screen will change as a response to each press; When the desired language appears, release the button to view the subtitle in that language. Note: this function only works on the DVDs recorded with multilanguage subtitles. PAUSE/STEP PLAY Press PAUSE/STEP button during playback to pause. during pause mode, each time the PAUSE/STEP button is pressed, the player will only play one frame; to resume normal play, press PLAY button. DISPLAY ON/OFF During playback, press SCREEN ON/OFF button on the remote or slide DISPLAY ON/OFF switch on the unit to turn on/off the display. RETURN TO MAIN MENU AND PLAY THE TITLE (DVD) During playback, press DVD MENU button to return to main menu. Press TITLE button to play the title. BASS BOOST During playback, press BASS BOOST button on the unit to enable or disable the bass effect. MP3/MPEG 4 PLAYBACK 1. Load the MP3/MPEG 4 disc onto the disc tray and the TV screen will show all its folders after a few seconds. 2. Select the folder you want by the navigation buttons and then ENTER button to confirm. 3. The files in this folder are displayed and select your favorable song via navigation buttons and press ENTER button to start playback. 4. Press NEXT and PREV button to select track directly. 5. Press REPEAT button change play mode. SEARCH FOR PREFERRED SCENE 1. Press SEARCH button during play and highlight the item to be played (Title, Chapter, or Chapter time) by navigation buttons 2. Input the desired number or time via the numeric buttons. 3. Press OK button to confirm and the playback from the located scene starts. 4. To exit search menu, press SEARCH button directly. KODAK PICTURE CD / JPEG CD PLAYBACK Slide show of Kodak Picture CD after being loaded begins automatically; Folders of JPEG picture CD after being loaded are displayed on the TV screen; use the navigation buttons to select the desired folder and then press ENTER button to confirm. The files in this folder are displayed and you can select your favorable pictures using the up/down navigation buttons and press ENTER button to start playback. Preview of the picture will be displayed while you scroll across the filenames. PROGRAM PLAY (UP TO 16 MEMORIES) 1. Press PROGRAM during playback to display the program menu. 2. Select location(s) to be memorized via navigation buttons and then enter desired Titles/Chapters numbers via numeric buttons. Note: Inputting leading zero is not necessary. Some figure inputs may be useless, because it's greater figure than total title/chapter /track number on the disc. Example: Track 3, press "3" Track 12, press "+10" and then "2" Track 21, press "+10" twice and then "1" 3. To start programmed playback, select PLAY on the menu; pressing PROGRAM button again to exit programming. 4. To clear all items, select the <CLEAR> on the menu, and then press ENTER button on remote control. 5. You could cancel program mode by clearing all the items in the program menu. KODAK PICTURE CD / JPEG CD OPERATIONS 1. PLAY MODES Press REPEAT button during play to change the play modes. During playback, press STOP to enter preview mode. 2. SKIP TO NEXT/PREVIOUS PICTURE Press NEXT button to skip to the next picture or PREV button to the previous picture. ZOOM PLAY Press ZOOM button continuously to zoom in the picture by 2, 3, and 4 times, zoom out by 1/2, 1/3, 1/4 normal size. Press this key once more when the picture is at 1/4 size to return to the normal size display. Scroll to view the enlarged picture using Navigation buttons. 3. PICTURE ROTATIONS Press RIGHT and LEFT navigation buttons to rotate the picture Clockwise and anti-clockwise respectively. 4. PICTURE FLIP AND TURN Press UP navigation button to flip the picture up or down. Press DOWN navigation button to turn the picture left or right. ON SCREEN DISPLAY INFORMATION When the player is in operation, press DISPLAY button continuously on the remote control, the screen will display parts of information (current disc type, title number, chapter number, playtime, audio language, audio type, subtitle language and multi angle, etc) in a sequence. 5. PICTURE ZOOM IN/OUT Press ZOOM button continuously, the picture zooms in by 2, 3, 4 times or zooms out by 1/2, 1/3, 1/4 the original size. Press this button once more when the picture getting 1/4 size to return to the normal play. If the picture is enlarged, you may use the navigation buttons to view blocked parts of the picture. CHANGING AUDIO SOUNDTRACK LANGUAGE (DVD DISC) It is possible to change the audio soundtrack language to a different language from the one selected at the initial settings (This operation works only with discs on which multiple audio soundtrack languages are recorded). Press AUDIO button during DVD disc play, the sound track language changes with the current sound track number shown on the TV screen. NOTE: When no soundtrack languages are recorded, pressing this button will not work. 6. SLIDE SHOW TRANSITION MODES During slide show playback, press the PROGRAM button cyclically to switch the play mode. MULTI-ANGLE VIEWING (DVD ONLY) Press and hold ANGLE button during playback to cycle the angle available on the disc. Note: only the DVDs shot with multi-angle scenes have this function. 7 2.3 SUBTITLE LANG- Select preferred subtitle language. (DVD only, need disc software support) 2.4 MENU LANG - Select preferred disc menu language. (DVD only, need disc software support) EXTERNAL MEMORY MEDIA OPERATION (USB & SD/MMC CARD) Insert a USB data traveler into the USB port and slide the FUNCTION SWITCH to the TV/DVD position; Press and hold STOP button to select USB mode among disc, USB and card via navigation buttons and press OK to confirm. An icon of READ USB shows in the LCD and after the USB is successfully detected and read, the screen will show folders and tracks on the USB. It will begin playback from track Number 1 automatically. NOTE: The player can successfully play the music files with USB 1.0 and USB 2.0 storage device. OR Insert an SD/MMC card into the card slot; Press and hold STOP button to select CARD mode among disc, USB and card via navigation buttons and press OK To confirm. Then the player will enter into SD/MMC mode. 3. VIDEO SETUP VIDEO SETUP BRIGHTNESS CONTRAST HUE SATURATION EXIT SETUP 3.1 BRIGHTNESS - to set the brightness for the display. Options: 0/2/4/6/8/10/12 3.2 CONTRAST - to set the contrast effect for display. Options: 0/2/4/6/8/10/12 3.3 HUE - to set the color impression for display. Options: -6/-4/-2/0/+2/+4/+6 3.4 SATURATION - to set the saturation level for display. Options: 0/2/4/6/8/10/12 INITIAL SETTINGS Initial settings page is for you to make your preferred settings up for your player. Once the initial settings are done they are retained in the CPU of the player until otherwise modified. COMMON PROCEDURES FOR INITIAL SETTINGS 1. Press SETUP button. 2. Use the navigation buttons to select the item you want to modify, press OK button to confirm, setting page with further setting items displayed shows on the TV screen. Again use navigation buttons to make changes. Press again OK button to confirm modifications. 3. Use navigation buttons to switch to another setting on the main setting page. 4. Press SETUP button to exit main setting page. 4. SPEAKER SETUP SPEAKER SETUP DOWNMIX EXIT SETUP 1. SYSTEM SETUP 4.1 DOWNMIX Options: LT/RT- Left/Right mix mode STEREO- Select this option if you don't have a 5.1 channels amplifier. SYSTEM SETUP TV SYSTEM SCREEN SAVER TV TYPE DEFAULT EXIT SETUP 1.1 TV SYSTEM - it is used to select the TV mode. Please select this option as per your TV set. 1.2 SCREEN SAVER- when the player is not used for several minutes, a running DVD logo will move across the screen to protect the screen. Options: ON: the screen saver is enable. OFF the screen saver is disable. 1.3 TV TYPE- it is used to select the TV scan mode, please set as per your TV set. Options: 4:3PS : Normal Pan & scan mode 4:3LB : normal Letter box mode 16:9 : 16:9 wide screen mode 1.4 DEFAULT - Reset to factory settings. Options: RESTORE 2. LANGUAGE SETUP LANGUAGE SETUP OSD LANGUAGE AUDIO LANG SUBTITLE LANG MENU LANG EXIT SETUP 2.1 OSD LANGUAGE - It is used to select different On Screen Display language for different user. 2.2 AUDIO LANG - select preferred audio language. (DVD only, need disc software support) 8 TV SETTING MENU Press once TV MENU button the screen will pop up a setting menu; Use the NAVIGATION LEFT/RIGHT buttons to select among the main setting options, then press NAVIGATION UP/DOWN button to enter the sub menu, again use NAVIGATION LEFT/RIGHT button to select the desired option or adjust and Antenna Auto Scan Show/Hide Channel No. Channel Label UP/DOWN 62 53 50 0 60 ADJUST MENU:EXIT 0 ADJUST MENU:EXIT Balance: it is used to adjust the balance effect according to your own favorite. Audio language: it is used to select the desired audio output language. UP/DOWN 60 Sec Off Central Off ----/--/-- --/-- ADJUST MENU:EXIT OSD Duration: it is used to set the OSD display duration. Sleep Timer: it is used to set the sleep timer to auto power off the set. Time Zone: it is used to select time zone from different region. Daylight Saving time: it is used to advance one hour of the daylight time in summer in order to save the power. Clock: it is used to show code create date. Menu Language Color Mode Zoom Mode Closed Caption Restore Default UP/DOWN ADJUST MENU:EXIT IMPORTANT: Make sure that you plug the external AC power cord correctly into the rear power Port. English OSD Duration Sleep Timer Time Zone Daylight Saving Time Clock Air Antenna: it is used to select the Antenna type CATV or air. Auto Scan: use this function to auto scanning and stored tuned channels. Select auto scan option, then press NAVIGATION RIGHT button to access the submenu, select the desired Cable system and then enter the Start to Scan option to begin auto scan. Show/Hide: it is used to show or hide the programs according to your own favorite. Channel No.: Select the desired program from this option. Channel Label: it is used to edit the name of the selected program (Use up or down button to input symbol or letter as desired, and press left or right button to enter the previous or next item). Picture mode: it is used to select the desired picture mode. Contrast: it is used to adjust the contrast effect according to your own favorite. Brightness: it is used to adjust the brightness effect according to your own favorite. Sharpness: it is used to adjust the sharpness according to your own favorite. Tint: it is used to adjust the tint effect according to your own favorite. Color: it is used to adjust the color according to your own favorite. UP/DOWN Basic Selection: select among from CC1, CC2, CC3, CC4, Text1, Text2, Text3 and Text4. Advance Selection: service 1, Service 2, Service 3, Service 4, Service 5, Service 6. Restore Default: select this option to restore the factory setting. Personal Balance Audio Language CC mode: use to select on, CC on Mute, off. 2. 3. press OK/ENTER Button to confirm the item to be set; Press TV MENU to go to previously menu or scroll to top the main setting options. Use TV MENU button to exit the setup menu. Picture Mode Contrast Brightness Sharpness Tint Color UP/DOWN 1. English Normal Wide ADJUST MENU:EXIT Menu Language: it is used to change menu language. Color mode: it is used to change the color mode of screen. Zoom Mode: it is used to select the display type. Closed Caption: it is used to select the broadcasting program provides closed caption. There are three options as follows: 9 DIGITAL TV FACTS 1. Digital TV differs greatly from older Analog TV. When all is right, Digital TV provides a clear, ghost free, highlysaturated, color picture. 2. However, it’s possible that even when a strong signal is available, you may not always receive a picture at all. Tube-style analog TV will nearly always display a picture, but sometimes it will be full of static, blurry and may have multiple ghosts. Digital TV is like a light switch….It is either ON or it is OFF. 3. After the initial setup, you do not receive one or more of your favorite TV channels, try placing the Digital Antenna in another area and re-scan your TV. 4. Should you still be unable to receive a particular channel, try hooking your unit to Cable TV and re-scan. DISC-HANDLING CAUTIONS Hold the disc by the edge so the surface will not be soiled with finger prints. Finger prints, dirt and scratches can cause skipping and distortion. Do not write on the label side with a ball-point pen or other writing utensils. Do not apply benzene, thinner, and liquid that prevents against static electricity. Be careful not to drop or bend the disc. Install only one disc on the disc tray. Do not try to close the disc tray when the disc is not installed properly. Be sure to store the disc in its case when not in use. TROUBLESHOOTING If your DVD player does not seem to be functioning properly, check the items below before you contact an authorized service center Symptom Check Power does not turn on or suddenly turns off. Make sure the AC cord is securely plugged into an AC outlet. Turn the power off and then back on. Remote control won't work Check that the battery is inserted in the "+" and "-" direction properly. The battery may be flat. Replace it with a new one. Check that the signal transmission is directed at the remote control sensor on the DVD player. No picture or sound Check that the A/V cables are securely connected. Check that the disc is a DVD, DVD-RW, AUDIO CD. Do not use a disc that has scratches or dirt. Check that the label-side of the disc is facing up. The pick-up lens of the DVD player may be dirty. Contact the service center for lens cleaning. Check that the TV channel is set to VIDEO or AV f viewing with a TV. No picture No sound Check that the LCD display is turned on. Check that the display panel is open. If it is closed, audio will not be output to the speakers. Check the volume setting. If set to zero, turn up volume level. Check that the headphones are plugged into the PHONES socket. Speakers cannot be used with the headphones. No picture and sound Check that the batteries are properly installed and AC cord is properly connected. Distorted video or sound Use a disc without scratches or dents. CAUTION • The apparatus shall not be exposed to dripping or splashing and that no objects filled with liquids, such as vases, shall be placed on the apparatus. • Minimum distances 2.0cm around the apparatus for sufficient ventilation. • The ventilation should not be impeded by covering the ventilation openings with items, such as newspapers, table-cloths, curtains, etc. • No exposed flame sources, such as lighted candles, should be placed on the apparatus. • When the main plug or an appliance coupler is used as the disconnect device, the disconnect device shall remain readily operable. • Dispose of battery according your local ordinances. 10