1
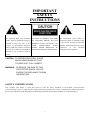
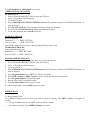
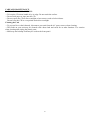
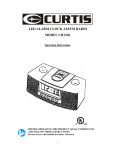
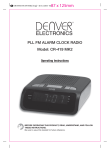
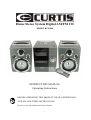
Home Stereo System Digital AM/FM CD
MODEL RCD 544
INSTRUCTION MANUAL
Operating Instructions
BEFORE OPERATING THIS PRODUCT, READ, UNDERSTAND,
AND FOLLOW THESE INSTRUCTIONS.
Be sure to save this booklet for future reference.
1
IMPORTANT
SAFETY
INSTRUCTIONS
The Lightning flash with arrowhead
symbol, with an equilateral triangle is
intended to alert the user of the
presence of uninsulated dangerous
voltage within the product’s enclosure
that may be of sufficient magnitude to
constitute a risk of electric shock to
persons.
CAUTION: TO REDUCE THE RISK
OF ELECTRIC SHOCK, DO NOT
REMOVE COVER (OR BACK). NO
USER
SERVICEABLE
PARTS
INSIDE. REFER SERVICING TO
QUALIFIED SERVICE PERSONNEL.
The exclamation point within an
equilateral triangle is intended to alert
the user of the presence of important
operating and maintenance (servicing)
instructions
in
the
literature
accompanying the appliance.
CAUTION : TO PREVENT ELECTRIC SHOCK,
MATCH WIDE BLADE OF PLUG
TO WIDE SLOT, FULLY INSERT.
WARNING : TO REDUCE THE RISK OF FIRE
OR ELECTRIC SHOCK, DO NOT
EXPOSE THE APPLIANCE TO RAIN
OR MOISTURE.
SAFETY CERTIFICATION
This Compact Disc Player is made and tested to meet the safety standards of the Federal Communications
Commission(FCC) and to comply with the safety performance requirements of the U.S. Department of Health and Human
Services and with the Food & Drug Administration(FDA) Radiation performance Standards 21 CFR Subchapter J.
2
IMPORTANT INFORMATION REQUIRED BY THE FCC
Since the Compact Disc (CD) circuitry may cause interference to other radios nearby, switch this set off when not in
use or move it away from the affected radios.
This device complies with Part 15 of the FCC Rules. Operation is subject to the following two conditions: (1) this
device may not cause harmful interference; and (2) this device must accept any interference received , including
interference that may cause undesirable operation.
NOTE: This equipment has been tested and found to comply with the limits for a Class B digital device, pursuant to
part 15 of the FCC Rules. These limits are designed to provide reasonable protection against harmful interference in a
residential installation. This equipment generates, uses, and can radiate radio frequency energy and, if not installed
and used in accordance with the instructions, may cause harmful interference to radio elevation reception, which can
be determined by turning the equipment off and on. The user is encouraged to try to correct the interference by one or
more of the following measures;
*Reorient or relocate the receiving antenna.
*Increase the separation between the equipment and receiver.
*Connect the equipment into an outlet on a circuit different from that to which receiver is connected.
*Consult the dealer or an experienced radio/TV technician for help
LASER SAFETY
THIS SET EMPLOYS AN OPTICAL LASER BEAM SYSTEM IN THE CD MECHANISM
DESIGNED WITH BUILT-IN SAFEGUARDS. DO NOT ATTEMPT TO DISASSEMBLE.
EXPOSURE TO THIS INVISIBLE LASER LIGHT BEAM MAY BE HARMFUL TO THE EYES.
THIS COMPACT DISC PLAYER SHOULD NOT BE ADJUSTED OR REPAIRED BY ANYONE
EXCEPT QUALIFIED SERVICE PERSONNEL. ALTHOUGH THIS PRODUCT USES A
LASER PICK-UP LENS, IT IS COMPLETELY SAFE WHEN OPERATED ACCORDING TO
THE MANUFACTURER’S INSTRUCTIONS CONTAINED HEREIN.
1.
2.
3.
4.
5.
6.
7.
Read instructions - All the safety and operating instructions should be read before the
appliance is operated.
Retain instructions - The safety and operating instructions should be retained for future
reference.
Head Warnings - All warnings and cautions on the appliance and in the operating instructions
should be adhered to.
Follow instructions - All operating and use instructions should be followed.
Water and Moisture-The appliance should not be used near water, e.g. near a bathtub,
washbowl, kitchen sink, laundry tub, in a wet basement, or near a swimming pool or the like.
Wall or Ceiling Mounting - The appliance should not be mounted to a wall or ceiling.
Ventilation - The appliance should be situated so that its location or position does not interfere
with its proper ventilation. For example, the appliance should not be situated on a bed, sofa,
rug or similar surface that may block the ventilation openings, or placed in a built-in installation,
3
8.
9.
10.
11.
12.
13.
14.
15.
16.
17.
18.
19.
such as a bookcase or cabinet, that may impede the flow of air through the ventilation
openings.
Heat - The appliance should be situated away from neat sources such as radiators, heat
registers, stoves, or other appliances (including amplifiers) that produce heat..
Power Sources - The product should be operated only with the type of power supply indicated
on the marking label. If you are not sure of the type of power supply to your home, consult your
product dealer or local power company. For products intended to operate from battery power,
or other sources, refer to the operation instructions.
Grounding Polarization - This product may be equipped with a polarized alternating current
line plug (a plug having one blade wider than the other). This plug will fit into the power outlet
only one way this is a safety feature. If you are unable to insert the plug fully into the outlet, try
reversing the plug. If the plug should still fail to fit, contact your electrician to replace your
obsolete outlet. Do not defeat the safety purpose of the polarized plug.
Power-Cord Protection - Power supply cords should be routed so that they are not likely to
be walked on or pinched by items placed upon or against them, paying particular attention to
cords at plugs, convenience receptacles, and the point where they exit from the appliance.
Cleaning - The appliance should be cleaned only as recommended by the manufacturer.
Nonuse periods - The power cord of the appliance should be unplugged from the outlet when
left when left unused for a long period of time.
Object and Liquid Entry - Care should be taken so that objects do not fall and liquids are not
spilled into the product case through product openings.
Damage Requiring Service - Unplug this product from the wall outlet and take it to qualified
service personnel under the following conditions.
a) When the power-supply cord or plug is damaged.
b) If liquid has been spilled into, or objects have fallen into the product.
c) If the product has been exposed to rain or water.
d) If the product does not operate when used according to the operating instructions.
Adjust only those controls that are covered by the operating instructions as an improper
adjustment of other controls may interfere with the product’s normal operation.
e) If the product has been dropped or damaged in any way.
f) When the product exhibits a distinct change in performance-this indicates a need for
service.
Servicing - The user should not attempt to service the product beyond that described in the
operating instruction. All servicing should be referred to qualified service personnel.
Power Lines - An outside antenna system should not be located in the vicinity of overhead
power lines, or other electric light or power circuits, or where it can fall into such power lines or
circuits. When installing an outside antenna system, extreme care should be taken to keep
from touching power lines or circuits as contact with them might be fatal.
If an outside antenna is connected to the receiver, be sure the antenna system is grounded so
as to provide some protection against voltage surges and built up static. Section 810 of the
National Electrical Code ANSI/NEFA 70 provides information with respect to proper grounding
of the mast and supporting structure, grounding conductress, location of antenna-discharge
unit, size of grounding electrodes, and requirements for the grounding electrode (see figure).
Cleaning - Unplug this product from the wall outlet before cleaning. Do not use liquid cleaners
or aerosol cleaners. Use a damp cloth for cleaning.
4
20. Lightning - For added protection for this product during a lightning storm, or when it is left
unattended and unused for long periods of time, unplug it from the wall outlet and disconnect
the antenna or cable system. This will prevent damage to the product due to lightning and
power-line surges.
21. Safety Check - Upon completion of any service or repairs to this product, ask the service
technician to perform safety checks to determine that the product is in proper operation
condition.
22. Overloading - Do not overload wall outlets, extension cords, or integral convenience
receptacles as this can result in a risk of fir or electric shock.
SAVE THESE INSTRUCTIONS FOR FUTURE REFERENCE
COND ENSATION
If coldwater is poured into a glass, water droplets form on the outside of the glass. This is called
condensation. Condensation may also occur on internal operating parts of the laser pickup.
Condensation occurs:
- When the unit is brought from the outdoors into a warm room, or if it is in a cold room which is heated
quickly.
- In the summer, if the unit is moved suddenly from an air-conditioned room or car to a hot or humid
location.
The unit may not operate property if condensation develops. Should condensation occur, wait for one to two
hours (to allow the internal parts to adjust to the surrounding temperature) before using the unit.
5
LOCATION OF CONTROLS
1. LEFT WOOFER
2. CD DOOR
3. RIGHT WOOFER
4. LEFT SPEAKERS
5. SENSOR
6. LCD DISPLAY
7. FM STEREO LED INDICATOR
8. BAND (AM/FM) BUTTON
9. TIME BUTTON
10. VOL- BUTTON
11. HOUR BUTTON
12. CD DOOR OPEN BUTTON
13. MIN BUTTON
14. VOL+ BUTTON
15. RIGHT SPEAKERS
16. TUNING KNOB
17. STANDBY/ON BUTTON
18. CD/RADIO FUNCTION SWITCH
19. PHONES JACK
20. PROGRAM BUTTON
21. REPEAT BUTTON
22. PLAY/PAUSE BUTTON
23. STOP BUTTON
24. FAST-FORWARD BUTTON
25. REWIND BUTTON
26. LEFT SPEAKER OUTPUT JACK
27. RIGHT SPEAKER OUTPUT JACK
28. FM WIRE ANTENNA
29. AM ANTENNA JACK
30. AM ANTENNA
REMOTE CONTROL
1. TRANSMIT LED
2. PLAY/PAUSE KEY
3. STOP KEY
4. SKIP ►►│ KEY
5. VOL. + KEY
6. SKIP│◄◄ KEY
7. VOL. – KEY
8. BAND (AM/FM) KEY
9. POWER KEY
10. REPEAT KEY
11. PROGRAM KEY
12. BATTERY COMPARTMENT (FOR REMOTE CONTROL)
6
Insert two(2) “AAA”/1.5V batteries following the polarity as indicated in the compartment to the right.
Alkaline batteries are recommended for long using time.
Note: when planning not to use the remote control for a long time. Remove the batteries in order to avoid
the electrolyte leakage.
UNIT POWER SUPPLY ( mains 120V/60Hz)
Connect the power cable plug to the (120V/60Hz) wall outlet.
Warning:
Before using the unit. Check that the local mains supply is compatible with the HI-FI System (120V 60Hz)
Do not plug or unplug the power cable when your hands wet.
When planning not to use this unit for long periods of time(i.e, Vacation etc.) disconnect the plug from the
wall outlet.
When disconnecting the power cord from the wall outlet , grasp the plug; do not pull the cord in order to
avoid shock risks caused by the damaged cable.
HEADPHONE JACK
This unit will accept stereo headphones with a Ф 3.5mm plug. Before connecting the headphones set
the volume to minimum level as not to damage your ears or the headphones. Connect the headphones to the
headphones jack. The speakers will be automatically disconnected.
Warning: Prolonged exposure to high sound levels may permanently damage your hearing. You may
not hear some warning sound while wearing these headphones.
VOLUME
Press VOL- or VOL+ to adjust the volume to the desired level.
VOL- : to decrease the volume;
VOL+: to increase the volume.
LISTENING TO THE RADIO
1. Press CD/RADIO FUNCTION SWITCH up to RADIO position.
2. Press STANDBY/ON button to turn on the unit.
3. Press the Band (AM/FM) Button to select AM or FM.
4. Turn TUNING Knob to tune in desired Radio station.
5. To turn off Radio, Press STANDBY/On Button to turn off the unit.
Note: While in the Radio Mode, the display will indicate as Frequency.
ANTENNAS
An AM antenna is built outside the unit.
For better reception , FM wire antenna shall be fully untied and adjusted well
CLOCK SETTING
In power off (standby) mode:
Press and hold Time button to set the clock
7
Press Hour Button or Min Button respectively
OPERATION OF CD PLAYER
PLAYING A CD
1. Press CD DOOR OPEN BUTTON to open the CD door.
2. Insert a CD with the label facing up
3. Close the CD Door.
4. Press CD/RADIO FUNCTION SWITCH down to CD position and press STANDBY/ON button
turn on the unit.
5. Press PLAY/PAUSE BUTTON to start CD playback from the first track.
6. Press one more PLAY/PAUSE BUTTON to momentarily pause
7. To stop the playback, Press STOP BUTTON.
to
SKIPPING TRACKS
Press during play.
Backward------------SKIP - BUTTON
Fast Forward---------SKIP + BUTTON
Press SKIP - button twice to skip to the beginning of the previous track.
SEARCHING TRACKS
Press and hold during play
Backward----------SKIP - BUTTON
Fast Forward-------SKIP + BUTTON
PROGRAMMED PLAYBACK
Up to 20 tracks can be programmed into play in any desired sequence.
1. Press CD DOOR OPEN BUTTON to open the CD door.
2. Insert a CD with the label facing up
3. Close the CD Door
4. Press CD/RADIO FUNCTION SWITCH down to CD position, and press STANDBY/ON button
turn on the unit.
5. Press Program button until “PROG 01” flashes in display.
6. Press SKIP + button or SKIP - button to select a desired track to be memorized.
7. Press Program button to program the track.
8. Repeat steps 6 and 7 to program tracks.
9. Press PLAY/PAUSE button to start playing.
To cancel program play, Press STOP button two times.
to
REPEAT PLAY
To Repeat Single Track
Press REPEAT button while the track you want to repeat is playing. The “REP” flashing will appear in
display.
------To repeat another track, Press SKIP - button or SKIP + button.
------To cancel repeat play, Press REPEAT button two times.
8
To Repeat all the tracks
Press REPEAT button twice during play. The “REP” indicator will appear in display steadily.
------All tracks will be played through in sequence and then the sequence will be repeated continuously.
-------To cancel repeat play, press REPEAT button one time.
TROUBLESHOOTING GUIDE
You experience a problem with this unit check the chart below before calling of service.
Handle a disc only by its edges. Do not touch the surface or rainbow-colored side of the
disc.
Handle a disc as shown in the two illustrations indicated (to the left).
Use a soft cloth to wipe a disc clean. Do not use benzene, thinner, or other chemical cleaners
to clean the disc as damage may result.
Do not expose a disc to direct sunlight, high humidity, or high temperatures for extended
periods of time. Do not place the disc on other equipment or near any heat source.
SYMPTOM
CD Play will
Not turn on
Disc will not
Play
Erratic CD
playback
No sound
Noise or Sound distorted on
radio
CAUSE
SOLUTION
AC cord not connected properly
Reinsert the AC cord
Disc inserted incorrectly
Defective compact disc
CD compartment not closed
Moisture condensation on disc
Reinsert disc with label side facing up
Try another compact disc
Close CD compartment
Wipe disc with soft cloth
Dirty or defective disc
Clean or replace disc
SPEAKER plug not inserted
property
Volume control set to minimum
Defective compact disc
Reinsert SPEAKER cord into SPEAKER
OUTPUT jack
Increase the volume
Try another compact disc
Station not tuned properly for AM
or FM
Unit is not positioned correctly
Retune AM or FM broadcast station
Rotate unit until best reception is obtained
9
CARE AND MAINTENANCE
CARING FOR COMPACT DISCS
---To keep the CD clean, handle it by its edge. Do not touch the surface.
---Do not stick paper or tape onto the CD
---Do not expose the CD to direct sunlight or heat sources such as holt air ducts.
Do not leave the CD in a car parked under direct sunlight.
Cleaning the Unit
---To prevent fire or shock hazard , disconnect your unit from the AC power source when cleaning.
---The finish on your unit may be cleaned with a dust cloth and cared for as other furniture .Use caution
when cleaning and wiping the plastic parts.
---Mild soap and a damp cloth may be used on the front panel.
10