1
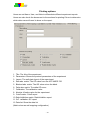
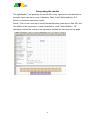
AgileReader™ SOFTWARE
USER MANUAL
Version 1.1
1
ACTGene Inc. provides this publication “as is” without warranty of any kind, either
express or implied, including, but not limited to the implied warranties of
merchantability or fitness for a particular purpose.
Information in this publication is subject to change without notice and does not
represent a commitment on the part of the vender.
Any errors or omissions which may have occurred in this publication despite the
utmost care taken in its production will be corrected as soon as possible, but not
necessarily immediately upon detection.
Contents
System Requirements ............................................................................................ - 1 Software Installation ............................................................................................... - 2 To start AgileReader™............................................................................................ - 3 AgileReader™ Menu Software Structure ................................................................ - 4 Main Window Overview ................................................................................... - 4 Section A Menu ............................................................................................... - 5 Section B Tool bar ........................................................................................... - 8 Section C Message ......................................................................................... - 8 Section D Temperature monitor ....................................................................... - 8 Section E Status monitor ................................................................................. - 8 Section F Working area ................................................................................... - 9 Section G Desktop Bar .................................................................................. - 10 AgileReader™ Function ....................................................................................... - 11 Basic Parameters .......................................................................................... - 11 Define Primary and Reference wavelengths ................................................. - 12 Starting method to read plates ...................................................................... - 12 Plate motion .................................................................................................. - 13 Using the built-in Incubator ............................................................................ - 13 Using the built-in Shaker ............................................................................... - 13 Measurement unit.......................................................................................... - 13 Define Calculation ......................................................................................... - 13 Well Mapping................................................................................................. - 14 Quantitative ................................................................................................... - 15 Cutoffs ........................................................................................................... - 16 Ratio/Inhibition............................................................................................... - 16 Q.C. ............................................................................................................... - 17 Print options ......................................................................................................... - 18 AgileReader™ connection setup .......................................................................... - 19 Start AgileReader™ under PC mode............................................................. - 19 Setup Connection between AgileReader™ and the PC ................................ - 19 Setting up USB connection Between ACT-AMPR-750 and AgileReader™ ... - 20 Main Menu Configuration ..................................................................................... - 21 Graphic User Interface .................................................................................. - 21 File menu functions ....................................................................................... - 21 Experiment menu functions ........................................................................... - 22 Setup menu functions .................................................................................... - 23 Tool Bar Menu Configuration ................................................................................ - 24 -
Defining Parameters for Experiment..................................................................... - 26 Defining Parameters...................................................................................... - 26 Well Mapping ........................................................................................................ - 30 Quantitative measuring method ............................................................................ - 33 Cutoff measuring method ..................................................................................... - 36 Ratio/Inhibition Calculation Method ...................................................................... - 38 Q.C. Calculation Method ...................................................................................... - 39 Printing options ..................................................................................................... - 40 Interpreting the results .......................................................................................... - 41 Appendix A ........................................................................................................... - 47 Setting of USB Serial Port ............................................................................. - 47 -
System Requirements
z
128MB of RAM above for Windows XP, Windows XP Professional SP2, Windows
Vista 32bit, Windows 7.
z
Microsoft Office 2003 or Microsoft Office 2007
z
20MB of available hard drive for the program files
z
CD-ROM drive
z
16bit color display / 800 x 600
z
Keyboard, mouse, and RS232 serial port or USB
-1-
Software Installation
To install AgileReader™r Software
1. Start Windows
2. Close all unnecessary Windows programs
3. Place CD in the CDROM drive
4. Double click the AgileReader™ folder within the CD-ROM
5. Double click install.bat program.
6. Click OK on the AgileReader™ setup menu
7. Click on the icon
to install
8. Select Program group then click continue, the AgileReader™ software will start
installation
9. Click OK when the AgileReader™ finishes installation
-2-
To start AgileReader™
1. From Start menu ÆProgramsÆACTGeneÆAgileReader™
2. Select the correct COM port for connection then click OK.
-3-
AgileReader™ Menu Software Structure
Main Window Overview
Section A: Menu
Section B: Tool bar
Section C: Message
Section D: Temperature monitor
Section E: Status monitor
Section F: Working area
Section G: Desktop bar
-4-
Section A Menu
The File Menu contains function for processing data from the AgileReader™
New : open new file window (Default file name is new.exp)
Load : Load an existing results record
Save : Save the experiment parameters
Save As : Save the results under a new ID
Generate/Preview report : Generate experiment report in data
Export/Print report : Export report to excel file, and select to print report
Exit : Close the AgileReader™ software
-5-
z Experiment Menu
Experiment Menu contains function to set the experiment and view the data
Protocol: Set the environment
Data: View data for the experiment
The Protocol and Data function can also function on the right tab of the main menu
-6-
z Setup Menu
The setup menu contains the AgileReader™ system configuration
COM port setting : To set the communication COM port between the AgileReader™
and PC
Filter tune : The AgileReader™ can setup to 8 different filter wavelength. Config the
filter wavelength.
-7-
Section B Tool bar
Initialize : Any commands issued from the AgileReader™ to the ACT-AMPR-750 must
initialize first.
Execute : To start the defined protocol
Stop : To stop executing the defined protocol
COM port setting : To set the COM port to communicate between the ACT-AMPR-750
and the PC
Plate in/out : To open or close the plate compartment
Shake : To start the shaking function on the AgileReader™
Incubator : To manually start the incubator, when incubator is initialized the temp will
show on section D temp monitor.
Post processing : Use the current protocol to re-process data results.
Section C Message
During operation the message will show on the right side of the tool bar
Section D Temperature monitor
When incubator is active the temperature will show on the right side of the tool bar
Section E Status monitor
After initialize the tool bar will show the plate state, and the connection status. The
plate in/out is defined as green/red. The connection on/off is defined as blue/grey
-8-
Section F Working area
The AgileReader™ allows you to define protocols and acquiring microplate data,
an .exp experiment file will contain 2 information, the Protocol and the Data. The
Protocol is to define parameters, the data is to show experiment data.
-9-
Section G Desktop Bar
The desktop bar is to select between the Protocol and the Data, this function can also
be accessed under experiment.
- 10 -
AgileReader™ Function
Basic Parameters
z Measurement types: The AgileReader™ provide 3 types of measurement types,
end point, two point, and Kinetics.
z Two points read: During the two points read theACT-AMPR-750 reads at 2
wavelength, with 2 reference reads as optional.
- 11 -
z Kinetics read: During a kinetics read users can define the kinetic method by select
the Kinetic method tap. User can define average rate, Maximum rate, Maximum
Abs, Total delta Abs, Time to max. rate, and Time to max. Abs. User can also define
the number of times the plate been read and intervals.
To select a measurement type
Click the tap under measurement type and select the desired method of End point,
Two points, Kinetics.
Define Primary and Reference wavelengths
If a Primary wavelength is defined alone the ACT-AMPR-750 reads the plate only
once at a single wavelength. If a Reference wavelength is defined the plate will be
read twice and automatically to calculate the delta Abs between the two readings.
To select the Primary and Reference wavelengths:
1. Select the Measurements type of End Point, and Two Points.
2. Enter the Primary wavelength in Main1 or Main2, and the reference Ref1 or Ref2
Starting method to read plates
Users can define the starting method of plates reading. Immediately the
ACT-AMPR-750 starts reading the plate right after executing tap is pressed. Users
- 12 -
can also define how long the plate reading delays.
To define the starting method
1. Click on the Immediate tap or define how many seconds needed to be delayed.
Plate motion
Users can define the plate motion while reading the plate to be Stepping in
milliseconds or Continuous.
Using the built-in Incubator
The incubator will set the temperature of the plate at ambient temperature.
Users can enable the Incubator by
1. Click the use incubator tab.
2. Enter the desired temperature.
Using the built-in Shaker
The built-in Shaker in ACT-AMPR-750 can let user define 3 settings, low 8Hz, Medium
11Hz, and High 14Hz. Users can also define how long the shaker needs to be active
by seconds.
To enable the Shaker
1. Click the Use shaker tab
2. Define the speed Low, Medium, High
3. Define the time in seconds.
Measurement unit
Users can define the Measurement unit to suit their experiments needs.
To define the Measurement unit
1. Click on the unit tab, and select the desired Measurement unit.
Define Calculation
User can define Quantitative, Cutoff, Ratio/Inhibition, and QC calculation method
To define calculation method
1. Click on the tab in respect to Quantitative, Cutoff, Ratio/Inhibition, and QC
calculation
2. The AgileReader™ lets users define each calculation method criteria.
- 13 -
Well Mapping
Users can define 5 types of different wells, Blank, Standard, Sample, Positive, and
Negative.
To define Well Mapping
1. Click on the Well mapping tap on the main working acres
2. Users can define Blank, Standard, Sample, Positive, and Negative, for each well
- 14 -
Quantitative
The AgileReader™ allows user to define quantitative analysis to determine the
absolute or relative abundance. There are 4 different types of curve fitting on the
AgileReader™. Users can use Curve on plate, Stored curve, Standard line, and
Concentration factor.
To define Quantitative analysis
1. Make sure the check mark is clicked on the Quantitative in Basis Parameter
2. Click the Quantitative tap in Basic Parameter
3. Define the desired parameter
- 15 -
Cutoffs
Cutoffs are used to classify results. Users can define 3 different Cutoff methods,
Single, Double, Calculation.
1. Make sure the check mark is clicked on the Cutoff in Basis Parameter
2. Click the Cutoff tap in Basic Parameter
3. Define the desired parameter
Ratio/Inhibition
The AgileReader™ will take a standard (B0) and other samples to calculate the
Ratio/Inhibition factor
1. Make sure the check mark is clicked on the Ratio/Inhibition in Basis Parameter
2. Click the Cutoff tap in Ratio/Inhibition
3. Define the desired parameter
- 16 -
Q.C.
The AgileReader™ can make Q.C. rules for experiment to determine the results.
1. Make sure the check mark is clicked on the QC in Basis Parameter
2. Click the Cutoff tap in QC
3. Define the desired parameter
- 17 -
Print options
Users can define the Name, User, and Printing selections for the experiments on the
AgileReader™.
To define print options
1. Click the Print options on the Basic parameters
2. Enter the desired field for print options.
- 18 -
AgileReader™ connection setup
To control the ACT-AMPR-750 through the AgileReader™, users must set and test the
COM port connection on the PC. User can connect the AgileReader™ with
ACT-AMPR-750 through USB or RS232 interface.
Start AgileReader™ under PC mode
1. Attach the appropriate cable to an available RS232 serial port or USB port.
2. Plug the other end of the cable into the RS232 serial port or USB port on the
reader
3. Plug all power cords into electrical outlets
4. Power on ACT-AMPR-750, if ACT-AMPR-750 is in standalone mode, power off
while pressing "Option" button to switch to PC mode
5. Configure the communication COM port between ACT-AMPR-750 and the PC
Setup Connection between AgileReader™ and the PC
1. Ensure AgileReader™ is connected to the computer.
2. Ensure on the AgileReader™ LCD shows is in PC mode
3. Ensure the COM port setting is
Baud rate= 57600
Data bits= 8 bits
Parity check= no
Stop bits= 1
Flow control=no
4. Go to start Æ program filesÆ ACTGeneÆAgileReader™ to execute the
AgileReader™ software
5. After executing ACT-AMPR-750, the PC will show the startup screen with the
software version of the AgileReader™.
6. In the initial setup, the AgileReader™ will scan all available ports, if there is no
response from the AgileReader™, the AgileReader™ will show off-line.
- 19 -
7. Select the desired COM port for the communication between the PC and
ACT-AMPR-750 (Currently the AgileReader™ supports COM 1~COM16).
8. Press OK on the AgileReader™ to start communication between ACT-AMPR-750
and AgileReader™
9. Press Init on the tool bar of AgileReader™. The AgileReader™ will use the desired
COM port and send a signal to the AgileReader™. If the ACT-AMPR-750 responds
to the LCD, the AgileReader™ will show ON LINE.
Setting up USB connection Between ACT-AMPR-750 and AgileReader™
1.
On ACT-AMPR-750 standalone mode go to SETUPÆCOMPUTER
2.
Change the RS232 to USB
3.
Power on the ACT-AMPR-750 again while pressing option button on the
instrument to switch to the PC mode (Appedix A for USB setting)
- 20 -
Main Menu Configuration
Graphic User Interface
The graphic user interface will have the function menu, tool bar, message, status
(Temp. connection status), and working area (Protocol, and data)
File menu functions
Under the main menu of the AgileReader™, there are four options, Files, Experiment,
Setup, and Version.
1. Load: Load experiment file
When loading, exp, file, AgileReader™ SW will check….
2.
3.
4.
5.
Save: Save experiment file
Save As: Save experiment file using different file name
Close: Close experiment file
Generate/Preview report: Generate report after experiment is done, must generate
report first before saving to Excel
6. Export/Print report: To export to excel or to Print report using the printer connected
to the PC
7. Exit: Exit the AgileReader™
- 21 -
Experiment menu functions
There are 2 functions under the experiment menu, Protocol and Data. Protocol is to
setup the parameters of a experiment, and data is to show the results of an
experiment.
1. Protocol: To setup the Parameters, Well mapping, Quantitative, Cutoff,
Ratio/Inhibition. Q.C, and print options of a experiment
2. Data: To show the result of an experiment
- 22 -
Setup menu functions
The setup menu is used for COM port configuration and filter setting. The
AgileReader™ can setup up to 8 filters
1. COM port setting: User can change the desire COM port to communicate between
ACT-AMPR-750 and AgileReader™. ACT-AMPR-750 will automatically detect
all available COM port on the PC
2. Filter tune: The AgileReader™ has one 8 slot filter wheel for the users to install
filters. After installing new filters on the ACT-AMPR-750, it is important to set the
correct filter wavelength on the AgileReader™. Check the check box on the left to
enter desired wavelength for the filter, and press the Tune key after the desired
wavelength is entered.
- 23 -
Tool Bar Menu Configuration
There are Init, Execute, Stop, COM port setting, Plate In/Out, Shaker, Incubator, and
post processing tabs on the tool bar menu
1. Init tab: After connecting ACT-AMPR-750 and AgileReader™, users must initialize
first before any changes can be made
2. Exec tab: To execute the desired parameters for the experiment
3. Stop tab: To stop the current action for the ACT-AMPR-750
4. COM port setting: To setup the COM port connection between the PC and the
AgileReader™.
5. Plate in/out: To open/close the plate, the plate status will show on the status bar
6. Shaker: The shaker tap is used to configure the shaker. The shaker has 3 speeds,
low (8Hz), Medium(11Hz), High (14Hz)
7. Incubator: To initialize the incubator, users can configure the incubator from
ambient + 3~50 ℃
8. Post Processing: Use the parameters on the main manual and refresh the data
- 24 -
9. Message: Shows the status and messages from ACT-AMPR-750.
Message
Description
INIT
Initializes the ACT-AMPR-750
INIT PASS
Initialization successful, and can start working
OFF LINE
ACT-AMPR-750 and AgileReader™ is off line
ON LINE
ACT-AMPR-750 and AgileReader™ is on line
STOP
Stop current action for ACT-AMPR-750
PLATE MOVE
The plate of ACT-AMPR-750 is moving
PLATE IN
The plate is in ACT-AMPR-750
PLATE OUT
The plate is out of ACT-AMPR-750
EXEC ENTRY
Confirm and retry execution
EXECTION
Start execution the parameters
EXEC…Pn
Execute plate n is the plate number
FILTER TUNE
Start tuning filter
TUNE PASS
Filter tuning success
SHAKER CTRL
Execute shaker
SHAKER DONE
Shaking done
TEMP CTRL
Execute Temp. control
DETECT
Detect ACT-AMPR-750 restart
10. Temperature monitor: To monitor the incubator temperature within
ACT-AMPR-750
Status monitor: To monitor the status of ACT-AMPR-750. After initialization, there
will be two lights showing on the status monitor. Red/Green represent plate is Out/In.
Blue/Grey represent connection status between ACT-AMPR-750 and AgileReader™
- 25 -
Defining Parameters for Experiment
Defining Parameters
When starting experiment users must first define the parameters such as wavelength,
reading method, incubator, and shaking. In addition, users can also define the
calculation such as Quantitative, Cutoff, Ration/Inhibition, and QC.
1. Measurement Type: Users can define 3 types of measuring types. End point, two
point, and Kinetic.
- 26 -
a、 End Point
b、 Two Points
- 27 -
c、 Kinetics: Kinetics measuring method can only select main filter and no
reference filter
2. Filter wavelength: Users will need to select the filter wavelength for the desired
experiment. In addition, users can also select a reference wavelength.
ACT-AMPR-750 will automatically calculate the Delta OD as for difference
between the main and reference filters.
3. Starting method: Define when to start the defined experiment parameters
a、 Immediate: Start right after pressing the execute tab
b、 Delay: Users can define from 0~999s delay to start
4. Plate motion: To define how the plate motion when measuring
a、 Continuous: When measuring the plate is in continuous motion and not
stopping
b、 Stepping: User can define the stop time when measuring from 0~999 ms (In
kinetic mode there is no stepping time)
5. Incubation: Users can define the incubator temperature by clicking the incubation
tab. ACT-AMPR-750 incubator can save the temperature from +3~50℃
- 28 -
6. Shaker: The shaker onACT-AMPR-750 can select 3 types of speed, and the
shaking time can range from 0~999s
Speed
Description
High
14 Hz
Medium 11Hz
Low
8Hz
7. Measurement unit: Users can select 15 types of measurement unit "None" ,
"G/dL" , "U/L" , "G/L" , "ug/dL" , "ABS" , "mg/dL" , "OD" , "mABS" ,
"U/mL" , "ug/mL" , "mEq/L" , "mmol/L" , "umol/L" , "ng/mL". When select to None
user can enter the desired measurement unit
8. Two point interval: Users can select the 2 point interval from 5~999s
9. Kinetic method, numbers, and interval: When user select kinetic measurement
user can select the method, numbers, and interval.
a、 Kinetic method: Uses can select Average rate, Maximum rate, Maximum OD,
Total delta OD, Time to max slope, Time to max OD.
- 29 -
b、 Measure number: User can enter the measuring numbers of the plate from
3~30 times
c、 Measure interval: User can select the measure interval. When plate motion is in
Continuous from 4~500s, in Stepping 5~500s
Well Mapping
1. Save and load map layout: Users can load their map layout by pressing the folder
under map layout or the disk icon to save under map layout
2. Well mapping method:
a、 Select the type well users would like to define (Blank, Positive, Negative,
Sample, Standard). Users can also enter the concentration value for the
standard.
b、 Determine where on the well the well type needs to be, and left click on the
position on the well
c、 Right click on the mouse to select the fill option.
3. Fill and replicate direction rule: Row is to fill or replicate the well vertically, column
is to fill or replicate the well horizontally.
- 30 -
4. Fill and replicate well rules:
a、 Fill number: Is to replicate the number of different samples
b、 Replicate number: Is to replicate the sample how many times on the well
plate.
Example: of filling and replicate the well plate
5. Blank, POS, and NEG can only have 1 set within AgileReader™
6. STD can configure 1~15 set, a maximum of 96
7. Sample max of 96
8. Types of well:
a、 BLK: User can define BLK for the blank well, and are defined as a light green
on the well plate
b、 POS: Uses can define positive control on the well plate, and are defined as a
light red on the well plate
c、 NEG: Users can define negative control on the well plate, and are defined as
- 31 -
a light blue on the well plate
d、 Sample: Users can define the sample on the well plate , and are defined as
an light orange on the well plate
e、 Standard: Users can define the standard on the well plate, and are defined
as a light purple on the well plate. Users can fill in the value of
0.001~999999.999
- 32 -
Quantitative measuring method
ACT-AMPR-750 supports 4 types of Quantitative method, Curve on plate, Stored
curve, Standard line, and Concentration factor.
1. Curve on plate: Uses the standard on the well plate for the calibration curve. There
are 7 types of curve fitting on the AgileReader™
a、 Linear regression
b、 Quadratic polynomial
c、 Cubic polynomial
d、 Point to point
e、 Cubic spline
f、 2 parameters logit-log
g、 4 parameters logistic
- 33 -
2. Stored curve: Users can load their existing stored curve for quantatitive, the stored
curve are under AgileReader™\StdCurve, file name is .cuv
3. Standard line: User can use the Abs=A* Conc+B equation and enter the value of A
and B to calculate a standard line.
The Value of A can be:-999999.999 ~ +999999.999
The value of B can be :-999999.999 ~ +999999.999
- 34 -
4. Concentration factor: User can enter a factor for calculate the concentration
The value of F can be:-999999.999 ~ +999999.999
- 35 -
Cutoff measuring method
ACT-AMPR-750 supports 3 types of Cutoff measuring methods.
1. Single cutoff method: User can enter a threshold of 0.0000~4.0000, and define the
result is positive or negative.
2. Double cutoff method: Users can define the high and low threshold. The high and
low value can be from 0.0000~4.0000. The AgileReader™ can determine the
positive, negative results and between (*)
- 36 -
3. Calculation cutoff method: Users can create a maximum of 4 formulas as the
threshold calculation and make the result as 5 groups.
Every formula can be calculated from the positive or negative control results with
the equation:
EQn = a * PC + b * NC + c
The value for a, b and c can be -1000.000 ~ +1000.000
Example: With four threshold the threshold higher then EQ1 as default ( ++ ),
Between EQ1 and EQ2 (+). Between EQ2 and EQ3 is (*). Between EQ3 and EQ4 is
(-). Below EQ 4 is (--)
- 37 -
Ratio/Inhibition Calculation Method
Select a B0 as a standard value to calculate the rest of the well plate Bn
1. Ratio/Inhibition operating procedure
a、
b、
c、
d、
definition: Ratio = (Bn/B0)%
Inhibition = 100% - (Bn/B0)%
Must have sample on B0 position or the AgileReader™ will show error
Please check if B0 is a replicate of the sample, if there are many replicate of
the sample the B0 will be the average of the replicates of the sample.
e、 If B0 value is 0 then the AgileReader™ will show error
f、 If ratio is over 200% then the AgileReader™ will show HI, lower, then -200%,
then the AgileReader™ will show LO
g、 Ratio is represent as blue
h、 Inhibition represent as red
- 38 -
Q.C. Calculation Method
The criteria of the QC calculation can used to determines on the reliability if this
experiment.
1. Can use a maximum of 4 equation for calculation, all of the calculation result are
considered to determine pass or fail of the QC calculation method.
2. The value of a can be -1000.000 ~ +1000.000
3. The value of b can be -1000.000 ~ +1000.000
4. The value of c can be 1000.000 ~ +1000.000
5. The value of H can be -9999999.999 ~ +9999999.999
6. The value of L can be -9999999.999 ~ +9999999.999
7. To determine pass or fail the queation uses a OR, AND, XOR to determine
- 39 -
Printing options
Users can set Name, User, and Note to differentiate different experiment reports.
Users can also check the boxes next to the sections for printing Colum to determine
which data users will need to show on the report.
1. Title: The title of the experiment
2. Parameters: Shows the protocol parameters of the experiment
3. Layout: The well plate layout of the experiment
4. Raw abs. matrix: The OD value from the ACT-AMPR-750
5. Blanked abs. matrix: The OD value minus the blank
6. Delta abs. matrix: The delta OD curve
7. Calibration: The calibration value
8. Kinetics: Kinetics value for the experiment
9. Cutoff matrix: Cutoff report
10. Ratio/Inhibition matrix: Ratio/Inhibition report
11. Q.C. validation: QC report
12. Data list: Show the data list
(Matrix show as well mapping configuration)
- 40 -
Interpreting the results
The AgileReader™ will generate the results after every experiment in the data tab on
the right. Users can use to result, Calibration, Data, Cutoff, Ratio/Inhibition, Q.C,
Kinetic to view their experiment results
Result : Click on the result tab to see the parameter setup, plate layout, Raw OD, and
Con Matrix of the experiment. If check Quantitative, cutoff, Ratio/Inhibition , QC
calculation method the criteria of the calculation method will also show on this page.
- 41 -
Calibration : When Quantitative is checked in the protocol, calibration curve will be
displayed according to the setting parameter.
Layout : Shows the well mapping layout of the plate. Different types of well uses a
different color to represent.
Source data : Shows the source data for the quantitative measurement.
z In end point measurement ,if there is no reference filter then the main filter (M1)
data is the source data. If there is reference filter then M1 – R1 is the source data.
z In Two points measurement if there is no reference filter the source data will be
M1
z In Two points measurement if there is reference filter then the source data will be
D1=M1-R1
z During Kinetic measurement user cannot use reference filter, the M1 data will be
the source data
Calibrators : Will use C01~C15 to represent every STD’s name, and OD value, and
will show the average measurement and the standard Conc value
Calib Curve : When using standard curve (Curve on plate or stored curve), will use
curve fitting to create a standard curve.
Residuals table : Will use C01~C15 to show standard OD value (C set), Average Abs,
and Concentration and Residual (Ccal-Cset)
- 42 -
Curve Viewer : User can double click on the curve to enable the curve viewer. User
can also store the curve in the save curve tab on the bottom. The default stored curve
are in AgileReader™\StdCurve
Data sheet : According to the well plate mapping, the AgileReader™ will display all the
result. The data sheet will show Name, Well ID, Replicate numbers, Abs, SD, CV%,
Conc, Measuring unit, Cuttoff, and Inhibition %. The average of every value will
display a _avg next to the well ID.
- 43 -
Cutoff results : When clicking the cutoff box and finished the configuration,
ACT-AMPR-750 will show the cutoff results according to the well mapping. Depends
on the conditions there will be max 5 symbols to interoperate the cutoff results
﹝++﹞、﹝+﹞、﹝*﹞、﹝–﹞、﹝--﹞
Ratio/Inhibition results : When clicking the Ratio/Inhibition tab and finished configuring.
The AgileReader™ will show the sample OD value and standard OD value (BO) using
% Inhibition. Ratio is represented in Blue, Inhibition is represented in Red. Over 200%
the data will show Hi, lower than -200% will show LO
- 44 -
Q.C results: After clicking the QC calculation method and finished configuration, the
AccuMate will show the QC criteria, Pass condition, Result on the data sheet
Kinetic results: When using the kinetic measuring method AccuMate will display the
kinetic curve of every reading. User can check the reaction rate easily on this screen.
Double click on the curve to show a detailed view of the plate number and OD value
- 45 -
View Report : To view report users will have to go into file and click the
Generate/Preview report tab for the AgileReader™ to generate report. After reports
being generated, users can use the Export/print option to save to Excel or print. The
report will be saved in Program Files\ACTGene\AgileReader™\Data under excel file.
- 46 -
Appendix A
Setting of USB Serial Port
If your Windows(XP/98SE) PC has USB ports only, please install the attached USB to
RS232 driver on PC. Connecting the USB cable between PC and ACT-AMPR-750,
then power it up. Please set up your Windows(XP) computer as follow.
Under ‘Systems Tasks’ of ‘My Computer’ screen, press ‘View system information’.
In System Properties, select icon ‘Hardware’ and press button ‘Device
Manager’(figure A-1).
In Device Manager, double click ‘USB Serial Port’(figure A-2) to enter port
setting(figure A-3). Please remember the com-port number for further use in appendix
B. Fill in ‘57600,8,None,1,None’ in those blanks. Press button ‘Advanced..’ to enter
advanced COM setting(figure A-4). USB transfer size is to be selected as max
number(4096). Latency timer is to be smallest number(1)
Upon finishing above procedure, please go to appendix B for further operation.
(Figure A-1)
- 47 -
(Figure A-2)
(Figure A-3)
- 48 -
(Figure A-4)
- 49 -