1
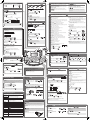
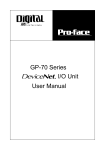
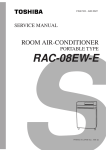
Part Names and Functions Keyboard See the other side for more information. Notation used in this manual Indicates information that, if ignored, could possibly result in CAUTION personal injury, physical damage, or damage to equipment due to incorrect handling. User’s Guide Indicates important information about LW-700. Attention Indicates additional information and points which may be useful to know regarding a topic. Indicates a separate manual where detailed information regarding a topic can be found. Indicates a title on the other side where detailed information regarding a topic can be found. MEMO Read this document carefully to use this product safely and correctly. If your product is faulty, please read the included warranty card and contact the store you purchased it from. If you require further assistance, contact your local Epson customer support centre. Please also visit us at www.epson-europe.com/support for help and support. , , 2. Preview 13. Delete 3. Print settings 14. Symbol list 4. Character keys 15. Font selection 5. Shift 16. Edit menu 6. Power 17. Increases the label number. 7. PC link 18. Sequence number menu 20. Preference menu 9. Accent marks 21. 10. Space Decreases the label number. 22. Special labels shapes 11. Cursor keys Included Items 23. Display By pressing + a key with a blue icon, you can operate the allotted function. By pressing + a key with a blue character on it, you can enter the character indicated in blue. 1. LW-700 2. AC adapter 3. USB cable 2. Shows which case you are using. 4. Tape cartridge 3. Blinks while selecting an accent 5. Label Editor CD-ROM 4. Indicates the current label number. Documents 5. Indicates which line you are editing. Appears when multiple lines exist. 6. 19. Font size 8. Caps lock Indicates steps in a procedure. Indicates the menu items, messages shown on the display, or the name of a manual. Example: "On", "Start print?" "Name" 12. Enter Separate "Label Editor User’s Guide" Indicates the buttons on LW-700. , 1. Print Display 7. When this indicator is off, tape is 1. Shows the remaining battery level. not automatically cut after it is printed. 8. Indicates the font width you are mark. using if customized. 9. Shows the currently selected font size setting. 6. Cursor Start Here Connecting the supplied AC adapter Installing a tape cartridge Using batteries (commercially available) CAUTION Connect the AC adapter as shown below. Insert the batteries with the correct polarity. Rewind the ink ribbon. Put the tape end into the tape eject slot Auto power-off Close the battery cover. If there is no key operation within five minutes, LW-700 automatically turns off. (The characters you have entered in the current session are stored.) If there is no operation within one hour while PC Link is in use, LW-700 automatically turns off. Close the top cover. Pull the tab to open the top cover. Using Label Editor software (PC Link) Tab Feeding the tape Top cover CAUTION Connect the USB cable to LW-700. CAUTION Be sure to use the supplied USB cable. . Make sure that the power is turned off. • Be sure to turn off the power before installing the batteries. • Use AA alkaline batteries or nickel-hydride rechargeable batteries (SANYO eneloop is only available). Other types of batteries cannot be used. • If you use Nickel-hydride batteries, set "Battery type" to "Ni-MH". (Press ) • When nickel-hydride batteries are in use, the battery level may not be displayed correctly. Remove the battery cover. Press Install a tape cartridge. CAUTION CAUTION Be sure to use only the supplied AC adapter. Turning the power on Be sure to feed the tape every time after you install a tape cartridge. Connect the other connector of the USB cable to the computer. Press + . The setting menu appears on the display. See separate "Label Editor User's Guide" for how to install and operate Label Editor. Select an item with CAUTION Make sure the top cover is completely closed. Entering text (Example: Name) Press + . Attaching label Printing label Attach the label and rub it firmly. MEMO Press keys: , • To cancel the printing, press . • Depending on your margin setting or the label type, tape may be fed and cut before printing. , "Name" appears on the screen. • Do not insert your fingers into the tape eject slot. • Do not pull the tape until the printing is completed. To decorate your text, see the other side. Press + . Style 1 Style 2 Press key. The characters you have entered in the current session are stored even after LW-700 is turned off. They are displayed when it is turned on again. Disconnect the AC adapter both from the electrical outlet and LW-700. CAUTION Attention Switching display style . Disconnect the supplied AC adapter. CAUTION MEMO Press Turning the Power Off Peel off the backing paper. Press . The label will be automatically cut when the printing is completed. . Tape feed: feeds the tape. Feed and cut: feeds and cuts the tape. • "Insert tape" will appear on the display if the tape cartridge is not loaded or not correctly set. • Length of the label shown on the display is a guide and may not match the length of the printed label exactly. • Label over 16m in length cannot be printed. Depending on the environment where you use labels and the nature of the adherend surface, the labels may be peeled or discoloured, and the adhesive may remain on or damage the adherend surface. Be sure to check the environment and the nature of the adherend surface before use. Epson takes no responsibility for any damage or loss due to the above mentioned causes. CAUTION • "Powering off." is displayed while turning off this product. Do not remove the AC adapter until the message disappears. • If this product is not to be used for long periods, remove the batteries, the AC adapter, and tape cartridge from the this product. Specifications Viewing print image The preview and the length of the label are also displayed. Up to 4 lines can be displayed at a time. Press . The print image scrolls on the entire screen. MEMO • To exit from the preview, press or . • You can stop the scrolling text temporarily by pressing Power supply Body Dimensions Approx. 184 (W) x 238 (D) x 79 (H) (mm) Weight Approx. 780 g (excluding batteries, tape cartridge) Usage conditions or . Attention Operating temperature 5 to 35 degrees C Storage temperature -10 to 55 degrees C AC adapter Type AST1116Z1-1 Manufacturer Seiko Epson Corp. Input AC100-240V, 0.4A, 50-60Hz (dedicated adapter, power cable only) Output DC11V, 1.64A Total output power 18 W Battery Printed labels may differ from the preview images. Supported tape width AA alkaline battery x 6 or AA Ni-MH battery x 6 6 mm, 9 mm, 12 mm, 18 mm, 24 mm Safety Instructions For your safety, read the attached documents carefully to use this product correctly. After you have read all instructions, keep this manual handy for future reference and to make your concerns clear. Items below indicate safety precautions to protect users, their surroundings and their property from possible injury or damage. Precautionary notations are categorised as follows according to personal injury and damage to the equipment if the instructions are ignored or the equipment is misused. DANGER This symbol indicates information that, if ignored, could possibly result in serious or fatal personal injury. Take extra caution in performing procedures with DANGER headings. WARNING This symbol indicates information that, if ignored, could possibly result in serious personal injury or even death due to incorrect handling. CAUTION This symbol indicates information that, if ignored, could possibly result in personal injury, physical damage, or damage to equipment due to incorrect handling. The following describes the meaning of each symbol used in the precautions. This indicates an important reminder. This indicates a prohibited item. This indicates a mandatory procedure. DANGER When handling batteries If liquid leaking from an alkaline battery gets into your eyes, do not rub your eyes but immediately wash them well with clean water and contact a doctor. Otherwise, it may cause blindness. WARNING When using the AC adapter and power cable Do not use any AC adapter or power cable other than the dedicated AC adapter and power cable. Do not use the AC adapter with other than the specified voltage also. Otherwise, damage, overheating, fire or electric shock may occur. Take the following precautions when handling the AC adapter and power cable. • Make sure to avoid octopus wiring. • Make sure the plug is not dusty before inserting it into an outlet. • Insert the plug firmly into the outlet. • Do not hold the AC adapter or the plug with wet hands. • Do not pull the power cable when disconnecting the plug. Be sure to hold the plug when disconnecting it. • Do not make any modification to the AC adapter or power cable. • Do not apply strong shocks to or put a heavy object on the AC adapter or power cable. • Do not bend or twist the AC adapter or power cable forcibly. • Do not place the AC adapter or power cable near a heater. Do not use any damaged AC adapter or power cable. Otherwise, damage, overheating or smoking may occur, which may result in fire or electric shock. Do not touch the plug during thunderstorms. When handling batteries Keep batteries out of reach of children. They are extremely dangerous if swallowed. Contact a doctor immediately if swallowed. If you use nickel-hydride rechargeable batteries (SANYO eneloop is only available), follow the instructions on the batteries and the charger. When using this product Do not apply any strong force or shocks to the product such as standing on, dropping or hitting it. Otherwise, the product may be broken, which may result in fire or electric shock. If it is damaged, turn off the power immediately, unplug the AC adapter and remove the batteries, and then contact the Epson customer support centre. Continuous use may result in fire or electric shock. Take care not to spill any beverage such as tea, coffee or juice onto the product, or to spray aerosol insecticide. It may cause malfunction, fire, or electric shock. If any liquid has been spilled on the product, turn off the power, unplug the AC adapter and remove the batteries immediately, and then contact the Epson customer support centre. Continuous use may result in fire or electric shock. Do not touch the printhead because it becomes very hot. Otherwise, there is a risk of burns. Do not open any covers other than the top cover or battery cover. Doing so may result in fire or electric shock. Always use the product as instructed in this manual. Otherwise, damage or injury may occur. Never modify or disassemble this product. Doing so may cause fire or electric shock. Do not carry out any operations not described in this manual, or the product may break or cause injury. If any of the following abnormalities is observed, turn off the power immediately, unplug the AC adapter and remove the batteries, and then contact the Epson customer support centre. • If smoke, strange odours or unexpected noises come from the product • If liquid or foreign objects get inside the product • If the product has been dropped or damaged Do not touch the tape eject slot, during printing or when the auto cutter is in operation. Otherwise there is a risk of injury. Others Do not use or store the product, batteries, AC adapter, power cable, or tape cartridges in the following places. • In direct sunlight. • Where it may become extremely hot such as in a vehicle with the windows closed. • Where it may become extremely hot such as near a heater or the temperature becomes very unstable such as near the exhaust duct of an air conditioner. • Where the product may get wet due to a shower or rain such as in a bathroom or outdoors. • In a dusty place or where the product may be exposed to smoke or steam such as near the kitchen or a humidifier. • On an unstable place such as on a shaky table or on an inclined place. • Where it might be subjected to vibration or shock. • Near high-voltage power lines or something that generates a magnetic field. Keep the plastic bags used to contain the product or this manual out of reach of children. Children may suffocate if they swallow them or put their heads into the bags. CAUTION When handling batteries If liquid leaks from a battery, wipe it off with a cloth and replace it with a new one. If the liquid comes in contact with your skin, wash it away with water immediately. If the batteries are used incorrectly, they may cause leakage, overheating, explosion, erosion, or damage to the product, which may result in fire or injury. • Do not use new ones and old batteries together, or mix different types of batteries. • Use AA alkaline batteries or nickel-hydride rechargeable batteries. • Use batteries in the correct directions. • Take the batteries out immediately when they have no power remaining. • Take the batteries out if you do not use the product for a long time. • Do not heat batteries or throw them in fire or water. • Do not pinch the batteries with metal tweezers or use any pointed sharp metal object such as the tip of a mechanical pen or ball-point pen when taking the batteries out. When disposing of used batteries, make sure to follow the regulations. When using the AC adapter Do not unplug the AC adapter while the product is in operation, otherwise printing may not be successful. Do not use the AC adapter in a small, confined space, or cover it with a cloth. Otherwise, the AC adapter may overheat and deteriorate. When using this product Do not stand or put anything heavy on the product or place it on an unstable place such as on a shaky table or on an incline. Otherwise, the product may fall and cause injury. To ensure safety, unplug this product before leaving it unused. Before cleaning, make sure to unplug the AC adapter from the outlet, and remove the batteries. Do not use a moistened cloth or solvents such as alcohol, thinner or benzine. Do not block or insert objects into the supplied AC adapter socket or the tape eject slot. When handling tape cartridges • Make sure to use a dedicated LC Tape. • Some types of tape cannot be cut by the cutter. For the details, refer to the tape's manual. • Do not drop it or disassemble it. Doing so may cause damage. • Do not pull out the tape forcibly by hand. But make sure to feed the tape with + . Otherwise, the tape cartridge may be broken and unusable. • Avoid using a tape cartridge without remaining tape. Doing so may cause overheating of the printhead, which may result in damage or malfunction. MEMO Tape cartridges contain ink ribbons in them. When disposing of tape cartridges, make sure to follow the local regulations for disposal. Other cautions Notes on usage • Operate the keyboard gently. • Take care not to cut your fingers when cutting the label with scissors. • Do not attach a label on human bodies, living things, public facilities or other people’s belongings. • Be sure to turn the power off after use. • Powering off message is displayed while turning off the product. Do not remove the AC adapter until the message disappears. • Be sure to replace batteries with the power turned off. If you replace the batteries while the product is powered, files or data stored on it may be deleted. Key functions during operation To redo or exit without changing the setting: Creating a label or editing a created label Creating a label for cables To select a setting item: The text you have entered before turning LW-700 off is stored unless deleting it or initializing the settings. So, when LW-700 is turned on, the display shows the text you entered before LW-700 was previously turned off. To confirm the setting: Wrap:V Creating an equipment management label Wrap:H Press . Enter text for "Products name" shown with Press to go to the next line, and enter text. Press . Text in is for this cell. MEMO To create a label other than an equipment management label, press . or Tab:V Length > Auto, 3.0cm to 40.0cm Frame & Table "Symbol List" on the separate sheet Decorates the text with a frame or inserts a table. Tab:H Select the length and press . Select an option with and press . When "Print copies" - "Set number" is selected, enter the number of Press . Printing starts. Print settings Shading, Brdr mesh, Round mesh Applies border, underline, shade etc. to text. Background > None, 1 Wave, 2 Diamond, 3 Flower, 4 Cards, 5 Arabesq., 6 Mesh, 7 Dotted Sets the background pattern. . Bold & Italic > Italic, Normal, Bold, B+I Place the cursor. Place the cursor on the left of the characters to which you want to apply a function. If you apply the function to a specific line or block, confirm that the cursor is in the line or block. . Select "Bold & Italic" with . and press and press . Select an area to which you want to apply the function with and press . When "character" is selected, the function is applied to all characters on the right of the cursor. MEMO When "Length", "Margins", or "Background" is selected from Edit menu, the settings are applied to the whole label. Changes the text in bold or italics. Vertical > Off, On The orientation of the label can be changed to vertical. When entering two-digit numbers Set "Vertical" to "On" in advance. 1. Press . + 2. Select "Doublefigure" with press . Adjustable in seven levels. Usually use "0". Auto cut 3. Enter numbers and press When "Off " is selected, the label is not automatically cut. When cutting the tape, cut it with the "Feed and cut" function. "Feeding the tape" + Procedure for setting Select "B + I" with This allows you to change the width or height of characters. , then Print density Press SansS.HG, SansS.ST, Gothic, B.Gothic, Roman, US Roman, CL Roman, Mincho, Gyosho, Reisho, BR, CB, ScriptPL Changes the font type of text. Char. Width > Smaller, Small, Narrow, Normal, Wide MEMO • 6 mm tape cannot be used for this function. • To create a label other than a tab or multi label: 1. Press . 2. Select "Exit" and press . . and press Border & Line > Strikeout, Underline, None, Border, Round brdr, . Enter characters and/or symbols. When "Panel"is selected, press enter text for the next label. . Char. spacing > None, Narrow, Normal, Wide . Font > SansS., Example: to apply "Bold & Italic" Sets the inter-character spacing. and press You can change the font size of text or a block line by line. Among the preset setting items, select one with the same number of lines as that of the text or block you want to change. To restore the previous settings, select "Equal". Press Applies a character style to text. . Select a function with Off Select "Start print?" with Adjusts the layout when multiple lines are used. When "Auto" is selected in "Length", the margins of the label become the same. Press copies and press Layout > Left, Center, Justify, Right Style > Outline, Normal, Shadow, S+O and press MEMO The label number is between 00 and 99. Up to 100 labels can be created at a time. Font size > Equal, 1 Line, 2 Lines, 3 Lines, 4 Lines, 5-8 Lines Sets the length of the label. When "Auto" is selected, the label length is adjusted to the current text. Select the layout of the text from "Left", "Center", "Justify", and "Right" after setting the length of the label. Panel Creates labels with the same width when the length is specified in "Length". When "Until stopped" is selected, labels are printed continuously until any key is pressed. Select a function with and select a label number to use, then enter text. You can decorate your label by setting the following. Margins > Minimum, Short, Middle, Long, Tape width /3, Tape width Print copies Press or Decorating your label (Edit menu) . Creating a tab and multi label Setting special print On Press . Sets the left and right margins. Mirror print To create the next label continuously: . MEMO • When creating a "Wrap:H" label, use 24mm tape. • To create a label other than a label for cables: 1. Press . 2. Select "Exit" and press . Label Automatically entered. and press Enter text there. Enter characters and/or symbols. Press Display . Select the length and press in the sample below. When text appears: • Overwrite the displayed text. (The overwritten text is deleted.) • Press or and select a label number in which there is no text, then enter text. Select a function with Press . When "Overwrite text?" appears, press Flag:H Flag:V When no text appears: and . . Select a function with and press . Select an option with and press . Adding a symbol Press Changing the font . Press . The font used for the entire text will change. The fonts appear in the following order. SansS. SansS.HG SansS.ST Gothic B.Gothic Roman US Roman CL Roman Mincho Gyosho Reisho BR CB Script PL Back to SansS. Switching upper case or lower case Press . To capitalize characters partially, press and hold , and enter characters. The indicator shows which case you are using. Select a category with Select a symbol with and press and press . MEMO To change the setting by line or character, use . . MEMO For available symbols, see "Symbol List" on the separate sheet. Adding an accent mark When entering "É" for example Press + . Adding a punctuation mark Press . A list of characters appears. Press Select a character with and press . (or + Preference menu Changing the font size ) for the next mark. * The location of the punctuation key and symbols printed on it will vary depending on the region of purchase. Press . Press repeatedly until an appropriate font size appears. Backlight Creating labels with serial numbers Attention This function initializes the settings. Take extreme care before initializing it. All the created text will be lost and the settings you made will be reset. If the power is on, press Press and hold + , and press Select a repetition number with and press The second line Adding a New Block . . If a one-digit number such as "2" is entered in Step 2, the following is displayed. + On: becomes "10" after "9" and goes up to "99". Block1 When a message appears This section explains the remedies when the following messages appear on the display. Check battery The batteries run out. Turn off the power and replace all Change alkaline batteries with new ones. For how to replace batteries, see the following: Check battery "Using batteries (commercially available)" Change Ni-MH! Cover open! Powering off. Top cover is open. Close the cover, and turn on the power again. Insert tape Check if the tape cartridge is loaded or correctly set. For how to install a tape cartridge, see the following: "Installing a tape cartridge" Check tape cartridge Insert 24* tape! The loaded tape is not supported. Insert a correct cartridge. Printing is available only for 24 mm tape. Use a 24 mm tape. Load wider tape Unable to print on the loaded tape. Change to wider tape. Too many lines. Delete some lines because they exceed the specified value. Printing length too long! Text is too long Continue? Shorten the text. Unable to print because the text length exceeds 16 m. Text overflows for the specified length. Shorten the text or press for printing label in text length. inch:cm The unit of length used to indicate the label size can be switched between inch and cm. Block2 Press + . A new block is star ted from the character next to the cursor. Press . Select a function with Off: goes back to "0" after "9". Select an item with Adding a barcode Block1 You can select the language shown on the display from the following: English, Español, Italiano, Português-EU, Français, Nederlands, Deutsch, Svenska, Suomi, Norsk, Dansk, Português-Br Procedure for setting By dividing text into blocks, you can change the style and the number of lines block-by-block. Label Display Block2 Battery type Language If the repetition number is two or more, the same label is printed for the number of times, then the number/alphabet increases. . Turns the backlight of the display on/off. If you use Nickel-hydride batteries, select "Ni-MH". "Alkaline" is selected by default. MEMO If "Too many lines." appears, reduce the number of lines. . . MEMO To cancel initialization, press a key other than Press . To break a line, place the cursor where you want to break the line, . Enter a number(0-9 or 00-99) or alphabet(A-Z or a-z) and press . Adding a line then press to turn it off. When a message appears, press The settings will be initialized. Press Enter key Initialize the settings if LW-700 does not operate normally such as the display is interrupted. Contrast You can adjust the difference between light and dark on the display. MEMO For available accented characters, see "Symbol List" on the separate sheet. Initializing the settings You can adjust LW-700 for more comfortable use by setting the following. and press and press . . + Supported barcode types: EAN-8, EAN-13,CODE128, CODE39, QR CODE, ITF, CODABAR, UPC-A, UPC-E Press + . Select an item with and press . Move on to the next options until the setting is complete. When [| ] appears on the display, enter the barcode number. Cleaning MEMO Only one barcode can be inserted into a label. CAUTION Before you start cleaning, turn off the power and unplug the AC adapter. Exterior Wipe the dirt off with a soft cloth. If it is very dirty, use a cloth wrung out of water. CAUTION No more Only one serial number sequence can be set at a time. sequence No.! No more barcode! Only one barcode can be created at a time. QR CODE too big! Perform either of the following: Use a wider tape. Reduce the text or cell size. Lower "ECC Level". Printhead Overheated! The printhead is overheated. Turn off the power and remove the tape cartridge, then leave the product until it cools down. Clean the printhead with a cotton swab. Motor error! The motor is abnormal. The power is automatically turned off. Turn the power back on. If the error persists, contact your local Epson customer support centre. Never use chemicals or solvents such as benzine, thinner, or alcohol, or use a chemical duster. Delete key Deleting characters Press . A character is deleted backward. Deleting lines Press at the line number. Deleting all text + Attention This operation deletes all the text for the current label. The deleted text cannot be restored. Press + . When "Delete all text?" appears, press MEMO To exit without deleting any text, press . .