Transcript
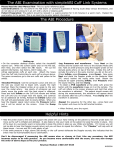
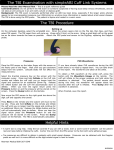
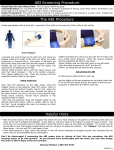
The ABI Examination with simpleABI Systems
Please Read the User Manual first– This is a quick reference guide
Contraindications: Do not perform the ABI exam on someone suspected of having acute deep venous thrombosis, and
do not take an arm pressure in an arm with a shunt or dialysis graft.
Patient Preparation: The patient should be relaxed in a supine position for 5-10 minutes in a warm room. Explain the
examination to the patient. This is an ideal time to enter patient information
The ABI Procedure
• On the computer desktop screen, select the simpleABI reports icon. When the screen opens click on the File tab, then
New, and then select the ABI report. Fill out the patient information, risk factors, ICD-9 codes, etc.
•Wrap appropriate cuffs at each site – generally 12cm cuffs on the arms and 10cm cuffs on the ankles.
Arm Pressure
Ankle Pressures
• Connect the hose to the right arm cuff. Place the Doppler
probe at an angle to the skin over either the radial
(preferred) or brachial artery. Use plenty of ultrasonic gel
and slowly move the probe until the best signal is obtained.
•Inflate the cuff until you no longer hear the signal, and
continue for an additional 20 mmHg.
•Slowly bleed pressure down until the signal returns and
note that return pressure. This is the systolic pressure.
Then rapidly deflate the cuff. Enter the pressure into the
respective brachial field on the report.
•Now take the pressures at the right ankle, using the
Doppler probe on the posterior tibial (PT) artery, which is
usually found just behind (roughly half an inch- about the
diameter of a dime) the ankle bone. Occlude the artery in
the same manner you did on the arm in the previous step,
noting return pressure. Record return pressure in the
respective field on report.
• Now take the pressure at the foot using the Doppler probe
on the dorsalis pedis (DP) artery, which is usually right on
top of the foot. To avoid occluding the arteries by pressing
too hard with the probe, be gentle.
•Inflate and bleed the cuff as you did with the PT artery and
arm, noting return pressure. Enter the systolic pressure
into the respective DP field on the report.
PVR Waveform
Move the hose to the ankle cuff and inflate to ~75mmHg
and then bleed to 65mmHg. (the green bar should be
about in the center of its box). Set aneroid on exam table
when finished bleeding pressure to avoid affecting
waveforms with your movement.
Press or click ‘Right PVR’ button. A pop-up window will
appear; press or click ‘Get Waveform’. simpleABI Reporting
software will take 5 seconds of PVR waveforms and return
to form. If waveform is acceptable, proceed to the ankle
pressures. You can click again on the “Get Waveform” box
if you are not satisfied with the waveform.
•When finished with the right side move to the left ankle.
•Start by obtaining a PVR waveform on the left ankle.
•Then take the ankle pressures at the PT and the DP.
•Follow by taking the left brachial arm pressure.
•When finished, save the report.
Helpful Hints
• Hold the probe close to the end and support the probe with your hand resting on the patient so that the probe does not
move as the cuff is inflated and deflated. It also helps to rest your hand on the patient to keep the probe in place. One
of the keys to a successful exam is being able to keep the probe in place as you inflate and deflate. If it moves you will
not be able to hear the Doppler sounds return and you will have to repeat the inflation. The “Cheater” will help with all
these issues – be sure and fill it with plenty of gel.
• If the ankle pressure is high, above 200 mmHg, or the cuff cannot obliterate the Doppler sounds, this indicates that the
artery may be incompressible due to calcification.
Don’t be discouraged if measuring the ABI seems slow or clumsy at first. Like any procedure, the ABI
becomes easier to do with practice. As you become more comfortable with the exam, you may also change
the order of above steps as fits your practice.
Newman Medical 1-800-267-5549
NM0013-F