1
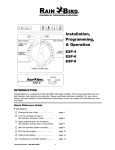
UNIK
Field Transmitter
Operating Principle
The following parameters are transmitted to the module:
The following parameters are received by the transmitter:
•
•
•
•
•
•
•
Current time and day
Water days / program
Start times / program
Run time / station and program as-
Water days / program
Start times / program
Run time / station and program assignment
Welcome to Rain Bird
The UNIK® Field Transmitter, part of the UNIK irrigation system family, allows you to
create, transmit and retrieve irrigation programming information when used with the
UNIK Control Module.
•
•
•
•
•
•
•
•
The Field Transmitter features include:
One minute to 12 hour irrigation run times per station in one minute increments
Three independent programs: A, B, C
Up to eight start times per program per day
Seven-day programming schedule calendar
Manual irrigation start or stop capacity
Ability to program an unlimited number of Control Modules with one Field Transmitter
Automatic reset of current time and day when transmitting a program to a Control
1
Quick Programming Guide
A Quick Programming Guide label is provided with the Field Transmitter. This label
should be placed on the inside of the Field Transmitter’s protective cover.
Understanding the Menu Display, Icons and Keypad
Menu system
The Field Transmitter has a cyclical menu system, which means that you move
through the eight menu displays one display at a time by pressing
. All of the
displays (except the start-up display) have icons representing the function that you
can program while in that display.
11
LCD display icons
1
Prog A
!
Prog B
10
Prog C
9
A
B
CY
C
2
3
1
2
4
1.
2.
3.
4.
5.
6.
7.
8.
9.
10.
11.
3
4
5
5
6
Program (A, B, or C)
Current time
Day of week or water day
Set watering days
Start time
Run time for each station
Manual start:
l single station: STA
l multi-station (cycle): CYC
Assign a station to a program (A, B, or C)
Transmitting program
On-off mode
Transmission failed
2
6
7
7
8
Keypad
A
B
C
ON
+
G
ABC
D
OFF
F
E
A. Arrow key/Next function
B. Increase/On
C. Program (A, B, C)
D. Decrease/Off
E. Transmit (download program) to Control Module
F. Retrieve (upload program) from Control Module and display program
G. Cycle key
l set clock / set current day
l watering time per station / select station
Installing the Battery
The Field Transmitter is powered by a 9-volt alkaline battery (not included), type
6AM6 (international standard) or type 6LR61 (European standard). We recommend
that you use a high-quality alkaline battery, such as Energizer. A high-quality battery
will last one year.
To install the battery:
1. Remove the screws that secure the battery compartment cover.
2. Remove the battery connector from the battery compartment and attach the battery
to the connector.
3. Insert the battery and connector into the battery compartment.
When the battery is properly connected, the start-up display will read 00:00.
4. Reinstall the screws that secure the battery compartment cover.
The Field Transmitter can now be programmed.
3
Setting up the Field Transmitter
Before you can create watering programs, you must
set the current time and day.
Setting the time
To set
1. Press
the time:
until the clock icon appears in the display.
2. Select either a 12-hour or a 24-hour display. The default
hour.
If you would like a 12-hour display, press and hold down
AM or PM will appear on the display to the left of the time.
time display is 24
for two seconds.
codes
Important: Only Field
or later
have the
Transmitters with November 1997 date
AM/PM option.
3. Press
to advance the clock or
to reverse the clock. Pressing and holding
down either key will make the numbers change more quickly.
Note: If the display shows AM and the current time is actually PM, advance or
reverse the clock until the display shows PM.
Important: When you change the batteries in the Field
Transmitter, the time reverts
back to the 24-hour display.
Setting the current day
The days are indicated by a number, for example,
1=
Monday, 2 = Tuesday, etc
To set
Press
the current day:
to select the current day
example, if it is Wednesday, press
until the square is around 3.
of the week. For
repeatedly
Programming the Field Transmitter
Before you begin programming the Field Transmitter, please take some time to learn
some of the programming and connection options you have with your irrigation system.
Three independent programs
The Field Transmitter has three independent programs: A, B and C. You can consider
each program as a separate controller with its own water days, start times and run
times. This allows you to select a program according to plant type; for example, A for
grasses, B for shrubs and C for trees. Stations assigned to the same program operate
sequentially.
4
Simultaneous watering start
If you assign a separate or different station to each program with the same water days,
start times and run times, you will obtain an almost simultaneous start of all three stations.
Multiple stations and programs
If you want more than eight start times per day on a site equipped with only one valve,
you can wire the valve to several stations on a Two or Four Station Control Module
and program multiple start times for each station.
For example, if you wire the same valve to both stations on a Two Station Control
Module, you can obtain up to 16 starts (2 x 8). If you connect the same valve to three
stations on a Four Station Control Module, you can obtain up to 24 starts (3 x 8). Stations assigned to this valve, however, cannot be assigned to other valves. If you use
this method, make sure that there is no program overlap. The program run time must
be shorter than the time interval separating the two start times.
Note: A One Station Control Module can use only one program.
Now you can begin setting up your watering programs.
Setting the water days
You must select the days of the week that you want to water for each program. If there
is a square around the day, watering will occur on that day. If the day does not
have a square around it, watering will not occur on that day.
To set the watering days:
1. Press
repeatedly until the
icon is displayed.
Program A will also appear in the display. If you want to
select Program B or Program C, press
program you desire is displayed.
until the
2. If you do not want to water on a certain day that is set as a watering day (it has a
square around it), press
repeatedly to advance to that day.
The day selected will blink.
3. Press
.to remove the square.
The square will disappear and no watering will occur on the selected day.
4. If a day you want to water does not have a square around it, press . repeatedly to
advance to that day.
The day selected will blink.
5. Press
to place a square around the day.
A square will appear around the day and watering will take place on the selected
day.
6. Repeat steps 2-5 until all the days are set for the program. When you are
ready to move on to the next program, press
to change to another program.
7. When you have set the watering days for all of your programs, press
5
to move
Setting the start times
You can set up to eight start times for each program, but it is not necessary for you to
use all eight start times with each program. After you enter all the start times, the
transmitter will automatically organize the start times in chronological order, from
00:00 to 23:59 or 12:00 AM to 11:59 PM.
To set the start time:
1. Make certain the
icon is visible on the display.
If it is not, press
repeatedly to cycle through the
menu system and display the
icon.
2. Press
repeatedly until the program you desire (A, B, or C) appears in the display.
3. Use
and
to set the first start time.
4. Press
to move to the next start time.
5. Repeat steps 3 and 4 until you have set all of the start times you desire (up to eight
per program) for the program.
6. If you would like to set start times for additional programs, press
until the pro
gram you desire is displayed. Then repeat steps 3 and 4.
7. When you have finished setting the start times, press
Setting the Watering Time Length display.
to move to the
icon,
Deleting a start time
To delete a start time:
1. Press
to advance to the
2. Press
icon.
to change to the appropriate program.
3. Press
to scroll through the start times and decide which one to delete (the start
times will be in chronological order).
4. Again, scroll through the start times and pause on the start time just before the time
you wish to delete.
5. Press and hold . The start time will flash momentarily on the display, signaling its
cancellation, and then change to --.--.
Note: It is a common misunderstanding that a start time of 00:00 is “off.” It is
actually a midnight start time. An “off” time is indicated by --.-- in the display.
Setting the run time per station
You can set the run time for each station from 0 to 12 hours (in one minute increments). All One Station Control Modules must be programmed on station 1. Multistation Control Modules (Two Station and Four Station) must be programmed starting
on station 1. For example, on a Four Station Control Module, programming would start
on station 1, then station 2, 3 and 4.
6
Note: Each station may be assigned to only one program (A, B or C)! The station will only respond to the start times and days on for this program.
Note: The time display is represented in hours and minutes. The first two
placeholders are for hours; the second two placeholders are for minutes.
To set the run time:
1. Make certain the
icon is visible on the display.
If it is not, press
repeatedly to cycle through the
menu system and display the
icon.
2. The station number appears to the left of the run time. Use
to select the station.
3. Press
repeatedly until the program you desire (A, B, or C) appears in the display
(to the right of the run time). Each station must be assigned to a program (A, B, or
C).
4. Use
5. Press
and
to set the station run time.
to move to the next station.
6. Repeat steps 3 through 5 until you have set all of the station run times.
Note: If there is an overlap on the same station, the second run time will not
take place.
7. When you have finished setting the run times, you may review the run times by
pressing
.
Erasing Field Transmitter programming data
To erase all program data in the Field Transmitter (except the current time and day):
Press and hold
and
simultaneously for at least three seconds.
All programming data are erased.
Transmitting Programs to a Control Module
When you want to transmit (download) program data to a Control Module:
1. If the Field Transmitter’s display is blank, press
.
2. If you have not already done so, enter the program data into the Field Transmitter.
3. Plug the Field Transmitter’s
optical connector onto the
Control Module’s optical connector.
4. Press
The
icon will appear on the screen for two seconds. When the icon disappears
from the display, the program data has been successfully transmitted.
Important: If there is a transmission problem, the
display and you will hear three beeps. Then the
7
icon will appear in the
icon will appear.
Verify that the:
Field Transmitter and the Control Module are connected properly
· l Field Transmitter’s and the Control Module’s optical connectors are clean
(wipe the connectors with a damp cloth)
l Field Transmitter and the Control Module have a fully charged 9-volt alkaline
battery
Press
and then transmit the programming information again.
l
5. Disconnect the Field Transmitter from the Control Module.
Reviewing Control Module programs
When you want to verify the program data of a Control Module:
1. Plug the Field Transmitter’s optical connector onto the Control Module’s optical
con- nector.
2. If the Field Transmitter’s display is blank, press
.
3. Press
on the Field Transmitter to receive (upload) the program data stored in
the Control Module. You can now review all of the Control Module program data ex
cept the current time of day stored in the Control Module.
Note: The Field Transmitter does not receive the current time from the Control
Module because there may be a difference in the current time between the two
devices. However, when you transmit (download) a program to a Control Module, the Field Transmitter synchronizes the Control Module’s current time
with the Field Transmitter’s current time.
4. To modify the program data stored in the Control Module, enter the desired modifications into the Field Transmitter, then press
to transmit (download) the program to the Control Module.
The
icon will appear on the screen for two seconds. When the icon disappears
from the display, the program data has been successfully transmitted.
Note: Press even if you have not made any changes to the programming data.
This will synchronize the time between the two devices.
On-off Mode/System Override
The Field Transmitter’s On-off function allows you to completely suspend and override
all currently set programming in the Control Module, without changing or losing this
programming for future use.
The Control Module’s default mode is always ON, allowing programmed watering to
take place. You can prevent watering, however, by activating the On-off Mode,
thereby switching the Control Module’s default mode to OFF.
8
Activating a Control Module’s On-off Mode
To activate the On-off Mode (or turn the Control Module’s default mode to OFF):
1. Press
played.
on the Field Transmitter repeatedly until the
icon is dis-
l
If the On-off Mode is deactivated, you will see the
icon, indicating that
the Control Module will water according to current programming.
l
If the On-off Mode is activated, you will see the
icon, indicating that all
Control Module programs have been overridden and no watering will take place.
2. If the
icon is displayed, press
.
The Field Transmitter sends the irrigation OFF command to the Control Module. An
X will appear on the sprinkler icon
.
Deactivating a Control Module’s On-off Mode
To deactivate the On-off Mode (or turn the Control Module’s default mode on):
1. Press
on the Field Transmitter repeatedly until
the icon is displayed.
l If the On-off Mode is deactivated, you will see the icon,
indicating that
the Control Module will water according to current programming.
l
If the On-off Mode is activated, you will see the
,indicating that all Control Module programs have been overridden and no watering will take place.
2. If the
icon is displayed, press
.
The Field Transmitter sends the irrigation ON command to the Control Module. The
X on the
icon disappears.
Verifying the On-off Mode
To check the Control Module’s On-off status:
1. Plug the Field Transmitter’s optical connector into the Control Module’s optical con
- nector.
2. If the Field Transmitter’s display is blank, press
.
3. Press
on the Field Transmitter to receive (upload) the program data stored in
the Control Module.
4. Press
·
·
on the Field Transmitter repeatedly until the
icon is displayed.
l
If the On-off Mode is deactivated, you will see the
icon, indicating that
the Control Module will water according to current programming.
l
If the On-off Mode is activated, you will see the
icon, indicating that all
Control Module programs have been overridden and no watering will take place.
9
Performing Manual Starts and Stops
Important: Before you perform manual starts and stops, you must verify the
status of the Control Module’s irrigation status. See Verifying the On-off
Mode, on page 9 (previous page).
Note: The manual functions described below override all other functions
(except On-off); any program currently running will be suspended to permit
their use. Manual starts and stops only affect an existing station run time or
program.
Important: Manual operations will not work if the On-off Mode is activated.
Starting a Control Module manually
You can perform either a single-station or a cycle (multi-station) manual start. Before
carrying out either type of manual start, make sure you have programmed a run time
of at least one minute and that the Control Module’s On-off Mode is not activated.
Performing a manual single-station start
If you would like to manually start one station:
1. Press
until the
icon is displayed.
The station number will also be displayed.
2. Press
to stop any stations that may be watering. If a station is in operation, a
manual start is impossible. A station may be in operation at the module level, but
without any irrigation in the field. This is what occurs when the Rain Shut-off De
vice prevents programmed irrigation.
3. Press
until the station you would like to start is displayed.
4. To start a station, press
. Irrigation will start after 20 seconds if you are using an
old type Control Module. If you are using a new type Control Module (a Control
Module with a yellow wire loop), irrigation will start after 10 seconds.
5. If you wish to stop watering before the programmed time is up, press
Performing a manual cycle start
If you are using an old type Control Module, the
manual cycle start option is only available on the
Two and Four Station Control Modules. If you are
using a new type Control Module (a Control Module
with a yellow wire loop), the manual cycle start option
is available on all Control Modules (One, Two and Four
Stations). The cycle consists of all of the stations operating
in sequential order.
To manually perform a cycle start:
CYC
1. Press
until the
icon is displayed.
Prog A, B or C also appears in the display.
10
.
2. Press
to stop any stations that may be watering. If a station is in operation, a
manual start is impossible. A station may be in operation at the module level, but
without any irrigation in the field. This is what occurs when the Rain Shut-off Device prevents programmed irrigation.
3. Press
until the program cycle you would like to start is displayed.
4. Press
to start the cycle.
Irrigation will start after 20 seconds if you are using an old type Control Module. If
you are using a new type Control Module (a control module with a yellow wire loop),
irrigation will start after 10 seconds. The stations assigned to the program will operate in sequence until the last station has finished watering. Irrigation will then
stop.
5. If you wish to stop watering before the manual cycle has completed, press
.
Maintaining the UNIK Field Transmitter
To keep your Field Transmitter in working order:
· Change the battery once a year. We recommend you use a high-quality alkaline bat
tery, such as Energizer. When changing the Field Transmitter battery, any stored
programs will be lost. To avoid this:
1. Press
to download the programs into a Control Module.
2. Change the battery.
3. Press
to upload the programs into the Field Transmitter.
• Replace the Field Transmitter’s protective cover after use.
• Secure the optical connector to the base of the cord after use.
• Do not expose the liquid crystal display (LCD) to sunlight for prolonged periods.
11
Troubleshooting
The following list contains possible problems you may encounter and some solutions.
Most of the problems involving the UNIK Field Transmitter can be classified as transmission/reception malfunctions usually caused by a dead or improperly connected battery. Other common causes of malfunction could be a dirty optical connector and poor
wire connections.
These problems are easy to fix. If you experience transmission/reception problems, try
using a Control Module that operates properly to determine if it is the Field Transmitter
or Control Module that is the source of the
problem.
Before calling Rain Bird, check this list. If you cannot solve the problem yourself, call
our Technical Service Hotline at 1-800-RAIN-BIRD (U.S.) or 626-963-9311 (outside
the U.S.) and we will be glad to help you.
Problem:
Weak LCD display/no display/incomplete display
Possible cause: The battery is weak.
Solution:
Replace the battery.
Possible cause: The microprocessor has locked up.
Solution:
Remove the battery. Short the UNIK Field Transmitter battery clip
(not the battery) contacts together with a paper clip or other piece
of metal for 30 seconds. Reinstall a fresh battery.
Possible cause:
Solution:
The battery contact is faulty.
Tighten the battery connectors to ensure tight battery connection.
Problem:
Locked display or keypad
Possible cause:
Solution:
The microprocessor did not reset properly.
Remove the battery. Short the UNIK Field Transmitter battery clip
(not the battery) contacts together with a paper clip or other piece
of metal for 30 seconds. Reinstall a fresh battery.
Problem:
Station does not start
Possible cause:
Solution:
No run time has been programmed for that station.
Transmit a run time to the Control Module.
Possible cause:
Solution:
The On-off Mode is activated (X on Sprinkler icon
Permit irrigation by deactivating the On-off Mode.
Possible cause:
Solution:
Another station is in operation.
Use the manual station option to turn off that station.
Possible cause:
The battery is weak.
Solution:
Replace the battery.
12
).
Possible cause: A wire connection is faulty.
Solution:
If you are using King wire connectors, gently pull on the wires to
make sure they are secure. If the wires are loose, cut the wires. Strip
0.5 in. (1.25 cm.) of the insulation off the wires. Twist the wires, then
push the wires into a new King connector and twist the connector
around the wires. Gently pull on the wires to make sure they are se
cure.
If you are using 3M DBM wire connectors, make sure the wires have
not been stripped. Unlike other wire connectors on the market,
DBMs are designed to cut through the insulation to make a waterresistant coupling without removing the insulation. Push the wires all
the way into the wire connector. Be sure to crimp the black cap all
the way down (gel should ooze out of the top) to ensure a water resistant connection. Gently pull on the wires to make sure they are
secure. If the insulation has been stripped, re-cut the wires and repeat the steps above.
Possible cause: The UNIK Rain Shut-off Device is wet.
Solution:
Flip the UNIK Rain Shut-off Device switch to off. If you have an old
style Control Module, cut the UNIK Rain Shut-off Device wires. Connect the black wires from the Control Module to the black field wires.
Carry out a manual stop and then repeat the manual start.
Problem:
Faulty transmission
Possible cause: The optical connector on the Control Module and/or the Field Trans
mitter is dirty.
Solution:
Clean the connector(s).
Possible cause: The battery is weak.
Solution:
Replace the battery.
Possible cause: The microprocessor did not reset properly.
Solution:
Remove the battery. Short the UNIK Field Transmitter battery clip
(not the battery) contacts together with a paper clip or other piece of
metal for 30 seconds. Reinstall a fresh battery.
BIRD
RAIN
Customer Support Center
6640 S. Bonney Ave.
Tucson, AZ 85706
1-800-RAIN-BIRD
(520) 434-6289 FAX
13
®
WARNING: This equipment has been tested and found to comply with the limits for a
Class B digital device, pursuant to part 15 of the FCC Rules. These limits are designed to provide reasonable protection against harmful interference in a residential
installation. This equipment generates, uses and can radiate radio frequency energy
and, if not installed and used in accordance with the instructions, may cause interference to radio communications. However, there is no guarantee that interference will
not occur in a particular installation.
If the equipment does cause harmful interference to radio or television reception,
which can be determined by turning the equipment off and on, the user is encouraged
to try to correct the interference by one of the following measures:
• Reorient or relocate the receiving antenna.
• Increase the separation between the equipment and receiver.
• Connect the equipment into an outlet on a circuit different from that to which the receiver is connected.
• Consult the dealer or an experienced radio/TV technician for help.
Changes or modifications not expressly approved by Rain Bird Sales, Inc. could void
the user’s authority to operate the equipment.
This product was FCC certified under test conditions that included the use of shielded
I/O cables and connectors between system components. To be in compliance with
FCC regulations, the user must use shielded cables and connectors to install them
properly.
14