1
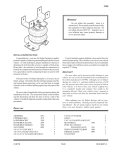
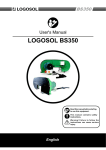
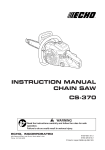
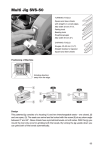
FOLLOW ALL INSTALLATION AND MAINTENANCE INSTRUCTIONS
IN THIS SHEET AND THOSE IN YOUR CHAIN SAW OPERATOR’S
MANUAL.
WEAR APPROVED EYE, EAR, HEAD, AND FACE PROTECTION.
Advanced Cutting Technology
ALWAYS WEAR PROTECTIVE CLOTHING AND GLOVES WHEN
USING THE SHARPENER.
DO NOT PRESS THE TREADED FOOT WITH YOUR HANDS, YOUR
FEET, OR AGAINST THE GROUND AS THAT WILL BRING THE
CUTTING CHAIN TOO CLOSE TO YOUR HANDS, ARMS, LEGS OR
FEET AND COULD RESULT IN SERIOUS PERSONAL INJURY.
Original Instructions:
PowerSharp® is a system that includes
the PowerSharp® chain, the PowerSharp®
guide bar, and the PowerSharp® barmount
sharpener. Together, they work to
make sharpening simple and easy.
WARNING:
THERE IS RISK OF SERIOUS PERSONAL INJURY TO THE SAW OPERATOR DUE TO THE CHAIN JUMPING OFF THE GUIDE BAR IF THE
SAW CHAIN IS NOT INSTALLED AND TENSIONED PROPERLY. FOLLOW ALL INSTALLATION AND MAINTENANCE INSTRUCTIONS IN
THIS SHEET AND THOSE IN YOUR CHAIN SAW OPERATOR’S MANUAL.
WARNING! Saw motor must be off!
BAR & CHAIN MOUNTING INSTRUCTIONS
FIG. A
Wear gloves. With the chain saw off and cool, remove the old bar and chain. Install your new bar and chain as follows:
IMPORTANT: Standard PowerSharp® bars may not work on saws equipped for Intenz® bars. Before replacing an Intenz® bar with a standard PowerSharp® guide bar, check that your saw has a tensioning mechanism on the saw (see your saw operators manual).
1)Place the guide bar on the mounting studs.
2) Loop the new chain onto the drive sprocket with teeth cutting edges facing away from the drive sprocket along top edge of the guide bar.
3) Feed the chain into the groove of the bar and slide the bar away from the motor to remove slack from the chain. Adjust the position of
the bar adjusting pin until it engages the hole in the bar.
4) Replace the drive sprocket cover with the nuts and finger tighten.
IMPORTANT: The saw chain must be properly tensioned before using. See Tensioning Instructions below.
* To even bar wear and maximize bar life, invert the bar occasionally.
Bar-Mounting Nuts
TENSIONING INSTRUCTIONS
FIG. B
Latch
FIG. A
1) With the bar-mounting nuts only finger tight, hold up the nose of the bar (FIG. A) and tighten the bar adjusting screw. (The location
of the adjusting screw varies. See your saw operator’s manual.)
2) Tighten the bar-mounting nuts securely.
Chain tension is correct when, with some effort, with a gloved hand you are able to pull the chain smoothly around the
bar. The chain should touch the underside of the bar rail (FIG. B).
During early life use, run the chain around the guide bar, not cutting for a minute or two (for gasoline-powered saws, run at slow speed),
making sure the chain is getting a good supply of oil. Stop the motor and check the chain tension. If it has loosened, readjust.
After a short period of use, allow the chain to cool and once again recheck the tension. Watch tension carefully for the first half-hour and periodically throughout the life of the chain, readjusting as required when the chain and bar are cool to the touch. Never tighten chain when it is hot.
Lubricate your chain properly with good quality bar and chain lubricant. Make certain the chain is getting an adequate supply of oil – oil
should be thrown from the nose of the bar when running, but not in the cut. For gasoline-powered saws, you should use a full tank of oil
for each tank of fuel.
When cutting under very cold conditions, bar and chain oil may be diluted with up to 25-percent kerosene or diesel fuel to ensure an
adequate flow of oil.
USING THE BAR-MOUNT SHARPENER
The PowerSharp® bar-mount sharpener requires the installation of a genuine PowerSharp® sharpening stone prior to first use. The stone is
packaged with PowerSharp® chain and should be replaced with every new chain.
IMPORTANT: The PowerSharp® bar-mount sharpener is for use ONLY with PowerSharp® chain. NEVER attempt to sharpen other chain with
the bar-mount sharpener. Damage to the chain and sharpener will occur.
IMPORTANT: PowerSharp® chain uses unique top-sharpening cutters and can only be sharpened with a genuine PowerSharp® barmount sharpener.
WARNING: ALWAYS WEAR PROTECTIVE CLOTHING, GLOVES, AND EYE PROTECTION WHEN USING THE SHARPENER.
INSTALL THE SHARPENING STONE
FIG. B
Unlatch the bar-mount sharpener cover by pulling up on the tip portion of the latch. Open the bar-mount sharpener cover (Fig. A) and insert
the stone into the mounting slot as shown (Fig. B). Ensure that the stone is completely seated to prevent loss during operation.
Steel guide pins
FIG. C
Visible tip of guide pin
ATTACH THE BAR-MOUNT SHARPENER TO THE BAR
IMPORTANT: Always position arrow on bar-mount sharpener facing up.
WARNING: NEVER ATTACH OR REMOVE THE BAR-MOUNT SHARPENER WITH THE CHAIN SAW MOTOR RUNNING.
CAUTION: Always wear gloves when installing or removing the bar-mount sharpener and take care not to pinch fingers
when closing the sharpener cover.
1) Clean debris from the surface of the bar and the sharpener bar mounting area. 2) Unlatch and open the cover of the bar-mount sharpener.
3) With cover open and motor off, slide the two steel guide pins through the guide holes in the bar (Fig C) until the sharpener is flush against
the bar. 4) Close the cover until the longest pin is slightly protruding above the cover. 5) Securely latch the cover by pushing the tip of the
latch towards the sharpener cover until the latch clicks into position and is flush with the cover (Fig D).
WARNING: WHEN THE SHARPENER IS ASSEMBLED ON THE BAR, THE LONGEST PIN MUST BE VISIBLE ABOVE THE LATCH AND
THE LATCH MUST CLICK INTO PLACE. IF NOT, DO NOT USE THE SHARPENER. DO NOT USE THE SHARPENER IF ANY COMPONENT
IS BROKEN. SERIOUS PERSONAL INJURY COULD RESULT.
FIG. D
. /..
USING THE BAR-MOUNT SHARPENER ./..
SHARPENING THE CHAIN
FIG. E
1) Select a location that provides good footing and a solid surface to push against. 2) With the saw at full throttle, lightly press the treaded
foot of the bar-mount sharpener against a firm surface that is between knee to waist high for 3-5 seconds (Fig E). Sparks will be visible when
the cutters are in contact with the sharpening stone.
CAUTION: Sharpening with the PowerSharp® system produces low energy sparks.
WARNING: POWERSHARP® SHOULD NOT BE USED IN THE PRESENCE OF EXPOSED, EXTREMELY FLAMMABLE MATERIALS SUCH
AS GASOLINE AND ACETYLENE.
WARNING: BEFORE ENGAGING POWERSHARP®, REMOVE ALL RESIDUAL GASOLINE FROM THE CHAIN SAW, BAR, AND CHAIN.
WARNING: DO NOT PRESS THE TREADED FOOT WITH YOUR HANDS, YOUR FEET, OR AGAINST THE GROUND AS THAT WILL BRING
THE CUTTING CHAIN TOO CLOSE TO YOUR HANDS, ARMS, LEGS OR FEET AND COULD RESULT IN SERIOUS PERSONAL INJURY.
WARNING: DO NOT PRESS THE TREADED FOOT AGAINST OBJECTS THAT ARE ABOVE YOUR SHOULDERS OR BELOW YOUR KNEES.
IMPORTANT: DO NOT APPLY TOO MUCH FORCE WHEN SHARPENING. Excessive force can reduce the performance of the sharpening stone.
IMPORTANT: It is normal to see a small amount of sparks and smoke emerging from the bar-mount sharpener during sharpening as the cutters contact the stone and friction heats the bar and chain oil. If excessive amounts of either sparks or smoke is present, immediately reduce
the pressure being applied to the sharpener.
IMPORTANT: After 5 or more chains the sparks may increase. If the volume of sparks exiting the bar-mount sharpener increases significantly,
the bar-mount sharpener needs to be replaced.
REMOVE THE BAR-MOUNT SHARPENER
WARNING: NEVER REMOVE THE BAR-MOUNT SHARPENER WITH THE MOTOR RUNNING.
CAUTION: NEVER cut with the bar-mount sharpener installed.
CAUTION: Use caution when removing the sharpener: the bar and chain may be hot due to the friction generated during
sharpening.
1) After sharpening, turn the saw off. 2) Remove the bar-mount sharpener by unlatching and opening the cover and removing from the guide
bar. 3) Close and latch the cover to prevent accidental overextension of the hinge, which could damage the bar-mount sharpener. 4) Make a test
cut to determine if the chain has been sufficiently sharpened. If not, repeat the sharpening procedure until the chain is sufficiently sharp.
HOW TO TELL WHEN TO REPLACE THE CHAIN AND STONE
The chain and stone are meant to be a matched pair.
Replace BOTH when:
• there is a sudden drop in the amount of sparks generated when attempting to sharpen the chain. The stone is worn out.
• the cutting speed of the chain is unsatisfactorily slow and repeated sharpenings do not improve the cutting speed. The chain is worn out.
WARNING: IMPROPER USE OR MAINTENANCE OF SAW CHAIN CAN INCREASE RISK OF LOSS OF CONTROL OF THE CHAIN SAW CAUSING
SERIOUS INJURY TO THE OPERATOR OR BYSTANDERS. FOLLOW ALL MAINTENANCE INSTRUCTIONS AND SAFETY PRECAUTIONS FOR THESE
PRODUCTS.
CHAIN SAW SAFETY
GUARD AGAINST THE DANGER OF CHAIN SAW KICKBACK
Kickback is a extremely fast, backward and/or upward motion of the chain saw occurring
when the saw chain near the nose or top area of the guide bar contacts any object, or when
the wood closes in and pinches the guide bar.
All saw chain can kick back.
Kickback can lead to dangerous loss of control of the chain saw which can result in serious personal
injury to saw operator or to bystanders.
Avoid contact of the upper quadrant of the guide bar nose with any object.
•
•
•
• attempt to operate a chain saw without first
•
•
•
receiving qualified operating and maintenance
instructions
let the tip of the bar and chain contact other
objects while the chain is moving
cut with loose or dull chain
cut in unsteady positions (off-balance, outstretched arms, one handed, over-reaching,
on a ladder, or in a tree)
Advanced Cutting Technology
• read the chain saw operator’s manual
• maintain this saw chain strictly according to the directions on this instruction sheet
• wear leather gloves, approved eye, ear, head, and face
protection
• use both hands and a firm grip
• run the engine at full speed while cutting
• use low-kickback chain and reduced kickback bars
OREGON® SAW CHAIN MAY BE MADE UNDER ONE OR MORE OF THE
FOLLOWING PATENT NUMBERS:
5,651,938; 5,666,871; 5,740,715; 5,772,957; 5,974,933; 6,003,423;
6,223,640; 6,748,840; 7,293,491B2 & RE37,288. Patent Pending.
USE OREGON® LOW-KICK CHAIN & REDUCED KICKBACK BARS.
© 2011 OREGON®, Blount, Inc. OREGON® and PowerSharp® are registered
trademarks of Blount, Inc. All rights reserved.
The saw chain in this package is
low kickback saw chain. It met the
reduced kickback requirements of
ANSI B175.1 when tested on a representative sample of chain saws.
Type C low-kickback saw chain
meets the kickback performance
requirements of CSA Standard
Z62.3. To learn more about chain
saw safety read your saw operator’s manual or our Maintenance
and Safety Manual, available on
request from:
BLOUNT EUROPE SA/NV
Rue Emile Francqui, 5
B 1435 Mont-Saint-Guibert, Belgium
+ 32 10 30 11 11
+ 32 10 30 11 99
BLOUNT EUROPE SA/NV - ALL RIGHTS RESERVED - 2012 - PRINTED IN EU - EN - 3459/12 - 18/07/12
Read and Follow All Instructions in This Sheet And in Your Chain Saw Operator’s Manual
NEVER
ALWAYS
PowerSharp® Complies to the following
European Directives:
2006/42/EC: (2006) ISO 12100-1,-2: (2009)