1
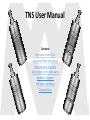
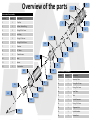
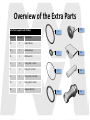
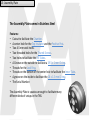
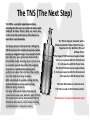
The TNS (The Next Step)
Τhe TNS is a versatile repairable atomizer,
meaning that the user can setup this device with
SS Mesh, SS Cable, Cotton, Silica, etc. and is able
to fine-tune the performance of the device to
meet their exact demands.
The design process that went into crafting the
TNS focused on the multifunctional basis while
keeping an elegant design. In our quest to fulfil
that objective, we engineered a device that is
structurally sound, meaning that it will hold up
to constant use and abuse from the toughest
consumers, is aesthetically pleasing and
performs at a level that will more than satisfy
even the most discerning of vapers.
With a multitude of possible settings for the
airflow the device can be used for many
different vaping demands.
The easy refill system means that you will
never have to open your atomizer again to fill it.
The entire device can be disassembled into its
individual components, which makes cleaning
and maintenance a simple procedure.
The TNS is shipped standard with a
Rhodium plated Poldiac Hybrid Screw, a
Pagodas drip tip, Wickhole Pin and
Airflow driver.
The Regular TNS features an approximate
8 ml juice capacity with the SS tank and
5.5 ml capacity with the Pyrex Tank.
The Short TNS features an approximate
5.5 ml juice capacity with the SS tank and
4 ml capacity with the Pyrex Tank.
The Dual Wick holes are 4.5mm each.
The TNS is made of 316L Stainless Steel.
This device is for experienced users only!
1
TNS User Manual
Contents
Overview of the Parts
Overview of the Extra Parts
Description of the parts
Description of the Extra parts
Assembly Diagram
Airflow Driver Setup
Optional Parts
2
Overview of the parts
1
3
Parts needed for assembly:
Item No.
Quantity
5
Description
1
1
Top Cap
2
1
Airflow Control Ring
3
3
O-ring 19.5 x 1 mm
4
1
Lock Ring
5
2
O-ring 1.5 x 1 mm
6
1
O-ring 19.5 x 0.5 mm
7
1
Chamber
8
2
Fill Tubes
9
2
Thumb Screws
10
2
Nuts
11
1
Spacer
12
1
Top Insulator
7
4
6
11
12
8
9
10
15
3
13
14
14
16
17
21
18
22
19
20
23
2
Parts needed for assembly:
Item No.
Quantity
Description
13
1
Assembly Plate
14
2
O-ring 16 x 1.5 mm
15
2
O-ring 2.5 x 1 mm
16
1
Inner Tube
17
1
Tank
18
1
Hybrid Connector
19
1
O-ring 7 x 1.5 mm
20
1
Alignment Part
1
Hybrid Insulator
1
Positive Post
21
22
3
Overview of the Extra Parts
Extra Parts (supplied with Poldiac)
Item No.
Quantity
23
3
Description
23
1
Hybrid Screw
24
1
Airflow Driver
25
1
Wickhole Pin
3
2
O-ring 19.5 x 1 mm
5
2
O-ring 1.5 x 1 mm
6
1
O-ring 19.5 x 0.5 mm
14
2
O-ring 16 x 1.5 mm
26
1
Pagodas Drip tip
5
24
6
25
14
26
4
1: Top Cap
Top Cap
The Top Cap is available in Polished SS and Satin SS.
Features:
• Threading for attaching it to the Chamber.
• Fill holes.
• Our logo and the name TNS.
The top cap attaches to the Chamber.
We unscrew the Top Cap slightly to open the access to the fill holes,
a line on the Chamber marks the right spot.
5
2: Airflow Control Ring
Airflow Control Ring
The Airflow Control Ring is available in Polished SS or Satin SS
Features:
• 8 different airflow settings.
• Grooves on the inside to facilitate the two 19.5 x 1 mm O-rings.
The Airflow Control Ring is suitable for a dual wick setup as well as a single
wick setup in combination with the Airflow Driver and Wickhole Pin.
When placing the Airflow Control Ring, find the 2 small air holes with one
bigger than the other, place the Airflow Control Ring with the larger of the 2
holes at the bottom towards the Chamber.
We spin the Airflow Ring to the preferred setting, the notches on the
Assembly Plate show where the air holes in the Chamber are located.
The O-rings make sure that the Airflow Ring stays in place.
6
3: O-ring 19.5 x 1 mm
O-Ring 19.5 x 1 mm
The TNS uses 3 O-rings in the size 19.5 x 1 mm
2 of these O-rings sit in the grooves inside the Airflow Control Ring.
1 sits in the top groove of the Assembly Plate.
You get 2 spare O-rings with the size 19.5 x 1 mm in your Extras Bag.
7
4: Lock Ring
Lock Ring
The Lock Ring comes in Stainless Steel
The Lock Ring goes over the Chamber after we put the 19.5 x 0.5 mm O-ring
on the Chamber.
The Lock Ring holds the Chamber in place. Make sure the Chamber is
placed correctly on the Assembly Plate before tightening the Lock Ring.
8
5: O-ring 1.5 x 1 mm
O-Ring 1.5 x 1 mm
The TNS uses 2 O-rings in the size 1.5 x 1 mm
The 2 O-rings in the size 1.5 x 1 mm sit in the openings on top of the
Chamber and prevent the TNS from leaking.
You get 2 spare O-rings with the size 1.5 x 1 mm in your Extras Bag.
9
6: O-ring 19.5 x 0.5 mm
O-Ring 19.5 x 0.5 mm
The TNS uses one O-ring with the size 19.5 x 0.5 mm
The O-ring with the size 19.5 x 0.5 mm is placed over the outside of the
Chamber before we place the Lock Ring over it.
You get 1 spare O-ring with the size 19.5 x 0.5 mm in your Extras Bag.
10
7: Chamber
Chamber
The Chamber is available only in Stainless Steel.
Features:
• An opening on top to facilitate the use of a standard 510 Drip tip.
• Threading on the top to facilitate the Top Cap.
• 2 holes on the top to facilitate the Fill Tubes.
• Inlays around the holes to facilitate the 1.5 x 1 mm O-rings.
• 2 air holes 2 mm x 5 mm to facilitate the use of a dual wick setup.
The Chamber is placed on the Assembly Plate. Around the Chamber we
place the 19.5 x 0.5 mm O-ring.
11
8: Fill Tubes
Fill Tubes
The Fill Tubes come in Stainless Steel
The Fill tubes are placed in the openings on the Assembly Plate.
The fill Tubes are used for easy filling of the TNS without taking it apart.
12
9: Thumb Screws
Thumb Screws
The Thumbscrews come in Stainless Steel
Features:
• Knurling on the topside for easy assembly.
• A groove on top to facilitate the use of a screwdriver.
The Thumbscrews are used to secure the negative connection for your coil
to the Assembly Plate.
13
Nuts
10: Nuts
The Nuts come in Stainless Steel
Features:
• Knurling on the outside for easy assembly to the Positive Post.
The Nuts are used to secure the positive connection of your coil.
14
11: Spacer
Spacer
The Spacer comes in Stainless Steel
Features:
• Knurling on the top for easy assembly.
The Spacer is used to raise the height for the Nuts.
15
12: Top Insulator
Top Insulator
The Top Insulator is made out of Teflon
The Top Insulator is placed in the middle of the Assembly Plate and
facilitates insulation for the Positive Post.
16
13: Assembly Plate
Assembly Plate
The Assembly Plate comes in Stainless Steel
Features:
• Cutout to facilitate the Chamber.
• A center hole for the Top Insulator and the Positive Post.
• Two 4.5 mm wick holes.
• Two threaded holes for the Thumb Screws.
• Two holes to facilitate the Fill Tubes.
• A Groove on the outside to facilitate a 19.5 x 1 mm O-ring.
• Threads for the Lock Ring.
• Threads on the bottom of the center hole to facilitate the Inner Tube.
• A groove on the inside to facilitate the 16 x 1.5 mm O-ring.
• The Serial Number.
The Assembly Plate is spacious enough to facilitate many
different kinds of setups in the TNS.
17
14: O-ring 16 x 1.5 mm
O-Ring 16 x 1.5 mm
The TNS uses two O-rings with the size 16 x 1.5 mm
One O-ring with the size 16 x 1.5 mm is placed in the groove inside the
Assembly Plate and one O-ring with the size 16 x 1.5 mm is placed in the
groove inside the Hybrid Connector.
You get 2 spare O-rings with the size 16 x 1.5 mm in your Extras Bag.
18
15: O-ring 2.5 x 1 mm
O-Ring 2.5 x 1 mm
The TNS uses two O-rings with the size 2.5 x 1 mm
The two O-rings with the size 2.5 x 1 mm are placed in the grooves on both
ends of the Inner Tube.
19
16: Inner Tube
Inner Tube
The Inner Tube comes in Stainless Steel and is available for Regular
and Short TNS
Features:
• Threads on both ends for connection to Assembly Plate and the Hybrid
Connector.
• Groves to facilitate the 2.5 x 1 mm O-rings.
The inner tube facilitates the Positive Post.
20
17: Tank
Tank
The Tank comes in Stainless Steel and is available in Regular and Short
with Polished or Satin finish.
Features:
• The regular size SS Tank features and approximate 8ml capacity.
• The short size SS Tank features and approximate 5.5ml capacity.
The bit that sticks out the most is the top of the tank and we place the Assembly
Plate on this end.
21
18: Hybrid Connector
Hybrid Connector
The Hybrid Connector comes in Stainless Steel in Polished or Satin finish.
Features:
• A groove on the inside to facilitate the 16 x 1.5 mm O-Ring.
• Threads on the outside for connection to the Poldiac.
• A cut out to facilitate the Alignment Part.
• Threads on the inside to facilitate the Hybrid Insulator.
The Hybrid Connector allows for the Hybrid connection to the Poldiac.
22
19: O-ring 7 x 1.5 mm
O-Ring 7 x 1.5 mm
The TNS uses one O-rings with the size 7 x 1.5 mm
The O-ring with the size 7 x 1.5 mm is placed over the Alignment Part before
placing it in the Hybrid Connector.
23
20: Alignment Part
Alignment Part
The Alignment Part comes in Stainless Steel.
Features:
• A groove on the inside to facilitate the 7 x 1.5 mm O-Ring.
• A groove on the bottom to facilitate the use of a screwdriver.
The Alignment Part is what we use to Align our atomizer with the battery holder.
Before tightening the Alignment Part completely we put the Atomizer on our
battery holder and turn the Atomizer to where we want it to be.
Then we carefully remove the Atomizer from the battery holder by only grabbing
the Hybrid Connector and tighten the Alignment Part.
24
21: Hybrid Insulator
Hybrid Insulator
The Hybrid Insulator comes in Peek Ketron
Features:
• A groove on the outside to facilitate the use of a screwdriver.
• Threads on the outside for assembly into the Hybrid Connector.
The Hybrid Insulator is added to the Hybrid Connector and insures insulation for
the Positive Post.
25
22: Positive Post
Positive Post
The Positive Post comes in Stainless Steel and is available for Regular
and Short TNS.
Features:
• Threads on the top to facilitate the Spacer and Nuts.
26
23: Hybrid Screw
Hybrid Screw
The Hybrid Screw comes in Rhodium over Silver plated Brass.
Features:
• Threading to attach it to the Plastic Base of the Poldiac
• A Groove on top to facilitate the use of a screwdriver.
The Hybrid Screw is used instead of the Double Screw + Pole Screw in the top of
the Poldiac (after removing the Top End Cap of the Poldiac) to facilitate the Hybrid
connection.
We ship the Hybrid Screw in the Extras Bag that comes default
with the TNS.
27
24: Airflow Driver
Airflow Driver
The Airflow Driver comes in Peek Ketron.
Features:
• A hole for the Wickhole Pin
The Airflow Driver is used together with the Wickhole Pin when we setup the TNS
with a single wick.
We ship the Airflow Driver in the Extras Bag that comes default with the TNS.
28
25: Wickhole Pin
Wickhole Pin
The Wickhole Pin comes in Peek Ketron.
Features:
• A groove to have grip to remove the pin from the wickhole.
The Wickhole Pin is used together with the Airflow Driver when we setup the TNS
with a single wick.
The Wickhole Pin can also be used as a tool to make the coil. With the Wickhole
Pin inserted into a wickhole it is easy to setup the coil, secure it and then remove
the Wickhole Pin leaving you with an exact 4.5mm diameter wick.
We ship the Wickhole Pin in the Extras Bag that comes default with the TNS.
29
26: Pagodas Drip tip
Pagodas Drip Tip
The Pagodas Drip Tip is available in Polished SS or Satin SS
The Pagodas Drip Tip fits the TNS perfectly and has a wide bore.
We ship the Pagodas Drip Tip in the Extras Bag that comes default with the TNS.
30
Assembly Diagram
An overview of the TNS
31
Airflow Driver Setup
An overview of the use
of the Airflow Driver
and Wickhole Pin
32
Optional Parts
Optional Parts
Item No.
Quantity
Description
30
1
Pyrex
(available in Regular and Short)
31
1
Scarf
(available in Regular and Short with the
options of Polished SS or Satin SS)
30
31
33