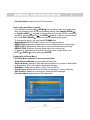
1
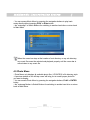
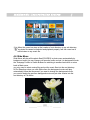
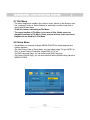
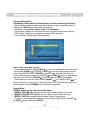
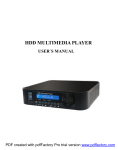
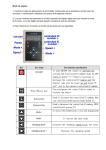
HDD Media Player
User Operation Guide
MULTIMEDIA CONCENTRATION SYSTEM
For use with 2.5/3.5-inch SATA hard drive
CONTENTS
1. Safety Instructions
2
1.1 Warnings and Cautions
2-3
2. Installing Product Drivers
3-5
2.1 Package Contents
5
3. Explanation of the Remote Control
6
4. Getting Started
7-8
4.1 Basic Operations
8
4.2 Main Menu
9
4.3 Movie Menu
9
4.4 Music Menu
9-10
4.5 Photo Menu
10-11
4.6 Slide Menu
11
4.7 File Menu
12
4.8 Setup Menu
12-17
5. Special Features
17
5.1 Copy
17
5.2 Delete
18
5.3 Move
18
5.4 Rename
18
5.5 Screen saver
18
5.6 Read txt
19
5.7 Folder encryption
19
Fashion·Technology·Life
1. Safety Instructions
1.1 Warnings and Cautions
It is normal that the surface becomes hot when using it as a player but do not
cover anything over the device.
The product may generate heat when used for long period of time.
Do not attempt to disassemble this product. Doing so may cause fire, electric
shock or electrical leakage, and defectiveness in the product itself.
In the event of unusually abnormal sounds, strange odor or smoke, stop using
this product immediately. Please shut down your computer, TV set and
peripheral devices promptly.
Do not handle, shake or try to remove this product while hard drive is writing
and reading data.
Do not expose this product to the following conditions;
1. Strong vibration or shock
2. Direct sunshine or dusty hot or humid conditions
3. Extreme temperature fluctuations or near magnetic fields
Regular backup is recommended to preserve and store your valuable data.
Before unplugging power you should stop playing first. Then use the POWER
or STANDBY/ON button to enter standby mode (the standby LED turns Yellow).
Do plug the power when playing. If the player is disconnected suddenly during
file transfer, it may cause data loss and harm the hard disk.
The hard disk must be set as master. When the device is used as a player,
make sure that all partitions are primary (not extended).
1.11 Limited Liability
The manufacturer importer and dealer can not be held responsible for
accidental damage, including personal injury or any other damage, due to
inappropriate usage of the product. Information in the user manual is written for
the current specification of the product. The manufacturer continues to provide
additional functions and apply new technology to it. All specifications may be
changed without prior notice to individual user. Manufacturer should not
be liable for any special, incidental or consequential damages. Even if informed
of possibility there of in advance.
2
Fashion·Technology·Life
Furthermore, warranty does not apply to:
Damages or problems resulting from misuse abuse accident alteration or
incorrect electrical incorrect voltage Any product tampered-with damaged
warranty seal or serial number barcode or serial number label Any product
without a warranty or serial number barcode or serial number label. AC adapter
and any consumable items delivered with or in the equipment.
Every user of MEDIA PLAYER may only use it in connection with materials
legally owned by or licensed to the user and only extend such ownership or
license rights that will permit such use.
2. Installing Product Drivers
In Windows XP, Vista, Windows 2000 and Windows Me
Upon connecting your portable Hard Disk to a computer for the first time,
Windows automatically installs the required drivers. Your Portable Hard Disk is
detected as Mass Storage Device and no additional drivers are required.
In Windows 98 SE
1. Upon connecting you Portable Hard Disk to a computer for the first time, the
Add New Hardware Dialog box appears.
2. Click the Next button.
3. Select the Search for the best driver for your device option, and then click
the Next button.
4. Select the CD-ROM drive check box.
5. Insert the Driver Installation CD into your CD/DVD-ROM Drive, and the click
the Next button. Windows searches for the necessary files and lists them in
the next dialog box.
6. Click the Next button. Windows copies the necessary files to your computer.
7. Click the Finish button to complete the installation.
To prevent data loss, ensure that:
* You have disconnected your Portable Hard Disk properly in Windows before
unplugging it from the USB port on your computer.(refer to the steps for your
respective operating system)
* You do not unplug your Portable Hard Disk from the USB port on your computer
when files or applications stored on your Portable Hard Disk are in use.
3
Fashion·Technology·Life
In Windows Vista
1. Click on the taskbar icon for external hardware
2. Choose your external hard drive and confirm to remove it
In windows XP, Windows 2000 and windows Me
1. Click the Safely Remove Hardware icon on the Taskbar and
Click Safe remove USB Mass Storage Device.
2. Unplug your Portable Hard Disk when you are prompted to do so.
* This prompt appears on the taskbar in Windows XP. On other operating
systems, a message box appears on the desktop instead.
In windows 98 SE
1.Wait at least 10 seconds after all file transfers are completed.
2.In windows Explorer, right-click the Removable disk icon and click Eject.
3.Unplug your player after 10 seconds.
4
Fashion·Technology·Life
Checking Package Contents
Select the check boxes to confirm that all items are included in the package.
In case you find any missing item, please contact local dealer.
2.1 Package Contents
TV Media Player 2.5" / 3.5" (no hard drive included) MEDIA PLAYER
A/V Cable (Composite Video RCA and Audio L/R RCA)
USB 2.0 High Speed Cable
USB Driver CD for Windows 98/SE
Screw bag for hard drive (with screws 4pcs)
Remote control
User's Manual
External Power Adapter
Keep the box and packing materials/cables in a safe place and use them when
transporting the product for the purpose of repair or other service.
Minimum system Requirements
*lntel Pentium III 450MHz or compatible processor
*Microsoft windows XP, Windows 200, Windows Me (Millennium) or windows 98
(Second edition) 128MB RAM
*Available USB port (version 1.1 or later)
5
Fashion·Technology·Life
3. Explanation of the Remote Control
STOP
POWERE Enter or exit standby mode
Stop playing
REW
SETUPE Enter function Setup Menu
Rewind, play reverse fast
FF
TV-OUT Select TV video output
Fast Forward, play forward
fast
(Composite, VGA, YPbPr,
Page Up
Page Up or Previous, move
YCbCr, HDMI)
MOVIE
to previous page or previous
Press the button to enter
file
Movie Menu, all movies are
Page Down or Next, move to
shown in directory structure Page Dn
MUSIC
next page or next file
Press the button to enter
REPEAT
Select repeat mode
Music Menu, all music are
shown in directory Structure ROTA TE Rotate selected photo
ZOOM
Zoom in/Zoom off selected
on the screen
PHOTO Press the button to enter
photo
Select Slide show interval time
Photo Menu, a photo preview S-TIME
S-Mode
Select Slide show transition
window will show on the
mode between the photos
screen and all photo share
Volume mute On/Off
shown in directory structure MUTE
FILE
Press the button to enter File SUBTITLE Select MPEG4 subtitles
Menu, all media will show on MAIN PAGE Press the button to enter/
jump to Main Menu directly
the screen in directory structure
DISPLAY Display/close a transparent
VOLUME +/- Adjust volume
PLAY/P AUSE Start to play back or
menu of media information
confirmation the selection
when playback ENTER
or pause playback
Confirm selection (it is equal
to PLAY/PAUSE button)
Do not drop the remote control and do not put it in wet place.
When the remote control becomes insensitive, please replace a new battery.
6
Fashion·Technology·Life
4. Getting Started
After connecting proper video & audio cables to your TV set and MEDIA PLAYER ,
Now, you can start to operate MEDIA PLAYER step by step.
Power on MEDIA PLAYER
- Power on your TV set first.
- Connect your MEDIA PLAYER to TV set.
- Power on MEDIA PLAYER by pressing ANDBY/ON button or by remote control
POWER button.
Note: TV-OUT button can be pressed only at MainMenu,SubMenu but
not any other Menu.
When press TV-OUT button, it switch's video output in following sequence.
Composite -- YCbCr / YPbPr
-- HDMI(VGA)
The first time power on MEDIA PLAYER may not appear proper Main Menu screen
on TV set. This is due to the default setting of video output (Composite) may not
match to your current TV setting. Before go to Setup Menu to adjust proper video
output, press TV-OUT button is the best way to search available video output.
7
Fashion·Technology·Life
- Once Main Menu screen is properly shown on TV set, press SETUP button to
adjust proper TV type (NTSC or PAL) and Video Output (Composite, Ypbpr ,
HDMI VGA).
- If the TV is still blank screen after finishing above installation, be sure to set
the TV to correct video input type (AV mode) and channel. Refer to the TV
manual for details.
- If the TV is black and white, press TV-OUT button to adjust proper video
output mode.
- If the TV is distorted or flicking, press SETUP button and select TV type to
match your TV system, NTSC or PAL.
4.1 Basic Operations
Movie, Music, Photo,Slideshow Playback
There are three main functions for media playback
- Play & watch movies (with favorite subtitle language)
- Play & listen to music
- Play & watch photos
- Play & watch slide show
- Use navigation buttons (UP /DOWN / LEFT /RIGHT ) to move the
cursor and use ENTER button to select function. Use PageUp(PREW
) or
PageDn (NEXT
) to jump to the previous or next page at each menu.
- Or use hotkeys MOVIE, MUSIC, PHOTO, FILE buttons on your remote control
to go into corresponding menu directly.
8
Fashion·Technology·Life
4.2 Main Menu
- This is the menu that appears when you turn on MEDIA PLAYER .
- There are five main selections MOVIE, MUSIC, PHOTO, SLIDE and FILE.
- You can access Main Menu by pressing the navigation buttons, PLAY or ENTER
button and enter each sub menu.
- Or you can access Main Menu directly by pressing hot keys MOVIE, MUSIC,
PHOTO, SLIDE, FILE on remote control.
4.3 Movie Menu
- Movie Menu only displays all available video files (movies or films) in file directory
style
- You can access Movie Menu by pressing the navigation buttons, PLAY or Enter
button and start movie playback.
- On the "mainpage" button is Switch Buttons for switching to another hard drive
(HD1, HD2, HD3 or HD4) or return back to Main page.
- Press REPEAT button, repeat mode is to select all video play back again or not.
When the cursor bar stays at the location of root directory or any sub directory,
any movie file cannot be selected and playback properly until the cursor bar is
moved down to any movie file.
4.4 Music Menu
- Music Menu only displays all available music sound files (MP3, oGG, and WMA)
in file directory style.
9
Fashion·Technology·Life
- You can access Music Menu by pressing the navigation buttons to play back
music directly without pressing PLAY or Enter button
- the "mainpage" is Switch Buttons for switching to another hard drive or return back
to Main Menu
When the cursor bar stays at the location of root directory or any sub directory,
any music file cannot be selected and playback properly until the cursor bar is
moved down to any music file.
4.5 Photo Menu
- Photo Menu only displays all available photo files ( JPG/JPEG) in file directory style.
- A preview window on the left-top corner will help you to search proper photo file
you want to display.
- You can access Photo Menu by pressing the navigation buttons, PLAY or ENTER
button.
- the "mainpage"button is Switch Buttons for switching to another hard drive or return
back to Main Menu.
10
Fashion·Technology·Life
When the cursor bar stays at the location of root directory or any sub directory,
any photo file cannot be selected and playback properly until the cursor bar is
moved down to any music file.
4.6 Slide Menu
Slide Menu will play all the photo files(JPG/JPEG) in photo menu automatically by
background music,you can choose you favourite music and set it to background music.
the "mainpage" button is Switch Buttons for switching to another hard drive or return
back to Main menu.
you only need to select musics files and put the music files into the root directory
of File Menu,then when you clink Slide menu the background musics will play
automatically follow the sequence.if you want to change the background music,
you need to delete the previous backgroud music and put other musics into the
root directory of File Menu.
11
Fashion·Technology·Life
4.7 File Menu
* File Menu displays all available files (videos, music, photos) in file directory style.
* the "mainpage" button is Switch Buttons for switching to another hard drive or
return back to Main Menu.
* PLAY ALL button is disabling at File Menu.
* The major function of File Menu is to check all files. Media cannot be
playback functions in File Menu. Photo preview window, music and movie
playback all are disabled in File Menu.
4.8 Setup Menu
- Setup Menu is to properly configure MEDIA PLAYER for media playback and
system operation.
- On Video Setup Page of Setup Menu, you can adjust proper TV type (NTSC or
PAL) or Video Output (Composite/ Ypbpr/HDMI) to TV set.
- On OSD Language Page, you can select prefer OSD language.
- On Factory Default Page, you can store back all factory default setting values to
MEDIA PLAYER .
12
Fashion·Technology·Life
Advanced Operations
Explanation of Movie Menu the Movie Menu consists of several parts below.
- Switch Buttons: Switch to other hard drive partitions or go back to Main Menu or
Playback all (PALY ALL) movie inside this directory.
- Sub Menu: display Movie, Music, Photo, File sub Menu.
- File Directory: display all movie/video files and sub directory in current directory.
- OSD Display: display any command in selected OSD language.
- File Information: display brief of file information.
How to play and watch a movie
- Use navigation buttons (UP /DOWN ) to move the cursor and locate video files.
Use PageUp (PREW
) or PageDn (NEXT
) to jump to the previous or next
page. Press ENTER or PLAY/PAUSE /button to play selected video file in full
screen. While playing a movie file, press FF
and REW
buttons to skip through
the movie file. Press PLAY/PAUSE / button to return to normal speed again.
- While playing a movie file, press PREW (PageUP
) or PageDn (NEXT
) to
jump to previous or next movie file directly. Presses DISPLAY button will show brief
file information. Press STOP button to exist movie playback.
Repeat Mode:
REPEAT button can be used to selected below
- REPEAT FOLDER ON: playback all video files in current folder continuously.
- REPEAT FOLDER OFF: playback all video files in current folder and stop.
- REPEAT ONE ON: playback selected single video file continuously.
- To switch to other hard drive partitions or return back to Main Menu, use LEFT
or RIGHT buttons and press ENTER.
13
Fashion·Technology·Life
Movie Playback with subtitles (SRT, SUB and SMI files are supported)
There are two ways to selected subtitle file while playing a movie file.
- Subtitle file is selected automatically.
- Subtitle file is selected by manual.
Subtitle file is selected automatically
To automatically selected subtitle file with playing movie file, it is necessary
to has subtitle file name as same as movie file name (only extension is
different).The subtitle file with same file name must also be located at
same file directory with corresponding movie file. For example, if the file
name of movie is "Star War.avi", then the corresponding subtitle file must
be "Star War.xxx". The xxx extension of subtitle file could be .SRT or .SUB
or .SMI.
Subtitle file is selected by Manual
If subtitle file name is different to movie file name, you can still select this subtitle
file by manual. No matter where the subtitle file is, find out the location of this
subtitle file and press SUBTITLE button on remote control.
Then, it shows "DIVX SUBTITLE SELECTED" message on screen. After 1~2
seconds when this message is disappeared, go to find out the movie file you
wan to play and press PLAY button to starting movie playback.
How to display subtitle file with correct subtitle language
Each subtitle file has corresponding language. It is necessary select correct
subtitle language to display correct subtitle file.
- To select corresponding subtitle language, please go to Setup Menu.
- Press Setup button - select OSD Language Page select Subtitle Language.
- Select correct language corresponding to subtitle file. For example, if the
subtitles file to be display is German. Then, you have to select Subtitle
Language as Deutsch on Setup Menu.
Explanation of Music Menu
The Music Menu consists of several parts below.
- File Info Window: display file information of selected music file.
- Switch Buttons: Switch to other hard drive partitions or go back to Main Menu
or Playback all (PALY ALL) music inside this directory.
- Sub Menu: display Movie, Music, Photo, File sub Menu.
- File Directory: display all music files and sub directory in current directory.
- OSD Display: display any command in selected OSD language and playing
time.
14
Fashion·Technology·Life
- File Information: display brief of file information.
How to play and listen to music
- Use navigation buttons (UP /DOWN ) to move the cursor and locate music
files, the selected music file is automatically playing. Use PageUp(PREW
)
or PageDn (NEXT
) to jump to the previous or next page. While a music file
is playing, you can press FF
and REW
buttons to skip through the music
file. Press PLAY/PAUSE /button to return to normal speed again.
- To stop playing music, you can press STOP button.
- Repeat Mode: REPEAT button can be used to selected below.
- REPEAT ON: playback all video files in current folder/directory continuously.
- REPEAT OFF: playback all video files in current folder/directory and stop.
- REPEAT ONE: playback selected single video file continuously.
- To switch to other hard drive partitions or return back to Main Menu, use
LEFT or RIGHT buttons and press ENTER.
Explanation of Photo Menu
The Photo Menu consists of several parts below.
- Photo Preview Window: preview selected photo file.
- Switch Buttons: Switch to other hard drive partitions or go back to Main Menu
or Playback all (PALY ALL) photos inside this directory.
- Sub Menu: display Movie, Music, Photo, File sub Menu.
- File Directory: display all photo files and sub directory in current directory.
- OSD Display: display any command in selected OSD language.
- File Information: display brief of file information.
15
Fashion·Technology·Life
How to play and watch photo & slide show
There are two ways to play and watch photo files
- Single photo playing.
- Slide Show playing.
Single Photo Playing
- Use navigation buttons (UP /DOWN ) to move the cursor and locate
photo files. Use PageUp(PREW
) or PageDn (NEXT
) to jump to the
previous or next page. Press ENTER or PLAY/PAUSE / button to play
selected photo file in full screen.
- While a single photo is playing, press PageUp(PREW
) or PageDn
(NEXT
), LEFT or RIGHT buttons to jump to previous or next movie file
directly.
- Press DISPLAY button will show brief file information. Press STOP button to
exist photo playback.
- Repeat Mode: REPEAT button can be used to selected below.
- REPEAT FOLDER ON: playback all photo files in current folder continuously.
- REPEAT FOLDER OFF: playback all photo files in current folder and stop.
- to switch to other hard drive partitions or return back to Main Menu, use
LEFT or RIGHT buttons and press ENTER.
- Photo Zoom: while playing a photo file, press ZOOM button zoom in screen
and press navigation buttons can pan the screen up/down/left/right. To return
back to normal screen, press ZOOM button again.
- Photo Rotate: While playing a photo file, you can use ROTATE button to turn
around photos clockwise.
Slide Show Playing
Slide Show is to display several photo files continuously.
Repeat Mode:
REPEAT: button can decide to play Slide Show in folder continuously or one
time only.
-Transition Mode:
While viewing Slide Show, you can use S-MODE button to change the transition
effect in between two photos. There are fourteen (12) kinds of transition effects.
16
Fashion·Technology·Life
Mode 1: Random
Mode 2: Fade out in
Mode 3: Slide L to R
Mode 4: ROLL: Edge to Center
Mode 5: ROLL: Center to LR
Mode 6: BLIND: LR to Center
Mode 7: ROLL: Right to Left
Mode 8: ROLL: Side T B
Mode 9: ROLL: Center to TB
Mode 10: ROLL: TB to Center
Mode 11: Bottom to Top
Mode 12: BLIND: Top to Bottom
Transition Time (Interval Time):
While viewing Slide Show, you can use S-TIME button to change the transition
time to change interval time in between two photos. The transition time could
be 5 second(default value), 10 seconds, 15 seconds.
To exit Slide Show mode, press STOP button.
5. Special Features:
5.1 Copy
You can copy all the contents from USB flash drive to HDD(FAT32)
1:Enter the FAT32 format HDD and enter the folder where you want to copy
the files to and press direction key "Right"to select copy path.
2:Enter the USB disk and select the file that you want to copy and press
“display"button
3:select "copy".
17
Fashion·Technology·Life
5.2 Delete
You can delete all the contents you want.
5.3 Move
You can move one file from one folder, partition or storage device to another
folder, partition, or storage device.
The operation is similar with "copy" function
5.4.Rename
You can change the name of file.
5.5 Screen saver
HDD sleep function (protect HDD)
18
Fashion·Technology·Life
5.6 Read txt
You can read txt format file on the TV.
5.7 Folder encryption
You just need to create a folder named "private", the default password is 123,
You can change it as you like.
19
Fashion·Technology·Life
WARNING: When using this product, please avoid liberating
heavily and colliding with other products, prevent the damage
of hardware or data losing.
Made in China