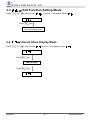
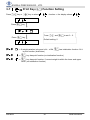
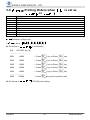
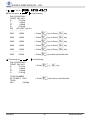
1
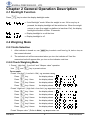
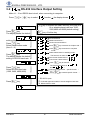
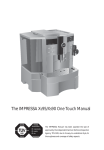
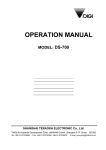
User Manual Waterproof Weighing Indicator GTW © EXCELL PRECISION CO., LTD. 2014. All rights reserved worldwide. The information contained herein is the property of EXCELL PRECISION CO., LTD. and is supplied without liability for errors or omissions. No part may be reproduced or used except as authorized by contract or other written permission. The copyright and the foregoing restriction on reproduction and use extend to all media in which the information may be embodied. EXCELL PRECISION CO., LTD. Table of Contents INSTRUCTIONS FOR USE ..........................................................................................................2 PREPARING TO USE THE SCALE..............................................................................................2 CHAPTER 1 INTRODUCTION .....................................................................................................4 1-1 FEATURES AND SPECIFICATIONS .............................................................................................4 1-2 APPEARANCE.........................................................................................................................5 1-3 DISPLAY DESCRIPTION ...........................................................................................................6 1-4 ERROR MESSAGES ................................................................................................................6 1-5 KEYPAD FUNCTIONS DESCRIPTION ..........................................................................................7 1-6 POWER DESCRIPTION.............................................................................................................7 CHAPTER 2 GENERAL OPERATION DESCRIPTION ................................................................8 2-1 BACKLIGHT FUNCTION ............................................................................................................8 2-2 WEIGHING MODE ...................................................................................................................8 2-2-1 Units Selection..............................................................................................................8 2-2-2 Check Weighing Mode .................................................................................................8 2-2-3 Totalizing .................................................................................................................... 10 2-2-4 Zero Function ............................................................................................................. 11 2-2-5 Tare Function ............................................................................................................. 11 2-3 COUNTING FUNCTION ........................................................................................................... 12 2-3-1 Sampling .................................................................................................................... 12 2-3-2 Check Weighing ......................................................................................................... 12 2-3-3 Totalizing .................................................................................................................... 12 CHAPTER 3 GENERAL FUNCTION SETTING .......................................................................... 13 3-1 ⇒ CHECK WEIGHING CONFIGURATIONS....................................................................... 14 3-2 ⇒ RS-232 INTERFACE OUTPUT SETTING .................................................................... 15 3-3 ⇒ EXIT FUNCTION SETTING MODE .............................................................................. 21 3-4 ⇒ INTERNAL VALUE DISPLAY MODE ............................................................................ 21 3-5 ⇒ G VALUE CALIBRATION ....................................................................................... 22 3-6 ⇒ ID CODE SETTING .............................................................................................. 23 3-7 ⇒ PRINT KEY ( 3-8 ⇒ PRINTING ORDERS WHEN ) FUNCTION SETTING ............................................................... 24 IS SET AS OR ......... 25 CHAPTER 4 WIRELESS CONNECTION INSTRUCTION .......................................................... 27 APPENDIX 1 RS-232 WIRING INSTRUCTION .......................................................................... 32 APPENDIX 2 7-SEGMENT DISPLAY CHARACTERS ............................................................... 33 02018058 1 ZSME300000264 EXCELL PRECISION CO., LTD. Thank for your purchasing of our EXCELL Weighing Scale. To guide you to use our product correctly, please read this User Manual carefully to extend the life of machine and to avoid error. Instructions for Use 1. Please keep scale in a cool and dry place. Do not store under high temperatures. 2. Please keep the scale clean and free from insect infestation. 3. Avoid impacting with other items or overloaded with excessively heavy weights (The load must not exceed the maximum capacity of the scale). 4. If the scale is not going to be used for some time, please clean it and store it in a plastic bag in dry condition. A desiccant sachet may be included to prevent moisture from building up. 5. Do not mix different types of dry battery or mix used dry batteries with new dry batteries. 6. Any suggestion is warmly welcome. Preparing to Use the Scale 1. Locate the scale on a firm level surface free from vibrations for accurate weight readings. Adjust the four leveling feet to centre the leveling bubble on the scale. 2. Avoid hot sunshine directly on the scale or near the exhaust port of ventilating system. 3. Please use a separate power source plug, to avoid the disturbance of other electric appliance. 4. There should be no weight on the scale when power is turned on. 5. Commodity should be placed at the centre of platter when being weighed, and its size should not exceed the dimension of the platter. 6. Please warm the scale 15 ~ 20 minutes before using. 7. Please note that when symbol appears on the screen, the scale needs to be recharged. 8. Introduction of Storage Battery 02018058 2 ZSME300000264 EXCELL PRECISION CO., LTD. Due to the storage battery adopt the advanced free-maintaining technique, customers need not to replenish electrolyte. The scale should be recharged every 3 months to prevent failure of the internal rechargeable battery. 1. The battery should be charged for 8~10 hours. 2. The temperature of battery should below 45℃. Maintaining 1. Please do not discharge with over-current when using the battery. Please charge the battery after discharging current. 2. Please take down the battery when the scale is not used for a long time or break the connection of cathode. 3. Do not short the battery terminals to check whether there is current. Please check whether the connection point is firm to guarantee good connection. 4. The battery should be replaced by specialized person. No reverse-battery or the product will be damaged. a) Anode of battery should be connected with Anode of product battery(usually red cable) b) Cathode of battery should be connected with Cathode of product battery (usually brown cable or black cable) c) See the picture following Brown cable(or black cable) connected with Anode of battery Red cable connected with Cathode of battery Safety warnings 1. The electrolyte of battery is caustic which causes metal, cotton, etc to corrode. 2. The hydrogen will be resolved when using or charging the battery and it will cause explosion when approaches fire. 02018058 3 ZSME300000264 EXCELL PRECISION CO., LTD. Chapter 1 Introduction 1-1 Features and Specifications Features: IP 68: mist-proof, waterproof and dustproof Up to 1/30,000 display resolution LCD display (Weight-6 digits); Full range tare; Auto zero tracking; Pre-tare High Speed 24bits AD; Display reading speed faster Faster weighing stability Zero key and Tare key react faster Preset weight or quantity; Weight accumulation Simple counting; Gross/Net indication; Hold function; Check mode Lo / Hi / OK Weight and quantity over-limit warning Pre-tare function Kilogram (kg) and pound (lb) weighing modes Stable sampling range setting function Built-in rechargeable battery Low power indication and auto power off U shape stand or Sleeve connecting stand selectable. RS-232 data-transfer interface Options: Wireless for distance 100M available (SPP mode supported) Relay output (3 sets relay output) 1/30,000 with temperature compensation component more accurate and stable Specifications: Operating Temperature: -10°C ~ +40°C Dimensions: 238 x 156 x 90mm ( W x H x D) Display: LCD, 6 Digits, 25 mm (Height), LED backlight 02018058 4 ZSME300000264 EXCELL PRECISION CO., LTD. 1-2 Appearance 238mm 90mm 156mm RS232 or RS485 Power Load Cell 02018058 5 ZSME300000264 EXCELL PRECISION CO., LTD. 1-3 Display Description 1 2 3 5 6 : High limit value : : OK value (The value between HI and LO limit value) Low limit value : “Zero” indication “Net weight” indication “Low battery power” indication “Stable” indication “Pre-tare mode” indication “Accumulation mode” indication “Samples insufficient” indication “Unit weight insufficient” indication “kg” unit “lb” unit No function Counting mode Percent indication : : : : : : : : : : : : Changes of “Range” indication mode The indicator with 2-segment specification: 6 is Range 1 5 is Range 2 1-4 Error Messages ⇒ Weight exceed 9d of maximum capacity. (d=division) ⇒ Zero value after power on is over +10% FS. ⇒ Zero value after power on is less than -10% FS. ⇒ Unstable zero return, unstable over 10 sec. Press to leave E4. ⇒ Zero is too high when calibrating. (over internal value350,000) ⇒ Zero is too low when calibrating. (under internal value 80,000) - - - - - - ⇒ If the negative weight is over 20 divisions and there is no T or PT, the display shows “- - - - - -” 02018058 6 ZSME300000264 EXCELL PRECISION CO., LTD. 1-5 Keypad Functions Description : Press this key to power on or power off the scale : Press this key to select the required unit from the preset units. : Press this key to preset the weight and quantity. : Press this key to accumulate the weight value or others. : Press this key to tare (deduct the container weight) : Press this key to preset tare value. : Press this key to recall the totalization value, preset value and pre-tare value. : Press this key to clear the totalization value, preset value and pre-tare value. : Press this key to zero the scale. : Press this key to print the total data and to confirm. : Press this key to input the numbers (0 ~ 9) and to light up the backlight. : Press this key to go into counting mode : Press this key to sample 1-6 Power Description Power Selection 1. 6 V / 4 Ah Rechargeable batteries 2. 110 V / 220 V ±15 % AC Power Consumption (Indicator + Load Cell+ no backlight) (Indicator + Load Cell+ backlight) (Indicator+ Load Cell+ Backlight+ wireless) About 25 mA About 33 mA About 65 mA Low Power Alarm Please note when the ( ) symbol keeps flashing on the left down corner of the display, the batteries should be recharged. The scale will turn off automatically after a few hours when the low battery warning symbol shows up. The scale must be fully recharged, before operating again. Please recharge at once when the symbol 02018058 shows in order to keep the weight accuracy. 7 ZSME300000264 EXCELL PRECISION CO., LTD. Chapter 2 General Operation Description 2-1 Backlight Function Press key to select the display backlight mode: . ⇒ “Auto Backlight” mode. When the weight is over 10d or any key is pressed, the display backlight will be switched on. When the weight returns to zero (the weight on platform is less than 10d), the display backlight will switch off after 10 seconds. ⇒ Display backlight is on all the time. . ⇒ Display backlight is off. . 2-2 Weighing Mode 2-2-1 Units Selection 1. After indicator is turned on, use the screen indicated. key to select a unit from kg, lb, tael or viss, as 2. The selected unit will be memorized when you turn the indicator off. And the memorized unit will appear after you turn on the indicator next time. 2-2-2 Check Weighing Mode 1. Preset “ High limit”, “Low limit” and “ Beeper value” operation Use and key to preset values. For example: Preset “Low limit” ( Low limit >10d ) e.g. Low limit = 20 kg Press key the display showsÑ Press key 1 time the display shows Ñ Ò . Press key 2 times the display shows Ñ Ò . Press key 4 times the display shows Ò . . Ñ Ò Ñ Ò Preset “High limit” ( High limit ≥ Low limit ) e.g. High limit = 25 kg Press key 1 time the display showsÑ Press key 1 time the display shows Ñ Ò . Press key 2 times the display shows Ñ Ò . Press key 1 time the display shows Ñ Ò. Press key 5 times the display shows Ñ Ò. Press key 3 times the display shows Ò . . Preset “Beeper value” ( Refer to Note ) e.g. Beeper value = 22 02018058 8 ZSME300000264 EXCELL PRECISION CO., LTD. Press key 1 time the display shows Ñ Ò Press key 2 times the display shows Ñ Ò Press key 1 time the display shows Ñ Ò Press key 2 times the display shows Ñ Ò Press key 1 times the display shows . Preset Single point (preset low limit only): After “preset low limit” procedures is completed and the display showsÑ then press key again, the display shows . Ò . . This means that the “preset single point” procedure is completed. NOTE _ _ _ x x A B A Setting for the status that LCD is on and the beeper beep: 0 = when stable, the beeper beeps and LCD is on. 1 = when stable, the beeper beeps; whether stable or not, LCD is on. 2 = whether stable or not, the beeper beeps and LCD is on. 3 = open warning device: when the weight is higher than HI value and the weight is stable, LCD is on and Relay Card open. Setting for the beep status: B 0 = No beep 1 = OK (when the weight is over Low Limit & under or equal to High Limit.), the beeper beeps. 2 = When the weight is under or equal to Low Limit & over High Limit, the beeper beeps. Under Status in Preset Low Limit (preset single point only) The BEEP, LCD mode should be fixed as follows: is off When over “Low Limit”, the beeper beeps and Whether stable or not, the beeper beeps and LCD indication is on Warning device setting Set HI value and value of the beep, LCD mode should be fixed as follows: A Β When the weight equals to HI value, Relay Card open and the weight is accumulated. Press CE key to dismiss the warning sound and the range of accumulated weight is [000.000]~[999999]. Clear warning accumulation ♦ Press key first and then press key to clear all accumulated data. ♦ Accumulated data is cleared automatically under following conditions a. when shift among weight mode, counting mode and warning accumulation mode. b. when shift the units c. turn off the scale LCD indication: Ñ Ò Ñ Ò Ñ Ò ⏐ÕÕÕ⏐ÕÕÕÕ Ö ÖÖÖ⏐ÖÖÖ 10d Low Limit High Limit ◆To exit preset mode, please press 02018058 key. 9 ZSME300000264 , EXCELL PRECISION CO., LTD. 2. Recall Check-weighing Values key then press key ⇒ Recall “Low limit value” Then press key again ⇒ Recall “High limit value” Then press key again ⇒ Recall “Beeper value” Then press key again ⇒ Back to the beginning Press 3. Clearing Check-weighing Values Press key then press value”. Then press Press key ⇒ Recall “Low limit key, and then press key again ⇒ Clear “High limit value” and “Beeper value” key 6 times continuously ⇒ Clear all values. key then press 2-2-3 Totalizing 1. Weight Totalizing Place goods on the platter, after stable and press key to save the weight value. Then the display shows the total number of additions and the totalized weight value. And the (M+) indication “” will flash on the display. The indicator will recover to show the weight value of the goods on the platter after 3 seconds and the (M+) indication “” is on. The indicator allows the next totalizing operation, even when the weight value does not return back to zero. The key is functional, when the weight value changes by more than 10d. The indicator will save the totalized weight value after the weight is stable. The indicator can totalize positive or negative weight but can’t do both at the same time. The totalized weight store must be reset to zero before it is possible to select positive or negative totalizing mode. The totalizing function can be used up to a maximum of 9999 times before it must be reset. The totalizing display is limited to 6 digits maximum. When totalizing, RS-232 will also output. ( Refer to F5 setting) 2. Clear Totalized Weight Values ♦ Press then key to clear all totalized weight values. ♦ When changing between weighing and counting mode, or selecting weighing unit, the indicator will automatically clear all the totalized weight values. ♦ The indicators will automatically clear all the totalized weight values after turning on. 3. Recall Totalized Weight Values Press key to display the total number of additions and the totalized weight value. And the (M+) indication “” will flash on the display. The indicator will return to the weighing mode after 3 seconds. 02018058 10 ZSME300000264 EXCELL PRECISION CO., LTD. The indicator will not display the negative sign “-” for negative totalized weight values when recalling a totalized weight value, but when printing, the negative sign “-” will be printed out (transmitted serially) for each negative weight and negative totalized weight. 2-2-4 Zero Function Press key to re-zero the display with no load on the platter. When zero is set, the ( ) symbol will be displayed. 2-2-5 Tare Function 1. When the weight of the container is unknown ( ) key, the weight value n Place the container on the platter, after stable and press returns to zero and net indication ( ) is on. o Place goods into the container, then the indicator shows the net weight of goods. p Clear tare value When removing the container and goods, the display shows the negative weight value of the container. Then press zero and net indication ( key to clear tare value. The indicator returns to ) is on. q Recall tare value Press then key ⇒ the display shows tare value Multiple tare operation ⇒ Users can continuously increase or decrease the tare value by pressing the key. The total tare value (tare value + pre-set tare value) can equal the full capacity of the indicator. 2. When the weight of the container is known ( n Press Use key and the display showsÑ and ) Ò . . keys to input weight value of the container. After finishing the procedures, the net indication ( ) and pretare indication “” is on. o Place goods into the container, then the indicator shows the net weight of goods. p Clear pretare value then key, and then press Press When the indicator returns to zero, net indication ( off. q Recall pretare value Press then key to clear pretare value. ) and pretare indication “” are key ⇒ the display shows pretare value In Tare mode, the Preset tare function is disabled. 02018058 11 ZSME300000264 EXCELL PRECISION CO., LTD. The indicators with two weighing ranges can NOT pre-set the tare value larger than the first weighing range. For example: a 30 kg indicator is set by two weighing ranges. The first range is 0 to 15 kg, and the second range is 15 to 30 kg. The pre-set tare value can not be larger than 15 kg. 2-3 Counting Function 2-3-1 Sampling n Press , key to select sample quantity from 10, 20, 50,100 and the display shows , , accordingly. o Select sample quantity and then place samples on the platter, and then press the display shows “ key, ”. After stable, the scale enters into counting mode and the display shows sample quantity. ♦ Sample Too Small ( . . . . . . . . . . ♦ Unit Weight Too Small ( ⇒ Sample is less than 20 divisions. ) Pcs ) ⇒ Unit weight is less than 0.2 division. (0.1 d for Brazil regulation) When sampling, the above two symbols indications are on. Under such conditions, the scale can still work, but may result in lower count precision. When using 2-segment weighing mode, the above two symbol indications change to Range 2 and Range 1 and the two symbol indications are off. 2-3-2 Check Weighing Refer to the operation of check weighing in weighing function. 2-3-3 Totalizing Refer to the operation of totalizing in weighing function. 02018058 12 ZSME300000264 EXCELL PRECISION CO., LTD. Chapter 3 General Function Setting ♦ Switch on the scale. While the scale is counting down to zero, press and hold key until the display shows the software program version number Release the key, the scale enters into the configuration setting mode and is showed on the display. ⇒ Reserved Press key Press key ⇒ Reserved ⇒ Reserved Press key Press key ⇒ Reserved ⇒ Check-weighing configurations Press key Press key ⇒ RS-232 Interface output Setting ⇒ Exit setting mode Press key Press key ⇒ Internal value display mode ⇒ Reserved Press key Press key ⇒ Reserved ⇒ G Value adjustment Press key Press key ⇒ ID code setting ⇒ Print key function setting ⇒ Reserved Press key Press key ⇒ Printing orders when F5 is set as or ⇒ Reserved 02018058 13 ZSME300000264 EXCELL PRECISION CO., LTD. ⇒ Check Weighing Configurations 3-1 ♦ If hold mode is set, accessing to Press or Press is denied. key to select key . kg function ⇒ the display shows Press key for 5 times to clear HI, OK, LO values . Preset “LO value” (LO value > 10d) Press kg key and Press key to set “ LO value” E.g. LO value = 2 kg . Press kg key key = Increase the flash value by one (from 0 to 9) . kg key = Confirm key Preset “HI value” (HI value ≥ LO value) Press and key to set “HI value” E.g. LO value = 2.5 kg . Press kg key kg Preset “Beeper value” Press and key to set “HI value” E.g. Beeper value = 22 kg Press key Χ Χ A B A ⇒ 0 = After stable, the beeper beeps and the indications are on 1 = After stable, the beeper beeps; whether stable or not, the indications are on. 2 = whether stable or not, the beeper beeps and the indications are on. 3 = open warning device: when the weight is higher than HI value and the weight is stable, LCD is on and Relay Card open. B ⇒ 0 = No beep 1 = OK (when the weight is between Low limit & High limit.), the beeper beeps. 2 = When the weight is under or equal to Low limit (must be over 10d) & over or equal to High limit, the beeper beeps. ♦ LCD indication description: Ñ Ò Ñ Ò Ñ Ò ⏐ÕÕÕ⏐ÕÕÕÕ ÖÖÖÖ⏐ÖÖÖ 10d Low limit value High limit value 02018058 14 ZSME300000264 EXCELL PRECISION CO., LTD. 3-2 ⇒ RS-232 Interface Output Setting Make J1、J3 on RS232 short circuit, when connecting to computer. Press or key to select Press key The display shows the default function ⇒ the display shows key = Increase the flash value by one (from 0 to 8) or selecting baud rate from 1200, 2400,4800 and 9600(default setting). key =Confirm key ⇒ No transmission ⇒ Stable transmission * ⇒ Continuous transmission * setting of transmission mode key Press Select transmission mode (from 0 ~ 8 ) ⇒ Press key to transmit in simple mode. * ⇒ Press key to transmit in complete mode.* ⇒ Stable transmission in totalizing mode. Press key The display shows the default setting of RS-232 baud rate The format is as same as * ⇒ Free format. Please refer to . ⇒ Free format. Please refer to . ⇒ Press key to transmit. The format is as same as and Press key Select RS-232 baud rate (1200, 2400, 4800,9600) . * ⇒ Continuous transmission,specific format * ⇒ or key transmit specific format * * : RS-232 is open Press 02018058 key For Brazil approval models, if the unit weight is less than 0.1d, RS232 function close. 15 ZSME300000264 EXCELL PRECISION CO., LTD. RS-232 Interface Format I . Mode: UART Signal of EIA-RS0232 C II . Format : 1. Baud rate : 1 200, 2 400, 4 800, 9 600 bits/second 2. Data bits : 8 bits 3. Parity bit : None 4. Stop bits : 1 bit 5. Code : ASCII (Exchange code of American standard) Start bit Data bits Stop bit RS-232 Data Format Stable transmission ( Press (1) 1 key to transmit ( gram as weight unit 2 3 4 5 6 HEAD (2) 1 ), Continuous transmission ( , HEAD , 7 HEAD 02018058 , HEAD , ) 8 9 ± kg or lb as weight unit 2 3 4 5 6 7 ± ), 10 11 12 13 14 15 16 17 DATA 8 9 UNIT g CR LF 10 11 12 13 14 15 16 17 18 kg/lb DATA 16 UNIT CR LF ZSME300000264 EXCELL PRECISION CO., LTD. HEAD1 ( 2 BYTES ) OL - Overload , Under load ST Display is Stable US Display is Unstable HEAD2 ( 2 BYTES ) TR TARE Mode NT NET Mode GS GROSS Mode DATA ( 7 or 8 BYTE ) 2B ( HEX ) = “ + ” ( PLUS) 2D ( HEX ) = “ – ” ( MINUS ) 2E ( HEX ) = “ . ” ( DECIMAL POINT ) UNIT ( 2、3 or 4 BYTE ) kg = 6B ( HEX ) ; lb = 6C( HEX ) ; tl.T = 74 ( HEX ) ; hkg = 68 ( HEX ) ; viss = 76 ( HEX ) ; 67 ( HEX ) 62 ( HEX ) 6C ( HEX ) 67 ( HEX ) 69 ( HEX ) ; 2E ( HEX ) ; 54 ( HEX ) ; 73 ( HEX ) ; 73 ( HEX ) Transmission examples: Data format for RS-232 continuous transmission are as below: 1. The gross weight (+0.876 kg) shows as below, after stable: (no tare or pre-tare mode) S T , G S , + 0 . 8 7 6 k g 0D 0A HEAD1 , HEAD2 , DATA UNIT C LF 2. The net weight (-1.568 lb) shows as below without weight stability: (under tare or pre-tare mode) U S , N T , 1 . 5 6 8 l b 0D 0A HEAD1 02018058 , HEAD2 , DATA 17 UNIT C LF ZSME300000264 EXCELL PRECISION CO., LTD. Press key to transmit (simple mode) S/N WT/UNIT ( kg / lb ) -------------0001 1.0000 ( Press or key 0002 1.0000 ( Press or key 0003 1.0000 ( Press or key 0004 1.0000 ( Press or key 0005 1.0000 ( Press or key ( Press twice to print TOTAL -------------0005 Press 5.0000 key to transmit (complete mode) TICKETS NO. 0001 G 1.000kg T 0.000kg N 1.000kg (3 blank lines) TICKETS NO. 0002 G 1.000kg T 0.000kg N 1.000kg (3 blank lines) TICKETS NO. 0003 G 1.000kg T 0.000kg N 1.000kg (3 blank lines) TOTAL NUMBER OF TICKETS 0003 TOTAL NET 3.000kg (3 blank lines) G = GROSS 02018058 ( Press or key ( Press or key ( Press or key ( Press twice to print TOTAL T = TARE N = NET 18 ZSME300000264 EXCELL PRECISION CO., LTD. Stable Transmission (totalizing mode) S/N WT/UNIT ( kg / lb ) -------------0001 1.0000 ( The scale is stable 0002 1.0000 ( The scale is stable 0003 1.0000 ( The scale is stable 0004 1.0000 ( The scale is stable 0005 1.0000 -------------- ( The scale is stable 0005 ( Press 5.0000 twice to print TOTAL RS232 output format in HOLD MODE Please set in . If there is only RS-232, press to print out the HOLD value on the display. (specific form for Brazil models) Continuous Transmission The print out is as below: If display shows 70.15kg, the RS-232 export is 51.07000 If display shows -70.15kg, the RS-232 export is 51.0700If display OL, RS-232 print nothing. or (specific form) key Transmission Totalization print form F R “ W T ? <LF> G G , G G T T , T T PT PT , PT PT N N , N N pcs pcs pcs pcs pcs n n n n n p 1 , 1 <LF> 3 G T PT N pcs n N “ <LF> <LF> <LF> <LF> <LF> <LF> t t t t t t pcs pcs pcs pcs pcs pcs <LF> For example: PT 0.3KG T 0.7KG G 1.2KG N 0.2KG PCS 20 02018058 19 ZSME300000264 EXCELL PRECISION CO., LTD. Then the printing form is: FR”WT3N ” ? 1,200 0,700 0,300 0,200 20 000020001000000020 P1,1 Use + key or key twice to clear the format Then, form of clearing the printing: F R “ 5 ? <LF> TN TN TN TN TN TW TW TW TW TW TA TA TA TA TA tn tn tn tn tn tn tn tn tn tn p 1 , 1 <LF> “ <LF> TN TW TA tn tn <LF> <LF> <LF> <LF> tw tw tw tw tw tw ta ta ta ta ta ta <LF> FR”520T ” ? 1 0,200 20 000001000200000020 P1,1 02018058 20 ZSME300000264 EXCELL PRECISION CO., LTD. 3-3 Press ⇒ Exit Function Setting Mode or function ⇒ the display shows key to select Press key Counting down to zero and exit setting mode 3-4 ⇒ Internal Value Display Mode Press or Press key to select function ⇒ the display shows key Internal value Press 02018058 key 21 ZSME300000264 EXCELL PRECISION CO., LTD. ⇒ G value Calibration 3-5 Press key or key to select function. ⇒ The display shows . You can input at most 9 sets of G value’s data. The historic data can be found out and not to be revised. Press key After about 1 second . Press key Press key The screen displays revised times at present and then displays local G value after about 1 second. After about 1 second Press key Press . keyThe screen displays last revised times and then displays local G value after about 1 second. After about 1 second . Press key Press key The screen displays the first two revised times and then displays local G value after about 1 second. After about 1 second . Press key Press key “01” ⇒ Fix to save ADJ condition, input local G value in F9. After about 1 second . Press key to enter into G value revised mode. “00” ⇒ Fix to save G value in manufacture site. . Press Input local G value and key to input the number. Press key to Shift the flashing digit one space to right. . key to save Press the data and then complete the revise. 02018058 22 ZSME300000264 EXCELL PRECISION CO., LTD. ⇒ ID Code Setting 3-6 (Use must be in coordination with Press key or Press , , , ) function ⇒ the display shows key to select key Machine ID code setting: Press and to set 01 ~ 99. Default setting: 00 Press Machine ID code setting: (1) “00”: RS-232 does not transmit Machine ID. (2) “01~99”: RS-232 transmits Machine ID. key RS232 DATA FORMAT Stable transmission ( Press ), Continuous transmission ( key to transmit ( ), ) 1. e.g. Machine ID code is 10. The gross weight (+0.876 kg) shows as below, after stable: (no tare or pre-tare mode) 1 0 ID 2. S T , HEAD1 , G S HEAD2 , + 0 0 , 0 . 8 7 6 DATA k g UNIT 0D 0A C LF e.g. Machine ID code is 00. (Not using Machine ID function.) The net weight (-1.568 lb) shows as below without weight stability: (under tare or pre-tare mode) U S HEAD1 02018058 , N , T HEAD2, , - 0 0 1 . DATA 23 5 6 8 l b UNIT 0D 0A C LF ZSME300000264 EXCELL PRECISION CO., LTD. ⇒ Print Key ( 3-7 Press key or Press ) Function Setting function ⇒ the display shows key to select key Press key Press ⇒ 02018058 to set 0 ~ 2. Default setting: 0 ⇒ If weight variation is beyond ±1d ~ ±10d, is print function (d=division) ⇒ and has totalization function. Or it key has print function (no totalization function) key has print function, if current weight is within the lower and upper limits. (no totalization function) 24 ZSME300000264 EXCELL PRECISION CO., LTD. ⇒ Printing Orders when or 3-8 No.0 No.1 No.2 No.3 No.4 No.5 No.6 No.7 No.8 No.9 is set as No print. TICKET NO. G T PT N P/N S/N No print No print Contains a 9-digit code If is set as n The format of is as following S/N WT/UNIT (kg / lb) -------------0001 1.0000 ( Press key or Press key 0002 1.0000 ( Press key or Press key 0003 1.0000 ( Press key or Press key 0004 1.0000 ( Press key or Press key ( Press key or Press key 0005 1.0000 -------------0005 5.0000 o The format of 02018058 ( Press key twice to print the total : RS-232 print nothing 25 ZSME300000264 EXCELL PRECISION CO., LTD. If is set as nThe format of is as following P/N 012345678901 TICKET NO. 0001 G 75.01kg T 0.00kg PT 0.00kg N 75.01kg S/N WT/UNIT ( kg / lb ) -------------0001 1.0000 ( Press key or Press key 0002 1.0000 ( Press key or Press key 0003 1.0000 ( Press key or Press key 0004 1.0000 ( Press key or Press key 0005 1.0000 -------------- ( Press key or Press key 0005 ( Press key twice to print the total. 5.0000 o The format of P/N 012345678901 TICKET NO. 0001 G 75.01kg T 0.00kg PT 0.00kg N 75.01kg TOTAL NUMBER OF TICKETS 0001 TOTAL NET 0.499kg 02018058 is as following ( Press or ( Press key twice to print the total 26 key ZSME300000264 EXCELL PRECISION CO., LTD. Chapter 4 Wireless Connection Instruction (Option) Step 1: Connect to your device 1. Enable Wireless on your computer. Right-click on the taskbar, highlight “New Connection” and left click. icon of the bottom-right corner on Due to the different bluetooth supplier software could be installed, the setting dialogs shown below are just for reference. 2. Check “My device is set up and ready to be found” in the dialogue box. 02018058 27 ZSME300000264 EXCELL PRECISION CO., LTD. 3. If the device is ready, the device names Device-C1 or C2 will be found. Device-C1 or Device-C2. Double-click on 4. Circle “Let me choose my own passkey”, input the passkey “111111” and click “Next > ” button 02018058 28 ZSME300000264 EXCELL PRECISION CO., LTD. 5. Device is added so far. Please disconnect COM port and click “Finish.” Step 2: Connection test To test the connection, use HyperTerminal recommended in Windows XP 1. go “START” → “All programs” → “Accessories“→ “Communications“→ “HyperTerminal” 02018058 29 ZSME300000264 EXCELL PRECISION CO., LTD. 2. Key in a name and select icon, then press “OK.” 3. After select the COM port referred by step 1 point 5 and click “OK.” 4. Click “File” → “Properties” 02018058 30 ZSME300000264 EXCELL PRECISION CO., LTD. 5. Select “settings” from the menu, and click “ASCII setup” on the bottom of the box. 6. Check “Send line ends with line feeds” and “Echo typed characters locally” and click “OK”. 7. Key in commands such RW, MZ, and RG in the main screen to test... 02018058 31 ZSME300000264 EXCELL PRECISION CO., LTD. Appendix 1 RS-232 Wiring instruction To connect RS232, please open the housing, RS232’s PIN connectors locate on the bottom-right corner of the mainboard. The most common connection method is using 9PIN and 25PIN, as shown below: PC Printer 02018058 PIN Function Female 9 PINS CN12 Function 2 Transmit Data 5 SG 3 Receive Data 1 RxD 5 Signal Ground 2 TxD PIN Function Male 25 PINS CN12 Function 2 Receive Data 5 SG 3 Transmit Data 1 RxD 7 Signal Ground 3 TxD 32 GTW GTW ZSME300000264 EXCELL PRECISION CO., LTD. Appendix 2 7-Segment Display Characters Number Letter Display Letter 0 A N 1 B O 2 C P 3 D Q 4 E R 5 F S 6 G T 7 H U 8 I V 9 J W K X L Y M Z ℃ 02018058 Display 33 Display ZSME300000264