1
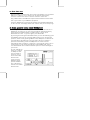
DMXPLORER USER INSTRUCTIONS REV3.0 Important information Warranty CPOINT warrants its products against defects in materials and workmanship for a period of 1 year. This warranty does not apply if the product has been modified or damaged by accident, abuse, or misuse. 14 day money back guarantee If, within 14 days of having received your DMXplorer you find that it does not suit your needs, you may return it for a refund. CPOINT will refund the purchase price excluding shipping/handling costs. If the product has been altered or damaged, a partial refund will be given. Disclaimer of liability CPOINT is not responsible for special, incidental, or consequential damages resulting from any internal fault, including damage to or replacement of equipment or property. Special note about reseller sales If you purchased your DMXplorer through a reseller, you should contact the reseller if there is a problem. They may have warranty policies that differ from those of CPOINT. Declaration of conformity This product complies with the EU requirements of the EMC Directive 89/336/EEC. Copyrights Copyright ©2003 by CPOINT. All rights reserved Contents Chapter Page 1. Introduction.................................................................... 3 2. First time use................................................................. 4 3. Some general notes about DMXplorer.............. 4 4. Menu DMX SEND........................................................ 5 4.1 Channel +/-, Level with fader........................... 5 4.2 All Channels, Level with fader.......................... 5 4.3 Step Channel with fader.................................... 5 4.4 Auto dim and step, speed with fader.............. 5 4.5 Auto dim one channel, speed with fader....... 5 4.6 Channel +/-, Level +/-....................................... 5 5. Menu 24 CH. MINIATURE LIGHTDESK.......... 6 5.1 Use presets.......................................................... 6 5.2 Edit presets.......................................................... 7 5.3 Fader as X-fade or Speed control.................... 7 5.4 Auto jump to next preset................................. 7 5.5 Erase all presets.................................................. 7 6. Menu USER SETUP.................................................... 8 6.5 DMX speed.......................................................... 8 6.5 Backlight............................................................... 8 6.5 Settings.................................................................. 8 7. Menu INFO..................................................................... 9 8. Menu POWER CONTROL...................................... 9 8.1 Switch off.............................................................. 9 8.2 Keep power on................................................... 9 9. About DMX512............................................................. 10 3 1. Introduction Controlling a dimmer, scroller or other DMX512 equipment, from a controldesk is an easy task when everything is working as it should, but haven´t you often wished you had something more portable than the controldesk when you are aligning scrollers or sorting out why the dimmers are not working as they should. The DMXplorer is a portable, easy to use, battery operated unit that transmits DMX512 data according to the USITT (United States Institute for Theatre Technology) standards and can be connected to any DMX512 equipment that complies to the USITT standards. At installations and fault finding etc, a reliable DMX512 source is indispensable. The DMX512 Transmitter has been designed with the following considerations in mind: Low cost. Ease of use. Small size. Basic and advanced transmit functions. Build, save and use presets. Use of fader. Possible to operate in total darkness. Battery use for portability. External power source input. “Kind” DMX512 output timing if needed. If you have any questions, comments or suggestions, please let us know. Our mail address is: [email protected] You can find the latest information on: http://www.cpoint-lighting.co.za Rev 3.0 4 2. First time use Open the battery lid at the back and connect a 9V battery. Use an alkaline battery for longer use. If you want to use an external power supply, connect a 12V-15V DC source to the DC connector on the side. Plug a DMX cable to the DMX512 output of the transmitter and the other end of your cable to your DMX512 equipment. Switch on DMXplorer by pressing and holding down the BACK/NO button for two seconds. The display should now come on and you are ready to go. 3. Some general notes about DMXplorer A menu system similar to a cell phone is used to access all functions in DMXplorer. At power up, you can scroll through the different menus by pressing PLUS or MINUS. When a suitable menu is shown, press SELECT/YES to enter. To go back again, press BACK/NO. By pressing and holding the BACK/NO button you will automatically get to the POWER CTRL menu. By pressing SELECT/YES you will be given the question, Switch off? By pressing SELECT/YES, DMXplorer is switched off. The backlight is automatically set to dim after a while if no button is pressed to save battery power and DMXplorer will switch itself off automatically after a duration of inactivity. If you want the power to be on continuously you can change the settings in the POWER CTRL menu. The USER SETUP menu contains different options to set the backlight to your needs. All your settings are stored in a memory in DMXplorer and can be loaded at power up. This is done in the USER SETUP menu. There are three DMX512 output speeds available. Any of the three is chosen in the USER SETUP menu. 5 Menus 4. DMX SEND DMX512 send functions are available in the DMX SEND menu. Press SELECT to enter the DMX SEND menu. Press PLUS or MINUS to select a suitable menu within DMX SEND. 4.1 CHANNEL +/- , LEVEL WITH FADER Select channel by pressing PLUS or MINUS and set the level with the fader. Pressing and holding PLUS or MINUS will increase or decrease channels faster. By pressing PLUS and MINUS at the same time, the channel is automatically set to channel 1. SELECT toggles the displayed level between 0-255 or 0-100%. 4.2 ALL CHANNELS , LEVEL WITH FADER Setting the level with the fader will set the same level for ALL channels. Use this function with care! 4.3 STEP CHANNEL WITH FADER The fader will set the level, when the fader is back to 0% it will automatically increase the channel. This makes it easier to step through a number of channels just by fading up and down. 4.4 AUTO INCREASE CHANNEL, CONTROL SPEED WITH FADER This mode automatically increases and decreases the level between 0 and 100% (SELECT to toggle between 0-100% or 0-255). When a channel has dimmed up and down, the channel is increased automatically. The dim speed is set with the fader. Use slow DMX speed for faster dimming. 4.5 AUTO DIM CHANNEL, CONTROL SPEED WITH FADER This mode automatically dims selected channel up and down between 0 and 100% (SELECT to toggle between 0-100% or 0-255). The speed is set with the fader. Use slow DMX speed for faster dimming. 4.6 CHANNEL +/- , LEVEL +/Press SELECT to toggle between channel control or level control. Set level or channel with PLUS or MINUS. This function is useful for measuring curves etc. when an exact level is required. 6 5. 24-CHANNEL MINIATURE LIGHT DESK With the 24-channel desk you can build 80 presets with 24 channels (DMX channel 1-24) and use them with the fader as a X-fade to dim out one preset while the next preset is dimmed in. The fader can also be used as speed control when presets are set to be loaded automatically. The 24-channel desk is very useful for testing equipment using more then one DMX channel but also for small exhibitions where some simple lighting is wanted or as backup for a small desk. You could even run a small show. You have 80 presets which you can build as you like within 24 channels. Remember to build them in chronological order. Preset 2 will be loaded when preset 1 is done. Preset 3 will be loaded when preset 2 is done and so on. When preset 80 is done it will load preset 1 again. When you are happy with your presets, you enter the USE PRESET menu and use the fader to do the X-fade. Each menu is explained in detail in its section. 5.1 USE PRESETS If the fader is set to work as X-fade: The display could for example show X1:03 X2:04 on the upper row. X1 is the loaded preset for the outgoing light and X2 is the preset it will fade to by using the fader. When the fade is ready, X2 will be loaded to X1 and the next preset is loaded to X2, which in this case would be preset 5. The lower row on the display shows the percentage of the fade and the direction of the fader. When a fade is complete the direction will change, if you were fading up on the previous X-fade you will now fade down to do the next X-fade. When the level reaches 0% in X1 the next preset is loaded into X2. By pressing PLUS or MINUS you change the preset loaded in X2. By pressing SELECT you will jump forward one step in the sequence (X1 and X2 is increased). If the fader is set to work as Speed control: The display is the same but the fader is now used to control the speed of the X-fade. SELECT works as a GO button to start the X-fade. If SELECT is pressed again it will pause the fade and continue when pressed again. If the selection Auto Jump is chosen, the next preset will be loaded and started automatically and the sequence will continue until SELECT is pressed to pause. 7 5.2 EDIT PRESETS When entered the current preset is shown on the display and also live on the DMX output. Use PLUS or MINUS to select desired preset. Press SELECT to edit selected preset. The display will now show the selected Preset Channel to be edited with its value previously stored. To change the level, you must “fetch” the stored level before it will change. This makes it possible to edit previously stored presets without having to see the actual output. To store the selected preset press SELECT. To change channel press PLUS or MINUS. To edit next preset press BACK and then SELECT. The preset will increase automatically. 5.3 FADER AS X-FADE OR SPEED CONTROL You can select the fader to work as Speed control or X-fade when the presets are used in USE PRESETS. SELECT toggles between Speed control or X-fade. 5.4 AUTO JUMP ON OR OFF You can select if the next preset should be loaded automatically when a X-fade is complete and automatically start the next X-fade. If off, it will stop when each X-fade is complete. Auto jump is only valid when the fader is set as Speed control. 5.5 ERASE PRESETS Press SELECT to enter the erase menu. By pressing PLUS and MINUS at the same time, all presets will be erased. 8 6. USER SETUP 6.1 DMX SPEED There is an option of three different DMX output speeds. Fast is the fastest and slow has lower update rate per second with kind break and MAB timing. When the fastest speed is used there is less time for other tasks and the DMXplorer can appear a bit slower compared to when slow DMX is chosen. If you want faster up and down dimming when Auto Level in DMX SEND is chosen, rather use slow or medium DMX speed. Choose speed with PLUS or MINUS and press SELECT to select desired speed. Selected speed is indicated with *. 6.2 BACKLIGHT There are four options for the backlight setting. Auto off, keep off, keep on and user level. Chose option with PLUS or MINUS and press SELECT at desired option. If user level is selected, adjust the backlight level with the fader and press SELECT. Selected option is displayed with *. 6.3 SETTINGS To save your current settings, press SELECT when save is displayed. To load a previously saved setting, press SELECT when load is displayed. To load default settings , press SELECT when default is displayed. To load your own settings automatically when DMXplorer is powered up press SELECT when AutoLoad is displayed. Select Auto:on or Auto:off with PLUS or MINUS. Press SELECT when Auto:on is displayed. To load defaults at power up, select Auto:off. Selected option is displayed with *. 9 7. INFO In the info menu you can find general info about CPOINT, XLR pin-out etc. 8. POWER CONTROL 8.1 SWITCH OFF Press SELECT to switch DMXplorer off. To switch on again, press and hold BACK until the display comes on. 8.2 KEEP POWER ON If the Keep power on is selected (indicated with *) DMXplorer will not switch off automatically. To toggle press SELECT. The option is stored with your user settings. 10 9. About DMX512 DMX512 (1990) is a specification set up by USITT (United States Institute for Theatre Technology) of how the electrical parameters and protocol of the transfer between different light control equipment must be performed. The DMX512 is capable of handling 512 channels at 256 different levels. The data speed is 250kBaud, which means the information is updated 44 times per second if all channels are transmitted at full speed. The data is normally transferred in a 3-wire cable where 1 wire is ground,0V (not earth) and the other two carry the data in a balanced pair, which means, when one dataline is at 5V the other one is at 0V and vice versa. The advantage of transferring data like this is that if any interference is picked up from any other source in the vicinity of the cable, it will most likely affect both datawires equally and since the receiver circuit detects the differences in the pair the interference will be cancelled out. This interface is an industry standard and is called RS-485 which is a description of the electrical levels and currents. DMX512 protocol consist of a break signal, a start code and 512 bytes of level values. The break signal must be at least 88us long. After the break is a period called M.A.B. (mark after break) which is at least 8us long. There after a start code is transmitted which indicates what kind of data is transmitted. For dimmer data this byte is zero. The following 512 bytes are level information starting with channel one. For more information, go to: www.usitt.org or www.plasa.org CONNECTOR PIN-OUT The standard connector type used in DMX512 equipment is the 5-pole XLR connector. Female is used as output and male as input. PIN: 1. 0V 2. Data 3. Data + 4. Not used 5. Not used 11 DMXPLORER www.cpoint-lighting.co.za [email protected] Distributor