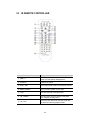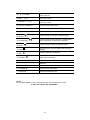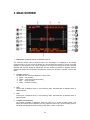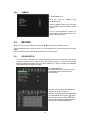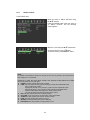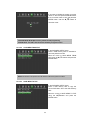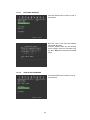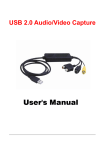
1
H.264
4Channel Mobile DVR User Manual - V1.0
MODEL: MDVR4SD
www.geniecctv.com
1
C 2009 Genie CCTV Limited
Copyright○
All rights reserved. This material, information and instructions for use contained
herein are the property of Genie CCTV Ltd. No part of this manual, including the
products and software described in it, may be reproduced, transmitted, transcribed,
stored in a retrieval system, or translated into any languages in any form or by any
means, except documentation kept by the purchaser for backup purposes, without
the express written permission of Genie CCTV Ltd
Liability: Genie CCTV Ltd provides this manual “as is” without warranty of any kind,
either expressed or implied, including but not limited to the implied warranties or
conditions of merchantability or fitness for a particular purpose. In no event shall
Genie CCTV Ltd its directors, officers, employees or agents be liable for any indirect,
special, incidental, or consequential damages (including damages for loss of profits,
loss of business, loss of use or data, interruption of business and the like), even if
Genie CCTV Ltd has been advised of the possibility of such damages arising from
any defect or error in this manual or product.
Specifications or information contained in this manual are furnished for informational
use only, and are subject to change at any time without notice, and should not be
constructed as a commitment by Genie CCTV Ltd.
Genie CCTV Ltd assumes no responsibility or liability for any errors or inaccuracies
that may appear in this manual, including the products and software described in it.
Trademarks. Product and cooperate names appearing in this manual may or may not
be registered trademarks or copyrights of their respective companies, and are used
only for identification or explanation and to the owners’ benefit, without intent to
infringe.
Translated material. Any discrepancies, errors or omissions in non-English versions
of this manual should be referenced to the English version for clarification.
2
PACKAGE CONTENTS
Prior to installation of this MDVR4SD DVR, please verify that the packaging contains
the following contents:
1.
2.
3.
4.
5.
6.
7.
8.
9.
One DVR
One AC Adaptor
One Power Cable
One Remote Controller
DVR Viewer Program CD
Instruction Manual on CD
Two AAA batteries
Rack Mount Ears and Screws
One 4Gb SD Card
If any of the contents are missing, please contact the seller immediately.
3
RISK OF ELECTRICAL SHOCK WARNING
WARNING
TO REDUCE THE RISK OF FIRE OR ELECTRIC SHOCK, DO NOT EXPOSE THIS PRODUCT TO RAIN
OR MOISTURE. DO NOT INSERT ANY METALLIC OBJECTS THROUGH THE VENTILATION GRILLS OR
OTHER OPENINGS ON THE EQUIPMENT.
CAUTION
EXPLANATION OF GRAPHICAL SYMBOLS
The lightning flash with arrowhead symbol, within an equilateral triangle, is intended to
alert the user to the presence of uninsulated "dangerous voltage" within the product's
enclosure that may be of sufficient magnitude to constitute a risk of electric shock to
persons.
The exclamation point within an equilateral triangle is intended to alert the user to the
presence of important operating and maintenance (servicing) instruction in the literature
accompanying the product.
Disposal of Old Electrical & Electronic Equipment
(Applicable in the European Union and other European countries with separate
collection systems)
This symbol on the product or on its packaging indicates that this product shall not be treated as
household waste. Instead it shall be handed over to the applicable collection point for the recycling of
electrical and electronic equipment. By ensuring this product is disposed of correctly, you will help
prevent potential negative consequences for the environment and human health, which could
otherwise be caused by inappropriate waste handling of this product. The recycling of materials will
help to conserve natural resources. For more detailed information about recycling of this product,
please contact your local office , your household waste disposal service or the distributor where you
purchased the product.
4
DISCLAIMER
While every effort has been made to ensure that the information contained in
this guide is accurate and complete, no liability can be accepted for any
errors or omissions.
Maker reserves the right to change the specifications of the hardware and
software described herein at any time without prior notice.
No part of this guide may be reproduced, transmitted, transcribed, stored in a
retrieval system, or translated into any language in any form, by any means,
without prior written permission of Maker.
Maker makes no warranties for damages resulting from corrupted or lost data
due to a mistaken operation or malfunction of the Digital Video Recorders, the
software,
personal
computers,
peripheral
devices,
or
unapproved/unsupported devices.
Trademark Acknowledgements
MDVR4SD Digital Video Recorder is the trademark of the Maker.
Other names and products not mentioned here may be registered trademarks
or trademarks of their respective companies.
5
Read this First
Test Sessions
Before you attempt to record important subjects, we highly recommend that you have
several test sessions to ensure that the Digital Video Recorder is operating and
being operated correctly. Please note that Maker, its subsidiaries and affiliates, and
its distributors are not liable for any consequential damages arising from any
malfunction of the Digital Video Recorder or its accessories.
The Privacy Act
Please note that the Digital Video Recorders are intended for surveillance use and
should never be used in a manner that invades other people’s privacy or
contravenes international or domestic privacy acts and their regulations. Please be
advised that in certain cases the monitoring of individuals, private properties, or
commercial properties may contravene legal rights of such individuals even if the
images were recorded for personal use.
Warranty Limitations
This equipment’s warranty is only effective in the country of sale. If a problem
arises while the Digital Video Recorder is in use abroad, please convey it back to the
country of sale before proceeding with a warranty claim to the Maker.
6
SAFETY PRECAUTIONS
Before using the Digital Video Recorder, please ensure that you read and
understand the safety precautions described below. Always ensure that the
Digital Video Recorder is operated correctly.
The safety precautions noted on the following pages are intended to instruct
you in the safe and correct operation of the Digital Video Recorder and its
accessories to prevent injuries or damage to the self, other persons and
equipment.
In this Instruction Manual, the term “Digital Video Recorder”, “equipment” and
“device” refers primarily to the Digital Video Recorder and its accessories
such as power supply and its remote controller.
WARNINGS
Do not cover the ventilation opening or slots on the outer casing. To prevent
the Digital Video Recorder from overheating, provide at least two inches of air
space around the vent and the slots.
Do not drop metallic parts through slots. This could permanently damage the
Digital Video Recorder. If this should occur immediately turn the Digital Video
Recorder’s power off or unplug the power cord from the power outlet. Contact
a qualified service personnel authorised by the equipment distributor or the
Maker.
Do not attempt to disassemble or alter any part of the equipment that is not
expressly described in this guide. Disassembly or alteration may result in
high voltage electric shock. Internal inspections, alterations and repairs
should be conducted by qualified service personnel authorised by the
equipment distributor or the Maker.
Stop operating the equipment immediately if it emits smoke or noxious fumes.
Failure to do so may result in fire or electrical shock. Immediately turn the
Digital Video Recorder’s power off, remove the power cable from the power
outlet. Confirm that smoke and fume emissions have ceased. Please consult
the Digital Video Recorder reseller.
Stop operating the equipment if a heavy object is dropped or the casing is
damaged. Do not strike or shake. Failure to do so may result in fire or
electrical shock. Immediately turn the Digital Video Recorder’s power off or
unplug the power cord from the power outlet. Please consult the Digital Video
Recorder reseller.
7
Do not allow the equipment to come into contact with, or become immersed
in, water or other liquids. Do not allow liquids to enter the interior. The Digital
Video Recorder has not been waterproofed. If the exterior comes into
contact with liquids or salt air, wipe it dry with a soft, absorbent cloth. In the
event that the water or other foreign substances enter the interior,
immediately turn the Digital Video Recorder’s Power off or unplug the power
cord from the power outlet. Continued use of the equipment may result in
fire or electrical shock. Please consult the Digital Video Recorder reseller.
Do not use substances containing alcohol, benzene, thinners or other
flammable substances to clean or maintain the equipment. The use of these
substances may lead to fire. Use a dry cloth on a regular periodic basis and
wipe away the dust and dirt that collects on the device. In dusty, humid or
greasy environments, the dust that collects around the ventilation or the slots
on the outer casing over long periods of time may become saturated with
humidity and short-circuit, leading to fire.
Do not cut, damage, alter or place heavy items on the power cord. Any of
these actions may cause an electrical short circuit, which may lead to fire or
electrical shock.
Do not handle the device or power cord with wet hands. Handling it with wet
hands may lead to electrical shock. When unplugging the cord, ensure that
you hold the solid portion of the plug. Pulling on the flexible portion of the
cord may damage or expose the wire and insulation, creating the potential for
fires or electrical shocks.
Use only the recommended power accessories. Use of power sources not
expressly recommended for this equipment may lead to overheating, damage
of the equipment, fire, electrical shock or other hazards.
The supplied power supply and power cord are designed for exclusive use
with the Digital Video Recorder. Do not use it with other products or battery.
There is a risk of fire and other hazards.
Avoid using, placing or storing the equipment in places subject to strong
sunlight or high temperatures, such as a greenhouse or boot of a car. High
temperatures may also cause deformation of the casing. Ensure that there
is good ventilation when using the equipment.
Do not operate the Digital Video Recorder beyond its specified temperature,
humidity or power source ratings. Do not use the Digital Video Recorder in
an extreme environment such as in high temperature or high humidity. Use
the device at temperatures within 0℃~+60℃ (32°F~140°F) and humidity
below 90%.
8
PREVENTING MALFUNCTIONS
Avoid Strong Magnetic Fields. Never place the Digital Video Recorder in
close proximity to electric motors or other equipment generating strong
electromagnetic fields. Exposure to strong magnetic fields may cause
malfunctions or corrupt image data.
Avoid Condensation Related Problems. Moving the equipment rapidly
between hot and cold temperatures may cause condensation (water droplets)
to form on its external and internal surfaces. You can avoid this by placing
the equipment in an airtight, re-sealable plastic bag and letting it adjust to
temperature changes slowly before removing it from the bag.
If Condensation forms inside the Digital Video Recorder. Stop using the
equipment immediately if you detect condensation. Continued use may
damage the equipment. Remove the power cord from the power outlet and
wait until the moisture evaporates completely before resuming use.
9
Table of Contents
1.
ABOUT THIS MANUAL ................................................................ 13
2.
FEATURES & SPECIFICATIONS ................................................ 13
2.1 Features ....................................................................................................... 14
2.2 Specifications ............................................................................................... 15
3.
OVERVIEW & CONTROLS.......................................................... 18
3.1 Front Panel ..................................................................................................... 18
3.2 Rear View..................................................................................................... 19
3.3 IR REMOTE CONTROLLER ....................................................................... 20
3.3 MOUSE CONTROLLER .............................................................................. 22
4.
MAIN SCREEN ............................................................................ 23
5.
MAIN MENU................................................................................. 25
5.1 QUICK SETUP ............................................................................................. 25
5.1.1 QUICK SETUP ...............................................................................................................25
5.1.2 IMAGE SIZE ...................................................................................................................26
5.1.3 RECORD FRAME ..........................................................................................................26
5.1.4 IMAGE QUALITY............................................................................................................27
5.1.5 EVENT ...........................................................................................................................27
5.1.6 PRE RECORD TIME ......................................................................................................28
5.1.7 POST RECORD TIME....................................................................................................28
5.1.8 PREVIEW QUALITY.......................................................................................................28
5.1.9 AUDIO RECORD............................................................................................................29
5.1.10 SAVE ..............................................................................................................................29
5.2 SCREEN ...................................................................................................... 29
5.2.1 AUTO SEQUENCE.........................................................................................................30
5.2.2 DISPLAY.........................................................................................................................30
5.2.2.1
5.2.2.2
5.2.2.3
5.2.2.4
5.2.2.5
5.2.2.6
5.2.2.7
5.2.2.8
5.2.2.9
5.2.2.10
STORAGE FREE SPACE ........................................................................................................... 31
STORAGE FREE SPACE MODE ............................................................................................... 31
RECORD STATUS ...................................................................................................................... 31
CLOCK DISPLAY........................................................................................................................ 32
DATE & TIME MODE .................................................................................................................. 32
TITLE DISPLAY........................................................................................................................... 32
TITLE MODE............................................................................................................................... 33
BORDER COLOUR .................................................................................................................... 34
GPS INFORMATION................................................................................................................... 34
SPEED DISPLAY MODE ............................................................................................................ 35
5.2.3 TITLE..............................................................................................................................35
5.2.4 COVERT.........................................................................................................................36
5.2.5 CAMERA ........................................................................................................................37
10
5.3 RECORD...................................................................................................... 37
5.3.1
5.3.2
5.3.3
5.3.4
5.3.5
5.3.6
5.3.7
RECORD SETUP ...........................................................................................................37
RECORD PROGRAM.....................................................................................................38
PREVIEW QUALITY.......................................................................................................38
AUDIO RECORD............................................................................................................39
REPEAT RECORD .........................................................................................................39
HOLIDAY ........................................................................................................................40
RECORD LIMIT..............................................................................................................40
5.4 EVENT ......................................................................................................... 41
5.4.1
MOTION DETECTION....................................................................................................41
5.4.1.1
5.4.1.2
5.4.1.3
5.4.1.4
5.4.2
5.4.3
5.4.4
5.4.5
5.4.6
5.4.7
CHANNEL ................................................................................................................................... 41
SENSITIVITY .............................................................................................................................. 42
AREA SETUP.............................................................................................................................. 42
TEST MOTION............................................................................................................................ 42
EVENT SCREEN MODE ................................................................................................43
EVENT CHECK ..............................................................................................................43
EVENT INDICATION ......................................................................................................44
SENSOR INPUT SELECT ..............................................................................................44
RELAY OUTPUT ............................................................................................................45
GPS................................................................................................................................46
5.5 SYSTEM....................................................................................................... 47
5.5.1
STORAGE ......................................................................................................................47
5.5.1.1
5.5.1.2
5.5.2
CLOCK ...........................................................................................................................48
5.5.2.1
5.5.2.2
5.5.3
5.5.4
5.5.5
STORAGE CONFIGURATION ................................................................................................... 47
SD CARD INITIALISE ................................................................................................................. 48
DATE&TIME ................................................................................................................................ 49
TIME ADJUST ............................................................................................................................. 49
VIDEO STANDARD........................................................................................................50
LANGUAGE....................................................................................................................50
ADVANCED SETUP .......................................................................................................50
5.5.5.1 PASSWORD CHECK.................................................................................................................. 51
5.5.5.2 SET PASSWORD........................................................................................................................ 51
5.5.5.3 USER AUTHORITY..................................................................................................................... 52
5.5.5.4 DVR MENU SETUP .................................................................................................................... 52
5.5.5.4.1 MENU INITIALISE.................................................................................................................. 52
5.5.5.4.2 LOAD MENU FROM FILE ..................................................................................................... 53
5.5.5.4.3 SAVE MENU TO FILE............................................................................................................ 53
5.5.6
FIRMWARE UPGRADE..................................................................................................54
5.6 LINK ............................................................................................................. 56
5.6.1
NETWORK .....................................................................................................................57
5.6.1.1 DHCP .......................................................................................................................................... 57
5.6.1.1.1 IP ADDRESS.......................................................................................................................... 57
5.6.1.2 SUBNET MASK........................................................................................................................... 58
5.6.1.3 GATEWAY ................................................................................................................................... 58
5.6.1.4 DNS ............................................................................................................................................. 58
5.6.1.5 PORT........................................................................................................................................... 59
5.6.1.6 DYNAMIC IP SERVER ............................................................................................................... 59
5.6.1.7 BACKUP IP SERVER ................................................................................................................. 60
5.6.2
RS485 ............................................................................................................................60
5.6.2.1
5.6.2.2
5.6.2.3
5.6.2.4
5.6.2.5
5.6.3
5.6.4
SYSTEM ID ................................................................................................................................. 60
BAUD RATE ................................................................................................................................ 61
DATA BIT ..................................................................................................................................... 61
PARITY BIT ................................................................................................................................. 61
STOP BIT .................................................................................................................................... 62
PTZ.................................................................................................................................62
E-MAIL ...........................................................................................................................64
5.6.4.1
5.6.4.2
SEND E-MAIL ............................................................................................................................. 64
SMTP SETUP ............................................................................................................................. 64
11
5.6.4.2.1 SMTP SERVER...................................................................................................................... 65
5.6.4.2.2 SMTP PORT .......................................................................................................................... 65
5.6.4.3 DVR E-MAIL ADDRESS ............................................................................................................. 64
5.6.4.4 USER ID AND PASSWORD ....................................................................................................... 64
5.6.4.5 E-MAIL ADDRESS 1 THROUGH 10........................................................................................... 64
5.6.5
5.6.6
5.6.7
5.6.8
5.6.8.1
5.6.8.2
DVR NAME.....................................................................................................................67
DVR LOCATION.............................................................................................................68
BANDWIDTH..................................................................................................................69
WIRELESS……………………………………………………………………………………....69
WIRELESS MODE…………………………………………………………………………………… 69
MOBILE SERVER……………………………………………………………………………………… 70
5.7 SEARCH ..................................................................................................
5.7.1
5.7.2
5.7.3
5.7.4
5.7.5
5.7.6
5.7.7
5.7.8
70
CALENDER SEARCH ....................................................................................................70
SEARCH & COPY ..........................................................................................................72
TIME SEARCH ...............................................................................................................72
EVENT SEARCH............................................................................................................73
BLOCK SEARCH ...........................................................................................................74
FILE SEARCH ................................................................................................................74
BOOKMARK SEARCH ...................................................................................................75
LOG FILE………………………………………………………………………………………...76
5.8 COPY ........................................................................................................... 76
5.8.1
5.8.2
5.8.3
COPY .............................................................................................................................76
COPY STATUS ..............................................................................................................77
MEDIA FORMAT ............................................................................................................78
5.9 STATUS SCREEN........................................................................................ 78
5.9.1
5.9.2
5.9.3
DVR STATUS .................................................................................................................78
NETWORK STATUS.......................................................................................................79
RECORDING BITRATE ..................................................................................................79
5.10. EXIT ............................................................................................................. 80
12
1. ABOUT THIS MANUAL
This is the Instruction Manual of the H.264 Mobile Digital Video Recorder - Model MDVR4SD, The
manual details how the user should install and operate the DVR, along with the features and
specifications.
Please read this manual carefully and follow the installation procedure before using the system.
Please contact your Distributor if you have any queries.
13
2. FEATURES & SPECIFICATIONS
2.1 Features
This DVR has the following features:
-
H.264 Compression Algorithm
-
Max 100ips (HD1)/50ips (D1) Recording in PAL
-
Quadraplex: Playback, Record, Copy and Network Transmission Simultaneously
-
Install max. 2 x SD Memory Cards (expandable to 6 x SD with the MDVR4SD-PRO model)
-
1 Channel of Synchronised Audio
-
SD Card Memory
-
4 Level Settings of Image Quality
-
Schedule Recording with Various Recording Setups per Channel
-
4 Channel Sensor Inputs - Pre-Alarm and Post-Alarm Recording
-
Panic Alarm Allows Emergency Recording in Full Frame Rate on Every Channel
-
Digital Watermark Support
-
Smooth Reverse Playback
-
Ease of Operation: Remote Controller, Front Buttons, and Network Viewer
-
Supported Copy Media: USB Memory Stick, External USB HDD/CDRW/DVDRW.
-
Firmware Upgrade via SD card, USB or Network.
-
RS-485 Port for PTZ & External Controller Support.
-
Driving Information (Warning Lights, Brakes, Indicators) Overlay on Live and Playback Video
-
GPS Data (PRO model) can Overlay Location & Speed and Record with Video
-
Impact Sensor (PRO model) Detects Excessive Gravitational Forces on the X,Y & Z axis
-
Daylight Saving
-
Web Browser Support
-
AVI File Conversion
-
Multi-Language Support
-
Network Client Viewer: 16 units x 16 Clients Connected Simultaneously.
14
2.2 Specification
VIDEO
Video Input
4CH (BNC)
Input Level
1.0Vp-p±10% Composite, 75Ω Balanced
Loop Through Output
Not Supported
Video Standard
NTSC, PAL, AUTO
Main Monitor Output
1.0 V p-p Composite, 75Ω Balanced
Analogue Spot Monitor Output
Not Supported
Camera Name
Max. 8 Characters
Display Options
Full Screen, Sequential Switching, Event or Quad Display
Display Dwell Time
1~60 Seconds
Resolution
Display
Speed
NTSC
720(H) × 480(V)
PAL
720(H) × 576(V)
NTSC
120 frames(Every CH Real Time)
PAL
100 frames(Every CH Real Time)
Function
Auto Sequence, Full Screen and Quad
AUDIO
Compression
ADPCM
Audio Input (Line)
1CH (RCA)
Input Level
0.5~1.4Vp-p@20kΩ
Audio Output (Line)
3.5mm Stereo Mini Jack
RECORDING
Compression
H.264
720(H) × 480(V), 720(H) × 240(V), 360(H) × 240(V)
Resolution
720(H) × 576(V), 720(H) × 288(V), 360(H) × 288(V)
NTSC
Speed
PAL
340 x240
Max. 120 Images(CIF)
720 x240
Max.120 Images(Half D1)
720 x480
Max. 60 Images(D1)
340 x288
Max. 100 Images(CIF)
720 x288
Max. 100 Images(Half D1)
720 x576
Max. 50 Images(D1)
Multiplexer
Each CH
Quadraplex
Frame Setting
Available
Event, Normal
Available
Speed
Available
Resolution
Available
Quality
4 Selectable Qualities (Low, Normal, Fine, BEST)
Setup per Channel
Individual
Record Limit
Configurable Automatic Data Deletion
Data Size
1~3KB(CIF), 3~7KB(D1/2), 6~15KB(D1)
15
Recording Mode
Normal (Continuous),Event (Motion Detection, Sensor, Video Loss),
Schedule
Pre-Alarm
Configurable. 1-5 Seconds
Watermark
Supported
Schedule
24-7 Calendar with Holiday Settings.
Summer Time
Support
Storage
Internal Storage
2 x SD Cards in the Front of the Unit
SD Bay Interface
4 x SD EXP Bay (File)
GPS Board
GPS (MDVR4SD-PRO Only)
SD Bay Interface
4 x SD EXP + GPS (MDVR4SD-PRO Only)
Searching & Playback
Search Method
Time, Calendar, Event, File (Copied), Text
Playback Speed
1, x2, x4, x16, x32, x 64, x128
COPY DEVICE
Media Support
USB Memory Stick, External USB HDD/CD-R/CD RW/ DVD RW/
DVD ROM
USB 2.0
1 Port ( Front)
Copied File Compatibility with
PC (Windows)
Compatible
MULTI-REMOTE SURVEILLANCE
Monitoring Environment
Client Software / CMS for Mobile DVR / SD Viewer
Transmission Rate
Max. 100ips (CIF) Full Motion Transmission
Search
Supports Multi-Client (16 Clients Accessible)
SYSTEM MONITORING & RECOVERY
System Logging
Power Failure Checkable/Menu Change/Network Connection
Monitoring
Software Watchdog
Recovery
Auto-Reboot by Watchdog - Automatic Database Recovery
OTHERS
OS
Embedded Linux
Menu Type
Graphic + Text
Supported Languages
English, Korean, Japanese, Polish, Spanish, Russian, French,
Turkish, German, Italian, Portuguese
ATM Interface
GPS Module Interface (MDVR4SD-PRO Only)
POS Interface
Shock Sensor (MDVR4SD-PRO Only)
Control Device
Front Key, Remote Controller and Mouse Control
PTZ
SPD & SRX(Samsung Techwin), SCC-643(Samsung Electronics),
SD-290 (Smile CAM), CS-854A(Panasonics), LPT-A100L, EZ
PROTOCOL(Vitek)DSC-230S (Dongyang Unitech),
SKD106(Sunkwang), VC-C4R(Canon) PELCO P, PELCO D,TKC655/676 (JVC), DMP23(DAIWA), BOSCH PCS-SERIES
Number of Event List / Log List
50,000 / 20,000 per SD
16
Connector
Video Input
4Channels (BNC)
Loop Though
Not Supported
Main Monitor
Output
Spot Monitor
Output
Composite
Supported
VGA Output
Supported
S-Video
Not Supported
Audio Input ( Line)
1Channel (RCA)
Audio Output ( Line)
1Channel (RCA)
HDD Bay Connection
1Channel Line Output (RCA)
External Control ( RS-232C)
Not Supported
Firmware Update
Updated by USB 2.0 Port or Network
Sensor Input
4Channel - Terminal Block
Alarm Output
1 Relay Output: 2 Pins Terminal Block (NO, Common)
RS-485 for External Control & PTZ
2 Pins (Box Connector) (Terminal Block)
Ethernet
RJ-45, 10/100Mbps
USB 2.0
1 Port (Front)
ELECTRICAL
Power Source
Input DC 9V ~ 35V, Output DC 12V,1.5A
Power Consumption
Approx.10 Watts ( Including 2x SD Memory Cards)
ENVIRONMENTAL
Operating Temperature
0°C ~ +40°C
Storage Temperature
-10°C ~ + 60°C
Humidity
30 ~ 90%RH (Non-Condensing)
PHYSICAL
Construction Shape
Rectangular
Construction Material
Steel Case
Body Colour
Black, with Tactile Switch Buttons ( 10 Buttons)
Dimension
200(W) x 110(D) x 30(H) mm
Weight
Approx. 1Kg
BACK UP
Digital Backup
Option(USB2.0)/Support (USB2.0)
17
3 OVERVIEW & CONTROLS
This section provides information about the front and rear panels.
3.1 Front Panel
NO.
Function
① Power Switch
This switch turns the DVR ON and OFF
② SD Card
Image storage, capacity of 32Gb per SD card
③ 2..0 Port
The USB 2.0 port can be used to connect to numerous USB 2.0
backup devices, individual external hard drives, external optical
drives and USB memory sticks.
④ IR Sensor
Infrared signal receiver for the IR remote controller.
*Do not block the receiver as a clear line of sight is required for
proper operation.
⑤ Panic REC
Press this button for Full Frame Recording @1/2 D1 Real Time
⑥ REC
Starts manual recording and accesses the Main Menu & goes back to the previous
menu. (press and hold for 3secondss to access)
⑦
Fast Forward , press this button to speed-up playback speed
⑧
Press this button to slow-down playback speed
⑨
Change the playback direction
⑩ ▶
Press this button to begin playback
⑪ ■
Returns to the live mode from the playback mode
⑫ Auto/
Selects Quad or sequential display
⑬ Enter
Executes the selected function in the menu screen or enters the selected
submenu.
18
3.2 Rear View
NO.
Function
①
GPS ANT.
GPS Aerial Connection (MDVR4SD-PRO Only)
②
Camera Input
BNC Connectors for Composite Video Signal Input
③
Audio Input
RCA Connectors for Connecting the Audio Input
④
Audio & Video Out
3.5 Jack Connector for Connecting the Audio & Video Output
⑤
VGA Output
D-Sub 15-pin Connector for Connecting to a VGA Monitor
⑥
Power Out
+12V Output (1.5A max)
⑦
Ethernet Port
10/100 Base-T RJ-45 Port Network Connection
⑧
Alarm & Sensor
Alarm and Sensors Connector
⑨
Power In
Power Socket for Nominal DC 12V
19
3.3 IR REMOTE CONTROLLER
Button Name
Description
① (IRIS-/+)
PTZ Iris open and close
Frame by Frame (field by field) playback
② (ZOOM-/+)
PTZ Zoom in and out
③ SPOT / ESC
Enter the spot mode / Return to the previous mode
④ ENTER (HOME)
Enter / Go home Position in PTZ mode
⑤ ( ◀ )
Move the cursor left in the setup menu
⑥ ( ▲ ) / MENU
Move the cursor up to the next line in the setup
menu / Display the setup menu
⑦ ( ▼ ) / PIP
Move the cursor down to the next line / Enter the
PIP mode / Exit the loop playback mode
20
Move the cursor right in the setup menu. / Control of
zoom in and out
Auto sequence / Decrease value /
PTZ Focus control
Freeze / Increase value /
PTZ Focus control
⑧ ( ▶ ) / D-ZOOM
AUTO / ( - ) / F(-)
⑩ FREEZE / ( + ) / F(+)
⑪ SEARCH / (PRESET)
Display the search menu /
Enter the preset mode of PTZ
⑫ COPY / (AF)
Display the copy menu / PTZ Auto focus
⑬ (PTZ)
Enter the PTZ mode
⑭ SLOW (
Press this button to slow-down playback speed
)
⑮ PLAY/PAUSE (
16 FAST (
○
)
Press this button to begin playback. If pressed again
during the playback, a still picture is displayed
Press this button to speed-up playback speed
)
17 LV/PB (
○
)
Return the screen into Live display mode during the
playback
18 DIR (
○
)
Change the direction of playback
19 RECORD (
○
)
Begin and stop recording
20 MULTI
○
Display multi-screen
21 TEXT
○
Reserved
22 AUDIO SELECT
○
Audio Mute ON/ OFF
23 CHANNEL ID
○
Camera number select button
24 FUNCTION
○
Used when AUDIO ON/ OFF
NOTE:
NO 4. ENTER (HOME): Protocol supported function of PTZ Home Position move.
D / DSC-230 / CS-854 / EZ / PCS-SERIES
21
3.4 MOUSE CONTROL
1
1. LEFT MOUSE BUTTON
a) Double-click in the main window:
b) Double-click in the menu screen:
2
3
status display.
select item or icon.
2. SCROLL WHEEL
Scroll up or down to change the value of the selected item.
3. RIGHT MOUSE BUTTON
a) Single-click in the main window: enter main menu.
b) Double-click in the menu screen: exit to main screen.
22
4 MAIN SCREEN
1. REMAINING STORAGE SPACE / PLAYBACK STATUS
The remaining storage space is displayed either as a percentage or in Gigabytes. If the storage
overwrite is set to on, the counter will remain as 0 and the DVR will continue to write on to the SD
storage from the beginning. The counter will remain 0 as long as the storage is full with previously
recorded data, and will display its original size once the storage is formatted. In playback mode, it
displays the direction and the speed of the playback. If there is no SD Card in the DVR, it shows “NO
HDD”.
2. CHANNEL STATUS
The status of each channel is displayed in colour codes.
z
White: non-recording
z
Yellow: continuous (manual) recording
z
Red:
event recording
z
Green: schedule recording
3. DATE
Current date is displayed when in live monitoring mode. Recorded date is displayed when in
playback mode.
4. TIME
Current time is displayed when in live monitoring mode. Recorded time is displayed when in
playback mode.
5. CHANNEL INFORMATION
The channel information is displayed. When the channel is in normal recording mode, it will
display the channel title as entered by the user. When the channel is in event recording mode, it
will display the appropriate event recording mode: alarm, motion or video loss.
23
6. Speed and Acceleration
The driving speed of the vehicle is displayed on the screen (MDVR4SD-PRO Only).
7. Location
The monitor shows the location where in you are with the DVR unit (MDVR4SD-PRO Only).
Below are the icons with specific events.
ⓐ Front Door
ⓑ Rear Door
ⓒ Turn Right
ⓓ Turn Left
ⓔ Braking
ⓕ Warning Light
ⓖ Emergency
ⓗ Shock
ⓘ High Speed
ⓙ Excessive Braking
ⓚ Excessive Speeding
ⓛ Lengthy Stop
ⓜ Stop w/o warning light
NOTE:
When there is a particular event happening, the icon will change to green.
24
5 MAIN MENU
Before operating the DVR, please make sure all the cables and SD Cards are properly connected.
Pressing the Menu button on the DVR or
using the Remote Control, this screen popsup.
5.1
QUICK SETUP
Quick setup enables the user to quickly setup major recording settings of the DVR. All changes
made in quick setup are affected equally to all channels. This includes the image size, record
speed, image quality, event options, pre and post recording time and audio record settings.
Moreover, the activation of quick setup overrides any other recording settings as the quick
setup takes preference over regular recording setups.
5.1.1
QUICK SETUP
Select “MANUAL” or “OFF” by pressing the
button on the remote controller.
NOTE: If “MANUAL” is selected the RECORD MENU is disregarded.
25
5.1.2
IMAGE SIZE
Select the desired IMAGE SIZE for recording as shown below by pressing the
NTSC
720 X 480 (D1)
720 X 240 (Half D1)
360 X 240 (CIF)
5.1.3
button.
PAL
720 X 576 (D1)
720 X 288 (Half D1)
360 X 288 (CIF)
RECORD FRAME
Users can select the desired frame rate for
button, from
normal recording using the
4/8/16/25/50 or 100 frames per second.
26
5.1.4
IMAGE QUALITY
Select the desired image quality using the
button.
There are 4 selectable image qualities: Best,
Fine, Normal & Low.
5.1.5
EVENT
Users can select any type of EVENT by
using the
button. Available events are:
ALL, MOTION, V-LOSS, ALARM, GPS and
OFF. Combinations of the above are also
available.
ALL:
V-LOSS:
MOTION:
ALARM:
GPS:
OFF:
Select all events
If video loss occurs, the DVR will start recording.
If motion is detected by the DVR, the DVR will start recording.
If an external sensor is triggered, the DVR will start recording
If GPS levels are exceeded (speed etc), the DVR will start recording
Unit will disregard all events.
The default value is “ALL”.
27
5.1.6
PRE RECORD TIME
Select the desired time for pre-recording
using the
button on the remote.
When video loss, alarm or motion is detected,
the DVR will store pre-recorded data during
the selected time.
The pre-recording time can be set from 0
second to 5 seconds, and the default is “5”.
5.1.7
POST RECORD TIME
Select the desired time for post-recording
button on the remote.
using the
When video loss, alarm or motion is
detected, the DVR will store post-recorded
data during the selected period.
The post-recording time can be set from 0
seconds to 60 seconds and the default is
“10”.
5.1.8
PREVIEW QUALITY
Move the cursor onto PREVIEW QUALITY
& press the Enter button to see the screen
on the left.
Users can select the desired preview
quality from the 4 following recording
qualities: Fine, Normal, Best & Low using
the
button on the remote.
Press ESC to go back to the previous menu.
28
5.1.9
AUDIO RECORD
Select “ON” or “OFF” using the
the remote to record audio.
5.1.10
button on
SAVE
Press the Save icon using the Enter
button in order to save the Menu
Configuration.
5.2
SCREEN
Screen setup defines various screen related options. Any changes affect the main video.
Users can select the SCREEN Menu by
pressing the Enter button on the remote.
Select the SCREEN icon and press enter.
The screen on the left will appear.
Select the required menu item by pressing
▲,▼ button on the remote controller.
29
5.2.1
AUTO SEQUENCE
In the SCREEN menu,
Move the cursor to AUTO SEQUENCE
using the ▲,▼ buttons.
Press the ENTER button when the cursor is
on AUTO SEQUENCE and the following
screen appears.
Move the cursor to each single or split
channel using the ▲,▼ buttons.
When the desired channel is selected,
change the value of AUTO SEQUENCE
duration using the
length of time for switching each channel in sequence.
button to set the
* The value is from 1 second to 60 seconds and the default is “3 seconds”.
To exit the AUTO SEQUENCE menu, press the ESC button.
VIDEO LOSS SKIP
If selected ON, any camera with VIDEO LOSS will be skipped in the AUTO SEQUENCE mode.
The default is “ON”.
ADD AUTO SINGLE
If selected OFF, every single channel will be skipped in the AUTO SEQUENCE mode.
The default is “OFF”.
5.2.2
DISPLAY
In the SCREEN menu,
Move the cursor to DISPLAY using the
▲ ,▼ buttons.
Press the ENTER button when the cursor is
on DISPLAY and the following items appear.
To exit the DISPLAY menu, press the ESC
button.
30
5.2.2.1
STORAGE FREE SPACE
In the DISPLAY menu,
Move the cursor using the ▲,▼ buttons to
select HDD FREE SPACE.
Press the
button to choose “ON” or
“OFF”.
* The default is “ON”.
ON: Remaining capacity of the SD Memory will be displayed on the screen.
5.2.2.2
STORAGE FREE SPACE MODE
In the DISPLAY menu,
Move the cursor using the ▲,▼ buttons to
select the HDD FREE SPACE MODE.
button to choose “PERCENT”
Use the
or “GIGABYTE”.
* The default is “PERCENT”.
PERCENT: Remaining capacity of the SD Memory will be displayed on the screen as a percent.
GIGABYTE: Remaining capacity of the SD Memory will be displayed on the screen in gigabytes.
31
5.2.2.3
RECORD STATUS
In the DISPLAY menu,
Move the cursor using the ▲,▼
select RECORD STATUS.
buttons to
Use the
button to choose “ON” or “OFF”.
* The default is “ON”.
ON: Displays the recording status of each channel on the screen.
5.2.2.4
CLOCK DISPLAY
In the DISPLAY menu,
Move the cursor using the ▲,▼ buttons to
select CLOCK DISPLAY.
button to choose “ON” or “OFF”.
Use the
* The default is “ON”.
ON: The date and time will be displayed on the screen.
5.2.2.5
DATE & TIME MODE
In the DISPLAY menu,
Move the cursor using the ▲,▼ buttons to
select DATE&TIME MODE.
Use the
button to choose “YY/MM/DD”
or “MM/DD/YY” or ”DD/MM/YY”.
* The default is “YY/MM/DD”.
32
YY/MM/DD : All dates and times will be displayed in numbers.
Ex. 2009/01/01 00:00:00
MM/DD/YY : the month section will be displayed in characters.
Ex. JAN. 01 2009 00:00:00
DD/MM/YY : the month section will be displayed in characters.
Ex. 01. JAN 2009 00:00:00
5.2.2.6
TITLE DISPLAY
In the DISPLAY menu,
Move the cursor using the ▲,▼ buttons to
select TITLE DISPLAY.
button to choose “ON” or “OFF”.
Use the
* The default is “ON”.
ON: Each channel title will be displayed on the screen.
5.2.2.7
TITLE MODE
In the DISPLAY menu,
Move the cursor using the ▲,▼ buttons to
select TITLE MODE.
Use the
button to choose “TEXT” or
“BITMAP”.
* The default is “TEXT”.
A bitmap is a type of graphics file on a computer. You can make characters with bitmaps
on the setup window of network client viewer after connecting the computer to the DVR.
33
5.2.2.8
BORDER COLOUR
In the DISPLAY menu,
Move the cursor using the ▲,▼ buttons to
select BORDER COLOUR.
Use the
button to choose “WHITE” or
“BLACK”.
* The default is “WHITE”.
WHITE: The colour of the border line will be displayed on the multi-channel screen in white.
BLACK: The colour of the border line will be displayed on the multi-channel screen in black.
5.2.2.9
GPS INFORMATION – Pro Model Only
In the DISPLAY menu,
Move the cursor using the ▲,▼ buttons to
select GPS INFOMATION.
button to choose “ON” or
Use the
“OFF”.
* The default is “OFF”.
ON: When the GPS INFORMATION is set to “ON”, it shows tracking information
about the vehicle.
34
5.2.2.10
SPEED DISPLAY MODE
In the DISPLAY menu,
Move the cursor using the ▲, ▼ buttons to
select SPEED DISPLAY MODE.
Use the
button to choose either MILE or
KILOMETRE.
This will display the distance covered by the
vehicle on the live screen in either Kilometres
or Miles.
5.2.3
TITLE
In the SCREEN menu,
Move the cursor to TITLE using the ▲,▼
buttons.
Press the ENTER button when the cursor is
on TITLE and the following screen appears.
Use the ◀,▶ buttons to see the next page.
Press the enter button to edit the channel title.
35
Press the ENTER button after selecting the
desired channel using the ▲,▼ buttons
and the following screen appears.
Select the character using the ▲,▼,◀,▶
buttons and then press the ENTER button.
To exit this CHARACTER TABLE screen,
press the ESC button.
CHANNEL TITLE MODE: These are “TEXT” or “BITMAP”.
TEXT: Using the CHARACTER TABLE
BITMAP: It is possible to download new characters using the client software.
5.2.4
COVERT
In the SCREEN menu,
Move the cursor to COVERT using the
▲,▼ buttons.
Press the ENTER button when the cursor is
on COVERT and the screen appears.
Move the cursor and select the desired item
using the ▲,▼ buttons.
Use the
“OFF”.
button to choose “ON” or
ON: Selected channel will be displayed as a black screen (hidden camera).
SELECT: It is possible to select from “LIVE&PLAYBACK&NETWORK”, “PLAYBACK&NETWORK”,
“LIVE&NETWORK”, “LIVE&PLAYBACK”, “NETWORK”, “PLAYBACK” and “LIVE”.
- LIVE: To covert selected channels on live screen
- PLAY: To covert selected channels on playback screen
- NETWORK: To covert selected channels on network viewer screen
COVERT TITLE DISPLAY: Select “ON”, and “COVERT” is displayed on the screen.
36
5.2.5
CAMERA
In the SCREEN menu,
Move the cursor
the▲,▼ buttons.
to
CAMERA
using
Press the ENTER button when the cursor
is on CAMERA and the following screen
appears.
You can control brightness, contrast, hue
and saturation of each camera from 0% to
100%. The default is 50%.
5.3
RECORD
Move the cursor to the RECORD icon using the ◀, ▶buttons when in the MENU screen.
Press the ENTER button when the cursor is on the RECORD icon and the following menu items
appear.
Users can select any item using the ▲,▼ buttons on the remote control.
5.3.1
RECORD SETUP
This menu allows configuration of a weekly recording schedule. In the schedule you must use the
predefined programs (0-9) in order to set up the recording properly. You can use and combine
different predefined programs during the week depending on what is needed. (see RECORD
PROGRAM section for more information)
In the RECORD menu,
Press the ENTER button when the cursor is
on RECORD SETUP and the following
screen appears.
Move the cursor to choose the desired time
using the ▲, ▼, ◀, ▶ buttons.
Select the desired program from PROGRAM
0~9 and POWER OFF using the
button.
Press the ESC button to exit this RECORD
SETUP menu or press the ENTER button to
enter the RECORD PROGRAM menu.
37
5.3.2
RECORD PROGRAM
This feature uses predefined recording modes to create new ones according to your own needs.
This means you can create different programs modes using the existing predefined programs.
You can have up to 10 different programs (0-9) available. These programs will be used to setup
the recording schedule on the RECORD SETUP menu. For example, you can create a program
for Motion Detection or Continuous recording.
In the RECORD menu,
Move the cursor to RECORD PROGRAM
using ▲,▼ buttons.
Press the ENTER button when the cursor is
on RECORD PROGRAM and the following
screen appears.
Use the ▲ ,▼, ◀ ,▶ buttons to move the
cursor to the desired item.
Select the desired value for each selected
item using the
button.
After all settings are done, exit using the
‘ESC’ key or the right-double-click the mouse.
When exiting from this menu, the DVR
calculates the values under this menu.
If the total maximum values are exceeded the
DVR will display an error message and will
return to this menu again.
5.3.3
PREVIEW QUALITY
In the RECORD menu,
Move the cursor to PREVIEW using the
▲,▼ buttons.
Press the ENTER button when the cursor is
on PREVIEW QUALITY and the following
screen appears.
Select the desired RECORD QUALITY
using the
button from “NORMAL”,
“FINE”, “BEST” and “LOW” and the size of
each image it’s quality and recording time of
the installed storage can be seen. To exit
this PREVIEW QUALITY menu, press the
ESC button.
38
Users have to turn off recording to see the Image Quality Screen.
RECORD TIME: The recording period available with the free space storage and frame rate setting.
TOTAL TIME: The recording period is calculated by the total amount of IPS selected and the quality
of video
** The better the image quality is, the larger the overall file size is.
5.3.4
AUDIO RECORD
In the RECORD menu,
Move the cursor to AUDIO RECORD using
the ▲,▼ buttons.
Press the
button on the remote to change
the Audio Record “ON” or “OFF”.
If select “ON”, DVR will record the Audio with
the Video.
5.3.5
REPEAT RECORD
In the RECORD menu,
Move the cursor to REPEAT RECORD using the ▲,▼ buttons.
Press the ENTER button when the cursor is on REPEAT RECORD and the following screen
appears.
Use the
button to set “ON” or “OFF”.
It is possible to set a point in time to work
the REPEAT RECORD ALARM function.
Move the cursor to “REPEAT RECORD
ALARM” using ▲,▼ buttons and then
select the desired value using the
button.
The value is from 5% to 10%.
To exit this REPEAT RECORD menu, press
the ESC button.
ON: The REPEAT RECORD option allows the unit to overwrite existing data. The DVR will start to overwrite
when the storage available reaches the % value of the REPEAT RECORD ALARM.
If you set “REPEAT RECORD ALARM” to 5%, alarm will work when the storage capacity is 5% used.
39
5.3.6
HOLIDAY
In the RECORD menu,
Move the cursor to “HOLIDAY” using the
▲,▼ buttons.
Press the “ENTER” button to set up
“HOLIDAY” and the HOLIDAY menu screen
appears.
Set up “ON” or “OFF” for HOLIDAY
RECORD using the
button.
Move the cursor using the ▲,▼ buttons
and set up the value using the
button.
To exit the HOLIDAY menu, press the ESC
button.
NOTE:
5.3.7
The recording policy for holiday settings is the same as the Sunday policy in the
recording schedule.
RECORD LIMIT
Users can select the RECORD LIMIT either
“ON” or “OFF” using the
remote.
button on the
If “ON” is selected it defines the maximum
amount of recording that will be stored before
automatic deletion.
40
5.4 EVENT
Event setup defines various event options such as the motion grid, motion detection sensitivity,
the main screen event response option, sensor input and relay output options.
5.4.1
MOTION DETECTION
In the EVENT menu,
Move the cursor to MOTION DETECTION
using the ▲,▼ buttons.
Press the ENTER button when the cursor is
on MOTION DETECTION and the screen on
the left appears.
5.4.1.1
CHANNEL
In the MOTION DETECTION menu,
Move the cursor to CHANNEL using the
▲,▼ buttons.
Select the desired channel using the
button.
41
5.4.1.2
SENSITIVITY
In the MOTION DETECTION menu,
Move the cursor to SENSITIVITY using the
▲,▼ buttons.
Select the sensitivity level using the
button.
SENSITIVITY: The higher the number is, the more sensitive the detection. 1(lowest) ~ 5(highest)
5.4.1.3
AREA SETUP
In the MOTION DETECTION menu,
Move the cursor to AREA SETUP using the
▲,▼ buttons.
Press the ENTER button to set the motion
detection area.
Select the motion detection area using the
▲,▼, ◀,▶ buttons and then press the
ENTER button to save the area.
Mouse Operation: Click the right button of mouse and drag to select the desired cells.
AREA SETUP GRID: 30 x 24
5.4.1.4
TEST MOTION
In the MOTION DETECTION menu,
Move the cursor to TEST MOTION using the
▲,▼ buttons.
Press the ENTER button to test the motion
detection.
To exit TEST MOTION, press the ESC button.
42
5.4.2
EVENT SCREEN MODE
In the EVENT menu,
Move the cursor to EVENT SCREEN MODE
using ▲,▼ buttons.
Select the EVENT SCREEN MODE using the
button.
SCREEN HOLD:
EVENT FULL:
EVENT MULTI:
EVENT F_RTN:
EVENT M_RTN:
Keep the current screen even if an event occurs.
Display the full screen of the channel where the event occurs.
Display the multi-screen when the event occurs.
Display the full screen of the channel where the event occurs and return.
Display the multi-screen when the event occurs and return.
NOTE: If you want to use this function, you have to set the EVENT setting of each channel of
RECORD PROGRAM to “O(ON)”.
5.4.3
EVENT CHECK
In the EVENT menu,
Move the cursor to EVENT CHECK using the
▲,▼ buttons.
Select “ON” or “OFF” using the
43
button.
5.4.4
EVENT INDICATION
In the EVENT menu,
Move the cursor to EVENT INDICATION
using the ▲,▼ buttons.
Select “ON’ or “OFF” using the
set the event indication.
5.4.5
button to
SENSOR INPUT SELECT
In the EVENT menu,
Move the cursor to SENSOR INPUT
SELECT using the ▲,▼ buttons.
Press the ENTER button when the cursor is
on the SENSOR INPUT and the following 2
page screen appears.
Select the desired channel using the ▲,▼
buttons.
Select the type of sensor which is connected
with DVR using the
button.
To exit the SENSOR INPUT menu, press the
ESC button.
Select the correct sensor setting to match the type of installed sensor.
NORMAL OPEN : The sensor is normally open.
NORMAL CLOSE : The sensor is normally closed.
NOT INSTALLED: No sensors are connected to the DVR.
44
5.4.6
RELAY OUTPUT
In the EVENT menu,
Move the cursor to “RELAY OUTPUT” using
the ▲,▼ buttons.
Press the ENTER button when the cursor is
on “RELAY OUTPUT” and the following
screen appears.
Move the cursor using the ▲,▼ buttons and
set up the value using the
button.
To exit this screen, press the “ESC” button
NOTE:
It’s possible to set the RELAY OUTPUT for the type of event, and it‘s possible to set the period of the
relay output from 1 to 30 seconds.
POWER (N.C), USER, REC, NOT USED, ALARM, LOSS, MOTION and HDD ERROR are available
and you can select any one of the eight.
z POWER: The relay operates when power is off/lost.
z USER: User can operate the relay output manually by pressing the “FUNCTION” button
with (+) button and (-) button.
NC (Normally Closed) →NO: press the (+) button with the “FUNCTION” button.
NO (Normally Open) →NC: press the (-) button with the “FUNCTION” button.
Press the “FUNCTION” button again if you want to exit this mode.
(you can also use this function through the network viewer.)
z REC: The relay operates when the unit starts recording.
z NOT USED: If you do not want to use this function, select “NOT USED”
z ALARM: The relay operates when the unit receives an alarm.
z LOSS: The relay operates when video loss occurs.
z MOTION: The relay operates when motion is detected.
z HDD ERROR: The relay operates if storage problems occur.
45
5.4.7
GPS - Only Available with the MDVR4SD-PRO Model
In the EVENT menu,
Move the cursor to “GPS” using the ▲,▼
buttons.
Press the ENTER button when the cursor is
on “GPS” and the following screen appears.
Users can change the SHOCKSENSOR to
either “ON” or “OFF” by pressing the
button.
X-THRESHOLD: X-Threshold values are automatically varied when there is any event but the default value is 1.
Y-THRESHOLD: Y-Threshold values are automatically varied whenever any event occurs but the default value
is 0.
Z-THRESHOLD: Z-Threshold values also changes when any event occurs but the default value is 4.
SPEED PARAMETER: The parameter values shown below may change depending on the acceleration speed
of the vehicle.
a)
b)
c)
d)
SPEED LIMIT
LENGTHY STOP
EXCESSIVE BREAK
EXCESSIVE SPEED
46
5.5 SYSTEM
System setup defines various system settings such as storage settings, system clock, password for
multiple users, video standard and language settings. Moreover the system settings can be
reinitialised, saved or retrieved from the USB flash memory, as well as updating the DVR firmware.
To set up the SYSTEM menu,
Move the cursor to the SYSTEM icon using
the ▲,▼ buttons when in the MENU
screen.
Press the ENTER button when the cursor is
on the SYSTEM icon and the following
items appear.
5.5.1
STORAGE
In the SYSTEM menu,
Move the cursor to STORAGE using the
▲,▼ buttons.
Press the ENTER button when the cursor is
on STORAGE and the screen on the left
appears.
To exit the STORAGE menu, press the ESC
button.
5.5.1.1
STORAGE CONFIGURATION
In the STORAGE menu,
Move
the
cursor
to
STORAGE
CONFIGURATION
using
the
▲,▼
buttons.
Press the ENTER button when the cursor is
on STORAGE CONFIGURATION and the
following screen appears.
Users can set the SDCARD Memory either
to Record or Backup Mode.
47
Note: MODE
1)
2)
REC: Normal and Event recording.
BACKUP: Only for backup.
Move the Cursor to EXTERNAL SDCARD
to see the following screen.
Users can have the facility of connecting
another 4 SDCARD Memory Cards
externally as shown above.
Users can select the MODE either as
BACKUP or RECORDING using
on the remote.
5.5.1.2
button
STORAGE INITIALISE
In the STORAGE menu,
Move the cursor to STORAGE INITIALISE
using the ▲,▼ buttons.
Press the ENTER button when the cursor is
on the STORAGE INITIALISE and the
following screen appears.
If you want to initialise the SD CARD, move
the cursor to “YES” and then press the
“ENTER” button.
If not, move the cursor to “NO” and then
press the “ENTER” button.
To exit this screen, press the ESC button.
To exit this HDD menu, press the “ESC”
button again.
5.5.2
CLOCK
In the SYSTEM menu,
Move the cursor to CLOCK using the ▲,▼
buttons.
Press the ENTER button when the cursor is
on CLOCK and the following screen
appears.
48
5.5.2.1
DATE&TIME
In the CLOCK menu,
Move the cursor to DATE&TIME using the
▲,▼ buttons.
Press the ENTER button when the cursor is
on DATE&TIME and the following screen
appears.
Use the ▲,▼ buttons to move the cursor to
the desired position of date or time.
buttons to modify the current
Use the
date and time.
DATE: YYYY/MM/DD YEAR/MONTH/DAY
TIME: HH:MM:SS
HOUR: MINUTE: SECOND
Press the ENTER button to save the modified valueME screen, press the ESC button.
5.5.2.2
TIME ADJUST
In the CLOCK menu,
Move the cursor to TIME ADJUST using
the ▲,▼ buttons.
Press the ENTER button when the cursor is
on TIME ADJUST and the screen on the
left appears.
If the INTERNET TIME ADJUST is “ON”,
the time of DVR will be adjusted to the time
offered by an internet server.
** There are 10 internet servers available to
supply GMT to the DVR.
Move the cursor using the ▲,▼ buttons
and then set the IP address of SELECT
TIME SERVER using the
button .
Set the correct TIME ZONE standardising around GMT (Greenwich Mean Time).
Move the cursor to DAYLIGHT SAVING TIME (Summer Time) using the
buttons then
select “ON” or “OFF” using the
button
If the DAYLIGHT SAVING TIME is set to “ON”, set up the start and end date and time.
Use the ▲,▼ buttons to move the cursor and use the (-), (+) buttons to change the value.
To exit the TIME ADJUST menu, press the ESC button.
Manual setup:
This DVR can recognise the correct time itself.
That’s to say, if you input the correct time 3 or 4 times,
the DVR will recognise the clock error and display the correct time by itself.
When you power on, you can see the TIME TRIMMING VALUE screen and modify time correctly on this
Screen with the AUTO button and ALARM RESET button.
49
5.5.3
VIDEO STANDARD
In the SYSTEM menu,
Move the cursor to VIDEO STANDARD
using the ▲,▼ buttons.
Users can select either “PAL”, “NTSC” or
“AUTO” using the
button.
Press the ESC button to exit the VIDEO
STANDARD menu after setting it to PAL.
If you select “AUTO”, this DVR can detect NTSC/PAL signals automatically
5.5.4
LANGUAGE
In the SYSTEM menu,
Move the cursor to LANGUAGE using the
▲,▼ buttons.
Select the desired language using the
buttons.
Available Languages:
ENGLISH, JAPANESE, POLISH, SPANISH, RUSSIAN,
FRENCH, TURKISH, GERMAN, ITALIAN, PORTUGUESE.
5.5.5
ADVANCED SETUP
In the SYSTEM SETUP menu,
Move the cursor to ADVANCED SETUP
using the ▲,▼ buttons.
Press the ENTER button when the cursor is
on ADVANCED SETUP and the following
screen appears.
To exit this ADVANCED SETUP menu,
press the ESC button
50
5.5.5.1
PASSWORD CHECK
In the ADVANCED SETUP menu,
Move the cursor to PASSWORD CHECK
using the ▲,▼ buttons.
button. If
Select ON or OFF using the
OFF is selected the password menu will not
work.
NOTE: In cases where the PASSWORD CHECK is ON, only ADMIN and MASTER can enter
the ADVANCED SETUP MENU.
5.5.5.2
SET PASSWORD
In the ADVANCED SETUP menu,
Move the cursor to SET PASSWORD using
the ▲,▼ buttons.
Press the ENTER button when the cursor is
on SET PASSWORD and the following
screen appears.
Select the administrator or User 1~4 to
change
the
password
and
press
the
“ENTER” button. The following screen is
displayed.
Insert the desired password (eight digits)
marked _ _ _ _ _ _ _ _ besides NEW
PASSWORD using the CAMERA/ NUMBER
INPUT buttons.
And then re-type the eight numbers of the
NEW PASSWORD in the eight spaces
marked _ _ _ _ _ _ _ _ beside RE-TYPE,
using the CAMERA/ NUMBER INPUT
buttons to verify the password. To exit this
menu, press the ESC button.
NOTE:
Only the 0~9 number buttons can be used to setup the PASSWORD.
The ADMIN default is 11111111, USER1 is 22222222, USER2 is 33333333, USER3 is 44444444,
and USER4 is 55555555.
If you forget the admin password, please contact your administrator.
CAUTION: It is always advisable to change the default passwords when commissioning
the system. .
51
5.5.5.3
USER AUTHORITY
In the ADVANCED SETUP menu,
Move the cursor to USER AUTHORITY
using the ▲,▼ buttons.
Press the ENTER button when the cursor is
on USER AUTHORITY and the following
screen appears.
Change the values using the
buttons.
If any functions are set to “ON”, the password is required when working with them.
The defaults are “OFF”.
5.5.5.4
DVR MENU SETUP
In the ADVANCED SETUP menu,
Move the cursor to DVR MENU SETUP
using the ▲,▼ buttons.
Press the ENTER button when the cursor is
on DVR MENU SETUP and the following
screen appears.
5.5.5.4.1
MENU INITIALISE
In the DVR MENU SETUP menu,
Move the cursor to MENU INITIALISE using
the ▲, ▼buttons.
Press the ENTER button when the cursor is
on MENU INITIALIZE and the following
screen appears.
52
If you want to initialize the system, move the
cursor to “YES” and press the ENTER button.
If not, move the cursor to “NO” and press the
ENTER button. Use the ▲, ▼ buttons to
move the cursor.
CAUTION: MENU INITIALISE will factory default the DVR programming.
PLEASE NOTE : The HDD’s data will NOT be deleted by using this function.
5.5.5.4.2
LOAD MENU FROM FILE
In the DVR MENU SETUP menu,
Insert a USB memory stick to download a
previously stored menu file.
Move the cursor to LOAD MENU FROM
FILE using the ▲,▼ buttons and press the
ENTER button.
NOTE: This function is to upload a menu file saved in USB memory stick to the DVR.
5.5.5.4.3
SAVE MENU TO FILE
In the DVR MENU SETUP menu,
Insert a USB memory stick to copy the
current DVR Menu file to the USB memory
stick.
Move the cursor to SAVE MENU TO FILE
using the ▲,▼buttons and press the
ENTER button.
53
NOTE: It’s only possible to copy and upload the menu setting from the front USB port.
5.5.6
FIRMWARE UPGRADE
In the SYSTEM menu,
Move the cursor to FIRMWARE UPGRADE
using the ▲,▼, buttons.
Press the ENTER button when the cursor is
on FIRMWARE UPGRADE and the following
screen appears.
If you want to update firmware using the
USB port, move the cursor to “YES” and
press the ENTER button. If not, move the
cursor to “NO” and press the ENTER button.
Use the ▲,▼ buttons to move the cursor.
To exit the FIRMWARE UPGRADE screen,
press the ESC button
NOTE: Upgrade the firmware with the USB port located on the DVR Front Panel.
CAUTION: WHEN YOU ARE IN FIRMWARE UPGADE DO NOT DOWN POWER THE UNIT. WAIT FOR
THE SYSTEM TO COMPLETE UPGRADE BEFORE DISCONNECTING POWER.
54
The DVR will start reading the available
upgrade file. Once the file is found, it will
check the file integrity.
If the file is intact the upgrade process will
start.
The upgrade progress will be shown as a
percentage. The whole process should take
approximately two minutes.
When the upgrade is finished, the DVR will
display “COMPLETED RESTART DVR”.
Powering the DVR OFF and ON will then
apply the firmware upgrade.
NOTE: Upgrade the firmware using the USB port located on the Front Panel.
CAUTION: WHEN YOU ARE IN FIRMWARE UPGADE DO NOT DOWN POWER THE UNIT. WAIT FOR
THE SYSTEM TO COMPLETE UPGRADE BEFORE DISCONNECTING POWER.
55
5.6
LINK
Link setup defines various settings between the DVR and various devices, such as, the internet
connection, keyboard controllers, PTZ cameras, e-mails and DVR name/location settings, in order to
access and search the DVR in the CMS (Central Monitoring System).
Before using the LINK menu, please make sure the LAN cable is properly connected and the required
equipment is prepared.
1) Using a LAN Cable
Plug the LAN cable into the unit.
This enables the unit to be connected via an
Ethernet network and also enables the unit to
be viewed via the Media Viewer software.
2) Using Mobile Communication Terminal
The DVR can also be accessed using a mobile communication terminal (not supplied). This enables
the user to connect to the unit while the DVR is mobile.
The Mobile Communication Terminal must be
configured before connection and have the
mobile SIM card inserted.
The Mobile Communications Terminal is
connected to the DVR via the USB port on
the front of the unit and once connected will
assign an IP address for the DVR.
For further information on how to operate
the connection with Media Viewer, please
refer to the Media Viewer Manual
“CONNECT TO MOBILE DVR FROM URL”
section.
56
5.6.1
NETWORK
In the LINK menu,
Move the cursor to NETWORK using the
▲,▼ buttons.
Press the ENTER button when the cursor is
on NETWORK and the following screen
appears.
To exit this NETWORK menu, press the ESC
button.
5.6.1.1
DHCP
In the NETWORK menu,
Move the cursor to DHCP using the ▲,▼
buttons.
Select “OFF” using the
button.
Select DHCP if the router which the unit is
connecting to is set up for DHCP operation.
5.6.1.1.1
IP ADDRESS
In the NETWORK menu,
Move the cursor to IP ADDRESS using the
▲,▼ buttons.
Select the desired position using the
◀,▶buttons and set the data value using the
buttons.
If a static IP address is to be used, firstly
ensure the address is free on the network.
Contact the Network administrator to
confirm details before assigning IP
addresses.
57
5.6.1.2
SUBNET MASK
Inthe NETWORK menu,
Move the cursor to SUBNET MASK using
the ▲,▼ buttons.
Select the desired position using the
◀,▶buttons and set the data value using the
buttons.
5.6.1.3
GATEWAY
In the NETWORK menu,
Move the cursor to GATEWAY using the
▲,▼ buttons.
Select the desired position using the
◀,▶buttons and set the data value using the
buttons.
5.6.1.4
DNS
In the NETWORK menu,
Move the cursor to DNS using the ▲,▼
buttons.
Select the desired position using the ◀,▶
buttons and set the data value using the
buttons .
58
5.6.1.5
PORT
In the NETWORK menu,
Move the cursor to PORT using the ▲,▼
buttons.
Select the desired position using the ◀,▶
buttons and set the data value using the
buttons .
NOTE: Port settings on the DVR and Client Viewer software must match.
5.6.1.6
DYNAMIC IP SERVER
At the NETWORK menu,
Move the cursor to DHCP using the ▲,▼
buttons.
buttons.
Select “ON” using the
Move the cursor to DYNAMIC IP SERVER
using the ▲,▼buttons.
Input the dynamic server IP address using
the
buttons to change the value and
the ▲,▼ buttons to move the cursor.
NOTE: DHCP is a protocol for assigning dynamic IP addresses to devices on a network.
** Please note that this unit does not support PPPOE networks.
59
5.6.1.7
BACKUP IP SERVER
In the NETWORK menu,
Move the cursor to DHCP using the ▲,▼
buttons.
buttons.
Select “ON” using the
Move the cursor to BACKUP IP SERVER
using the ▲,▼ buttons.
Input the backup server IP address using the
buttons to change the value and the
▲,▼ buttons to move the cursor.
NOTE: DHCP is a protocol for assigning dynamic IP addresses to devices on a network.
** Please note that this unit does not support PPPOE networks.
5.6.2
RS485
In the LINK menu,
Move the cursor to the RS485 using the
▲,▼ buttons.
Press the ENTER button when the cursor is
on RS485 and the following screen appears:
5.6.2.1
SYSTEM ID
Use the ▲,▼ buttons to choose the item
and use the
buttons to set the data
value.
To exit the RS485 menu, press the ESC
button.
60
5.6.2.2
BAUD RATE
Select the communication speed.
The
available speeds are from 1200 to
115200bps.
The default speed is 115200.
5.6.2.3
DATA BIT
Select the data bit.
default bit rate is 8.
5.6.2.4
PARITY BIT
Select the parity bit. Available options are
ODD, EVEN and NONE.
The default is NONE.
61
5.6.2.5
STOP BIT
Select the stop bit.
and 2.
Available options are 1
The default is 1.
5.6.3
PTZ
The DVR can control as many Pan / Tilt / Zoom cameras which correspond to the number of channels
it records on. As there are multiple vendors of PTZ cameras, the DVR also supports a variety of
protocols. The following is a list of supported manufacturers and their models:
Manufacturer
Model
Samsung Techwin
Samsung Techwin
Canon
Smile Cam
Samsung Electronics
Pelco
Pelco
Dongyang Unitech
Panasonic
Daiwa
LG Electronics
Bosch
Vitek
JVC
Sunkwang
SPD
SRX-100B
VC-C4R
SD-290
SCC-643
Pelco D
Pelco P
DSC-230S
WV-CS854A
DMP23
LPT-A100L
TC8560/TC700
EZ (Xpress Dome)
TK-C655/C676
SK-D106
62
In the SCREEN menu,
Move the cursor to PTZ using ▲,▼ buttons.
Press the ENTER button when the cursor is
on PTZ and the following screen appears.
Select the desired channel using ▲,▼
buttons.
Use the
buttons to select the correct
model of installed PTZ camera
Select the communication speed.
speeds are from 1200 to 115200.
Available
The default is 9600.
Press the
button to set up the ID of
the PTZ camera.
Use the
ID.
buttons to select the desired
Press the
button to see the next page.
To exit this PTZ menu, press the ESC
button.
63
5.6.4
E-MAIL
In the LINK menu,
Move the cursor to E-MAIL using ▲,▼
buttons.
Press the ENTER button when the cursor is
on E-MAIL and the following screen appears.
NOTE: If you want to use this function, you have to input the DNS address.
5.6.4.1
SEND E-MAIL
In the E-MAIL menu,
Move the cursor to SEND E-MAIL using the
▲,▼ buttons and select “ON” using the
buttons to send e-mail when an event occurs.
5.6.4.2
SMTP SETUP
In the E-MAIL menu,
Move the cursor to SMTP SETUP using the
▲,▼ buttons to input the e-mail sever
address to be used by DVR.
Press the ENTER button and the following
screen appears.
Select the characters using the ▲,▼,
◀,▶buttons and then press the ENTER
button. To exit the CHARACTER TABLE
screen, press the ESC button.
64
5.6.4.2.1
SMTP SERVER
Press the ENTER button to define an e-mail
server.
Enter the e-mail server’s address.
For example:
mail.domainname.com
Press the ESC button to return to previous
menu.
5.6.4.2.2
SMTP PORT
Define the port which the DVR will
communicate through. Available ports are
0000 through 9999.
65
5.6.4.3
DVR E-MAIL ADDRESS
Press the ENTER button to define a DVR email address.
Move the cursor to the DVR email address
using the ▲,▼ buttons .
Press the ENTER button and the following
screen appears. Select the characters using
the ▲,▼, ◀,▶buttons and press the ENTER
button.
5.6.4.4.
USER ID AND PASSWORD
Press the ENTER button to define a user ID
and password.
66
5.6.4.5.
E-MAIL ADDRESS 1 THROUGH 10
Highlight the e-mail address to send the
notifications to, and then press the ENTER
button to define the e-mail address.
5.6.5
DVR NAME
In the E-MAIL menu,
Move the cursor to DVR NAME using the
▲,▼ buttons .
Press the ENTER button and the following
screen appears.
67
Select the characters using the ▲,▼,
◀,▶buttons and then press the ENTER
button.
To exit the CHARACTER TABLE screen,
press the ESC button.
5.6.6
DVR LOCATION
In the E-MAIL menu,
Move the cursor to DVR LOCATION using
the ▲,▼ buttons .
Press the ENTER button and the following
screen appears
Select the characters using the ▲,▼,
◀,▶buttons and then press the ENTER
button.
To exit the CHARACTER TABLE screen,
press the ESC button.
68
5.6.7
BANDWIDTH
Move the cursor to BANDWIDTH using the
▲,▼ buttons to input the network bandwidth.
User can change the values from 0Mb to
10Mb using the
button of the remote.
To exit, press the ESC button.
5.6.8
WIRELESS
Move the cursor to WIRELESS using the
▲,▼ buttons to set up a wireless condition
5.6.8.1
WIRELESS MODE
Users can select two types of WIRELESS
MODE, “MANUAL” AND “AUTO” using the
◀,▶buttons.
69
5.6.8.2
MOBILE SERVER
Move the cursor to the MOBILE SERVER
using the ▲,▼ buttons and select the
characters.
Select
the
characters
using
the
▲,▼,
◀,▶buttons and then press the ENTER
button.
To exit the CHARACTER TABLE screen,
press the ESC button.
5.7 SEARCH
This section outlines how to use the search facility to interrogate the unit
To access the SEARCH menu move the cursor to the SEARCH icon using the ▲,▼in the MENU
screen.
Press the ENTER button when the cursor is on the SEARCH icon and the following menu appears.
Users can select and search any of the following options by pressing the Enter button.
5.7.1
CALENDAR SEARCH
Move the cursor to CALENDAR SEARCH
using the ▲,▼in the MENU screen.
Press the ENTER button when the cursor is
on CALENDAR SEARCH and the following
screen appears.
Calendar search provides a quick overview
of the year, month, day and hours of the day.
70
Press the SEARCH button to access the
search screen.
Highlight CALENDAR SEARCH and press
the ENTER button to access the CALENDAR
SEARCH screen. It will start searching for
the data automatically.
The dates that contain recorded data will be
displayed in yellow, whereas dates without
data will be in white.
Select the desired date and then press the
ENTER button.
To change the month or the year, highlight
the month or the year and then adjust the
value by pressing the + and – buttons.
When a date is selected, the DVR will then
search again for the recorded data in a 24hour period for the date.
The hour blocks that contain data will be
displayed in yellow. Move the highlight to
the desired hour block and then press the
ENTER button to start the playback.
71
5.7.2
SEARCH & COPY
Move the cursor to SEARCH & COPY using
the ▲,▼in the MENU screen.
Press the ENTER button when the cursor is
on it and the following screen appears.
Search & copy allows a quick review of the
recorded data and backup onto an external
device and thus minimises the need to
navigate through different screens to pinpoint
the exact time and duration of the video.
Press the SEARCH button to access the
search screen.
Highlight SEARCH & COPY and then press
the ENTER button to access the SEARCH &
COPY screen.
Select which SD Card Memory Card to
retrieve the data from. If unknown, leave the
STORAGE ID to “NORMAL”.
5.7.3
TIME SEARCH
Move the cursor to TIME SEARCH icon
using the ▲,▼in the MENU screen.
Press the ENTER button when the cursor is
on it and the following screen appears.
72
Time search provides an overview of the
recorded data from the earliest available
recording to the latest available recording.
5.7.4
EVENT SEARCH
Move the cursor to EVENT SEARCH using
the ▲,▼in the MENU screen.
Press the ENTER button when the cursor is
on it and the following screen appears.
Event search provides an overview of the
all event related recordings so that a
specific event can be quickly pinpointed
and accessed.
Users can select the event type from those
listed.
73
5.7.5
BLOCK SEARCH
Move the cursor to BLOCK SEARCH using
the ▲,▼in the MENU screen.
Press the ENTER button when the cursor is
on it and the following screen appears.
Block search has the capability to retrieve
the recorded data even from hard drives
that may have failed during normal
operation. Block search reads the logical
block addressing (LBA) of the hard disk
drives where the recorded data are
associated chronologically with the actual
location of the files. In other words, even
if the hard drives are damaged, it may be
possible to retrieve data from the hard disk
drives.
Press the SEARCH button to access the
search screen.
5.7.6
FILE SEARCH
Move the cursor to the FILE SEARCH icon
using the ▲,▼in the MENU screen.
Press the ENTER button when the cursor is
on it and the following screen appears.
74
File search is capable of reading and
playing back the data from the media used
for backup.
Connect the USB flash
memory or the external hard disk drive into
the USB port.
Press the SEARCH button to access the
search screen.
5.7.7
BOOKMARK SEARCH
Move the cursor to the BOOKMARK
SEARCH icon using the ▲,▼in the MENU
screen.
Press the ENTER button when the cursor is
on it and the following screen appears.
Bookmark search looks up any bookmarks
that have been added by the user.
75
5.7.8
LOG FILE
Move the cursor to the BOOKMARK
SEARCH icon using the ▲,▼in the MENU
screen.
Press the ENTER button when the cursor is
on it and the following screen appears.
The log file keeps a list of the important
events that happened to the DVR. The log
file can be saved to a USB flash memory as a
text file so that it can be viewed and archived
to a computer.
The following are what the DVR keeps in its
log file:
¾
¾
¾
¾
¾
¾
¾
Power on / off
Power loss / DVR restart
Changes in the menu
DVR initialisation
SD initialisation
Network connection / disconnection
Record start / stop
5.8 COPY
This section shows how a user can copy the image data of the DVR.
To set up the COPY menu, Move the cursor to the COPY icon using the ◀,▶ in the MENU
screen
5.8.1
COPY
In the COPY menu,
Move the cursor to COPY using the ▲,▼
buttons.
Press the ENTER button and the following
screen appears.
76
Move the cursor to HDD ID using the
▲,▼ buttons and select the desired HDD
to copy from.
HDD IDs using the
buttons .
Move the cursor to the desired position of
COPY START TIME/ COPY END TIME
using the ▲,▼, , buttons and press the
button to set up the COPY START
TIME and COPY END TIME.
Press the ENTER button to copy.
You can further secure the recorded data by
applying a password to the recorded file.
When the data is played back the user will
be prompted for the password
NOTE
When the copy is in process, the copying status (ex. “COPY 30 %”) will be displayed on the right hand side of
the monitor.
You can search and playback the copied images in HDD with DVR itself.
** You will firstly need to format the HDD before copied data can be downloaded
5.8.2
COPY STATUS
In the COPY menu,
Move the cursor to COPY STATUS using
the ▲,▼buttons.
Press the ENTER button to see the current
copying status and the following screen
appears.
Press the ESC button to exit this menu.
77
5.8.3
MEDIA FORMAT
In the COPY menu,
Move the cursor to MEDIA FORMAT using
the ▲,▼ buttons.
Press the ENTER button and the following
screen appears.
Select formatting media using the
button.
Move the cursor to MEDIA FORMAT and
then press the “ENTER” button.
The message, “FORMATTING” will be
displayed while formatting.
NOTE
If you don’t connect any media, the message “Fail” is displayed
5.9 STATUS SCREEN
Move the Cursor to the DVR STATUS icon
using ▲,▼ on the remote & press the Enter
button.
5.9.1
DVR STATUS
The status screen displays the basic
information about the DVR. Press the
STATUS button to access the information
screen.
78
1. FIXED HDD/SD TOTAL SPACE
Displays the total amount of installed storage space, including the storage space in any expansion
bays.
2. FIXED HDD/SD FREE SPACE
Displays the available remaining storage space, including the storage space in any expansion
bays.
3. RECORD PROGRAM
Displays current recording program.
4. USB STORAGE
Displays the size of the external hard drive space or USB Flash Memory.
5. USB CD / DVD
Displays the status of installed CD or DVD optical drive.
6. SOFTWARE VERSION
Displays current software version of the DVR.
7. HARDWARE VERSION
Displays current hardware version of the DVR.
5.9.2
NETWORK STATUS
Move the cursor to the Network Status
using ▲,▼ button on the remote & then
press the Enter button to get the following
information.
1. DHCP (DYNAMIC HOST CONFIGURATION PROTOCOL)
Displays the status of the DHCP application.
2. IP ADDRESS
Displays currently assigned IP address.
3. SUBNET MASK
Displays currently assigned Subnet Mask.
4. GATEWAY
Displays currently assigned Gateway address.
5. DNS (DOMAIN NAME SERVER)
Displays currently assigned DNS server information.
6. PORT
Displays currently assigned network port.
79
7. DYNAMIC IP SERVER
Displays currently assigned backup IP server.
8. BACKUP IP SERVER
Displays the IP address of the Backup Server.
9. MAC ADDRESS
Displays the DVR’s MAC address (Media Access Control Address).
10. IP SERVER RESPONSE
Indicates the connectivity status with the IP server.
5.9.3
RECORDING BITRATE
Move the cursor to the RECORDING
STATUS icon and press the ENTER button
to see the following screen.
The screen gives the information about the
recording bitrate all 4 channels.
5.10 EXIT
At the MENU screen,
Move the cursor to the EXIT icon using the
◀,▶ buttons.
Press the ENTER button when the cursor is
on the EXIT icon and the following options
appear.
Move the cursor to the desired option using
the ▲,▼ buttons and press the ENTER
button.
-
SAVE ONLY: Select this option to save the setup.
SAVE AND EXIT: Select this option if you want to save setup and exit setup menu.
EXIT WITHOUT SAVE: Select this option to exit without saving the setup information.
80