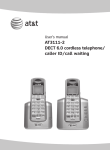
1
Congratulations
on purchasing your new VTech product.
Before using this product, please read the
Important safety instructions
on page 68 of this manual.
This manual has all the feature operations and troubleshooting necessary
to install and operate your new VTech product. Please review this manual
thoroughly to ensure proper installation and operation of this innovative and
feature rich VTech product. For support, shopping, and everything new at
VTech, visit our website at www.vtechcanada.com/IS9181.
Table of contents
Before you begin . . . . . . . . . . . . . . . . . 1
Minimum requirements . . . . . . . . . . . . . 1
Parts checklist . . . . . . . . . . . . . . . . . 2
Getting to know the IS9181 . . . . . . . . . . . 3
IS9181 layout . . . . . . . . . . . . . . . . . . 3
Remote control layout . . . . . . . . . . . . . . 5
IS9181 status icons . . . . . . . . . . . . . . . 6
Installation . . . . . . . . . . . . . . . . . . . . 7
IS9181 installation . . . . . . . . . . . . . . . . 7
Standby mode . . . . . . . . . . . . . . . . . . 9
Remote control installation . . . . . . . . . . 10
Replace remote control battery . . . . . . . . 10
Menu . . . . . . . . . . . . . . . . . . . . . . . 11
Alarm . . . . . . . . . . . . . . . . . . . . . 11
To stop the buzzer . . . . . . . . . . . . . 12
To stop the alarm . . . . . . . . . . . . . . 12
To silence the alarm . . . . . . . . . . . . 12
To cancel snooze . . . . . . . . . . . . . 13
Screen brightness . . . . . . . . . . . . . . . 13
Wireless network . . . . . . . . . . . . . . . 14
Clock . . . . . . . . . . . . . . . . . . . . . 16
ii
Weather settings . . . . . . . . . . . . . . . 18
Product ID . . . . . . . . . . . . . . . . . . . 19
Source . . . . . . . . . . . . . . . . . . . . . 20
Internet radio . . . . . . . . . . . . . . . . . 20
Play Internet radio station . . . . . . . . . . 20
My Stations . . . . . . . . . . . . . . . . . 22
Play added Internet radio station . . . . 23
My music . . . . . . . . . . . . . . . . . . . 24
Computer setup for My Music - Windows . . . 25
Determine the version of your
Windows operating system . . . . . . . . 25
Share a folder on Windows 2000
Professional . . . . . . . . . . . . . . . . 26
Create a new user account for
Windows 2000 . . . . . . . . . . . . . . 27
Share a folder on Windows XP . . . . . . . 29
Create a new user account for
Windows XP . . . . . . . . . . . . . . . 31
Share a folder on Windows Vista . . . . . . 35
Create new user account in
Windows Vista . . . . . . . . . . . . . . 37
Computer setup for My Music - Mac . . . . . 42
Table of contents
Instructions for IS9181 setup with
Mac OS 10.4 . . . . . . . . . . . . . . . 42
Create the IS9181 user account and
share the folder . . . . . . . . . . . . . 42
Instructions for IS9181 setup with
Mac OS 10.5 . . . . . . . . . . . . . . . 48
Create the IS9181 user account and
share the folder . . . . . . . . . . . . . 48
External USB & Firewire drives . . . . . . 51
Access your music from the IS9181 . . . . . 52
Play music on your computer . . . . . . . . . 52
FM radio . . . . . . . . . . . . . . . . . . . . 54
Play FM radio station . . . . . . . . . . . . 54
Aux in . . . . . . . . . . . . . . . . . . . . . 55
External audio device connection . . . . . 55
Favorites . . . . . . . . . . . . . . . . . . . . 56
Add to favorites . . . . . . . . . . . . . . . . 56
Play favorites . . . . . . . . . . . . . . . . . 57
Move favorites . . . . . . . . . . . . . . . . . 58
Delete favorites . . . . . . . . . . . . . . . . 59
Info . . . . . . . . . . . . . . . . . . . . . . . 60
Weather forecast . . . . . . . . . . . . . . . 60
Optional external audio system connection . 61
Optional battery installation . . . . . . . . . 62
Troubleshooting . . . . . . . . . . . . . . . . 64
Important safety instructions . . . . . . . . . 68
Maintenance . . . . . . . . . . . . . . . . . . 69
Warranty . . . . . . . . . . . . . . . . . . . . 70
FCC Part 15 . . . . . . . . . . . . . . . . . . . 73
IC RSS-210 (Canada) . . . . . . . . . . . . . . 75
Technical specifications . . . . . . . . . . . 76
iii
Before you begin
The IS9181 enables you to:
• Listen to thousands of free Internet radio stations from around the world without turning on a
computer.
• Listen to the digital music collection stored on your computer in any room of the house.
• Listen to music from a MP3 player or connect to a home audio system.
In addition, the IS9181 provides weather for your area.
Basic operation
Before you begin
Remove both clear plastic protective sheets from the top and from the display of the IS9181.
Minimum requirements
You must have the following to access Internet radio and the music files stored on your computer.
• Broadband Internet connection (typically cable, fiber optic or DSL).
• A wireless router.
To access the music files on your computer you will also need: Windows 2000, XP (32-bit edition),
Vista (32-bit edition), Mac OSX version 10.4 or 10.5: English versions only.
Before you begin
Parts checklist
• To purchase
a replacement
power adapter
or remote
control, visit our
website at www.
vtechcanada.
com/IS9181 or
call 1 (800) 2677377.
Your IS9181 package contains the following items. Save your sales receipt
and original packaging in the event warranty service is necessary.
User’s manual
1. Quick start guide
4. IS9181 power
adapter
2. User’s manual
3. IS9181
5. Auxiliary audio cable
6. Remote control
Getting to know the IS9181
IS9181 layout
2. SOURCE
Select music source (Internet
Radio, My Music, FM Radio,
Aux In).
3. FAVORITES
Show a list of saved favorite
stations.
4. INFO
Show weather information.
5. VOL+ / VOL Adjust listening volume.
6. Rotary dial
Rotate clockwise or counter-
clockwise to navigate through
the menu and display items.
7. SELECT
Select the highlighted item.
8. BACK
Return to the previous menu.
Basic
Getting to know
theoperation
IS9181
1. MENU
Show settings and options.
Top view
9. STANDBY
Press to switch between
standby mode and on.
Entering standby mode exits
menus, stops the music, and
the backlight on the VTech
logo turns off. The clock
appears while in standby
mode.
1
2
3
4
10.
My Music: skip to the
previous song.
Internet and FM Radio: skip
to the previous station.
5
7
11.
My Music: play and pause
6
current song.
Internet and FM Radio: mute
and un-mute audio.
8
12.
My Music: skip to the next
song.
Internet and FM Radio: skip
to the next station.
9
10
11
12
Getting to know the IS9181
IS9181 layout
1. Remote control receiver
5. LINE OUT port
Receives the signal from the
Connect to an audio cable (not
remote control.
2. VTech logo with backlight
Blinks while the IS9181 boots up.
On when the IS9181 is on.
Off when the IS9181 is in
standby mode.
3. High frequency speakers
Audio output.
4. DC 14V power jack
Connect to the IS9181 power
adapter.
Front view
1
included) here to send the audio
to an external audio system.
6. AUX IN port
Connect the supplied audio
cable here to listen to an external
audio device.
2
3
Back view
7. Low frequency speaker
Audio output.
8.Battery compartment cover
4
6
5
Bottom view
Battery installation is
optional. Remove the battery
compartment cover to install the
six AA batteries (not included).
7
8
Getting to know the IS9181
The keys on the remote control correspond to the keys on the IS9181, so you can
perform all operations using the remote control.
1. STANDBY
6.
Press to switch between standby
mode and on.
Entering standby mode exits menus,
stops the music, and the backlight on
the VTech logo turns off. The clock
appears while in standby mode.
2. FAV (FAVORITES)
Show a list of saved favorite stations.
3. MENU
Show settings and options.
4.
My Music: skip to the previous song.
Internet and FM Radio: skip to the
previous station.
5. VOL+ / VOL-
Adjust listening volume.
/
Press to navigate through the menu
and display items.
These keys operate the same as the
rotary dial.
7. SOURCE
Select music source (Internet Radio,
My Music, FM Radio, Aux In).
1
7
2
3
4
5
8
9
10
11
12
6
8. INFO
Show weather information.
9.
11.SELECT
My Music: play and pause the current
Select the highlighted item.
song.
Internet and FM Radio: mute and un- 12.BACK
mute the audio.
Return to the previous menu.
10.
My Music: skip to the next song.
Internet and FM Radio: skip to the
next station.
Basic
Getting to know
theoperation
IS9181
Remote control layout
Getting to know the IS9181
IS9181 status icons
2
1
3
4
5
9:25 AM
1. Clock (page 16)
7. Favorites
You can set the clock manually or
automatically from the Internet (see
page 16).
WiFi is connected.
No WiFi connection
WiFi is disconnected or not
configured.
4. Alarm
(page 11)
The alarm is set.
Alarm (on)
The alarm is on.
5. Battery
(page 62)
The batteries are in use.
The radio or music is playing.
Pause
(page 14)
(page 56)
8. Play
2. Internet connection
Internet service is connected.
3. WiFi connection
12
Favorites No. 12 is playing.
The music is paused.
12
6
8
7
6. Internet radio
(page 20)
Internet radio is playing.
My music
The Internet radio or FM radio is
muted.
Previous
Go to the previous available station
or song.
(page 24) Skip
Music on your computer is playing.
FM radio
Skip to the next available station or
song.
FM radio is playing.
Seek
(page 54)
(page 54)
Search for the next available FM
Aux in
An external audio source is playing.
(page 55)
channel.
Installation
Installation
IS9181 installation
A wireless network with Internet access is required to complete the setup of your IS9181. For
easier setup, write the required information in the table below.
WIRELESS NETWORK
Your Network Name (SSID)
Basic operation
Your Password (Network Key)
CLOCK
Your Time Zone (Newfoundland, Atlantic,
Eastern, Central, Mountain, Pacific, Hawaii,
Alaska)
WEATHER
Your 5-digit zip code (USA)
or
6-character postal code (Canada)
Avoid placing the IS9181 too close to:
•
•
•
•
•
Communication devices such as cordless telephones.
Excessive heat or moisture sources.
Microwave ovens, refrigerators, or fluorescent lighting.
Excessive dust sources such as a workshop or garage.
Mechanical vibration or shock such as on top of the washing machine or workbench.
Installation
IS9181 installation
To install the IS9181:
Plug the IS9181 power adapter into the power
port labeled DC 14V on the back of the IS9181,
and plug the other end into an electrical outlet
not controlled by a wall switch.
A progress bar appears on the screen while
booting up. It may take up to three minutes to
complete this process.
Electrical outlet
not controlled by
a wall switch
Power adapter
When the IS9181 is
finished booting up for the
first time, Press STANDBY Press STANDBY to advance to
device setup
to advance to device
setup appears on the
screen.
1. Press STANDBY and
Set up IS9181 system
the initial setup screen
Steps:
1. Connect to a Wireless Network
appears (shown to the
2. Adjust the Clock
right).
3. Enter location for Weather
Continue Setup ?
2. Rotate the dial on the
YES
NO
top of the IS9181 to
select YES .
3. Press SELECT and follow the setup screen
instructions.
For instructions on setting the Wireless
network, see page 14.
For instructions on setting the Clock, see page
16.
For instructions on setting the Weather
settings, see page 18.
Standby mode
Every time that you plug in the IS9181 and each time it regains power after an outage, the
progress bar appears on the screen. It may take up to three minutes to complete the boot-up
process. When the clock appears, the IS9181 is in standby mode. Press STANDBY to turn on and
use the IS9181.
Installation
Installation
Alarm icon and alarm time
12:00
AM
Battery icon
Basic operation
11:00 AM
Clock
Press STANDBY again to return the IS9181 to standby mode. When in standby mode, the IS9181
exits menus, stops the music, and the backlight on the VTech logo turns off. The clock appears
while in standby mode.
Installation
Remote control installation
The battery is already installed in the remote control. However,
you must remove the plastic tab before use (as shown to the
right).
Pull
Replace remote control battery
Back of remote control
Use a CR2025 lithium cell battery (sold separately) or equivalent to
replace the remote control battery. To replace the battery:
1. Push and hold the tab on the battery compartment to the right
and pull the compartment out of the remote control.
2. Remove the old battery and insert a new CR2025 lithium cell
battery or equivalent into the battery compartment with the
positive side (+) facing up.
3. Push the battery compartment into the remote control until it
clicks into place.
Positive
side (+)
Push
10
Open
Push
1
2 + 3
Menu
Alarm
Menu
Alarm
Screen Brightness
Wireless Network
Clock
Weather Settings
Set to ON
CHANGE
EXIT
Alarm Time
Press SELECT when finished
12 :00 PM
DONE
CANCEL
Alarm Source
Buzzer
Internet Radio
FM Radio
11
Basic operation
Alarm
Current Settings:
Status: OFF
Time: 12:00 AM
Source: Buzzer
• The alarm clock
does not work on
battery power.
The alarm clock
must have AC
power in order to
work.
• You cannot
adjust the alarm
volume using the
VOL + and
VOL - keys; you
must use the
rotary dial.
• The volume
for the alarm
buzzer cannot be
adjusted.
Menu
In this menu, you can set the alarm time and turn it on and
off. To set the alarm:
1. With the IS9181 turned on, press MENU.
2. Rotate the dial to highlight Alarm and press SELECT.
3. To turn the alarm on, rotate the dial to highlight
Set to ON and press SELECT.
4. To set the alarm time, rotate the dial to highlight
CHANGE and press SELECT. The Alarm Time screen
appears.
5. Rotate the dial to move the cursor between the hour,
minute, and AM/PM positions. When the cursor is in the
desired position, press SELECT.
6. Rotate the dial up or down to change the time or to
change between AM and PM, and press SELECT.
7. Repeat steps 5 and 6 until the time is correct. Rotate
the dial to highlight DONE and press SELECT. A list of
alarm sources appears.
8. Rotate the dial to highlight the alarm source and press
SELECT. The Alarm Volume screen appears. Press
SELECT.
Menu
Alarm
9. Rotate the dial to adjust the volume and press SELECT.
10.Rotate the dial to highlight DONE and press SELECT. Alarm Settings updated appears.
When the alarm goes off, the selected alarm source plays continuously. If the selected source is
Internet radio or FM radio, the last station that you listened to plays and the station information is
shown on the bottom bar. If Internet radio station is not available, Buzzer is used instead.
To stop the buzzer:
While the alarm is sounding, rotate the dial to highlight STOP and press
SELECT to stop the alarm buzzer.
To stop the alarm:
If the selected alarm source is Internet radio or FM radio, rotate the dial to
highlight OK and press SELECT. The radio continues to play until you stop it
by pressing
, or STANDBY.
To silence the alarm:
Do any of the following to snooze the alarm for 10 minutes.
• Press
,
, or
.
• Press STANDBY. The screen goes into the snooze standby mode (the time
displays in the center of the screen).
• Rotate the dial to highlight SNOOZE and press SELECT.
You can snooze the alarm as many times as you want until you cancel snooze
mode or stop the alarm.
12
11:08 AM
Alarm
SNOOZE
STOP
11:08 AM
Alarm
SNOOZE
OK
SWR3
12:00
AM
Menu
Alarm
11:08 AM
Snoozing...
Menu
Cancel Snooze?
NO
YES
Basic operation
To cancel snooze:
If the alarm is in snooze mode, rotate the dial to highlight YES and press
SELECT.
If the alarm is in snooze standby mode (the time displays in the center of
the screen), press STANDBY. Rotate the dial to highlight YES and press
SELECT.
This is a daily alarm, so the alarm continues to go off every day until you turn
the alarm off (see step 3 on page 11).
Screen brightness
You can adjust the screen brightness to suit different lighting conditions. To
change the brightness of the screen:
1. With the IS9181 turned on, press MENU.
Screen Brightness and press SELECT. The
2. Rotate the dial to highlight
current level of brightness appears on the screen.
3. Rotate the dial to adjust the level of brightness. When you adjust the level,
the screen brightness changes accordingly.
4. Press SELECT to confirm. Screen Brightness setting saved appears.
Menu
Alarm
Screen Brightness
Wireless Network
Clock
Weather Settings
Screen Brightness
High
Medium
Low
13
Menu
Wireless network
• If at first you do
not see your
network on
the list, press
BACK and try
searching again.
If you still do not
see your network
after a few tries,
you may need
to enter the
network name
manually.
• If capital letters
or symbols are
used, select
CAPS or
SYMBOLS
to show a list
of characters.
Select SPACE
to insert a blank
space.
• Select DELETE
to erase the last
character.
14
In this menu, you can either allow the system to search for
a wireless network, or enter the name of a known available
network.
To connect to your wireless network:
1. With the IS9181 turned on, press MENU.
2. Rotate the dial to highlight Wireless Network and press
SELECT.
3. Rotate the dial to highlight CHANGE and press
SELECT.
4. To search for a wireless network automatically, rotate the
dial to highlight Search for Network and press SELECT.
5. Any available networks appear on the screen. Rotate the
dial to highlight your network and press SELECT.
-OR To enter the name of the network, rotate the dial to
highlight Enter Network Name and press SELECT.
Rotate the dial to highlight the character of the name of
the network and press SELECT to add it to the entry line.
Network names are case sensitive. Repeat this process
until the entire name is displayed. Rotate the dial to
highlight DONE and then press SELECT.
Menu
Alarm
Screen Brightness
Wireless Network
Clock
Weather Settings
Wireless Network
Current Settings:
Status: Not Connected
SSID: None
Key: None
CHANGE
EXIT
Connect to Network
Search for Network
Enter Network Name
Enter Name (SSID):
a b c d e f g h i j k l m
n o p q r s t u v w x y z
1 2 3 4 5 6 7 8 9 0
SPACE
CAPS
SYMBOLS
DELETE
DONE
CANCEL
Menu
Wireless network
None
WEP64 / WEP128
WPA / WPA2
• Passwords are
case-sensitive.
If capital letters
or symbols are
used, select
CAPS or
SYMBOLS
Enter Password (Key):
a b c d e f g h i j k l m
n o p q r s t u v w x y z
1 2 3 4 5 6 7 8 9 0
SPACE
CAPS
SYMBOLS
DELETE
DONE
CANCEL
to show a list
of characters.
Select SPACE
to insert a blank
space.
• Press BACK
to return to
the previous
screen. Select
CANCEL to
go to the screen
with the current
settings for
the wireless
network.
15
Basic operation
NOTES:
• If the IS9181 cannot find the network in one minute, an error message
appears.
• The password for the wireless network is different than the password
for the router configuration utility.
Select Security Type:
Menu
If you enter the network name manually, the next step is
to choose your security type.
6.If password protection is not set on your network, move
on to step 7.
-OR Rotate the dial to highlight the character of the network
password and press SELECT to add it to the entry line.
You can select DELETE to erase the last character.
Repeat character selection until the entire password is
displayed. Rotate the dial to highlight DONE and then
press SELECT.
7. The IS9181 now attempts to connect to your wireless
network (this could take up to 1 minute). Once connected,
the menu screen appears and the IS9181 is ready to use.
Menu
Clock
The clock is set to 12:00 AM by default. You can choose to set the clock
manually or to have it automatically set by the Internet.
To set the clock to be automatically set by the Internet:
1. With the IS9181 turned on, press MENU.
Clock and press SELECT.
2. Rotate the dial to highlight
3. Rotate the dial to highlight CHANGE and press SELECT.
4.Rotate the dial to highlight Auto (from Internet) and press SELECT. A list of
time zones appears.
5.Rotate the dial to highlight your time zone and press SELECT.
6.If Daylight Saving is currently in effect, rotate the dial to highlight On and
press SELECT.
-OR If Daylight Saving is currently not in effect, rotate dial to highlight Off and
press SELECT.
NOTE:
•
16
Daylight saving time adjustments must be changed manually.
Menu
Alarm
Screen Brightness
Wireless Network
Clock
Weather Settings
Clock
Current Settings:
Time: 12:00 AM
Mode: Manual
CHANGE
EXIT
Clock Setting
Auto (from Internet)
Manual
Daylight Saving:
On
Off
Menu
Clock
Menu
Alarm
Screen Brightness
Wireless Network
Clock
Weather Settings
Menu
Clock
Current Settings:
Time: 12:00 AM
Mode: Manual
CHANGE
EXIT
Clock Setting
Press SELECT to adjust setting
07 :49 PM
DONE
CANCEL
Clock Setting
Press SELECT when finished
07 :49 PM
DONE
CANCEL
17
Basic operation
To set the clock manually:
1. With the IS9181 turned on, press MENU.
Clock and press SELECT.
2. Rotate the dial to highlight
3. Rotate the dial to highlight CHANGE and press SELECT.
4.Rotate the dial to highlight Manual and press SELECT.
5.Rotate the dial to move the cursor between the hour, minute, and AM/PM
positions. When the cursor is in the desired position, press SELECT.
6. Rotate the dial up or down to increase or decrease the time value or to
change between AM and PM, and press SELECT.
7. Repeat steps 5 and 6 until the time is correct. Rotate the dial to highlight
DONE and press SELECT. Clock set appears.
Menu
Weather settings
In this menu, enter your zip code (in the USA), or your postal code (in Canada).
After you have entered your zip or postal code, you can see the five day
weather forecast for your area by pressing the INFO key.
To program the weather settings for your area:
1. With the IS9181 turned on, press MENU.
2. Rotate the dial to highlight
Weather Settings and press SELECT.
3. Rotate the dial to highlight CHANGE and press SELECT.
4.Rotate the dial to highlight USA or Canada and press SELECT. Depending
on which you choose, either the Enter ZIP Code or Enter Postal Code
screen appears.
5.Rotate the dial to highlight the character of the zip code or postal code and
press SELECT to add it to the entry line. You can select DELETE to erase
the last character. Repeat the character selection until the entire zip code or
postal code is displayed. Rotate the dial to highlight DONE and then press
SELECT. Weather settings saved appears.
Press BACK to return to the previous screen. Select CANCEL to go to the
screen with the current settings for the weather.
Menu
Alarm
Screen Brightness
Wireless Network
Clock
Weather Settings
Weather Settings
Current Settings:
Country: None
ZIP or Area Code: None
CHANGE
Select Country:
USA
Canada
Enter Zip Code:
1 2 3 4 5 6 7 8 9 0
DELETE
18
EXIT
DONE
CANCLE
Menu
Product ID
•
The web code uses zero and one, not the capital letter “O” or “I”.
Menu
Screen Brightness
Wireless Network
Clock
Weather Settings
Product ID
Basic operation
NOTE:
Menu
This screen displays the product information, such as its MAC address,
assigned IP address, web code, and firmware version. You need to know the
web code of the IS9181 when adding a new radio station to the IS9181 through
the VTech website (see page 22).
To view the Product ID:
1. With the IS9181 turned on, press MENU.
2. Rotate the dial to highlight
Product ID and press SELECT.
3. To exit the screen, press SELECT.
Product ID
MAC Address: 00:11:A0:09:D5:DE
IP Address: 192.168.103.100
Web Code: 09D5 DEBD
Firmware Version: 1.0.8
OK
19
Source
Internet radio
Play Internet radio station
The Internet radio stations are organized into different categories. You can search for and play
Internet radio stations by browsing through the available categories. You may also search for radio
stations using the VTech website (see page 22). To play the Internet radio station:
1. With the IS9181 turned on, press SOURCE.
Source
2. Rotate the dial to highlight Internet Radio and press SELECT.
Internet Radio
3. Rotate the dial to highlight the desired browsing method and press SELECT.
My Music
Repeat this process until you reach a list of radio stations (the
icon
FM Radio
appears to the left of the station name).
Aux In
• Depending on the list of radio stations available on the Internet, your
browsing experience may differ. A typical session may go through several
Internet Radio
levels of options - for example:
Genres
Locations
Locations
Languages
Most Popular Stations
North America
My Stations
United States
California
Alternative
NOTES:
•
•
20
To make browsing easier, your country (USA or Canada) will show up on the top of the list of countries.
Stations with UK only or USA only at the end of the station name indicate these stations can only be played in that
country or region.
Source
Internet radio
Play Internet radio station
Alternative
4.Rotate the dial to highlight the desired radio station and press SELECT. The
selected radio station plays.
. To resume the sound, press
Press
to play the previous station on the list. Press
station on the list.
again.
to play the next
Press BACK to return to the previous screen.
Press SOURCE to go back to the top source menu.
If you are playing an Internet radio station and you change to another source,
when you select Internet radio again the same station plays.
If you have chosen Internet radio as your source and you press MENU, two
additional items appear at the top of the menu:
• Now Playing - returns you to the Internet radio playing screen.
• Add to Favorites - see page 56 for instructions.
09:25 am
Private Stream for Free
Free Radio Santa Cruz
Alternative
United States
Sample of Internet
radio station
playing
21
Basic operation
Source
To mute the sound, press
1.fm Indie 104
1.fm X
Buzz Radio
Free Radio Santa Cruz
Indie Airplay
Source
Internet radio
My Stations
You can search for and add Internet radio stations to the My Stations folder at
http://www.vtechcanada.com/IS9181. Use this website when you are unable to find a radio
station on the IS9181, you want more search options, and when you want the convenience of a
computer screen for viewing all the station choices.
If you have not added any stations from the VTech website and you try to access My Stations,
you will see the following message:
Stations list is empty.
To add your own stations, visit www.vtechcanada.com/IS9181.
Once you create your online account you can:
• Search for Internet radio stations online.
* Search by the station name (Charlie) or call letters (KYCH).
* Browse the list of stations by: genre, location, language, and most popular.
* Add stations by URL if you know the URL of a specific station.
• When you save an Internet radio station online, it will be saved in the website and in the
My Stations folder on your IS9181.
22
Source
Internet radio
My Stations
Play added Internet radio station
Internet Radio
Genres
Locations
Languages
Most Popular Stations
My Stations
23
Basic operation
Source
1. With the IS9181 turned on, press SOURCE.
2. Rotate the dial to highlight Internet Radio and press SELECT.
3. Rotate the dial to highlight My Stations and press SELECT. A list of all
added radio stations appear.
4. Rotate the dial to highlight the desired station and press SELECT.
Source
Internet Radio
My Music
FM Radio
Aux In
Source
My music
The IS9181 can play music stored on one or more computers on your wireless network.
Your computer must be on for the IS9181 to see and play your music files. The IS9181 only
supports the following formats of music files:
• MP3
• WMA
• Real audio (only RA, RM, and RMVB)
• AAC (only MP4 and M4A)
If you use a Windows operating system go to the next page. If you use a Mac operating system go
to page 42.
NOTE:
• IS9181 cannot play any protected music files.
24
Source
Computer setup for My Music - Windows
Windows 2000:
Windows XP:
Basic operation
Source
Determine the version of your Windows operating system
If you do not know what operating system you are using:
1. Click on the Start menu.
2. Right click My Computer and click on Properties.
Windows Vista (All versions):
For setup PC setup instructions for Windows 2000 see pages 26-28.
For setup PC setup instructions for Windows XP see pages 29-34.
For setup PC setup instructions for Windows Vista see pages 35-41.
25
Source
Computer setup for My Music - Windows
Share a folder on Windows 2000 Professional
For the IS9181 to access the music on your computer, you must share the folder where the music
is located.
1. Right click on the folder you wish to share.
2. Click on Sharing.
3. Check Share this folder and click Apply.
26
Source
Computer setup for My Music - Windows
Basic operation
Source
Create a new user account for Windows 2000
You must create a new user account in Windows 2000 for the IS9181 to access the music on your
computer. If you would like to access music files on multiple computers you will need to create the
same user account with the same password on each computer.
1. Click the Start menu, then click Control
3.You MUST enter IS9181 (the “IS” must be
Panel.
capitalized) as the User name and Full
name then click Next.
2. Click Users and Passwords, then click Add.
27
Source
Computer setup for My Music - Windows
Create a new user account for Windows 2000
4.Create a password. Enter a password and
5.Select Other: Administrators as the
click Next.
account type and click Finish.
To ensure the security of your computer we
recommend that you create a password for
the IS9181 user account. A typical password
consists of 6-8 characters including numbers
and letters.
Note: If you are going to create the user
account on multiple computers then you must
use the same password on each.
28
Source
Computer setup for My Music - Windows
Share a folder on Windows XP
For the IS9181 to access the music on your computer, you must share the folder where the music
is located.
Basic operation
Source
1. Right click on the folder you wish to share.
2. Click on Sharing and Security.
3. If you see one of the two screens shown below:
a. Check the box next to: Share this folder on the network.
b. Click Apply.
-OR29
Source
Computer setup for My Music - Windows
Share a folder on Windows XP
If you see the screen shown below, click on
the phrase: If you understand the security
risks but want to share files without
running the wizard, click here.
4.When the following message box appears,
select Just enable file sharing and click
OK.
30
Source
Computer setup for My Music - Windows
1.Click the Start menu then click Control Panel.
The instructions are given in the Category
View (the Windows default) as shown below.
If your Control Panel is in Classic View as
shown below, click Switch to Category View.
31
Basic operation
Source
Create a new user account for Windows XP
You must create a new user account in Windows XP for the IS9181 to access the music on your
computer. If you would like to access music files on multiple computers you need to create the
same user account with the same password on each computer. When you boot up your computer,
you will see the IS9181 user account on the login page.
Source
Computer setup for My Music - Windows
Create a new user account for Windows XP
2. Click User Accounts, then click Create a
new account.
3. You MUST Enter IS9181 (the “IS” must be
capitalized) as the new account name then
click Next.
Note: If you are going to create the user
account on multiple computers, then you must
use the same account name.
32
4. Select Computer administrator as the
account type.
Source
Computer setup for My Music - Windows
33
Basic operation
Source
Create a new user account for Windows XP
5. Create a password. Click on the user icon next to the IS9181 user account, then click Create a
password.
To ensure the security of your computer we recommend that you create a password for the IS9181
user account. A typical password consists of 6-8 characters, including numbers and letters.
Note: If you are going to create the user account on multiple computers then you must use the
same password.
Source
Computer setup for My Music - Windows
Create a new user account for Windows XP
If you want to switch back to Classic View click on Switch to Classic View.
34
Source
Computer setup for My Music - Windows
Share a folder on Windows Vista
For the IS9181 to access the music on your computer, you must share the folder where the music
is located.
5.The User Account Control prompts for your
permission, click Continue.
If the following message pops up, click: No,
make the network that I am connected to a
private network.
35
Basic operation
Source
1. Right click on the folder you wish to share.
2. Click on Share.
3. Select user IS9181 and click Add.
4. Click Share.
Source
Computer setup for My Music - Windows
Share a folder on Windows Vista
6.The computer may take a few minutes to setup the network access. When the setup is complete
and you see the confirmation screen shown below, click Done.
36
Source
Computer setup for My Music - Windows
1. Click the Start menu then click Control Panel.
The instructions are given in the Category
View (the Windows default) as shown below.
If your Control Panel is in Classic View as
shown below, click Switch to Category View.
37
Basic operation
Source
Create new user account in Windows Vista
You must create a new user account in Windows Vista for the IS9181 to access the music on your
computer. If you would like to access music files on multiple computers, you must create the same
user account with the same password on each computer. When you boot up your computer, you
will see the IS9181 user account on the login page.
Source
Computer setup for My Music - Windows
Create new user account in Windows Vista
2. Click User Accounts and Family Safety or
User Accounts.
3. Click Add or remove user accounts.
-OR4. The User Account Control prompts for your
permission, click Continue.
38
Source
Computer setup for My Music - Windows
Create new user account in Windows Vista
5. Click Create a new account.
39
Basic operation
Source
6. You MUST Enter IS9181 (the “IS” must be
capitalized) as the new account name.
7. Select Administrator as the account type.
8. Click Create Account.
Note: If you are going to create the IS9181 user
account on multiple computers then you must
use the same account name.
Source
Computer setup for My Music - Windows
Create new user account in Windows Vista
9. Create a password. Click on the user icon next to the IS9181 user account. Then click Create a
password.
To ensure the security of your computer we recommend that you create a password for the IS9181
user account. A typical password consists of 6-8 characters including numbers and letters.
Note: If you are going to create the user account on multiple computers, then you must use the
same password on each.
40
Source
Computer setup for My Music - Windows
Create new user account in Windows Vista
If you want to switch back to Classic View click on Switch to Classic View.
Basic operation
Source
41
Source
Computer setup for My Music - Mac
Instructions for IS9181 setup with Mac OS 10.4
Create the IS9181 user account and share the folder
1. Under the Apple menu, select System
Preferences and choose the Accounts pane.
2. Click the “+” symbol to add an account. You
may need to click the lock icon on the bottom
left to edit the settings.
42
3. You must name the account IS9181 and
create a password. This user does not have
to administer the computer.
Source
Computer setup for My Music - Mac
Instructions for IS9181 setup with Mac OS 10.4
Create the IS9181 user account and share the folder
6.After checking the “Windows Sharing” box,
click the Accounts… button to enable the
IS9181 account.
Basic operation
Source
4.After the account is created, open the
Sharing Pane under System Preferences.
5.Ensure “Windows Sharing” is checked. You
may need to click the lock icon on the bottom
left to edit the settings.
43
Source
Computer setup for My Music - Mac
Instructions for IS9181 setup with Mac OS 10.4
Create the IS9181 user account and share the folder
7. After enabling to IS9181 account to allow
windows sharing, choose the Firewall button
of the “Sharing” pane. If your Firewall is on,
ensure that the “Windows Sharing” box is
checked. (Note: The graphic below shows
the Firewall to be off).
44
8.After setting up sharing, you may now quit
System Preferences.
9.Now, use Spotlight (the blue magnifying
glass), found on the top right corner of
your desktop, to find the Directory Access
Application. Launch the Directory Access
application.
Source
Computer setup for My Music - Mac
Instructions for IS9181 setup with Mac OS 10.4
Create the IS9181 user account and share the folder
10.In Directory Access, ensure SMB/CIFS is checked and selected.
Basic operation
Source
45
Source
Computer setup for My Music - Mac
Instructions for IS9181 setup with Mac OS 10.4
Create the IS9181 user account and share the folder
11. You will need to move your music to the IS9181 account in order for the IS9181 to access the
music. You may make duplicates of the music you wish to play in the IS9181 music folder.
-OR You can move your entire music collection to the IS9181 account by following these
instructions:
1. While logged into the new IS9181 account, control click the music folder in the users root
directory and select Get Info.
2. At the bottom of the dialog box there is a Ownership & Permission section.
3. Click the arrow for Details to expand this section.
4. Click the Lock next to the Owner drop-down and enter the IS9181 user password when
promoted.
5. Change the Group drop-down box to the original user account name, which will be
available in the drop-down list.
6. Change the Access drop-down to Read & Write.
7. Click the Apply to enclosed items button at the bottom of the dialog box.
8. Enter administrator or original password when prompted.
9. Logout of the IS9181 account.
10.
Log into the administrator or original user account.
46
Source
Computer setup for My Music - Mac
Instructions for IS9181 setup with Mac OS 10.4
Create the IS9181 user account and share the folder
47
Basic operation
Source
11. Open up two Finder windows each looking at the music directories for both accounts. The
IS9181 music folder should no longer be “X” out and inaccessible.
12.Drag the iTunes folder from the original user account music folder to the IS9181 account
music folder. This will copy the music. If you do not have the room on your hard drive to
copy the music, you can copy the music to an external hard drive. Then delete the music
from your computer. Copy the music back to the computer on in the IS9181 music folder.
13.Open iTunes.
14. Open iTunes Preferences and select the Advanced tab.
15.Ensure that the Copy files to iTunes Music folder when adding to library is selected.
16.Click Change next to iTunes Music folder location.
17. Create a path to the IS9181 account music folder and iTunes music will point to that folder.
Now the IS9181 account houses all of your music. Any new music added in iTunes will show on the
IS9181 after you select Update Computer list . You can use iTunes as normal and access all
the content through the IS9181.
Source
Computer setup for My Music - Mac
Instructions for IS9181 setup with Mac OS 10.5
Create the IS9181 user account and share the folder
1. Under the Apple menu, select System
Preferences and choose the Accounts pane.
2. Click the “+” symbol to add an account. You
may need to click the lock icon on the bottom
left to edit the settings.
48
3. You must name the account IS9181 and
create a password. The account can be a
standard or admin type.
Source
Computer setup for My Music - Mac
Instructions for IS9181 setup with Mac OS 10.5
Create the IS9181 user account and share the folder
5.When you press the “Options…” button, you
will be able to select the type of file sharing.
Ensure the “Share files and folders using
SMB” box is checked, and check the box
for the user IS9181. Press the “Done” when
finished.
Basic operation
Source
4.Select the Sharing pane from the System
Preferences application. Ensure File Sharing
box is checked and selected. Click the
Options… button.
49
Source
Computer setup for My Music - Mac
Instructions for IS9181 setup with Mac OS 10.5
Create the IS9181 user account and share the folder
6.Click the + button under the “Shared Folder” pane. Navigate to your existing iTunes or other
music folder.
NOTE: it is important that you drill down to the folder that your music is in, not the first iTunes folder which has some
playlist information.
50
Source
Computer setup for My Music - Mac
Instructions for IS9181 setup with Mac OS 10.5
External USB & Firewire drives
Basic operation
Source
It is possible to share files from external drives using the same method. You have to setup the
desired folder on the external drive as a shared folder. Note, however, that external drives are not
accessed until you physically (not remotely) log into the Mac, so simply turning on the computer is
not enough to share the files, you must log in.
You can now close the System Preferences. On the IS9181 go to My Music and select Update
Computer List and reconnect with the desired Mac. Your music folder will now be available and
you can play all unprotected music that you may have in the folder you have chosen.
51
Source
Access your music from the IS9181
1. On your IS9181, press SOURCE.
2. Rotate the dial to My Music and press SELECT.
3. Rotate the dial to Computer Password and press SELECT.
4. Rotate the dial to YES and press SELECT.
5. Enter the password you selected for the IS9181 user account by rotating the dial and pressing
SELECT for each character. Repeat this process until the entire password is displayed. Rotate
the dial to highlight DONE , and then press SELECT.
Play music on your computer
To play music stored on your computer:
1. On your IS9181, press SOURCE.
2. Rotate the dial to highlight My Music and press SELECT.
3. Rotate the dial to highlight Update Computer list and press SELECT.
The IS9181 searches and shows a list of computers on the same network as
the IS9181. (continued on the next page)
My Music
Update Computer List
Computer Password
PC1
NOTES:
• Other devices connected to your network such as printers may show on the computer list.
• If your IS9181 cannot find the computer with your music files, there may be a firewall program installed which is blocking
access. Temporarily disable the firewall, or see the firewall software user’s manual to allow ICMP echo requests. Visit
http://www.vtechcanada.com/IS9181 for help with many firewall software versions.
52
Source
Play music on your computer
PC1
Shared Music
Basic operation
Source
4.Rotate the dial to highlight the desired computer and press SELECT. All
shared folders on the computer appear.
5.Continue to browse the folders until you reach the music files. Only
supported music files (see page 24) appear.
6.Rotate the dial to highlight the desired music file and press SELECT. All
supported files in the same folder play sequentially.
NOTES:
Update Computer list to see the changes.
• If you make any changes to your music files on your computer, select
Update Computer list again.
• If you do not see the computer or folder you want, try
Press BACK to return to the previous screen.
Press SOURCE to go back to the top source menu.
If you are playing My Music and you change to another source, when you select My Music again
the same file plays.
The IS9181 will automatically repeat all the songs that are in the folder you are playing from.
If you have chosen My Music as your source and you press MENU, one additional item appear at
the top of the menu:
• Now Playing - returns you to the My music playing screen.
53
Source
FM radio
Play FM radio station
To listen to FM radio stations:
1. With the IS9181 turned on, press SOURCE.
2. Rotate the dial to highlight FM Radio and press SELECT.
3. Press
to seek the next lower FM frequency with sufficient signal strength.
Press
to seek the next higher FM frequency with sufficient signal
strength.
-OR Rotate the dial counter clockwise to increase the FM frequency by one step.
Rotate the dial clockwise to decrease the FM frequency by one step.
To mute the sound, press
. To resume the sound, press
again.
If you have chosen FM radio as your source and you press MENU, two
additional items appear at the top of the menu:
• Now Playing - returns you to the FM radio playing screen.
• Add to Favorites - see page 56 for instructions.
54
Source
Internet Radio
My Music
FM Radio
Aux In
12:00AM
Stereo
95.3
MHz
Source
Aux in
Please note that the IS9181 does not provide power or control to your
external audio device.
You can adjust the listening volume using the VOL+ / VOL- on the IS9181
and/or the volume control of your external audio device.
Basic operation
Source
External audio device connection
The IS9181 enables you to listen to the audio from any source with a standard
headset jack connection.
1. Connect one end of the supplied auxiliary audio cable to the headset jack
(audio/line out) of your device, and plug the other end of the cable into the
Aux In port on the back of the IS9181.
2. With the IS9181 turned on, press SOURCE.
3. Rotate the dial to select Aux In and press SELECT.
Source
Internet Radio
4.Aux In appears on the screen. You can now play the music on your
My
Music
external audio device, and listen to it through the IS9181.
FM Radio
Aux In
12:00AM
Aux In
If the sound is distorted, try decreasing the volume on the external audio
device.
55
Favorites
Add to favorites
When either an Internet radio station or FM radio station is playing, you can add
the current station that is playing to your favorites for easy access.
The favorites entries are sorted in numeric order and duplicate entries are
allowed.
The maximum number of favorites that can be added for each source:
• Internet Radio: 100 favorites
• FM Radio: 20 favorites
To add an Internet Radio or FM Radio station to your favorites:
1. When you are playing an Internet radio or FM radio station, press MENU.
Add to Favorites and press SELECT. The
2. Rotate the dial to highlight
current station that is playing is automatically added to the favorites.
Menu
Now Playing
Add to Favorites
Alarm
Screen Brightness
Wireless Network
Private Stream for Free
56
Favorites
Play favorites
• If the source
is not selected
first, No Source
selected
appears when
you press
FAVORITES on
the IS9181.
57
Basic
operation
Favorites
To play your favorites, you must first select the source. To play your favorites:
1. With the IS9181 turned on, press SOURCE.
2. Rotate the dial to highlight the desired source (Internet Radio, or FM
Radio) and press SELECT.
3. Press FAVORITES and a list of saved entries for that source appears.
4. Rotate the dial to highlight the desired favorite and press SELECT. The
favorite plays.
Favorites
Move favorites
• To go back to the
screen currently
playing, press
MENU and select
Now Playing.
You can organize or move the favorites. To move the
favorite:
1. With the IS9181 turned on, press SOURCE.
2. Rotate the dial to highlight the desired source (Internet
Radio, or FM Radio) and press SELECT.
3. Press FAVORITES and a list of saved favorites for that
source appears.
4. Rotate the dial to highlight the desired favorite to be
moved and press MENU.
Move Favorite and press
5. Rotate the dial to highlight
SELECT.
6. A red line shows on the favorites screen. Rotate the
dial to position the red line where you want to move the
favorite (the favorite will be inserted by the red line) and
press SELECT.
Menu
Now Playing
Add to Favorites
Move Favorite
Delete Favorite
Delete All Favorites
Private Stream for Free
Select new location:
1. 87.5 MHz
2. 104.3 MHz
3. 96.5 MHz
87.5 MHz
58
Favorites
Delete favorites
Basic
operation
Favorites
You can delete one favorite or all favorites. To delete favorites:
1. With the IS9181 turned on, press SOURCE.
2. Rotate the dial to highlight the desired source (Internet Radio, or FM
Radio) and press SELECT.
3. Press FAVORITES and a list of saved favorites for that source appears.
4. Rotate the dial to highlight the desired favorite to be deleted or highlight any
favorite if you want to delete all the favorites and press MENU.
5. To delete a favorite, rotate the dial to highlight
Delete Favorite and
press SELECT.
-OR To delete all favorites, rotate the dial to highlight
Delete All Favorites
and press SELECT.
6.You are prompted to confirm that you want to delete the favorite or all
favorites. To delete the favorite or all favorites, rotate the dial to highlight
YES and press SELECT. To cancel the deletion, rotate the dial to highlight
NO and press SELECT.
Menu
Now Playing
Add to Favorites
Move Favorite
Delete Favorite
Delete All Favorites
Radio Pooki
Menu
Now Playing
Add to Favorites
Move Favorite
Delete Favorite
Delete All Favorites
Radio Pooki
59
Info
Weather forecast
After you have set up the weather feature (see page 18), press INFO and rotate
the dial to view the 5-day weather forecast.
If you do not press a key within one minute, the IS9181 will return to your playing
screen.
Weather
Rotate dial to view 5-day forecast
Playing Your Music
VANCOUVER, BC
Today
High:23℃
Low:
Mostly sunny
60
13℃
operation
Optional external audioBasic
system
connection
Optional external audio system connection
The IS9181 can send music being played to an external audio system for more control over the
sound quality. To connect the IS9181 to an external audio system:
1. Connect one end of audio cables (RCA type, not included) to the LINE OUT jacks on the back
of the IS9181, matching the cable colors.
2. Connect the other end of the cables to the respective audio input jacks on the external audio
system.
3. You can now play music from your IS9181 and listen to it through the external audio system.
61
Optional battery installation
• If you use AA
rechargeable
batteries, the
IS9181 does not
recharge the
batteries.
You can install AA alkaline or rechargeable batteries (sold
separately) to use your IS9181 as a portable radio. To
install the batteries:
1. Press the tabs on the battery cover on the bottom of
the IS9181 and open the battery door.
2. Insert six new AA alkaline or rechargeable batteries,
matching the + and - signs engraved inside the battery
compartment.
3. Replace the battery cover. It clicks into place when
attached correctly.
Battery cover
When powered by batteries, the IS9181 operates the same as when it is
plugged into an AC power outlet with the following exceptions:
• A battery icon appears on the status bar at the top of the screen (see page
6).
• The maximum speaker volume level is 25.
• When the IS9181 goes into standby mode, the IS9181
automatically shuts down after one minute to save
battery power (power save mode). To wake the IS9181
from power save mode, press STANDBY.
62
• The batteries do not maintain the clock setting. If your clock is set manually and the IS9181
loses power, then the setting is lost. We recommend you have the clock set by the Internet (see
page 16), so when the power returns, the clock setting will be automatically set by the Internet.
• The alarm clock does not work on battery power. The alarm clock must have AC power to work.
63
Basic operation
Optional battery installation
Optional battery installation
Troubleshooting
If you have difficulty operating your IS9181, please try the suggestions below. For Customer
Service, visit our website at www.vtechcanada.com, or call 1 (800) 267-7377.
General
• You cannot access any of the features of the IS9181 when it is in standby (idle) mode. Power up
the unit by pressing STANDBY.
• Reset procedure: Unplug the power cord and remove all batteries (if used) IS9181. Wait
approximate 30 seconds, then plug the cord back in and re-install the batteries (if used).
• When powered by batteries and the IS9181 goes into standby mode, the IS9181 automatically
shuts down after one minute to save battery power (power save mode). To wake the IS9181 from
power save mode, press STANDBY.
• After pressing the STANDBY key, you cannot de-activate the IS9181 by immediately pressing
the STANDBY key again. Wait at least 3 seconds between key presses.
Networking
• Your wireless network name and password MUST match what you enter in the IS9181. Check
that they are entered exactly the same (including capitalization and special characters).
• If the SSID Broadcast is turned OFF on certain brands of wireless routers, the IS9181 will not be
able to connect during setup. Refer to your wireless router user’s manual for instructions to turn
ON the SSID Broadcast during the IS9181 wireless network setup process. Once the IS9181
successfully connects to your wireless router, the SSID Broadcast can be turned OFF again.
64
Troubleshooting
Appendix
Networking
• Make sure your wireless router does not restrict connection by particular MAC addresses (MAC
filtering). Refer to you wireless router’s user manual for details.
Remote control
• Point the remote directly at the IS9181 display.
• Check to make sure the remote control’s battery is properly installed.
• Try replacing the remote control’s battery.
Clock/alarm
• If the clock is one hour off when set to Auto (from Internet) mode, check that the daylight
saving option is set correctly.
Internet radio
• Check that your internet and wireless network are working.
• Use your computer to play the Internet radio station stream via the broadcasting website (page
22). If the station plays on your computer, try to reset the IS9181 and reconnect to the station.
• If you experience a slow response when browsing the Internet radio directory, buffering, or
choppy audio play. Reset the IS9181, WiFi router, and DSL or Cable modem by removing power
for 30 seconds.
• The internet radio station might not be broadcasting at this time, or the station might have
reached it’s maximum number of listeners/subscribers.
65
Troubleshooting
My music
• Check that your computer is turned on and connected to the same network as the IS9181. Make
sure your computer is working properly - you may need to reboot/restart your computer.
• Make sure that you have created a user account for the IS9181 on your computer and that the
folder with your music files is properly shared (see pages 26-51).
• Supported files extension types are: mp3, mp4, m4a, ra, rm, rmvb, and wma.
• WAV format music files are not supported.
• Follow the instructions on page 52 for entering the Computer Password. The Computer
Password and the IS9181 user account password must be the same.
• If your IS9181 cannot find the computer with your music files, there may be a firewall program
installed which is blocking access. Temporarily disable the firewall, or see the firewall software
user’s manual to allow ICMP echo requests. Visit www.vtechcanada.com/IS9181 for help with
many firewall software versions.
FM radio
• If the FM radio reception is poor, try moving the IS9181 to a different part of your home and on a
different electrical outlet.
• Keep the IS9181 at least two feet away from other electronic devices and appliances to reduce
interference.
66
Troubleshooting
Favorites
• There are separate dedicated favorites lists for Internet Radio and FM Radio. You must choose
a SOURCE before choosing FAVORITES.
• To add an Internet station to the favorites list, the station must be connected and playing.
• You are allowed a maximum of 100 favorites for Internet Radio and 20 for FM Radio. If you
reach the maximum you will need to delete other favorites before you can add new ones.
INFO
• While viewing the Weather screen, rotate the dial to view the five day forecast weather display.
Reception or interference
• If audio playback stops or the IS9181 shows Buffering..., move the IS9181 closer to your
wireless router.
• Make sure the IS9181 is at least two feet away from computer equipment and other
communication devices.
• Try changing the channel on your router. Refer to the router user manual for instructions.
• Do not install IS9181 near a microwave oven or on the same electrical outlet. You might
experience decreased performance while the microwave oven is operating.
67
Appendix
AUX IN
• If you have trouble with the volume, you can adjust the volume using the IS9181 and the volume
control on your external device.
• Make sure the auxiliary cable is properly plugged into the IS9181 and your external device.
Important safety instructions
When using your IS9181 equipment, basic safety precautions should always be followed to reduce the risk of fire, electric shock and injury,
including the following:
1. Read and understand all instructions.
2. Follow all warnings and instructions marked on the product.
3. Unplug this product from the wall outlet before cleaning. Do not use liquid or aerosol cleaners. Use a damp cloth for cleaning.
4. Do not use this product near water (for example, near a bathtub, kitchen sink, or swimming pool).
5. Do not place this product on an unstable table, shelf, stand or other unstable surfaces.
6. Slots and openings in the back or bottom of the unit are provided for ventilation. To protect it from overheating, these openings must
not be blocked by placing the product on a soft surface such as a bed, sofa or rug. This product should never be placed near or over a
radiator or heat register. This product should not be placed in any area where proper ventilation is not provided.
7. This product should be operated only from the type of power source indicated on the marking label. If you are not sure of the type of
power supply in your home, consult your dealer or local power company.
8. Do not allow anything to rest on the power cord. Do not install this product where the cord may be walked on.
9. Never push objects of any kind into this product through the slots in the unit because it may touch dangerous voltage points or create a
short circuit. Never spill liquid of any kind on the product.
10. To reduce the risk of electric shock, do not disassemble this product, but take it to an authorized service facility. Opening or removing
parts of the unit other than specified access doors may expose you to dangerous voltages or other risks. Incorrect reassembling can
cause electric shock when the product is subsequently used.
11. Do not overload wall outlets and extension cords.
12. Unplug this product from the wall outlet and refer servicing to an authorized service facility under the following conditions:
A. When the power supply cord or plug is damaged or frayed.
B. If liquid has been spilled onto the product.
C. If the product has been exposed to rain or water.
D. If the product does not operate normally by following the operating instructions. Adjust only those controls that are covered by
the operation instructions. Improper adjustment of other controls may result in damage and often requires extensive work by an
authorized technician to restore the product to normal operation.
E. If the product has been dropped and the unit has been damaged.
F. If the product exhibits a distinct change in performance.
13. The power adapter is intended to be correctly oriented in a vertical or floor mount position. The prongs are not designed to hold the plug in place if it is plugged into a ceiling or an under-the-table/cabinet outlet.
SAVE THESE INSTRUCTIONS
68
Maintenance
Taking care of your unit
Avoid rough treatment
Handle the unit gently. Save the original packing materials to protect your IS9181 if you ever need to ship it.
Avoid water
Your unit can be damaged if it gets wet. Do not use the handset outdoors in the rain, or handle it with wet hands. Do not install the IS9181
near a sink, bathtub or shower.
Electrical storms
Electrical storms can sometimes cause power surges harmful to electronic equipment. For your own safety, take caution when using
electrical appliances during storms.
Cleaning your unit
Your unit has a durable plastic casing that should retain its luster for many years. Clean it only with a soft cloth slightly dampened with
water or a mild soap. Do not use excess water or cleaning solvents of any kind.
Remember that electrical appliances can cause serious injury if used when you are wet or standing in the water. If the unit should fall into the
water, DO NOT RETRIEVE IT UNTIL YOU UNPLUG THE POWER CORD FROM THE WALL.
69
Appendix
Your IS9181 contains sophisticated electronic parts, so it must be treated with care.
Warranty
What does this limited warranty cover?
The manufacturer of this VTech Product warrants to the holder of a valid proof of purchase (“Consumer” or “you”) that the Product and
all accessories provided in the sales package (“Product”) are free from defects in material and workmanship, pursuant to the following
terms and conditions, when installed and used normally and in accordance with the Product operating instructions. This limited warranty
extends only to the Consumer for Products purchased and used in the United States of America and Canada.
What will VTech do if the Product is not free from defects in materials and workmanship during the limited warranty period
(“Materially Defective Product”)?
During the limited warranty period, VTech’s authorized service representative will repair or replace at VTech’s option, without charge,
a Materially Defective Product. If we repair the Product, we may use new or refurbished replacement parts. If we choose to replace the
Product, we may replace it with a new or refurbished Product of the same or similar design. We will retain defective parts, modules,
or equipment. Repair or replacement of the Product, at VTech’s option, is your exclusive remedy. VTech will return the repaired or
replacement Products to you in working condition. You should expect the repair or replacement to take approximately 30 days.
How long is the limited warranty period?
The limited warranty period for the Product extends for ONE (1) YEAR from the date of purchase. If VTech repairs or replaces a Materially
Defective Product under the terms of this limited warranty, this limited warranty also applies to repaired or replacement Product for a
period of either (a) 90 days from the date the repaired or replacement Product is shipped to you or (b) the time remaining on the original
one-year warranty; whichever is longer.
What is not covered by this limited warranty?
This limited warranty does not cover:
1. Product that has been subjected to misuse, accident, shipping or other physical damage, improper installation, abnormal operation or
handling, neglect, inundation, fire, water or other liquid intrusion; or
2.Product that has been damaged due to repair, alteration or modification by anyone other than an authorized service representative of
VTech; or
3.Product to the extent that the problem experienced is caused by signal conditions, network reliability, or cable or antenna systems; or
4.Product to the extent that the problem is caused by use with non-VTech accessories; or
5.Product whose warranty/quality stickers, product serial number plates or electronic serial numbers have been removed, altered or
rendered illegible; or
6.Product purchased, used, serviced, or shipped for repair from outside the United States of America or Canada, or used for commercial
or institutional purposes (including but not limited to Products used for rental purposes); or
70
Warranty
7. Product returned without a valid proof of purchase (see item 2 below); or
8.Charges for installation or set up, adjustment of customer controls, and installation or repair of systems outside the unit.
What must you return with the Product to get warranty service?
1. Return the entire original package and contents including the Product to the VTech service location along with a description of the malfunction or difficulty; and
2. Include a “valid proof of purchase” (sales receipt) identifying the Product purchased (Product model) and the date of purchase or receipt; and
3. Provide your name, complete and correct mailing address, and telephone number.
71
Appendix
How do you get warranty service?
To obtain warranty service in the United States of America, please call 1 (800) 595-9511. In Canada, please call 1 (800) 267-7377. NOTE:
Before calling for service, please review the user’s manual - a check of the Product’s controls and features may save you a service call.
Except as provided by applicable law, you assume the risk of loss or damage during transit and transportation and are responsible for
delivery or handling charges incurred in the transport of the Product(s) to the service location. VTech will return repaired or replaced
Product under this limited warranty. Transportation, delivery or handling charges are prepaid. VTech assumes no risk for damage or loss
of the Product in transit. If the Product failure is not covered by this limited warranty, or proof of purchase does not meet the terms of this
limited warranty, VTech will notify you and will request that you authorize the cost of repair prior to any further repair activity. You must pay
for the cost of repair and return shipping costs for the repair of Products that are not covered by this limited warranty.
Warranty
Other Limitations
This warranty is the complete and exclusive agreement between you and VTech. It supersedes all other written or oral communications
related to this Product. VTech provides no other warranties for this Product. The warranty exclusively describes all of VTech’s
responsibilities regarding the Product. There are no other express warranties. No one is authorized to make modifications to this limited
warranty and you should not rely on any such modification.
State/Provincial Law Rights: This warranty gives you specific legal rights, and you may also have other rights, which vary from state to
state or province to province.
Limitations: Implied warranties, including those of fitness for a particular purpose and merchantability (an unwritten warranty that the
Product is fit for ordinary use) are limited to one year from the date of purchase. Some states/provinces do not allow limitations on how
long an implied warranty lasts, so the above limitation may not apply to you. In no event shall VTech be liable for any indirect, special,
incidental, consequential, or similar damages (including, but not limited to lost profits or revenue, inability to use the Product or other
associated equipment, the cost of substitute equipment, and claims by third parties) resulting from the use of this Product. Some states/
provinces do not allow the exclusion or limitation of incidental or consequential damages, so the above limitation or exclusion may not
apply to you.
Please retain your original sales receipt as proof of purchase.
72
FCC Part 15
This product complies with Part 15 of the FCC Rules. Operation is subject to the following two conditions: (1) this product may not cause harmful
interference, and (2) this product must accept any interference received, including interference that may cause undesired operation.
VTech Technologies Canada Ltd.
12111 Jacobson Way, Richmond, B.C., Canada V6W 1L5
IMPORTANT NOTICE: NO NOT MODIFY THIS PRODUCT
This product, when installed as indicated in the instructions contained in this manual, meets FCC requirements. Changes or modifications to
this equipment not expressly approved by the party responsible for compliance could void user authority to operate the equipment.
CAUTION
IEEE 802.11b or 802.11g operation of this product in the U.S.A. is firmware-limited to channels 1 through 11.
• To comply with FCC RF exposure compliance requirement, separation distance of at least 20 cm must be maintained between the antenna
of this product and all persons.
• This product and its antenna must not be co-located or operating in conjunction with any other antenna or transmitter.
73
Appendix
COMPLIANCE INFORMATION
Product Name: WiFi Internet Radio
Model Number: IS9181
This product contains FCC ID: EW780-6569-00
FCC Part 15
FCC NOTICE
This product has been tested and found to comply with the requirements for a Class B digital device under Part 15 of the FCC Rules. These
requirements are intended to provide reasonable protection against harmful interference in a residential installation.
This equipment generates, uses and can radiate radio frequency energy and, if not installed and used in accordance with the instructions, may
cause harmful interference to radio communications. However, there is no guarantee that interference will not occur in a particular installation.
If this equipment does cause harmful interference to radio or television reception, which can be determined by turning the product OFF and
ON, the user is encouraged to try to correct the interference by one or more of the following measures:
• Reorient or relocate the receiving antenna.
• Increase the separation between the equipment and receiver.
• Connect the product into an outlet on a circuit different from that to which the receiver is connected.
• Consult the local retailer authorized to distribute this type of product or an experienced radio/TV technician for help.
74
IC RSS-210 (Canada)
This product complies with RSS-210 of Industry Canada. Operation is subject to the following two conditions: (1) this product may not
cause harmful interference, and (2) this product must accept any interference received, including interference that may cause undesired
operation.
Industry Canada Notice
This Class B digital apparatus complies with Canadian ICES-003.
CAUTION
To reduce potential radio interference to other users, the antenna type and its gains should be so chosen that the equivalent isotropically
radiated power (e.i.r.p.) is not more than that permitted for successful communication.
75
Appendix
PRODUCT
This product contains IC 1135A-80656900.
Technical specifications
Size
314 mm (w) X 159 mm (d) X 88 mm (h)
Weight
1420 grams
Power requirements
14V DC
Operating temperature
32°F — 122°F
0°C — 50°C
IMPORTANT:
This product is protected by certain intellectual property rights of Microsoft Corporation. Use or
distribution of such technology outside of this product is prohibited without a license from Microsoft
or an authorized Microsoft subsidiary.
MPEG Layer-3 audio decoding technology licensed from Fraunhofer IIS and Thomson.
Portions of this software are included under license from RealNetworks, Inc.
Copyright 1995-2007, RealNetworks, Inc. All rights reserved.
®2008 RealNetworks, Inc. Patents Pending. All rights reserved. RealNetworks, Real,
the Real logo, RealPlayer, and the RealPlayer logo are trademarks or registered
trademarks of RealNetworks, Inc.
76
Index
A
Access your music from the
IS9181 52
Add to favorites 56
Alarm 11
Aux in 55
B
Before you begin 1
Internet radio 20
IS9181 installation 7
IS9181 layout 3
IS9181 status icons 6
E
External audio device connection 55
External USB & Firewire drives
51
M
Maintenance 69
Menu 11
Minimum requirements 1
Move favorites 58
My music 24
My Stations 22
F
Favorites 56
FCC Part 15 73
FM radio 54
G
Getting to know the IS9181 3
I
IC RSS-210 (Canada) 75
Important safety instructions 68
Index 77
Info 60
Installation 7
Instructions for IS9181 setup with Mac
OS 10.4 42
Instructions for IS9181 setup with Mac
OS 10.5 48
O
Optional battery installation 62
Optional external audio system
connection 61
P
Parts checklist 2
Play added Internet radio station 23
Play favorites 57
Play FM radio station 54
Play Internet radio station 20
Play music on your computer 52
Product ID 19
77
Appendix
C
Clock 16
Computer setup for My Music Mac 42
Computer setup for My Music Windows 25
Create a new user account for
Windows 2000 27
Create a new user account for
Windows XP 31
Create new user account in Windows
Vista 37
Create the IS9181 user account and
share the folder 42
Create the IS9181 user account and
share the folder 48
D
Delete favorites 59
Determine the version of your
Windows operating system 25
Index
R
Remote control installation 10
Remote control layout 5
Replace remote control battery 10
S
Screen brightness 13
Share a folder on Windows 2000
Professional 26
Share a folder on Windows Vista 35
Share a folder on Windows XP 29
Source 20
Standby mode 9
T
Technical specifications 76
To cancel snooze 13
To silence the alarm 12
To stop the alarm 12
To stop the buzzer 12
Troubleshooting 64
V
Volume 3, 5
78
W
Warranty 70
Weather forecast 60
Weather settings 18
Wireless network 14
VTECH TELECOMMUNICATIONS LTD.
A member of THE VTECH GROUP OF COMPANIES.
Distributed in the U.S.A. by VTech Communications, Inc. Beaverton, Oregon 97008
Distributed in Canada by VTech Technologies Canada, Ltd., Richmond, B.C. V6W 1L5
Copyright ©2009 for VTECH TELECOMMUNICATIONS LTD.
Printed in China.
Version 1
91-002506-010-100
User’s manual
www.vtechcanada.com/IS9181
Model: IS9181