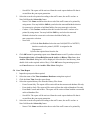
1
AT-Pak PRO
Time attendance solution for Access Control System
User’s Manual
Contents
Introduction
P.3
System Requirement
P.3
Quick Start
P.4
-
How to integrate with UC-SOFT or AAC software
-
Installing AT-Pak PRO
Opening AT-Pak PRO
-
Login
-
Setup and Register
Change Password
Setup Area
Creating Databases
-
Time Attendance Database
Special Day Database
-
Amendment Database
P.10
Generating Report
-
Attendance Report
Late Arrival Report
-
Early Departure Report
Over Time Report
User Report
P.19
Viewing Report
P.25
2
1.0 Introduction
AT-Pak PRO is a software for integration to the UC-SOFT or AAC Access Control Software to
provide an automated method to process employee time. The system calculates employees’ total hours,
overtime, absenteeism and tardiness.
2.0 System Requirement
Computer
- 733Mhz Processor, 128 MB RAM, 1 GB Free Hard Drive Space, 2 Serial Communication Ports,
CD-ROM Drive, 800x600 SVGA Display, Keyboard, Mouse or higher configuration
Operating System
- Windows 95, Windows 98, Windows NT 4.0, Windows 2000, Windows ME or Windows XP
3
3.0 Quick Start
3.1 How to integrate with UC-SOFT or AAC software
1. Under the UC-SOFT or AAC software, Select Note Field from Configuration menu under
Badging.
2. Change the “Note 1” to “Department” and change the “Note 2” to “Shift Group”.
3. Change option to Drop Down List for “Note 1” and “Note 2” and add the corresponding items
for them. The Shift Group items should be matched to AT-Pak Pro Time Attendance Database
Record Name.
Fig. 3.1.1
4
Fig. 3.1.2
4. Select the correct Department and Shift Group when adding Card Holder for UC-SOFT or
AAC.
3.2 Installing AT-Pak PRO
1. Insert the AT-Pak PRO CD disk into your CD-ROM drive.
2. From the Start button, select Run from the main menu.
3. Type “ D:\SETUP” in the Open text box. (Where “D” is your CD-ROM drive.) Click OK to
continue.
4. An AT-Pak PRO installation screen will appear. Click OK to continue. (Click Exit Setup to
abort the installation).
5
5. Click the Installation Icon to start the installation or Click the Change Directory button to
change the Directory or Click the Exit Setup to abort the installation.
Fig. 3.2
3.3 Opening AT-Pak PRO
1. From the Start button, select Programs and then select AT-Pak PRO icon.
6
3.4 Login
Select Login from the Login Menu. Then, the Login dialog box will be displayed.
Password is required to login when the program is executed. Enter the Password and then
click OK (or press Enter button on the Keyboard) to confirm (Click Cancel to abort the
login).
The factory-programmed password is at-pak .
Fig. 3.4
3.5 Setup and Register
1. Select Setup from the Setup Menu. Then, the Setup dialog box will be displayed.
2. Enter the Access Control Database Directory.
3. Enter the Registered Name (Same as the Company Name that shown on the report).
4. Enter the Registered no. which is given by Factory after registration.
5. Click Save button (or press Enter button on the Keyboard) to confirm (Click Cancel
button to abort the change in setup).
Fig. 3.5
7
3.6 Change Password
1. Select Change Password from the Password Menu. Then, the Change Password dialog
box will be displayed.
2. Enter the Current Password.
3. Enter the New Password twice.
4. Click Update button (or press Enter button on the Keyboard) to confirm (Click Cancel
button to abort the change in setup).
Fig. 3.6
3.7 Setup Area
1. Select Area from the Area Menu. Then, the Area dialog box will be displayed.
2. Double click the required readers on the Available list boxes or use the arrow buttons to
select clock in and clock out readers. The max. of 30 clock in and 30 clock out are allowed
to be selected. Enable Global Selection that will be the same functions of selection of all
readers as both clock in and clock out readers. It is recommended if there are more than 30
clock in and 30 clock out readers are required.
8
2. Click Save button to confirm (Click Cancel button to abort the change in setup).
Fig. 3.7
9
4.0 Creating Databases
4.1 Time Attendance Database
Select Time Attendance Database from Database menu. Then, the Time Attendance
Database dialog box will be displayed.
Fig. 4.1
4.1.1 Add Time Attendance Record
1. Click the Add button and enter the details of the record to be added.
- Record Name (Maximum 15 characters): Unique description for each record.
- Start Time (hhmm): Start time for records of a day. In general, the start time should be set
2-3 hours ahead of the start of the Office hour.
- Normal Working Hour Setting Frame
Office Hour (hhmm): It is the office hour of the shift and it is used to be displayed on
the report only.
Late Arrival (hhmm): Arrival beyond this preset time will be treated as late arrival. If
this field is blank, then late arrival will be ignored. Late Arrival Remark (Maximum
15 characters) could be displayed on the Time Attendance Report.
10
Early Departure (hhmm): Leave earlier than this preset time will be treated as early
departure. If this field is blank, then early department will be ignored. Early
Departure Remark (Maximum 15 characters) could be displayed on the Time
Attendance Report.
Mini Working Hr.: If the actual working hour is less than this preset time limit, Mini
Working Hr. Remark (Maximum 15 characters) will be displayed. If this field is
blank, then Mini Working Hr. checking will be ignored.
Absent Remark (Maximum 15 characters) could be displayed if no record is found
on the day that is not a Holiday.
Missing record Remark (Maximum 15 characters) will be displayed if either the
-
clock in or the clock out record is missing.
Lunch Setting
Start (hhmm): It is the starting time of the sampling to detect the lunch early out. It is
advised to have this setting 30mins to 60mins ahead of the Lunch time.
End (hhmm): It is the ending time of the sampling to detect the lunch late in. It is
advised to have this setting 30mins to 60mins after the Lunch time
Early Out (hhmm): Leave earlier than this preset time will be treated as Lunch early
departure. If this field is blank, then Lunch early department will be ignored. Lunch
Early Departure Remark (Maximum 15 characters) could be displayed on the Time
Attendance Report.
Late In (hhmm): Arrival beyond this preset time will be treated as Lunch late arrival.
If this field is blank, then Lunch late arrival will be ignored. Lunch Late Arrival
Remark (Maximum 15 characters) could be displayed on the Time Attendance
Report.
-
Weekday, Saturday and Sunday Option: Tick these options to enable Lunch checking
Over Time Setting Frame
Maximum of 3 different overtime settings are allowable with different pay rate. Tick
the corresponding check box to activate the Over Time setting that required.
OT Unit (1 to 9999) and OT Rate (0 to 9999.9999): Completion of the basic OT unit
will be counted for one OT. The OT count in the Time Attendance Report is equal to
Number of the OT times OT Rate
2. Click Save to confirm the operation. Click Cancel to abort the operation.
3. Click Exit to exit the Time Attendance Database.
4.1.2 Edit Time Attendance Record
1. Select the record to be edited.
11
2. Click the Edit and then modify the details of the record to be edited.
3. Click Update to confirm the operation. Click Cancel to abort the operation.
4. Click Exit to exit the Time Attendance Database.
4.1.3 Delete Time Attendance Record
1. Select the record to be deleted.
2. Click the Delete.
3. Click Exit to exit the Time Attendance Database.
4.1.4 Find Time Attendance Record
1. Enter the Record Name to be found.
2. Click the Find button.
4.1.5 Clear all Time Attendance Setup Record
Click the Clear all records button to clear all records.
4.1.6 Print Time Attendance Record Setup
Click the View/Print button.
4.2 Special Day Database
Select Special Day Database from Database menu. Then, the Special Day Database
dialog box will be displayed.
12
Fig. 4.2
4.2.1 Add Special Day Record
1. Click the Add and then enter the details of the record to be added.
- Date (yyyy/mm/dd): The day that requires special arrangement.
-
-
Time Attendance Database Frame
Record Name : Name of the Time Attendance Record to be selected.
Start Time : Start time of the Time Attendance Record selected. It is generated
automatically.
Normal Working Hour Setting Frame
Office Hour (hhmm): It is the office hour of the special day record and is used to
override the normal office hour setting of the selected Time Attendance Record at the
day selected.
Late Arrival (hhmm): It is the late arrival time of the special day record and is used to
override the normal office hour setting of the selected Time Attendance Record at the
day selected. If this field is blank, then late arrival will be ignored.
Early Departure (hhmm): It is the early departure time of the special day record and
13
is used to override the normal office hour setting of the selected Time Attendance
Record at the day selected. If this field is blank, then early department will be
ignored.
Mini Working Hr.: If the actual working hour is less than this preset time limit, Mini
Working Hr. Remark (Maximum 15 characters) will be displayed. If this field is
blank, then Mini Working Hr. checking will be ignored.
Lunch Option: Tick these options to enable Lunch checking
-
-
Over Time Setting Frame
It is the over time setting of the special day record and is used to override the over
time setting of the selected Time Attendance Record at the day selected.
Remark (Maximum 15 characters): Reasons for the changing of the Normal Working
Database and Over time Setting. It will be displayed on the Time Attendance Report.
2. Click Save to confirm the operation. Click Cancel to abort the operation.
3. Click Exit to exit the Special Day Database.
4.2.2 Edit Special Day Record
1. Select the record to be edited.
2. Click the Edit and then modify the details of the record to be edited.
3. Click Update to confirm the operation. Click Cancel to abort the operation.
4. Click Exit to exit the Special Day Database.
4.2.3 Delete Special Day Record
1. Select the record to be deleted.
2. Click the Delete.
3. Click Exit to exit the Special Day Database.
4.2.4 Find Record
1. Enter the Day to be found.
2. Click the Find button.
4.2.5 Clear all Special Day Setup Record
Click the Clear all records button to clear all records.
4.2.6 Print Special Day Record Setup
Click the View/Print button.
14
4.3 Amendment Database
Select Amendment Database from Database menu. Then, the Amendment Database
dialog box will be displayed.
Fig. 4.3.1
15
Fig. 4.3.2
4.3.1 Add Amendment Record
1. Click the Add and then enter the details of the record to be added.
- Staff No.: The record of the Staff no. that to be modified.
- Staff Name: The record of the Staff Name that to be modified.
- Active Date (yyyy/mm/dd): The day that requires amendment. Type in the start date and
the no. of consecutive days applies.
- Amendment Frame
On leave: Tick this optional box if the staff is on leave at the specified date.
Hour Leave: Tick this item if Hour leave is applied
Paid: Select this option if this is Paid Leave.
16
No Paid: Select this option if this is No Paid Leave.
Late arrival amendment: Tick this optional box and enter the revised late arrival
time setting (hhmm).
Early departure amendment: Tick this optional box and enter the revised early
departure time setting (hhmm).
Revise Mini Working Hr.: Tick this optional box and enter the revised Mini
Working Hr. setting (hhmm).
Ignore absence: Tick this optional box will ignore absence of the staff at the
specified date
IN time amendment: Tick this optional box and enter the revised IN time (hhmm).
OUT time amendment: Tick this optional box and enter the revised OUT time
(hhmm).
Lunch OUT time amendment: Tick this optional box and enter the revised Lunch
OUT time (hhmm).
Lunch IN time amendment: Tick this optional box and enter the revised Lunch IN
time (hhmm).
Ignore late arrival: Tick this optional box will ignore late arrival of the staff at the
specified date
Ignore early departure: Tick this optional box will ignore early departure of the
staff at the specified date
Ignore Lunch early OUT: Tick this optional box will ignore Lunch Early Out of
the staff at the specified date
Ignore Lunch late IN: Tick this optional box will ignore Lunch Late In of the staff
at the specified date
Remark (Maximum 40 characters): Reasons for amendment. It will be displayed
on the Time Attendance Report.
Add Item Button: Type in Remark and click the Add Item to build up the
drop down list.
Del Item Button: Select the unused Remark and click Del Item to remove it
from the drop down list.
2. Click Save to confirm the operation. Click Cancel to abort the operation.
3. Click Exit to exit the Amendment Database.
4.3.2 Quick Search Amendment Record
1. Select “Order by Staff” or “Order by Active Date”.
2. Type in the criteria for the Staff No. , Active Date or Update Date.
17
3. Click the Search Button for Active Date or click the Search Button for the Update Date.
4.3.3 Edit Amendment Record
1. Select the record to be edited.
2. Click the Edit and then modify the details of the record to be edited.
3. Click Update to confirm the operation. Click Cancel to abort the operation.
4. Click Exit to exit the Amendment Database.
4.3.4 Delete Amendment Record
1. Select the record to be deleted.
2. Click the Delete.
3. Click Exit to exit the Amendment Database.
4.3.5 Clear all Special Day Setup Record
Click the Clear all records button to clear all records.
4.3.6 Print Amendment Record Setup
Click the View/Print button.
18
5.0 Generating Report
Select Report from Report menu. Then, the Report dialog box will be displayed.
Fig. 5.1
5.1 Attendance Report
1. Input the report period that required.
2.
3.
4.
5.
Select the name of the Time Attendance Database setting that required.
Click the Attendance from the report frame.
Select the required history files from the History Files frame.
- From Current Only: The report will be retrieved from the current used database file only.
- From Archive Only: The report will be retrieved from the archived database files only.
- From Both Current and Archive: The report will be retrieved from both the current and
archived database files.
- Saved File: The report will be retrieved from the saved export database file that is
created from the past report generation.
Select the records to be printed according to the staff’s name, the staff’s card no. or
Note field from the Selected by frame.
19
-
Name: Click Name and then select the record of the staff’s name to be printed by
using mouse. You may hold the Shift key and select the start and finish selection
for consecutive selection or hold the Ctrl key for non-consecutive selection.
-
Card no.: Click Card no. and then select the record of the staff’s card no. to be
printed by using mouse. You may hold the Shift key and select the start and
-
finished selection for consecutive selection or hold the Ctrl key for
non-consecutive selection.
Note field:
a) Click the Note field and select the note field (NOTE1 to NOTE25)
that the records to be printed. (NOTE1 is assigned as the
Department.)
b) Select the required item from the list.
6.
Click OK button for generating report or use Cancel button to exit. If you have
selected From Archive Only or From Both Current & Archive in History Files
frame, then Archive Files Select dialog box will be displayed. Select the drive and
directory, then double click on the required archive file(s). Click OK button for
generating report or use Cancel button to exit the Archive Files Select dialog box.
Fig. 5.1
5.2 Late Arrival Report
1. Input the report period that required.
2.
3.
Select the name of the Time Attendance Database setting that required.
Click the Late Arrival from the report frame.
20
4.
Select the required history files from the History Files frame.
-
From Current Only: The report will be retrieved from the current used database file only.
From Archive Only: The report will be retrieved from the archived database files only.
-
From Both Current and Archive: The report will be retrieved from both the current and
-
archived database files.
Saved File: The report will be retrieved from the saved export database file that is
created from the past report generation.
5.
Select the records to be printed according to the staff’s name, the staff’s card no. or
Note field from the Selected by frame.
-
Name: Click Name and then select the record of the staff’s name to be printed by
using mouse. You may hold the Shift key and select the start and finished selection
for consecutive selection or hold the Ctrl key for non-consecutive selection.
-
Card no.: Click Card no. and then select the record of the staff’s card no. to be
printed by using mouse. You may hold the Shift key and select the start and
finished selection for consecutive selection or hold the Ctrl key for
non-consecutive selection.
-
Note field:
a) Click the Note field and select the note field (NOTE1 to NOTE25)
that the records to be printed. (NOTE1 is assigned as the
Department.)
b) Select the required item from the list.
6.
Click OK button for generating report or use Cancel button to exit. If you have selected
From Archive Only or From Both Current & Archive in History Files frame, then
Archive Files Select dialog box will be displayed. Select the drive and directory, then
double click on the required archive file(s). Click OK button for generating report or
use Cancel button to exit the Archive Files Select dialog box.
5.3 Early Departure Report
1. Input the report period that required.
2.
3.
4.
Select the name of the Time Attendance Database setting that required.
Click the Early Departure from the report frame.
Select the required history files from the History Files frame.
- From Current Only: The report will be retrieved from the current used database file only.
- From Archive Only: The report will be retrieved from the archived database files only.
- From Both Current and Archive: The report will be retrieved from both the current and
archived database files.
21
5.
Saved File: The report will be retrieved from the saved export database file that is
created from the past report generation.
Select the records to be printed according to the staff’s name, the staff’s card no. or
Note field from the Selected by frame.
- Name: Click Name and then select the record of the staff’s name to be printed by
using mouse. You may hold the Shift key and select the start and finished selection
for consecutive selection or hold the Ctrl key for non-consecutive selection.
-
Card no.: Click Card no. and then select the record of the staff’s card no. to be
printed by using mouse. You may hold the Shift key and select the start and
finished selection for consecutive selection or hold the Ctrl key for
non-consecutive selection.
-
Note field:
a) Click the Note field and select the note field (NOTE1 to NOTE25)
that the records to be printed. (NOTE1 is assigned as the
Department.)
b) Select the required item from the list.
6.
Click OK button for generating report or use Cancel button to exit. If you have selected
From Archive Only or From Both Current & Archive in History Files frame, then
Archive Files Select dialog box will be displayed. Select the drive and directory, then
double click on the required archive file(s). Click OK button for generating report or
use Cancel button to exit the Archive Files Select dialog box.
5.4 Over Time Report
1. Input the report period that required.
2.
3.
4.
5.
Select the name of the Time Attendance Database setting that required.
Click the Over Time from the report frame.
Select the required history files from the History Files frame.
- From Current Only: The report will be retrieved from the current used database file only.
- From Archive Only: The report will be retrieved from the archived database files only.
- From Both Current and Archive: The report will be retrieved from both the current and
archived database files.
- Saved File: The report will be retrieved from the saved export database file that is
created from the past report generation.
Select the records to be printed according to the staff’s name, the staff’s card no. or
Note field from the Selected by frame.
- Name: Click Name and then select the record of the staff’s name to be printed by
22
using mouse. You may hold the Shift key and select the start and finished selection
-
for consecutive selection or hold the Ctrl key for non-consecutive selection.
Card no.: Click Card no. and then select the record of the staff’s card no. to be
printed by using mouse. You may hold the Shift key and select the start and
finished selection for consecutive selection or hold the Ctrl key for
non-consecutive selection.
-
Note field:
a) Click the Note field and select the note field (NOTE1 to NOTE25)
that the records to be printed. (NOTE1 is assigned as the
Department.)
b) Select the required item from the list.
6.
Click OK button for generating report or use Cancel button to exit. If you have selected
From Archive Only or From Both Current & Archive in History Files frame, then
Archive Files Select dialog box will be displayed. Select the drive and directory, then
double click on the required archive file(s). Click OK button for generating report or
use Cancel button to exit the Archive Files Select dialog box.
5.5 User Report
1. Input the report period that required.
2.
Select the name of the Time Attendance Database setting that required.
3.
4.
Click the User from the report frame and select the required user report.
Select the required history files from the History Files frame.
- From Current Only: The report will be retrieved from the current used database file only.
- From Archive Only: The report will be retrieved from the archived database files only.
-
5.
From Both Current and Archive: The report will be retrieved from both the current and
archived database files.
- Saved File: The report will be retrieved from the saved export database file that is
created from the past report generation.
Select the records to be printed according to the staff’s name, the staff’s card no. or
Note field from the Selected by frame.
- Name: Click Name and then select the record of the staff’s name to be printed by
using mouse. You may hold the Shift key and select the start and finished selection
for consecutive selection or hold the Ctrl key for non-consecutive selection.
- Card no.: Click Card no. and then select the record of the staff’s card no. to be
printed by using mouse. You may hold the Shift key and select the start and
finished selection for consecutive selection or hold the Ctrl key for
23
non-consecutive selection.
-
Note field:
c) Click the Note field and select the note field (NOTE1 to NOTE25)
that the records to be printed. (NOTE1 is assigned as the
Department.)
d) Select the required item from the list.
6.
Click OK button for generating report or use Cancel button to exit. If you have
selected From Archive Only or From Both Current & Archive in History Files
frame, then Archive Files Select dialog box will be displayed. Select the drive and
directory, then double click on the required archive file(s). Click OK button for
generating report or use Cancel button to exit the Archive Files Select dialog box.
24
6.0 Viewing Report
Attendance Report
Fig. 6.1
25
Late Arrival Report
Fig. 6.2
26
Early Department report
Fig. 6.3
27
Over Time Report
Fig. 6.4
28
Daily Attendance Report
Fig. 6.5
29
6.1 Viewer Tools
Scroll bar
3-View Zoom Tool
Print
Fig. 6.5
Next Page
Previous Page
Cancel
Export report
Last Page
First Page
-
Scroll bar
The scroll bar can be used to browse the entire length of a page. Click on the arrows to
browse slowly or on the bar itself to move up or down a screen at a time.
-
First Page
Use this button to view the first page of the report
-
Previous Page
Use this button to view the page before the one currently displayed.
-
Next Page
Use this button to view the page after the one currently displayed.
-
Last Page
Use this button to view the last page of the report.
-
Cancel
Use this button to view the last page of the report.
-
3-View Zoom Tool
Use this button to move between three different views. One view shows the page at
100%, another view fits the entire page in the viewing window, and the last view fits the
page in the window from side to side.
-
Print
Use this button to print the report.
30
6.2 Exporting the report
AT-Pak PRO allows the export of report information to a number of various file types. Click
either of the two buttons shown to bring up the Export dialog box.
Fig. 6.6
-
Format
Select the type of file you want to export to from the drop-down list. A number of data,
word processing, and spreadsheet formats are available. Some selections may request
additional information before exporting the data.
-
Destination
In most cased you will probably want to export the data to a file on your own computer.
If so, select Disk File from the Destination drop-down list, and you will be prompted to
navigate to the directory you want the file put in.
31