1
Contents
Contents
2 of 104
1
General information
5
2
Operation using the web browser in your own network
6
2.1
Requirements
6
2.2
2.2.1
2.2.2
Overview
Navigation overview
Homepage
7
7
8
2.3
2.3.1
2.3.2
2.3.3
2.3.4
2.3.5
2.3.6
Calling up yield data
How to navigate within the overviews
What the values in the overviews mean
Day overview
Month overview
Year overview
Total overview
9
9
10
11
13
14
15
2.4
2.4.1
2.4.2
2.4.3
Calling up yield data on a mobile computer
Day
Month
Year
17
18
18
19
2.5
2.5.1
2.5.2
2.5.3
2.5.4
2.5.5
Calling up the diagnosis function
Calling up and filtering the event log
Displaying the decrease in output for your plant
Pac Correction Factor
Calculating the PAC correction factor
Example calculation
20
21
23
25
25
26
2.6
Changing settings in the configuration menu
27
3
Using Solar-Log WEB
28
3.1
Register with Solar-Log™ WEB "Classic 2nd Edition"
28
3.2
Calling up plant data
31
3.3
3.3.1
3.3.2
3.3.3
3.3.4
3.3.5
Calling up yield data
How to navigate within the overviews
What the values in the overviews mean
Day overview
Month overview
Year overview
35
35
35
35
37
38
Solar-Log
200
User Manual
Contents
Solar-Log
200
3.3.6
3.3.7
Overview of all years
Calling up and filtering the event log
40
41
4
E-mail Notification
43
4.1
Yield E-mail
43
4.2
Performance Monitoring
47
5
Using the Solar-Log™ APP iPhone V3 for iPhones
53
5.1
Installing the App
54
5.2
Add plants
55
5.3
5.3.1
Retrieving Yield Data
How to navigate between different time periods
56
57
5.4
The top menu bar
58
5.5
5.5.1
5.5.2
5.5.3
5.5.4
The bottom menu bar
Day
Monthly Overview
Annual Overview
Total Overview
60
60
61
62
63
5.6
Viewing CO2 Savings
64
5.7
Retrieving Plant Data
65
5.8
5.8.1
The Yield Data as a Slide Show
Start the Slide Show
67
69
6
Using the Solar-Log™ Android App
70
6.1
Installing the App
70
6.2
Add plants
71
6.3
6.3.1
6.3.2
Plant Settings
S0 meter
Management
73
73
74
6.4
The Toolbar
75
6.5
6.5.1
6.5.2
6.5.3
6.5.4
Retrieving Yield Values
Daily Overview
Monthly Overview
Annual Overview
Total Overview
77
78
79
80
81
User Manual
3 of 104
Contents
6.6
Viewing CO2 Savings
81
6.7
6.7.1
6.7.2
6.7.3
6.7.4
App Settings
Periodical data update
Reset
Slide show
Legal Disclaimer
82
84
85
86
87
6.8
The Yield Data as a Slide Show
88
6.9
6.9.1
6.9.2
6.9.3
Using the Android App with a Smartphone
Smartphone vertical format
Smartphone - horizontal format
Solar-Log™ Widget for Smartphones
89
90
91
92
7
Cleaning and care
94
7.1
Cleaning tips
94
7.2
Care tips
94
8
Malfunctions
95
8.1
Status display for the LEDs
95
8.2
8.2.1
8.2.2
Remedying faults yourself
Obtaining information from the internet
Informing a specialist technician
96
98
98
9
Disposal
99
10
Technical data
100
Glossary
101
103
104
4 of 104
Solar-Log
200
User Manual
General information
1
General information
This user manual is intended to assist you in the operation of the Solar200
200
Log . The yield data for the Solar-Log can be displayed in several
ways:
via a web browser in a local network (page 6) or
via the internet (page 28) or
via the Solar-Log™ APP for iPhone (page 53).
Solar-Log
200
User Manual
5 of 104
Operation using the web browser in your own network
2
Operation using the web browser in your own
network
2.1 Requirements
Information
For faster access, enter "solar-log" in the address line of the
browser and create a bookmark.
In the local network
200
To operate the Solar-Log using a web browser you will need to be on
a computer that is connected to the same local network as the Solar200
Log . This computer will also need to have a modern web browser
installed on it.
200
You are also able to operate the Solar-Log on a mobile device such
as a tablet, smartphone. This device must also be connected to the
200
same local network as the Solar-Log . It must also have a modern web
browser installed on it.
Via the internet
In addition to the computer or mobile computer with a web browser you
need an active internet connection as well as a user account on a
server.
To set up a user account please contact your solar technician or find
out more on our homepage under
http://www.solar-log.com/en/products-solutions/solar-log-web.html
6 of 104
Solar-Log
200
User Manual
Operation using the web browser in your own network
2.2 Overview
2.2.1 Navigation overview
Day overview
Tagesübersicht
Month overview
Monatsübersicht
Visualisierung
Visualisation
on PC
PC
Year overview
Jahresübersicht
Gesamt
–
Total
overview
übersicht
Ertragsdaten
Yield data
Day
Tag
PDA/pocket PC
PDA/Pocket
PC
Month
Monat
Event log
Ereignisprotokoll
Year
Jahr
Diagnosis
Diagnose
Degradation
Degradation
Konfiguration
Configuration
Solar-Log
200
User Manual
7 of 104
Operation using the web browser in your own network
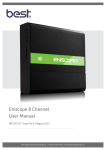
2.2.2 Homepage
A
C
B
The homepage contains the following areas:
Main navigation menu (A)
Navigation bar (B)
Information field (C)
Main navigation menu
The main navigation menu contains three main operating groups:
Yield data: Here you will find the yield information within certain
periods of time such as day, month, year and the total yield to date
of your plant.
8 of 104
Solar-Log
200
User Manual
Operation using the web browser in your own network
Diagnosis: Here you can call up the fault and process reports as
well as filter according to desired criteria.
Configuration: Here you can change the settings of your device as
required.
Left navigation bar
Depending on the selected field in the main navigation menu you can
access additional functions in the left navigation bar.
Information field
Device configuration will take place in this area. When viewing yield
information an additional window will pop up and yield information can
be found there.
2.3 Calling up yield data
1 Start the web browser and enter "solar-log" in the address line of the
browser or select the bookmark in the browser's navigation bar.
The homepage is displayed.
2 Select Visualization PC in the left navigation bar.
The output details for the current day are displayed in a new
window.
2.3.1 How to navigate within the overviews
Symbol
Meaning
Arrow keys: used to navigate to the previous
or next period of time shown. Magnifying
glass symbol: used to update the modified
parameters.
Solar-Log
200
User Manual
9 of 104
Operation using the web browser in your own network
Symbol
Meaning
Information on the inverter that is connected.
Hold the cursor over a field to display the
specific values.
Display of additional information on the plant
(page 10).
1 Click inside the colored area of the connected inverter or the desired
yield values.
2 Click on the magnifying glass symbol.
The overview is updated and the yield information for the inverter
or the yield values is shown in the selected overview, as a line.
3 Move to the next overview by clicking on the information under the
heading.
4 Close the yield data window.
This allows you to return to the main menu.
2.3.2 What the values in the overviews mean
10 of 104
Description
Unit
Meaning
Power input
Pac
W
The current power input P on the AC
voltage side
Generator output Pdc
W
The current power input P on the DC
voltage side (solar generator)
Inverter efficiency η
%
The current efficiency from the
generator output and the power input.
The manufacturer's specifications
regarding the efficiency of the inverter
can be checked here.
Solar-Log
200
User Manual
Operation using the web browser in your own network
Description
Unit
Status / Error
Meaning
Status and error codes for the inverter.
The codes shown are dependent on
the manufacturer and must be looked
up in the manual for the respective
inverter. Status messages that are the
same are collated.
Yield
kWh
The yield for the period of time shown
(day, month, year, total)
Yield, specific
kWh/kWp
The output divided by the plant size.
This value is a good reference value
with respect to other plants.
Maximum value
W
The maximum output value within the
period of time shown.
Target
kWh
The device runs a forecasting statistics
function that specifies a certain target
value for each time period. If the target
value is attained or exceeded the
forecast output has been achieved.
Actual
%
The actual value shows the percentage
share for the actual yield and the target
yield.
2.3.3 Day overview
Select Overview Daily in the left navigation bar.
Solar-Log
200
User Manual
11 of 104
Operation using the web browser in your own network
The daily yields are shown in a curve chart. The red line shows the
target value for each day.
Buttons for the day overview
Yield: Yield line via which the yield trend can take place. In addition,
a red line is displayed as the total daily target.
Udc: Generator voltage. To display voltage of the individual strings
only one inverter may be selected.
kWp: Converting the scaling from "Output in watts" to "Output in
kWh/kWp". This makes all of the curves comparable in terms of their
specific output. This also makes it easier to identify decreased
outputs from specific inverters/strings.
°C / °F : Display showing the inverter's internal temperature. This
allows you to check that the fans are functioning correctly. Please
note that inverters are designed to have high internal
temperatures.
The temperature display is shown only for inverters that provide the
corresponding measured value.
12 of 104
Solar-Log
200
User Manual
Operation using the web browser in your own network
24h: Display showing the output over 24 hours of the day for a
complete visualisation of the power consumption over the course of
one day.
Additional functions using S0 meter reader
The following displays are also available to you by connecting an S0
meter to the Solar-Log™:
S0: Shows the power consumption for your building as a graph, in
watts.
Cons.: Shows the power consumption for your building as a rising
line, in kWh.
Values: Shows various values for your inverter in text form.
Balance: Shows you the ratio of your power consumption to your
power yield. In the lower left text field the ratio is also shown as a
percentage.
Additional functions with the sensor box
Solar: Shows the reference value of an irridation sensor. The daily
output of the plant must be within the measuring range of the sensor.
Mod T: Shows the module temperature. The temperature is detected
by the sensor box.
2.3.4 Month overview
Select Overview Monthly in the left navigation bar.
Solar-Log
200
User Manual
13 of 104
Operation using the web browser in your own network
The daily yields for one month are shown as a total in a bar graph. The
red line shows the target yield for each month.
1 Move the mouse over a day bar.
The corresponding day's yield is shown.
2 Click on an individual bar to switch to the corresponding day
overview.
2.3.5 Year overview
Select Overview Yearly in the left navigation bar.
14 of 104
Solar-Log
200
User Manual
Operation using the web browser in your own network
The individual monthly yields are shown as a total in a bar graph. The
red line shows the target yield for each month.
The "Forecast" value is calculated using the yields already achieved for
the year and is then projected using the target yields for the remaining
months of the year.
1 Move the mouse over a month bar.
The corresponding month's yield is shown.
2 Click on an individual bar to switch to the corresponding month
overview.
2.3.6 Total overview
Select Overview Total in the left navigation bar.
Solar-Log
200
User Manual
15 of 104
Operation using the web browser in your own network
The individual annual yields are shown as a total in a bar graph. The red
line shows the total target yield. For the current year two red lines are
shown:
The top line shows the annual target.
The bottom line shows the annual target accumulated to the present
day.
1 Move the mouse over a year bar.
The corresponding year's yield is shown.
2 Click on an individual bar to switch to the corresponding year
overview.
3 Click on Line overview, years to display a line view for the total
yield.
16 of 104
Solar-Log
200
User Manual
Operation using the web browser in your own network
4 Click on Chart overview, years to display a bar view for the total
yield.
2.4 Calling up yield data on a mobile computer
You can also call up the current yield data for your plant via mobile
computer (e.g. smart phone). To do this your smart phone logs onto the
internet or your local server and calls up your data.
Note
This function is only available in the local network or for plants
which run on our "Classic 1 Server".
Please note that additional costs for the internet connection
may be charged by your mobile service provider.
Solar-Log
200
User Manual
17 of 104
Operation using the web browser in your own network
1 Start the web browser on the mobile computer and enter "solar-log"
TM
or the IP address for the Solar-Log in the address line of the
browser or select the bookmark in the browser's navigation bar.
The homepage is displayed.
2 Select PDA/Pocket PC in the left navigation bar.
2.4.1 Day
Select Day in the left navigation bar.
The updated yield data for the day is shown.
2.4.2 Month
Select Month in the left navigation bar.
18 of 104
Solar-Log
200
User Manual
Operation using the web browser in your own network
The yield data for the current month is shown.
2.4.3 Year
Select Year in the left navigation bar.
The yield data for the previous year is shown.
Solar-Log
200
User Manual
19 of 104
Operation using the web browser in your own network
2.5 Calling up the diagnosis function
With the diagnosis function you are accessing the device's event log.
You can display a total overview of all of the errors, malfunctions and
status changes that have occurred for the connected inverters. You can
also filter them according to your desired criteria.
Moreover, the diagnosis menu also shows you the decrease in output
("degradation") of your plant.
1 Start the web browser and enter "solar-log" in the address line of the
browser or select the bookmark in the browser's navigation bar.
The homepage is displayed.
2 Select Diagnosis in the main navigation menu.
The event log is shown.
20 of 104
Solar-Log
200
User Manual
Operation using the web browser in your own network
2.5.1 Calling up and filtering the event log
Select Even log in the left navigation bar.
The complete list of all system events is shown.
Solar-Log
200
User Manual
21 of 104
Operation using the web browser in your own network
To display only certain events or events that occurred on a certain day
in the previous 35 days, use the filter function.
1 Select the desired inverter in the All inverters drop-down menu.
Only the events for the selected inverter are shown.
2 Narrow down the selection by selecting the desired day in the All
days drop-down menu.
Only the events for the selected day are shown.
3 Narrow down the selection further by selecting the desired status in
the All statuses drop-down menu.
The only statuses available are those which occurred within the
selected period of time.
22 of 104
Solar-Log
200
User Manual
Operation using the web browser in your own network
4 Narrow down the type of error by selecting the desired error in the
All errors drop-down menu.
Only those errors are shown which occurred within the selected
period of time.
5 Click on Reset selection to cancel all of the filter settings.
2.5.2 Displaying the decrease in output for your plant
To obtain an overview of the total output for the previous years and the
current performance, the device offers a tabular view.
1 Start the web browser and enter "solar-log" in the address line of the
browser or select the bookmark in the browser's navigation bar.
The homepage is displayed.
2 Select Diagnosis in the main navigation menu.
3 Select Degradation in the left navigation bar.
Your plant's decrease in performance is shown.
Solar-Log
200
User Manual
23 of 104
Operation using the web browser in your own network
The performance of your modules decreases gradually over the years.
Depending on the quality of the modules, this leads to a continuous
reduction in the total yield of your plant, so-called "degradation".
To this end the "average maximum day value" is calculated for each
year. It is calculated from the actual maximum values and a statistical
adjustment to filter out extreme peaks. The comparison of these
calculated maximum values allows conclusions to be drawn regarding
the performance on the plant.
24 of 104
Solar-Log
200
User Manual
Operation using the web browser in your own network
2.5.3 Pac Correction Factor
At photovoltaic plants, several measuring points and power generators
(inverters) are combined with one another. The Solar-Log™ evaluates
this data and partially looks for any correlations.
Since some of the components are not calibrated, deviations in the values measured can easily arise.
For example, if the total amount of energy produced based on what the
inverters display is compared with the values from calibrated power meters, deviations of up to 8% can arise.
In practice, meters and inverters both can display too much or too little
kWh.
To correct these inaccuracies in the medium term, the Solar-Log™
firmware uses a PAC correction factor.
Note
A calibrated power meter has a tolerance of +/- 1 % and
an inverter has a tolerance of +/- 8 %.
From experience, if the the deviations are greater than 810%, there is a problem somewhere else and the measuring devices are not the source of this deviation.
2.5.4 Calculating the PAC correction factor
All of the yield data is saved internally without the correction factor. The
correction factor is only applied to the data output. The factor can therefore be adjusted at any time.
The formula for calculating the correction factor is as follows:
Solar-Log
200
User Manual
25 of 104
Operation using the web browser in your own network
If the inverter does not have a display, it is advisable to use the values
which are recorded by the Solar-Log™ from a period over a week.
That is why it is recommended to leave the default PAC correction factor
at 1000 initially.
The correction factor can be adjusted yearly after receiving the statement from the utility company.
2.5.5 Example calculation
Inverter 1
Inverter 2
Calibrated power meter
Total energy
Total energy
Total energy
259.12 kWh
305.22 kWh
550.55 kWh
564.34 kWh
Deviation= 13.79 kWh
By comparing the values, you see that the inverters are more likely to
display too much.
Pac Correction Factor
Calibrated power meter total energy
Inverter total energy
550. 55 kWh
564.34 kWh
Calculated PAC correction factor in the example:
Rounded PAC correction factor = 976
26 of 104
Solar-Log
200
User Manual
Operation using the web browser in your own network
2.6 Changing settings in the configuration menu
The configuration menu allows you to make changes and adjustments
to the device software. The device should have been put into service
and fully configured by your solar technician. However, you may like to
make changes at a later date, such as changing your password or the
network settings (because you want to use a new router, for example),
etc.
To make changes to the configuration please contact your solar
technician.
If you would like to make changes yourself, obtain the installation
manual that is available for download from our internet site (page
98).
Solar-Log
200
User Manual
27 of 104
Using Solar-Log WEB
3
Using Solar-Log WEB
TM
You can also use Solar-Log WEB to call up the yield data and event
logs for your plant via the internet, as well as set up a daily email
containing the yield and fault reports to be sent out to an email address.
TM
To do this you need a Solar-Log WEB account.
In addition to this option we also offer further levels of expansion with a
corresponding range of service to fulfil every requirement. For further
information, contact your solar technician directly or visit the following
address
http://www.solar-log.com/en/products-solutions/solar-log-web.html
3.1 Register with Solar-Log™ WEB "Classic 2nd Edition"
Registration for the Solar-Log™ WEB "Classic 2nd Edition" takes place
quickly and simply online.
Information
It is important to note that the following addresses are for the
nd
German “Classic 2 Edition”. To determine which address to
visit for your country ask your installer or visit
http://www.solar-log.com/?L=1 for more information
I ADDED THE ABOVE AS I THOUGHT IT WAS NECESSARY TO
MENTION. DELETE THIS COMMENT BEFORE PRINT
1 Open the browser and navigate to the Solar-Log™ WEB registration
page under
http://www.solar-log.com/classic2/
28 of 104
Solar-Log
200
User Manual
Using Solar-Log WEB
2 Select Registration in the left navigation bar.
The registration form is shown.
3 Enter the Serial number of your device.
The serial number (SN) can be found under the top cover
(page 97).
4 Select whether you would like the data to be Publicly visible to the
internet.
Your plant information is then able to be viewed by other visitors
to the site. If you select "No", you must log in using the user data
that you receive from Solare Datensysteme GmbH in the course
of the registration process (page 31).
Solar-Log
200
User Manual
29 of 104
Using Solar-Log WEB
The "publicly visible" setting can be changed at any time
afterwards on your website in the "Configuration" area.
5 Enter your Location data and your Contact information.
6 Confirm acceptance of the General Terms and Conditions (AGB)
and the Privacy Policy after you have read them.
7 Enter the Code word shown in the chart in order to ensure that no
automated programs (Bots) are performing the registration which
could then paralyze the server.
8 Confirm your entries by pressing Register now.
If you have not entered a code word or have entered the code
word incorrectly, a new code word is automatically displayed and
you do not need to re-enter your data.
On successful completion of your registration you will receive an email
sent to your designated email address which you must confirm. After
your data has been manually checked your access will be granted.
Note
The activation takes place during normal business hours and
can take up to 24 hours.
30 of 104
Solar-Log
200
User Manual
Using Solar-Log WEB
3.2 Calling up plant data
TM
In the browser, open the homepage for Solar-Log
the URL in the address line of the browser:
WEB or enter
http://home.solarlog-web.eu/
The homepage is displayed.
Logging in to Solar-Log
TM
WEB
If you have refused "visibility to all" when registering, you must log in to
TM
the Solar-Log WEB internet site. If your plant is visible to all, you can
skip the log in.
Solar-Log
200
User Manual
31 of 104
Using Solar-Log WEB
In the header enter your User and Password information and click
on Log On.
Calling up the plant overview
All of the plants are shown in the overview. The plants are anonymous.
You can directly display the plants that are visible to all under the day
chart.
Plant data that has been given a password can only be called up by
registering.
Select Plants on the left navigation menu
1 Select the Zip Code of your location, Inverter manufacturer, Final
Date of installation or the manufacturer of the Modules in your plant.
32 of 104
Solar-Log
200
User Manual
Using Solar-Log WEB
2 Click on Select to filter the list according to the criteria selected or
click on Reset selection to cancel the selection criteria.
A list of plants is shown that correspond with the filter criteria.
The overview shows the installed inverters, their output, module
manufacturer, year of manufacture, orientation and the roof slope of the
plants. If no picture of the plant has been made visible to all, a standard
image is shown.
In addition, in the right column you can find an overview of the plants'
current yield.
3 Click on to plant view below the yield diagram.
The detailed overview of the plant is shown.
Solar-Log
200
User Manual
33 of 104
Using Solar-Log WEB
The detailed overview shows additional technical details about the plant
as well as the plant status including any error messages that have
occurred.
4 To navigate directly to the plant details, place a bookmark in your
browser.
34 of 104
Solar-Log
200
User Manual
Using Solar-Log WEB
3.3 Calling up yield data
3.3.1 How to navigate within the overviews
The navigation on the internet site for the overviews is similar to the
navigation on the overview pages in your local network (page 9).
Switching between the overviews
1 Move the cursor onto the small triangle on the left next to the display
for the period of time.
An overview of the time periods is shown.
2 Click on the desired time period.
The overview of the time period is shown.
3.3.2 What the values in the overviews mean
The values provided below the diagrams are similar to the values on the
overview pages in your local network (page 10).
Any information regarding revenue is not shown on the internet site for
reasons related to privacy.
3.3.3 Day overview
1 Open the browser and click on the bookmark for your plant.
You may have to log in (page 31).
Solar-Log
200
User Manual
35 of 104
Using Solar-Log WEB
The detailed overview of your plant is shown.
2 Select Graphics in the left navigation bar.
The day overview of the plant is shown.
The daily yields are shown in a curve chart. The dark green line shows
the target value for the day.
Move the cursor over the curves to display the corresponding values.
Buttons for the day overview
Yield: Yield line via which the yield trend can take place. In addition,
a dark green line is displayed as the total daily target.
36 of 104
Solar-Log
200
User Manual
Using Solar-Log WEB
Udc: Generator voltage. To display voltage of the individual strings
only one inverter may be selected.
kWp: Converting the scaling from "Output in watts" to "Output in
kWh/kWp". This makes all of the curves comparable in terms of their
specific output. This also makes it easier to identify decreased
outputs from specific inverters/strings.
24h: Display showing the output over 24 hours of the day for a
complete visualisation of the power consumption over the course of
one day
Additional functions using S0 meter reader
The following displays are also available to you by connecting an S0
meter reader to the Solar-Log™:
S0: Shows the power consumption for your building as a graph in
watts.
Cons.: Shows the power consumption for your building as a rising
line in kWh.
Values: Shows various values for your inverter in text form.
Balance: Shows you the ratio of your power consumption to your
power yield. In the lower left text field the ratio is also shown as a
percentage.
Additional functions with the sensor box
Solar: Shows the reference value of an irridation sensor. The daily
output of the plant must be within the measuring range of the sensor.
Mod T: Shows the module temperature. The temperature is detected
by the sensor box.
3 Click on one of the buttons and then on the magnifying glass symbol.
The selected curve is shown.
3.3.4 Month overview
Select Overview Monthly in the navigation menu.
Solar-Log
200
User Manual
37 of 104
Using Solar-Log WEB
The daily yields for one month are shown as a total in a bar graph. The
dark green line shows the target value for the month.
1 Move the mouse over a day bar.
The corresponding day's yield is shown.
2 Click on an individual bar to switch to the corresponding day
overview.
3.3.5 Year overview
Select Overview Yearly in the navigation menu.
38 of 104
Solar-Log
200
User Manual
Using Solar-Log WEB
The individual monthly yields are shown as a total in a bar graph. The
dark green line shows the target value for the month.
The "Forecast" value is calculated using the yields already achieved for
the year and is then projected using the target yields for the remaining
months of the year.
1 Move the mouse over a month bar.
The corresponding month's yield is shown.
2 Click on an individual bar to switch to the corresponding month
overview.
Solar-Log
200
User Manual
39 of 104
Using Solar-Log WEB
3.3.6 Overview of all years
Select Overview all years in the navigation bar.
The individual annual yields are shown as a total in a bar graph. The
dark green line shows the target value for the year. For the current year
two green lines are shown:
The top line shows the annual target.
The bottom line shows the annual target accumulated to the present
day.
3 Move the mouse over a year bar.
40 of 104
Solar-Log
200
User Manual
Using Solar-Log WEB
The corresponding year's yield is shown.
4 Click on an individual bar to switch to the corresponding year
overview.
5 Click on Line overview, years to display a line view for the total
yield.
3.3.7 Calling up and filtering the event log
Select Events in the left navigation bar.
The complete list of all system events is shown.
To display only certain events or events that occurred on a certain day
in the previous 35 days, use the filter function.
1 Select the desired inverter in the All inverters drop-down menu.
Only the events for the selected inverter are shown.
2 Narrow down the selection by selecting the desired day in the All
days drop-down menu.
Only the events for the selected day are shown.
Solar-Log
200
User Manual
41 of 104
Using Solar-Log WEB
3 Narrow down the selection further by selecting the desired status in
the All status drop-down menu.
Only those statuses are available which occurred within the
selected period of time.
4 Narrow down the type of error by selecting the desired error in the
All errors drop-down menu.
Only those errors are shown which occurred within the selected
period of time.
5 Click on Reset selection to cancel all of the filter settings.
42 of 104
Solar-Log
200
User Manual
E-mail Notification
4
E-mail Notification
4.1 Yield E-mail
The Solar-Log™ comes with an e-mail program that can send a daily
overview of the day's performance to two different e-mail addresses
(maximum of 57 characters, separated with a semicolon).
Open the dialog box
Select e-mail from the Configuration // Advance menu.
The following dialog box appears on the right.
Solar-Log
200
User Manual
43 of 104
E-mail Notification
The basic e-mail settings as well as the E-mail Notification are
configured here. (See the chapter Configuring E-mail Notifications
in the Installation Manual(Advanced/E-mail))
44 of 104
Solar-Log
200
User Manual
E-mail Notification
Sent Yield E-mail
Screenshot of a yield message
Solar-Log
200
User Manual
45 of 104
E-mail Notification
Explanation of the message:
Subject: The Solar-Log serial number and time and date
Day
Field
Explanation Text
Sum
The actual amount of energy fed into the grid for the day
in kWh.
Specific
Yield specific. The energy yield divided by the amount of
generator power installed. (Values are normalized to 1
kWp.)
Max.
The maximum power in Kw
Target Yield
The yield in kWh which can be achieved according to the
forecast.
Actual Yield
Percentage of days on which the target was achieved.
The daily yield achieved in percent. The total to target
ratio.
Month
Field
46 of 104
Explanation Text
Sum
The actual amount of energy fed into the grid for the
month in kWh.
Specific
Yield specific. The energy yield divided by the amount of
generator power installed. . (Values are normalized to 1
Solar-Log
200
User Manual
E-mail Notification
Field
Explanation Text
kWp.)
Max.
Displays the maximum daily production for this month in
kWh.
Medium
The average daily production which was achieved for
this month.
Target Yield
The yield in kWh which had been achieved up to the
current day according to the forecast.
Actual Yield
Percentage of the monthly target that has already been
achieved up to the current day.
The month target already achieved as a percentage. The
total to target ratio.
Year
Field
Explanation Text
Sum
The actual amount of energy fed into the grid for the
year. In kWh
Specific
Yield specific. The energy yield divided by the amount of
generator power installed. (Values are normalized to 1
kWp.)
4.2 Performance Monitoring
To monitor different sized inverters, the Solar-Log™ scales down**** the
value from every inverter to 1 kWp. The Solar-Log™ uses the amount of
generator power set in Configuration // Basic // Inverter.
Solar-Log
200
User Manual
47 of 104
E-mail Notification
The generator power is equivalent to 100% and the value here is normalized to 1 kWp)
Example plant:
Inverter 1, Inverter 1 house
Inverter 2, Inverter 2 house
Generator Power:
25* 220W (Modules) = 5500 Wp
Generator Power:
15* 220W (Modules) = 3300 Wp
Module Field 1
Module Field 1
The Solar-Log™ compares all of the inverters that are located in the
same module field.
Performance Monitoring Configuration under Configuration // Basic // Inverter.
48 of 104
Solar-Log
200
User Manual
E-mail Notification
The output measured from the inverters is contrasted with the generator
capacity that is listed in the system.
The notification is sent when the deviation exceeds the amount configured (for example 15%) over set time period (for example 30 minutes).
Solar-Log
200
User Manual
49 of 104
E-mail Notification
Performance Monitoring Notification
Example Notification:
The notification contains the following information:
Module field: The module field which was affected or at least the module field in which a deviation was detected.
Inverter with a deviation: "Inverter 1"
IRV:*** The reference value that is used to contrast inverters. It comes
from the most effective operating inverter, the value is in W.
IAV***: The amount of output from inverter with a deviation.
Dev: The amount of deviation as a percentage of the reference value.
50 of 104
Solar-Log
200
User Manual
E-mail Notification
Inverter 1 Inverter 1 house
Inverter 2 Inverter 2
house
Generator Power:=
5500 Wp
3300 Wp
Current production
= 3950 W
= 2950 W
Current efficiency
= 71.81 %
= 89.39 %
Inverter with a difference
Reference Inverter
Inverter has generated the most power with its value of 0.8939 and is
thus used as the reference inverter.
Calculation and Explanation of the Notification
In regard to the reference inverter, inverter 1 is compared to all of the
inverters in the same module field (in the example only output is used).
A deviation of 19.65 is determined based on the comparison of the gen-
Solar-Log
200
User Manual
51 of 104
E-mail Notification
erator capacity and IRV forecast.
Calculating the Deviation for Inverter 1
Deviation Calculation
Inverter 1 IRV calculation
(5500*89.39): 100= IRV 4916 W
Efficiency of Inverter 1
(3950 W: 5500 W)* 100= 71.81 %
corresponds to 71.81 % of the generator power or a value of 0.7181 kWp.
Deviation as a percentage
IRV Inverter 1 - IAV Inverter 1
4916 W – 3950 W= 966 W
Deviation as a percentage
(966 W: 4916 W)* 100= 19.65 %
Inverter 2 is used as the reference inverter since it was the most effective one at the time of the measurement. Inverter 1 should have produced an output of 4916 W based on the measurement and the calculations comparing all of the inverters in the same module field. The actual
output was 3950 W, a deviation of 19.65%. This caused a notification to
be sent.
52 of 104
Solar-Log
200
User Manual
Using the Solar-Log™ APP iPhone V3 for iPhones
5
Using the Solar-Log™ APP iPhone V3 for iPhones
We offer a Solar-Log™ App iPhone V3 for iPhones, iPads and iPod
Touches to allow you to access your plant data at any time and from
any location. The App is available for free from the Apple App Store.
The App displays current and past yield data in a graphical form. In addition, there is the possibility to display power consumption. Intuitive finger gestures (swipes) enable you to quickly navigate between different
time period views (daily, monthly, yearly and total).
Note
When starting the App for the first time, there is a brief
introduction on how to operate the App.
Requirements
Our Solar-Log™ App is compatible with every iPhone, iPod Touch and
iPad starting from iOS version 3.0.
Note
The Solar-Log™ App only runs with the server solution SolarLog™ Web Classic 2 and the WEB Commercial Edition from
Solare Datensysteme GmbH.
The Solar-Log™ Web Classic 1* and Self-made* editions are
not supported.
*It only pretains to new plants, existing plants will continue to be
displayed.
Solar-Log
200
User Manual
53 of 104
Using the Solar-Log™ APP iPhone V3 for iPhones
5.1 Installing the App
The App is available for free from the Apple App Store.
Loading the App
6 Search for "Solar-Log" in the Apple App Store.
7 Follow the directions to download and install the App on your mobile
iOS device.
Start the App
8 Start the App on your iOS device.
The start screen is displaed with the saved plant.
54 of 104
Solar-Log
200
User Manual
Using the Solar-Log™ APP iPhone V3 for iPhones
5.2 Add plants
You can monitor as many plants with the App as are connected with a
Solar-Log™.
9 Touch the + symbol.
The screen New Plant is then displayed.
Solar-Log
200
User Manual
55 of 104
Using the Solar-Log™ APP iPhone V3 for iPhones
10 Enter the URL, Serial Number and Password from the registration
email that you received from Solare Datensysteme GmbH.
11 Save the added plant.
12 The plant now appears with a name and URL in the plant menu.
5.3 Retrieving Yield Data
After your plant has been correctly recognized, the yield data is displayed in the plant overview.
Note
The data is only updated when your iOS device is connected to
the internet.
56 of 104
Solar-Log
200
User Manual
Using the Solar-Log™ APP iPhone V3 for iPhones
5.3.1 How to navigate between different time periods
13 Start the App
14 Touch the blue arrow next to the name of your plant.
The current Daily Overview is displayed with the yield values, percentage (based on the forecast) and consumption (only if a meter is connected and activated, see the chapter Retrieving Plant Data).
15 By touching the screen, a menu appears on the top and bottom the
screen from which you can select the desired view.
Solar-Log
200
User Manual
57 of 104
Using the Solar-Log™ APP iPhone V3 for iPhones
5.4 The top menu bar
The following items can be selected from the top menu bar:
Back
Today
Legend****
Slide show
Touch Back to go back to the plant settings page.
58 of 104
Solar-Log
200
User Manual
Using the Solar-Log™ APP iPhone V3 for iPhones
The following settings can be configured:
Update intervals
Plant update intervals from 5 to 60 minutes.
CO2
The CO2 factor can be adjusted from 0.0 to 1.0 (see the chapter
Viewing CO2 Savings).
Slide Show (see the chapter The Yield Data as a Slide Show).
Sound (see the chapter The Yield Data as a Slide Show).
Clear cache.
Delete all of the App's cached data. It is necessary to restart the
App.
Touch Today from any view to go to the current Daily values.
Touch Legend*** to hide and unhide these values.
Solar-Log
200
User Manual
59 of 104
Using the Solar-Log™ APP iPhone V3 for iPhones
Touch Slide Show to start this with the previously adjusted settings. (see
the chapter The Yield Data as a Slide Show)
5.5 The bottom menu bar
The following items can be selected from the top menu bar:
Day
Month
Year
Total
CO2
Plant
5.5.1 Day
16 Touch the screen.
The bottom menu bar is displayed.
17 Select Day to go the Daily Values.
60 of 104
Solar-Log
200
User Manual
Using the Solar-Log™ APP iPhone V3 for iPhones
The daily yields are displayed as a graphical curve.
18 Rotate iOS device horizontally for a better view.
19 Swipe to the left go to the next view or to the right to go back to the
previous view.
20 Swipe up or down to change the module views.
5.5.2 Monthly Overview
21 Touch the screen.
The bottom menu bar is displayed.
22 Select Month to go the monthly values.
Solar-Log
200
User Manual
61 of 104
Using the Solar-Log™ APP iPhone V3 for iPhones
The daily yields of the selected month are displayed as a bar graph. The
dotted line in the view displays the plant's calculated target value based
on the annual forecast.
23 Swipe to the left go to the next view or to the right to go back to the
previous view.
24 Swipe up or down to change the module views.
5.5.3 Annual Overview
25 Touch the screen.
The bottom menu bar is displayed.
26 Select Year to go the yearly values.
62 of 104
Solar-Log
200
User Manual
Using the Solar-Log™ APP iPhone V3 for iPhones
The monthly yields of the selected year are displayed as a bar graph.
The dotted line in the view displays the plant's calculated target value
based on the annual forecast.
27 Swipe to the left go to the next view or to the right to go back to the
previous view.
28 Swipe up or down to change the module views.
5.5.4 Total Overview
29 Touch the screen.
The bottom menu bar is displayed.
30 Select Total to go the total view.
Solar-Log
200
User Manual
63 of 104
Using the Solar-Log™ APP iPhone V3 for iPhones
The annual yields of the total view are displayed as a bar graph. The
dotted line in the view displays the plant's calculated target value based
on the annual forecast.
31 Swipe up or down to change the module views.
5.6 Viewing CO2 Savings
32 Touch the screen.
The bottom menu bar is displayed.
33 Select CO2.
The total accumulated amount of carbon dioxide emissions that
have been prevented by your plant is displayed.
64 of 104
Solar-Log
200
User Manual
Using the Solar-Log™ APP iPhone V3 for iPhones
The CO2 savings depends on how much CO2 emissions are produced to generate 1 kWh of power. (g/kWh)
5.7 Retrieving Plant Data
34 Touch the screen.
The bottom menu bar is displayed.
35 Select Plant to go to the page with the plant details.
The page displays the following plant data:
Solar-Log
200
Plant Name
Location
Module
Inverter
Plant size
Installation Date
User Manual
65 of 104
Using the Solar-Log™ APP iPhone V3 for iPhones
66 of 104
Orientation of the plant and pitch of the modules
Number of Modules
Consumption
Inverter Label
Connected Senors
Solar-Log
200
User Manual
Using the Solar-Log™ APP iPhone V3 for iPhones
In addition, you can also adjust the following settings from these menu
items:
Images.
Select plant image.
Select background image.
Consumption (can only be activated if a meter is connected).
Activate display power consumption (has to be manually activated)
Activate calculate energy balance (has to be manually activated)
5.8 The Yield Data as a Slide Show
With the slide show function, you can turn your iOS device into an "electronic picture frame". The "picture frame" alternates in displaying the
various modules of the Solar-Log™ App.
Solar-Log
200
User Manual
67 of 104
Using the Solar-Log™ APP iPhone V3 for iPhones
The Slide Show function can be configured in the settings menu.
In addition to the activating the the Slide Show function, the options can
be configured:
Enable after - adjustable from 1 to 10 minutes.
Time settings for when the Slide Show starts
Change every – adjustable from 5 to 60 seconds.
Interval in which the images switch.
Background image.
Adjust which background image is set for the Slide Show.
Sound.
Here the standard sound can be enabled. By default, this function
is deactivated.
Cache
68 of 104
Solar-Log
200
User Manual
Using the Solar-Log™ APP iPhone V3 for iPhones
Delete all of the App's cached data. It is necessary to restart the
App.
5.8.1 Start the Slide Show
36 Tap the screen. The menu bar is displayed.
37 Select Slideshow from the top menu bar.
Now you can always see the current values.
Solar-Log
200
User Manual
69 of 104
Using the Solar-Log™ Android App
6
Using the Solar-Log™ Android App
We offer a Solar-Log™ App for Android tablet PCs and smartphones to
allow you to access your plant data at any time and from any location.
The App is available for free from the Google Play store.
The App displays current and past yield data in a graphical form.
Note
The screen shots and instructions refer to using the SolarLog™ App with Android tablets. The operating instructions for
smartphones may differ. The differences are explained in detail
in Chapter 1.9 Using the Android App with a smartphone.
Requirements
Our Solar-Log™ App is compatible with every Android tablet PC and
smartphone starting from OS version 2.3 Gingerbread (4.0 Ice Cream
Sandwich is recommended).
The Solar-Log™ App runs with the server solution from C2 and the
WEB Commercial Edition from Solare Datensysteme GmbH.
6.1 Installing the App
The App is available for free from the Play store.
Loading the App
1 Search for "Solar-Log" in the Play store.
2 Follow the directions to download and install the App on
your smartphone.
70 of 104
Solar-Log
200
User Manual
Using the Solar-Log™ Android App
Start the App
3 Start the App on your smartphone.
The start screen is displayed.
6.2 Add plants
You can monitor as many plants with the App as are connected with a
Solar-Log™.
Solar-Log
200
1 Touch the
symbol in the toolbar.
2 Touch the
symbol.
User Manual
71 of 104
Using the Solar-Log™ Android App
The screen Solar-Log™ App Access Data is then
displayed.
3 Enter the URL, Serial Number and Password from the registration email that you received from Solare Datensysteme
GmbH.
4 After that tap on the button Load.
5 After that the Plant Name appears. Check that everything is
correct and then touch Ok.
6 The plant's current daily values will then be loaded. This can
take a moment.
72 of 104
Solar-Log
200
User Manual
Using the Solar-Log™ Android App
6.3 Plant Settings
By selecting add Plants
displayed.
1 Tap on
2 Tap on the
, you can adjust the Settings for the view
to go the Plant.
symbol to get to the following settings:
S0 meter
Management
6.3.1 S0 meter
By selecting S0 meter, you have the option to adjust the settings for the
view displayed.
1 Tap on the
symbol to get to the settings.
2 Tap on the S0 meter.
Solar-Log
200
User Manual
73 of 104
Using the Solar-Log™ Android App
3 The S0 meter's view settings has the following options:
Display power consumption
Calculate energy balance
6.3.2 Management
Be selecting Management, you can update the plant configuration, reset yield data or also delete the plant.
1 Tap on the
symbol to get to the settings.
2 Tap on Management.
74 of 104
Solar-Log
200
User Manual
Using the Solar-Log™ Android App
3 In the Management section, the following options are available:
Update plant configuration. Reload the plant
configuration from the portal.
Reset the yield data. The yield data will be deleted and reloaded from the portal. Reboot required.
Delete plant. This plant can be completely deleted
here.
6.4 The Toolbar
Solar-Log
200
User Manual
75 of 104
Using the Solar-Log™ Android App
You can select the desired menu from the toolbar at the top right corner.
Use the
symbol to add a plant. (See section 1.2 )
By selecting the
section 1.3 )
Day
Month
Year
Total
CO2
Tap on the
symbol to start the slide show. (See section 1.8 )
By selecting the
tion 1.7 )
76 of 104
symbol, you can display various yield values. (See
symbol, you can perform various actions. (See sec-
Update
Today
Settings
End
Solar-Log
200
User Manual
Using the Solar-Log™ Android App
6.5 Retrieving Yield Values
After your plant has been correctly recognized, the yield values are displayed with the current daily values in the overview.
Note
The data is only updated when your mobile device is connected
to the internet.
By selecting the
Solar-Log
200
User Manual
symbol, you can display various yield values.
77 of 104
Using the Solar-Log™ Android App
Day
Month
Year
Total
CO2
6.5.1 Daily Overview
1 Tap on the
symbol in the toolbar at the top right corner of
the screen.
The navigation screen then appears.
78 of 104
2
Select Day to go the daily overview.
3
Swipe to the left go to the next view or to the right to go
back to the previous view.
Solar-Log
200
User Manual
Using the Solar-Log™ Android App
4 Swipe up or down to change the module views.
6.5.2 Monthly Overview
1 Tap on the
symbol in the toolbar at the top right corner of
the screen.
The navigation screen then appears.
2 Select Month to go the monthly overview.
The daily yields of the selected month are displayed as a bar graph.
3 Swipe to the left go to the next view or to the right to go back
to the previous view.
Solar-Log
200
User Manual
79 of 104
Using the Solar-Log™ Android App
4 Swipe up or down to change the module views.
6.5.3 Annual Overview
1 Tap on the
symbol in the toolbar at the top right corner of
the screen.
The navigation screen then appears.
2 Select Year to go to the annual overview.
The monthly yields of the selected year are displayed as a bar graph.
3 Swipe to the left go to the next view or to the right to go back
to the previous view.
4 Swipe up or down to change the module views.
80 of 104
Solar-Log
200
User Manual
Using the Solar-Log™ Android App
6.5.4 Total Overview
1 Tap on the
screen.
symbol in the toolbar at the top right corner of the
The navigation screen then appears.
2 Select Total to go the total overview.
3
Swipe up or down to change the module views.
6.6 Viewing CO2 Savings
Solar-Log
200
User Manual
81 of 104
Using the Solar-Log™ Android App
1 Tap on the
screen.
symbol in the toolbar at the top right corner of the
The navigation screen then appears.
2 Select CO2.
The total accumulated amount of carbon dioxide
emissions that have been prevented by your plant
is displayed.
The savings shown is calculated using the quantity of carbon dioxide
that would have been created in order to generate the same amount of
energy using fossil fuels.
6.7 App Settings
Tap on the
82 of 104
symbol in the toolbar at the top right corner of the screen.
Solar-Log
200
User Manual
Using the Solar-Log™ Android App
The navigation screen then appears.
Update
Today
Settings
End
Select Update to update the plant's data.
Select Today to leave the yield data and to switch
to the current daily overview.
Select End to quit the application.
By selecting Settings from the menu, the following categories are available:
Overall
Solar-Log
200
User Manual
83 of 104
Using the Solar-Log™ Android App
Slide show
Legal Disclaimer
6.7.1 Periodical data update
1 Under General, tap on Periodical data update
The following setting options will become visible.
84 of 104
Solar-Log
200
User Manual
Using the Solar-Log™ Android App
2 Tap on the update interval to automatically update the data.
The window automatically closes after the selection.
6.7.2 Reset
With the Reset function, you can delete all of the plants and cached data.
After tapping on Reset, you will receive the following message:
Click on Ok to confirm the selection and to delete
the plants and cached data. (The application automatically closes and has to be restarted.)
By clicking on Cancel, you return to the main
menu.
Solar-Log
200
User Manual
85 of 104
Using the Solar-Log™ Android App
6.7.3 Slide show
In the Slide Show menu, you have the option to adjust the display duration settings and to select a background image.
By selecting Slide Show, the following settings are available:
Display duration. You can determine after how
many seconds the image should switch.
Background image. You can select the background image that is to be displayed when the respective value is activated.
86 of 104
Solar-Log
200
User Manual
Using the Solar-Log™ Android App
6.7.4 Legal Disclaimer
By selecting Legal Disclaimer, you can see the App's version and who
is legally responsible.
Solar-Log
200
User Manual
87 of 104
Using the Solar-Log™ Android App
6.8 The Yield Data as a Slide Show
With the slide show function, you can turn your tablet PC or smartphone
into an "electronic picture frame". The "picture frame" alternates in displaying the various modules of the Solar-Log™ App.
Note
Proper cradles to mount the device are available at specialist
shops.
1 Tap the screen.
The slide show function appears in the top right
edge of the screen by touching the
symbol.
88 of 104
Solar-Log
200
User Manual
Using the Solar-Log™ Android App
2 Tap on
and place your tablet PC or smartphone into a
cradle.
Now you can always see the current values.
6.9 Using the Android App with a Smartphone
When using the Android App with a smartphone, some menus differ
from those with a tablet PC.
In contrast to the tablet PC, there are minor differences between the
vertical and horizontal format.
The configuration possibilities for tablet PCs and smartphones, however, are identical.
Solar-Log
200
User Manual
89 of 104
Using the Solar-Log™ Android App
6.9.1 Smartphone vertical format
Use the
and
symbols from the toolbar in the top right corner of
the screen to add plants and adjust settings.
Similarly, use the
symbol to select the yield data.
When in the vertical format, click on the smartphone's Menu button for
the App Settings and Slide show. (See your smartphone's manual.)
90 of 104
Solar-Log
200
User Manual
Using the Solar-Log™ Android App
After pressing the Menu button, the options that are accessible with the
App settings symbol and
pear.
Slide show symbol on the tablet PC ap-
Use the Back button to return to the program.
6.9.2 Smartphone - horizontal format
Solar-Log
200
User Manual
91 of 104
Using the Solar-Log™ Android App
The only difference between the horizontal and vertical format is that
slide show can also be selected from the toolbar.
The App settings have to be accessed with the smartphone's Menu button.
Use the Back button to return to the program.
6.9.3 Solar-Log™ Widget for Smartphones
With an Android smartphone, you can display yield reports from your
plant with the Solar-Log™ Widget (Activating Widgets: see the user
manual).
The Widget allows the plant's current daily yields to be display directly
on your smartphone's home screen.
92 of 104
Solar-Log
200
User Manual
Using the Solar-Log™ Android App
Changing the view:
The view can be directly changed in the App. All you have to do is tap
on the Widget.
Adjusting the size and positioning the Widget:
Press on the Widget 1 to 2 seconds to change the size. A box with four
points pops up. Move one of the four points to define the size.
To select the Widget's position, press down on the Widget and move it
to the desired position.
Note
For Android versions less than 4.0, 2x1, 2x2 and HD can
selected for the Widget.
Only HD is available for Android versions greater than 4.0.
The HD format for the newer Android versions, however, can be
displayed in variable sizes.
Solar-Log
200
User Manual
93 of 104
Cleaning and care
7
Cleaning and care
7.1 Cleaning tips
Caution
Be sure to unplug the device prior to cleaning it!
Clean the device on the outside only with a dry, lint-free cloth.
If very dirty, the device can be cleaned with a slightly damp cloth and
a commercially available household cleaner.
Caution
When cleaning, ensure that no moisture enters the device!
7.2 Care tips
Ensure that the device is not exposed to any moisture at the location
where it is kept.
Ensure that the device is not exposed to any heat or strong sunlight
at the location where it is stored.
Please take note of the Technical Data (page 100).
94 of 104
Solar-Log
200
User Manual
Malfunctions
8
Malfunctions
8.1 Status display for the LEDs
On the front side of the device in the lower left area there are four LEDs
that show the operating status of the device.
Statu
s
1 2 E
P
Depending on the operating status, LED 1, LED 2, and LED E can flash
quickly or slowly, be permanently illuminated or not be illuminated.
The red LED P indicates the power supply.
The LED E is generally not illuminated during normal fault-free
operation. If it is illuminated or flashing, this indicates that a system
malfunction has occurred.
Normal operation
Normal operation
Solar-Log
200
LED 1
LED 2
LED E
Meaning
quickly
quickly
off
Max. 5 min.: Device starts
illuminated
slow
off
Import time via internet
off
quickly
off
Read configuration from inverter
User Manual
95 of 104
Malfunctions
Normal operation
illuminated
illuminated
off
Normal operation, inverter online
illuminated
off
off
Normal operation, inverter offline
System malfunctions
System malfunctions
LED 1
LED 2
LED E
Meaning and possible remedy
quickly
quickly
off
For 5 min. during initialization: Error!
Unplug power plug and plug in
again.
illuminated
slow
slow
Import time via internet failed:
Set time manually
Check internet access
off
slow
slow
Configuration invalid or nonreadable:
Check interface
Check cable
Perform re-start (page 98)
illuminated
Only for Fronius inverters:
No data communication!
Wait until inverters import
Check wiring
quickly
Plant has signalled a fault.
8.2 Remedying faults yourself
You can remedy faults yourself by restarting the device. A restart is
necessary if the device no longer reacts to entries in the web browser.
All of the settings made on the device remain in place, as does the
saved yield data.
To restart the device, use the reset button at the top of the device.
96 of 104
Solar-Log
200
User Manual
Malfunctions
Opening the cover
If the cover is fitted, you must first open the cover of the device.
Rese
t
Reset
Pull the cover frontwards to remove.
Solar-Log
200
User Manual
97 of 104
Malfunctions
Performing a restart
1 Press the reset button e.g. with an open paper clip.
LED 1 goes out.
3 Release the reset button.
After approx. 5 seconds LED 1 illuminates again.
After approx. 20 seconds LED 1 and LED 2 start to flash, the
device restarts with the set values.
4 Wait until normal operation has recommenced and then close the
cover.
Caution
Do not perform a restart by pulling out the power plug!
8.2.1 Obtaining information from the internet
You can also obtain support for operating the device or the settings on
our internet site under the following URL:
http://www.solar-log.com/en/service-support/technical-support.html
Here you will also find additional product information and manuals
available for download.
8.2.2 Informing a specialist technician
200
Should problems occur with the Solar-Log that are not able to be
remedied using them measures described, we recommend that you
contact your solar technician or our customer service.
The contact addresses for our customer service can be found on the
back of the envelope.
98 of 104
Solar-Log
200
User Manual
Disposal
9
Disposal
Caution
TM
Your Solar-Log contains electronic components that can
release highly toxic substances if burned or disposed of via the
domestic garbage disposal system.
TM
Be sure to dispose of the Solar-Log
electronic scrap.
Solar-Log
200
User Manual
in a recycling center as
99 of 104
Technical data
10 Technical data
Supply voltage
12V DC
Energy consumption
approx. 3 watts
Power supply
External wall power supply 12V DC
Dimensions in cm
22.5 / 28.5 / 4 (W x H x D)
Housing
Plastic housing, passively ventilated
Interfaces
Ethernet RJ45 bushing 10/100MBit
RS485/RS422 combined
S0 impulse input (in accordance with DIN43864
and DIN62056)
Reset buttons
100 of 104
Memory capacity
8 MB RAM + 2 GB SD RAM (internal only)
Protection class
IP 20 (exclusively for inside use)
Temperature range
-10°C to 50°C
Display
4 LEDs for status displays
Mounting
Wall mounted
Weight
0.55 kg
Solar-Log
200
User Manual
Glossary
Glossary
Solar-Log
200
Term
Meaning
Account
User account on a server into which the user
must log with their name and password.
App
Abbreviation for application, programme
Back-up
Data back-up A method of archiving or to
ensure against loss of data.
Browser, web browser
Programme used to display internet sites in the
worldwide web
Derating
Loss in power of an electronic component
depending on the surrounding temperature,
e.g. decrease in output delivered in order to
protect against overheating.
DHCP
Dynamic Host Control Protocol. Characteristic
setting in local networks in which the IP
addresses for the connected devices are
assigned by the router.
Firmware
Operating system for your device
Gateway
Router that serves as a "gateway" for network
access from outside, e.g. via the internet.
iOS
iOS is an operating system from Apple for
mobile devices.
IP address
Network address for the device. Each device in
the network is identified by its own number.
This number consists of four blocks of
maximum three figures. The network address
is usually assigned by the router.
Local network
Several computers or network-compatible
devices that exchange data with one another
within a closed area.
User Manual
101 of 104
Glossary
Term
Meaning
MPP
The Maximum Power Point (MPP) is the point
of maximum output. It is not constant but
depends on the irradiation intensity, the
temperature and the type of solar cells.
PDA
102 of 104
Personal Digital Assistant, a form of mobile
computer
Server
Computer in the local network or internet which
provides the available data to authorised
users.
SMS
Short Message Service. Transfer of short
messages in text form. They can be received
by numerous types of mobile phones.
Solar-Log
200
User Manual
The copyright of these instructions remains with the manufacturer. No part of
these instructions may be may be reproduced in any form or processed,
duplicated or distributed using electronic systems without the written consent
of Solare Datensysteme GmbH.
Non-compliance resulting in contradiction of the above-mentioned
specifications shall result in obligation to provide compensation for damages.
All of the brands mentioned in these instructions are the property of the
respective manufacturer and hereby recognised as such.
Solar-Log
200
User Manual
103 of 104
Solare Datensysteme GmbH
Fuhrmannstrasse 9
72351 Geislingen-Binsdorf
Germany
[email protected]
www.solar-log.com
Version June 2013 – 1.1
104 of 104
Solar-Log
200
User Manual