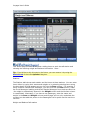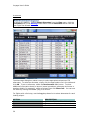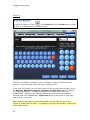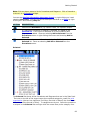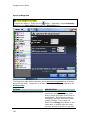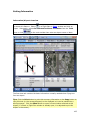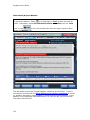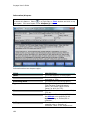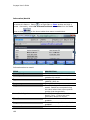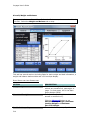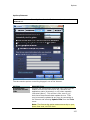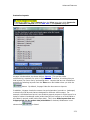
1
Voyager User's Guide
Based on Voyager version 4.0.0.30408
Last updated: May 20, 2008
i
Table Of Contents
Table Of Contents
Product and Installation .................................................................................. 1
Getting Started.............................................................................................. 5
Layouts .......................................................................................................73
Weather .................................................................................................... 113
Customizing a Chart .................................................................................... 123
Printing ..................................................................................................... 145
Getting Information..................................................................................... 165
Import/Export ............................................................................................ 193
Customizing Aircraft and Other Lists .............................................................. 211
Options ..................................................................................................... 237
Briefer Version............................................................................................ 265
Advanced Features ...................................................................................... 271
Appendix ................................................................................................... 295
Index ........................................................................................................ 305
ii
Product and Installation
Copyright and Credits
All application and data copyright © 2003-2008 Seattle Avionics, Inc. All Rights
Reserved.
No part of this publication may be reproduced, stored in a retrieval system, or
transmitted, in any form or by any means, electronic, mechanical, photocopying,
recording, or otherwise, without prior permission of Seattle Avionics, Inc.
Voyager, SmartPlan, SmartPlates and GlassView are trademarks of Seattle Avionics,
Inc.
Special thanks to all of our beta testers for their valuable assistance.
Seattle Avionics, Inc.
18706 North Creek Parkway
Suite 120
Bothell, WA 98011
Phone: +1.425.806.0249
Fax: +1.425.806.9329
This product was developed using DAFIF, a product of the National Imagery and
Mapping Agency. This product has not been endorsed or otherwise approved by the
National Imagery and Mapping Agency, or the United States Department of Defense
(10 U.S.C. 425)
a. Under 10 U.S.C. 456, no civil action may be brought against the United States on
the basis of the content of a navigational aid prepared or disseminated by either the
former Defense Mapping Agency (DMA) or the National Imagery and Mapping Agency
(NIMA).
b. The DAFIF product is provided "as is," and no warranty, express or implied,
including, but not limited to the implied warranties of merchantability and fitness for
particular purpose or arising by statute or otherwise in law or from a course of
dealing or usage in trade, is made by NIMA as to the accuracy and functioning of the
product.
c. Neither NIMA nor its personnel will be liable for any claims, losses, or damages
arising from or connected with the use of this product. The user agrees to hold
harmless the United States National Imagery and Mapping Agency. The user's sole
and exclusive remedy is to stop using the DAFIF product.
The product may also make use of data provided under license from Control Vision
Corp. (100LL.com) and/or Stenbock & Everson, Inc.
1
Voyager User's Guide
Contact Information
For general information about Seattle Avionics or our products:
Web: www.SeattleAvionics.com
Email: [email protected]
Phone: +1.425.806.0249
Fax: +1.425.806.9329
Mail:
Seattle Avionics, Inc.
18706 North Creek Parkway
Suite 120
Bothell, WA 98011
For purchase or sales information:
Email: [email protected]
For customer service:
Email: [email protected]
For technical support:
Web: www.SeattleAvionics.com/Support
Email: [email protected]
2
Product and Installation
System Requirements
Voyager requires a modern computer running Windows XP or Vista (32 or 64 bit)
with a good video card that supports Microsoft DirectX 9.0. 1 GB of RAM is required
(2 GB if running Vista). As much as 20 GB of hard disk may eventually be used if
you download all scanned charts and all approach plates. No particular CPU speed is
required as we’ve seen Voyager run well on the Samsung Q1 Ultra with an 800 MHz
low-power processor. That said, Voyager will run smoother on dual core systems
with lots of RAM and good video card. Unlike previous versions of Voyager, the
video card is central to the system’s performance for Voyager 4.0.
Minimum Computer Requirements
•
•
•
•
IBM or compatible PC. CPU speed is not critical so long as the CPU was made
in 2005 or later. Voyager takes full advantage of multi-core processors such
as a Core 2 Duo. Also, for single processors machines, a Centrino or Pentium
IV is the effective minimum. We do not recommend installing Voyager on
machines made before in 2004 or before.
Microsoft Windows Vista (32 or 64 bit) or XP.
1 GB RAM minimum required, 2 GB strongly suggested if running Vista.
A video card and driver capable of running Microsoft DirectX 9.0c. We
suggest checking with your video card manufacturer for updated video
drivers. In particular, computers using an Intel 915 video card, such as the
Motion LE 1600 and LS 800, must update their video drivers. The URL is:
http://downloadcenter.intel.com/filter_results.aspx?strTypes=all&Pr
oductID=1862&OSFullName=Windows*+XP+Professional&lang=eng
&strOSs=44&submit=Go%21
Install the latest Mobile Intel® 915GM/GMS, 910GML Express Chipset Family
Driver.
•
•
•
•
Users of other video cards should check for updated drivers by visiting
http://www.seattleavionics.com/support/VideoCards.aspx
Voyager can download any number of approach plates and scanned FAA
charts. A full US set of each could take up to 15 GB of disk space.
Voyager runs well on Intel-based Apple Macintosh computers under Boot
Camp. However, as of this writing, Voyager will not run correctly under a
virtual machine such as Parallels or VMWare.
GPS: Bluetooth, serial or USB GPS unit required for GlassView (moving map)
XM Receiver: An XM WX satellite receiver, either Bluetooth or USB, is
required for XM weather. A subscription to XM is also required.
See Troubleshooting if you're having a problem running Voyager.
3
Voyager User's Guide
Installation and Activation
FROM A CD-ROM
Insert the disk into a CD-ROM or DVD drive. Within 30 seconds, the Setup program
should start automatically. If it doesn't, browse to the disk and double-click on
SETUP.EXE. The Setup application installs Voyager and all available data. This may
include the Microsoft .NET runtime and certain Microsoft database components if not
already installed. Follow all on-screen instructions.
You will be asked for your name and email address the first time Voyager runs after
Setup. This is necessary to activate the product, even a demo version. The
activation process also sends us very basic information about your computer (CPU
type and speed, RAM and Operating System) that helps us optimize the product for
all customers and may be used to target our marketing efforts. Seattle Avionics has
a strict privacy policy, meaning, among other things, that your contact information
will not be sold, rented or otherwise made available to any third part without your
explicit consent. See http://www.seattleavionics.com/privacy.htm for more
information.
If Setup should fail for any reason, refer to Troubleshooting for more information.
FROM A DOWNLOAD
Installing from a download is essentially the same as from a CD-ROM except that
you must double-click on the downloaded application (like VoyagerSetup.exe or
VoyagerFreeFlightSetup.exe) first. This application unpacks the installation files to
temporary space on your hard and begins the main Setup as described above.
Depending on the data downloaded, these temporary files may consume up to
400MB of disk space. When Setup finishes (successfully or not), the temporary files
are deleted.
4
Getting Started
What is Voyager?
Voyager is the world's first Flight Software System. It's a framework for integrating
a fully comprehensive set of modules that cover all aspects of using software to help
you fly safer, more quickly and more enjoyably. You can purchase all the modules at
once or separately as your needs change.
As of this writing, Seattle Avionics makes modules that cover sophisticated pre-flight
planning (SmartPlan), an innovative in-flight moving map/information system
(GlassView), an easy-to-use IFR procedure management system (SmartPlates) and a
near real-time, in-cockpit weather system (XM WX Link).
Although they're separate modules, as they reside within the Voyager framework,
they seamlessly share information and look (and work) very similarly. In fact, in
many places you won't know (or care) where one module leaves off and another one
begins. For example, while flying, you'll be using the GlassView module to provide
moving map and general information but, on the same screen, SmartPlan displays
your current flight plan, SmartPlates shows an approach procedure and XM WX Link
displays real-time NexRad radar. Want to switch to a different view (called a
Layout) with different information? It's just one click away.
GETTING STARTED
The first time Voyager runs (you're probably already past this point), it asked some
basic questions about which modules you'd like to try, about you and about the
plane you fly the most. After that, it starts with a Tasks pad (What do you want to
do?) that show you the basic tasks that Voyager can help you with. Click a task type
(below) and Voyager shows specific choices associated with each. You can show the
Tasks pad in the future by selecting Tasks from the View menu.
5
Voyager User's Guide
Check the Weather: Opens a Chart window showing weather for the continental
US or zoomed to any point you like. Or see any of more than 400 weather
graphics for the US and Canada.
Plan: Create a flight plan or review an existing one. If you have SmartPlan, you
can use a very sophisticated autorouting system (we call it the SmartRouter) to
create a wind-optimized flight avoiding TFRs and other selected airspace, using
SIDs/STARs if you like. Once done, print the plan, get a full DUAT/DUATS
briefing or even file it online or send the plan to your GPS or PDA.
Fly: Using the GlassView module, Voyager uses a GPS card attached to your laptop
or tablet to show you a moving map (or two) and other in-flight information such as
airport information, wind data, nearest airports and more.
Organize Plates: For IFR pilots, the SmartPlates module makes it a snap to keep
track of which plates have changed, download the new ones, send them to your
PDA, print them side-by-side, etc.
View FAA Charts: Makes it quick work to view or print the official FAA scanned
Sectionals, IFR Low, IFR High, WAC or TAC charts.
See a list of Common Tasks.
6
Getting Started
Launching Voyager
On your Windows desktop, double-click the Voyager icon. Alternately, click the
Start button and select Voyager from the Seattle Avionics program group. The
application is also implicitly launched if you double-click a flight plan file (.fp), a
Plate Pack (.PlatePack) or a weight and balance file (.wbs).
Additionally, if you have the GlassView module, you can quickly start Voyager in
GlassView mode, bypassing all standard dialog boxes, by starting Voyager with the
/QuickFly command-line switch. The Setup program automatically creates a Voyager
QuickFly icon on the desktop.
7
Voyager User's Guide
Main Window
The main window appears after you launch Voyager (technically, before this window
appears, you'll see a message about TFRs, a note from our lawyers and, possibly, a
message about your data being out date).
Note: The first time you run Voyager, the program will begin with the First Time
Setup Wizard, asking you to select a default aircraft, enter pilot information and
provide some other preferences.
MENUS
The menus below alter somewhat depending on which layout is active. For
example, the Plan menu is only shown when there is an active flight plan while the
Procedures menu is only available when a Plate Pack is open.
MENU
File
View
Chart
Plan
Procedures
Weather
8
DESCRIPTION
Functions for creating, opening,
exporting and printing flight plans,
Plate Packs, etc.
Controls what information is displayed
within a window and which layout is
used.
Controls what is shown on a Chart.
Functions for modifying flight plans and
completing an FAA Flight Plan Form.
Functions for modifying Plate Packs.
Controls the download and display of
weather information. The same
functions are also available from the
Getting Started
button on the bottom toolbar.
Themes
Lists
Tools
Provides quick access to user-defined
color/symbol themes.
Provides access to lists of available
aircraft, pilots, passengers, etc.
Miscellaneous tools not directly related
to flight planning or organizing plates
and the general Options dialog.
Window
Help
When window is open, the Window
menu lists each open window.
Has various ways to query the on-line
Help system and, if the application is a
demo version, has purchase
information. Pressing F1, at any time,
displays context-sensitive Help.
THE MAIN TOOLBAR
ICON
DESCRIPTION
Creates a new flight plan or Plate Pack.
Opens an existing flight plan or Plate
Pack.
Saves the current flight plan and/or Plate
Pack.
Prints the current flight plan, Plate Pack
or Chart window.
Displays the Briefer Task Pad.
When a Plate Pack is active, verifies that
all the plated are downloaded and valid.
If not, the new and revised plates are
downloaded.
Synchronizes your default settings,
preferences, lists (passengers, pilots,
etc.) and flight plans with the Seattle
Avionics Web server. This makes it easy
to keep information consistent between
multiple computers.
Sends (exports) the current flight plan to
9
Voyager User's Guide
a portable GPS, PDA or specialized
application such as Microsoft Flight
Simulator, Google Earth or
ControlVision Anywhere Map. Also
sends the current Plate Pack to
SmartPlates for the Pocket PC.
Prompts for a location name then displays
information about this location. The
location can be an airport, navaid, city,
etc.
Switches to a GlassView (moving map)
layout and connects to your GPS. The
specific layout chosen varies depending
on what the current layout is. For
example, if a VFR flight plan is open in
design mode (SmartPlan), clicking this
will open a VFR/IFR layout but if a simple
Chart is the current layout, the new
layout is just a large moving map.
F5 is the keyboard shortcut.
Analyzes the current flight plan, looking
for unsafe conditions.
Displays an on-screen version of the
standard FAA Flight Plan Form, as
completed with information from the
current flight plan. Also allows direct
electronic flight plan filing.
Connects and disconnects from your XM
WX satellite receiver. When connected,
this provides near real-time weather to
the cockpit.
Reverses the current flight plan.
Runs the SmartRouter™ Routing Wizard
over the current flight plan.
Adds fuel stops to the current flight plan.
Optimizes each leg of the flight plan for
the expected winds aloft.
Sectional
Applies a Chart theme that is very similar
to a standard VFR Sectional.
You can modify which theme is associated
10
Getting Started
with this or any other button.
F7 is the keyboard shortcut.
IFR Enroute
Applies a Chart theme that is very similar
to a standard IFR Enroute chart.
Identical to selecting Switch to the IFR
Enroute Theme from the Wx button on
the bottom of the screen.
Weather
F8 is the keyboard shortcut.
Switches the current theme to the
Weather theme.
Identical to selecting Switch to the
Weather Theme from the Wx button on
the bottom of the screen.
Fuel Prices
Sets a theme that only displays airports
that have fuel applicable to the current
aircraft (or default aircraft if no flight plan
is on the screen). That is, you'll see AvGs
prices unless you fly a jet or turbo-prop,
in which case you'll see JetA prices. Fuel
prices require a ChartData
subscription.
Identical to selecting Switch to the Fuel
Prices Theme from the Wx button on
the bottom of the screen.
Fuel prices provided by 100LL.com.
Tip: Voyager displays and uses fuel
prices in many useful and innovative
ways. See all the different ways by
clicking here.
The current Zulu (Greenwich mean) time.
11
Voyager User's Guide
Using Help
Voyager has a rich built-in Help system. At any point in the program, press the F1
key on your keyboard or click a Help button to see Help information specific to your
current task.
In addition, select Contents from the Help menu to see a table of contents that
mirrors the printed documentation. You can also access a complete index via the
Index choice on the Help menu or use a full-text search via the Search menu.
12
Getting Started
Modules
To access this feature: Select Modules from the Tools menu.
Voyager is an integrated flight software system consisting of various modules for
different functions such as pre-flight planning (SmartPlan), in-flight moving map
(GlassView), IFR procedures (SmartPlates), etc. This dialog box shows the status of
each module (trial, purchased, etc.) and lets you choose which modules to enable.
If you purchase a Voyager module, be sure that Select specific module to
activate is checked then check the purchased modules and click OK. To use
FreeFlight mode, choose Select FreeFlight mode for basic flight planning. In
FreeFlight mode, you get basic flight planning but no advanced planning features,
IFR procedures, scanned Charts, fuel prices or moving map.
If you purchased Voyager from a reseller and were given a purchase key, select the
purchased modules and click the link that mentions purchase keys. Important:
Each purchase key can only be used once and purchase codes are not
necessary or provided when Voyager is purchased directly from Seattle
Avionics (see below).
Note: Voyager is licensed for up to three computers. Seattle Avionics uses email
address as customer IDs. Thus, when installing Voyager on a second or third
machine, be certain to use the same email address as used for your first purchase.
This allows us to correctly activate all your modules. If you use a different email
13
Voyager User's Guide
address for this subsequent installations, we have no way of knowing that you are
'you' and the modules will not activate correctly and you'll have to contact technical
support. Additionally, even if you originally used a purchase key to install Voyager,
purchase keys are not necessary for subsequent installations.
Click here to see what's included in each module.
Click the Buy Now button to jump to the e-commerce page of the Seattle Avionics
Web site.
Note: Unchecking all modules (or allowing all modules to expire) puts Voyager into
the free configuration, Voyager FreeFlight.
14
Getting Started
Downloading Weather
By default, Voyager automatically downloads weather in the background when a
flight plan or Plate Pack is opened or changed; If you're connected to the Internet,
there is no need to take any specific steps to get the latest weather. Voyager also
downloads current and forecast weather for an airport when an airport information
dialog opens. Voyager automatically updates the weather every 30 minutes,
refreshing Charts as required.
If you have an XM WX in-cockpit weather receiver, Voyager can
download and display a wide variety of near real-time weather
information. To use this feature, you'll need to enable the XM WX
Weather Link module. More info...
You can access this information in a number of ways including:
•
•
•
•
•
•
Click the
button on the bottom toolbar to see add weather to the
current chart or view hundreds of weather graphics.
Select Show DUAT/DUATS Standard Weather Briefing from the
Weather menu.
Select Show Weather Graphics from the Weather menu.
Select Show Winds Aloft from the Weather menu.
Select Animate Weather from the Weather menu or the Wx button.
Get information on any airport and select the Weather tab.
If you're not connected to the Internet, you can disable background weather
downloads with the Allow background weather downloads option on the
Internet tab of the Options dialog. Select Download Weather from the Weather
menu to manually download current weather.
Note: To save time, Voyager downloads weather along a corridor defined by your
route rather than the entire window. To see weather for the entire visible area (for
wide-area trends, etc.), select Download Weather from the Weather menu.
15
Voyager User's Guide
Working with Flight Plans
CREATING A FLIGHT PLAN
Select New from the File menu or click
Plan tab. The following dialog appears:
on the main toolbar. Select the Flight
The flight plan wizard is the easiest way to create a new flight plan but the other
options are useful for simple flight plans or when you're making a small modification
to an existing flight plan. If you select either of these two bottom options, a Flight
Plan window opens. If you use the wizard, Voyager takes you through a quick stepby-step process.
16
Getting Started
FLIGHT PLAN WIZARD
The Flight Plan Wizard is the easiest way to create a complete flight plan. Select
New from the File menu then select the Flight Plan tab or click
toolbar and choose the Use the flight plan wizard option.
on the main
Tip: If you'd like to skip this step in the future, you can remove it by using the
Wizards tab of the main Options dialog box.
Click Next to begin.
17
Voyager User's Guide
This page collects basic flight planning information such as the date/time of your
flight, the takeoff and landing airport, etc. Many of these fields may be set to your
personal defaults with the Defaults tab of the Options dialog box. More...
Note: Routing method, Consider expected winds and Add fuel stops are not
shown if you're using SmartPlan Premier as these, and other options, will be
presented later. If you're using Voyager FreeFlight, Consider expected winds and
Add fuel stops are not shown because the product does not support these features.
Tip: The Takeoff airport and Landing airport fields typically show either an FAA
or ICAO identifier; however, you can type anything in this fields and Voyager will
attempt to determine which airport you mean. For example, Snohomish County
Airport in Everett, WA (Seattle area) has the FAA identifier of PAE, the ICAO
identifier of KPAE and the common name of Paine. Any of these (including the city
name) may be entered and, when you click the Next button, Voyager pops-up a list
of matches.
Click Next when all the fields are completed.
18
Getting Started
Voyager's Autorouting features can plan a flight from start to finish for you, including
adding fuel stops and occasional waypoint. However, sometimes you may want to
fly over specific points or make specific fuel stops. If so, click the second option and
enter the points. More...
For now, let's let Voyager make all the preliminary decisions. When it's done
planning, you can, of course, go back and make any changes you like.
Click Next to continue.
19
Voyager User's Guide
Step 4, shown only for IFR plans, allows you select specific Arrival and/or Departure
procedures for your flight. If you click the top option ("Select..."), Voyager will
display the following screen.
Tip: If you'd like to generally skip this step, you can remove it by using the
Wizards tab of the main Options dialog box.
20
Getting Started
For IFR plans, Voyager displays the Departure and Arrival procedures available at
your takeoff and landing airports. You can select specific transitions and even
specific entry/exit points within those procedures. More...
For now, let's just select None from each and click Next.
21
Voyager User's Guide
Voyager includes several sophisticated, 3D, wind-optimized autorouters. They
include an Airway (either Victor or Jet routes) router and a GPS Direct router. Select
the routing method you'd like and options specific to that router appear below.
Each router has several options specific to that router and some common to all
routers. For example, only the airway router has an Airway type choice but all
routers have detailed Avoid options (Class B, Class C, Class D, MOA, TFR,
Restricted, Prohibited, Water, etc.).
When you're satisfied with your choices, click Next and Voyager computes an
optimal course based on actual winds aloft expected at flight time.
Tip: If you'd like to skip this step in the future, you can remove it by using the
Wizards tab of the main Options dialog box.
22
Getting Started
Unlike most products, Voyager's autorouter takes altitude into account when
planning so a flight over a TFR is allowed; no need to go around it. As Voyager
"thinks", the in-progress route is displayed on the Chart thumbnail. If the router has
any problems finding a reasonable solution given the criteria you provided, it will
alert you to the issues. Click the Full Screen button to see a large, zoomable Chart.
You can experiment with different routing criteria and even different routers: Click
Previous, change the criteria, then click Next again. For example, you might want
to see the difference in flight times (again, which takes actual winds aloft into
account) between Victor and GPS Direct routes.
When you're satisfied with the preliminary plan, click Next to continue.
23
Voyager User's Guide
This wizard page consists of two parts: Adding items to each aircraft station and
showing the resulting weight and balance information. More...
Tip: If you'd like to skip this step in the future, you can remove it by using the
Wizards tab of the main Options dialog box.
Stations
The Stations table shows each station and the items at those stations. You can enter
items either by typing their names and weights or by selecting existing items using
the drop-down list that appears as you click into the Item column. For example, if
there is station named Front Passenger, you can click into the Item column, under
the Front Passenger heading, and select Sample Passenger from the drop-down list.
His weight is automatically entered in the Weight column and the Moment column
is recalculated. Alternately, if you have a new passenger, enter her name and
weight in the Item and Weight columns and Voyager will not only recalculate the
moment but also add this person to the Passengers list for quick use the next time
she flies.
Weight and Balance Information
24
Getting Started
The right side of this page displays the weight and balance information implied by
the Stations area. The acceptable weight and balance envelope for this aircraft is
displayed as a shape consisting of various points (five in the above example,
arranged more-or-less diagonally). The vertical or Y axis is the weight. The
horizontal or X axis is the total moment divided by 1000. An aircraft loaded within
the weight and balance envelope has all the colored points within the shape. If any
point is outside the shape, Voyager will warn of the imbalance.
Click Next when ready.
If you're planning an IFR flight and you also have SmartPlates, Voyager can create a
Plate Pack specific to this flight. This ensures that you have all the plates you
might need for the flight. The plates can be printed or merely left on the computer
for in-flight use. Each time a Plate Pack is accessed, Voyager uses the Internet to
ensure that you have the latest plates.
The first option downloads plates for airports within about a 50 NM range of the
takeoff, landing or refueling stops. The second option downloads much more data as
it loads plates from airports within 50 NM corridor all along the route. The third
option creates a plate pack to associate with this flight plan but does not
automatically add any procedures.
25
Voyager User's Guide
Select you choice and click Next when ready.
This wizard page shows general flight information (time enroute, fuel used, etc.) as
well as warns about some, but not all, potential problems. As the text on the page
itself shows, Voyager does not warn about all potential problems. As always get an
official briefing before you fly.
Click Finish to open the plan in a Flight Plan window or Previous to make any
corrections.
26
Getting Started
SAVE
Save a flight plan and/or Plate Pack to disk by selecting Save from the File menu or
button on the main toolbar. If Analyze flight plan before
clicking the
save/print is on (which it is, by default), Voyager first analyzes the flight plan and
warns of problems.
If a window with a changed Flight Plan or Plate Pack is closed, Voyager prompts to
save the changed files.
Use Save As, also on the File menu, to save the current file under a new name.
PRINTING
Print flight plans, Charts and Plate Packs by selecting Print from the File menu or
clicking the
button on the main toolbar. If Analyze flight plan before
save/print is on (which it is, by default), Voyager first analyzes the flight plan or
Plate Pack and warns of problems.
An on-screen preview is available via the Print Preview menu item. We suggest
using it before printing a complete flight plan. With SmartPlan Premier, you can also
create a PDF file by selecting Print to PDF from the File menu.
For flight plans, Voyager prints a complete flight dossier including a navigation log,
weather, weight and balance, an FAA Flight Plan Form, airport information,
and charts. Select Print Setup from the File menu to control whether or not print
each of these is printed and, if it is, which options are selected.
In addition, you can quickly print the current Chart or NavLog by clicking the
button on the toolbar immediately above these items.
27
Voyager User's Guide
FILE A FLIGHT PLAN
When you're satisfied that a flight plan is ready, filing it via DUAT or DUATS is very
button on the main toolbar or select File FAA/ICAO Flight
easy: Click the
Plan from the Plan menu. A completed flight plan form is displayed similar to the
one below:
Verify that all the information is correct and edit fields or change the flight plan as
required. Click File via Internet to send the plan to the FAA via DUAT or DUATS.
The specific weather provider is determined by the pilot's setting in the
DUAT/DUATS tab of his profile.
Note: To file a flight plan, the Pilot must have entered valid DUATS information.
28
Getting Started
FAA FLIGHT PLAN
To access this feature: Select File FAA/ICAO Flight Plan from the Plan menu or
click the
button on the main toolbar.
The FAA/ICAO Flight Plan dialog is an on-screen version of the standard FAA and
ICAO flight plan forms. Most of the fields are completed based on your flight plan
but, as noted below, you may override many of the them here. You can work with a
summary form that covers the entire flight or with forms for each individual leg
(takeoff/landing pair). With SmartPlan Premier, use the Leg drop-down list to select
specific legs (takeoff/landing pairs).
Click Print to send the form to a printer or Print Preview to see how it will look
when printed. Click File via Internet to electronically file this plan with the FAA via
DUAT or DUATS using the DUAT/DUATS account of the Pilot specified in the flight
plan. This pilot must have a valid DUAT/DUATS Access code and Password.
Note: If you prefer to work with individual legs separately, you can use the Split
Flight Plan command, on the Plan menu, to create multiple flight plans from a
single master.
FAA
FIELD
Type
Aircraft ID
Type/equipment
TAS
DESCRIPTION
The flight plan mode: VFR, IFR or
DVFR. For summary forms, this field
cannot be changed here but it may be
for individual legs. For summary
forms, close this dialog and make the
appropriate change to the flight plan
itself.
The tail (or "N") number of the aircraft.
This field cannot be changed here. To
change, close this dialog, open the
Aircraft list dialog, select this aircraft
and edit the Tail number field.
The aircraft type is an ICAO identifier
unique to the model and make of the
aircraft. The equipment portion is
derived from the items selected in the
Equipment tab of the Aircraft dialog.
Neither of these items can be changed
here. To modify the type, open the
General tab of the Aircraft dialog and
select a different Manufacturer or
Model.
The TAS of the first cruise leg of the
flight, always expressed in knots. This
29
Voyager User's Guide
Depart pt.
Depart time
Cruise alt.
Route of flight
Destination
ETE
Remarks
Fuel on board
Alt. airports
30
field may be modified here.
The departing airport ident. This field
cannot be changed here. Rather, make
the appropriate change to the flight
plan itself.
The takeoff date/time, expressed in
Zulu time. For summary forms, this
field cannot be changed here. If
necessary, make an appropriate
change to the flight plan itself. This
field may be modified for individual
legs.
The altitude of the first cruise leg of the
flight, always expressed in feet. This
field may be modified here. Note:
Although this value is in feet, it is
submitted to DUAT/DUATS in hundreds
of feet (e.g. 7000 feet is submitted as
70).
A sequential list of each airport, navaid
and waypoint (including GPS
waypoints). Voyager condenses flights
along airways to show airway
identifiers rather than all the specific
navaids and waypoints. This field may
be modified manually.
For a summary form, this is the final
landing airport. This is derived from
the flight plan itself so cannot be
changed here.
For summary forms, this is the
estimated time enroute, in hours and
minutes, to the first landing (FAA
regulation). For individual legs, it is
the actual estimated time enroute.
This field may be edited.
Free-form text, only editable from this
dialog. This field is often used in IFR
flights to clarify your intentions. For
example, if you plan to go VFR on top,
state it here.
The estimated total endurance of the
aircraft fuel, assuming cruise fuel
consumption during then entire flight,
in hours and minutes. This field may
be edited to allow slight variation from
the Voyager estimate.
The alternate airport. Required for
some IFR flights, optional for
VFR/DVFR flights. Only editable via
this dialog.
Getting Started
# on board
Color of aircraft
Pilot name, phone number and
aircraft home base
The total number of passengers and
crew. Edit as required. Voyager
analyzes flight plans for consistency
between this number and the number
on board implied by the Weight and
Balance form.
The primary and secondary colors of
the aircraft. This field cannot be
changed here. To change, open the
Aircraft dialog and alter the Color
field of the General tab.
A combination of the pilot's name,
phone number and aircraft home base
information. This field cannot be
changed here. To change, select and
modify the appropriate Pilot from the
Pilots list or the appropriate Aircraft
from the Aircraft list.
ICAO
Voyager allows you view, print and file ICAO flight plans. As with the FAA plans,
they may be electronically filed via DUAT/DUATS. Most of the fields may not be
edited but are derived from the flight plan itself, the selected pilot or the aircraft.
Those that can be manually edited are white. ICAO flight plans are more
complicated than FAA plans so please refer to
http://www.faa.gov/ATpubs/FSS/Appendix%20B.htm#Note%201 for more
information.
31
Voyager User's Guide
OPEN A FLIGHT PLAN
Existing flight plans, including the samples included with Voyager, are opened from
button on
disk in the usual way: Select Open from the File menu or click the
the main toolbar. After a moment, a Flight Plan window will appear and Voyager will
begin downloading weather.
Note: Within the context of Voyager, "Opening" a flight plan means loading it from
disk, not calling a FSS to begin the clock on a flight plan previously filed with the
FAA.
CLOSE A FLIGHT PLAN
Flight plans are closed in the usual way: Select Close from the File menu or click
the
button in the upper right corner of the Flight Plan window. Voyager will
prompt to save the file if the flight plan hasn't been saved or has been changed since
the last save.
Note: Within the context of Voyager, "Opening" a flight plan means loading it from
disk, not calling a FSS to begin the clock on a flight plan previously filed with the
FAA. Similarly, "Close" simply means "hide the window", not terminate an inprogress flight plan.
32
Getting Started
EMBEDDING PLATE PACKS WITHIN FLIGHT PLANS
Within Voyager, flight plans (.fp files) and Plate Packs (.PlatePack files) are distinct
entities. However, it's often convenient to view or print them together so we made a
way to associate Plate Packs with flight plans.
To Add an Existing Plate Pack to a Flight Plan
•
•
•
•
Open or
create the flight plan in the usual way.
Select Add Plate Pack from the Plan menu and use the standard Windows
file open dialog to select the Plate Pack.
Once the combined entity opens, use the NavLog and Plate Pack tabs to
switch between the two.
Save the flight plan to save the reference to the Plate Pack.
To Add a New Plate Pack to a Flight Plan
•
•
•
Open or
create the flight plan in the usual way.
New from the File menu and select the Plate Pack tab. Choose
Select
either of the top options to create a default Plate Pack or the Blank option to
create a blank Plate Pack.
Save the flight plan to save the reference to the Plate Pack.
To Remove a Plate Pack from a flight plan
•
•
With the combined flight plan / Plate Pack open, select Remove Plate Pack
from the Plan menu.
Save the flight plan.
To Print a Flight Plan and the Associate Plates from the Plate Pack
•
With the combined flight plan / Plate Pack open, simply select
Print Preview or Print Settings in the usual way.
Print,
33
Voyager User's Guide
CUSTOMIZE NAVLOG
To access this feature: Select Customize NavLog from the Plan menu or click
on the NavLog toolbar.
This dialog selects which NavLog columns are displayed on the screen. Use the
Standard Navigation Log plug-in within the Page Setup dialog to select which
columns are printed. These are not automatically synchronized because the screen
is wider than most kneeboard prints, allowing more on-screen detail than is typically
possible on prints.
Note: As pre-flight and in-flight needs are very different, Voyager defaults to
showing different columns depending on how it is being used. Additionally, the
columns selected when each of the checkboxes below are checked varies somewhat
between pre-and in-flight use. See each Description below for details.
In addition to selecting the NavLog columns, you can also select which types of legs
are shown in the on-screen NavLog. Specifically, Voyager defaults to keeping the
display simple by only showing the cruise legs. Internally, it creates the necessary
climb and descend legs (using appropriate climb/cruise TAS and fuel settings), too,
but hides them. You can see these legs by selecting Show All Legs from the View
menu. However, since many of these legs are "synthetic" (generated based on wind
data, etc.), you cannot edit the Plan in this view. In either mode, the climb and
descent legs are shown on the Profile view but they're only numbered when Show
All Legs is checked. The printed NavLog has the opposite default setting so, by
default, printed NavLogs show the climb and descend legs. An option in the
Standard Navigation Log print plug-in controls this setting.
Tip: When you print a flight plan, Voyager defaults to printing much more than just
the NavLog, typically including Charts, Airport Information, Weather
Information and more. You can suppress any of these by unchecking the option
after choosing Print Setup from the File menu.
34
Getting Started
OPTION
Altitude
Course detail
Cum. time/distance
Cum. time/distance since last stop
Distance
Duration
Fuel
Groundspeed
Layover
TAS
Winds
DESCRIPTION
If checked, the table includes the final
altitude for each leg.
If checked, the table includes MCrs,
TCrs and THdg (MHdg is always
included pre-flight and MCrs is always
included in-flight). Not editable.
When checked, two columns are added
showing the cumulative time (duration)
and distance up to and including this
leg. Layover time is not included. Not
editable.
Similar to the above except that the
values are reset at each Stop and Go
leg so it's easy to tell how long you've
flown since the last fuel stop. Not
editable.
Displays the distance of each leg. Not
editable.
Displays the duration (flight time) of
each leg in hours, minutes and
seconds. Layover time is not included.
Not editable.
If selected, three columns are added to
the table: Fuel used (-Fuel), fuel added
(+Fuel) and fuel remaining (FuelRem)
after each leg. The +Fuel column is
editable.
When checked, Voyager adds a column
(GS)showing estimated groundspeed,
taking wind into account. Not editable.
If selected, Voyager shows the layover
(on the ground) time in HH:MM:SS
format of Stop and Go legs. Voyager
defaults to one hour layovers but can
be changed within the Defaults tab of
the Options dialog.
Shows the True Airspeed (TAS).
Toggles display of wind direction
(degrees) and speed. Wind direction is
the direction from which the wind is
coming. Voyager automatically
completes these fields if weather has
been downloaded but you may enter
overriding data.
Note: Pre-flight, Name, Type and MHdg are always shown even if all other options
are turned off. In-flight, Name and TCrs are always shown.
35
Voyager User's Guide
ALTERNATES
To access this feature: Choose Select Alternates from the Plan menu, click the
Alternates area in the NavLog's Plan area or use the Alternate button from the
New Flight Plan Wizard.
The Alternates dialog box makes it easy to select appropriate airports as IFR
alternates. To select an alternate, simply click the appropriate row in the table and
click OK. To set no alternate, select the No alternate radio button. To show
additional information about an airport (actual procedures, alternate minimums or
weather details, for example), select an airport then click Show info. You can sort
the table by clicking the header (top) of a column.
For flights with a fuel stop, use the Leg drop-down list to select alternates for each
landing airport.
OPTION
Ident
Name
Dist
36
DESCRIPTION
Shows the FAA identifier of the airport.
The name of the airport.
The distance of this airport from the
Getting Started
Duration
Fuel used
Max rwy
Procs
METAR
TAF
primary landing airport.
The approximate time required to fly
from the primary airport to this airport.
Note: This assumes the unlikely
scenario of actually landing at the
primary airport then immediately
taking off again. Thus, the time and
fuel estimates here are probably worse
than what you'll actually see.
The amount of fuel used to fly from the
primary landing airport to this airport.
As above, this assumes the pessimistic
case of actually landing at the primary
airport.
The maximum runway length available
at this airport.
The types of approach procedures
available where I = ILS , G = GPS, L =
Localizer, V = VOR, N = NDB and O =
Other (such as LDA, etc.)
This colored dot represents the
weather conditions listed for the most
recent METAR available for this airport.
Assuming your flight is somewhat in
the future, this does not necessarily
indicate what weather to expect at
landing. Normally, green means VFR
conditions, Yellow means Marginal VFR
and Red is IFR. However, if you have
set Voyager to Use standard weather
symbols, Blue is VFR, Green is MVFR,
Yellow is IFR and Red is LIFR.
This colored dot represents the
weather anticipated at this airport at
the time of your expected landing at
the primary airport.
37
Voyager User's Guide
PREFERRED ROUTES
To access this feature: Create a new flight plan with the New Flight Plan Wizard and
check Look for preferred routes.
The Preferred Routes dialog box shows FAA-designated preferred routes between
airport pairs or areas. It shows airport pairs that exactly match your flight and
airport pairs that are close to your flight. Select a row to use that preferred route
rather than allowing the autorouter to plan the route. If any exact matches exist,
Voyager selects the first one by default. To some extent, Voyager takes your
aircraft's performance into account when selected routes (i.e. piston aircraft with low
service ceilings are not shown High routes). However, each route may have specific
applicability so refer to the Lower Alt, Aircraft, Speed, etc. columns for more
information.
Click Do not use preferred route to deselect any selected preferred route.
Note: Some columns are not shown by default for space reasons. Use the
horizontal scroll bar to show these columns.
Note: This dialog box does not appear if Voyager cannot find any applicable routes.
38
Getting Started
OPTION
Match
Level
Start
End
Start distance
End distance
Aircraft
Required speed
Lower alt
Upper alt
Route
Effective time(s)
DESCRIPTION
A green dot indicates if the route is
specifically for the airports listed for
your flight. A yellow dot denotes a
route to or from a nearby airport.
Routes are designated as High (at or
above FL180), Low or Both. Voyager
uses this designation to show only
routes that are applicable to the
aircraft specified in the flight plan.
The name and ident of the route's
designated departure airport. For
routes from a general area, rather than
a specific airport, no ident is shown.
The name and ident of the route's
designated landing airport. For routes
to a general area, rather than a specific
airport, no ident is shown.
The distance between your desired
takeoff airport and the start of the
route. This is useful when deciding
whether to use a route from a nearby
airports. It is zero, by definition, for
routes that exactly match your flight
plan.
The distance between your desired
landing airport and the end of the
route. This is useful when deciding
whether to use a route to a nearby
airports. It is zero, by definition, for
routes that exactly match your flight
plan.
Some routes are designated for a
specific aircraft typs. If so, the type is
listed here.
Some routes have minimum or
maximum speed requirements. If so,
such a requirement is shown here.
Some routes can only be flown at or
above certain altitudes. If so, this is
noted here.
If there is an upper limit to the route, it
is stated here.
This field shows the entire route,
including SIDs and/or STARs. For
routes longer than the width of the
column, you may need to click into the
field to see the whole route.
A route may have one or more
designated active time periods. If so,
it is shown here in Zulu time.
39
Voyager User's Guide
Moving Map (GlassView) and XM Weather
WHAT IS GLASSVIEW?
GlassView is Voyager's GPS/Moving Map module. But it's really much more than
that. While it certainly can display a moving map with your aircraft's position
derived from a GPS, it's more like an integrated flight information system that you
might expect on a next-generation airliner or military jet.
The top of the GlassView screen has a Gaugebar that shows common flight data.
You can customize what information is shown by clicking any gauge. You can turn
40
Getting Started
the Gaugebar off to save screen space by unchecking Show Gaugebar from the
View menu. A Personal Layout can also specify whether the Gaugebar is on or off.
Below that is the Chartbar that has large, easy to click buttons that turn chart layers
on or off. Like the Gaugebar, it can be turned off with the View menu and set on or
off with a Personal Layout.
The bottom of the screen has is the GlassView toolbar that makes it easy to
change screen configurations, change what's on the chart, show weather, switch
from 2D to 3D mode, go Direct To, show TAWS, etc.
GlassView divides the rest of the screen into different sections where each section
can show a different type of information -- Chart, Nearest Airports, Winds Aloft,
Approach Procedure, etc. Each of these different sections is called a widget.
When several widgets are combined together to form a specific screen arrangement,
it's called a Layout. Voyager includes many GlassView layouts, each designed for
different situations. Some are best for VFR flights, some for IFR, some best for
cruise, some for landing or taxiing, etc.
•
•
•
•
How do I begin GlassView mode?
What are the different layouts and how do I switch between them?
How do I customize which gauges (Track, Altitude, Groundspeed,
etc.) are on the screen?
How do I use my XM WX satellite weather receiver for in-cockpit
weather updates?
Tip: You can quickly start Voyager in GlassView mode, bypassing all standard dialog
boxes, by starting Voyager with the /QuickFly command-line switch. The Setup
program automatically creates a Voyager 4 QuickFly icon on the desktop.
41
Voyager User's Guide
START FLYING
Once a flight plan is open, it's easy to switch to GlassView (moving map) mode and,
or
with your connected GPS, have the computer track your flight. Simply click
press F5 and the screen switches to a GlassView layout that depends on whether it's
an IFR or VFR flight. Alternately, you can jump to a specific layout by clicking the
button at the bottom of the screen. Look for layouts that have the
GlassView
icon.
You can also directly open the flight plan in GlassView mode by selecting a recently
used flight plan from the File menu, using the
button on the main toolbar, using
button on the toolbar and selecting the Chart tab or by selecting the Fly
the
options from the Tasks pad.
You can quickly start Voyager in GlassView mode, bypassing all standard dialog
boxes, by starting Voyager with the /QuickFly command-line switch. For new
Voyager installations, the Setup program automatically creates a Voyager QuickFly
icon on the desktop. For updates to existing Voyager installations, you may need to
refer to your Windows documentation on how to create a shortcut with a commandline parameter.
Voyager should automatically detect any GPS connected via Bluetooth or a COM port.
If your GPS connects via USB, you may have to install a device-specific driver from
the manufacturer. If you're having trouble connecting to your GPS, you can review
and alter the settings from the GPS area of the Options dialog box. Voyager also
includes a built-in GPS simulator that can be accessed via either the Options dialog
box or by selecting Show GPS Simulator from the Tools menu.
Tip: Motion Computing tablets come with built-in Bluetooth but, for security
reasons, you have to manually enable it via the Motion Dashboard. Also, their
default Bluetooth drivers have trouble with the XM receiver. If you plan to use a
Motion tablet with an XM receiver, please see the XM Help topic for more
information.
Once the GPS is engaged, the Chart moves automatically to keep the aircraft
centered.
42
Getting Started
GLASSVIEW CHART LAYOUT
To access this feature: Use the
(any layout with a
button to switch to any GlassView layout
icon next to it).
All GlassView layouts have at least one Chart. While in GlassView mode, the Chart
not only displays a map but also navigational information. It also has various
'hotspots' that make it easy to change the zoom (Range), scroll, etc. See below for
more information.
43
Voyager User's Guide
FEATURE/TASK
HSI Arc
DESCRIPTION
By default, Voyager displays a
standard HSI arc (or complete circle)
to indicate the range from the center
of the screen to the circle. Voyager
uses a semi-circle when you're in
Track Up mode (the default) and a
complete circle when you're in North
Up mode.
Toggle the HSI on or off by clicking
Range
on the GlassView toolbar atthe
bottom of the screen.
Indicates the current Chart zoom
range. The number, 15 in this case,
indicates a 15 NM radius from the
center of the Chart to the shortest side
(i.e. a radius).
Click the Zoom In or Zoom Out icons
on the side to zoom the chart or click
the number in the center for the menu
of options.
The numeric choices set the range to
specific settings.
AutoFit All scales the Chart zoom
such that the entire plan is visible.
AutoFit Remaining scales such as to
allow the aircraft's current location and
any remaining waypoints in the flight
plan to be shown. As you fly, this
range does not dynamically adjust.
AutoFit to Wpt scales the Chart to
show the aircraft's current location and
the next waypoint. As you fly, this
range does not dynamically adjust.
Ground Track
44
Shows the current magnetic ground
track.
Getting Started
GPS Centering
When you begin GlassView, Voyager
assumes you're connected to a GPS
and looks for one. If it finds one, it
locks on and centers the aircraft
around your position.
When locked, you'll see an indicator to
that effect in the upper left corner of
the Chart. If the GPS is receiving
WAAS information, that will be
indicated as well. The lack of a WAAS
flag means that WAAS is not being
used and the location information is
less accurate. This indicator will be
green if the GPS has a solid, 3D lock
from the satellites and yellow if it can
only get a 2D lock due to the number
of satellites it is receiving. A 2D
connection is noted as marginal while
a 3D connection is noted as locked.
Altitude information is substantially
less accurate when the GPS can only
achieve a 2D lock (the third dimension
being altitude).
If Voyager doesn't find a GPS or finds
a GPS but gets no satellite data, you'll
see a message at the top of the screen
(as above):
As it's underlined, click on it to go the
GPS settings in Tools/Options so
you can manually configure the GPS or
check its status.
if the GPS
You'll also see
momentarily loses its lock on the
satellites. Should the GPS re-acquire
the satellites, the message will go
away.
You can also manually disengage from
the GPS centering so you can scroll the
off to
Chart (see below). Click
disengage. When the button is blue, it
means the Chart will be continually recentered around the aircraft's location
45
Voyager User's Guide
(as indicated by the GPS). When it's
grey, it means that centering is
disengaged and you can freely scroll
the Chart to any location. When
centering is disengaged, you'll see a
message at the top of the Chart that
warns you about centering being off.
Click the text to re-enable.
Scrolling (Panning)
If you're using a laptop or a tablet with
a keyboard, you can also press F4 to
toggle the GPS centering on and off.
Voyager includes many other
keyboard shortcuts optimized for inflight use.
While GPS centering is engaged, you
can change the zoom but not scroll as
the system keeps the aircraft's location
centered at all times.
You can either disable the GPS
centering as explained above then
scroll or simply try to scroll and
Voyager will ask if you want to
disengage first.
Track Up / North Up
Scroll (or pan, as it's sometimes
called) simply by dragging the chart.
This is done by clicking (or tapping)
and holding while you move the stylus
or mouse.
Voyager defaults to Track Up mode,
which means that the screen
constantly rotates such that what's in
front of you is always "up" on the
Chart. You may prefer North Up
mode, which is more like using a
printed chart.
to toggle from Track Up
Click
between North Up.
TAWS
The keyboard shortcut is F9.
Strictly speaking, Voyager does not
have a TAWS display since it isn't
certified. Still, you can display very
useful terrain avoidance information by
. When this mode is on,
clicking
Voyager augments the usual terrain
46
Getting Started
coloring system with yellow and red.
Yellow indicates that your GPS altitude
(which is not especially accurate)
shows you to be above but within 1000
ft of the terrain. Red indicates that
you're below the terrain or within 500
feet.
The top GPS indicator notes when
TAWS is enabled.
Weather
Tip: You may also want to engage
obstacle warnings. Obstacle warning
are automatically on whenever the
Obstacles layer is turned on. TAWS
and Obstacle warnings are
independent of one another.
By default, weather is not shown on
the Chart so you can clearly see
aviation points. However, you can use
button to add some or all
the
weather layers. For in-flight use, the
Overlay Radar and Winds on this
Chart option is especially useful
because it puts vital NexRad and winds
aloft info on the screen but does not
clutter it up with TAF and METAR
circles.
QuickInfo / Clicking on the Chart
If weather is a concern, consider
switching to the Splitscreen 2 layout
where you can display weather on one
Chart and a normal aviation Chart on
the other. You can even set the two
Charts to different zooms (perhaps the
weather Chart with a wider zoom) and
different display modes (e.g. North
Up for weather, Track Up for the
aviation Chart).
Clicking anywhere on the Chart brings
up information about that location in a
format that's easy to use while flying.
If the location is an airport and an
Airport Information widget is on the
screen, the information will appear on
the current layout. If it's any other
type of object or there is no Airport
Information widget, a QuickInfo
47
Voyager User's Guide
dialog will appear.
A QuickInfo dialog shows key
information about the object and
makes it easy to go Direct To that
point, add that point to your flight plan
or jump the chart to that point. You
can also see additional information.
QuickInfo also shows the distance and
bearing to that location, from your
current position. This information is
updated every five seconds.
Click the large text area (in this
example, SEATTLE (SEA, US), etc.) to
see that same text in a full-screen
window with very large text. This is
especially handy when displaying
airspace information and some of the
airspace (such as a TFR), has
substantial text associated with it.
These windows stay open until you
click Close or click some other button.
However, checking Automatically
close after 5 seconds makes then
automatically go away without taking
any action.
Tip: You can open multiple QuickInfo
windows at the same time. This is
helpful when you want to intercept
radials from two different VORs, for
example.
Changing a Flight Plan
If Command Mode is off (that is, there
is no Layers toolbar or timeline),
you cannot move a flight plan
waypoint. See below.
While flying, the easiest way to modify
a flight plan is to switch to the NavLog
widget and click any waypoint. That
shows the window to the left that
makes it easy to modify that waypoint
or add new waypoints.
Using Direct To is also another
common way to modify the flight plan.
The Direct To dialog has a new +FP
button (like the QuickInfo box and the
48
Getting Started
Airport Info widget) that accepts the
new point but then lets you sequence
it within your existing flight plan rather
than immediately going direct to it.
In a desktop layout, you can "rubberband" the flight plan by moving the
cursor over the flight path or over an
existing waypoint. To prevent
accidental movements while in rough
air in-flight, this is disabled while
Command Mode is off. If you want to
move a flight plan point in-flight, click
then move the points with
your mouse or stylus. Click
again to restore normal layout.
Altering which gauges are shown
(Altitude, Track, Groundspeed, etc.)
See the NavLog
Click on any gauge or on the blank
space to the right of the gauges to
bring up a dialog that lets you
configure which gauges are
shown.
Voyager has both a Gaugebar at the
top of the screen and, in many layouts,
a Gauges widget that can display even
more gauges.
Most GlassView layouts have a tab
with the NavLog widget on it. Simply
select the appropriate tab (as shown to
the left).
Click a waypoint to modify the flight
plan in any way, as described in
Changing the Flight Plan above.
49
Voyager User's Guide
GLASSVIEW TOOLBAR
All Voyager windows have a lower toolbar that displays common buttons like Cmd,
Layout, Chart, Wx, etc. In GlassView mode, Voyager adds a few additional buttons
helpful when flying. This is called the GlassView toolbar.
OPTION
DESCRIPTION
Shows the Direct To dialog box.
When clicked, the current Chart uses red and yellow to alert you of
terrain clearance problems. This is frequently called a TAWS display.
Yellow means that the aircraft, according to the GPS-provided
altitude, is within 1000 feet of the terrain. Red indicates that the
aircraft is below the terrain or within 300 feet of it. Important!
GPS altitude information is only accurate to several hundred
feet. Also, Voyager's display takes only terrain, not man-made
obstacles, into account.
Tip: When the Obstacles layer is turned on, Voyager also displays
obstacle warnings when obstacles are +/- 15 degrees of your heading,
within 500 feet of your altitude and within two minutes at your
current speed. This feature works independently of TAWS.
Toggle with F10.
When on, Voyager rotates the Chart as the aircraft moves such that
the top of the Chart is always approximately the direction that the
aircraft is heading. This is called Track Up mode. When off, the
system is in North Up mode and the Chart is oriented such that North
is always up and the aircraft icon rotates to denote heading.
Toggle with F9.
Toggles the HSI (heading) display on and off the current Chart. If the
Chart is in North Up mode (see below), Voyager shows a complete
360 degree circle around the aircraft. If the Chart is in Track Up
mode, a half-circle is shown.
When enabled, a black line extends 50 NM from the tip of the aircraft
to show where the aircraft, if it stays on the current heading, will be in
the future. This is helpful for avoiding airspace and such.
When selected (highlighted in blue), Voyager uses GPS position
information to continually center the Chart around the aircraft's
location. When off, the Chart may be manually panned to any other
50
Getting Started
location. To re-establish centering, simply turn this button back on or
click the text message, at the top of the Chart that warns that GPS
centering is off.
Note: In previous versions of Voyager, using this feature also
stopped the aircraft's location from being updated on the Chart and
stopped the gauges from updating. This is no longer the case.
Toggle with F4.
You can alter the gauges shown at the top of the GlassView screen by clicking any
gauge or in any otherwise empty area on the bottom of the window.
Note: Previous version of Voyager had a fuel button on this toolbar. That
functionality has been replaced and extended by Fuel Prices theme. In-flight, this
theme can be quickly activated by clicking the Wx button then Switch to Fuel
Prices Theme.
Tip: You can show two charts on the screen at the same time, using completely
different zooms, rotations, themes and other settings. See the Layouts and
Personal Layouts topics.
51
Voyager User's Guide
XM WX WEATHER
OVERVIEW
Voyager, when used in conjunction with the XM Link module, can display near realtime weather while in the cockpit. This requires an XM WX satellite receiver
connected to the laptop or tablet via either a USB or Bluetooth connection.
The XM receiver, whether connected via Bluetooth or a USB connection, uses what's
called a COM port to communicate with the computer. The COM port number varies
by machine so you must determine which COM port your configuration is using. See
Hardware Installation / Configuration below for more info.
Tip: Voyager is optimized to automatically find a GPS receiver by scanning the
available COM ports. This works well for GPS-only users but can create a problem
when also using an XM receiver as XMLink may report that the COM port it needs is
already in use. To resolve this conflict, go to the GPS settings tab of the Options
dialog box and manually select the specific COM port used by your GPS receiver.
Once an XM receiver is properly connected (see below), select the
button after
button and Voyager will begin collecting XM weather as it
clicking the
arrives. To see the weather, be sure to turn on the weather layers you want or
select the Weather theme from the
button.
HARDWARE INSTALLATION / CONFIGURATION
Pre-setup Steps
Make sure the antenna has a very clear view of the sky, preferably to the south.
Also, other than your computer and XM WX receiver, make sure there aren’t any
other Bluetooth devices on within range. Reboot your machine and, while your
computer is rebooting, unplug the receiver's power cable. After several seconds,
plug it back in.
Bluetooth Configuration
Follow the instructions that come with the XM receiver that outline the steps
necessary to configure your computer to use Bluetooth for communicating with the
receiver. This will probably involve entering what is called a Passcode to 'pair' the
XM receiver with the computer. The passcode varies by receiver manufacturer but
common codes are 9679 and 1234. See your receiver's documentation for more
information.
52
Getting Started
Tip: You may want to write the passcode on a slip of paper and tape it to the
bottom of the receiver for future use.
Determining the COM port assigned to the WxWorx receiver
If you are using Microsoft’s Bluetooth driver, the XM COM port can be determined by
double-clicking on the Bluetooth icon
in the system tray (the area immediately
surrounding the Windows digital clock in the lower, right hand corner of your
computer). Then click the COM Ports tab and find the COM port number stated for
the WxWorx entry that says "outgoing" under the "direction" column. If you do not
see an entry for your WxWorx receiver, it is because your computer has not been
configured to use Bluetooth for communicating with the WxWorx receiver. To do
this, follow the instructions that come with the WxWorx receiver.
VOYAGER CONFIGURATION
Before proceeding, please read Bluetooth Notes section above and then follow the
instructions in Pre-setup Steps and Determining the COM port assigned to the
WxWorx receiver sections. From within Voyager, click Tools then Options, select
Preferences then XM. Click Use the COM setting below, then specify the proper
port number and click the Connect button.
53
Voyager User's Guide
DIRECT TO
To access this feature: Click
, select Direct To from the View menu or press
F3 while in a GlassView (moving map) screen.
The Direct To dialog box makes it easy to change (or create) a flight plan while
enroute. It has oversized buttons for easy in-flight access.
If the point you'd like to go to is within about 50 NM, you can save typing by using
the Navaids, Waypoints, Airports, Airways and Flight Plan selector to show a
list of each nearby item. Navaids are sorted first by type (VORs first) then
alphabetically. Waypoints are sorted alphabetically and Airports are sorted by
airspace class then alphabetically. Flight Plan shows all the points in your flight
plan (if any) in sequence.
Tip: Except for the Flight Plan and Airways tabs, you can click the top of each
column to change the sort order. For example, to sort by Airport ident, click the top
of the Ident column.
54
Getting Started
Tip: The Airport Info widget also has a Direct To button that bypasses this dialog
box and sets the selected airport as the next waypoint. It also has a +FP button
that adds the airport to the flight plan.
You can filter-out smaller airports, heliports and seaplane bases with the GPS tab of
the Options dialog box.
Use the By Ident selector to use an embedded oversized alphanumeric keypad to
manually enter any point (or points, separated by spaces) not listed by the other
tabs. You can create an entire flight plan by entering a series of idents separated by
spaces.
Once a point is selected, click D-> to fly directly to that point or +FP to add the
point to the flight plan then fly directly to it.
Use the Alt area to optionally enter the altitude you need to be at when crossing the
new waypoint. If you leave it blank, Voyager assumes no altitude changes.
Alt is a drop-down box that lets you also optionally enter a Radial (if a Navaid is
selected) and/or a Bearing if a Navaid or Airway is selected.
If the current tab is Navaid, you can select a navaid (e.g. the PAE VOR) and use
Radial to select the 150 radial from PAE to intercept. If no Bearing is specified,
Voyager selects the closest point along that radial for intercept (approximately).
Keep in mind this could mean flying directly to the Navaid if the navaid itself is the
closest point. If a Bearing is specified, Voyager finds the intersection of the bearing
and the radial.
Similarly, for Airways, if no Bearing is specified, Voyager selects the closest intercept
point (approximately) along the airway. If a Bearing is set, Voyager selects the point
where the bearing will intercept the airway.
55
Voyager User's Guide
GAUGE OPTIONS
To access this feature: While in a GlassView (moving map) window, click any of the
gauges at the bottom of the screen. You can also get here from the Select GPS
Gauges button in the GPS area of the Options/Preferences dialog.
Use this dialog to select which gauges are shown on the Gaugebar or Gauges widget.
To select the gauges, choose the Manually select gauges option then click the
items you'd like in the Available list. Click Add to add the Selected (shown) list.
To remove a gauge, select it in Selected then click Remove.
OPTION
Manually select gauges
Available
56
DESCRIPTION
Allows you to select exactly which
gauges, and in which sequence, you'd
like to see.
Shows all the gauges available but not
currently set to be shown (i.e. not in
the Selected list)
Getting Started
Selected
Copy current gauges
Add
Remove
Up/Down
Use short gauge labels
GPS Settings
The gauges that will be shown in the
order they'll appear. The top item is
shown to the left on the screen.
Subsequent gauges appear to its right
as the screen width allows.
Click to populate the Selected list with
the gauges currently shown on the
screen. This makes it easy to slightly
modify the default set of gauges.
Moves the item highlighted in
Available to the Selected list so it will
be shown.
Moves the item highlighted in Selected
back to the Available list so it will not
be shown.
Changes the order of the item
highlighted in Selected up or down.
By default, Voyager uses gauge labels
(names) that are longer and more
English-like than those used on most
in-panel GPS units. Select this option if
you'd like to use GPS-like three letter
gauge labels instead.
Jumps to the GPS area of the Options
dialog box.
Note: VSR (Vertical Speed Required) is the altitude change rate, typically in
Feet/Min, required to get from your current altitude to the desired waypoint altitude.
It's only applicable if you entered a target altitude in the Direct To dialog or are
flying on a flight plan.
57
Voyager User's Guide
Working with Procedures
PLATE PACK
The SmartPlates module creates Plate Packs. Plate Packs are collection of Approach
and Departure Procedures plus Airport Diagrams and, in some cases, Minimums.
The Procedures and Diagrams are created by the FAA and legal for in-flight use.
A Plate Pack is a list of Procedures and Diagrams, not the Procedures and Diagrams
themselves. That is, a Plate Pack file is small because it's just a list, no graphics. To
print or view the Procedures and Diagrams referred to in the Plate Pack, you need a
copy of SmartPlates.
SmartPlates runs on a desktop or laptop PC and can export files to a PDA running the
Pocket PC 2002, 2003 or Windows Mobile operating system. To use SmartPlates on
a Pocket PC, you'll need SmartPlates for the Pocket PC, available from Seattle
Avionics at an additional charge. The Pocket PC version requires the desktop/laptop
version.
As the name implies, Plate Packs are packages (collections) of plates, often created
for a specific flight. They can be created by opening a flight plan from within
SmartPlates or by manually adding specific procedures. If you begin with a flight
plan, you can tell SmartPlates to add procedures from every airport along your route
or just near takeoff, landing and refueling airports.
By default, every time you open, save or print a Plate Pack, SmartPlates verifies the
plates to make sure they're all downloaded and current.
Create a Plate Pack by selecting New from the File menu or clicking the
on the main toolbar.
58
button
Getting Started
PLATE PACK WIZARD
The Plate Pack Wizard is the fastest, easiest way to create a Plate Pack. Select
New from the File menu or click
on the main toolbar, select Plate Pack and
choose the Use the Plate Pack wizard option.
Click Next to begin.
59
Voyager User's Guide
Plate Packs can be created for specific flights or for general-purpose use. The top
two choices are for specific flights, the last two are for general-purpose use.
If you use Voyager, Seattle Avionics advanced flight planning system, you can open
a Voyager flight plan and quickly collect all the procedures you'll need for the flight.
Alternately, you can create a rough flight plan by entering the route idents in the
second area. For example, enter PAE PDX SFO LPC to plan a flight from Paine Field,
near Seattle, to the Portland VOR to the San Francisco VOR to the Lompoc airport in
central California. Note that SmartPlates interprets 3 letter FAA idents as navaids,
not airports, unless they happen to be the first or last ident, in which case
SmartPlates will assume you mean the airport. Therefore, if you plan a landing at
Portland, enter KPDX instead of PDX. Tip: Check the Search airports only box to
search airport idents only, not navaids or waypoints.
The third option effectively cancels the Wizard and opens a blank Plate Pack
window. This is the same as selecting New from the File menu and choosing the
blank Plate option.
The last option helps you create a general-purpose Plate Pack that can include any
arbitrary collection of Procedures and Airport Diagrams. If you like, you can enter
specific airport idents in the text field. Unlike the route choice above, all idents here
are assumed to be airports. Tip: You can enlarge the selected airport list to account
for IFR alternates by checking the Also add nearby airports box. Regardless of
60
Getting Started
whether or not you enter idents here, the next page helps you select additional
airports.
Click Next to continue.
The next page depends on what you selected in the previous step. If you selected
one of the route-based selections (a Voyager flight plan, for example), you'll see the
following screen. However, if you selected the general purpose option (the last
choice), you'll see the second screen below.
Here, you can select alternate and backup airports either all the way along the route
(the second choice), only near the existing takeoff/landing airports or no additional
airports at all. The small Chart on the right graphically depicts your selection where
green dots show all airports with a Procedure or Diagram and the red circles show
those you've selected. You can vary the 'width' (radius) of the search corridor with
the Maximum distance from the route field.
61
Voyager User's Guide
The screen above is only shown if you selected the general-purpose Plate Pack option
in the previous step. It does not apply to route-based Plate Packs.
This page is divided into two sections. The top half helps you select airports that
meet a specific criteria. It's similar to the Filter section of a Plate Pack window.
The bottom half shows the airports found from the above section and let's you
choose the specific airports to add to the Plate Pack.
This screen works in two steps. First, you use the top section (Filter) to make a
rough-cut at the airports you're interested in. You can narrow the list, for example,
by entering the US postal codes for the states you want or by entering a list of
airports that you need. You can enter a list in both fields so, for example, to select
Northwest airports, you can type WA ID OR in the Within State(s) area. Or, if you
just fly around Seattle/Portland area, enter SEA PDX in the Nearby an Airport(s)
field. When you click Search Now, SmartPlates populates the Airports Found area
(bottom left of the screen) with matching airports. You can also use a Chart to
select airports by clicking Show Chart.
Once the Airports Found list is filled, you can choose the specific airports you want
by selecting the airport and clicking the Add button. Or select all the airports in
Airports Found by clicking Add All. Important: Only the airports listed in
Airports Selected will become part of the Plate Pack. The Airports Found list is a
searching convenience only.
62
Getting Started
After selecting some airports, click Next to continue.
Now that you've selected the airports, choose the type of information you want. As
you check and uncheck boxes, SmartPlates updates the number of selected
Procedures and Diagrams.
Click Next when you're satisfied.
63
Voyager User's Guide
Now SmartPlates displays the Procedures and Diagrams selected, grouped by airport.
The small Chart on the right graphically depicts your selection where green dots
show all airports with a Procedure or Diagram and the red circles show those you've
selected.
Click Next to begin downloading these Procedures and Diagrams (as necessary) or
use Previous to change your selections.
64
Getting Started
Depending on the first option in the Preferences tab of the Options dialog,
SmartPlates will either automatically download Procedures as necessary or determine
which need to be downloaded and wait for you to click Start Downloads.
Procedure and Diagram may be downloaded from the Seattle Avionics Web site or
directly from the FAA. The Seattle Avionics site provides the same legal plates as
the FAA Web site but have been optimized for much faster download with a
small decrease in quality. By default, SmartPlates downloads from the Seattle
Avionics Web site.
When all downloads are complete, click Finish to close the Wizard and open the new
Plate Pack in a Plate Pack window.
65
Voyager User's Guide
PLATE PACK WINDOW
Plate Packs are the core of SmartPlates. They are created, viewed and organized
from within a Plate Pack Selector widget. In addition to being part of the standard
SmartPlates layout, if you have SmartPlan, there is a layout that combines a flight
plan with a Plate Pack.
Tip: To quickly find a few procedures for a specific airport or two (or while in-flight),
it is probably more efficient to use a layout that includes a combination of the
Airport Selector widget and a Procedure Viewer widget such as SmartPlates
Viewer 1 (pre-flight) or SmartPlates In-Flight 1 or 2.
The widget is divided into several sections to help you find and select the right
Procedures and Diagrams for your flights.
66
Getting Started
Filter
The Filter area lets you quickly select airports and procedures. After you enter the
desired criteria, click Search and Voyager will fill the Available list with matching
airports.
OPTION
Checkboxes
States
Nearby airport(s)
DESCRIPTION
Toggles the Filter area on and off.
Same as selecting Show Filter from
the Procedures menu.
The top section of the filter area
controls the type(s) of procedures that
are selected. Check as many or as few
as you like.
Enter the US postal code (two letter
abbreviation) for as many or as few
states as you're interested in.
Separate multiple states with a space
or comma. Example: WA CA ID OR WY
Enter the name or ident of one or more
airports. Voyager will select not only
these airports but also any airport
within a 50 NM radius of each of these.
Separate multiple entries with a space
or comma. Example: PAE PDX SFO
As airport names often contain spaces,
it's sometimes difficult to enter multiple
airport names. In that event, it's
easiest to use idents rather than
names.
67
Voyager User's Guide
Group by State
Show Ident then Name
Show Name then Ident
Search
When checked, Voyager organizes the
Available list by state then by airport.
When unchecked, airports are listed
alphabetically. Same as selecting
Group by State from the Procedures
menu.
Airport idents (FAA 3 or 4 letter
versions) are shown, followed by the
airport's name. Same as selecting
Show Ident then Name from the
Procedures menu.
Airport names are shown before the
FAA ident. Same as selecting Show
Name then Ident from the
Procedures menu.
Populates the Available list area with
airports and Procedures that match all
of the criteria in the Filter area.
Available
The Available list shows the airports and procedures that match the criteria
specified in the Filter area. These procedures are not in the Plate Pack. Only the
Procedures and Diagrams in the Selected list are saved as part of the Plate Pack.
The Available list can be thought of as a 'rough draft' list that you manually narrow
down before it gets to the Plate Pack.
By default, the Available list contains every US airport with a Procedure or Airport
Diagram.
68
Getting Started
Note: Click an airport name to list its Procedures and Diagrams. Click a Procedure
to show it in a Procedure widget.
You can see detailed information about any airport by right-clicking on it and
selecting Show Info. You can also show the airport centered on a Chart by rightclicking on it and choosing Jump to.
OPTION
DESCRIPTION
Searches the Available list, by name or ident, for a specific airport.
If a particular Procedure or Diagram is selected, it's added to the
Selected list. If an airport is selected, all of its Procedures and
Diagrams are added. Same as selecting Add to Selected from the
Procedures menu or right clicking the mouse and choosing Add to
Selected.
Adds all the airports and Procedures in the Available list to the
Selected list. Same as selecting Add All to Selected from the
Procedures menu.
Selected
The Selected list shows all the Procedures and Diagrams that are in the Plate Pack.
The icons to the left of the airport name show optional categories, useful for print
organization (the top icon signifies a Fuel Stop, the third is Takeoff, the fourth is an
Alternate, and the second is Other). To categorize an airport: Select the procedure
or airport in the Selected list and right-click the mouse then pick a category from
69
Voyager User's Guide
the pop-up menu or select the category from the Procedures menu on the main
window.
Click a Procedure to show it in a Procedure widget. See detailed information about
any airport by right-clicking on it and selecting Show Info. Center an airport on a
Chart by right-clicking on it and choosing Jump to.
As you add airports, either from the Available list or by clicking on the Chart, the
Selected list may get out of sort order. To resort, choose Resort Selected List
from the Procedures menu.
OPTION
DESCRIPTION
Hides or shows the Selected area.
Searches the Selected list, by name or ident, for a specific airport.
If a particular Procedure or Diagram is selected, it's removed from the
Selected list. If an airport is selected, all of its Procedures and
Diagrams are removed. Same as selecting Remove from Selected
from the Procedures menu or right clicking the mouse and choosing
Remove from Selected.
Removes all the airports and Procedures in the Selected list. Same
as selecting Remove All from Selected from the Procedures menu.
Note: On the Chart related to the Plate Pack Selector, Voyager uses light-blue
circles to indicate all airports that have any type of Procedure or Airport Diagram
(not just those in Available). Those in the Plate Pack (that is, in the Selected list),
are also outlined in orange. You can hide the blue circles by selecting Show Only
Selected Airports from the Procedures menu.
70
Getting Started
SAVE A PLATE PACK
Save a Plate Pack to disk by selecting Save from the File menu or clicking the
button on the main toolbar. By default, Voyager first analyzes the Plate Pack and
warns if some of the procedures need to be downloaded or are out of date.
When a Plate Pack window is closed, Voyager prompts to save it if the Plate Pack
was changed since the last save. Use Save As, also on the File menu, to save the
current Plate Pack under a new name.
Note: A Plate Pack is simply a list of airports and procedures, not the procedures
themselves. That is, you email a Plate Pack to a friend, it will not be useful unless
they also have Voyager.
PRINT A PLATE PACK
Print Plate Packs by selecting Print from the File menu or clicking the
button
on the main toolbar. Depending on a setting in the Preferences section of the
Options dialog, Voyager first analyzes the Procedures and Diagrams to ensure that
they're downloaded and up-to-date (this is on by default for maximum safety).
Not only does Voyager print the Procedures and Diagrams in the Plate Pack, it
also prints a manifest of all the procedures printed, Airport Information for
selected airports and Charts that give you better situational awareness. Each of
these can be turned on or off and customized. See Print Setup for more
information.
OPEN A PLATE PACK
Existing Plate Packs are opened from disk in the usual way: Select Open from the
File menu or click the
button on the main toolbar. After Voyager verifies that all
the Procedures and Diagrams in the Plate Pack are still valid, a Plate Pack window
will appear. If any of the plates need updating because they have changed, Voyager
will warn you and begin downloading the changed plates.
CLOSE A PLATE PACK
Plate Packs are closed in the usual way: Select Close from the File menu or click
the
button in the upper right corner of the window. Voyager will prompt to save
the file if the Plate Pack hasn't been saved or has been changed since the last save.
71
Voyager User's Guide
EMBEDDING PLATE PACKS WITHIN FLIGHT PLANS
Within Voyager, flight plans (.fp files) and Plate Packs (.PlatePack files) are distinct
entities. However, it's often convenient to view or print them together so we made a
way to associate Plate Packs with flight plans.
To Add an Existing Plate Pack to a Flight Plan
•
•
•
•
Open or
create the flight plan in the usual way.
Select Add Plate Pack from the Plan menu and use the standard Windows
file open dialog to select the Plate Pack.
Once the combined entity opens, use the NavLog and Plate Pack tabs to
switch between the two.
Save the flight plan to save the reference to the Plate Pack.
To Add a New Plate Pack to a Flight Plan
•
•
•
Open or
create the flight plan in the usual way.
New from the File menu and select the Plate Pack tab. Choose
Select
either of the top options to create a default Plate Pack or the Blank option to
create a blank Plate Pack.
Save the flight plan to save the reference to the Plate Pack.
To Remove a Plate Pack from a flight plan
•
•
With the combined flight plan / Plate Pack open, select Remove Plate Pack
from the Plan menu.
Save the flight plan.
To Print a Flight Plan and the Associate Plates from the Plate Pack
•
72
With the combined flight plan / Plate Pack open, simply select
Print Preview or Print Settings in the usual way.
Print,
Layouts
Layouts
The Voyager Flight Software System shows information relevant to each stage of
flight from checking the weather, to pre-flight planning to enroute use, and more. It
does this by displaying one or more widgets. A widget is a portion of the screen
dedicated to showing a specific type of information. For example, there is a Chart
widget that shows a map, a NavLog widget that shows a standard navigation log, a
Wind Optimizer widget that shows in-flight winds aloft, and so on.
As there are many widgets and each can be displayed in a variety of different sizes
and locations, Voyager contains many pre-defined combinations of widgets, each
ideal for particular tasks or stages of flight. These are called Layouts. If you're
familiar with GPS systems, you can think of these as pages or screens. You can use
the Personal Layouts feature to create your own customized layouts.
When you click the
button, a menu appears:
The top item, Customize Layouts, is a way to create or modify a Personal Layout.
A Personal Layout is a way to create a screen setup exactly how you like it -- a
layout, the theme for each Chart, the zoom for each chart, etc. Once created, you
can have Voyager instantly switch to all those settings at once simply by selecting
the Personal Layout from the Layouts button (no Personal Layouts are shown in the
73
Voyager User's Guide
screenshot above; they would be listed just above the bar, below Save Layout
Settings).
Save Layout Settings sets the current Personal Layout to match whatever is
currently on the screen. This is a quick way to redefine a Personal Layout once set.
If Save Layout Settings is selected without a current Personal Layout, Voyager
creates one based on the way the screen is currently organized. Clicking Save
Layout Settings also saves the current Chart theme (or themes if the layout has
more than one chart), exactly as would clicking Save Chart Settings from the
button.
Below the bar are the standard layouts built-into Voyager. By default, to reduce
visual complexity, Voyager hides the less frequently used layouts and hides layout
that are inappropriate for a given screen size and orientation (landscape vs.
portrait). The ones shown on the menu screenshot above are the default common
layouts. You can customize this selection by selecting Layouts from the View menu
and clicking Customize.
The table below described all layouts.
The three columns of icons give you quick visual cues about each layout:
•
•
The current layout is indicated with a checkmark.
An icon representing the primary function (flight planning, in-flight, plates,
etc.).
Flight planning (SmartPlan)
In-flight information (GlassView)
Organizing procedures (SmartPlates)
•
An icon that indicates, approximately, what the resulting screen looks like.
One widget, full screen.
One set of tabs and one or more widgets on each tab.
Two widgets, split vertically.
or
74
Two widgets, split horizontally.
Layouts
Four widgets, split (approximately) into quadrants.
Three widgets, one primary on the left and two smaller ones on the right.
As above but mirror image.
Three widgets with the primary on top and two smaller ones below.
A complex layout with one primary on the top left, surrounded with four
additional widgets.
Layouts are grouped by primary use -- in-flight or desktop. That is, layouts designed
mainly for desktop pre-flight use are grouped together while the many in-flight
, the other layouts
layouts are grouped together. When you click
designed for the same function (desktop vs. in-flight) are listed first. Below those,
under a dividing line, are the other layouts listed alphabetically. This makes it easy
to find related layouts, especially while in the air.
FLIGHT PLANNING LAYOUTS (SMARTPLAN)
LAYOUT
Standard Flight
Plan
Chart and
Profile
NavLog
NavLog and
Chart
Big Chart
Flight Plan and
Plate Pack
DESCRIPTION
Shows a NavLog, a Chart and a Profile. Ideal for desktop
pre-flight planning. Essentially the same as the Flight Plan
window in Voyager 2.5 and earlier.
Shows a Chart and a Profile. Good for reviewing a flight
plan once the route is set.
Shows a full-screen NavLog. Excellent for a detailed review
of a flight plan, either desktop or enroute.
Shows a NavLog a Chart. Good for flight planning on
smaller screens or when SmartPlan Premier has not been
purchased.
Just as the name implies, a full-screen Chart.
A combined layout that, for IFR flights, shows both a detailed
flight plan (same as the Standard Flight Plan layout) but
also a Plate Pack Selector and Procedure widget. This lets
you work with both a flight plan and a related Plate Pack at
the same time.
ORGANIZING PROCEDURES (SMARTPLATES)
75
Voyager User's Guide
LAYOUT
SmartPlates
Flight Plan and
Plate Pack
SmartPlates
Viewer 1
SmartPlates
Viewer 2
SmartPlates
In-Flight 1
SmartPlates
In-Flight 2
DESCRIPTION
Like the layout used with SmartPlates version 1.0, this layout
shows a Plate Pack Selector, a Chart and a Procedure.
A combined layout that, for IFR flights, shows both a detailed
flight plan (same as the Standard Flight Plan layout) but
also a Plate Pack Selector and Procedure widget. This lets
you work with both a flight plan and a related Plate Pack at
the same time.
A landscape-mode layout that makes it easy to simply pick an
airport and view the procedures for it. No Plate Pack is
created.
Same as above but for portrait-mode.
A landscape-mode layout designed for in-flight use that
includes both a Procedure and Chart and an easy way to
select Procedures and take in-flight notes. It's almost
identical to SmartPlates Viewer 1 except with the Chart and
the Procedure reversed.
As above but for portrait-mode.
IN-FLIGHT INFORMATION (GLASSVIEW)
LAYOUT
Widescreen
Tabs
Splitscreen 1
(side by side)
Splitscreen 1
(stacked)
76
DESCRIPTION
A multi-widget layout ideal for larger landscape-mode
screens. It has one large tab area that toggles between a
Chart and Procedure and two smaller tabbed areas that
contain Nearest, Gauges, NavLog, AirportView and
Scratchpad on one tab and WindView and AirportSelector
on the other.
An excellent layout for smaller portrait-mode Tablet PCs that
uses one tab strip to switch between all the in-flight widgets
(Chart, Procedure, Gauges, Nearest, NavLog,
AirportView, Scratchpad, WindView and AirportSelector)
An excellent layout for landscape mode tablets that shows a
Chart on the left plus a tabbed column on the right that
provides access to the other inflight widgets (Procedure,
Gauges, Nearest, NavLog, AirportView, Scratchpad,
WindView and AirportSelector).
As above but for portrait mode tablets (longer than wide) so
the two areas are stacked on top of each other rather than
Layouts
Splitscreen 2
(side by side)
Splitscreen 2
(stacked)
VFR/IFR
Moving Map 1
VFR/IFR
Moving Map 2
VFR/IFR
Moving Map 3
VFR/IFR
Moving Map 4
IFR Moving
Map 1
IFR Moving
Map 2
IFR Moving
Map 3
SmartPlates
In-Flight 1
SmartPlates
In-Flight 2
Taxi
side by side.
Two Charts, side by side plus tabs that show all the other
widgets. Each Chart can be configured completely separately
so it's possible to show two different zoom levels, an IFR
Chart on one side and weather on the other, Track Up in one
Chart and North Up in the other, etc. A Personal Layout can
configure both Charts at the same time.
As above but for portrait mode tablets (longer than wide) so
the two areas are stacked on top of each other rather than
side by side.
A basic multi-widget moving map that works well for small or
large screens. It shows a large Chart on top of smaller
Nearest and Wind Optimizer widgets.
This layout is ideal for small screens. It shows a Chart on
the left side with a small Nearest below it. On the right, it
has a small Wind Optimizer widget and Airport Info below.
A good general purpose in-flight layout with a large Chart on
the left and smaller Nearest and Airport Info widgets to the
right.
As above but with a Wind Optimizer below the Chart. It's
the default VFR GlassView layout for larger screens.
A good general-purpose IFR layout with a large Chart above
a small Nearest plus a Procedure area above an Airport
Info on the right.
As above but with a Wind Optimizer sandwiched between
the Chart and the Nearest. It's the default IFR GlassView
layout for larger screens.
An excellent layout for portrait-mode displays but also useful
for landscape-mode. It has two areas stacked on top of each
other. The top area shows your choice of Chart, Procedure
or AirportView and the bottom switches between Nearest,
NavLog, WindView, Scratchpad and AirportSelector.
A landscape-mode layout designed for in-flight use that
includes both a Procedure and Chart and an easy way to
select Procedures and take in-flight notes. It's almost
identical to SmartPlates Viewer 1 except with the Chart and
the Procedure reversed.
As above but for portrait-mode.
A good layout for pre-flight or post-flight taxi. It has a
relatively small Chart with Airport Info below it (to show
various Com frequencies and the runway diagram) and a
large Procedure area next to it. If downloaded, the airport
diagram or an approach procedure for the closest airport is
automatically displayed.
77
Voyager User's Guide
Airport Information
The Airport Information widget is conceptually similar to Voyager's standard Airport
Information dialog box except optimized for in-flight use. It's used in most
GlassView layouts.
By default, it shows airport information about the closest Class B, C or D airport
(within a maximum range) of your current location. If you'd like to see smaller
airports, check the Show small apts box. If you manually request information
about a particular airport (by clicking on the Chart or in a Nearest widget), that
airport's data will be shown here and the Lock checkbox will check. When checked,
78
Layouts
Locked tells Voyager to leave that airport's information on the screen rather than
update it with the closest airport.
icon indicates that the airport has fuel although it does not take hours of
A
availability or type of fuel into account. Click the airport's ident (PAE/KPAE in this
case) to bring up the complete Airport Information dialog or the fuel price for
more fuel info.
Tip: You can see even more information about this airport or select other airports
either by clicking the name of the current airport (it's blue and underlined) or using
the Airport Selector widget.
There are four categories of information: General, Weather, Approaches and
Departures. Click the appropriate button to see the information (General is selected
in the example above).
The most important information is shown at the top of the widget (the Key
Information below) or on the General tab.
KEY INFORMATION
OPTIONS (CLOCKWISE FROM THE
TOP LEFT)
Airport Name
Distance and Bearing
Weather conditions
Elevation
TPA
Max runway length
Hours of operation
DESCRIPTION
The official name of the airport.
The distance and bearing (magnetic)
from your current position to this
airport.
VFR, IFR, MVFR or blank. Blank
indicates no valid TAF or METAR for this
time at this airport.
The airport's reported elevation.
The stated or estimated traffic pattern
altitude.
The length of the longest runway.
If an operating schedule is available,
the field contains information in the
following format:
Month(s)/Days of the week/Time
(local)
If the field has more than one
schedule, generally depending on the
month, additional schedules are
separated by a comma.
Examples:
ALL/ALL/ALL
79
Voyager User's Guide
The airport is open every month, every
day and every hour. This is typical for
major airports.
NOV-APR/ALL/0700-1800,MAYOCT/ALL/0700-2100
Between November and April, the
airport is attended every day of the
week from 7AM to 6PM local time and
between May and October from 7AM to
9PM.
Note: In some cases, this field
represents the hours during which the
field is attended but the field may be
open for uncontrolled traffic during
additional hours. It is not uncommon,
for example, for a Class D airport to be
attended less than 24 hours a day but
revert to a usable Class E airport
during the other hours.
Shows the lowest fuel price at this
airport if you have a current
ChartData subscription or the types
of fuel available as reported in the
FAA's AF/D.
Fuel prices
Click to see additional info and the
prices at nearby airports.
Fuel prices from 100LL.com.
Runway surface(s)
Tip: Voyager displays and uses fuel
prices in many useful and
innovative ways. See all the
different ways by clicking here.
Indicates which surfaces (Hard, Soft,
etc.) are available.
GENERAL
OPTION
DESCRIPTION
Sets this airport as the next waypoint.
Adds this airport to the flight plan in the sequence you select.
Shows the Runway Selector dialog box that makes it easy to find the
80
Layouts
best runway and add an approach to the flight plan. As this button
adds multiple points to the flight plan, an airport must be on the
flight plan before Rwy can be used. If the airport is not on the flight
plan, Rwy asks if you want to add it to the end.
Tip: To add the airport somewhere other than the end, use the new
+FP button first then click Rwy.
Centers the current Chart on this airport.
Shows the FAA taxi diagram, if available, in a Procedure widget. If
no Procedure widget is on the screen, the diagram appears in a fullscreen window.
If the FBO information has been previously downloaded, Voyager
displays it in a full-screen window.
Runway
diagram
Comm
Nav
Tip: Before you fly, you can download FBO information for all the
airports along your route with the Download Airport Information
dialog box.
For land airports and sea-plane bases, an approximate diagram of
the runways, excluding helipads. Runways are numbered and red
arrows indicate right-hand patterns. Hard land runways and water
runways are drawn in black and soft land runways in light gray.
If available, surface winds are graphically depicted over the runway
diagram. Click the diagram to toggle the wind information on and
off.
The published communication frequencies for this airport, listed
alphabetically. The name of the tower, if applicable, is shown on the
Comm line (e.g. Comm (PAINE)).
The applicable navaids for this airport, including type, frequency,
name (ident) and range (if known). Click an entry to see more
detailed information.
WEATHER
This tab shows current and forecast weather conditions at this airport.
If you're connected to the Internet and Allow background weather
downloads is turned on, weather information is downloaded or
refreshed as the dialog appears. Current weather is also show if
you're connected via an XM WX weather receiver. If the weather is
not completely downloaded when you click this tab, you may see the
information refresh itself.
OPTION/FIELD
Current conditions
DESCRIPTION
The most current METAR available for
this airport or the nearest airport with
a METAR.
Click the text to view the report in a
full-screen window using large fonts.
81
Voyager User's Guide
Forecast
Winds aloft
The most current TAF available for this
airport or the nearest airport with a
TAF.
Click the text to view the report in a
full-screen window using large fonts.
The currently-valid Winds Aloft (FD) at
the closest reporting station to this
airport. Click the phrase Winds Aloft
to see the entire Winds Aloft table.
The reporting station's ident is also
shown if it's not this airport. Click that
ident to see information about the
reporting station.
The Winds Aloft table shows the wind
direction (true, not magnetic) and
speed at the various altitudes (MSL)
shown at the top of the table. If
available, the outside air temperature
at each altitude is shown in
parenthesis.
Note: Winds Aloft is only displayed if
the closest reporting station is within
200 NM of this airport. Voyager only
downloads US and Canadian data.
APPROACHES / DEPARTURES
These tabs show lists of published procedures. Click a procedure to
see it in a Procedure widget. If no Procedure widget is on the screen,
the procedure appears in a full-screen window.
82
Layouts
Airport Selector
The Airport Selector widget is a quick way to select an while airport in-flight. It's in
many layouts including IFR Moving Map 3, Combo 1 and the SmartPlates In-Flight
layouts.
It contains an easy-to-use, oversized keyboard designed for in-flight use. Entering
an airport name or ident shows information about that airport in an Airport Info
widget (if on the screen) or in a separate dialog box.
Enter the name or ident of the airport then click
character.
. Click
to delete the last
Tip: Uncheck the Airports only checkbox to search for any type of item such as a
Navaid.
Tip: If a flight plan is open, click
to immediately select any airport in the plan.
83
Voyager User's Guide
Chart
The Chart widget displays aviation and/or weather information on a map (Chart).
It's used in most layouts; some layouts even include two Charts. Its look varies
somewhat depending on the type of layout. For example, in a desktop planning
environment (SmartPlan layouts), the Chart normally has toolbars, a timeline and an
altitude slider. However, in an in-flight environment, these elements are removed so
Voyager can show more information.
SECTION
Gaugebar
Chartbar
84
DESCRIPTION
When in GlassView mode, Voyager
normally displays a series of gauges
that provide valuable in-flight
information such as course, speed,
altitude and much more.
The Chartbar, optionally shown during
GlassView, is essentially a large-button
version of the Layers toolbox that's
easy to use in-flight. The Chartbar is
off by default but can be turned on by
selecting Show Chartbar from the
View menu while in GlassView mode.
When shown, it's visible regardless of
the Cmd mode.
Layouts
Toolbar
Chart
Layers
Time slider
Altitude slider
Note: Unlike the Layers toolbox,
turning a layer on with the Chartbar
also ensures that the layer's key range
settings are such that the layer will
actually appear (that is, it alters the
declutter settings for that layer if
necessary so if you turn the layer on, it
always shows up).
Contains various tools for adding,
deleting and moving waypoints and
controlling the zoom-level (range).
The actual Chart (map) display.
Buttons that control which layers
(airspace, airport, rivers, terrain, etc.)
are shown.
Determines the time used for the
weather display.
Determines the altitude level for the
Winds aloft display.
TOOLBAR
The toolbar is normally shown in desktop layouts (SmartPlates, SmartPlan, etc.) and
hidden in enroute (GlassView) layouts.
ICON/FEATURE
DESCRIPTION
The left (back) button restores the
previous Chart settings and location
and the right (next) button goes
forward.
Prints the current Chart but not any
associated Flight Plan or Plate Pack.
The output can be sent to a printer, to
the screen (print preview) or to an
Adobe PDF file (not available with
Voyager FreeFlight). You may also
select whether the print uses the full
width of the paper or just half the
width, making it more suitable for
kneeboards.
To print the entire flight plan (NavLog,
Airport Info, Weight and Balance, etc.),
use the Print command on the File
menu or the Print icon on the main
toolbar.
Click to show a legend that describes
the colors and symbols used to depict
85
Voyager User's Guide
weather.
The pointer automatically adapts to
what is nearby. For example, if a
Flight Plan window is open and the
pointer is near the flight path, this tool
moves (click and drag a selected point)
and creates new legs (click and drag
the flight path line). If you're over an
airport click, Voyager shows
information about the airport. If you
click and drag over a general area (not
starting near a flight path), Voyager
zooms to the selected area.
Note: In GlassView mode, the pointer
can only select points, not create new
ones or move legs. This keeps helps
avoid inadvertent flight plan changes.
The grab tool makes it easy to move
the Chart. Select this tool then click
and drag. The Chart will move with the
mouse until you release it.
Voyager guards against accidental
movement of the Chart by only moving
the Chart once you move the stylus a
certain amount; move it less than that
and Voyager acts like you just clicked
on a point for information about the
area.
Only shown in SmartPlates layouts.
Used to selects all the airports within a
given region into SmartPlate's
Selected list.
Hidden in SmartPlates layouts.
Changes the cursor to a push-pin tool
that adds waypoints to the plan.
Similar to the Pointer, if the cursor is
near an existing waypoint, the cursor
becomes a four-way arrow, denoting
that the waypoint will be moved if you
click-and-drag. If the cursor is on or
near the line between two waypoints,
the cursor also becomes a four-way
arrow, now implying that you can
"rubber-band" the line, creating a new
waypoint between the two other points.
Except for adding a new point to the
end of a flight plan, the Pointer tool
above does everything this tool does.
86
Layouts
Selects the distance and bearing
measurement tool. Click-and-drag to
draw a temporary line between any two
points. A small window appears,
showing distance, bearing,
maximum/minimum elevation, etc.
Click and hold to smoothly zoom in
(decrease range) the Chart.
You can also zoom using the mouse
wheel or with Ctrl +.
Click and hold to smoothly zoom out
(increase range) the Chart.
Range or Alt
Jump to
You can also zoom using the mouse
wheel or with Ctrl -.
Customizes the chart. The customize
dialog allows simultaneous setting of
all the layers as well as provides access
to the more advanced customization
features.
Sets the center and range of the chart
such as to show the entire flight plan.
In 2D mode, the Range drop-down list
shows the current range in NM. Select
an item from the list to redraw the
Chart at a different range, keeping the
same center point. Range is defined as
the smaller of the visible horizontal or
vertical radius from the center. For
example, in the diagram below, the
horizontal range is 80 NM and the
vertical is 50 NM so Voyager reports
the range, conservatively, as 50 NM.
In 3D HITS mode, Voyager displays the
eye altitude. That is, the altitude
required for the view displayed.
A quick access tool that lets you enter
a place name and move/center the
chart to that location. Recent locations
are listed in the drop-down for
immediate selection.
CHART
87
Voyager User's Guide
The Chart can work in either 2D (as shown above) or 3D mode. Use
lower toolbar to toggle between modes.
on the
The colors and symbols on a chart depend on the Mode (IFR vs. VFR/DVFR). The
above example uses VFR colors/symbols and shows most available layers at a 50 NM
range. This includes a detailed land outline, high-precision (1K blocks) terrain
elevation, airspace (TFRs in red), navaids, low-level airways, cities, rivers and
airports. As the range decreases (zoom-in), more details would be shown including
runways (and runway numbers) at the correct size and orientation, airway radials,
etc. Airports with fuel are depicted with a small Fuel icon and current fuel prices.
Move the chart by using the Hand tool and your mouse, as described above. You can
also use the Navigator (the compass wheel in the top right corner) to move, rotate
or zoom the chart. Using the Navigator, use the center button like a joystick to
move in any direction or the 4 arrow buttons to move in standard directions. Click
and rotate the ring to rotate the Chart and double-click anywhere on the ring to
reset to North up. Use the + and - buttons and the slider on the right to zoom or
and
buttons on the Chart toolbar. In preflight layouts, the Navigator
use the
is on by default but can be toggled by pressing F12 or selecting Show Navigator from
the View menu. In GlassView layouts, the Navigator is hidden by default but turns
on when invoked as previously described or Cmd is engaged.
See more about zooming or panning the Chart.
Individual layers are toggled with the Layers toolbar and multiple layers set
simultaneously by selecting Customize Chart from the
88
button.
Layouts
When in GlassView mode, the top of the Chart will have indicators about the GPS
connection and whether or not TAWS is turned on. If there is a problem with the
GPS connection, you can click on the indicator for troubleshooting help.
LAYERS
Note: GlassView also displays a large ChartBar at the top of the screen, rather than
the Layers Toolbox, that functions very similarly to the Layers toolbox but with much
larger buttons. The GlassView Chartbar does behave differently in one regard: When
a layer is turned on via the Chartbar, Voyager automatically adjusts the layer's
Range settings, if necessary, so that the selected layer is displayed. The Layers
Toolbox, by contrast, may turn a layer on but if the layer's Range settings are set to
only show items when zoomed more closely, nothing may appear on the Chart until
it's zoomed.
The Layers toolbar selects which layers are shown on the Chart.
Each of these has options, accessible by selecting Customize Chart
from the
ICON
button.
DESCRIPTION
Displays airports.
Displays airspace.
Displays airways, either lowlevel (Victor) or high-level (Jet).
Displays cities.
Displays terrain elevation
colors.
Displays man-made obstacles
near airports.
Displays lakes and rivers.
Displays major roads.
Displays navaids.
Displays personal waypoints and
off-airway waypoints.
Shows colored circles (10 NM
radius) over reporting points
indicating if the conditions are
VFR
, IFR
or Marginal VFR
89
Voyager User's Guide
. Click any colored area to
see additional details in an
Airport Information dialog. By
default, the Chart shows the
most recent information from
each location, which does not
necessarily mean they represent
the readings taken at the same
time. To see conditions at a
specific time, uncheck the
Latest checkbox in the Time
slider area and move the time
slider to a specific time.
Note: If you're using standard
weather colors (not Voyager's
default setting), you'll see a
different color set: Blue = VFR,
Green = MVFR, Yellow = IFR and
Red = LIFR.
This information is derived from
a combination of METARs and
TAFs, depending on the time
selected in the Time Slider.
Shows colored areas
representing the amount of
radar energy reflected at the
time indicated on the time slider,
effectively meaning the
cloud/rain density at a point in
the past.
The greenish hues represent the
lightest cloud cover required for
rain (10-35 dBZ). The yellow
and orange colors mean a
medium rain (36-45 dBZ) and
everything from red (46 dBZ) on
means a heavy rain.
Radar data is only available
within the United States (all 50
states). As radar data is not
predictive (that is, only available
for the past), Voyager shows an
"after-image" of the last radar
image for a few hours after the
90
Layouts
last image was processed.
The Cloud Tops layer uses
shades of grey to represent the
cloud altitude (cloud tops)
observed by infrared satellite at
the time indicated on the time
slider.
The darker the color, the lower
the cloud layer. The highest
layer (white) indicates clouds
present above 40,000 Ft.
Moving the altitude slider
changes the threshold at which
cloud levels are suppressed.
This layer, called Echo Tops,
shows the tops of each radar
echo using shades of pink to
represent radar returns (echoes)
at different altitudes.
The darker the color, the lower
the top of the radar echo. The
highest layer (white) indicates
radar echoes present above
40,000 Ft.
In practice, Echo Tops indicates
the highest altitude at which
precipitation appears (hence the
raindrop icon).
Moving the altitude slider
changes the threshold at which
radar echoes are suppressed.
For example, if you move the
altitude slider to 12,000 Ft., all
the pink you see indicates
precipitation present at or above
12,000 Ft. If moving the slider
to 20,000 Ft. hides all the pink,
it means that there is no
precipitation at or above 20,000
Ft.
91
Voyager User's Guide
Shows the location of lightning
strikes within the past seven
minutes.
Displays arrows representing
wind speed and direction at wind
reporting stations during the
time specified on the Time
slider at the altitude indicated
on the Altitude slider. The
arrow points to the direction that
the wind is heading (e.g. an
arrow pointing straight up means
the wind is heading towards
0/360 degrees or from 180
degrees). Green arrows denote
wind speed at or less than 20 kts
and yellow arrows indicate wind
greater than 20 kts but less than
60 kts. Red arrows indicate
winds equal to or greater than
60 kts. If there is sufficient
room on the Chart, a circle
within the arrow shows wind
speed converted to the Speed
units specified in the Units tab
of the Options dialog. Light and
variable winds are shown by a
small dot within a circle. Winds
aloft are available within the US
and Canada only.
TIME SLIDER
The Time Slider is normally shown in desktop layouts (SmartPlates, SmartPlan, etc.)
and hidden in enroute (GlassView) layouts.
Weather readings are generally available over a wide time period. The Time slider
controls which weather readings are displayed on the Chart.
Move the slider by clicking just above the black bar or by dragging the triangle
pointer. The horizontal axis shows the available times (in hours) with their
associated dates below. The Time caption notes if the display is in Home or Zulu
time.
If weather data is available during the flight period, the applicable portion of the
black slider line becomes green. In the above example, the flight takes place
92
Layouts
between approximately 4:30 pm and 10:30 pm. If the flight has a fuel stop, the
layover time is shown in black to indicate that you're not actually in flight.
Animate the display to see trends by clicking the Play button to the left of the slider.
ALTITUDE SLIDER
The Altitude Slider is normally shown in desktop layouts (SmartPlates, SmartPlan,
etc.) and hidden in enroute (GlassView) layouts.
Winds Aloft data, Cloud Tops and Echo Tops are available for specific
altitudes (MSL) at specific times. Move the Altitude slider, by
clicking to the right of the black line or dragging the triangle, to
display data from different altitudes. Move the Time slider to
change the applicable date/time. Winds Aloft data is available in
tabular format from the Winds Aloft dialog, shown by selecting
Show Winds Aloft Table from the Weather menu.
93
Voyager User's Guide
NavLog
The NavLog widget is a table that shows the details of each flight leg. Its look and
behavior varies somewhat if used pre-flight or in-flight.
By default, the pre-flight view is wide enough to display just three columns, Name,
Type and Alt (Altitude) but more can be shown using the toolbar or moving the
splitter to the left of the NavLog. It is in the same pane as the Plan area.
By default, the in-flight view shows a different set of columns, more applicable to inflight use. Also, it is edited in-flight with the use of a single click that opens an
oversized list of applicable tasks (Add a leg, Direct To, Add SID/STAR, Clear the Plan,
etc.).
Note: The File menu has three commands related to printing the NavLog:
•
•
•
Print: Prints the NavLog plus other information related to this flight plan
such as weather, airport info, weight and balance, etc.
Print Preview: Same as above but as an on-screen preview.
Print Setup: Controls which items (NavLog, Airport Information, etc.) are
printed as well as sets options specific to each item.
Note: Right-click the mouse in the Name column of a NavLog entry to get a list of
actions to perform on that entry. These include Show Info, Remove Leg, Add
SID/STAR, etc.
TOOLBAR
ICON
DESCRIPTION
Adds a new row to the bottom of the NavLog table. Equivalent to
selecting Add Leg from the Plan menu and similar to using the
tool
on the Chart toolbar.
Deletes the current row of the table. Equivalent to selecting Delete Leg
from the Plan menu.
Inserts a leg just above the current row. Equivalent to Insert Leg on
tool to "rubber band" insert
the Plan menu and similar to using the
a leg between two existing points on the Chart window.
Selects which columns are displayed using the Customize NavLog
dialog. If the table is too narrow to display all the columns, use the
horizontal scrollbar or click
94
to expand the table. Note: The
Layouts
columns shown on a printed NavLog are controlled independently using
the Customize button of the Standard Navigation Log printing plugin.
Prints the NavLog without the other documents normally printed when a
flight plan is printed. The output can go to a printer, to the screen (print
preview) or to an Adobe PDF file (not available with Voyager FreeFlight).
You can also select to print in normal kneeboard size or full-page size.
To print all flight documents (NavLog, Charts, Airport Info, Weather,
Weight and Balance, etc.), use the Print command on the File menu or
click the Print icon on the main toolbar.
Toggles between showing the user-defined legs (the default) and all
legs, including the implied Begin Cruise and Begin Descent legs that
Voyager calculates. If all legs are show, the flight route may not be
changed via either the NavLog or the Chart since some points are
calculated based on aircraft performance and winds-aloft.
Shows or hides the Plan area of the NavLog. Enabled only when
Voyager is running on a screen with very limited vertical size such as the
Samsung Q1 in landscape mode.
Expands or contracts the pane. When expanded, it shows more columns
in a format very similar to a standard navigational log. Not available
while in flight.
TABLE
Note: By default, some of these columns are not shown. Use the
select the displayed columns.
COLUMN
Name
Type
button to
DESCRIPTION
The name of the leg. Typically, this is
the ident of the airport or navaid but it
can be any text. The name is supplied
automatically if the leg was created on
tool. If you
the Chart with the
manually enter text here, including
overwriting existing text, Voyager
scans airports, navaids and cities for
matches, raising a Locations dialog if
the text is ambiguous.
The waypoint type: Takeoff, Landing,
Stop and Go, Touch and Go, or
Waypoint (general non-landing point).
Fuel may only be added during Takeoff
and Stop and Go legs (by default, the
aircraft is filled to its useable fuel
capacity on the first leg). A flight plan
must have exactly one Takeoff and one
Landing waypoint but as many Touch
and Go, Stop and Go and Waypoint
95
Voyager User's Guide
Alt (Altitude)
WindDir (Wind direction)
WindSp (Wind speed)
TAS
GS (Groundspeed)
TCrs
THdg
MHdg
96
waypoints as desired.
The altitude at the end of the leg. The
initial value is the default value
specified in the Altitude field of the
Defaults tab in Options, as modified
to a cardinal altitude for the heading
and IFR/VFR mode.
The direction (true) from which the
wind is coming, in degrees. The value
may be hand-entered or, more
commonly, applied by Voyager when it
automatically downloads weather. In
that case, the value is based on the
altitude, location and date/time of the
leg.
The wind speed. The value may be
hand-entered or, more commonly,
applied by Voyager when it
automatically downloads weather. In
that case, the value is based on the
altitude, location and date/time of the
leg.
The True Airspeed of the leg. By
default, cruise legs (any leg manually
entered) are set to the Cruise TAS of
the selected aircraft but the value may
be manually changed. The TAS of a
Voyager-created leg (Begin Cruise,
Begin Descent) is determined by the
Climb/Descend performance of the
aircraft and cannot be directly changed
(you can modify the aircraft's
performance or change aircraft,
however, resulting in a change here).
The implied groundspeed, after taking
TAS and wind into account. Not
editable and not shown, by default.
The implied true course from this leg to
the next. Neither magnetic variation
nor wind are taken into account. Not
editable and not shown, by default.
The implied heading required to adjust
TCrs to compensate for the wind.
Magnetic variation is not taken into
account. Not editable and not shown,
by default.
The compass heading that should be
flown to travel from the starting point
of this leg to the starting point of the
next leg. Both wind and magnetic
variation are taken into account. Not
editable.
Layouts
Dist (Distance)
Duration
Layover
+Fuel
-Fuel
FuelRem (Fuel remaining)
The ground distance covered during
this leg. Not editable.
The time required to fly this leg in
hours, minutes and seconds
(HH:MM:SS). Not editable.
The layover time, if any, for a Stop and
Go leg. Editable but only for Stop and
Go legs. The default layover time may
be set in the Defaults tab of the
Options dialog box.
The fuel added at the start of this leg.
Editable but only for Takeoff and Stop
and Go legs.
The fuel used during this leg. Not
editable.
The fuel remaining after the end of this
leg. Not editable.
97
Voyager User's Guide
Nearest
The Nearest widget gives you immediate information about the nearest airports,
navaids or airspace. The data is automatically updated with each GPS movement so,
in case of an emergency, the information you need for a safe landing is already on
the screen. It's used in most GlassView layouts.
The selector at the top chooses between Airspace, Airports and Navaids.
Clicking any row in the table shows more detailed information about the item.
Tip: Click the top of each column (the header) to sort by that column.
AIRSPACE
The Airspace list shows each layer of the airspace that the aircraft is currently in. By
default, it's sorted such that the lowest airspace layer (like Surface) is at the top of
the list and the highest layer (usually Unlimited) is at the bottom. Click the top of
any column to sort by that column.
Note: The airspace Floor and Ceiling are shown in MSL or as Unknown or
Unlimited. If the airspace was originally expressed as AGL, the Floor and Ceiling
98
Layouts
values (displayed as MSL) are computed by adding the elevation of the
Latitude/longitude of this point to the given AGL. By contrast, if you click on an
airspace for more information, Floor and Ceiling for AGL values are computed using
the center of the airspace region. This can cause slightly different Floor and/or
Ceiling values.
OPTION
Class
Floor
Ceiling
Com freq1
Com freq2
Com name
DESCRIPTION
The ICAO class of the airspace or MOA,
TFR, etc.
The bottom of the airspace (MSL) in
the Altitude units specified in the
Options dialog or Surface/Sfc or
Unknown.
See the Note above.
The top of the airspace (MSL) in the
selected units or Unknown or
Unlimited.
See the Note above.
The primary communications
frequency, if any.
The secondary communications
frequency, if any.
The name of the controlling
organization.
AIRPORTS
By default, airports are sorted by distance from the current location. Click the top of
any column to sort by that column.
OPTION
Fuel
100LL or JetA
DESCRIPTION
A fuel icon indicates that this airport
has fuel according to the FAA's AF/D
publication. The operating hours and
types of fuel are not taken into account
and it's possible for substantial
differences between the verified fuel
data (below) and what the AF/D claims.
Shows the lowest fuel price at this
airport for the type of fuel required by
the current aircraft. Requires a current
ChartData subscription.
Fuel prices from 100LL.com. These
prices are verified frequently and
should be considered much more
accurate than the FAA's AF/D data, as
99
Voyager User's Guide
noted above.
Ident
Dist/ MHdg to
Name
Class
Max rwy
Wx
Tip: Voyager displays and uses fuel
prices in many useful and
innovative ways. See all the
different ways by clicking here.
The FAA ident, if applicable, and the
ICAO ident, if applicable.
The distance and magnetic heading
from the current location to this
airport.
The official name of the airport.
While airports are not technically
assigned a class, the predominant
airspace surrounding them implies a
class. When possible, Voyager shows
this implied class here.
The length of the longest runway at
this airport.
If a current METAR or TAF is available
for the airport, this field shows green
for VFR, red for IFR or yellow MVFR. A
blank field indicates no valid report, not
necessarily VFR conditions.
Note: If Voyager is set to Use
standard weather symbols and
colors, a blue dot means VFR, green is
MVFR, yellow is IFR and Red is LIFR.
NAVAIDS
By default navaids are sorted by distance from the current location. Click the top of
any column to sort by that column.
OPTION
Type
Ident
Frequency
To / From
Dist
Name
100
DESCRIPTION
An icon representing the type of navaid
(VOR, NDB, etc.).
The ident of the navaid.
The frequency of the navaid.
Using the published magnetic variance
for the this navaid, this shows the
standard TO and FROM radials relative
to the current location (MHdg).
The distance from the current location
to the navaid.
The name of the navaid. This is
especially relevant for NDBs as they
are typically referred to by name rather
than ident, unlike VORs.
Layouts
Plate Pack Window
Plate Packs are the core of SmartPlates. They are created, viewed and organized
from within a Plate Pack Selector widget. In addition to being part of the standard
SmartPlates layout, if you have SmartPlan, there is a layout that combines a flight
plan with a Plate Pack.
Tip: To quickly find a few procedures for a specific airport or two (or while in-flight),
it is probably more efficient to use a layout that includes a combination of the
Airport Selector widget and a Procedure Viewer widget such as SmartPlates
Viewer 1 (pre-flight) or SmartPlates In-Flight 1 or 2.
The widget is divided into several sections to help you find and select the right
Procedures and Diagrams for your flights.
101
Voyager User's Guide
FILTER
The Filter area lets you quickly select airports and procedures. After you enter the
desired criteria, click Search and Voyager will fill the Available list with matching
airports.
OPTION
Checkboxes
States
Nearby airport(s)
DESCRIPTION
Toggles the Filter area on and off.
Same as selecting Show Filter from
the Procedures menu.
The top section of the filter area
controls the type(s) of procedures that
are selected. Check as many or as few
as you like.
Enter the US postal code (two letter
abbreviation) for as many or as few
states as you're interested in.
Separate multiple states with a space
or comma. Example: WA CA ID OR WY
Enter the name or ident of one or more
airports. Voyager will select not only
these airports but also any airport
within a 50 NM radius of each of these.
Separate multiple entries with a space
or comma. Example: PAE PDX SFO
As airport names often contain spaces,
it's sometimes difficult to enter multiple
airport names. In that event, it's
easiest to use idents rather than
names.
102
Layouts
Group by State
Show Ident then Name
Show Name then Ident
Search
When checked, Voyager organizes the
Available list by state then by airport.
When unchecked, airports are listed
alphabetically. Same as selecting
Group by State from the Procedures
menu.
Airport idents (FAA 3 or 4 letter
versions) are shown, followed by the
airport's name. Same as selecting
Show Ident then Name from the
Procedures menu.
Airport names are shown before the
FAA ident. Same as selecting Show
Name then Ident from the
Procedures menu.
Populates the Available list area with
airports and Procedures that match all
of the criteria in the Filter area.
AVAILABLE
The Available list shows the airports and procedures that match the criteria
specified in the Filter area. These procedures are not in the Plate Pack. Only the
Procedures and Diagrams in the Selected list are saved as part of the Plate Pack.
The Available list can be thought of as a 'rough draft' list that you manually narrow
down before it gets to the Plate Pack.
By default, the Available list contains every US airport with a Procedure or Airport
Diagram.
103
Voyager User's Guide
Note: Click an airport name to list its Procedures and Diagrams. Click a Procedure
to show it in a Procedure widget.
You can see detailed information about any airport by right-clicking on it and
selecting Show Info. You can also show the airport centered on a Chart by rightclicking on it and choosing Jump to.
OPTION
DESCRIPTION
Searches the Available list, by name or ident, for a specific airport.
If a particular Procedure or Diagram is selected, it's added to the
Selected list. If an airport is selected, all of its Procedures and
Diagrams are added. Same as selecting Add to Selected from the
Procedures menu or right clicking the mouse and choosing Add to
Selected.
Adds all the airports and Procedures in the Available list to the
Selected list. Same as selecting Add All to Selected from the
Procedures menu.
SELECTED
The Selected list shows all the Procedures and Diagrams that are in the Plate Pack.
The icons to the left of the airport name show optional categories, useful for print
organization (the top icon signifies a Fuel Stop, the third is Takeoff, the fourth is an
Alternate, and the second is Other). To categorize an airport: Select the procedure
or airport in the Selected list and right-click the mouse then pick a category from
104
Layouts
the pop-up menu or select the category from the Procedures menu on the main
window.
Click a Procedure to show it in a Procedure widget. See detailed information about
any airport by right-clicking on it and selecting Show Info. Center an airport on a
Chart by right-clicking on it and choosing Jump to.
As you add airports, either from the Available list or by clicking on the Chart, the
Selected list may get out of sort order. To resort, choose Resort Selected List
from the Procedures menu.
OPTION
DESCRIPTION
Hides or shows the Selected area.
Searches the Selected list, by name or ident, for a specific airport.
If a particular Procedure or Diagram is selected, it's removed from the
Selected list. If an airport is selected, all of its Procedures and
Diagrams are removed. Same as selecting Remove from Selected
from the Procedures menu or right clicking the mouse and choosing
Remove from Selected.
Removes all the airports and Procedures in the Selected list. Same
as selecting Remove All from Selected from the Procedures menu.
Note: On the Chart related to the Plate Pack Selector, Voyager uses light-blue
circles to indicate all airports that have any type of Procedure or Airport Diagram
(not just those in Available). Those in the Plate Pack (that is, in the Selected list),
are also outlined in orange. You can hide the blue circles by selecting Show Only
Selected Airports from the Procedures menu.
105
Voyager User's Guide
Procedure View
The Procedure widget shows airport diagrams and approach, arrival or departure
procedures. It's used in most IFR GlassView layouts and in all SmartPlates layouts.
When Command Mode is On, there is a toolbar on the top. With Command Mode
Off, the toolbar is hidden.
106
Layouts
You can move (pan) the procedure by clicking and dragging the mouse. Double-click
to show it in a full-screen window.
Note: In the above picture, the aircraft's current location is indicated by the aircraft
within the green circle. As your aircraft moves, this position is continually updated
because the procedure is geo-referenced. This requires a ChartData subscription
at the EFB level. You can indicate the aircraft's position with an aircraft icon, a green
circle or both with a choice within the GPS area of the Options dialog box.
OPTION
DESCRIPTION
Zooms in (makes larger) by 50%.
Zooms out by 50%.
Automatically sizes the Procedure such that it fits the available space
in terms of both height and width.
Automatically sizes the Procedure so it fits full width.
Rotates the Procedure 90 degrees clockwise.
Rotates the Procedure 90 degrees counter-clockwise.
For multi-page Procedures (Minimums, for example), moves to the
previous page.
For multi-page Procedures, moves to the next page.
Prints the current Procedure.
Shows the current Procedure in a full-screen window. Double-clicking
the procedure has the same effect.
The FAA puts a date on the left side of each procedure. This is NOT an expiration
date. Rather, it's just the date that the procedure was printed. Since the FAA
reprints procedures every 28 days, this date changes every 28 days; it is in no way
related to when the procedure may expire since there is no way the FAA can predict
when they will materially change the procedure in the future. That is, unlike
sectionals and IFR charts, procedures have no pre-determined expiration dates; they
only become obsolete when the FAA decides to change them. The FAA provides us
with a database of when each procedure was materially changed, requiring a new
download. We use this information to put our own valid dates at the top of the
procedure. Each 28 days, when Voyager checks for new data, it uses this FAA
database to determine which plates have materially changed and, thus, need to be
downloaded. Voyager does not download procedures that have not materially
changed because doing so would require downloading about 700 MB each month.
That said, you can force Voyager to download a full set of all 13,000+ procedures by
selecting Download All Procedures from the Tools menu and selecting the second
option. Again, this file is 700 MB so it will take a long time even with a very fast
Internet connection.
107
Voyager User's Guide
Tip: In most layouts, clicking on the Procedure itself opens the full-screen Procedure
viewer. However, if there is no Airport View or Plate Pack Selector widget on the
screen (in other words, no way to select a Procedure), clicking the Procedure causes
Voyager to ask if you'd like to show a related Procedure or show the current one full
screen.
Tip: Rather than create a specific Minimums and Alternate Minimums for each
airport, the FAA combines airports by region into multi-page documents. To see
each page, ensure that Command Mode is on (that is, click Cmd) and use
and
to flip the pages. These buttons are also available when the document is shown
Full Screen.
108
Layouts
Profile
The Profile widget shows the flight path, terrain, airspace, airway MEAs and clouds.
It's used in several SmartPlan layouts.
By default, Voyager synchronizes the Profile area with the portion of the flight plan
shown on the Chart. If you'd like the Profile area to always display the entire flight,
right-mouse click on the Profile area and select Show Entire Flight. To switch back
to synchronize mode, select Synch View with Chart.
Altitude (MSL) runs along the vertical axis. The top row of the horizontal axis shows
the distance from the departure airport. The bottom row shows the ident of any
airport or navaid on the NavLog (the flight above is from KPAE in Everett, WA to
KSFO (San Francisco). The idents are color-coded to summarize the conditions at
the time the flight passes the point. Yellow means Marginal VFR, Red means IFR and
black means VFR or no information (such as the case above).
The yellow line shows altitude at each moment during the flight. Waypoints are
numbered to match the rows in the NavLog unless Show Waypoint Identifiers is
turned off, in which case, waypoints are shown as dots. Colors represent terrain
elevation, using standard VFR sectional elevation colors.
Airspace display is enabled via right-clicking anywhere on the Profile and selecting
Show Airspace. Airspace is color-coded to VFR Sectional or IFR Enroute colors, as
appropriate for the current flight plan. When enabled, Voyager displays Class B, C
and D airspace as well as TFRs, MOAs, Prohibited and Restricted airspace. In the
above example, the dark blue areas above KPAE and KSFO indicate Class B airspace
using VFR (Sectional) colors.
Black and green lines show airways. For example, there is a black line between
points 3 and 4. If you move the mouse cursor over it, Voyager will tell you the
airway name and MEA (V165, MEA 9000 in this case). Black lines are low-level
(Victor) airways, green (not shown) are Jet routes.
Cloud layers are shown with white lines. Solid lines indicate Overcast or Vertical
Visibility, dashed lines indicate Broken clouds and dotted lines indicate Scattered
clouds. Few and Clear sky conditions are not shown to reduce visual 'noise'.
Thunderstorms are shown in red (over BTG and 77S in the above example). Move
the mouse over a cloud to see details. In the example above, OED has a layer of
broken clouds at about 6000 feet (MSL) and overcast clouds at about 8000 feet
109
Voyager User's Guide
(MSL). Important! The Profile does not display cloud tops so do not assume
that empty space over a cloud indicates a break.
As you move the mouse over the window, Voyager displays the elevation at that
point.
To change the cruise altitude of any leg, simply click and drag the flight path line.
By default, Voyager adjusts this altitude to an appropriate cardinal altitude.
Click and drag the aircraft icon along the flight path line to change the Time slider's
location.
By default, weather in the Profile area is determined by the time you're expected to
cross each point. Any two points, therefore, represent weather at different times
and moving the time slider has no effect. If you'd prefer to synchronize the weather
with the current time slider position (like the Chart area above the Profile), rightmouse click on the Profile area and select Synch Weather with Timeline. To
restore the default system, right-mouse click and choose Synch Weather with
Entire Flight. Synching with the timeline slows updates to the Profile area, which is
why it's off by default.
Note: In a round-trip flight or a flight using a waypoint multiple times, an ident may
be shown more than once and terrain may repeat.
110
Layouts
Wind Optimizer
The Wind Optimizer widget, patent pending, is a unique Voyager feature that makes
it easy to select optimal cruise altitudes while in flight. It's used in many of the
GlassView layouts. It's based on Winds Aloft data that NOAA updates four times a
day unless you're using Voyager with an XM receiver, in which case, it's updated
every few minutes.
On the left is a depiction of the aircraft's current course (true) and an overlaid arrow
that shows the direction and speed (in the circle) of the winds at the aircraft's
current altitude. In the case above, the pilot is encountering an almost direct crosswind from his right. The wind arrows use the same color scheme as they do in the
Chart widget -- green is a < 20 Kts wind, yellow is 20 to 60 kts and red indicates >
60 kts.
The right area gives instant information about the gain or penalty for changing
altitude. Near the center of the widget is an altitude scale which automatically varies
depending on your current altitude and the performance of your aircraft. The lines
to the right and left indicate whether to expect a headwind (red lines to the left) or a
tailwind (green lines to the right) at different altitudes on the same course, at the
current time. The blue line indicates current altitude.
In the example above, we're flying at about 11000 ft but we clearly should be flying
lower.
As elsewhere in Voyager, blue underlined text means something you can click for
more information. In this case, you can click the Winds Aloft - RBL area to see the
complete Winds Aloft table. The RBL portion means that the wind data displayed
is based on the RBL reporting station.
111
Weather
Download Weather
To access this feature: Select Download Weather from the Weather menu.
Downloads new or updated weather from the Internet based on what is shown in the
current window.
For example, if a Flight Plan or Chart window is open and set to 500 NM Range
(large enough for about half of the US), Voyager downloads every weather report
available within the entire region, potentially taking some time over a modem
connection.
Note: To save time during an automatic background download, Voyager downloads
weather along a corridor defined by your route rather than for the entire window.
Therefore, when a Chart window is open, Voyager downloads weather for the entire
visible area because there is no route.
113
Voyager User's Guide
Weather Graphics
To access this feature: Select Show Weather Graphics from the Weather menu
or Show All US and Canadian weather graphics after clicking the
at the bottom of the screen.
button
Tip: To see a full and legal DUAT/DUATS weather briefing, click the Text tab.
Voyager downloads a wide variety of weather graphics from the US National
Weather Service and NavCanada. The charts are organized by type and location
or time period.
Click Print to send the checked charts to the printer.
Checked charts are automatically downloaded in the background when Voyager
begins, saving you time. They are also updated automatically when Voyager
refreshes the weather (by default, every 30 minutes).
114
Weather
Tip: In the main chart area, select Animate Weather from the Wx button to show
an animated display of weather changes in the last two hours.
Note: Interpreting weather information is a highly-specialized field and beyond the
scope of this Help file. For more information, please refer to aviation and/or weather
reference guides.
115
Voyager User's Guide
Standard Weather Briefing
on the bottom toolbar and select Show
To access this feature: Click
DUAT/DUATS briefing or select Show DUAT Standard Weather Briefing from
the Weather menu.
Tip: To see a wide variety of weather graphics, click the Graphics tab.
This dialog displays a full and legal weather briefing as generated by DUAT or DUATS
(depends on which provider you selected for the pilot). The briefing is downloaded
automatically as a Flight Plan is displayed and refreshed as you change an existing
plan. You may also force a manual download by selecting Download Weather from
the Weather menu.
A briefing is only available for flight plans that include a pilot, aircraft and valid
takeoff and landing airports. In addition, the pilot must have valid DUAT or DUATS
credentials (if not, a free DUAT account is available by clicking here), the aircraft
have a tail number and the takeoff time within the next 24 hours. You also must be
connected to the Internet. However, Voyager stores reports as part of each flight
116
Weather
plan so they may be accessed, once downloaded, even when disconnected from the
Internet.
By default, when you print a Flight Plan, Voyager prints the reports checked in the
Reports list. You can enable/disable all DUAT/DUATS printing with the Weather
plug-in found in Print Settings
You can control if the weather briefing is downloaded as Plain English or Coded Text.
Voyager requests the briefing format based on the selection of the Translated vs.
Raw coded text selection in any Airport Information dialog. However, unlike
how that switch behaves within the Airport Information dialog, the display format
(English vs. coded) of DUATS briefings cannot be changed once downloaded because
Voyager has to specifically tell the provider which format it prefers when the briefing
is downloaded; For the TAFs and METARs on the Airport Information tab, Voyager
always downloads in coded format then does the translation to English, if requested,
so it can alter the display format on the fly.
Check Print all text to print the entire DUAT/DUATS report.
Click Print to send the selected reports to the printer
117
Voyager User's Guide
Winds Aloft
To access this feature: Select Show Winds Aloft Table from the Weather menu
or click the Winds Aloft (FD) field within the Weather tab of an Airport
Information dialog.
The Winds Aloft dialog has two parts: A region/time selector and a winds table.
Winds Aloft information is available only within the US and Canada.
REGION/TIME SELECTOR
OPTION
Region
Time period
118
DESCRIPTION
The FAA or NavCanada Winds Aloft
region.
Winds Aloft data is generally updated
twice daily for three outlook periods: 6
hours, 12 hours and 24 hours. The
resulting time period is shown just
above the winds table.
Weather
WINDS TABLE
The table lists various reporting stations (usually airports) within the selected
Region and at several reporting altitudes (MSL). The speed and true (not magnetic)
wind direction is shown for each station/altitude combination. Outside air
temperature may also be shown in parenthesis. Wind direction is defined as the
direction from which the wind comes.
An empty cell can either mean that no data was available or, more likely, that the
reporting station's elevation is either below or within 1,000 feet of the specified
altitude. In these cases, a TAF or METAR for the station provides wind information
(remember, this is winds aloft).
119
Voyager User's Guide
XM WX Weather
Overview
Voyager, when used in conjunction with the XM Link module, can display near realtime weather while in the cockpit. This requires an XM WX satellite receiver
connected to the laptop or tablet via either a USB or Bluetooth connection.
The XM receiver, whether connected via Bluetooth or a USB connection, uses what's
called a COM port to communicate with the computer. The COM port number varies
by machine so you must determine which COM port your configuration is using. See
Hardware Installation / Configuration below for more info.
Tip: Voyager is optimized to automatically find a GPS receiver by scanning the
available COM ports. This works well for GPS-only users but can create a problem
when also using an XM receiver as XMLink may report that the COM port it needs is
already in use. To resolve this conflict, go to the GPS settings tab of the Options
dialog box and manually select the specific COM port used by your GPS receiver.
Once an XM receiver is properly connected (see below), select the
button after
button and Voyager will begin collecting XM weather as it
clicking the
arrives. To see the weather, be sure to turn on the weather layers you want or
select the Weather theme from the
button.
Hardware Installation / Configuration
PRE-SETUP STEPS
Make sure the antenna has a very clear view of the sky, preferably to the south.
Also, other than your computer and XM WX receiver, make sure there aren’t any
other Bluetooth devices on within range. Reboot your machine and, while your
computer is rebooting, unplug the receiver's power cable. After several seconds,
plug it back in.
BLUETOOTH CONFIGURATION
Follow the instructions that come with the XM receiver that outline the steps
necessary to configure your computer to use Bluetooth for communicating with the
receiver. This will probably involve entering what is called a Passcode to 'pair' the
XM receiver with the computer. The passcode varies by receiver manufacturer but
common codes are 9679 and 1234. See your receiver's documentation for more
information.
120
Weather
Tip: You may want to write the passcode on a slip of paper and tape it to the
bottom of the receiver for future use.
DETERMINING THE COM PORT ASSIGNED TO THE WXWORX RECEIVER
If you are using Microsoft’s Bluetooth driver, the XM COM port can be determined by
double-clicking on the Bluetooth icon
in the system tray (the area immediately
surrounding the Windows digital clock in the lower, right hand corner of your
computer). Then click the COM Ports tab and find the COM port number stated for
the WxWorx entry that says "outgoing" under the "direction" column. If you do not
see an entry for your WxWorx receiver, it is because your computer has not been
configured to use Bluetooth for communicating with the WxWorx receiver. To do
this, follow the instructions that come with the WxWorx receiver.
Voyager Configuration
Before proceeding, please read Bluetooth Notes section above and then follow the
instructions in Pre-setup Steps and Determining the COM port assigned to the
WxWorx receiver sections. From within Voyager, click Tools then Options, select
Preferences then XM. Click Use the COM setting below, then specify the proper
port number and click the Connect button.
121
Customizing a Chart
Edit Themes
To access this feature: Select Edit from the Themes menu.
Themes are collections of Chart settings. For example, one theme may show all
airports and airspaces while another theme might exclude small private airports,
hide Class E airspace and even hide terrain. In this way, it's fast and easy to switch
between customized views.
Themes may be applied to Chart or Flight Plan windows by selecting from the
button on the lower toolbar or from the Themes menu. Printed Charts
may also be set to a theme.
In addition, a Personal Layout may specify which theme to use for each Chart in the
Layout. That is, you can use a Personal Layout to quickly switch to a screen
configuration with two charts on the screen, each one with a different theme (such
as Sectional on one and Weather on the other) and even a specific Range (e.g. have
123
Voyager User's Guide
one Chart zoomed-in tightly for a Sectional view while the second Chart shows
weather from a much greater Range).
Add creates a new theme based on the current Chart or Flight Plan settings.
Edit lets you change the name or icon for an existing theme.
Tip: To change the way an existing theme is defined (that is, which layers are on),
configure the screen the way you want using the Chart Options dialog box then
click
and select Save Chart Settings.
Delete removes the currently-selected theme. You may not delete the built-in
themes.
Copy creates a new theme that is identical to the selected theme. You can them
modify the new theme, making it easy to create slightly-modified themes.
Rename changes the name of the currently-selected theme. You may not rename
the built-in themes.
Restore presets returns the built-in themes (Sectional, IFR Enroute, Fast Draw,
etc.) to their default values. Any theme you may have created will not be affected.
Assign buttons lets you modify which themes are associated with the four large
buttons at the top of the Main Window.
Note: A few themes have built-in keyboard shortcuts. F7 selects Sectional (Digital)
and F8 selects IFR Enroute Low (Digital).
124
Customizing a Chart
Options/Obstacles
To access this feature: Right-click the
button. Alternately, select Customize
Chart from the Chart button and select the Obstacles item.
This item controls if and when man-made obstacles are shown. Obstacle data is only
available within the United States.
In GlassView mode, when the Obstacles layer is turned on, Voyager also displays
obstacle warnings when obstacles are +/- 15 degrees of your heading, within 500
feet of your altitude and within two minutes at your current speed. This feature
works independently of TAWS.
OPTION
Maximum range
DESCRIPTION
The range, in the Distance units
specified in the Options dialog, must
be at or below this value for the item to
be displayed. This allows the chart to
intelligently declutter itself as the zoom
125
Voyager User's Guide
Display altitude
126
(range) changes. If the range, as
shown on the Range drop-down on the
Chart pane, is greater than this value,
this item will not be shown on the chart
and the other settings here are
ignored. Note: For various reasons,
this value is approximate so it may
vary slightly if this dialog is displayed
at different Ranges.
If selected, the altitude (MSL and AGL)
of each obstacle is shown whenever
possible. Even if this option is
selected, the altitude may be hidden if
it would cover other text.
Customizing a Chart
Options/Airports
To access this feature: Right-click the
button. Alternately, select Customize
Chart from the Chart button and select the Airports item.
This item controls which airports are shown and which attributes of those airports
are displayed. It is divided into three sections: General/Runways, Show by attribute
and Show by airspace class.
GENERAL/RUNWAYS
OPTION
Maximum range
DESCRIPTION
The range, in the Distance units
specified in the Options dialog, must
be at or below this value for the item to
be displayed. This allows the chart to
intelligently declutter itself as the zoom
(range) changes. If the range, as
shown on the Range drop-down on the
Chart pane, is greater than this value,
127
Voyager User's Guide
Minimum runway length
Show runways
(Show runways) Range
Show numbers
Show fuel icons
this item will not be shown on the chart
and the other settings here are
ignored. Note: For various reasons,
this value is approximate so it may
vary slightly if this dialog is displayed
at different Ranges.
In order for an airport to be displayed,
its longest runway must be at least this
value.
Subject to the constraint below, if this
option is checked, runways are
displayed as lines in the correct relative
length, width and orientation.
The range must be at or below this
value for a runway to be displayed,
regardless of the option above. In this
way, airports are generally displayed
on the chart before runways are
revealed.
If selected, runway numbers are
displayed whenever runways are
displayed.
When checked, Voyager puts a small
icon next to airports that have fuel.
Show fuel prices
Voyager displays and uses fuel
prices in many useful and
innovative ways. See all the
different ways by clicking here.
Voyager displays current fuel prices if
you have a current ChartData
subscription. Fuel prices are provided
by 100LL.com.
Voyager displays one fuel price per
airport. The lowest price of JetA at
each airport is displayed if the aircraft
involved in the current flight plan
requires JetA or, if no flight plan, if the
default aircraft uses JetA. Otherwise,
Voyager displays the lowest price of
100LL at each airport.
SHOW BY ATTRIBUTE
To simplify charts, Voyager normally hides airports that don't have various
attributes.
OPTION
128
DESCRIPTION
Customizing a Chart
Private
Military
Land
Sea
Heliport
Other
Hard surface/water
Soft surface
100LL
Jet A
Determines if private airports are
displayed. Only applicable to US
airports. Note: Public airports are
always shown, subject to the other
criteria on this tab.
If selected, military-only airports are
displayed. Only applies to US airports.
Shows land airports.
Shows sea-plane bases.
Shows heliports.
Shows other types of airports such as
glider and dirigible bases.
In conjunction with the Land and Sea
switches above, this determines if land
airports with hard runways and seaplane bases are shown.
If selected, land airports that lack any
hard surface runways will be shown.
Note: For the purpose of this and the
previous switch, sea-plane base
runways are considered hard surface.
When selected, only airports with
100LL fuel available will be shown.
This does not take available times into
account. Applies only to US airports.
When selected, only airports with Jet A
fuel available will be shown. This does
not take available times into account.
Applies only to US airports.
SHOW BY AIRSPACE CLASS
Although airports are technically not categorized as being of different classes, the
predominant airspace surrounding them assigns de-facto classes to each airport.
The checkboxes and Range fields associated with each class let you tailor the chart
to displaying different types of airports at different times. Often, this is used to hide
small Class E and G airports entirely (by unchecking the Class E/G box) and make
Class C and B airports appear sooner (higher range) than Class D airports.
129
Voyager User's Guide
Options/Terrain
To access this feature: Right-click the
button. Alternately, select Customize
Chart from the Chart button and select the Terrain item.
There are no options for this layer.
Options/Navaids
To access this feature: Right-click the
button. Alternately, select Customize
Chart from the Chart button and select the Navaids item.
130
Customizing a Chart
The Navaids page is divided into two primary areas (Display and Show by type) and
a general Range setting.
OPTION
Maximum range
DESCRIPTION
The range, in the Distance units
specified in the Options dialog, must
be at or below this value for the item to
be displayed. This allows the chart to
intelligently declutter itself as the zoom
(range) changes. If the range, as
shown on the Range drop-down on the
Chart pane, is greater than this value,
this item will not be shown on the chart
and the other settings here are
ignored. Note: For various reasons,
this value is approximate so it may
vary slightly if this dialog is displayed
at different Ranges.
DISPLAY
OPTION
Name
Frequency
DESCRIPTION
If this option is checked and the Chart
Range is at or below the associated
Range value, the name (ident) of the
navaid is displayed when its symbol is
shown.
If this option is checked and the Chart
Range is at or below the associated
Range value, the frequency of the
navaid is displayed when its symbol is
shown.
SHOW BY TYPE
OPTION
VOR/DME
NDB
DESCRIPTION
This option determines if and when
VORs and similar navaids are
displayed.
This option determines if and when
NDBs are displayed.
131
Voyager User's Guide
Options/Airways
To access this feature: Right-click the
button. Alternately, select Customize
Chart from the Chart button and select the Airways item.
The Airways page is divided into two primary areas (Display and Show by type) and
a general Range setting.
Note: Voyager differentiates between navaids and airways although navaids are
essential to airways. Therefore, if you want to show airways along with their navaid
intersections, be sure to also show navaids.
OPTION
Maximum range
132
DESCRIPTION
The range, in the Distance units
specified in the Options dialog, must
be at or below this value for the item to
be displayed. This allows the chart to
intelligently declutter itself as the zoom
(range) changes. If the range, as
shown on the Range drop-down on the
Customizing a Chart
Chart pane, is greater than this value,
this item will not be shown on the chart
and the other settings here are
ignored. Note: For various reasons,
this value is approximate so it may
vary slightly if this dialog is displayed
at different Ranges.
DISPLAY
The following options control what information, if any, is displayed along with each
airway line. Each consists of a checkbox that turns the display on or off and a Range
value which specifies the maximum range for the item to be displayed.
OPTION
Changeovers
MEA
Name
Radials
Intersections
DESCRIPTION
The point at which a pilot navigating an
airway should switch from one navaid
to another. Regardless of this setting,
like a printed IFR chart, changeovers
are only shown when the changeover
point is more than about one mile from
the midpoint of the airway leg. Not
supported in the current version of
Voyager.
Minimum Enroute Altitude (MEA) is one
of the most vital pieces of information
for IFR flying as it specifies the lowest
altitude (MSL) of the airway segment.
Tip: Even if this option is off, you can
see the MEA by selecting the Pointer
cursor on a Chart and clicking
anywhere along the airway.
The name of the airway such as V207
(Victor 207) or J54.
Determines if Voyager should compute
and display the radials from each
navaid to matching airway segments.
Similar to the above option, you can
always view radials by clicking on an
airway with the Pointer cursor.
If enabled, intersections (waypoints
along an airway) are shown as
triangles along each airway. If the
Name option is also turned on,
Voyager displays the intersection ident
if space allows.
133
Voyager User's Guide
SHOW BY TYPE
Airways may be categorized as either low-level (below FL200) airways based on VOR
navigation or high-level airways used primarily by jets in Class A airspace. Voyager
can show either or both of these.
134
Customizing a Chart
Options/Roads
To access this feature: Right-click the
button. Alternately, select Customize
Chart from the Chart button and select the Roads item.
This item controls when roads are shown. Road data is only available within the
United States.
OPTION
Maximum range
DESCRIPTION
The range, in the Distance units
specified in the Options dialog, must
be at or below this value for the item to
be displayed. This allows the chart to
intelligently declutter itself as the zoom
(range) changes. If the range, as
shown on the Range drop-down on the
Chart pane, is greater than this value,
this item will not be shown on the
chart. Note: For various reasons, this
value is approximate so it may vary
slightly if this dialog is displayed at
different Ranges.
135
Voyager User's Guide
Options/Airspace
To access this feature: Right-click the
button. Alternately, select Customize
Chart from the Chart button and select the Airspace item.
This item controls if and when each type of airspace is shown. It is divided into two
sections, General and Show by class.
GENERAL
OPTION
Maximum range
136
DESCRIPTION
The range, in the Distance units
specified in the Options dialog, must
be at or below this value for the item to
be displayed. This allows the chart to
intelligently declutter itself as the zoom
(range) changes. If the range, as
shown on the Range drop-down on the
Chart pane, is greater than this value,
this item will not be shown on the chart
Customizing a Chart
Display altitude
and the other settings here are
ignored. Note: For various reasons,
this value is approximate so it may
vary slightly if this dialog is displayed
at different Ranges.
If selected, the altitude (MSL) of each
airspace segment is shown whenever
possible. Even if this option is
selected, the altitude may be hidden if
it would cover other text. Tip: Select
the Pointer cursor on a Chart pane and
click within an airspace region to
display the altitude of each airspace
class at any given point.
SHOW BY CLASS
The checkboxes and Range fields associated with each class let you tailor the chart
to displaying different types of airspace at different times. Often, this is used to
completely hide Class E airspace and make Class B airspace appear sooner (higher
range) than other airspace classes.
Note: MOA refers to Military Operation Areas and Other SUA refers to other Special
Use Airspace.
137
Voyager User's Guide
Options/Water
To access this feature: Right-click the
button. Alternately, select Customize
Chart from the Chart button and select the Water item.
This page controls when rivers and lakes are shown. This data is only available
within the United States.
OPTION
Maximum range
138
DESCRIPTION
The range, in the Distance units
specified in the Options dialog, must
be at or below this value for the item to
be displayed. This allows the chart to
intelligently declutter itself as the zoom
(range) changes. If the range, as
shown on the Range drop-down on the
Chart pane, is greater than this value,
this item will not be shown on the
chart. Note: For various reasons, this
Customizing a Chart
Lakes and major rivers
Minor rivers and streams
value is approximate so it may vary
slightly if this dialog is displayed at
different Ranges.
Displays lakes and major rivers. The
term "major" refers to the width of the
river so a well-known river (or that
segment of one) that is very narrow
may not appear with this just option.
Displays the tens of thousands of
streams and narrow rivers in the
database. As there are so many, you
should keep this option off if
performance is a concern.
139
Voyager User's Guide
Options/Cities
To access this feature: Right-click the
button. Alternately, select Customize
Chart from the Chart button and select the Cities item.
The Cities item determines when and if different size cities (based on population) are
displayed.
OPTION
Maximum range
140
DESCRIPTION
The range, in the Distance units
specified in the Options dialog, must
be at or below this value for the item to
be displayed. This allows the chart to
intelligently declutter itself as the zoom
(range) changes. If the range, as
shown on the Range drop-down on the
Chart pane, is greater than this value,
this item will not be shown on the chart
and the other settings here are
ignored. Note: For various reasons,
Customizing a Chart
Large (500,000+)
Medium (50,000 to 499,999)
Small (0 to 49,999)
Urban areas
this value is approximate so it may
vary slightly if this dialog is displayed
at different Ranges.
The checkbox determines if large cities
(half a million or more people) are ever
shown. The associated Range field
determines the maximum range at
which this size city is shown.
The checkbox determines if mediumsized cities (from 50,000 to half a
million people) are ever shown. The
associated Range field determines the
maximum range at which this size city
is shown.
The checkbox determines if small cities
(up to 50,000 people) are ever shown.
The associated Range field
determines the maximum range at
which this size city is shown.
When selected, Voyager shades
populated areas yellow, similar to a
VFR sectional.
141
Voyager User's Guide
Options/Waypoints
To access this feature: Right-click the
button. Alternately, select Customize
Chart from the Chart button and select the Waypoints item.
The Waypoints page determines when and if personal waypoints and off-airway
waypoints are show. Waypoints on airways (intersections) are controlled with the
Airways page.
OPTION
Maximum range
142
DESCRIPTION
The range, in the Distance units
specified in the Options dialog, must
be at or below this value for the item to
be displayed. This allows the chart to
intelligently declutter itself as the zoom
(range) changes. If the range, as
shown on the Range drop-down on the
Chart pane, is greater than this value,
this item will not be shown on the chart
Customizing a Chart
Show name
Personal waypoints
Off-airway waypoints
and the other settings here are
ignored. Note: For various reasons,
this value is approximate so it may
vary slightly if this dialog is displayed
at different Ranges.
The checkbox determines if waypoint
names are ever shown. The associated
Range field determines the maximum
range at which the name is shown.
The checkbox determines if personal
waypoints are ever shown. The
associated Range field determines the
maximum range at which they are
shown.
The checkbox determines if off-airway
waypoints are ever shown. Such
waypoints are often used when flying
IFR approaches and arrivals. The
associated Range field determines the
maximum range at which they are
shown.
143
Printing
Printing
Print flight plans, Charts and Plate Packs by selecting Print from the File menu or
button on the main toolbar. If Analyze flight plan before
clicking the
save/print is on (which it is, by default), Voyager first analyzes the flight plan or
Plate Pack and warns of problems.
An on-screen preview is available via the Print Preview menu item. We suggest
using it before printing a complete flight plan. With SmartPlan Premier, you can also
create a PDF file by selecting Print to PDF from the File menu.
For flight plans, Voyager prints a complete flight dossier including a navigation log,
weather, weight and balance, an FAA Flight Plan Form, airport information,
and charts. Select Print Setup from the File menu to control whether or not print
each of these is printed and, if it is, which options are selected.
In addition, you can quickly print the current Chart or NavLog by clicking the
button on the toolbar immediately above these items.
Print Setup
To access this feature: Select Print Setup from the File menu.
This dialog lets you specify which types of information to print when a flight plan or
Plate Pack is printed. Most types of information allow additional customization.
Select Full page to print use the full width of a standard US piece of paper. Select
Kneeboard size to use this same width to print two pages side-by-side, each page
suitable for a standard kneeboard.
Check Use ink-saver mode to have Voyager save ink by printing topic titles without
a solid black bar.
145
Voyager User's Guide
Cover Page Options
To access this feature: Select Print Setup from the File menu and choose Cover
Page.
If enabled, this item prints an attractive cover page that you can customize with
Voyager Premier.
Note: SmartPlan Express does not support any customization.
OPTION
Show general information
Leave fields blank
146
DESCRIPTION
When checked, Voyager prints basic
information about the flight including
the aircraft tail number and type, pilot
name and organization and takeoff
time.
If checked, the space for the
information above is reserved but the
text is left blank so you can fill it in
manually.
Printing
Show picture or logo
Custom file name
Show flight summary information
Checking this option tells Voyager to
add a the picture of the aircraft (this
can be added in the General tab of the
Aircraft dialog box) or any other
custom graphic you like (see below).
The full name and path of any GIF,
BMP or JPEG you want to add to the
print. If left blank, Voyager prints
either the aircraft picture, if supplied,
or the Voyager logo.
When checked, Voyager prints a
concise summary of the flight including
distance, duration and fuel information.
147
Voyager User's Guide
Standard Navigation Log Options
To access this feature: Select Print Setup from the File menu and choose
Standard Navigation Log.
If enabled, this item prints a navigation log in a commonly used format. By default,
each leg of the flight, including the synthesized legs that Voyager inserts for
calculating cruise and descent points, is shown.
Note: Certain vital columns, such as Location, Altitude and MHdg are always shown
even if all other options are turned off. If the Kneeboard option on the main
portion of the dialog is checked, Course detail and TAS are disabled because they
will not fit in the smaller format.
OPTION
Altitude
Course detail
148
DESCRIPTION
If checked, the log includes the final
altitude for each leg. Normally, this is
the cruise altitude that your or Voyager
specified. However, it will be the field
elevation of any Begin Descent leg.
If checked, the log includes wind
Printing
Distance
Fuel
Groundspeed
Layover
Nav/Airway
speed/direction, TCrs and THdg (MHdg
is always included).
Enables printing of the total distance,
leg distance and distance remaining
after each leg.
If selected, two columns are added to
the log. The first shows fuel added
(+Fuel) and used (-Fuel) per leg, the
second shows fuel remaining after each
leg.
When checked, Voyager adds a column
showing estimated groundspeed,
taking wind into account, and a space
for you to record actual groundspeed.
When checked, Voyager prints the time
specified as the Layover for a Stop
and Go leg. The default layover time
may be set in the Defaults tab of the
Options dialog box.
Instructs Voyager to add a column
showing relevant navaid, airway and
radial/MCrs information.
If the waypoint is an airport with an
associated navaid, the navaid ident and
frequency are shown.
If the waypoint is on an airway, the
airway ident and MEA are shown.
If the waypoint is a navaid, the radial
from this navaid to the next waypoint
(not necessarily the next navaid) is
shown. If the radial/MCrs from the
next waypoint back to this navaid is
different, that value (essentially a VOR
FROM value from the next waypoint)
will also be shown after a slash (e.g.
182/183).
If the waypoint is named Waypoint or a
general lat/long location, the MCrs
from this waypoint to the next is
shown. Additionally, Voyager will
search for a nearby VOR and, if found,
print the ident and frequency of the
navaid and distance and bearing from
it (the VOR FROM radial).
Note: The above differentiates
between a radial and a Mcrs although
149
Voyager User's Guide
TAS
Time
Winds
Show altitude change points
150
they technically should be the same.
The difference is that the official
MagVar associated with a navaid is
used when the waypoint is a navaid
and a computed MagVar is used
otherwise. That is, Voyager can
compute the exact MagVar for any
location on Earth with extreme
precision based not only on the location
but the exact date/time. The official
MagVar for a navaid is changed just
once during the year, in January. As
MagVar changes over time, the
Voyager computed value is more
precise but may not exactly match a
charted radial. Hence, where possible
here, Voyager uses the official value
and calls it a Radial rather than a MCrs.
Thus, if the location is not a navaid,
Voyager has no choice but to use the
computed value and call the course a
MCrs. When a waypoint is a navaid but
the next waypoint is not, Voyager may
print Radial: X/Y where the X is a radial
as described above but the Y is actually
a MCrs since the next waypoint has no
official MagVar.
Shows the True Airspeed (TAS) under
the MHdg.
Adds three time-related columns. The
first, ETE/ATE, shows the estimated
time enroute and a space for you to
record actual time enroute. The
second, ETA/ATA is a space for you to
note the estimated time of arrival
(based on your actual time off) and,
later, your actual time of arrival. The
final column shows cumulative elapsed
time and the time remaining after each
leg.
Toggles display of wind direction
(degrees) and speed in the Speed
units specified in the Options dialog.
Wind direction is the direction from
which the wind is coming.
Determines whether only user-defined
waypoints (the ones you created for
your route) or user-define plus
synthetically created waypoints for
altitude changes (Begin Cruise, Begin
Descent, etc.) are also shown. This is
equivalent to the Show All Legs feature
Printing
Show notes area on the first page
in a Flight Plan window.
When checked, Voyager prints areas
for recording tach and Hobbs settings
as well as hand-written notes, notes
associated with the flight plan or an
IFR clearance. Uncheck this box if you
want to save space (that is, print more
waypoints) on the first page of the
NavLog. This can be useful for short
flights.
151
Voyager User's Guide
Procedure and Diagram Options
To access this feature: Select Print Setup from the File menu and choose
Procedures and Diagrams.
If enabled, this item prints approach, arrival and departure procedures and airport
diagrams. This only applies when the current window shows a Plate Pack.
GENERAL
OPTION
Print list of Procedures/Diagrams
Only those with errors/warnings
152
DESCRIPTION
In addition to the procedures and
diagrams themselves, this option prints
a list of the items printed, grouped by
airport, and with flags to indicate if the
procedure is expired or has other
problems.
In a large Plate Pack, the list can be
very long. To save paper, check this
box and Voyager will create a list of
just those items with a problem. All
Printing
Print customization information
Skip recently printed
Max age
Only changed or added
Sort by
Categories
procedures and diagrams are printed,
regardless of this setting.
When checked, Voyager prints
customization information that is useful
as you learn the product but might be
considered visual 'noise' later.
To save time and paper, check this
option and Voyager skips printing those
procedures and diagrams it has
recently printed.
If the above option is checked, enter a
value to specify how recently printed
the item must be to be suppressed. If
a procedure has changed since it was
last printed, this value is ignored and
the revised item is printed.
When checked, Voyager only prints
Procedures and Diagrams that have
changed since you last updated the
Voyager data file (which is not
necessarily the same as saying it has
changed in the last 28 day cycle).
Items can be printed in either a strictly
alphabetical order based on airport
idents or by category (below) then
ident.
For organizational convenience, you
can associate an airport with a
particular category. If Sort by
Category is selected, all the
procedures and diagrams associated
with the airports in each category are
printed together.
Use Skip 'Other' for route-based
Plate Packs to suppress the printing
of 'Other' category airports if the Plate
Pack contains at least one airport
marked as Takeoff, Landing, Fuel Stop
or Alternate. That usually means that
it was created for a specific flight
(route-based) rather than an arbitrary
collection of procedures. This makes it
easy to save paper by printing the
procedures you really expect to need
while keeping the rest, the 'Other'
category procedures, part of the Plate
Pack. As part of the Plate Pack, they're
always current and ready for on-screen
access or later printing.
To categorize an airport: From a Plate
153
Voyager User's Guide
Pack window, select the procedure or
airport in the Selected list and rightclick the mouse then pick a category
from the pop-up menu or select the
category from the Procedures menu
on the main window.
Voyager can download procedures and airport diagrams either from the Seattle
Avionics Web site (the default) or directly from the FAA. The Seattle Avionics'
procedures are compressed for much better download speed but at the expense of
some slight visual quality. You can change your preference by selecting Options
from the Tools menu, selecting Preferences and Procedures.
154
Printing
Airport Information Options
To access this feature: Select Print Setup from the File menu and choose Airport
Information.
If enabled, this item prints information about airports. This may include a wide
variety of information.
GENERAL
OPTION
Basic information
Airport diagram
DESCRIPTION
Selects if general airport information,
including runway information, com and
nav frequencies (essentially the
Overview tab of the Airport
information dialog) is printed.
Determines whether the airport
diagram PDF file (downloaded from the
FAA) is printed.
FBOs and services
155
Voyager User's Guide
Notes
Selects if the detailed FBO and
Services information, downloaded
from AOPA, is printed.
Prints any personal notes you may
have added about this airport from
within an Airport Information dialog
box. To save paper, the page is only
printed when notes are present.
Nearby fuel prices
Prints a table of the fuel prices at
nearby airports. Requires a current
ChartData subscription. Fuel prices
provided by 100LL.com.
Other details
Weather
Translated
Raw coded text
Tip: Voyager displays and uses fuel
prices in many useful and
innovative ways. See all the
different ways by clicking here.
If selected, Voyager prints summary
information plus fuel, service, remarks,
etc.
When checked, Voyager prints Current
Conditions (METAR), Forecasts (TAF)
and Winds Aloft for each airport.
Current conditions (METAR) and
Forecast (TAF) text are translated
from the cryptic weather codes to
English. Times are displayed as per
the Time format option of the
Options dialog.
METAR and TAF text are displayed
exactly as received.
Approach/departure procedures
Selects whether IFR
approach/departure information,
downloaded from the FAA or Seattle
Avionics Web sites, are printed.
Voyager can download procedures and
airport diagrams either from the
Seattle Avionics Web site (the default)
or directly from the FAA. The Seattle
Avionics' procedures are compressed
for much better download speed but at
the expense of some slight visual
quality. You can change your
preference by selecting Options from
the Tools menu, selecting
Preferences and Procedures.
All
If the above is also selected, all
156
Printing
procedures for each airport are printed.
Only selected
As above but only those procedures
that you've checked for printing (in the
Procedures tab of the Airport
information dialog) are printed. This
allows you to save paper by only
printing procedures that you expect to
use.
Skip for VFR flights
Only takeoff/landing airports
Skip home airport
Instructs Voyager to suppress printing
procedures if the flight plan is VFR or
DVFR since VFR flight do not typically
involve IFR approaches.
If checked, Voyager only prints airport
information if the airport is a takeoff or
landing airport. If unchecked, Voyager
prints information about each airport
listed in the NavLog, even those only
used as waypoints.
Allows you to save paper by
suppressing information about your
home airport.
157
Voyager User's Guide
Chart Options
To access this feature: Select Print Setup from the File menu and choose Chart.
If enabled, this item prints a summary chart and/or a series of enroute charts.
Click the Customize button to customize the two charts. Settings apply to both
summary and series charts.
OPTION
Summary
Series
DESCRIPTION
If checked, Voyager prints a chart
showing the entire route (for a flight
plan) or all the airports with selected
Procedures (Plate Pack)
If checked, Voyager prints a number of
enroute charts, each representing a
small portion of the total route or Plate
Pack.
Distance (NM) between charts
Controls the distance, always in NM,
158
Printing
between each chart in the series.
Note: If scanned charts are printed,
this value is ignored and Voyager uses
a built-in value (either 10 or 20 NM,
depending on the type of scanned
chart) that ensures that the printed
charts are easily read.
Maximum number of charts
Overrides the above setting to ensure
that prints for very long flights don't
consume excessive pages.
Note: If scanned charts are printed,
this value is ignored and Voyager uses
a built-in value that ensures that the
printed charts are easily read. This
may result in more printed pages than
expected.
Skip Series if at maximum
Use current screen settings
Show waypoint identifiers
Show profile
If checked, rather than adjust the
radius to force the Series into a specific
number of Charts (above), Voyager
simply aborts printing the Series as
each zoomed-in Chart would probably
show too little detail to be useful.
When checked, Voyager uses the Chart
settings from the currently displayed
Chart as the basis for printing rather
than what settings are shown when the
Customize button is clicked. For
example, if Scanned Charts are shown
on the screen, they will be printed.
This is checked, by default, to make
printing more "what you see is what
you get."
Determines if waypoint identifiers,
as well as a route line, are displayed on
the charts.
Flight Plans only. Adds a profile view
to the bottom 1/4 of the page. The
points are synchronized to what is on
the Chart above.
159
Voyager User's Guide
Weather Options
To access this feature: Select Print Setup from the File menu and choose
Weather.
If enabled, this items prints enroute weather information and legal DUAT/DUATS
Standard Weather Briefings.
The graphical features summarizes forecast weather conditions and winds as they
change during the flight.
Click the Customize button to customize the weather chart (requires SmartPlan
Premier).
OPTION
METARs/TAFs
160
DESCRIPTION
If checked, Voyager prints a summary
chart showing expected enroute
weather as you pass each reporting
point. This is derived from a
combination of both METAR and TAF
Printing
Winds aloft
Show legs
Customize
Weather Log
DUAT/DUATS Briefing
Report List
All sections
information.
If selected, Voyager prints a summary
chart with overlaid winds aloft direction
and speed arrows. The arrows take
your expected altitude and time into
account.
Determines if leg numbers, as well as a
route line, are displayed on the charts.
Lets you select which layers are
shown on the printed Chart.
When checked, Voyager prints a table
that shows the weather to expect every
30 minutes during the flight. This
report includes nearby METARs/TAFs
and Winds Aloft.
The format of the report, original raw
text or translated, is determined by the
Raw vs. Translated switch in any
Airport Information dialog box and can
be changed at any time.
When enabled, the items checked in
the Report List (below) are printed.
The briefing must have been
previously downloaded.
The format of the briefing, original raw
text or translated, is determined by the
Raw vs. Translated switch in any
Airport Information dialog box.
However, unlike the METARs and TAFs,
this format cannot be changed once
downloaded so be sure to set the
raw/translated switch as desired before
getting a DUAT/DUATS briefing.
Lists each of parts of DUAT/DUATS
Standard Weather Briefing. Check the
items to print.
Prints the entire briefing, including all
header text.
161
Voyager User's Guide
Weight and Balance Options
To access this feature: Select Print Setup from the File menu and choose Weight
and Balance.
If enabled, this item prints weight and balance information. This always includes at
least summary information.
OPTION
Details (Part 135)
Graphic
162
DESCRIPTION
When checked, Voyager adds a
detailed, FAA Part 135-style, table
showing the item(s) at each station.
When checked, a graphic depiction of
the weight and balance envelope, as it
changes during the flight, is printed.
Printing
FAA/ICAO Flight Plan Form Options
To access this feature: Select Print Setup from the File menu and choose
FAA/ICAO Flight Plan Form.
If enabled, this item prints a standard FAA and/or ICAO flight plan form completed
with the information about this flight plan, aircraft and pilot. Using the FAA/ICAO
Flight Plan window, you can also file plans via the Internet or print specific legs.
Note: Voyager FreeFlight and SmartPlan Express do not support individual leg or
ICAO printing.
OPTION
FAA flight plan
Print one plan for the entire flight
Print a plan for each leg
ICAO flight plan
DESCRIPTION
When checked, Voyager prints the FAA
flight plan for either the whole flight or
for individual legs, depending on what
is checked below.
One flight plan is printed which covers
the entire flight, including any fuel
stops.
A separate flight plan is printed for
each leg (takeoff/landing pair).
When checked, Voyager prints an ICAO
flight plan using the options described
above.
163
Getting Information
Information/Airport Overview
To access this feature: Select
in a Flight Plan or Chart window and click an
airport. Alternately, select Get Information About a Location from the Tools
menu or click
on the main toolbar then enter an airport name or ident.
The Overview tab contains the basic information normally needed when flying to or
from an airport.
Tips: Click the Print button to print this summary information or the Copy button to
copy this text (or the runway diagram) to the clipboard so it can be pasted into a
word processor. Click the Show button to open a Chart window centered at this
airport (if a Chart or Flight Plan window is already open, it is adjusted to put this
airport in the center).
165
Voyager User's Guide
FIELD
Name
Public/private
Class
Elevation
TPA
Tower name
Fuel(s)
DESCRIPTION
The name field shows the FAA ident (if
applicable) and the ICAO ident (if
applicable) as well as the official name
of the airport.
For US airports, Voyager notes if the
airport is public or private. The field is
left blank for non-US airports.
While airports are not technically
assigned a class, the predominant
airspace surrounding them implies a
class. When possible, Voyager shows
this implied class here.
The official field elevation (MSL).
The Traffic Pattern Altitude (MSL). If
no official value is available, Voyager
displays an estimated value computed
by adding 1000 feet to the Elevation
and rounding up to the nearest 100
feet
The name that pilots should use when
communicating with the tower or
ground control.
A list of which fuels, if any, are
available, such as 100LL, JetA, etc. US
airports only.
Additionally, if you have a current
ChartData subscription, Voyager
displays current fuel prices. Click to
see additional info and the prices at
nearby airports.
Fuel prices are provided by
100LL.com.
Max runway
ILS
Hard/soft
Operating schedule
166
Tip: Voyager displays and uses fuel
prices in many useful and
innovative ways. See all the
different ways by clicking here.
The length of the longest runway at
this airport.
If at least one runway has an
Instrument Landing System available,
Voyager puts an ILS in this field. It is
blank otherwise.
A combined field showing the presence
of hard and/or soft runways. Water
runways at sea-plane bases are
considered hard in this context.
If an operating schedule is available,
Getting Information
the field contains information in the
following format:
Month(s)/Days of the week/Time
(local)
If the field has more than one
schedule, generally depending on the
month, additional schedules are
separated by a comma.
Examples:
ALL/ALL/ALL
The airport is open every month, every
day and every hour. This is typical for
major airports.
NOV-APR/ALL/0700-1800,MAYOCT/ALL/0700-2100
Between November and April, the
airport is attended every day of the
week from 7AM to 6PM local time and
between May and October from 7AM to
9PM.
Lighting schedule
Latitude/longitude
Sunrise/sunset time
Note: In some cases, this field
represents the hours during which the
field is attended but the field may be
open for uncontrolled traffic during
additional hours. It is not uncommon,
for example, for a Class D airport to be
attended less than 24 hours a day but
revert to a usable Class E airport
during the other hours.
The hours during which lighting is
available. The lighting might be
continuous or pilot-controlled. The
Remarks field of the Other Details
tab may have additional lighting
information (possibly in extremely
cryptic language).
The latitude and longitude of the official
reference point of the airport.
The time, in either Home or Zulu time
(as noted), of civil sunrise and sunset.
If this dialog is shown while a flight
plan window is open, the times are
based on the flight plan's takeoff date.
167
Voyager User's Guide
Runway Diagram
Satellite View
Otherwise, the time is based on the
current date.
For land airports and sea-plane bases,
an approximate diagram of the
runways, excluding helipads. Runways
are numbered and red arrows indicate
right-hand patterns. Hard land
runways and water runways are drawn
in black and soft land runways in light
gray.
Note: For small private airports where
the FAA does not have the
latitude/longitude of each runway, just
of the airport itself, Voyager has to
guess where the runways are. In cases
of one runway, the estimate should be
fairly accurate but, for small airports
with multiple runways, Voyager may
draw them overlapped even when they
are really offset. In such cases, the
Satellite View is very useful.
Displays a satellite image of the airport
provided by Google Maps. Using the
mouse, you can zoom in/out and
reposition the image. Click Full
Screen to see a large image.
Note: This feature requires an active
Internet connection as Google Maps
images cannot be cached to disk or
printed from within Voyager (you can
print the Full Screen version since it
simply uses your Web browser). Thus,
this feature is not available in-flight or
when an Internet connection is
otherwise unavailable.
Airport Diagram
168
Note: Voyager also has the ability to
export a flight plan in the format used
by Google Earth. Using Google Earth,
which is a standalone free application
that must be downloaded to your PC,
you can preview the flight in 3D.
The FAA-provided diagram of the
airport. This is generally available only
for major US airports. This feature
requires an Internet connection to
download new images but once
downloaded the image is available for
in-flight use or anytime that the
Internet is unavailable. Double-click to
Getting Information
Comm
Navaids
show it full-screen or click the Full
Screen link.
The published communication
frequencies for this airport, listed
alphabetically.
The applicable navaids for this airport,
including type, frequency, name (ident)
and range (if known). Click an entry to
see more detailed information.
169
Voyager User's Guide
Information/Airport Weather
To access this feature: Select
in a Flight Plan or Chart window and click an
airport. Alternately, select Get Information About a Location from the Tools
menu or click
on the main toolbar then enter an airport name or ident.
Select the Weather tab.
This tab shows current and forecast weather conditions at this airport. If you're
connected to the Internet and Allow background weather downloads is turned
on, weather information is downloaded or refreshed as the dialog appears. If the
weather is not completely downloaded when you click this tab, you may see the
information refresh itself.
170
Getting Information
OPTION/FIELD
Translated
Raw coded text
Show Weather Graphics
Show DUATS Standard Weather
Briefing
Current conditions
Forecast
Winds aloft
DESCRIPTION
Current conditions (METAR) and
Forecast (TAF) text are translated
from the cryptic weather codes to
English. Times are displayed as per
the Time format option of the
Options dialog.
Note: This selection also controls how
a DUAT/DUATS Standard Weather
Briefing is downloaded and how the
Weather Log is printed. If
Translated is set here, any DUATS will
be downloaded as Plain English. If
Raw coded text, DUATS will be
downloaded in coded form.
METAR and TAF text are displayed
exactly as received.
Jumps to the Weather Graphics
dialog which shows more than 200
weather graphics including radar and
satellite images.
If a flight plan is active, jumps to the
Weather Text dialog which shows a
full and legal DUATS briefing.
The most current METAR available for
this airport.
The most current TAF available for this
airport.
The currently-valid Winds Aloft (FD) at
the closest reporting station to this
airport. Click the phrase Winds Aloft
to see the entire Winds Aloft table.
The reporting station's ident is also
shown if it's not this airport. Click that
ident to see information about the
reporting station.
The Winds Aloft table shows the wind
direction (true, not magnetic) and
speed at the various altitudes (MSL)
shown at the top of the table. If
available, the outside air temperature
is shown in parenthesis.
Note: Winds Aloft is only displayed if
the closest reporting station is within
200 NM of this airport. Voyager only
downloads US and Canadian data.
171
Voyager User's Guide
Information/Airport Procedures
To access this feature: Select
in a Flight Plan or Chart window and click an
airport. Alternately, select Get Information About a Location from the Tools
menu or click
on the main toolbar then enter an airport name or ident.
Select the Procedures tab.
The Procedures tab lists the IFR approach, arrival and departure procedures available
at each airport. This data is downloaded from either the FAA or Seattle Avionics
Web site. This feature requires SmartPlates.
Each procedure has a checkbox next to its name. Check procedures that you want
printed when information about this airport is printed. See Standard Navigation
Log Options for more information.
172
Getting Information
Tip: Rather than create a specific Minimums and Alternate Minimums for each
airport, the FAA combines airports by region into multi-page documents. To see
each page, click Full Page and use
and
to flip the pages.
There are several ways to print a procedure.
1. If you only want to print a procedure or two, click the Full Screen button above
the procedure. Then click the Print button on the next screen.
2. To print several procedures at once, check the desired procedures then click the
Print button. The Print Airport Information dialog will ask what you want to print.
Uncheck everything but the Approach/departure procedures box and click OK.
3. To print the selected procedures whenever this airport is used in a Flight Plan,
simply check the desired procedures. With the default Page Settings, Voyager will
print the selected procedures for all IFR flight plans that include this airport when the
Flight Plan is printed. Also by default, they will be suppressed for VFR flight plans.
173
Voyager User's Guide
Information/Airport FBO Information and Notes
To access this feature: Select
in a Flight Plan or Chart window and click an
airport. Alternately, select Get Information About a Location from the Tools
menu or click
on the main toolbar then enter an airport name or ident.
Select the FBO/Notes tab.
The FBO/Notes tab shows information about any FBOs, restaurant and transportation
available at each airport and has space for personal notes about the airport. This
FBO data is downloaded from the AOPA Web site so a valid AOPA membership is
required.
AOPA credentials are entered separately for each pilot in the Pilots list. To review or
add AOPA login information: Select Pilots from the Lists menu, choose a pilot, click
the Edit button and the AOPA tab.
174
Getting Information
Information/Airport Runway Details
To access this feature: Select
in a Flight Plan or Chart window and click an
airport. Alternately, select Get Information About a Location from the Tools
menu or click
on the main toolbar then enter an airport name or ident.
Select the Runway Details tab.
This tab displays a table of very detailed information about each runway at this
airport.
COLUMN
ID
Len
Width
Surface
DESCRIPTION
The runway ident, such as 07, 34 or
H2.
The runway length.
The runway width.
The runway surface type: Hard, Soft or
175
Voyager User's Guide
Pattern
Elev
ILS type
Angle
Ind.
Lights
REIL
Grad.
Markings
176
Water.
The traffic pattern, either Left or Right.
The elevation of the threshold, in the
Altitude units specified in the Options
dialog box,
The type of ILS, if any. US airports
only.
The visual glidepath angle, in degrees.
US airports only.
The type of visual glideslope indicator,
if any. For example, V2L means a two
light VASI to the left of the runway.
US airports only.
Runway lights such as MALSR. US
airports only.
Yes if REIL is available. US airports
only; non-US airports are always
reported as No regardless of the actual
status.
The angle, in degrees, from the
threshold to the end of the runway.
Positive numbers indicate an upward
slope, negative a downward. US
airports only.
The type of markings, if any, on the
runway. These include BSC (Basic,
runway ident only), NPI (Non-precision
instrument) and PIR (Precision
Instrument).
Getting Information
Information/Airport Other Details
To access this feature: Select
in a Flight Plan or Chart window and click an
airport. Alternately, select Get Information About a Location from the Tools
menu or click
on the main toolbar then enter an airport name or ident.
Select the Other Details tab.
The Other Details tab shows other information about this airport.
FIELD
Primary approach/departure
control
Beacon
DESCRIPTION
The name of the primary approach and
departure control agencies.
The color of the airport beacon or Yes
or No or None. Civilian land airports
have green and white beacons, military
airports have two white lights and one
177
Voyager User's Guide
Sectional
Distance/direction to the closest
city
Airport of entry
Customs landing rights airport
Master airport
O2 bottle
O2 bulk
Non-commercial landing fees
Engine repairs
Airframe repairs
Mag var
Tower ID
178
green light, etc. Airports outside the
US are reported simply as Yes or No.
The name of the US Sectional chart
that contains this airport. US airports
only.
The name, direction and distance to
the closest city. Click the link to search
for more information about that city.
US airports only.
If Yes, this airport is approved for
routine international arrivals.
If Yes, this airport is available for
international arrivals but only when
special permission has been previously
obtained.
Some smaller airports are linked to
larger, so-called master, airports. If
so, the master airport ident is shown
here. Blank otherwise. US airports
only.
The type of oxygen bottles available, if
any. These include Low (pressure),
High (pressure), High/Low, None and
Unknown. US airports only.
The type of bulk oxygen available, if
any. These include Low (pressure),
High (pressure), High/Low, None and
Unknown. US airports only.
If Yes, a fee is charged for noncommercial use (fees are usually
charged for commercial use). US
airports only.
The type of engine repairs available at
this airport. These include Major,
Minor, None and Unknown. US airports
only.
The type of airframe repairs available
at this airport. These include Major,
Minor, None and Unknown. US airports
only.
The actual magnetic variation for this
airport on the current date. This could
be slightly different than a published
variation since this value changes daily.
Positive indicates westerly variation,
negative easterly variation. For
example, a value of -20 means that a
true heading of 360 degrees appears
as 340 magnetic.
If this airport is associated with a
master airport, this field displays the
Getting Information
FSS info
Remarks
ident of the master tower. Blank
otherwise.
The ID, name and phone numbers of
the primary and secondary FSS
contacts for this airport. US airports
only.
FAA-provided free-form comments.
These should be read carefully
because, although cryptic, they often
contain valuable information. US
airports only.
179
Voyager User's Guide
Information/Airspace
To access this feature: Select
in a Flight Plan or Chart window and click in any
open space. Click an airspace in the Airspace(s) list.
Information about an airspace region.
FIELD
Ident
Name
Controlling ICAO
Type
Class
Floor
Ceiling
180
DESCRIPTION
The ICAO identifier of the airspace.
The name of the airspace. Only
applicable to TFRs.
The ident of the controlling agency.
The type of airspace, most commonly
TCA (Terminal Control Airspace),
ARTCC (Air Route Traffic Control
Center) or N/A (for TFR).
The ICAO class of the airspace or MOA,
TFR, etc.
The bottom of the airspace (MSL) in
the Altitude units specified in the
Options dialog or Surface/Sfc or
Unknown.
The top of the airspace (MSL) in the
selected units or Unknown or
Unlimited. Note: If the airspace was
Getting Information
Com name
Com freq1
Com freq2
Approx. bounds
Comments
originally expressed as AGL, the
Ceiling value (displayed here as MSL)
is computed by adding the elevation of
the center of the Approx. bounds to
the given AGL. By contrast, if you click
a random location on a Chart surface,
the Floor and Ceiling values for AGL
airspaces are computed using the exact
Latitude/longitude of the selected
point. This can cause slightly different
Floor and/or Ceiling values.
The name to use when contacting the
controlling agency.
The primary contact frequency.
The secondary contact frequency.
The approximate upper-left and lowerright boundaries of the region.
Additional information, generally for
TFRs.
181
Voyager User's Guide
Information/Airway
To access this feature: Select
in a Flight Plan or Chart window and click any
segment of a low-level (Victor) or jet airway.
This dialog displays detailed information about an airway. It includes both general
information and detailed information about each segment.
Click a Navaid/Fix for additional information.
Tip: By default, this dialog shows all segments, including both Navaids and
Waypoints (fixes). To simplify the display, uncheck the Show fixes box.
182
Getting Information
GENERAL
FIELD
Name
Countries
Type
Jet route
Effective date
DESCRIPTION
The name of the airway, such as V27
or J34.
An abbreviation for the country or
countries that this airway is in. If the
airway goes through several countries,
this field only represents the country of
the first and last nodes.
The type of the airway: VOR
(continental US), Hawaii or Alaska.
Yes if the airway is a high-altitude jet
route, No if it is a low-altitude airway.
The first date (Zulu) that this data is
valid.
SEGMENTS
The table shows detailed information about each airway segment. Click any item to
see additional information about the navaid/fix.
COLUMN
Name
Ident
Type
Freq
Radial
Dist
MEA
DESCRIPTION
The name of the waypoint or navaid.
The ident of the navaid and its Morsecode equivalent.
The type of the waypoint. If it's a
navaid, the type of navaid (VORTAC,
VOR/DME, etc.) is shown. If not, the
type is a REP-PT (reporting point),
AWY-INTXN (airway intersection) or
ARTCC-BDRY (ARTCC boundary).
The navaid frequency.
The radial from this navaid to the next
and previous navaids. The first
number is the radial from this navaid to
the next (lower in the list). The
number after the slash is the radial
from this navaid to the previous one
(higher in the list).
The distance, in the Distance units
specified in the Options dialog, from
this waypoint to the next waypoint.
The MEA (Minimum Enroute Altitude),
in the Altitude units specified in the
Options dialog, from this waypoint to
the next. If there is a slash, the
number after the slash is the MEA of
the leg from this waypoint to the
previous one. If not, the MEA in both
183
Voyager User's Guide
Max alt
Obs clear
Min dir
Min X alt
Min X dir
Mag var
ARTCC
MRA
184
directions is the same.
The maximum altitude, if any, of this
segment, in the user-specified altitude
unit.
The minimum obstacle clearance
altitude, if any, in the user-specified
altitude unit.
The point-to-point minimum enroute
direction. Not currently used.
The minimum crossing altitude. If
there is a slash, the first number
applies from this waypoint to the next
and the second from this waypoint to
the previous one. Not currently used.
The minimum crossing direction. If
there is a slash, the first number
applies from this waypoint to the next
and the second from this waypoint to
the previous one. Not currently used.
The official magnetic variation of the
navaid. Radials are computed using
this value rather than a more precise
number that changes daily.
The name of the ARTCC zone.
Minimum reception altitude of the
navaid in the user-specified altitude
unit. Aircraft flying lower than this
altitude may not be able to receive the
navaid signal. Not currently used.
Getting Information
Information/City
To access this feature: Select
name or click
in a Flight Plan or Chart window and click a city
on the main toolbar then enter city name.
Information about a city. US only.
FIELD
Name
State
Latitude/longitude
Population
DESCRIPTION
The official name of the city.
The state in which the city is located.
The latitude and longitude of the center
of the city. Click the field for more
information about this point.
A range indicating the approximate
population.
185
Voyager User's Guide
Information/NavAid
in a Flight Plan or Chart window and click a
To access this feature: Select
navaid. Alternately, select Get Information About a Location from the Tools
menu or click
on the lower toolbar then enter a navaid ident.
Information about a navaid.
FIELD
Name (ident)
Country
Type
Frequency
Mag var
Associated airport
Elevation
Range
Morse code
186
DESCRIPTION
The name and ident of the navaid.
An abbreviation for the country that
contains this navaid.
The type of navaid such as VOR,
VORDME, NDB, etc.
The radio frequency.
The official magnetic variation of the
navaid. Radials are computed using
this value rather than a more precise
number that changes daily.
The ICAO ident of an associated
airport, if any. Click to see more
information about this airport.
The elevation of this navaid, if
available.
The reception range of this navaid, if
available.
The Morse-code equivalent of the ident.
Getting Information
Latitude/longitude
Associated airway(s)
The latitude and longitude of the
navaid. Click the field for more
information about this point.
A list of each airway (either low-level
or jet) of which this navaid is part. The
Previous and Next Waypoint columns
show the waypoints, if any, on either
side of this navaid and the MEA
between the points.
187
Voyager User's Guide
Information
To access this feature: Select
open space.
in a Flight Plan or Chart window and click in any
Information about a general location.
Tip: To simplify the Airspace display, check the Hide Class E and Class A
airspace box.
FIELD
Latitude/longitude
Elevation
Sunrise/sunset
Mag var
188
DESCRIPTION
The latitude and longitude of this
location.
The elevation of this location.
The time, in either Home or Zulu time
(as noted), of civil sunrise and sunset.
If this dialog is shown while a flight
plan window is open, the times are
based on the flight plan's takeoff date.
Otherwise, the time is based on the
current date.
The actual magnetic variation of this
location on the current date. Positive
indicates westerly variation, negative
easterly variation. For example, a
value of -20 means that a true heading
Getting Information
Airspace(s)
Hide Class E and Class airspace
Hide TFRs
of 360 degrees appears as 340
magnetic.
A list of the applicable airspaces at this
location, sorted from the surface up.
Click on any item for more
information. Note: The airspace Floor
and Ceiling are shown in MSL or as
Unknown or Unlimited. If the airspace
was originally expressed as AGL, the
Floor and Ceiling values (displayed as
MSL) are computed by adding the
elevation of the Latitude/longitude
of this point to the given AGL. By
contrast, if you click on an airspace for
more information, Floor and Ceiling
for AGL values are computed using the
center of the airspace region. This can
cause slightly different Floor and/or
Ceiling values.
When checked, Class E and Class A
airspace is hidden to declutter the
display.
When checked, TFRs are ignored when
computing airspace. Thus, check this
box to see the underlying airspace
when a TFR overlaps (and, therefore,
overrides) another class of airspace.
189
Voyager User's Guide
Information/Waypoint
To access this feature: Select
in a Flight Plan or Chart window and click a fix
(waypoint). Alternately, select Get Information About a Location from the Tools
menu or click
on the main toolbar then enter a waypoint ident.
Information about a waypoint.
FIELD
Name (ident)
Country
ICAO
Mag var
Type
Usage
Latitude/longitude
Navaid?
Associated navaid
190
DESCRIPTION
The name and ident of the waypoint.
An abbreviation for the country that
contains this waypoint.
The ICAO identifier of the owner of this
waypoint.
The magnetic variance as computed for
this location on the current date. As
magnetic variation changes over time,
this value will change accordingly.
The type of waypoint, such as Named
(most waypoints), Offroute, VFR
Reporting Point, etc.
The way in which this waypoint is used
such as Low-level, High-Level, Both,
Terminal, etc.
The latitude and longitude of the
waypoint. Click the field for more
information about this point.
Yes if the waypoint is a navaid.
The ident, if any, of a navaid
Getting Information
Associated airway(s)
associated with this non-navaid
waypoint.
A list of each airway (either low-level
or jet) of which this waypoint is part.
The Previous and Next Waypoint
columns show the waypoints, if any, on
either side of this waypoint and the
MEA between the points.
191
Import/Export
Web Synch
To access this feature: Click
File menu.
on the main toolbar or select Web Synch from the
Voyager includes a unique and powerful feature called Web Synch. Web Synch
makes it easy to use Voyager on multiple machines and keep the same flight plans,
default settings and user information on each. Rather than copy files to disk or send
them via email, Web Synch acts like a Web-based 'clipboard' and keeps the latest
version of your information on a Web server. When you perform a synch, Voyager
contacts the Web server and determines who has the latest copy of everything and
copies information back between your machine and the Web server as required.
For example, if you create a flight plan on your work computer and you want it on
your home machine, simply click the Synch button on the work machine then click
Synch again at home. If you modify it at home and want it back on the work
machine, just click Synch again on each machine.
To create an account, simply supply the User ID you'd like to use (your email
address works well as it's easy to remember) and the password you'd like to use.
Tip: If you have multiple machines and one of them is not normally connected to
the Internet, you can use a Memory Card Synch to accomplish much of the same
synchronization.
193
Voyager User's Guide
OPTION
User ID
DESCRIPTION
The User Name associated with your
information.
When you first installed Voyager, it
asked for an email name. Seattle
Avionics automatically creates an
account for each new email address
registered. Thus, there is no need to
create an account as one has already
been created for you ... simply use
your email name.
Password
Remember Password
Confirm User ID/Password before
Synch
Discard existing data on this
machine before Synch
Tip: If you want to change your User
Name (for example, you change your
email name), simply select Change My
Email Contact Info from the Help
menu.
The Password associated with your
account.
Note: The first time you use Web
Synch, your account won't have an
assigned password. Simply enter the
password you'd like to set.
When checked, Voyager will remember
your Password. Use with care and
never use on a public computer.
Note: This is not available when used
from a Briefer version of Voyager.
When checked, Voyager shows this
dialog box before a Web Synch for
entering a User ID and Password.
When unchecked, Voyager uses the
last-used combination.
Note: This is not available when used
from a Briefer version of Voyager.
Check this box if you're temporarily
using a computer that is not yours.
When checked, any existing data is
cleared before the synch so that the
existing data doesn't get merged with
your data. As the existing data is
cleared, be careful when using this
feature.
Tip: If you're using a friend's
194
Import/Export
Change my User ID or Password
Delete old items from WebSynch
I forgot my Password
computer and he also uses Voyager,
have him do a Synch with his User ID
and Password before you Synch to get
your data. That ensures that his data
can be restored after you finish. To
restore his data, he should do a Synch
with his User ID/Password and this
checkbox checked.
Jumps to a page on the Seattle
Avionics Web site that lets you change
your account User ID and/or Password.
Note: This is not available when used
from a Briefer version of Voyager.
Jumps to a page on the Seattle
Avionics Web site lets you select items
(flight plan, aircraft, pilots, etc.) from
your WebSynch account that you no
longer need and delete them. To
ensure that they don't come back after
the next WebSynch, be sure to also
delete them from all your computers.
Note: This is not available when used
from a Briefer version of Voyager.
Jumps to a page on the Seattle
Avionics Web site that can email you a
lost Password.
Note: This is not available when used
from a Briefer version of Voyager.
195
Voyager User's Guide
Import and Export
To access this feature: Select either Import or Export (as appropriate) from the
File menu.
The export dialog allows you to export aircraft, pilots, passengers, cargo items,
personal waypoints, personal procedures, personal workspaces and themes from the
internal Voyager database to a file. These files may be emailed or otherwise copied
between different Voyager installations. For example, if you create the definition for
an aircraft not built-into Voyager, you can email the exported file to a friend with the
same aircraft so he can load it into his Voyager.
Tip: Select Upload/Download Aircraft from the Tools menu to download new
aircraft profiles from the Web or upload profiles you've created.
To export an item:
•
•
•
Select the type of item from the drop-down list near the top of the dialog.
The default is Aircraft.
Select the item to export.
Click the Export button and use the standard Save As dialog to save the file
to disk.
To import an item:
•
196
From the main window, select Import from the File menu.
Import/Export
•
•
In the standard Open dialog, select the type of item to import with the Files
of type drop-down.
Select the file and click Open.
Files are saved with an extension representing the type of item saved: Aircraft are
saved as .Aircraft, Pilots as .Pilot, Passengers as .Passenger, Cargo Items as .Cargo,
Personal Waypoints as .Waypoint, Personal Procedures (requires SmartPlan
Premier) as .Procedure, and Themes as .Thm. All files, except themes and
workspaces, are saved in standard XML format.
Aircraft Exchange Wizard/Welcome
To access this feature: Select Upload/Download Aircraft from the Tools menu.
The Wizard makes it easy to exchange aircraft profiles with your fellow Voyager
users. In particular, it makes it easy to find and download new aircraft profiles as
well as contribute profiles you've created.
This Wizard requires an Internet connection.
197
Voyager User's Guide
Send to PDA (Plate Pack)
To access this feature: While a Plate Pack is on the screen, select Send to Device
or Application from the File menu or click the
on the main toolbar.
This feature sends Plate Packs and/or Procedures to SmartPlates for the Pocket PC
(PDA). To use it, you must have a Pocket PC connected to the desktop/laptop/tablet
on which Voyager is running and a memory card for the Pocket PC. All Procedures
and Diagrams for the entire US consume between 500MB and 1GB so a 1GB memory
card (currently less than $100) is required. The options below allow you to reduce
the amount of storage space required on the memory card if you have less space
available.
Once you select what to send (Options) and a Procedure storage location, click
the Send button to begin copying files.
Tip: On many systems, copying files from a desktop/laptop/tablet to a Pocket PC
can be slow. If your desktop PC has a memory card reader (compact flash, SD,
198
Import/Export
etc.), you may get better transfer speeds by removing the card from the Pocket PC
and putting it directly into the desktop. Then, when the file copy is done, remove
the card from the desktop and put it back in the Pocket PC. SmartPlates for the
Pocket PC will recognize the new files regardless of how the files got there.
OPTION
Send all Procedures and Diagrams
Send selected Procedures and
Diagrams
Send just the Procedures and
Diagrams in the current Plate Pack
Procedure storage location
Show all drives
Automatically begin sending next
time
DESCRIPTION
Sends all the Procedures and Diagrams
on the desktop PC to the Pocket PC.
Voyager compares the files on the
Pocket PC to the files on the desktop
and only copies files that have been
added or changed.
Same as above but allows you to select
by procedure type.
Sends all the Procedures and
Diagrams, in the current Plate Pack, to
the Pocket PC. Voyager compares the
files on the Pocket PC to the files on
the desktop and only copies files that
have been added or changed.
Selects the memory card that will
contain the Procedures and Diagrams.
The memory card may be connected
to either the Pocket PC or the desktop
machine. Of course, if you choose to
copy to a memory card on the desktop
PC, remember to remove the card from
the desktop and put it into the Pocket
PC before using SmartPlates for the
Pocket PC.
Voyager queries each drive on your PC
to determine which might be memory
cards (as opposed to hard drives or
network drives) and limit the visible list
to these drives. In some
circumstances, this logic fails and valid
memory cards will be hidden. If so,
check this box to show all drives
attached to the PC.
Tells Voyager to use the current
settings to automatically begin sending
files then next time this feature is
used. In other words, once you tell
Voyager which storage location to use
and which options you prefer, you need
not set the options again.
199
Voyager User's Guide
Send to Voyager FDX Universal Format
To access this feature: Select Send to Device or Application (or Send to Google
Earth or Application if using FreeFlight) from the File menu or click
main toolbar.
on the
This feature exports the current flight plan to the Voyager FDX (Flight Data
eXchange) Universal file format. These files have file extensions of .fdx.
This standard file format is based on XML and designed for easy portability between
different applications and systems as well as good human readability.
Just like a printed Voyager flight plan, Voyager can export the plan either with all the
altitude change points (Begin Cruise, Begin Descent, etc.) or just the waypoints you
entered (airports, navaids, etc.). Check or uncheck the Send altitude change
points box depending on your preference.
FILE FORMAT
<?xml version="1.0" encoding="UTF-8" standalone="no" ?>
<FlightPlan>
<Name> FPNAME </Name>
<Waypoints>
<Waypoint>
<Name> NAME </NAME>
<LocationType> LOCTYPE </LocationType>
<WaypointType> WAYPOINTTYPE </WaypointType>
<Ident> IDENT </Ident>
<Country> COUNTRY </Country>
<Longitude> LONG </Longitude>
<Latitude> LAT </Latitude>
<AltStart> ALTSTART </AltStart>
<AltEnd> ALTEND </AltEnd>
200
Import/Export
<Comment> COMMENT </Comment>
</Waypoint>
<Waypoint>
....
</Waypoint>
</Waypoints>
</FlightPlan>
FIELDS
FIELD
FPNAME
NAME (Optional, generally)
LOCTYPE (Required)
DESCRIPTION
The name of the flight plan.
Name is a text name or description that
is only for humans to understand. It
may or may not be displayed by the
host application. The field is optional
for all LOCTYPE except User where it is
required. If not supplied, the host
system should display the IDENT or, if
it can unambiguously obtain the name
using the IDENT and COUNTRY fields, it
may display a more friendly name. For
example, if no NAME is supplied but the
IDENT is KJSC, the application may
display either KJSC or San Jose Intl.
The host application should do no
validation of NAME and must accept
duplicate NAME entries.
LOCTYPE is the type of object. Allowed
values are (only):
NavAid
Airport
Fix (both fixes and intersections)
WAYPOINTTYPE (Optional)
User (user-defined lat/long point)
Describes the way the waypoint is
used. Valid entries (only) are:
Takeoff
201
Voyager User's Guide
Landing
Waypoint
Stop (a landing followed by
another takeoff, often but not
always a fuel stop)
IDENT (Required, generally)
If the field is not supplied, the host
application should assume a Waypoint.
A flight plan may not have more than
one Takeoff or Landing. It is suggested
that flight plans either complete this
field for all waypoints or for none.
IDENT is either the official name or
common ident of the point.
For airports, this should include the
country identifier (e.g. KSEA rather
than SEA) but programs should accept
it either way. The COUNTRY field
should also be used to match as
airports with no ICAO idents, in
different countries, will often have the
same name or ident.
For navaids, the program should scan
navdata for either official idents or
names. For example, PA is an NDB
north of Seattle that is typically
referred to as RITTS. Matches should
be found if either PA or RITTS is
provided. The COUNTRY identifier
should also be used to verify the
match.
For a FIX, the IDENT may be either a
name (e.g. EYWOK) or an FAA (or
equivalent) computer-generated ID
such as 23096. Note: This is NOT the
same as accepting the FAA, DAFIF or
other internal ID code. Such codes are
never accepted. This section refers to
fixes that the FAA calls "computer
fixes" that have no name, just an ID
number. These waypoints are found in
the FAA database but are not in the
DAFIF database. The computer idents
and names are not interchangeable
(that is, a specific Waypoint will have
one or the other) but the program
should be able to deal with all-numeric
202
Import/Export
waypoints. COUNTRY should be used
to clarify matches.
COUNTRY (Required, generally)
LONG / LAT (Required)
ALTSTART/ALTEND (Optional)
IDENT may be provided for userdefined waypoints but host applications
may ignore them. Rather, the NAME
field should be used to provide a
human-readable name to the user.
This is the two-letter ICAO identifier for
each waypoint. The field is mandatory
for all LOCTYPE except User.
This field represents the latitude and
longitude point for the waypoint. Data
is in decimal where negative numbers
denote West longitude and Southern
latitude. Example: KPAE near Seattle
is: Latitude: 47.90633, Longitude: 122.2816 There is no formal limit to
the number of decimal places used but
it is suggested that writing applications
limit these fields to 6 decimals places.
It is suggested, although not
mandatory, that applications compare
the latitude/longitude of each named
waypoint (that is, navaids/airport/fix)
with this value and reject the point if it
does not match, with a high degree of
precision. Applications that match in
this manner must accept a small
amount of difference due to potentially
different data sources (Jepp vs FAA, for
example).
These are the altitudes of the start and
end of the leg, respectively. The unit is
FT MSL. This field is not required and
may be ignored, if present, by
consuming applications.
NOTES:
Waypoints are sequenced from the start of the flight to the end.
The reading program should ignore other fields that may be in the data that it does
not recognize.
There are no limits on the number of characters in any field.
All field names are case-sensitive as per XML specifications. Data is case-insensitive.
203
Voyager User's Guide
Send to ControlVision Anywhere Map
To access this feature: Select Send to Device or Application from the File menu
or click
on the main toolbar.
This feature exports the current flight plan to a ControlVision Anywhere Map flight
plan file (.fp).
By default, Voyager will automatically detect your Pocket PC PDA and put the flight
plan in the usual directory used by Anywhere Map (\dat.) Alternately, you can use
the Write the Anywhere Map plan to my PC and let me manually put it on my
PDA option to write the file to any location on your computer's hard disk. You can
then copy or move the file to the PDA yourself.
Just like a printed Voyager flight plan, Voyager can export the plan either with all the
altitude change points (Begin Cruise, Begin Descent, etc.) or just the waypoints you
entered (airports, navaids, etc.). Check or uncheck the Send altitude change
points box depending on your preference.
An Anywhere Map flight plan is not as detailed as a Voyager plan. For example, the
exported flight plan does not contain altitude information, fuel stops or any
information specific to the plane or pilot. Additionally, if the Anywhere Map airspace
database is not updated, it's possible that the Voyager plan, using current airspace
data, has airport, navaid or waypoint references that are not in the Anywhere Map
database. And, even when updated properly, the Anywhere Map database is more
limited than the Voyager database so references to smaller or soft-field airports may
produce an invalid (truncated) Anywhere Map plan.
For this feature to work, your Pocket PC must be properly connected and turned on.
The file is copied via Microsoft ActiveSync so that must also be properly installed
(it's installed by default when you connect a Pocket PC).
Note: ControlVision changed Anywhere Map's flight plan file format with its version
1.7 release in the summer of 2005. Voyager defaults to using the new file format.
This new file format includes altitude (what they call VNav) information. If you're
using an older version of Anywhere Map, be sure to check the Use old file format
checkbox.
Tip: If Anywhere Map is having trouble loading the Voyager flight plan, uncheck the
Use Anywhere's database for aviation waypoints checkbox. When unchecked,
Voyager sends all waypoints as pure latitude/longitude points.
Note: It's a coincidence that Voyager and Anywhere Map use the same file
extension (.fp). A flight plan created with Anywhere Map cannot be loaded into
Voyager even though, since the extension is the same, the file may appear to have
the standard Voyager icon associated with it. Similarly, a Voyager flight plan cannot
be directly loaded by Anywhere Map.
204
Import/Export
Send to Garmin GPS
To access this feature: Select Send to Device or Application from the File menu
or click
on the main toolbar.
This feature exports the current flight plan to a Garmin handheld GPS. It has been
tested against the Garmin Pilot III, 96, 96c, 195, 196, 295 and 296 but it might also
work with other units. As Garmin panel-mounted GPS units do not have a public
computer interface, Voyager cannot export to panel-mounted units such as the 430,
530 and G1000.
The export makes best-use of the features available on each GPS unit. For example,
the export process will use the internal aviation database of most units rather than
create user-defined waypoints directly over existing airports or navaids.
By default, Voyager will scan your computer's COM and USB ports for a Garmin GPS
so be sure the unit is on and properly connected before you use this feature.
A Garmin route is not as detailed as a Voyager flight plan. For example, the
exported flight plan does not contain altitude information, fuel stops or any
information specific to the aircraft or pilot.
Note: For the USB-based GPS units (96, 96c and 296) to communicate with the
computer, you must install the software that came with your GPS first. For the COM
(serial port)-based units, you may need to purchase a special connection cable
before you can connect to your PC. The cables can be purchased directly from
Garmin or from many of their resellers.
OPTION
Automatically detect my GPS
DESCRIPTION
Instructs Voyager to scan your
computer's COM (serial) ports and USB
bus for a Garmin GPS. Conceivably, if
you have another device connected to
the COM port (a dial-up modem, Palm
PDA, etc.), this scan could interfere
with other devices so you might need
to manually determine which port your
GPS is connected to.
Note: After Voyager finds the correct
COM or USB connection the first time,
Voyager attempts to use that
connection for subsequent exports
before trying other connections.
Therefore, the first export might take
a little longer than later exports.
205
Voyager User's Guide
Use the following connection
Waypoints only
Flight plan (route)
Name/Number
Altitude change points (all
waypoints)
Use the GPS database for standard
aviation wpts
206
Select this option if the automatic scan
has trouble finding your GPS or you
have multiple GPS units connected to
your computer.
By default, Voyager sends the
waypoints as part of what Garmin calls
a route (a flight plan). However, if this
option is selected, Voyager just sends
the waypoints in the flight plan to the
GPS as user-defined waypoints, not as
part of a route.
The flight plan points are sent as part
of a Garmin route.
A unique name for the route. For older
GPS units, a route number is also
required. This value is ignored by the
295 and later models.
On the screen, Voyager normally shows
just the waypoints you entered
(airports, navaids, etc.). However,
when printed, a Voyager flight plan
usually also includes altitude change
points (Begin Cruise, Begin Descent).
Check this box to include these points
as well.
If checked, Voyager attempts to use
the GPS aviation database rather than
create user-defined waypoints. This
feature requires the 295 or later GPS
units. For older units, this checkbox is
ignored and Voyager must create userdefined waypoints even when the
waypoint is an airport, navaid or
waypoint. Additionally, even with a
newer units, if you don't keep its
database up to date, Voyager may
have to create user-defined waypoints
if the waypoints are too new to be in
the GPS database.
Import/Export
Send to Microsoft Flight Simulator
To access this feature: Select Send to Device or Application from the File menu
or click
on the main toolbar.
This feature exports the current flight plan to a Microsoft Flight Simulator plan file
(.pln). By default, the output goes to the usual Flight Simulator directory
(c:\documents and settings\<your name>\My Documents\Flight Simulator Files) but
you can use the Browse button to put the file in a different location.
A Flight Simulator flight plan is not as detailed as a Voyager plan. For example, the
exported flight plan does not contain altitude information, fuel stops or any
information specific to the plane or pilot. In addition, a Flight Simulator plan is
constrained to airports, navaids and waypoints so a Voyager plan created via the
GPS Direct router (or manually 'rubber-banded') cannot be accurately translated to
Flight Simulator. In such a case, 'user-defined' points are removed from the
exported flight plan. Additionally, the Flight Simulator airspace database does not
get updated so it's possible, especially if your copy of Flight Simulator is old, that the
Voyager plan, using current airspace data, has airport, navaid or waypoint references
that are not in the Flight Simulator database.
Flight plans are supported by Microsoft Flight Simulator 2000 or later.
Note: You can also do a virtual flight using Google Earth.
207
Voyager User's Guide
Send to Lowrance GPS
To access this feature: Select Send to Device or Application from the File menu
or click
on the main toolbar.
This feature exports the current flight plan to a Lowrance handheld GPS. It has been
tested against the AirMap 500, 1000 and 2000c but it might also work with other
units.
Lowrance units store flight plans on industry-standard SD/MMC memory cards so you
must remove the memory card from your GPS and attach it to your computer before
using this feature. Once the flight plan is copied to the memory card, put the card
back into the GPS. See the Lowrance documentation for how to remove the memory
card,
A Lowrance route is not as detailed as a Voyager flight plan. For example, the
exported flight plan does not contain altitude information, fuel stops or any
information specific to the aircraft or pilot.
OPTION
Memory cards attached to this
computer
Show all drives
Waypoints only
Flight plan (route)
208
DESCRIPTION
Shows all the available memory cards
currently attached to this computer.
As noted above, Lowrance units store
flight plans on a removable memory
card. The card must be removed from
the GPS and connected to this
computer (and then replaced, of
course).
Voyager queries each drive on your PC
to determine which might be memory
cards (as opposed to hard drives or
network drives) and limit the visible list
to these drives. In some
circumstances, this logic fails and valid
memory cards will be hidden. If so,
check this box to show all drives
attached to the PC.
By default, Voyager sends the
waypoints as part of what Lowrance
calls a route (a flight plan). However,
if this option is selected, Voyager just
sends the waypoints in the flight plan
to the GPS as user-defined waypoints,
not as part of a route.
The flight plan points are sent as part
of a Lowrance route.
Import/Export
Name
Altitude change points (all
waypoints)
A unique name for the route.
On the screen, Voyager normally shows
just the waypoints you entered
(airports, navaids, etc.). However,
when printed, a Voyager flight plan
usually also includes altitude change
points (Begin Cruise, Begin Descent).
Check this box to include these points
as well.
209
Voyager User's Guide
Send to Hilton Software WingX
To access this feature: Select Send to Device or Application from the File menu
or click
on the main toolbar.
This feature exports the current flight plan to a Hilton Software WingX route (.rt).
By default, Voyager will automatically detect your Pocket PC PDA and put the flight
plan in the usual directory used by WingX. Alternately, you can use the Write the
WingX plan to my PC and let me manually put it on my PDA option to write the
file to any location on your computer's hard disk. You can then copy or move the file
to the PDA yourself.
Just like a printed Voyager flight plan, Voyager can export the plan either with all the
altitude change points (Begin Cruise, Begin Descent, etc.) or just the waypoints you
entered (airports, navaids, etc.). Check or uncheck the Send altitude change
points box depending on your preference.
A WingX route is not as detailed as a Voyager plan. For example, the exported flight
plan does not contain fuel stops or any information specific to the plane or pilot.
Additionally, if the WingX database is not updated, it's possible that the Voyager
plan, using current airspace data, has airport, navaid or waypoint references that are
not in the WingX database.
For this feature to work, your Pocket PC must be properly connected and turned on.
The file is copied via Microsoft ActiveSync so that must also be properly installed
(it's installed by default when you connect a Pocket PC).
Tip: If WingX is having trouble loading the Voyager flight plan, uncheck the Use
WingX's database for aviation waypoints checkbox. When unchecked, Voyager
sends all waypoints as pure latitude/longitude points.
210
Customizing Aircraft and Other Lists
Aircraft/General
To access this feature: Select Aircraft from the Lists menu and choose an aircraft
or click the Add button.
This tab contains the most basic information about an aircraft such as its make and
model, tail number, etc.
Tip: To define a new aircraft, it's usually faster to base it on an existing aircraft
rather than define it from scratch. Click the Copy from aircraft library button to
clone and modify information from another aircraft.
OPTION
Name
Description
DESCRIPTION
The name you'll use to refer to this
aircraft. This can be anything you like
such as My Airplane, Bonanza A-36,
Rental 172, or the tail number.
The description is optional text that you
can use to differentiate between this
aircraft and others later. It's not
211
Voyager User's Guide
Manufacturer
Model
Type
Color
Tail number
Year
Category
212
shown anywhere except in the Aircraft
dialog box.
The current manufacturer of this
aircraft as listed in the official ICAO
aircraft directory. In cases where the
aircraft design has been sold from the
original manufacturer, select the
current manufacturer and look for the
aircraft in the Model list below. The
Mfg and Model are used when filing a
flight plan.
Note: Selecting a Mfg and Model does
not automatically select all the proper
performance, weight and balance and
other factors for this aircraft as such
would require Voyager to store
thousands of aircraft profiles. The Mfg
and Model selections are only used to
complete the Type/Equipment field
(block 2) of the FAA Flight Plan form.
The model of the aircraft as listed in
the official ICAO aircraft directory. In
cases where the aircraft is referred to
by multiple names, you may have to
look to find the right choice. For
example, most people refer to a
Cessna Skyhawk 172 as a C172 or 172
but it's listed here under its official
name of Skyhawk 172 although the
similar Cessna 152 is simply called a
152. The Mfg and Model are used
when filing a flight plan.
Optional additional model specifier. For
example, the Cessna Skyhawk 172 has
been made for decades so an additional
type, a single letter in this case, is used
to differentiate between the variants.
The color(s) of this aircraft, using
colors approved for FAA flight plans
and used when a flight plan is filed.
Click the ... button to change the
color.
The ICAO identification number of the
aircraft. For US-based aircraft, this is
commonly called the "N-Number" since
it begins with the letter N.
Optional year of manufacture.
The FAA category of the aircraft:
Normal, Utility, Acrobatic, Restricted,
Transport or Experimental.
Customizing Aircraft and Other Lists
IFR certified?
Fuel
Show fuel as
Photo
Icon
Photo
Home airport
Home base phone
Selects whether or not this aircraft is
rated for IFR operations.
The type of fuel used by this aircraft
such as AvGas (100LL) or JetA. If this
aircraft uses a fuel not listed, add it
with the Fuel item of the Lists menu.
Selects whether fuel is displayed as
Volume (typically Gallons) or as Weight
(typically pounds). Volume is common
for light GA aircraft; Weight for jets.
Voyager can display a photograph of
the aircraft. Use the Browse button to
select a photo and the Clear button to
remove one.
The icon used during the time-lapse
display of weather.
An optional photograph of the aircraft.
Click the Browse button to select a
GIF, JPEG or BMP image. Click the
Clear button to clear an existing image
(this does not delete the original file).
The FAA or ICAO identifier of the home
airport of this aircraft. Used to
complete the FAA Flight Plan Form.
As with any other airport identifier in
Voyager, you may enter almost any
text in this field (3 or 4 letter FAA
ident, 4 letter ICAO ident, official
name, common name, city, etc.) and
Voyager will present you with a list of
matching airports from which to select.
The optional phone number of the
aircraft's home base. Used to complete
the FAA Flight Plan Form.
213
Voyager User's Guide
Aircraft/Weight and Balance
To access this feature: Select Aircraft from the Lists menu, choose an aircraft and
click Edit. Select the Weight and Balance tab or step.
This tab has several sections including fields for basic weight and load information, a
weight and balance stations table and a CG envelope display.
BASIC WEIGHT AND LOAD INFORMATION
OPTION
Empty weight
Max takeoff weight
Usable fuel capacity
214
DESCRIPTION
The minimum weight of the aircraft
without any useable fuel, passengers or
cargo. In most cases, this is the Basic
Empty Weight (BEW).
The maximum total weight at which the
aircraft is certified to fly.
Click the Advanced button to set
Maximum Ramp Weight, Maximum
Landing Weight and Maximum
Zero-Fuel Weight.
The useable fuel capacity. By default,
Customizing Aircraft and Other Lists
this amount of fuel is added to new
flight plans using this aircraft. This
value is displayed as either a volume
(usually gallons) or as weight (usually
pounds) depending on the setting of
the Show fuel as option in the
General tab.
Click the Advanced button to specify
the capacity and burn order when using
multiple tanks.
Advanced
When using multiple fuel tanks, use
this button to set individual fuel
capacities and fill/burn orders.
STATIONS TABLE
Stations are specific locations within the aircraft that are different distances away
from the CG datum point and, therefore, affect weight and balance differently.
Hence, the same weight at different stations may cause very different stability
characteristics.
The Add button inserts a new station immediately above whichever station is
currently selected or at the end of the table if no row is selected. The Delete button
removes the selected row. The up and down arrow buttons change the order of the
stations for visual purposes but the sequence is technically irrelevant.
COLUMN
Name
Arm
Type
DESCRIPTION
The unique name of the station.
Arm is the distance from the CG datum
point.
To make it easier to complete a weight
and balance form during flight
planning, Voyager keeps track of
several different types of objects
(pilots, passengers, cargo, etc.) that
might be added to an aircraft manifest.
Type selects which of these objects
may be added to this station.
CG ENVELOPE DISPLAY
A CG (Center of Gravity) Envelope is a 2-dimensional range of weight and moment
combinations that define a safe flight range for the aircraft. As aircraft may be
certified in more than one category (Normal, Utility, etc.), the Envelopes button
adds and removes envelopes. Note: Voyager currently only looks to the first
envelope (typically Normal) to determine if an aircraft is loaded within limits.
215
Voyager User's Guide
The acceptable weight and balance envelope for this aircraft is displayed as a shape
defined by various points. The vertical or Y axis is the weight, measured in
whichever units are selected in the Units tab of the Options dialog (default is
pounds). The horizontal or X axis is the total moment measured in the combined
units implied by the product of the arm unit (default is inches) and the weight unit or
simply the arm, depending on the aircraft. If moment is on the X axis, it is shown
divided by 1000 to simplify the display. An aircraft loaded within the weight and
balance envelope has weight/moment combinations that are within this envelope
during all stages of flight.
Define points with the Edit points button. Also use Edit Points to switch between
Weight x Moment and Weight x Arm display.
216
Customizing Aircraft and Other Lists
Advanced Weight and Balance
To access this feature: Select Aircraft from the Lists menu. Select an aircraft and
click Edit. Choose the Weight and Balance tab and click the Advanced button.
This dialog box helps make very precise profiles for high-performance
planes. In addition to the Maximum Takeoff Weight specified in the
main Weight and Balance tab, this window lets you specify
additional maximum weight points. It also lets you specify the
capacity and fill/burn order of the fuel tanks.
217
Voyager User's Guide
WEIGHT
OPTION
Max ramp weight
Max landing weight
Max zero-fuel weight
DESCRIPTION
The maximum total weight, in the units
specified in the Units tab of the
Options dialog, of the aircraft before it
begins its run-up. See Run-up fuel
burn (below) for more information.
The maximum total weight of the
aircraft as it begins to land.
The maximum total weight of the
aircraft without any fuel. Any
additional weight, up to Maximum
Takeoff Weight, must be in fuel not
cargo or passengers.
FUEL
This area lets you specify the fill and burn order of your fuel tanks.
Tip: The fuel tanks listed here are based on the stations marked as Type Fuel in the
main weight and balance area. Therefore, to add or remove fuel tanks, use the
Add and Delete buttons in the Stations area of the main weight and balance
screen.
OPTION
Capacity and fill order
Burn order
Taxi/run-up fuel burn
218
DESCRIPTION
This grid does two things. It lets you
specify the capacity of each tank, in
the units specified in the Units tab of
he Options dialog box. It also lets you
specify the order in which fuel is to be
added to the tanks. The tank at the
top of the list is filled first, the bottom
tank last.
Use the Up and Down arrow buttons
to the right of the list to change the fill
order.
This list lets you specify the tank burn
order, which is often different than the
fill order. Use the Up and Down arrow
buttons to the right of the list to
change the burn order.
The amount of fuel burned before
takeoff (i.e. startup, taxi and run-up).
Customizing Aircraft and Other Lists
Aircraft/Performance
To access this feature: Select Aircraft from the Lists menu and choose an aircraft
or click Add. Select the Performance tab or step.
SmartPlan Premier lets you model performance based on a Quick model, most
applicable for lower performance plans that fly at lower altitudes and Advanced
model, applicable to high-performance aircraft. Select the model appropriate for you
aircraft.
The Quick model lets you select different fuel and speed values for climb, cruise and
descend but doesn't vary by altitude, temperature or weight. The Advanced tab
lets you take those additional factors into consideration for more precise
performance modeling.
Regardless of which modeling method is used, this page is divided into two sections.
The top section specifies the speed and fuel burn rates under various conditions and
the second half has various minimum and maximum performance specifications.
QUICK MODEL
The following table asks for basic performance data used during flight planning. In
all cases, the actual performance will vary given different conditions such as altitude,
219
Voyager User's Guide
temperature, power settings, etc. Therefore, use values that reflect your most
typical conditions. For example, if you fly a Cessna Skyhawk 172, your aircraft may
have better than 500 feet/minute climb at sea level but only 150 feet/minute at
12,000 feet. If you normally fly high, use a lower climb rate; if you normally fly
below 7,000 feet, use something closer to 500.
Tip: If accurate performance modeling at different altitudes, temperatures or
weights is important, use the Advanced Model, below.
TAS
Fuel rate
Climb/descend
rate
Climb
True airspeed
during a climb.
Fuel consumption
rate during climb,
normally in
gallons per hour.
Climb rate. This
is in Ft/Min if
you're using
either Feet or FL
as your altitude
unit and M/Min if
Meters is
selected.
Cruise
True airspeed
during cruise.
Fuel consumption
rate during cruise,
normally in
gallons per hour.
Descend
True airspeed
during a descent.
Fuel consumption
rate during
descent, normally
in gallons per
hour.
Descent rate.
This is in Ft/Min
if you're using
either Feet or FL
as your altitude
unit and M/Min if
Meters is
selected.
Tip: Fuel rates may be expressed as either volume/hour (e.g. 10 gl/hr) or
weight/hour (e.g. 100 lbs/hr). This is controlled by the Show fuel as option on the
General tab or step.
PERFORMANCE SPECIFICATIONS
OPTION
Required runway length
Service ceiling
DESCRIPTION
The minimum runway length required
for safe operation of this aircraft.
The highest altitude MSL at which this
aircraft is certified to fly.
ADVANCED MODEL
The Advanced model shows a table divided into four sections. The left-most
column(s) show the different combination of settings. By default, this area just
shows Alt so you can vary performance by altitude. By clicking the Options button,
you can also take Weight and Temperature into consideration.
The next three sections, which begin with the headings Cruise, Climb and
Descend, are essentially the same as the table in the Quick model (see above for
220
Customizing Aircraft and Other Lists
details) with a somewhat different layout. Here, these settings are grouped by the
Alt, Weight and Temperature selected in the left-most area.
Note: Temperature is relative to ISA not absolute. For example, if the POH groups
performance by ISA such as ISA -20, ISA and ISA +20, the correct settings in
Voyager would be -20, 0 and 20 respectively. This makes the data easier to enter.
When computing expected performance, Voyager converts these values to absolute
outside air temperatures, for each altitude, and compares them to the expected
winds aloft temperatures.
Note: Weight is the initial weight at the start of the climb or descent.
Note: Each TAS and Fuel Rate must be > 0 even if it represents climb from the
highest altitude the aircraft can fly (that is, impossible). If necessary, duplicate
values from the next-highest altitude in the table.
For example, to model performance differently at 6,000 ft than at 18,000 ft, you
need two rows, one with an Alt of 6000 and one with an Alt of 18000. Then you
need to complete the Cruise, Climb and Descend values for each altitude.
Use the Add button to add another row to the end of the worksheet. Use Delete to
remove the currently selected row. Use Insert to add a row above the currently
selected row. The Up and Down arrow buttons are used to re-order the worksheet
although the order in the table is for data-entry ease only; Voyager is indifferent to
the order of each entry.
Use the Import button to load complex tables saved as text files. For importing
models with tens or even hundreds of different combinations, it's generally easier to
use an external editor, like a spreadsheet, and use the Import button rather than
use Voyager's built-in interface. See File Format for details.
221
Voyager User's Guide
Advanced Performance Options
To access this feature: Select Aircraft from the Lists menu and choose an aircraft
then select the Performance tab and click Options.
The dialog lets you select how detailed you'd like to model aircraft performance. By
default, Advanced performance modeling takes altitude into account. Select
other options for even more precise performance modeling.
OPTION
Temperature
Weight
222
DESCRIPTION
When selected, Voyager takes the
current outside air temperature into
account. If no predicted or actual data
is available, the standard lapse rate, at
ISA, is assumed.
When selected, Voyager take the
current aircraft weight into account
when estimating performance. That is,
as fuel burns and weight decreases,
Voyager will model performance
differently. This option is only
available if Temperature is also
selected.
Customizing Aircraft and Other Lists
Performance Table Import File Format
To access this feature: Select Aircraft from the Lists menu. Choose an aircraft and
click Edit. Select the Performance tab and, within that, the Advanced tab. Click
Import.
This feature makes it easier to enter large amounts of performance data for
advanced planes where weight and temperature are all taken into account. For
modeling performance based on altitude alone, it's easier to use Voyager's built-in
interface from the Performance tab.
Voyager can import a performance table as a text file formatted with the fields
below. Each field must be separated by a comma and each line by a carriagereturn/line-feed combination. The file may be created with Notepad or any text
editor or with a spreadsheet such as Microsoft Excel. If a spreadsheet is used,
remember to export the file as a CSV (comma-separated values) file as Voyager
cannot directly read spreadsheet files.
The units used for temperature, weight, altitude and speed are all determined by the
Units tab of the Options dialog box unless otherwise noted below. Fuel flow is
entered as either a Volume (such as Gal/Hr) or a Weight (such as Lbs/Hr) as set in
Show fuel as area of the General tab of the Aircraft dialog.
Note: It is necessary for Show fuel as to be set to the appropriate value before
Import is used. It may be necessary, therefore, to set Show fuel as, close the
dialog box, then re-open the dialog box before using Import.
For more information, see Advanced Model in the Performance topic.
The first three lines of the file are special.
LINE
1
2
3
DESCRIPTION
The file format version number.
Should always be Version=1
A description of the file. This can be
any text or nothing and is not used by
Voyager. It is just so a human reading
the file knows what the file models.
E.g. Falcon 900EX with Long-Range
Cruise and Normal Takeoff.
A comma-separated list of three key
columns.
As all POHs are organized somewhat
differently, this feature allows you to
specify the column-order for the
223
Voyager User's Guide
Weight, Temperature and Altitude
columns such as to best match your
manual. The other columns, however,
must be entered in the exact order. If
either Weight or Temperature is not to
be used in the model, leave the column
name off this line.
Case and spaced after the commas are
ignored.
e.g.
Temp, Alt, Wt
Temperature, Altitude, Weight
Temp, Alt
Wt, Alt
etc.
Data
OPTION
Temperature
Weight
Altitude
TAS Cruise
TAS Climb
DESCRIPTION
If used (see above), the differential
from ISA in the units specified in the
Units tab of the Options dialog box.
(e.g. -10,0,10,20)
If used (see above), the weight at the
start of the climb, descent or cruise.
Units specified in the Units tab of the
Options dialog.
The altitude to which this entry applies,
in units specified in the Units tab of
the Options dialog.
The speed, in units specified in the
Units tab of the Options dialog, of the
aircraft, during cruise, at this
combination of altitude and/or
temperature and/or weight.
The speed, in units specified in the
Units tab of the Options dialog, of the
aircraft, during climb, at this
combination of altitude and/or
temperature and/or weight.
Note: This value must be > 0 even if
it represents climb from the highest
224
Customizing Aircraft and Other Lists
TAS Descent
Fuel Rate Cruise
Fuel Rate Climb
Fuel Rate Descent
Altitude Change Rate Climb
altitude this aircraft can fly (that is,
impossible). If necessary, duplicate
values from the next-highest altitude in
the table.
The speed, in units specified in the
Units tab of the Options dialog, of the
aircraft, during descent, at this
combination of altitude and/or
temperature and/or weight.
The fuel flow per hour, in units
specified in the Units tab of the
Options dialog, of the aircraft, during
cruise, at this combination of altitude
and/or temperature and/or weight.
The data should be a weight (e.g.
Lbs/Hr) if Show Fuel As is set to
Weight in the General tab of this
dialog or a volume (e.g. Gals/Hr) if
Volume is selected.
Same as above but during a climb
beginning at this
altitude/temperature/weight
combination.
Note: This value must be > 0 even if
it represents climb from the highest
altitude this aircraft can fly (that is,
impossible). If necessary, duplicate
values from the next-highest altitude in
the table.
Same as above but during a descent
beginning at this combination.
The climb rate per minute in either
Feet or Meters (e.g. Ft/Min) when
starting at this
altitude/temperature/weight condition.
If your POH uses Time and Distance
rather than Ft/Min, you may have to do
some manual calculations first.
Note: If your Altitude Unit is FL, use
FT here instead. That is, enter as
FT/Min not FL/Min.
Altitude Change Rate Descent
Note: This value must be > 0 even if it
represents climb from the highest
altitude this aircraft can fly (that is,
impossible). If necessary, duplicate
values from the next-highest altitude in
the table.
As above but for descent.
225
Voyager User's Guide
Aircraft/Equipment
To access this feature: Select Aircraft from the Lists menu and choose an aircraft
or click the Add button. Select the Equipment tab or step.
This tab list the various equipment that may be aboard each aircraft. These settings
are used to compute the equipment field (/Q, /X, etc.) of an FAA or ICAO Flight Plan
Form. As FAA and ICAO forms have very different equipment sections, this page is
also separated into an FAA and ICAO section.
FAA
OPTION
GPS
Transponder
FMS
Radio
DME
226
DESCRIPTION
Specifies what Global Positioning
System equipment, if any, is aboard.
Specifies which transponder, if any, is
aboard.
Specifies which Flight Management
System, if any, is aboard.
Checked if a radio is aboard.
Checked if Distance Measurement
Equipment is aboard.
Customizing Aircraft and Other Lists
RNav
TACAN
LORAN
INS
RNP
RNP/RVSM
TCAS
Heavy
Checked if Area Navigation equipment
is aboard.
Checked if TACAN equipment is aboard.
Checked if a LORAN is aboard.
Checked if an Inertial Navigation
System is aboard.
Checked if Required Navigation
Performance equipment is aboard.
Checked if RNP with RVSM equipment
is aboard.
Checked if the aircraft includes an
advanced collision avoidance system.
Checked if the aircraft is capable of a
takeoff weight of more than 255,000
pounds, whether or not it is operating
at this weight.
ICAO
227
Voyager User's Guide
COM/NAV
OPTION
ADF
Datalink
DME
GNSS
HF RTF
ILS
LORAN C
MLS
Omega
RNP
TACAN
UHF RTF
VHF RTF
VOR
W
X
Y
Z
Wake turbulence
DESCRIPTION
Checked if the aircraft has ADF
navigation equipment.
Checked if a datalink system is
installed.
Checked if Distance Measurement
Equipment is aboard.
Checked if a Global Navigation Satellite
System (effectively a GPS system) is
installed.
Indicates that a High Frequency RTF is
installed.
Checked if Area Navigation equipment
is aboard.
Checked if a LORAN is aboard.
Indicates that a MLS is installed.
Checked if an Omega receiver is
installed.
Checked if Required Navigation
Performance equipment is aboard.
Checked if TACAN equipment is aboard.
Indicates that an Ultra High Frequency
RTF is installed.
Indicates that an Very High Frequency
RTF is installed.
Indicates that a VOR navigation system
is installed.
Indicates that the aircraft is RVSM
certified.
Indicates that the aircraft is MNPS
certified.
Indicates that the aircraft is CMNPS
certified.
Indicates that the aircraft has other
special equipment.
Indicates the amount of expected wake
turbulence based on the MCTOM
(maximum certified takeoff mass) of
the aircraft. Choices are:
Heavy. MCTOM of 136,000 kg or more.
Medium. MCTOM less than 136,000 kg
but more than 7,000 kg.
Light. MCTOM of 7,000 kg or less.
Transponder/ADS
228
Customizing Aircraft and Other Lists
OPTION
Mode
Ident reporting
Altitude reporting
ADS
DESCRIPTION
Specifies which transponder, if any, is
aboard.
Specifies if the transponder can
transmit the aircraft identification -- a
Mode S transponder, for example.
Specifies whether the transponder
transmits altitude information -- a
Mode C transponder, for example.
Indicates if the transponder contains an
ADS.
Emergency and Survival Equipment
OPTION
Radio/VHF radio
Radio/UHF radio
Radio/ELBA
Survival/Polar
Survival/Desert
Survival/Maritime
Survival/Jungle
Jackets/Lights
Jackets/Fluorescent
Jackets/UHF
Jackets/VHF
Dinghies/Covered
Dinghies/Number and Capacity
Dinghies/Colour
DESCRIPTION
Indicates that the aircraft has a radio
that transmits and receives in the VHF
band.
Indicates that the aircraft has a radio
that transmits and receives UHF.
Indicates that the aircraft has an ELBA
(called an ELT by the FAA).
Indicates that cold-weather survival
equipment is on-board.
Indicates that hot-weather survival
equipment is on board.
Indicates that the aircraft contains
survival equipment for water landings.
Indicates that the aircraft contains
survival equipment for landing in
tropical climates.
Indicates that the aircraft contains life
jackets with lights.
Indicates that the aircraft contains life
jackets with fluorescent chemicals.
Indicates that the aircraft contains life
jackets with embedded UHF
transmitters.
Indicates that the aircraft contains life
jackets with embedded VHF
transmitters.
Indicates that the aircraft carries
covered dinghies.
Indicates the number of dinghies and
the capacity (in people) of each.
Indicates the color of each dinghy.
Note: The spelling of color as colour is
to match the ICAO English spelling of
the word.
229
Voyager User's Guide
Pilot
To access this feature: Select Pilots from the Lists menu and choose a pilot.
This dialog shows information about a pilot. This information is used for completing
weight and balance forms, submitting flight plans via DUAT or DUATS and for
verifying valid flight plans. It is divided into three sections: General Info,
DUAT/DUATS Info and AOPA Info. You can edit this information later using the
Pilots choice under the Lists menu.
GENERAL INFO
OPTION
Name
230
DESCRIPTION
The pilot's full name. Used to
differentiate between various pilots in
the Pilots list, to complete the FAA and
ICAO Flight Plan Forms and is printed,
by default, on the cover page of a
printed flight plan.
Customizing Aircraft and Other Lists
Description
Organization
Certificate #
Rating
Phone
Address
Weight
An optional description of the person.
This is only displayed within this
dialog.
An optional item that is printed on the
flight plan's cover page.
The pilot's FAA certificate number as
listed on his license.
The pilot's highest FAA rating. Used to
compare against flight plans to ensure
that a VFR or Student pilot is not
planning an IFR flight.
The pilot's contact phone number.
Required to complete a FAA Flight
Plan Form via DUAT.
The pilot's address. Required for DUAT
and ICAO flight plan forms.
The pilot's actual weight. Used to
complete the weight and balance
form for a flight plan.
DUAT/DUATS INFO
This optional section lets you select which provider you prefer (DUAT or DUATS) and
the login information for either. Voyager uses this information to download legal
weather briefings and file flight plans via the Internet.
OPTION
Provider
Access Code
DESCRIPTION
Lets you switch between DTC DUAT
and CSC DUATS.
Note: The free version of Voyager
only works with DUAT.
The pilot's DUATS access code (ID
number). This is his unique ID
number. Access codes can be
obtained, free of charge, from
DUAT.COM.
For DUAT, the Access code must be
between 8 and 10 digits.
Note: DUAT and DUATS are different
companies with different Access Codes.
If your Access Code has exactly 8
digits, the first digit specifies the
provider: 0 means DUAT and 1 means
DUATS.
Tip: If you're not a registered US pilot,
you can provide the following fictitious
231
Voyager User's Guide
Password
Test Logon
Access Code (DUAT only) and Voyager
knows to accept it but not process it:
01234567
The password associated with the
above Access Code.
DUAT Passwords are 6 to 8 characters
using only letters and numbers (that is,
no symbols).
Attempts to logon to DUAT or DUATS
using the Access Code and Password
specified.
AOPA INFO
AOPA is an acronym for the Aircraft Owners and Pilots Association. AOPA is the
largest, most influential aviation association in the world. This optional section is
used for various tasks including downloading comprehensive FBO/Services
information.
OPTION
Web Username
Web Password
232
DESCRIPTION
The AOPA Web Username is used to
download FBO information. If you've
been an AOPA member for years, this
is probably your AOPA Membership
number. If you became a member
more recently, this is probably a name
you selected. Click here if you don't
remember your Web Username or
Password.
The Web Password associated with the
above Web Username. If you are an
AOPA member but have not registered
on the Web site, click here to register
now. If you are not yet an AOPA
member, we strongly recommend
joining for many reasons. See
www.aopa.org for more information.
Customizing Aircraft and Other Lists
Passenger
To access this feature: Select Passengers from the Lists menu and choose a
passenger.
To simplify completing weight and balance forms, Voyager allows the creation of a
passenger list. When a listed passenger is added to a weight and balance form, their
weight is automatically added to the station.
FIELD
Name
Description
Weight
DESCRIPTION
The person's full name.
An optional description of the person.
This is only displayed within this
dialog.
This person's weight.
233
Voyager User's Guide
Fuel
To access this feature: Select Fuel from the Lists menu and choose an item.
This dialog defines each type of available fuel. Voyager comes with AvGas (100LL)
and JetA already defined.
Within Voyager, Fuel quantity can be displayed as either a volume (usually gallons)
or a weight (usually pounds). This is determined by the Show fuel as option of the
selected aircraft.
FIELD
Name
Description
Weight
234
DESCRIPTION
A unique name associated with this
item.
An optional description of the item.
This is only displayed within this
dialog.
The weight of each unit of this item.
Customizing Aircraft and Other Lists
Cargo Item
To access this feature: Select Cargo from the Lists menu.
This dialog defines each cargo item.
The Quantity field can simplify data entry for items frequently used in groups. For
example, if you define an item named Case of Oil (12 quarts), you can enter the
Weight/unit as 1.875 pounds and the Quantity as 12.
FIELD
Name
Description
Weight/unit
Quantity
DESCRIPTION
A unique name associated with this
item.
An optional description of the item.
This is only displayed within this
dialog.
The weight of each unit of this item.
The quantity of these items.
235
Options
Options
Voyager can display information in a variety of different ways and can remember
your preferred default settings (default pilot, default aircraft, etc.). For simplicity,
the dialog is divided into sections.
Defaults
Preferences
Internet
Units
Wizards
237
Voyager User's Guide
Options/Defaults
To access this feature: Select Options from the Tools menu.
This tab shows the defaults used when a new flight plan is created or a new
GlassView window is created. They can all be changed for each flight plan. Changes
made to these defaults do not affect flight plans already created.
OPTION
Aircraft
Pilot
Departure airport
238
DESCRIPTION
The default aircraft. Select an aircraft
from the drop-down list. The aircraft
list can be changed with the Aircraft
selection from the Lists menu.
The default pilot. Select a pilot from
the drop-down list. The pilot list can
be changed with the Pilot selection
from the Lists menu.
The default departure airport. Typically
this is either the FAA or ICAO identifier;
Options
Cruise altitude
Plan type
Number on board
Takeoff time
however, you can type anything in this
field and Voyager will attempt to
determine which airport you mean. For
example, Snohomish County Airport in
Everett, WA (Seattle area) has the FAA
identifier of PAE, the ICAO identifier of
KPAE and the common name of Paine.
Any of these (including the city name)
may be entered and, when you click
the OK button, Voyager will pop-up a
list of matches.
The default cruising altitude MSL. If
the Adjust cruise altitude for
VFR/IFR standard cardinal
altitudes is on (which it is, by default),
the cruise altitude of a given leg is
based on this but adjusted to meet
standard cruise altitudes. For example,
an east-bound leg of a VFR flight with a
specified cruise altitude of 7,000 feet
results in an actual cruise altitude of
7,500 feet. 7,000 feet is the default
value.
The default flight plan style: VFR or
IFR. This determines the default
color/symbol scheme used in the Chart
and is a required part of the FAA
Flight Plan Form. VFR is the default.
Note: A DVFR flight plan can also be
created but DVFR is not available as a
default since it's so uncommon.
The default number of occupants,
including the pilot, aboard the aircraft.
This is used to complete the FAA
Flight Plan Form and verify against
the number of occupants implied in the
Weight and Balance associated with
each flight plan. Default is 1.
The default difference, in hours and
minutes, between the current time and
takeoff time. Default is 1 hour.
Voyager adds this value to the current
time and rounds up to the next 15
minute increment. For example, if this
value is 02:00, a flight plan created at
09:08 Home Time gets a default
takeoff time of 11:15.
Layover time
Default VFR theme
The default layover duration, in hours
and minutes, of Stop and Go legs.
01:00 (1 hour) is the default value.
Selects which theme is used when
239
Voyager User's Guide
Voyager opens a flight plan in VFR
mode. The default VFR theme is called
Default.
Default IFR theme
Default GlassView layout
Default document folder
Tip: If you want faster performance
when you open a flight plan, select Fast
Draw as the default theme and turn
Show Profile when flight plan
opens (below) off.
Selects which theme is used when
Voyager opens a flight plan in IFR
mode. The default IFR theme is called
IFR Enroute.
Tip: If you'd prefer to also see terrain,
select IFR Enroute with Terrain instead.
Normally, when you switch to
GlassView, Voyager selects the layout
most appropriate for the task, your
screen size and orientation (landscape
vs. portrait). If you prefer a specific
layout, select it from the list or select
Auto to let Voyager choose.
You can also specify a Personal Layout.
If set, this specifies the folder
(directory) that Voyager defaults to
using to store flight plans and Plates
Packs. If not set, Voyager uses a
folder called Flight Plans under the
default Windows Documents folder.
For example:
Windows Vista:
c:\Users\<your
name>\Documents\Flight Plans
Windows XP:
Show Profile when flight plan
opens
Delete Airport Info
240
c:\documents and settings\<your
name>\My Documents\Flight Plans
When Voyager opens a flight plan, it
normally generates a detailed Profile
view. For long flights, this generation
can take some time so you might want
to disable it until you've reviewed and
edited the plan. When this checkbox is
off, the Profile is hidden until you select
Show Profile from the View menu.
Options
Restore Chart Presets
Clear List of Recently Opened Files
This button deletes all Procedures,
Airport Diagrams and FBO info pages
from your disk. It cannot be undone.
To get the data back, you'd have to
reload from a CD-ROM or download
them all again. This is most useful if
you switch Procedure sources.
This button only appears when using
Voyager FreeFlight.
It resets all the Chart themes to their
default values in case you've altered
them. It is identical to clicking
Restore Presets from the Themes
dialog box (which is not available in
Voyager FreeFlight).
This button clears the list of recently
opened or saved files that Voyager
normally lists on the File menu and in
Tasks screen. It does not delete the
flight plans or Plate Packs themselves,
only tells Voyager to "forget" about
them.
Note: This button does not appear in
the Briefer version.
Clear Current User Data
Removes all data related to the current
user (not Briefer) from the database
and deletes all stored flight plans, etc.
Unlike the Delete command in the
Users dialog box, the actual user is not
deleted. This is useful if a Briefer or
System Administrator wants to
essentially reset an account.
241
Voyager User's Guide
Options/Preferences
To access this feature: Select Options from the Tools menu then choose the
Preferences tab.
This tab shows various display and information settings, organized by topic. Select
General, Planning, GPS, Procedures or XM.
GENERAL
OPTION
Time format
DESCRIPTION
Voyager can display time in either Zulu
format or in Home Time (the time zone
set on this computer).
Default desktop layout style
All GlassView layouts assume you want
maximize information and minimal
screen clutter so they begin with
Command Mode off. While working at
242
Options
your desk doing pre-flight planning,
you may want the additional tools
always visible. Hence, this switch lets
you set the style to your liking.
Auto select based on screen size Uses the Simplified (Command Mode
off) view for screens smaller than 1280
x 1024 and Rich for those that size or
larger.
Rich - The Chart includes the Layers
toolbar, the altitude slider and the
timeline.
Simplified - The above items are
hidden to maximize Chart size.
Adjust chart color and symbols to
match IFR/VFR
Show Tasks at startup and when
other windows close
Warn if data is out of date
Show screen tips
Use smooth zooming
Use standard weather symbols and
colors
If selected, switching an existing flight
plan from VFR/DVFR to IFR (or viceversa) will change the colors and
symbols on the open Chart to match
the new flight plan type.
If checked, Voyager begins with a quick
way to create a new flight plan or open
an existing plan. If this isn't checked,
Voyager opens with a blank main
window.
When selected, Voyager compares
today's date with the expiration date of
the air database each time it is
launched. If today's date isn't within
the valid term of the database, a
warning dialog will display.
Selects whether screen tips (the
balloons that pop-up as you open
certain windows) are enabled.
When checked, Voyager smoothly
zooms and 'flies' to new locations
rather than immediately jumping to the
new zoom or location. This feature
requires a reasonably fast computer
and video card so it is disabled, by
default, for single-processor
computers.
In a few places, most notably for Winds
Aloft and METAR/TAF graphics, Voyager
uses a display system that is easier for
most of us to understand but non243
Voyager User's Guide
standard. For example, rather than
use arrows with multiple barbs to
indicate wind speed (akin to counting
with Roman Numerals), Voyager simply
states the wind speed and/or uses
color to give a general range. For
METARs and TAFs, Voyager uses a
three color system (Green=VFR,
Yellow=MVFR and Red=IFR). The FAA
has suggested, and some in-cockpit
weather systems use, a four (or
sometimes five) color system to show
even worse weather than IFR such as
Low IFR (LIFR) and Very Low IFR
(VLIFR). When this switch is checked,
Voyager uses wind barbs and the four
color METAR/TAF system.
Different themes can have different
settings. See Advanced/METAR and
Advanced/Winds Aloft for more
information.
Open PDF after creation
Confirm User ID/Password before
Synch
When checked, Voyager tells Windows
to open the PDF generated by the
Print to PDF command on the File
menu. If not checked, the file is still
created but Adobe Reader (or other
PDF reading program you may have)
will not be invoked.
When checked, Voyager shows a dialog
box before a Web Synch for entering
a User ID and Password. When
unchecked, Voyager uses the last-used
combination.
First letter of ICAO identifier
Voyager tries very hard to match
anything you type to an airport or
navaid name. For a given entry, it
searches both the FAA name list (the
typical 3 letter name like PAE) and the
ICAO name list (the 4 letter name list
that, for everything in the continental
US begins with K such as KPAE),
among other things. However, if
you're outside the continental US (any
other country or even in Alaska and
Hawaii), K isn't the correct first letter
so you'll want to supply the appropriate
one. For example, the ICAO identifier
of Vancouver International in Canada is
CYVR. Therefore, if YVR is typed into
244
Options
an airport field and this value is still set
to K, Voyager will look for any US
airport with a YVR or KYVR ident, never
finding Vancouver.
Note to US users: K is correct for
continental US only. Alaska and Hawaii
both have initial letters of P (for
Pacific). Additionally, the second letter
of all ICAO airports in Alaska is A and H
in Hawaii.
When a theme has been changed
As you modify the Chart layers (e.g.
add Navaids, terrain, etc.), you are
implicitly changing the definition of the
Chart theme. When you close the
window with the Chart, Voyager checks
to see if the Chart settings have
changes from the settings in the
current theme. If they have, Voyager
normally asks if you want to save or
discard the changes. This switch lets
you determine if Voyager asks what to
do, automatically saves all changes
without asking, or never saves any
changes.
Scanned Charts folder
Scanned Charts (sectionals, IFR low
and high altitude, etc.) can consumer
more than 6 GB of storage space.
Normally, Voyager puts this in the
same directory as other Voyager data:
Windows Vista:
c:\Users\<your
name>\AppData\Roaming\Seattle
Avionics\Voyager\Scanned Charts
Windows XP:
c:\documents and settings\<your
name>\application data\Seattle
Avionics\Voyager\Scanned Charts
However, if you'd prefer to put them on
a different drive, you can select a drive
and folder here. Leave this field blank
to use the default folder above. If you
change this setting, you'll have to
manually copy any downloaded Charts
245
Voyager User's Guide
to the new location.
Tip: This feature is very handy if you
have multiple machines. For example,
you can download a complete set to
your home or work desktop to a
memory card then put the memory
card into a laptop or Tablet PC for inflight use.
Tip: You can use the Memory Card
Synch feature to export current
ChartData, Procedures, flight plans,
etc. to another computer via a memory
card or USB memory stick.
PLANNING
OPTION
Adjust cruise altitude to VFR/IFR
standard cardinal altitudes
246
DESCRIPTION
A switch that allows Voyager to vary
the requested cruise altitude to
Options
Analyze flight plan before
save/print
Ask about refueling when an
airport is selected as a wpt
Ask what to do when a flight plan
is reversed
Ask what to do when a change is
made in the NavLog
Show message when autorouting is
complete
Autosave flight plans in Voyager
FDX format
conform to VFR/IFR standards. If
checked, the cruise altitude of a given
leg is based on the Cruise altitude but
adjusted to meet standard cruise
altitudes. For example, an east-bound
leg of a VFR flight with a specified
cruise altitude of 7,000 feet results in
an actual cruise altitude of 7,500 feet
while a west-bound IFR flight with the
same specified cruise altitude results in
a 6,000 foot actual altitude.
An option that instructs Voyager to
analyze a flight plan, warning of some
potential problems, before it is saved,
printed or submitted electronically to
the FAA.
If checked and you choose an airport
as a waypoint, Voyager asks if you'd
like to make it a refueling stop.
A switch that causes Voyager to ask
you what to do, in terms of potentially
renaming the flight plan, when you
reverse a flight plan. If unchecked,
Voyager will do whatever it was
instructed to do in similar
circumstances last time.
If checked, manual changes to an item
in the NavLog (changing an altitude,
changing a TAS entry, etc.) cause
Voyager to ask you if you'd like to
change just one entry, change all
entries below this one or change all
entries. If unchecked, Voyager will do
whatever it was instructed to do in
similar circumstances last time.
When checked, Voyager shows a dialog
box when the SmartRouter successfully
completes a route. Regardless of this
setting, Voyager will always alert you
when it has a problem routing.
When this is checked, saving a flight
plan causes Voyager to not only save
the original Voyager-format flight plan
but also save a duplicate flight plan in
the Voyager Flight Data eXchange
(FDX) format. This format is easily
read by third-party applications.
Checking this option may make it
easier to use Voyager in conjunction
247
Voyager User's Guide
with another application that needs to
read flight plans because you won't
have to manually export the flight plan
in FDX format.
Use ID for file name
Waypoint identification style
Voyager file names are usually humanreadable names comprised of the
takeoff, landing and fuel-stop airports.
However, in cases of multiple users
sharing a same document folder, this
can cause a problem because file
names would tend to overlap, causing
either a proliferation of files names
with numbers (like KPAE-KSFO
(215).fp) or overwriting files for other
users. By checking this box, Voyager
substitutes its internal ID number for
the file name. These ID numbers are
unique for all flight plans, regardless of
the machine or user that created them.
Thus, file names will not be duplicated.
Of course, this also means that the file
name itself will not be understandable
to a human so the user should use the
Customize columns button within
Tasks to display the Flight plan name
column instead of the File name
column.
Voyager can display route waypoints
using any of three styles.
Waypoint numbers is the most basic as
it simply displays the sequential
number of each waypoint within the
flight plan.
Ident displays the name of each
waypoint or, if the name is too long,
Wpt<Number>.
Ident and numbers combines both of
the above and is the default setting.
248
Options
GPS
OPTION
Automatically select COM and Baud
rates
DESCRIPTION
Normally, Voyager can automatically
detect the correct connections to your
GPS. Use this option to enable
automatic detection.
Notes:
Only GPS units connected via a COM
port or Bluetooth can be used with
Voyager. If your GPS is connected via
a USB connection, most come with
driver software to make it appear to
Windows, as if its connected via a COM
port. You may have to install this
software before Voyager (or most other
249
Voyager User's Guide
programs) can see your GPS.
Voyager, like most programs that
connect to a GPS, supports only those
GPS units that use a standard data
format called NMEA. As virtually all
GPS units support this by default, this
is seldom a problem. However, some
handheld aviation GPS units (Garmin,
for example), have both NMEA and
Garmin-proprietary output modes. If
you're having trouble connecting to an
aviation GPS, check its documentation
to ensure it's using NMEA output
format. Contact
[email protected] for more
information.
Use the COM and Baud settings
below
COM port
Baud rate
Test Settings
250
Be careful when using programs other
than Voyager to diagnose GPS
connection problems. Under Windows,
only one application may access a COM
port at a time. Thus, if the testing
program (such as Microsoft Streets and
Trips) is connected to the GPS,
Voyager will never see it. In addition,
Windows COM ports are notoriously
'sticky' meaning that even after an
application shuts down, Windows may
still not allow another program to
access it without a reboot.
Turns off automatic GPS discovery so
you can manually select the COM and
Baud rates. This should only be
necessary when troubleshooting GPS
connection problems or if you have
multiple GPS units connected to your
computer.
The logical communication port (COM
port) used to connect your GPS
receiver to the computer. See Notes
above for more details.
If manual settings has been enabled,
you can choose the speed (baud) at
which your GPS communicates with the
computer. As GPS data is very low
bandwidth (that is, very little
information is sent), there is no need
to select a high baud rate. Most GPS
units function properly at 4800 baud.
If you manually adjust the COM and
baud rates, click this button to test a
Options
Status
Quality
Position
new setting. After clicking, allow the
system some time, perhaps as high as
30 seconds, to report success (see
below).
This is not an option but a display. It
shows whether or not Voyager is
connected to a GPS. If so, it also
shows which COM port is being used,
the baud rate and whether or not the
GPS is receiving valid position data
from the satellites. It's bright red
when there is no connection, yellow
when connected but without valid data
and green when valid data is being
received.
Note: If Voyager is not connected to a
GPS, you can click here to start a builtin GPS simulator. You can also output
a Voyager flight plan to the GPS
simulator portion of Franson's
GPSGate.
When connected, this area shows the
number of satellites that the GPS has
found, whether the GPS is receiving
WAAS information and if the GPS has
enough data for a 3D position. The
more satellites, the more accurate the
positional information. If fewer than
three or four satellites are found, the
GPS will be unable to provide valid
data. Altitude information is much
more accurate if the GPS finds enough
satellites for a 3D lock. Without a 3D
lock (a 2D lock), altitude information is
highly suspect. Positional information
is much more accurate if the GPS is
receiving WAAS information.
If valid data is being received, this area
shows the current position,
groundspeed and altitude updated
every second.
Note: GPS locations are only accurate
to about 10 feet, at best (with WAAS).
Hence, even when you're stationary,
the GPS will report some movement
and a track. GPS altitude is less
accurate. Even when stationary, a GPS
may report altitude that varies by
hundreds of feet. The reported
altitude should be considered less
251
Voyager User's Guide
Reset GPS
Ask to change takeoff time
Automatically change zoom for
landing
Show NDBs in Direct To/Nearest
Show seaplane bases/heliports in
Direct To/Nearest
Minimum runway length for Direct
To/Nearest
Overlay the following on
Procedures
252
accurate than a properly set
altimeter.
Sometimes, after a computer returns
from Hibernation or Sleep, the
Bluetooth connection to the GPS is lost.
Click this button to re-initialize a lost
GPS connection. After clicking,
Voyager may take up to 30 seconds to
restore the connection so do not click
the button repeatedly.
In most cases, you won't have to reset
the GPS itself (that is, turn it off then
back on again) but, if Voyager doesn't
regain the GPS connection within one
minute, you might try that.
When you open a flight plan in
GlassView mode, Voyager can ask you
to set the correct takeoff time. If
unchecked (the default), Voyager
assumes a takeoff time of when you
open the flight plan.
When checked, Voyager uses heuristics
that take speed and position into
account to adjust the Chart zoom as
you approach landing. This only
applies when a flight plan has been
created explicitly or implicitly (via the
). When unchecked,
use of
Voyager makes no automatic
adjustments.
When checked, the Nearest widget
and the Direct To dialog box lists
NDBs. If unchecked, they are
suppressed.
Similar to above, unchecking this box
will remove items from Direct To and
Nearest.
Entering a value here will remove
smaller airports from the Nearest and
Direct To lists. Set to 0 to show all
airports.
This setting determines if, and how,
Voyager overlays your position on
Procedures and Airport diagrams. You
can overlay nothing, an icon
representing your aircraft and/or a
colored circle. The aircraft is best if
you want to get directional information
Options
Customize layouts
GPS gauges
but can cover information and might be
hard to see against the plate. The
colored circle is semi-transparent so
may be the best choice if you want to
see the plate's diagram and text most
clearly.
Click to change which layouts are
is clicked.
shown when
Allows you to select which GPS
gauges (altitude, groundspeed, track,
etc.) are displayed when in GlassView
mode.
PROCEDURES
253
Voyager User's Guide
OPTION
Do the following when a Plate Pack
is opened, saved or printed
DESCRIPTION
When a Plate Pack is opened, saved
or printed, you have the option for
what action, if any, SmartPlates should
take to ensure you have the latest
plates. The choices are:
Verify Procedures and automatically
download as required
Verify Procedures but do not
automatically download.
Do nothing. Do not verify or download.
Procedure Source
Show message after all Procedures
have been downloaded
254
The first choice tells Voyager to do
everything automatically. This is the
safest choice and ideal if you have a
high-speed, always-on Internet
connection. The second choice is best
if you have a slow connection to the
Internet or are frequently not online.
The last option should only be used if
you're not online as it makes no
attempt to verify if the Procedures are
current.
Voyager can download Procedures and
Diagrams from either the FAA directly
or from Seattle Avionics. The plates
are legal and essentially identical either
way. The difference is that the Seattle
Avionics plates have been preprocessed from the FAA plates to give
much better download speed (about 5
times faster) at a very slight resolution
loss. The Seattle Avionics plates can
also be viewed on a PDA whereas the
FAA plates cannot.
If you specifically request to download
procedures (select Download
Procedures from the File menu) or
procedures get downloaded when you
open, save or print, Voyager will
generally tell you when the download is
done. Uncheck this box to disable the
message. With or without this box
checked, Voyager will always tell you if
there is a problem downloading a
Procedure.
Options
Show the Procedure count before
printing
Show Helicopter procedures
When checked, Voyager shows the
number of Procedures and Diagrams
that will actually be printed (or
previewed) so you can decide if you
need to abort the print and change a
setting. Voyager has a number of
different ways to categorize airports
and, depending on the type of Plate
Pack, this affects which Procedures and
Diagrams are printed. See Print
Settings/Procedures for more
information.
When checked, helicopter Procedures
are shown. When unchecked, they are
always suppressed even when all other
Filter settings are checked.
XM
255
Voyager User's Guide
Tip: Configuring an XM receiver properly can be a little tricky. See XM
Troubleshooting for additional information.
OPTION
COM port
Test Settings
Status
Reports
Connect/Disconnect
256
DESCRIPTION
The logical communication port (COM
port) used to connect your XM receiver
to the computer.
See XM Troubleshooting for
additional information.
If you manually adjust the COM port,
click this button to test a new setting.
After clicking, allow the system some
time, perhaps as high as 30 seconds,
to report success (see below).
See XM Troubleshooting for
additional information.
This is not an option but a display. It
shows whether or not XM Link (the XMsupplied program that retrieves the
raw data from the receiver) is running.
If so, it also shows which COM port is
being used and when the last file of
any type was downloaded from the
satellite. It's bright red when XM Link
is not running and green when it is.
See XM Troubleshooting for
additional information.
When data is being received, this area
shows the last time specific weather
products were downloaded. You can
use this as a diagnostic tool or, more
commonly, to see how old your XM
weather is while in-flight.
Use this button to toggle your
machine's connection with XM Link.
Clicking Connect and clicking Test
Settings (above) are exactly the
same.
Options
Options/Internet
To access this feature: Select Options from the Tools menu then choose the
Internet tab.
The tab contains options controlling Voyager's use of the Internet.
OPTION
Automatically
download current
TFRs
DESCRIPTION
Voyager can automatically download new TFRs from the
Seattle Avionics Web site once a day, whenever the
application starts (At startup) or only when manually
instructed (Never). This service is free, even if you
don't have the automatic data update service. TFRs
may be manually updated at any time by connecting to
the Internet and selecting Update TFRs from the Tools
menu.
Note: The Once a day option means once a day in your
Home time zone, not Zulu time.
257
Voyager User's Guide
Automatically check
for updates
Show message
when TFRs / fuel
prices have been
downloaded
Show message
when plan has been
filed with DUATS
Allow background
weather downloads
Automatic
download interval
Days to keep
airport information
before new
download
Use a proxy server
to connect to the
Internet
258
Voyager can ensure that you always have the latest
version of the application, airspace data (ChartData) and
fuel prices by automatically checking at various periods.
By default, the application checks for updates once a
day although you can make this less frequent or even
disable it entirely (the Never option). If it's disabled,
you can still check for updates by selecting the Update
Application item from the Tools menu. Most
application updates and all data updates require an
optional ChartData subscription service.
Voyager always displays a message if it attempts to
download current TFRs or fuel prices and it fails for any
reason (not connected to the Internet, for example).
This option controls whether or not a message appears
when the download is successful.
Tip: Voyager displays and uses fuel prices in many
useful and innovative ways. See all the different
ways by clicking here.
Similar to the above, Voyager always warns if an
attempt to electronically file a flight plan fails. This item
determines if a message is displayed upon successful
filing.
Voyager saves you time and effort by downloading
weather information in the background, as you need it,
rather than waiting for you to explicitly ask to download
it. If you're not usually connected to the Internet, you
can turn this feature off by unchecking the box.
If background weather downloads are enabled, Voyager
can also update weather already downloaded at a fixed
interval. This helps ensure that you're always looking at
current weather data. Uncheck this box to disable the
feature.
Airport information, including airport diagrams and
FBO information are downloaded from the Internet.
This value is the number of days to keep cached data
before requesting updated data from the source. A
higher value improves performance to often reviewed
airports but could potentially lead to out-of-date
information. The default value is 14 days.
Approach/departure procedures are also
downloaded from the Internet but carry intrinsic
expiration dates. Voyager uses that information to
determine when new data must be downloaded so this
value does not apply to them.
If your computer network requires you to logon to a
proxy server, check this box and complete the
information below as required.
Options
Learn more about proxy servers.
If you can access the Internet via Microsoft Internet
Explorer but SmartPlates is having trouble, try copying
the proxy settings from Internet Explorer. To do that:
•
•
•
•
Launch Microsoft Internet Explorer
Select Internet Options from its Tool menu
Choose the Connection tab
Click the LAN Settings button
The resulting dialog box should look something like
•
•
Address
Port
Username
Copy the Address and Port settings in Internet
Explorer to the same fields in SmartPlates
(described below).
Unlike in Internet Explorer, you'll usually also
have to enter your Username and Password.
Domain, however, is not typically required.
The name or IP address of your proxy server. This is
typically just a one-word name like CorporateProxy.
Proxy servers generally require access via a specific
network port. The most common value is 8080 but it
can vary depending on your network. Ask your Network
Administrator for details if it isn't clear from the Internet
Explorer dialog box (above).
If your proxy server requires a login, you'll have to enter
your Username here. Ask your Network Administrator
259
Voyager User's Guide
Password
Domain
Test Connection
260
for details if you need more information.
If your proxy server requires a login, you'll have to enter
your Password here. Ask your Network Administrator
for details if you need more information.
Passwords are stored in an encrypted format using
encryption algorithms built into Windows; they are not
stored as plain text.
In some situations, it might be necessary to also enter
your network domain name. This can be left blank in
most cases.
Use this button to verify the Internet connection. If
you've entered proxy information and get an error,
please contact your System Administrator for more
information as these settings vary greatly between
networks.
Options
Options/Units
To access this feature: Select Options from the Tools menu then choose the Units
tab.
This tab controls the units used to display information. Changing the units
immediately updates all open flight plans but does not affect those saved to disk.
For ad-hoc unit conversions, use the Unit Converter feature under the Tools menu
instead of changing these values.
Note: Fuel quantities can be displayed as either a Volume or a Weight. This is
specified for each individual aircraft, not here. To change, use the Show fuel as
option within an aircraft dialog.
261
Voyager User's Guide
OPTIONS
Altitude
Arm
Distance
Lat/Long
Pressure
Runway
Speed
Temp
Volume
Weight
262
DESCRIPTION
The units used to display altitude and
terrain elevation. Default is Ft (feet).
Other choices include M (meters) and
FL (Flight Level).
Note: If FL is selected, Voyager will
use feet in situations, such as terrain
elevation, where FL would be odd.
The units used to display the arm
portion of a weight and balance
calculation. Default is In (inches). Cm
(centimeters) is the other choice.
The units used to display large
distances such as distance between
two legs. NM (nautical miles) is the
default and other choices include Ft
(feet), km (kilometers), M (meters)
and SM (statute miles).
The format used for latitude/longitude
points. The default, DD MM.xx,
matches the Degree Minute.[fraction of
minute] format used in popular GPS
units. Other options include DD MM SS
(Degrees Minutes Seconds) and
Decimal formats.
The units used to display pressure
readings. Default is Hg (inches of
mercury). Mb (millibars) is the other
choice.
The units used to display relatively
small distances like runway length and
width. Default is Ft (feet). M (meters)
is the other choice.
The units used to display speed.
Default is Kts (knots) and other
choices include KPH (kilometers per
hour), and MPH (statute miles per
hour).
The units used to display temperature.
Default is C (Celsius). F (Fahrenheit)
is the other choice.
The units used to display liquid volume.
Default is Gal (gallon). Ltr (liter) is
the other choice.
The units used to display weight.
Default is Lbs (pounds). Kg
(kilograms) is the other choice.
Options
Options/Wizards
To access this feature: Select Options from the Tools menu then choose the
Wizards tab.
This tab shows options for the Wizards.
NEW FLIGHT PLAN
OPTION
Welcome page
DESCRIPTION
When checked, the Wizard begins with
a summary of what it does.
Add manual waypoints
If checked, Voyager asks if you'd like
to add manual waypoints before the
SmartRouter begins.
Show details (waypoints)
If the above item is checked, also
263
Voyager User's Guide
checking this option tells Voyager to
skip asking if you'd like to add
waypoints and immediately show the
feature.
Select SIDs/STARs
When this item is checked and the
flight plan is IFR, Voyager asks if you'd
like to add Departure (SID) and Arrival
(STAR) procedures to the takeoff and
landing points.
Show details (SIDs/STARs)
If the above item is checked, also
checking this option tells Voyager to
skip asking if you'd like to add
SIDs/STARs and immediately show the
feature.
Autorouting options
When checked, Voyager displays a
wide variety of routing options. If
unchecked, the General step of the
New Flight Plan Wizard simply asks
which routing method to use (Airway or
GPS Direct) and uses the options last
selected.
Create a Plate Pack
When selected, Voyager asks whether
to create a Plate Pack for IFR flights.
Weight and Balance
Checking this instructs Voyager to
display a weight and balance table and
graph.
Review
This option displays summary and
warning information about the flight.
264
Briefer Version
Briefer Task Pad
To access this feature: Click
the View menu.
on the main toolbar or select Briefer Tasks from
The Briefer version of Voyager allows corporate or government flight planning
departments to quickly and easily plan flights for many different pilots. Voyager
keeps track of personal preferences, default settings, lists (passengers, pilots, etc.)
and flight plans for each pilot individually. It requires a Web server running Microsoft
IIS and Microsoft SQL Server. Contact the Sales department at Seattle Avionics for
more information.
When the Briefer version is used in conjunction with a special Client version of
Voyager, pilots and Briefers can jointly create flight plans and exchange information
using the Web Synch feature. In this way, a pilot can create a rough flight plan,
synch it with the Web server to give the Briefer a copy, then let the Briefer review
and/or modify the plan and send back the revised plan. All of this takes just a few
mouse clicks. Or a Briefer can create the entire plan and send it to the Client for
review.
While there are a few visual differences between the Briefer and standard versions of
Voyager, most of the Briefer features are encapsulated here for efficient use.
265
Voyager User's Guide
WORKING WITH USERS
At the top of the Briefer Task
pad is text field that allows a
Briefer to enter a name or
partial name of a specific
user. When blank (as it is
here), all Users are listed. To
find a specific user, such as
when one calls, enter his
name or any part of his name
then click Find or press the
Enter key on the keyboard.
In the example to the side,
Steve or even Perm would
find Steve Permutter.
The Less << button makes
the Briefer Task Pad shorter
by hiding less important
information. When in the
'short' mode, the Less <<
button becomes More >>
and expands the Briefer Task
Pad.
There are five levels of users
from Basic to Briefer to
System Administrator. Users
with Briefer or better
privileges are shown with a
Briefer icon, all other
.
users are indicated with a
The list is sorted such that
Briefers are always listed
first.
Clicking a user name shows
the flight plans associated
with him (created either by
the user or a Briefer for
them), his preferences and
defaults (below the flight
plan list), and any notes a
Briefer has associated with
him such as the name of his
children.
Double-clicking a user (or
selecting one and clicking the
Activate button), activates
all his default settings so any
266
Briefer Version
new flight plan or other
action refers to his settings.
It also brings any open flight
plan associated with him to
the front.
The name of the active user
and the current Briefer are
shown at the top of the main
window. In addition, when
flight plans are open, the
Flight Plan Window shows
the name of the user
associated with that plan to
make it easy to keep track of
plans for different users.
Note: Select Users from the
Tools menu to add or delete
users, change their names or
passwords, etc.
OPENING / CREATING FLIGHT PLANS
To open an existing flight plan, simply double-click any listed plan or select the plan
and click Open.
To create a flight plan with the New Flight Plan Wizard (with the current user's
defaults), clear the Quick Route area (the text field below the user list that now
shows pae sfo) and click New.
Use the Quick Route area (the text field below the user list with pae sfo) to bypass
the Wizard. You may enter airport, navaid or fixes as well as Victor and Jet route
identifiers (like V23 or J4). The first and last idents are assumed to be airports so, in
the example above, PAE is the same as KPAE and SFO is the same as KSFO. For all
other idents, Voyager assumes a navaid unless a full ICAO airport identifier is used.
If an airport ident is entered, Voyager assumes a fuel stop. To create the flight
plan, press the Enter key on the keyboard or click the New button below.
When using the Quick Route area, use the drop-down list next to it to select the type
of routing. Options include No Routing (simply connects the idents listed without any
wind optimization or fuel planning), Wind/Fuel Only (same as the previous but adds
fuel stops and optimizes for best winds), Victors, Jets or GPS Direct. Note: If the
route includes an explicit Victor or Jet ident, the routing method is ignored.
The Briefer Task Pad normally stays open after you open or create a flight plan. If
screen space is limited, you may check the Close on use checkbox so that Voyager
267
Voyager User's Guide
automatically closes this window when flight plan is created or opened. You can
bring it back at any time by clicking
on the main toolbar.
EXCHANGING INFORMATION BETWEEN BRIEFERS AND USERS
Exchanging information is very easy. Normal users running the Client version of
synch button on the main toolbar to exchange information with
Voyager click the
the server. Within about 30 seconds, each Briefer's screen is updated with any new
flight plans the user may have created. Similarly, each Briefer's screen is also be
updated if another Briefer makes a change.
Briefers do not need to manually synch as their data is always automatically
synchronized.
Examples:
1. A user creates a flight plan and wants a Briefer to review it.
The user creates the flight plan in the usual way then clicks Synch. He then calls a
Briefer who uses the text field at the top of the Briefer Task Pad to immediately find
the user. The Briefer then double-clicks on the new flight plan (which is at the top of
the list since the flight plans are sorted by the time they were last modified). If the
Briefer makes any changes, he simply saves the changed plan and tells the user to
click the Synch button on his computer.
2. A user wants the Briefer to create the plan from scratch then send it to him.
The Briefer uses the Briefer Task Pad to find the user in the Users list. After clicking
the user, the Briefer either uses the Quick Route area or the Wizard to create the
plan. The Briefer then saves the flight plan and calls or emails the user, telling him
to hit the Synch button on Voyager. The Briefer might also create a PDF of the plan
(select Print to PDF from the File menu) and email or fax the printout to the user.
3. A user has two machines (Home and Work) and wants to keep the same flight
plans and pilot info on both of them.
In most cases, the user simply clicks the Synch button on the machine with the most
recent changes then clicks Synch on the other machine. However, if flight plans
have been added on both machines, the user may have to click Synch on the first
machine again. That is, if Work created a flight plan from SEA to SFO and Home has
a plan from SFO to LAX, clicking Synch on Work puts SEA SFO on the server.
Clicking Synch on Home gets SEA SFO and uploads SFO LAX to the server. Clicking
Synch on Work downloads SFO LAX.
268
Briefer Version
Briefer Login
To access this feature: Select Login from the File menu.
OPTION
User ID
DESCRIPTION
The User Name of the Briefer. This is
the 'short' name assigned to the
Briefer, not the full 'human' name.
Only users with a Briefer or better
Access Level may login.
Password
Remember password
Automatically log into SQL Server
Note: User Names, Passwords and
Access Levels may be changed by
selecting Users from the Lists menu.
The Password associated with this user.
When checked, the system will
remember the Password associated
with this user. Use with care.
User information is stored in a
Microsoft SQL Server database.
Therefore, to access the Briefer
version of Voyager, the user and
machine must have access to the SQL
Server. Contact your System
Administrator for more information.
When checked, the system will find the
SQL Server login credentials of the user
and attempt to automatically login. If
the login credentials are blank or
invalid,the SQL Server login window
will still appear.
269
Advanced Features
Keyboard Shortcuts
Voyager includes a number of keyboard shortcuts. Many are especially useful while
in GlassView mode using a laptop.
KEY
F1
F2
DESCRIPTION
Shows Help (Common Tasks and Questions)
Toggles Command Mode
F3
Direct To
F4
GPS Centering lock
F5
Switch to GlassView mode (from desktop layouts only)
Use the Sectional (Digital) theme
Use the IFR Enroute Low (Digital) theme
F7
F8
F9
Toggle Track Up/North Up modes
F10
Toggles the TAWS-like terrain avoidance system
Ctrl O
Open file
Ctrl N
New file
Ctrl S
Save file
Ctrl P
Ctrl
Ctrl
Ctrl
Ctrl
W
Shift P
Shift N
I
Print
Print Preview
Previous Layout
Next Layout
Get information about a location
Ctrl +
Zoom In
Ctrl Zoom Out
Ctrl F
Ctrl J
Autofit the Chart to flight plan or Plate Pack
Jump the Chart to a location
271
Voyager User's Guide
Alt
Backspace
Previous Chart view
Ctrl A
Add leg to end of the flight plan
Ctrl D
Delete leg
Ctrl R
Start the SmartRouter Wizard
272
Advanced Features
Customize Layouts
To access this feature: Select Layouts from the View menu then click Customize
or click Customize Layouts from the GPS area in the Options dialog box.
Voyager includes about two dozen distinct layouts. This can be a little
overwhelming, especially for quick in-flight access. Therefore, this dialog lets you
hide layouts you never use by unchecking them. Layouts that are not checked are
available by selecting Layouts from the View menu but hidden when you click the
button. By default, Voyager hides the less common layouts.
In addition, Voyager checks the screen size and orientation (portrait vs. landscape)
to selectively hide layouts that are designed for different sized screens. For
example, the Widescreen layout is an excellent general-purpose in-flight layout for a
laptop or tablet in landscape mode (wider than tall) but useless on a small tablet or
any tablet in portrait mode (taller than wide). Thus, when Hide layouts that are
inappropriate for the screen size/orientation is checked, Widescreen is not
shown when
is clicked.
273
Voyager User's Guide
Many layouts include multiple areas. You can usually resize the areas by grabbing
and dragging the dividing line between the areas (the splitter). Voyager keeps track
of where you last resized each area and uses those settings the next time the layout
is displayed on the same screen size and orientation. You can click Restore presets
to restore the default settings for each layout if necessary.
You may also create Personal Layouts specific to your missions. Such layouts are
not listed here but are shown when you click the Chart button on the lower toolbar.
274
Advanced Features
Columns
To access this feature: While the Tasks list is open, click Customize columns in
either the Plan or Fly tab.
The Columns dialog lets you select which columns of flight plan information are
shown, and in what order, in the Tasks window.
You can also filter on these columns to limit the number of flight plans shown in
the Tasks window.
COMMANDS
COMMAND
Automatically layout columns
Manually select columns
Available
Selected
Add
DESCRIPTION
Shows the standard columns, File
name and Folder, regardless of what
is shown in the Selected area.
Shows the columns selected in the
Columns area.
Lists each column available that is not
already in the Selected list.
The columns to be shown. The top
item is listed first (to the far left).
Moves the column highlighted in
275
Voyager User's Guide
Remove
Up arrow
Down arrow
Sort by
Available to Selected.
Removes the column selected in the
Selected list. The column is added to
the Available list.
Moves the column selected in Selected
up one place.
Moves the column selected in Selected
down one place.
Selects the column used to sort.
It is not necessary for a column to be
shown to be used as the sort criteria.
For example, by default Voyager
shows the File name and Folder
columns yet sorts by Last accessed.
Text columns are sorted alphabetically
from A to Z. Date columns are sorted
from most recent to oldest.
DATA COLUMNS
NAME
Aircraft manufacturer
Aircraft model
Aircraft name
Alternates
Briefer
Comments
File name
Flight plan name
DESCRIPTION
The name of the aircraft manufacture
such as Cessna, Piper or Eclipse.
The model of the aircraft such as 172,
PA-28 or A-36.
The name of the plane, as used within
Voyager. This could be anything you
choose such as My Diamond DA40 or
N12345 or My Plane.
A list of any airports provided in the
Alternate block of the FAA form.
The name of the briefer. Only relevant
in Voyager Briefer versions.
A comment added by the briefer. Only
relevant in Voyager Briefer versions.
The name of the flight plan file such as
KSEA-KSFO.fp
The name of the flight plan.
Note: File name and Flight plan
name are not the same although they
sound similar. In most cases, the File
name will be the same as the Flight
plan name plus a .fp. However, if
Voyager is saving flight plans based
276
Advanced Features
Folder
Fuel stops
Full file name
Landing airport
Landing time
Last accessed
Last modified
Pilot name
Pilot organization
Routing method
Tail number
Takeoff airport
Takeoff time
Type
on an internal ID, the File name will
be the machine-readable ID number
and the Flight plan name will be the
human-readable name you'd expect.
The folder in which the flight plan is
stored.
Note: By default, all Voyager flight
plans are stored in your My Documents
folder, under a Flight Plans subfolder.
However, it is possible to tell Voyager
to use a different default document
directory.
This is a comma-separated list of all
airports used a fuel stops.
This field is the combination of the
Folder and File name columns.
The ident of the landing airport.
The date and time of landing.
Depending on how Time format is
set, Voyager will either display this as
your computer's normal time format,
using the local time zone setting (such
as 6/28/06 5:05 PM) or in Zulu format
(such as 2006-06-28 17:05)
The date and time the file was last
saved or opened, displayed according
to the time display rules above.
Same as above but only based on when
the file was last saved.
The name of the pilot such as Joe Pilot.
Note: It is possible to rename a pilot
in the Pilot window. However, if so,
the new name is not reflected here.
The organization (company), if any, to
which the pilot belongs.
The routing method used when the
flight plan was created. Possible values
include Victor Airways, Jet Airways,
GPS Direct, Manual (no routing) and
Direct.
The tail number of the aircraft,
normally including the country
identifier (e.g. N).
The ident of the takeoff airport.
The date and time of takeoff, displayed
according to the time display rules
above.
The flight rules used for the flight: VFR,
IFR or DVFR.
277
Voyager User's Guide
Filter
To access this feature: While the Tasks list is open, click Set filter in either the
Plan or Fly tab.
The filter is a powerful way to limit the number of flight plans shown in the Tasks
window.
The first line in each column is a text field in which you can enter whatever criteria a
flight plan must match to be shown in the list. You can enter criteria for multiple
columns and, if so, a plan must match all the criteria to be shown (a logical AND).
For text fields, matches are found if the given text appears anywhere in the field.
That is, wildcards are implicitly added to both sides of the text (e.g. SFO will match
KSFO or SFOX). In addition, you can use comparison operators such as >, <, =>,
=< and <> (not equal) to further refine the criteria.
See Customize columns for an explanation of each column.
As a shortcut, Voyager lists all the observed values in each column, except for date
columns. To select one of these values, simply click it in the list.
The columns are shown in the order they appear in the Tasks window (determined
by the Customize columns button). After these columns, all remaining columns
(that is, the ones not shown in Tasks) are arranged alphabetically.
Examples:
278
Advanced Features
Enter KSFO in the Takeoff airport column shows all flight plans that originate in
San Francisco.
Enter SFO in the Takeoff airport column is essentially the same as above since SFO
will find a match within KSFO.
Enter Steve in the Pilot name column to find all flights flown by anyone named
Steve or with Steve as any part of their last name (like Stevenson).
Enter SFO in the Takeoff airport column and N12345 in the Tail number column
finds only those flight plans that begin in San Francisco and fly the aircraft with
N12345 as its tail number. Note that 12345 would be the same as N12345 because
of wildcard matching.
Enter 6/30/06 in the Last modified column to show all plans created or modified on
June 30, 2006. Entering 2006-06-30 would have the same effect.
Enter < 6/30/06 in the Last modified column to show all plans created before June
30, 2006.
Enter > 6/30/06 3:00 PM in the Last modified column to show all plans created
after June 30, 2006, 3 PM.
Note: Using > with a date that has no time may give unexpected results in that it
will show all plans matching the supplied date with an implicit "12:00 AM" added.
That is, > 6/30/06 shows all plans created after midnight on 6/30 such as on
6/30/06 at 2 PM. To get plans created on 7/1/06 or later, use > 7/1/06 rather than
> 6/30/06.
279
Voyager User's Guide
Download Airport Information
To access this feature: Select Download Airport Information from the Plan
menu while a Flight Plan is open.
This powerful features makes it easy to download all airport information that might
be necessary during a flight, including airports near your planned stops or even
anywhere near your planned route. In this way, if you want to make an unplanned
stop while enroute, Voyager already has the airport information you need even
without a live Internet connection. Of course, depending on which airports are
selected and which download options are chosen, this can take some time, especially
with a dial-up modem.
By default, Voyager keeps download FBO information for 28 days to strike a balance
between speed and accuracy. You can change this setting in the Internet tab of the
Options dialog box. Approach and Departure procedures have embedded dates so
280
Advanced Features
Voyager expires them as required. You can also uncheck the Skip recently
downloaded airports box to force Voyager to download fresh information, even if
the airport had been examined recently.
AIRPORTS
OPTION
All airports near the route (longest
download time)
Takeoff and landing airports only
(shortest download time)
Takeoff and landing airports plus
nearby airports (recommended)
Maximum distance from the route
More airport options
DESCRIPTION
This option downloads all airports near
(as determined by Maximum distance
from the route, below) your planned
route. As this may be hundreds or
potentially even thousands of airports,
this option should be used sparingly.
This option is the fastest because it
downloads the least information, only
airports involved in a takeoff and/or
landing. This option is not suggested
for IFR flights or flights into poor
weather because it won't provide any
information about alternate airports.
This option is the recommended
compromise between the two previous
options. It tells Voyager to download
information for airports near (again,
determined by Maximum distance
from the route) any planned stops.
In this way, if you need to deviate
from a landing (but not too far),
Voyager will be ready with the
information you need.
This is the search radius that Voyager
uses when it needs to scan nearby
airports. As the area of a circle grows
very rapidly as the radius expands,
relatively small increases in this value
may dramatically impact download
time.
Click this button to make more specific
airport selections. For example,
Voyager defaults to requiring a runway
length appropriate for the selected
aircraft. You might want to override
that for emergency use.
INFORMATION
OPTION
Procedures (IFR plans only)
DESCRIPTION
Check this option to download legal
(FAA) terminal procedures from the
FAA Web site. No membership is
required. Only available for IFR flight
281
Voyager User's Guide
ILS
GPS or RNAV
VOR
NDB
Arrivals/Departures
Minimums
FAA airport diagrams
FBO and services information
282
plans. Select options below to limit the
downloads to the types of approaches
your prefer. Each procedure is an
Adobe PDF (Acrobat) file, generally
between 50K and 100K bytes.
Check to download ILS approaches.
Check to download GPS and RNAV
approaches.
Check to download VOR approaches.
Check to download NDB approaches.
Check to download arrival and
departure procedures.
Check to download airport minimums.
Downloads FAA airport diagrams when
available. As of this writing, this
means all US Class B, most Class C and
many Class D airports. Even without
this download, Voyager displays a
runway diagram.
Select this option to download, from
the AOPA Web site, current FBO and
services info, generally including hotel
and rental car information. AOPA
membership is required.
Advanced Features
Personal Waypoint
To access this feature: Select Personal Waypoints from the Lists menu then
choose a waypoint.
Voyager lets you define as many unique, personal waypoints as you like. Once
defined, you can enter the name of a Personal Waypoint anywhere that Voyager asks
for a location. This includes within a NavLog, as part of a Personal Procedure or in a
Jump To box.
A valid Personal Waypoint simply has a unique name (like My House or Point Near
Airport) and a latitude/longitude coordinate. Use the Flag button to visually select a
point by clicking on a Chart or Flight Plan window that happens to be open in the
background.
Tip: Any place where Voyager accepts a series of idents to produce a route
(QuickRoute from the Tasks dialog, within the Idents area of the Direct To dialog
box, etc.) it will accept a Personal Waypoint or Personal Procedure only if the
waypoint or procedure is a single word. If this is important to you, be sure to keep
your names to one word (e.g. MyHouse rather than My House). If the name is
multiple words, Voyager will interpret each word as a distinct ident.
After creation, a Personal Waypoint is shown on the Chart when the Waypoints
layer is turned on.
As there is no 'standard' format for expressing latitude longitude coordinates,
Voyager recognizes a wide variety of common formats. These include (but are not
limited to) the following where W means West or East, N means North or South, DDD
means Degrees, MM is Minutes, SS is Seconds and XXX is decimal. Voyager accepts
either Lat x Long or Long x Lat order.
283
Voyager User's Guide
WDDD MM SS x NDDD MM SS
WDDD MM SS NDDD MM SS
W DDD MM SS x N DDD MM SS
W DDD MM SS N DDD MM SS
W DDD'MM'SS" N DDD'MM'SS"
W DDD*MM'SS" N DDD*MM'SS"
W DDD'MM.xx' N DDD'MM.xx'
W DDD*MM.xx' N DDD*MM.xx'
WDDD'MM'SS" NDDD'MM'SS"
W DDD'MM'SS" x N DDD'MM'SS"
WDDD'MM'SS" x NDDD'MM'SS"
+/-DDD.DDDD +/- DDD.DDDD
'+/-DDD.DDDD x +/- DDD.DDDD
W DDD°MM.XX' x N DD°MM.XX'
284
Advanced Features
Personal Procedure
To access this feature: Select Personal Procedures from the Lists menu then
choose a procedure.
Voyager has the unique ability to let you define your own procedures, a Personal
Procedure. Personal Procedures are similar to standard Terminal Procedures except
you choose the waypoints. They are useful in a number of situations including
creating a custom departure from your home airport, a typical mountain crossing, a
commonly taken path, etc. Once created, you can enter (or select from a list) a
Personal Procedure while editing a Flight Plan (the NavLog window, for example) and
Voyager instantly enters all the waypoints in the procedure.
For example, if you typically exit your airport to the west to avoid Class B airspace
then pass over a recognizable visual point, you can create a Personal Procedure
called Takeoff that lists each of these points. Then, when you create a new Flight
Plan with the New Flight Plan Wizard, enter Takeoff in the Waypoints/Must-Fly
step and Voyager automatically adds all the required points. You can also enter a
Personal Procedure when you manually add points to a Flight Plan using the NavLog.
285
Voyager User's Guide
Defining a Personal Procedure simply means assigning it a unique name and entering
one or more waypoints. A waypoint can be an airport, navaid, standard waypoint or
Personal Waypoint.
Tip: Any place where Voyager accepts a series of idents to produce a route
(QuickRoute from the Tasks dialog, within the Idents area of the Direct To dialog
box, etc.) it will accept a Personal Waypoint or Personal Procedure only if the
waypoint or procedure is a single word. If this is important to you, be sure to keep
your names to one word (e.g. MyHouse rather than My House). If the name is
multiple words, Voyager will interpret each word as a distinct ident.
286
Advanced Features
Split Flight Plan
To access this feature: Select Split Flight Plan from the Plan menu.
Use this dialog box to split an existing flight plan into multiple flight plans,
demarcated by fuel stops. Place a check next to the fuel stops at which you'd like to
begin a new plan. This is useful for flights that span more than one day, for IFR
flights or whenever you expect significant changes after a fuel stop.
In the case of a very long flight with several fuel stops, you can break the plan into
fewer plans than fuel stops. For example, assume you have a flight that should last
two days and you plan two fuel stops in the first day and only one in the second.
Rather than split the first day into three plans, you might want to keep the whole
first day's flying together as one plan but create a new plan for the second day. Do
that by only checking the box next to the third fuel stop (the overnight stop).
287
Voyager User's Guide
Weight and Balance
To access this feature: Select Weight and Balance from the Tools menu or click
the Weight and Balance field in the Plan area of a Flight Plan window.
This dialog page consists of two parts: Adding items to each aircraft station and
showing the resulting weight and balance information.
If a flight plan is displayed, the name of the flight plan and the associated aircraft
are shown at the top left of the dialog. If no flight plan is open, this area has a
drop-down list of available aircraft.
Note: This dialog lets see the results of adding items to the aircraft. To edit the
weight and balance definitions for the aircraft (e.g. modify its Basic Empty Weight,
the Stations or the Arms, or the Weight/Moment envelope, see the Weight and
Balance tab of the actual aircraft definition. From this dialog, you can immediately
jump to that by selecting the blue underlined name of the aircraft at the top of the
dialog. From elsewhere in Voyager, simply select Aircraft from the Lists menu,
choose an aircraft and click Edit. Then switch to the Weight and Balance tab.
Note: Voyager warns when the number of passengers and pilots in this table is
different than the number specified for the FAA Flight Plan form. To correct the
288
Advanced Features
imbalance, once the flight plan is open, select File FAA/ICAO Flight Plan from the
Plan menu and edit the value in block 15 (# on board).
STATIONS
The Stations table shows each station and the items at those stations. You can enter
items either by typing their names and weights or by selecting existing items using
the drop-down list that appears as you click into the Item column. For example, if
there is station named Front Passenger, you can click into the Item column, under
the Front Passenger heading, and select Sample Passenger from the drop-down list.
His weight is automatically entered in the Weight column and the Moment column
is recalculated. Alternately, if you have a new passenger, enter her name and
weight in the Item and Weight columns and Voyager will not only recalculate the
moment but also add this person to the Passengers list for quick use the next time
she flies.
Each station may have more than one item in it. For example, the rear seat of a
Cessna 172 can carry two passengers although only one blank row is shown. To add
a second passenger, click into the existing Rear Passenger row, click the Add item
button and enter the passenger information as above. Similarly, to delete an item
from a station, click into the appropriate row and click the Delete item button.
Tip: You can edit the Passenger, Cargo and Pilot lists by clicking the blue underlined
hyperlink in the See also area of this page or via the Lists menu on the main
window when this dialog box is closed.
Tip: You can save completed weight and balance manifests for later use with the
Save and Save as buttons. Later, if you use the Open button to apply a saved
weight and balance manifest to a different aircraft, Voyager will try to match stations
with the same names. Therefore, if you rent aircraft, you can still use the
Open/Save features to rapidly complete the weight and balance form.
COLUMN
Item
Wt (Weight)
Qty (Quantity)
DESCRIPTION
The name of the item. Either type a
new name or select an existing item
from the drop-down list. If you enter a
new item, the name and its associated
weight will be saved in the appropriate
list (Pilot, Passenger, etc.) for later
use.
The weight of one unit of the selected
item.
The number of units of the selected
item. This is typically 1 for Pilot and
Passenger stations and the number of
gallons of fuel in a Fuel station.
However, if this is a Fuel station and
the selected aircraft displays fuel as
weight, not volume, this column is
disabled. In that case, the Wt column
displays the total fuel weight, not just
289
Voyager User's Guide
Total
Arm
Moment
one unit.
The product of Weight times Quantity.
This is the arm specified for this station
of this aircraft. It cannot be directly
changed but you can modify the station
from within the Aircraft dialog box. In
that case, the arm (and moment) will
be automatically updated.
The moment is the product of Weight X
Quantity X Arm. It cannot be changed
directly.
WEIGHT AND BALANCE INFORMATION
The right side of this dialog displays the weight and balance information implied by
the Stations area on the left side. The most obvious part is the graph similar to the
example below.
Here, the acceptable weight and balance envelope for this aircraft is displayed as a
shape consisting of five points arranged more-or-less diagonally. The vertical or Y
axis is the weight, measured in whichever units are selected in the Units tab of the
Options dialog (default is pounds). The horizontal or X axis is the total moment
measured in the combined units implied by the product of the arm unit (default is
inches) and the weight unit. To simplify, the moment is divided by 1000. An aircraft
loaded within the weight and balance envelope has all the colored points within the
shape. If any point is outside the shape, Voyager will warn of the imbalance.
Therefore, in this example, the aircraft is safely loaded within the weight and
balance envelope.
Tip: You can use the checkboxes above the graph to show or hide any
measurement point. This is useful when two or more dots appear to overlap,
obscuring one of them.
290
Advanced Features
The Takeoff checkbox is only enabled when using Voyager Premier or above
because only these version of Voyager take taxi / run-up fuel burn into account.
Without taking these into account, Ramp and Takeoff are always identical.
Moreover, even in Voyager Premier, if the aircraft doesn't have taxi / run-up fuel
burn set (that is, greater than 0), the takeoff blue box is suppressed to simplify the
display.
291
Voyager User's Guide
Flight Calculator
To access this feature: Select Flight Calculator from the Tools menu (not
available with SmartPlan Express).
The Flight Calculator window is conceptually similar to a standalone E6B flight
calculator.
To compute a flight variable, either:
•
•
Select a function in the By category list then choose a specific flight variable
in the list to its right.
Click the Alphabetical tab and choose a specific flight variable.
If more than one function computes this flight variable, choose a function from the
right pane.
The right pane becomes a Function area, providing space to enter necessary inputs
(the Input area) and showing the results in the Output area. Click the Compute
button to calculate the output values. If additional preliminary values must be
calculated, click the blue-underlined flight variable names (if name) in the Input
292
Advanced Features
area. Results from one calculation are automatically applied to subsequent
calculations using the same variables.
Click the Close button to dismiss this window. Click Units to change the display
units.
293
Appendix
Purchase
If you're using a trial version of any module, simply select Buy now from the Help
menu to purchase online from the Seattle Avionics Web site. The online purchase
process accepts most major credit cards and works 24 hours a day, 7 days a week.
After your purchase, a Purchase key is emailed to you. Enter the Purchase key
in the Trial dialog or by selecting Enter Purchase Key from the Help menu.
Alternately, you can order by phone during normal business hours (US Pacific time
zone) at +1.425.806.0249 or via fax at +1.425.806.9329.
The purchase key, for this exact version of the software, is valid forever for the
installed computer. Data and program updates, however, are licensed separately.
Additionally, as the purchase key is specific to each computer, if you must install the
software on a different machine (you get a new computer, for example), please call
Seattle Avionics (+1.425.806.0249) or visit the Seattle Avionics Web site for more
information.
295
Voyager User's Guide
Uninstall
This application makes use of the standard Windows Uninstall mechanism. Go to
your computer's Control Panel and select the Add/Remove Programs application.
Select Voyager from the list and click Remove. After the removal completes, some
files are intentionally left on your computer so that you don't lose information if you
re-install the application later. Unless otherwise stated, these files are in the
application's main directory (c:\program files\Seattle Avionics\Voyager4\ by default).
These files include:
FILE(S)
Config.mdb
All program settings (files ending
with .ini)
Some registry keys
Flight plans (.fp), Plate Packs
(.PlatePack), saved weight and
balance configurations (.wbs), etc.
DESCRIPTION
A database with aircraft, pilot,
passenger, fuel and cargo information.
General setup and configuration
information.
Basic setup and configuration
information.
User-created data files. You may have
placed them anywhere but the default
location is:
Windows Vista:
c:\Users\Your Name\Documents\Flight
Plans\
Windows XP:
c:\Documents and Settings\Your
Name\My Documents\Flight Plans\
See the Seattle Avionics Web site for information about deleting these files.
296
Appendix
Troubleshooting
There is relatively little that should go wrong during the installation process providing
the machine is relatively modern (built in 2005 or later), includes a modern video
card and has at least 1 GB of RAM (2 GB if running Vista). Voyager will not run
on machines with 512 MB or less RAM.
Voyager relies of a Microsoft technology called DirectX (version 9.0c) to dramatically
enhance chart drawing performance by pushing most of the work to the video card.
Thus, overall performance can be dramatically affected by the video card. If you're
having trouble displaying charts, we suggest checking with your video card
manufacturer for updated video drivers.
In particular, computers using an Intel 915 video card, such as the Motion LE 1600
and LS 800, must update their video drivers. The URL is:
http://downloadcenter.intel.com/filter_results.aspx?strTypes=all&ProductI
D=1862&OSFullName=Windows*+XP+Professional&lang=eng&strOSs=44&
submit=Go%21
Install the latest Mobile Intel® 915GM/GMS, 910GML Express Chipset Family Driver.
Users of other video cards should check for updated drivers by visiting
http://www.seattleavionics.com/support/VideoCards.aspx
Voyager runs well on Intel-based Apple Macintosh computers under Boot Camp.
However, as of this writing, Voyager will not run correctly under a virtual machine
such as Parallels or VMWare.
Additional support information is available on the Seattle Avionics Web site. See
http://www.seattleavionics.com/support
Contact Seattle Avionics technical support via email at
[email protected] or by phone at +1.425.806.0249.
297
Voyager User's Guide
License Agreement and Warranty
END USER LICENSE AGREEMENT FOR SEATTLE AVIONICS SOFTWARE
IMPORTANT-READ CAREFULLY: This End-User License Agreement (EULA) is a legal
agreement between you (either an individual person or a single legal entity, who will
be referred to in this EULA as You) and Seattle Avionics, Inc. (SA) for the software
product that accompanies this EULA, including any associated media, charts and
data, printed materials and electronic documentation (the Software Product). The
Software Product also includes any software updates, add-on components, Web
services and/or supplements that SA may provide to You or make available to You
after the date You obtain Your initial copy of the Software Product to the extent that
such items are not accompanied by a separate license agreement or terms of use.
By installing, copying, downloading, accessing or otherwise using the Software
Product, You agree to be bound by the terms of this EULA. If You do not agree to
the terms of this EULA, do not install, access or use the Software Product; instead,
You should return it to Your place of purchase for a full refund.
SOFTWARE PRODUCT LICENSE
The Software Product is protected by intellectual property laws and treaties. The
Software Product is licensed, not sold.
1. GRANT OF LICENSE. This Section of the EULA describes Your general rights to
install and use the Software Product The license rights described in this Section are
subject to all other terms and conditions of this EULA.
General License Grant to Install and Use Software Product. You may install
and use one copy of the Software Product on one computer, device, workstation,
terminal, or other digital electronic or analog device (“Device”). You may also copy,
install and use Software Product on up to two additional Devices for the exclusive
use of the person who is the primary user of the first copy of the Software Product.
A license for the Software Product may not be shared.
General License Grant to Install and Use Subscription Product. The following
licensing terms apply to You instead of the license grants in the previous two
paragraphs if You licensed a subscription-based Software Product (a Subscription
Product). You may install one copy of the Subscription Product on a single Device
and use the Subscription Product for the term of Your subscription. You may also
exercise the additional license rights described in the paragraphs below, but only for
the term of Your subscription. The initial subscription period begins on the date You
first activate Your copy of the Subscription Product and ends three hundred and sixty
five (365) days thereafter. You cannot use the Subscription Product after Your
subscription expires unless You renew or extend Your subscription. By renewing or
extending Your subscription, You will be entitled to continue using the Subscription
Product for a specified period of time beyond the date when Your previous
subscription would have otherwise ended. All the terms and conditions of this EULA
will continue to apply to Your use of the Subscription Product during any subsequent
renewal periods unless otherwise specified. After the expiration of Your subscription,
298
Appendix
You can continue to open, view and print any documents You created with the
Subscription Product.
Additional License Grant for Chart and Data Elements. The Software Product
may include certain data related to aviation, weather and cartography. If so, the
following terms describe Your rights to the Chart and Data Elements:
You may not sell, license or distribute copies of the Chart and Data Elements on a
stand-alone basis or in any digital or analog form except: You may print charts from
Your licensed copy of the Software Product for personal use only, and may not create
copies of the first-generation printouts for any other purpose. You may not sell,
license or distribute such printouts in any form.
You may not permit third parties to distribute copies of the Chart and Data Elements.
Reservation of Rights. All rights not expressly granted are reserved by SA.
2. DESCRIPTION OF OTHER RIGHTS AND LIMITATIONS
Mandatory Activation. You may not be able to exercise Your rights to the
Software Product under this EULA unless You activate Your copy of the Software
Product in the manner described during the launch sequence.
Copy Protection. The Software Product may include copy protection technology to
prevent the unauthorized copying of the Software Product or may require original
media for use of the Software Product on the Device. It is illegal to make
unauthorized copies of the Software Product or to circumvent any copy protection
technology included in the Software Product.
Not for Resale Software. If the Software Product is labeled Not For Resale or NFR,
then, notwithstanding other sections of this EULA, Your use of the Software Product
is limited to use for demonstration, test, or evaluation purposes and You may not
resell, or otherwise transfer for value, the Software Product.
Limitations on Reverse Engineering, Decompilation, and Disassembly. You
may not reverse engineer, decompile, or disassemble the Software Product, except
and only to the extent that such activity is expressly permitted by applicable law
notwithstanding this limitation.
Separation of Component Parts. The Software Product is licensed as a single
product. Its component parts may not be separated for use on more than one
Device unless expressly permitted by this EULA.
Trademarks. This EULA does not grant You any rights in connection with any
trademarks or service marks of SA.
No rental, leasing or commercial hosting. You may not rent, lease, lend or
provide commercial hosting services to third parties with the Software Product.
Support Services. SA may provide You with support services related to the
Software Product (Support Services). Use of Support Services is governed by the SA
299
Voyager User's Guide
policies and programs described in the user manual, in online documentation, or in
other SA-provided materials. Any supplemental software code provided to You as
part of the Support Services are considered part of the Software Product and subject
to the terms and conditions of this EULA. You acknowledge and agree that SA may
use technical information You provide to SA as part of the Support Services for its
business purposes, including for product support and development. SA will not
utilize such technical information in a form that personally identifies You.
Software Transfer. Except as specified in this Section, the initial licensee of the
Software Product may make a one-time permanent transfer of this EULA and
Software Product only directly to an end user. This transfer must include all of the
Software Product (including all component parts, the media and printed materials,
any upgrades, this EULA, and, if applicable, the Certificate of Authenticity). Such
transfer may not be by way of consignment or any other indirect transfer. The
transferee of such one-time transfer must agree to comply with the terms of this
EULA, including the obligation not to further transfer this EULA and Software Product.
Subscription Products are non-transferable.
Termination. Without prejudice to any other rights, SA may terminate this EULA if
You fail to comply with the terms and conditions of this EULA. In such event, You
must destroy all copies of the Software Product and all of its component parts.
3. UPGRADES
Standard Software Product. If the Software Product is labeled as an upgrade,
You must be properly licensed to use a product identified by SA as being eligible for
the upgrade in order to use the Software Product. A Software Product labeled as an
upgrade replaces or supplements (and may disable) the product that formed the
basis for Your eligibility for the upgrade. You may use the resulting upgraded
product only in accordance with the terms of this EULA. If the Software Product is
an upgrade of a component of a package of software programs that You licensed as
a single product, the Software Product may be used and transferred only as part of
that single product package and may not be separated for use on more than one
Device.
Subscription Based Software Product. The following terms apply to You instead
of the terms in the previous paragraph if You licensed a Subscription Product. If SA
releases any upgrades or new versions of the Subscription Product during the term
of Your subscription, You will be entitled to receive a copy of such upgrade(s) or new
version(s) at no additional cost, except for any applicable connection charges, taxes,
duties and shipping costs if You select fulfillment by mail. Such upgrades shall be
considered part of the Subscription Product and subject to all of the terms and
conditions of this EULA unless otherwise indicated in any license agreement that
accompanies such upgrade or new version.
4. INTELLECTUAL PROPERTY RIGHTS. All title and intellectual property rights in
and to the Software Product (including but not limited to any chart, data, images,
photographs, animations, video, audio, music, text, and applets incorporated into the
Software Product), the accompanying printed materials, and any copies of the
Software Product are owned by SA or its suppliers. All title and intellectual property
rights in and to the content that is not contained in the Software Product, but may
be accessed through use of the Software Product, is the property of the respective
300
Appendix
content owners and may be protected by applicable copyright or other intellectual
property laws and treaties. This EULA grants You no rights to use such content. If
this Software Product contains documentation that is provided only in electronic
form, you may print one copy of such electronic documentation. You may not copy
the printed materials accompanying the Software Product.
Information provided to AOPA members courtesy of AOPA is also subject to the
terms and conditions of AOPA Online to which you have previously agreed.
5. BACKUP COPY. After installation of one copy of the Software Product pursuant
to this EULA, you may keep the original media on which the Software Product was
provided by SA solely for backup or archival purposes. If the original media is
required to use the Software Product on the Device, you may make one copy of the
Software Product solely for backup or archival purposes. Except as expressly
provided in this EULA, you may not otherwise make copies of the Software Product
or the printed materials accompanying the Software Product.
6. U.S. GOVERNMENT LICENSE RIGHTS. All Software Products provided to the
U.S. Government pursuant to solicitations issued on or after December 1, 1995 is
provided with the commercial license rights and restrictions described elsewhere
herein. All Software Products provided to the U.S. Government pursuant to
solicitations issued prior to December 1, 1995 is provided with RESTRICTED RIGHTS
as provided for in FAR, 48 CFR 52.227-14 (JUNE 1987) or DFAR, 48 CFR 252.2277013 (OCT 1988), as applicable.
7. EXPORT RESTRICTIONS. You acknowledge that the Software Product is of U.S.
origin. You agree to comply with all applicable international and national laws that
apply to the Software Product, including the U.S. Export Administration Regulations,
as well as end-user, end-use and destination restrictions issued by U.S. and other
governments.
8. APPLICABLE LAW
If you acquired this Software Product in the United States, this EULA is governed by
the laws of the State of Washington. If this Software Product was acquired outside
the United States, then local law may apply.
Should you have any questions concerning this EULA, or if you desire to contact SA
for any reason, please refer to the SA Web site: http://www.SeattleAvionics.com.
9. LIMITED WARRANTY
LIMITED WARRANTY FOR SOFTWARE PRODUCTS ACQUIRED IN THE US AND
CANADA. SA warrants that the SOFTWARE PRODUCT will perform substantially in
accordance with the accompanying materials for a period of ninety (90) days from
the date of receipt.
If an implied warranty or condition is created by your state/jurisdiction and federal or
state/provincial law prohibits disclaimer of it, you also have an implied warranty or
condition, BUT ONLY AS TO DEFECTS DISCOVERED DURING THE PERIOD OF THIS
LIMITED WARRANTY (NINETY DAYS). AS TO ANY DEFECTS DISCOVERED AFTER THE
301
Voyager User's Guide
NINETY (90) DAY PERIOD, THERE IS NO WARRANTY OR CONDITION OF ANY KIND.
Some states/jurisdictions do not allow limitations on how long an implied warranty
or condition lasts, so the above limitation may not apply to you.
Any supplements or updates to the SOFTWARE PRODUCT, including without
limitation, any (if any) service packs or hot fixes provided to you after the expiration
of the ninety (90) day Limited Warranty period are not covered by any warranty or
condition, express, implied or statutory.
LIMITATION ON REMEDIES; NO CONSEQUENTIAL OR OTHER DAMAGES. Your
exclusive remedy for any breach of this Limited Warranty is as set forth below.
Except for any refund elected by SA, YOU ARE NOT ENTITLED TO ANY DAMAGES,
INCLUDING BUT NOT LIMITED TO CONSEQUENTIAL DAMAGES, if the Software
Product does not meet SA's Limited Warranty, and, to the maximum extent allowed
by applicable law, even if any remedy fails of its essential purpose. Some
states/jurisdictions do not allow the exclusion or limitation of incidental or
consequential damages, so the above limitation or exclusion may not apply to you.
This Limited Warranty gives you specific legal rights. You may have others which
vary from state/jurisdiction to state/jurisdiction.
YOUR EXCLUSIVE REMEDY. SA's and its suppliers' entire liability and your
exclusive remedy shall be, at SA's option from time to time exercised subject to
applicable law, (a) return of the price paid (if any) for the Software Product, or (b)
repair or replacement of the Software Product, that does not meet this Limited
Warranty and that is returned to SA with a copy of your receipt. You will receive the
remedy elected by SA without charge, except that you are responsible for any
expenses you may incur (e.g. cost of shipping the Software Product to SA).
This Limited Warranty is void if failure of the Software Product has resulted from
accident, abuse, misapplication, abnormal use or a virus. Any replacement Software
Product will be warranted for the remainder of the original warranty period or thirty
(30) days, whichever is longer. Outside the United States or Canada, neither these
remedies nor any product support services offered by SA are available without proof
of purchase from an authorized international source. To exercise your remedy, refer
to the SA Web site: http://www.SeattleAvionics.com.
Software Product is designed for use by experienced pilots who must be thoroughly
familiar and competent with the navigation of aircraft. SA expressly warrants that it
has accurately graphically depicted the flight procedures prescribed by applicable
government authorities, and that it has accurately communicated the information
obtained from other sources which are depicted on its electronic charts or other
materials. SA does not design, review, or flight-check any of these procedures and
has no authority to alter them. SA's flight procedure charts simply depict the flight
procedures exactly as designed, flight-tested and prescribed by applicable
government authorities.
The Software Product and any documentation are delivered as is, and are not
guaranteed to be free from errors or defects. You assume all risk as to their
performance. EXCEPT AS STATED ABOVE, SA MAKES NO EXPRESS OR IMPLIED
WARRANTY, AND DISCLAIMS ANY LIABILITY FOR THE SOFTWARE OR THE DESIGN,
ACCURACY, SAFETY, OR CONFORMANCE WITH STANDARDS OR REGULATIONS OF
ANY FLIGHT PROCEDURE PRESCRIBED BY A GOVERNMENT AUTHORITY, INCLUDING,
302
Appendix
BUT NOT LIMITED TO, ANY EXPRESS OR IMPLIED WARRANTY OF MERCHANTABILITY
OR FITNESS FOR A PARTICULAR PURPOSE.
You indemnify and hold harmless SA from any and all claims, expenses, liabilities
and damages, including claims by third parties, arising out of Your utilization of the
Software Product and/or Chart and Data Elements provided hereunder except to the
extent that SA is liable under any express warranty set forth herein.
10. ENTIRE AGREEMENT. This EULA (including any addendum or amendment to
this EULA which is included with the Software Product) is the entire agreement
between you and SA relating to the Software Product and the support services (if
any) and they supersede all prior or contemporaneous oral or written
communications, proposals and representations with respect to the Software Product
or any other subject matter covered by this EULA. To the extent the terms of any
SA policies or programs for support services conflict with the terms of this EULA, the
terms of this EULA shall control.
303
Index
.
ADF .......................................... 226
.pln........................................... 207
Admin ....................................... 265
1
Adobe ....................................... 242
100LL........... 127, 165, 211, 234, 242
ADS .......................................... 226
100LL.com .... 8, 78, 98, 127, 155, 165
Air Route Traffic Control Center..... 180
195........................................... 205
Aircraft ...29, 196, 211, 214, 219, 226,
238, 298
196........................................... 205
Aircraft ID....................................29
2
2000 ............................................ 3
295........................................... 205
296........................................... 205
AirMap 1000............................... 208
AirMap 2000c ............................. 208
AirMap 500 ................................ 208
AIRMETs .............................114, 116
9
96 ............................................ 205
96c ........................................... 205
98 ............................................... 3
Airport Info .......................... 78, 242
Airport Selector ............................83
Airport View ............................... 106
Airport waypoints ........................ 148
A
About Us....................................... 2
Access Code ............................... 230
Accuracy.................................... 298
Acrobatic ................................... 211
Activation ....................... 4, 297, 298
Add.............................................94
Add Plate Pack........................ 33, 72
Airports ............94, 98, 127, 186, 280
Airspace ......... 98, 136, 148, 180, 188
Airways ............17, 54, 132, 186, 263
Alphabetical ............................... 292
ALT .............................................56
Alternate Minimums .............106, 172
Alternates ....................................36
Add/Remove Programs application. 296
305
Voyager User's Guide
Altitude ..29, 34, 56, 84, 94, 109, 118,
125, 132, 136, 148, 160, 165, 170,
182, 219, 222, 238, 242, 261
C
Altitude Slider...............................84
Cargo ........... 196, 214, 235, 288, 296
Anywhere Map........................ 8, 204
CD-ROM ....................................3, 4
AOPA ........... 155, 174, 230, 280, 298
Celsius ...................................... 261
Approach/departure ....... 78, 155, 280
CG ............................................ 214
Arm ............................214, 261, 288
CG Envelope Display.................... 214
Arrivals........................... 17, 78, 280
Characteristics............................ 214
ARTCC................................180, 182
Autorouting.......................... 17, 263
Chart ...3, 8, 15, 73, 84, 94, 113, 125,
127, 130, 132, 136, 138, 140, 158,
160, 165, 177, 238, 242
Available.............................. 66, 101
Chart Data ................................. 298
AvGas .........................211, 234, 242
Chart toolbar ....84, 94, 125, 127, 130,
132, 136, 138, 140
Canada................ 114, 118, 242, 298
B
Chart window 8, 84, 94, 113, 132, 165
Backup copy............................... 298
Balance envelope .................214, 288
Baud ......................................... 242
Begin Cruise......................... 94, 148
Chartbar ......................................84
Cities ........................................ 140
Class 84, 127, 132, 136, 165, 180, 188
Class C ...................................... 127
Begin Descent ...................... 94, 148
Class D...............................127, 165
Best Economy ............................ 219
Class E ....................... 127, 136, 165
Best Performance........................ 219
Class E/G................................... 127
Bluetooth............................. 42, 242
Client ........................................ 265
Briefer............................ 8, 265, 269
Climb/descend............................ 219
Burn order ................................. 217
Buy....................................... 2, 295
306
Cloud Tops ...................................84
Cmd............................................42
Index
CMNPS ...................................... 226
Current Conditions ...................... 155
Color ...........................................29
Customer service ........................... 2
Color/symbol.............................. 238
Customize Chart ...........................84
Columns .................................... 278
Customize Layouts ...................... 273
COM........................ 42, 78, 205, 242
Customize NavLog.........................34
Command Mode.................... 43, 271
D
Config.mdb ................................ 296
DAFIF........................................... 1
Contact Seattle Avionics........... 2, 297
Date/time ................... 17, 29, 84, 94
Contents......................................12
Declutter ..... 125, 127, 130, 132, 136,
138, 140
Context-sensitive Help .................... 8
Control Panel.............................. 296
ControlVision Anywhere Map......... 204
Copter....................................... 242
Decompile.................................. 298
Default directory ......................... 242
Default folder ............................. 242
Copy ..................................211, 219
Defaults... 8, 15, 17, 27, 94, 109, 182,
196, 214, 237, 238, 261, 288, 296
Copy protection .......................... 298
Degrees Minutes Seconds............. 261
Copyright............................... 1, 298
Delete Leg ...................................94
Course ........................... 34, 94, 148
Departure ....................................17
Courseline....................................50
Desired Track ...............................56
Cover page ................................ 146
Dinghies .................................... 226
Create ..... 8, 16, 17, 84, 94, 148, 196,
219, 238
Direct ..........................................17
Credits ......................................... 1
Cruise .......29, 94, 109, 219, 238, 242
CSC/DynCorp/GTE DUATS ............ 230
Cummulative................................34
Direct To....................50, 54, 78, 271
Direction.................................... 182
Directory ................................... 242
DIS .............................................56
Disassemble ............................... 298
307
Voyager User's Guide
Display toolbar ........................... 132
Distance ......................... 34, 94, 182
Distance to Waypoint.....................56
Distance/direction ....................... 177
DME.......................................... 226
Enroute ... 17, 29, 132, 148, 158, 160,
182
Equipment ................................. 226
ETA.............................................56
ETA/ATA .................................... 148
ETE .............................................56
Document directory..................... 238
ETE/ATE .............................. 29, 148
Document folder ......................... 238
ETT .............................................56
Download Weather ................ 15, 113
EULA ......................................... 298
DTC DUAT.................................. 230
Experimental .............................. 211
DTK ............................................56
Export .......... 196, 204, 205, 207, 298
DUAT ........................... 29, 160, 230
DUATS 15, 28, 29, 116, 160, 230, 257
Express .......................................13
Extended Courseline ......................50
Duration ......................................34
F
DVD ..........................................3, 4
DVFR .................................155, 238
F1........................................... 8, 12
E
FAA......17, 28, 29, 32, 118, 155, 163,
165, 177, 182, 211, 230, 238, 242
E6B........................................... 292
FAA Diagram ................................78
Echo Tops ....................................84
Fahrenheit ................................. 261
Economy ................................... 219
FBO .................... 155, 174, 230, 280
ELBA ......................................... 226
FD .....................................118, 170
Elevation ............... 78, 165, 175, 186
FDX ...................................200, 242
ELT ........................................... 226
Features ......................................13
Email ......................... 2, 4, 196, 297
Feet/minute ............................... 219
Empty weight ............................. 214
File menu16, 17, 27, 32, 94, 148, 155,
158, 160, 162, 163, 196
End-User License Agreement ........ 298
308
Index
Fill order .................................... 217
G
Filter ....................... 54, 66, 101, 278
Garmin ......................... 56, 205, 242
FL ............................................. 261
Gaugebar.....................................84
Flight Calculator.......................... 292
Gauges....................... 43, 50, 56, 84
Flight Level ................................ 261
General 17, 29, 84, 94, 132, 136, 155,
182, 188, 230
Flight plan 7, 8, 15, 16, 17, 27, 28, 29,
32, 33, 54, 72, 84, 94, 148, 155,
163, 165, 188, 211, 219, 230, 238,
242, 257, 288
Geo-referenced....................106, 242
Get Information About . 165, 170, 172,
174, 175, 177, 186, 190
Flight Plan Exchange Format......... 200
Flight Plan Window .....8, 29, 163, 211,
230
GlassView .. 42, 43, 50, 56, 73, 78, 98,
111, 271
GNSS ........................................ 226
Flight Plan Wizard ................. 17, 263
Google Maps .............................. 165
Flight Simulator ...................... 8, 207
Fly ..............................................42
GPS . 17, 42, 43, 50, 56, 98, 205, 208,
226, 242, 261, 263, 271
FMS .......................................... 226
GPS Settings ................................43
Folder ....................................... 242
GPS Simulator ...................... 42, 242
Forecast .............................155, 170
Graphics .............................. 15, 114
Freq ...................................180, 182
Gravity ...................................... 214
FSS........................................... 177
Greenwich..................................... 8
Fuel . 17, 29, 34, 50, 78, 94, 155, 165,
211, 214, 217, 219, 234, 242, 288,
296
Groundspeed ..............34, 56, 94, 148
Fuel icon.................................... 127
H
Fuel Prices ... 8, 78, 98, 127, 155, 165,
257
Hard surface/water ..................... 127
Fuel remaining........................ 34, 94
Fuel stop ................................... 287
GS ...................................34, 56, 94
Hard/soft ............................165, 175
Hawaii ................................182, 242
Headwind................................... 111
309
Voyager User's Guide
Heavy ....................................... 226
Info .......................................... 230
Helicopter .................................. 242
Information ..............2, 185, 186, 188
Helipads .............................165, 242
Ini ............................................ 296
Help .................................8, 12, 271
Input......................................... 292
Help menu ........................... 12, 295
INS ........................................... 226
Hibernate................................... 242
Insert Leg ....................................94
Hide layouts ............................... 273
Installation.................................... 4
High/Low ................................... 177
Instrument Landing System.......... 165
High-Level ................................. 190
Internet . 3, 4, 15, 113, 165, 170, 230,
257, 297
High-resolution ....................... 4, 130
Intersection................................ 132
Hilton Software........................... 210
J
HSI ....................................... 43, 50
JetA ............. 127, 165, 211, 234, 242
I
K
ICAO 17, 29, 163, 165, 180, 186, 190,
211, 238, 242
Keyboard ................................... 271
Icing ......................................... 114
Kneeboard ...................................34
Ident 29, 94, 109, 132, 165, 170, 172,
174, 175, 177, 180, 182, 186, 190,
211, 242
L
IFR .. 29, 84, 132, 155, 172, 211, 242,
263
LAN.............................................. 3
IFR Enroute.........................242, 271
IFR/VFR..................................... 242
ILS ....................................165, 175
Lakes ........................................ 138
Land ................................... 17, 127
Landscape.................................. 273
Landscape Mode ...........................73
Import....................................... 196
Latitude/longitude .. 84, 165, 185, 186,
188, 190, 261, 283, 285
Index ..........................................12
Launching ..................................... 7
in-flight notes...............................73
Layers toolbar ..............................84
310
Index
Layout.........................................73
Max weight ................................ 214
Layouts .....................8, 42, 271, 273
Maximum landing weight.............. 217
Layover ................... 34, 94, 148, 238
Maximum ramp weight ................ 217
License agreement ...................... 298
Maximum takeoff weight .............. 217
Life jackets ................................ 226
MCrs ......................................... 148
Lightning .....................................84
Me ............................................... 3
Lists menu ... 211, 214, 219, 226, 230,
233, 234, 235, 238, 288
MEA .................... 132, 182, 186, 190
METAR................................... 36, 78
Load Information ........................ 214
METARs .......... 84, 118, 155, 160, 170
Location .... 8, 94, 109, 148, 165, 170,
172, 174, 175, 177, 186, 188, 190,
214, 242, 296
Login......................................... 269
Logo ......................................... 146
LORAN ...................................... 226
Low........................................... 177
Low-level ............................186, 190
Lowrance ................................... 208
MHdg .................................. 34, 148
Microsoft Flight Simulator ............. 207
Military Operation Areas ............... 136
Min dir....................................... 182
Minimum Computer Requirements .... 3
Minimum range........................... 130
Minimums ................... 106, 172, 280
Minor ........................................ 177
M
Mach ......................................... 261
Magnetic course.......................... 148
Magnetic variation 148, 177, 182, 188,
190
Minute....................................... 261
MLS .......................................... 226
MNPS ........................................ 226
MOA/other SUA ...................136, 180
Main Toolbar .......................... 8, 186
Model list ................................... 211
Main Window................................. 8
Moment ............17, 32, 109, 214, 288
Major ........................................ 177
Morse-code .........................182, 186
Manufacturer........................ 29, 211
Motion Computing ........ 3, 42, 52, 120
311
Voyager User's Guide
Motion LE 1600.............................. 3
NIMA............................................ 1
Motion LS 800 ............................... 3
NMEA ........................................ 242
Move
N-Number.................................. 211
Altitude.....................................84
Normal ...............................214, 271
Time ........................................84
Normal, Utility .....................211, 214
Waypoint/Leg ............................84
North America ............................ 165
Move...........................................84
North Central ............................. 118
MPH .......................................... 261
North East ................................. 118
MRA .......................................... 182
North Up......................... 43, 50, 271
MRU.......................................... 242
NOTAMs..................................... 116
MSL ...................................165, 180
Notes ......................... 148, 155, 174
My Documents............................ 242
NT ............................................... 3
N
Number on Board..........................29
Name .... 4, 8, 17, 27,
165, 170, 172, 175,
186, 190, 211, 214,
234, 235, 238, 242,
29, 34, 94, 132,
177, 180, 182,
219, 230, 233,
288, 292
Nav..................................... 78, 155
Navaid....8, 29, 84, 94, 109, 132, 148,
165, 182, 186, 190, 242
O
O2 ............................................ 177
Obstacles............................125, 182
Off-airway waypoints ................... 142
Offroute..................................... 190
Navaid/Fix ................................. 182
Oil ............................................ 235
Navaids .......................................98
Omega ...................................... 226
NavCanada ................................ 114
Online ....................................... 295
NavLog.. 29, 34, 73, 94, 109, 155, 242
Open............................ 32, 196, 271
NavLog toolbar .............................34
Open/Save................................. 288
Nearest .......................................98
Options ... 15, 16, 17, 34, 84, 94, 118,
125, 127, 130, 132, 136, 138, 140,
148, 155, 158, 160, 162, 163, 170,
New 16, 17, 27, 84, 94, 113, 196, 211,
214, 238, 242, 257, 271, 288, 295
312
Index
175, 180, 182, 211, 214, 219, 226,
230, 237, 238, 242, 257, 261, 288
Plate Pack .... 33, 58, 72, 73, 158, 242,
271
Output ...................................... 292
Plate Pack Selector ................ 73, 106
Outside air temperature ............... 222
Plates ..........................................78
Overview ................................... 165
Play button ..................................84
P
Pointer ...............................132, 136
Pacific ....................................... 118
Pointer tool ..................................84
Page Setup ......34, 94, 148, 155, 158,
160, 162, 163
Portrait ...................................... 273
Part 135 .................................... 162
Passenger .... 8, 17, 29, 196, 214, 233,
288, 296
Portrait Mode................................73
Precision Instrument ................... 175
Preferences ................................ 242
Passengers list............... 17, 233, 288
Preferred Routes ...........................38
Password ............... 29, 193, 230, 242
Premier .......................................13
PDF........................................... 242
Primary approach/departure ......... 177
PDF file........................155, 165, 172
Print............. 29, 33, 72, 94, 271, 298
Performance.................. 29, 219, 298
Print Preview ................... 29, 94, 271
Personal Layout ...................123, 238
Print Setup... 146, 148, 155, 158, 160,
162, 163
Personal Procedures ......196, 283, 285
Personal Waypoints 84, 142, 196, 283,
285
Procedure ............................ 73, 106
Procedure Types ................... 66, 101
Picture ...................................... 146
Procedure View ........................... 106
Pilot ... 8, 29, 132, 163, 165, 196, 214,
230, 237, 238, 288, 296, 298
Procedures .....8, 36, 66, 78, 101, 155,
172, 196, 242, 280, 285, 298
Pilot III...................................... 205
Profile .......................... 73, 109, 219
Pilot-controlled ........................... 165
Prog Charts ................................ 114
Plan .......................................... 288
Public/private ............................. 165
Plan menu ........................28, 29, 94
313
Voyager User's Guide
Purchase................ 2, 4, 13, 295, 298
Runway Details ........................... 175
Purchase key.............................. 295
Runway length............................ 242
Q
Runways......................................78
Q1 ..............................................94
RVSM ........................................ 226
Quantity .............................235, 288
S
QuickInfo.....................................43
Samsung Q1 ................................94
R
Satellite ........................ 84, 114, 242
Radar .................................. 84, 114
Satellite Image ........................... 165
RAM ............................................. 3
Satellite View ............................. 165
Range ....84, 113, 125, 127, 130, 132,
136, 138, 140, 165, 186, 214, 242
Save 15, 27, 113, 155, 196, 242, 261,
288, 296
Range setting ............................. 132
Save/print.................................. 242
Region....................................... 118
Scanned Charts .......................... 242
Region/time ............................... 118
Scratchpad...................................73
REIL.......................................... 175
Scrollbars .............................. 84, 94
Remove ..................................... 296
Sea ........................................... 127
Remove Plate Pack .................. 33, 72
Seaplane bases........................... 242
Restricted .................................. 211
Search.........................................12
Reverse engineering .................... 298
Seattle Avionics ............................. 2
Rivers ....................................... 138
Sectional ............................242, 271
RNav......................................... 226
Selected .............................. 66, 101
RNP/RVSM ................................. 226
Send to ..................................... 207
Roads........................................ 242
Send to AirMap ........................... 208
Rocky Mountains......................... 118
Send to Anywhere Map ................ 204
Run-up fuel burn......................... 217
Send to Garmin GPS.................... 205
314
Index
Server ....................................... 265
Streams..................................... 138
Service ceiling ............................ 219
Student pilot .............................. 230
Services ......................155, 174, 219
Subdirectory .............................. 242
Setup ............................. 4, 296, 297
Sunrise/sunset ....................165, 188
SETUP.EXE.................................... 4
Surface Analysis ......................... 114
Shortcuts................................... 271
Synch.................................... 8, 193
SIDs/STARs ...............17, 38, 94, 263
Synch Alt/Timeline ........................84
SIGMETs.............................114, 116
Synch Timeline/Plan ......................84
Sleep ........................................ 242
System Requirements..................... 3
SmartPlan....................................73
T
SmartPlates ....... 58, 66, 73, 101, 106
TAC........................................... 242
SmartRouter .......................263, 271
TACAN....................................... 226
Sort ............................................54
TAF ....................................... 36, 78
South Central ............................. 118
TAFs .............. 84, 118, 155, 160, 170
South East ................................. 118
Tail .............................................29
Special Use Airspace.................... 136
Tailwind..................................... 111
Speed/direction .......................... 148
Takeoff .................................. 17, 94
Speed/Fuel ................................ 219
TAS............ 29, 34, 94, 148, 219, 242
Split flight plan ........................... 287
TAWS .................................... 43, 50
Standard Navigation Log ........ 94, 148
Taxi Diagram................................78
Start button .................................. 7
TCA........................................... 180
States ................................. 66, 101
TCAS......................................... 226
Station/altitude........................... 118
TCrs ............................................94
Stations..17, 118, 162, 170, 214, 233,
288
Temperature .............................. 222
Terminal .................................... 190
315
Voyager User's Guide
Terminal Control Airspace ............ 180
Unit Converter ............................ 261
Terrain ...................................... 130
TFRs ..............3, 8, 84, 180, 188, 257
Units ......84, 125, 127, 130, 132, 136,
138, 140, 175, 180, 182, 214, 234,
235, 261, 288, 292
Themes ............8, 123, 196, 238, 271
Unknown ................................... 177
Time ....8, 15, 17, 29, 34, 84, 94, 109,
113, 118, 127, 136, 155, 160, 165,
170, 188, 219, 238, 242, 288
Update application ...................... 257
Time Slider ..................................84
Update TFRs............................... 257
Tools menu .... 15, 113, 118, 165, 170,
172, 174, 175, 177, 186, 190, 238,
242, 257, 261, 288, 292
US Sectional chart....................... 177
Tower ID ................................... 177
User ID...................................... 242
TPA..................................... 78, 165
User Name ..........................193, 242
Track ..........................................56
Users ........................................ 265
Track to Waypoint .........................56
Using Help ...................................12
Track Up......................... 43, 50, 271
V
Traffic Pattern Altitude ................. 165
Vertical Speed Required .................56
Transponder............................... 226
VFR.......... 29, 84, 109, 155, 190, 238
Transport................................... 211
VFR colors/symbols .......................84
Trial .......................................... 295
VFR Reporting Point..................... 190
TRK ............................................56
VFR Sectional ...............................84
Troubleshooting .................... 52, 120
VFR/DVFR ....................... 29, 84, 242
True Airspeed ........... 34, 94, 148, 219
VFR/IFR..................................... 242
Turbulence................................. 114
View menu34, 84, 109, 125, 127, 130,
132, 136, 138, 140
Update data ............................... 257
USB .................................... 42, 205
Type/equipment ...........................29
VOR/DME.................... 132, 182, 186
U
VSR ............................................56
Uninstall .................................... 296
316
Index
W
Wind Speed.......................... 84, 118
WAAS.................................. 43, 242
Windows
WAC ......................................... 242
2000 ......................................... 3
Warranty ................................... 298
98............................................. 3
Water........................................ 175
Me ............................................ 3
Waypoint ... 29, 84, 94, 109, 132, 142,
148, 155, 182, 186, 190, 283, 285
Menu ......................................... 8
NT............................................. 3
Waypoints............ 142, 196, 283, 285
XP............................................. 3
Waypoints layer .......................... 283
Weather .. 3, 8, 15, 32, 34, 78, 84, 94,
113, 116, 155, 160, 170, 211
Windows.................................... 186
Winds.. 34, 84, 94, 118, 160, 170, 261
Weather Graphics ................. 15, 114
Winds Aloft 78, 84, 111, 118, 160, 170
Weather Log........................160, 170
WingX ....................................... 210
Weather Tab ................................84
Wizard....................................... 263
Web site ......................172, 174, 230
Workspace ................................. 123
Web Synch............................. 8, 193
WPT ............................................56
Weight . 7, 17, 94, 162, 214, 217, 222,
230, 233, 234, 235, 261, 288, 296
X
Weight and Balance.. 17, 94, 162, 214,
217, 233, 261, 263, 288, 296
XM ............... 8, 15, 52, 111, 120, 242
XM Link ........................ 52, 120, 242
Weight/Moment .......................... 214
XML ...................................196, 200
Weight/unit ................................ 235
XP ............................................... 3
Widgets .......................................73
Z
Wind Direction ...................... 84, 118
Zoom ........................................ 271
Wind Optimizer..................... 73, 111
317