1
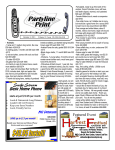
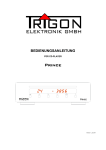
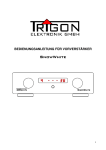
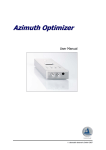
USERS MANUAL FOR PREAMPLIFIER
SnowWhite
1
CONTENTS
1
Introduction
2
2.1
2.2
2.3
General Description
Safety Information
Installation Information
Warranty and Service Information
3
3.1
3.2
3.3
Initial Setup
Front Panel Controls
Rear Panel Connections
Remote Control
4
4.1
4.2
4.3
4.4
4.5
4.6
4.7
The MODE Function
Balance Control
Initial Volume Level
Display Brightness
Record Output Activation
Input Levels
Unity Gain – Home Theater Throughput
Factory Default Settings
5
5.1
5.2
5.3
5.4
What to do, if ...
... unit doesn’t turn on?
... no sound is produced?
... there is a hum?
... the remote control doesn’t seem to work?
6
Technical Data
2
1 Introduction
Valued Trigon - Customer,
We are excited that you have chosen to purchase the SnowWhite preamplifier.
This unit was built using the highest quality control to insure utmost precision in
manufacturing.
Whether you are a beginner to High-Fi or advanced user, it is highly recommended that
you read and understand this User’s Manual thoroughly before using your new
preamplifier.
Be sure to keep this manual easily accessible as it could come in handy during normal
use of this preamplifier.
We hope that you enjoy your new preamplifier and thank you for choosing Trigon.
2 General Description
The SnowWhite is a High-End preamplifier with between four and five high-level
inputs.
This preamplifier is completely controlled by a sophisticated Microprocessor. The features
of the SnowWhite are both accessible via the front panel or via the Director remote
control. The front panel features a dimming Display that informs users of the active in-use
configuration. The unit can also be turned off or on via the remote control when in standby mode.
The volume setting is controlled through a special D/A Converter and as such is both
technically and sonically far superior to a traditional volume pot (potentiometer). This
method of volume control allows for a channel output that is exact at low volume as well
as high volume settings, insuring that the soundstage doesn’t wander or lose focus with
each change of the volume setting.
The power supply also boasts noteworthy features in its design. The external power
supply delivers the preamplifier with controlled even voltage. Inside the preamplifier itself,
is housed the current regulation for all the gain stages. This power supply design helps
reduce the possibility of inducing hum into the system.
2.1 Safety Information
Trigon Elektronik GmbH will not assume any responsibility for damages
occurred from unsafe handling of the product or from not adhering to the recommend
safety instructions below.
-
The preamplifier should not be used un-monitored in close proximity to heat
producing devices such as Water heaters, Fireplaces or Flammable materials.
The preamplifier is not designed to withstand heavy impacts or severe vibrations.
The preamplifier should not be used un-monitored when being transported from a
cold environment into a warm room.
The preamplifier should not be used when placed out in direct contact with the Sun.
Insure that the installation location for this product has adequate ventilation.
The preamplifier should not be doused with any type of liquid. It is imperative that no
liquid get inside the unit.
3
-
Never use this product without the shielded top cover installed.
Before removing the top cover always insure that the AC cord has been removed
from the AC outlet and that the product has sat to drain any residual current.
Never short any of the fuses. Replace broken fuses only with original fuses of the
same value and type.
Do not attempt to service this unit. Repairs are only to be done by authorized
service centers or through the factory direct. Any such unauthorized repairs will
result in a voided warranty.
Always make sure that your complete audio system is shut off before changing any
cables or connecting any other components.
The SnowWhite power supply is set at the factory to be operated in 115V. Contact
your local dealer or Trigon directly if you should need a different voltage version.
2.2 Installation Information
During unpacking, please inspect the unit for any potential transportation damage. If you
notice any damage, please get in contact with your dealer.
Confirm the contents of the box. In addition to the SnowWhite, you should also
have the following:
-
Floor Power Supply
User’s Manual
Warranty Card
Place the unit on a dry, level surface. Be sure that the unit has good ventilation around it.
Strong magnetic fields commonly found in amplifier transformers and halogen light
transformers can induce hum into a system. Because of this, it is best to place the unit a
reasonable distance from such devices. Also, the audio interconnects should not be run
in parallel to AC power cables as this can also induce noise.
Hum is also produced from light bulbs. It is best to place audio equipment at least 3 feet
away from them.
Try to utilize natural light and make sure not to use the SnowWhite unmonitored
next to heat sources.
2.3 Warranty and Service Information
In choosing the SnowWhite, you have selected a valuable and technologically
advance product. We at Trigon are trying to improve our quality control through all
steps in the production cycle to insure that all Trigon products meet our quality
expectations. If a problem is experienced, Trigon Elektronik GmbH offers
a three-year warranty. This warranty covers repairs for any manufacturing defects.
It does not cover damages that are the result of neglect or misuse. It also is considered
void if unauthorized personnel do any repairs or modifications. Any alterations to the
serial number, or transportation damage are not covered as part of this warranty.
3 Initial Setup
4
After you have unpacked the preamplifier, you should first connect the unit to the power
supply and plug it into the AC outlet. Before you have connected any of your other
components turn the unit on to test that it powers up properly.
After a short warm-up period, you will hear a quiet “clicking” sound from Relays within the
Snow White signaling that the unit is ready to be operated. At this time you should
become more familiar with the proper usage and connection possibilities of the Snow
White. Test the various controls (i.e. input selection, volume, etc..) at this time for
functionality, while none of your sources are connected. This will insure that no damage
can occur. After you have tested all the functions and understand how to control the
Snow White, you can begin to connect your other audio components.
When connecting cables between components, be sure that both the Snow White and
other components are powered OFF!
3.1 Front Panel Controls
1
2
3
4
5
6
7
8
1 - INPUT SELECTOR KNOB :
With this knob you can select which input is to be activated for listening. The selected
input can be seen on the Display [2].
Pushing the knob will engage the MODE menu. While in the MODE menu, turning the
knob will scroll through the individual Menus. To exit the MODE menu, simply push the
knob once again.
2 - Input Display :
This display shows what input is currently selected and active. A small dot will light up
behind the display if the Display Off function is selected.
3 – Standby LED :
This LED will glow dimly as soon as the Snow White is set into Stanby mode.
4 – Operate LED :
This LED will light up once the Snow White is switched on.
5
5 – Mono LED :
This LED will light up when the Snow White is operated in Mono mode.
6 – Volume Display :
This display shows the select volume level. It also displays other values when in the
MODE Menu. This is more fully described in the MODE-Menu section (Chapter 4) below.
7 – Volume Knob :
This knob is used to set and adjust the volume of the Snow White. If you push the knob,
you will engage the MONO operation and the dots behind LED [6] will light up. The
preamplifier will switch back to Stereo operation as soon as the Volume knob is pushed or
if the unit is switched into Standby.
8 – On/Off (Standby) Button:
This button is used to switch the unit On or Off (Standby). Once switched On, the LED [4]
will light up.
3.2 Rear Panel Connections
9
10
11
12
13
14
L
OUTPUT REC/IN 5
IN 4
IN 3
IN 2
IN 1
R
9 Power Supply Input:
This input is used to connect the external power supply to the Snow White.
CAUTION!!! Please never try to connect a similar cable from a Telephone or Computer
network! This could damage the Snow White which would not be covered by our
warranty. In addtion, we would not be responsible for any other damage this may cause!
10 Balanced Output R :
This is the balanced XLR output for the right channel. This output can be used with either
an amplifier or active loudspeaker that has a balanced XLR input. Pin configuration is as
follows:
Pin 1 - Ground
Pin 2 - Positive Signal (+).
Pin 3 - Negative Signal (-).
6
11 Balanced Output L :
This is the balanced XLR output for the left channel. This output can be used with either
an amplifier or active loudspeaker that has a balanced XLR input. Pin configuration is as
follows:
Pin 1 - Ground
Pin 2 - Positive Signal (+).
Pin 3 - Negative Signal (-).
12 Unbalanced Output:
These are the unbalanced RCA outputs to be used with amplifiers and active
loudspeakers that have unbalanced RCA inputs. You’ll find the left channel output on top
and the right channel output on the bottom. The Snow White does not invert phase over
these outputs.
13 – INPUT5 / TAPE OUTPUT :
This set of connections can be configured to be used in two different ways. They can be
used as an additional line input or as a record output. In the MODE-Menu, you can select
which way you choose to use these connections. More detailed information is listed below
in capter 4.6.
14 - UNBALANCED INPUTS :
The RCA pairs INPUT1 through INPUT4[5] are the unbalanced inputs. The top row of the
inputs is the left channel and the bottom row for the right stereo channel. These inputs
can be used with all traditional line-level sources such as Tuners, CD Players, Tape Deck,
etc.
Turntables will need a separate phonostage (such as the Trigon Vanguard II or Advance)
to amplifier the signal of the phono cartridge to a level which the Snow White can accept.
7
3.3 Remote Control
The Snow White offers and optional IR Remote called the Director.
The Director is a system remote that can control multiple
components. It controls the following functions for the Snow White
preamplifier.:
-
-
On/Off (Standby) : used to turn the preamp on or off.
Display On/Off : used to turn the display on or off.. When
switched off, a small dot will be displayed behind the Input
LED [2]. Also when switched off, the display will come on
for a few seconds if the preamp is used in order to show
any changes made.
Mode Menu : used to engage the MODE-Menu. More
information can be found in Chapter 4.
Mono/Stereo : used to engage Mono operation. Once
engaged, the Mono LED[5] will light up.
Input + : each press will select the next input.
Input – : each press will select the previous input.
Volume +10 : the volume will increase by 10
Volume -10 : the volume will decrease by 10
Mute : used to mute the outputs. When engaged, a small
dot will be displayed behind the Mute LED[6].
Volume + : Increase volume
Volume – : Decrease volume
The buttons used for these functions are described in the User
Manual for the Director remote control.
(The image to the left has the relevant buttons for the Snow White
highlighed in bold.)
Director
8
4 The MODE Function
We have included many additional features in this preamplifier that can be accessed via
the MODE menu.
The following functions are available in order of access in the MODE menu:
- Balance control
- Adjusting initial volume level
- Adjusting Display brightness
- Setting Input 5 to a record output
- Unity Gain (Home Theater through-put)
- Input level adjustment
- Factory Default Setting
To access the MODE menu, push the input selector knob. Once in the MODE menu,
rotate the input selector knob right or left to scroll through the menu options. If nothing is
done within approx. 15 seconds, the unit will automatically switch back to “normal”
operation mode.
All changes in are automatically saved once the input selector knob is used to move to the
next menu option. The input selector knob can be turned either right or left to scroll either
forward or back within the MODE menu. You can escape from the MODE menu at any
time by simply pressing the input selector knob.
The individual options in the MODE menu are described in further detail below.
4.1 Balance Control
The following should be seen on the display to adjust balance:
The volume control knob [7] is used to adjust the channel balance. When adjusting
channel balance, please note that either the left LED [3] or right LED [5] will be lit to
indicate which channel is receiving more signal. The volume display will indicate exactly
how much more signal is being sent to an individual channel. Each number represents a
difference of 1 dB of gain. The maximum difference is 100 dB. All changes in are
automatically saved once the input selector knob is used to move to the next menu option,
or it is pressed to escape the MODE menu.
The balance setting will be reset once the unit is turned off. Once turned on again, if
another balance setting is desired, please follow the steps above.
9
Turning the input selector knob clockwise will move to the Initial Volume level menu
option. Pressing the input selector knob will exit the MODE menu.
4.2 Adjusting Initial Volume Level
The SnowWhite uses an electronic volume control system. In addition to offering
better performance (over the conventional Potentiometer), it also allows for special
features that have previously not been available. One of these features is the ability to
adjust the Initial volume level. This is the volume level in which the preamplifier is set to
any time it is turned on. This design insures that if a high volume level was last used
before the preamplifier was turned off, that this level is not automatically selected when
next turned on in an effort to protect your loudspeaker from potential damage.
The initial volume level can be set in the MODE menu. To do so, press the Input selector
knob [1] and move to the second option to adjust the initial volume level.
Use the Volume Knob to set the desired initial volume level. The selected value will
automatically be saved as soon as another menu option is selected or on exiting the
MODE menu.
Once finished adjusting initial volume level, the preamplifier will automatically exit the
MODE menu after approx. 15 seconds or if the Input selector knob [1] is pressed.
10
4.3 Adjusting Display brightness
The brightness of the complete Display can be adjusted in 100 steps. To do so, press the
Input selector knob [1] and move to the third option to adjust the display brightness.
Turning the volume knob will adjust the display brightness in this menu option. The
volume display will show the select brightness level.
Turning the input selector knob [1] clockwise will move you to the next item in the MODE
menu.
If you don’t want to change any other options, simply press the input selector knob or wait
for approx. 15 seconds to exit the MODE menu.
4.4 Activating the Record Output
The SnowWhite is shipped from the factory (preset) with five inputs. The fifth input
can be converted to a Record Output.
To convert the fifth input, once in the Record Output option, press and hold the volume
knob for approx. 3 seconds until the “0” in the volume display changes to “1”.
This change is then saved until, using the same sequence, it is reverted back to an input
by changing the “1” in the volume display to a “0”.
Turning the input selector knob [1] clockwise will move you to the next item in the MODE
menu. If you don’t want to change any other options, simply press the input selector knob
or wait for approx. 15 seconds to exit the MODE menu.
11
4.5 Unity Gain
This setting option will by-pass the volume control of a choosen input. This feature is
useful if integrating the SnowWhite into a multichannel system.
The volume selector knob [7] can activate the Unity Gain feature for the input, which was
selected by the input selector. Press and hold the volume knob until the volume display
changes from “0” to “1”, signifying that the volume control is now bypassed. The signal
from this input now has no attenuation and volume must be control from the surround
processor that is connected to this input.
CAUTION! Be very careful when activating the Unity Gain feature. If selected input has a
musical signal at time of activation, it could cause extreme damage to amplifiers and/or
loudspeakers.
All other input are still available as normal inputs with volume control.
Display output with Unity Gain setting on Input 2
4.6 Input level adjustments
It can be that the various sources connected to the SnowWhite have different
output levels. This is usually noted when switching inputs and noticing that different
sources play at more loudly than others. The SnowWhite offers the option to
adjust the sensitivity for each input.
In the MODE menu, there is an adjustment for input level. When in the input level
adjustment menu, the Input display [2] will alternate showing the letter “E” and a number
between 1-5 indicating which input is to be adjusted. Rotate the volume knob to increase
(to right) or decrease (to left) the level. An increase in level will light the right LED [5] and
a decrease will light the left LED [3]. The volume display [6] will show what level has been
selected. Rotating the Input selector knob to the right will move to the next input to be
adjusted.
12
Input level adjustment display …
… alternating with the following for Input 1:
The adjusted input level value will automatically be saved as soon as the next input is
selected. This process can be used to set the input level for each individual input.
The total input level can be adjusted to +/- 12dB in 0.5dB steps. There are 24 steps in
either direction that can be selected.
The selected input levels will stayed saved in memory even if the preamplifier is turned off.
The selected input levels can only be changed back individually or via the Factory Default
reset as described below.
Once finished adjusting input levels, the preamplifier will automatically exit the MODE
menu after approx. 15 seconds or if the Input selector knob [1] is pressed.
Turn the Input selector knob [1] clockwise to move to the factory default setting menu
option.
4.7 Factory Default Setting
The SnowWhite can be reset to the factory default settings in this menu option.
If you are unhappy with the changes you have made in the MODE menu and would like to
reset the preamplifiers settings to the factory default, press the volume knob [7] quickly in
this menu (LED [2] shows a “n”). The MODE menu is exited and at the same time all the
factory default settings are reset (i.e. Stereo Balance = 0, Display Brightness = “99”, Initial
Volume = “5”, Input Level is set to “0” for all inputs and 5 inputs are available).
13
--- All of your settings will be lost! The SnowWhite will me reset to the Factory
Default settings. --If you don’t want to reset your settings, press the input knob to exit the MODE menu.
5 What to do, if...
This chapter is designed to help diagnose and trouble-shoot some of the most common
errors.
5.1 ... unit doesn’t turn on?
Is the AC plug from the Power supply connected properly to the AC outlet? – Secure
connection.
Does the AC outlet that you have the power supply connected to have current, or is it
possible that the fuse for that outlet has been blown? – Test the fuse for that AC outlet at
the house fuse box.
Is the internal fuse blown? – Contact your dealer.
Is the power supply connected to the preamplifier? – Secure connection.
5.2 ... no sound is produced?
Do you have the correct input selected? – Select the intended input.
Is the selected source even sending a signal? – Select a different input with another
connected source to test if it works. If this source works, then you should test the first
source to be sure that it is functioning properly.
Is the MUTE function activated? – Press the MUTE button on the remote, or simply turn
the volume knob.
Has the unit encountered a static electric charge? – Sometimes it can occur, especially
during winter months, when humidity is higher, that your clothing will carry a slight static
electric charge. This charge can be transmitted to the preamplifier during normal use and
may confuse the microprocessor used to control the SnowWhite. This is a
common problem with many common computers as well.
If this happens, the
SnowWhite will turn off the output relays to protect the rest of the system. To fix,
first try to change the selected input, which should reset the output relays. If this doesn’t
seem to work, disconnect the AC cord from the wall outlet for approx. 30-60 seconds.
Reconnect the AC cord and the preamplifier should work without any problems.
5.3 ... there is a hum?
Are all the connections fastened securely? – Test all cable connections.
14
Sometimes multiple problems can contribute to a magnetic reception, which will result in a
system hum. To fix these types of problems, it is recommend that you contact your local
dealer who has many years of experience in trouble shooting such issues.
It hums only when connected to a Tuner, VCR or Television? – All of these components
are also connected to some type of grounded Antenna. This problem can also be related
to a magnetic reception. In this case however, the resolution is quite simple. Use of a
shielded power filter on the antenna can reduce or eliminate this hum. These types of
shielded power filters are readily available at most HiFi or Radio stores.
5.4 ... the remote control doesn’t seem to work?
Does the remote work when set into the Preamplifier mode? – Press the PREAMP button
on the remote control. It is now set to control the SnowWhite preamplifier.
Are the batteries empty? – Install new batteries.
Are you using the remote too far from the preamplifier? – Get closer to the preamplifier.
IR-remote controls do have an ideal use distance. With full batteries, the unit will only
function with in 8 meters from the preamplifier.
Beeinträchtigt zu helles Sonnenlicht die Empfängersonde, geht die Reichweite ebenfalls
zurück. - Direktes Sonnenlicht vermeiden!
15
6 Technical Data
Gain
: +20dB
Frequency Response
: 1Hz – 1MHz (+ - 3dB)
Total Harmonic Distortion
: < 0.02 %
Channel Separation
: < 80 dB ( 1kHz )
Signal-to-Noise ratio
: < 96 dBA
Inputs
: 4x (5x) RCA
Input Impedance
: 47kOhm
Ouputs
: 1x RCA , 1x XLR , 1x RCA for Record
Output Impedance
: Line RCA and XLR connectors @ 33 Ohm
max. Output voltage
: 4.8 V eff
Headphone Output
: 1x ¼” > 200 Ohm
Accessories
: IR-Remote Control
Weight
: 2.1 kg (4.7 lbs)
Size (WxHxD)
: 200 x 58 x 350 mm ( 7.9 x 2.3 x 13.8 inches )
Warranty
: 3 Years
Specifications subject to change.
Designed and Manufactured by:
Distribution (Germany/Switzerland):
TRIGON ELEKTRONIK GmbH
LivingAudio
Music Components
Crumbacher Str. 60
Stettiner Straße 8
D-34277 Fuldabrück - Bergshausen
Tel.
+49 (0) 561/20753880
Fax
+49 (0) 561/20753888
Email [email protected]
Web www.trigon-audio.de
D-35083 Wetter
Tel.
+49 (0) 6423/969 0 474
Fax
+49 (0) 6423/969 0 476
Email Mail@LivingAudio
Trigon, 11.10.2005
16