1
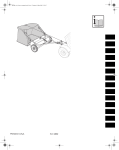
Agrifab_A4_Lawn_sweeper.book Seite 1 Freitag, 4. März 2005 5:30 17
GR
DK
Printed in U.S.A.
Form 48882
Agrifab_A4_Lawn_sweeper.book Seite 7 Freitag, 4. März 2005 5:30 17
User’s manual – Lawn sweepers
Important
The owner's manual describes three
models that differ only slightly from
another.
English
Wear safety footwear when working
with the sweeper.
Unpacking/assembly
Model A: Sweeping width 42 inch
(106 cm)
Check the scope of supply when
unpacking.
B model: Sweeping width 38 inch
(96 cm)
If parts are missing or damaged, contact
the salesperson.
C Model: Sweeping width 30 in (76 cm)
Have the necessary tools at hand. This
speeds up assembly.
The differences will be pointed out at
the places concerned.
Important for Customer Service
Copy all the details from the type plate
into the panel below. These are
important for the identification of the
sweeper and for ordering spare parts.
Check the loading capacity of the
towing vehicle and only sweep
appropriate amounts of grass and
leaves into the grass bag.
Do not work on steep slopes.
Attaching the sweeper to a
towing vehicle
(Fig. 2)
a
b
Assemble the sweeper as shown in the
illustrations at the end of these
instructions. Symbols are used in these
illustrations; their meanings are as
follows:
GB
Do not tighten yet.
kg
Tighten now.
Function
(Fig. 1)
Loosen the knurled nut (1), place the
adjustment handle in the middle and
tighten the knurled nut.
Safety
Attach the sweeper so that the grass
bag is as parallel to the ground as
possible and that the underside clears
the ground by a minimum of 13 cm.
Proper use
This sweeper may only be used
– for sweeping cut grass and leaves on
lawns
Setting the brush height
– in accordance with the descriptions
and safety instructions contained in
this User's Manual.
Every other use will not be regarded as
proper use.
Never allow persons to ride on the
sweeper.
General safety instructions
As the user of the sweeper, read
through this User's Manual carefully
before using the sweeper for the first
time. Act accordingly and keep it in a
safe place for future reference.
Improper use of the towing vehicle may
cause injuries or material damage.
Read the Owner's Manual for the
towing vehicle and make sure that
– that you have understood it and
– that you are completely in control of
the towing vehicle on slopes with the
sweeper attached.
Never allow children to handle the
sweeper.
Park the sweeper and the towing
vehicle on horizontal and level ground.
Tip: Best results are achieved if the
brushes penetrate the grass to a depth
of 1.5 cm.
When the sweeper moves forward, two
pairs of brushes rotate and sweep grass
and leaves into the grass bag.
The depth of penetration of the brushes
can be set using the control lever (1). To
empty the grass bag, pull the rope (2)
while the sweeper is stationary.
Operation
!
Risk of injury
The rope (Fig.1, No. 2) may wrap around
the brushes or other rotating parts and
injure you.
Never attach the rope to your body, but
only to the towing vehicle. Do not touch
it while the vehicle is in motion.
!
Risk of overturning
Loosen the knurled nut (Fig. 2, No. 2),
place the brush in the setting you
require by means of the adjustment
handle and tighten the knurled nut.
Driving
!
Caution
On starting off, make sure that the
sweeper retains it balance and does not
overturn.
Do not exceed the maximum speed
(10 km/h).
There is a risk of the sweeper
overturning when you are working on
slopes.
Do not work on slopes having an incline
of more than 10°.
Drive slowly and carefully, especially
when turning.
The driving and braking characteristics
depend on the towed load.
7
F
Agrifab_A4_Lawn_sweeper.book Seite 8 Freitag, 4. März 2005 5:30 17
English
Drive slowly on uneven ground (danger
of overturning).
If the foreign matter (such as a stone) is
struck, switch off the engine of the
towing vehicle immediately. Check the
sweeper and towing vehicle for damage
and visit a specialist workshop, as
necessary .
Open fire or severe heat can damage or
even ignite the brushes and grass bag.
Keep the sweeper away from fire.
Wear safety footwear.
GB
User’s manual – Lawn sweepers
Every two years
Greasing driving parts
Clean and grease driving parts (refer to
“Maintenance”)
Detach wheel:
Storage
!
Caution
Grass and leaves in the grass bag can
develop a great deal of heat over a long
period of time and ignite.
Empty the grass bag before storing the
sweeper.
Emptying the grass bag
Clean the sweeper thoroughly so that
fungus and rust do not form.
Stop the towing vehicle and switch off
the engine.
Store the sweeper in a dry room.
Tip the grass bag from the towing
vehicle by pulling the rope (Fig. 1, No.
2).
If necessary (such as when space is
cramped), the grass bag can be folded
together. To do this, remove the two
braces inside the grass bag.
Tips on using the sweeper
A good result is achieved by sweeping
at a speed of approximately 5 km/h.
Experiment to determine the driving
speed at which best results are
achieved.
Models A and B (Fig. 5)
Remove the wheel cap (1) with a
screwdriver.
Remove locking nut (2) and washer (3):
Maintenance
Remove wheel. There is one washer (4)
behind the wheel.
Lubricate wheel bearings
Model C (Fig. 6)
(Fig. 3)
Mow the lawn uniformly before
sweeping the lawn.
Care and maintenance
Every time you use the sweeper
Check all screw connections for loose
fitting and tighten as necessary.
Inspect sweeper parts such as brushes
for damage (refer to “Maintenance”).
Visit a specialist workshop as necessary.
When you have finished
working
Empty the grass bag and clean with a
brush or broom.
Remove the wheel cap (1) with a
screwdriver.
Lubricate wheel bearings with a few
drops of light oil.
Remove the wheel cap (1) with a
screwdriver.
Lubricate the brush axle
Remove retaining washer (2) and plain
washer (3).
(Fig. 4)
Remove wheel. There is one washer (4)
behind the wheel.
Clean the housing of the sweeper with
a soft brush.
(Fig. 7)
String or the like may wrap itself around
the brushes or brush axle while you are
working. Remove it carefully.
Once during the season
Lubricate the wheel bearings (refer to
“Maintenance”).
At beginning and end of season
Lubricate the brush axle (refer to
“Maintenance”)
8
Lubricate the brush axle with a few
drops of light oil.
Clean wheel housing and driving parts
(remove old grease):
Agrifab_A4_Lawn_sweeper.book Seite 9 Freitag, 4. März 2005 5:30 17
User’s manual – Lawn sweepers
Grease wheel housing and driving parts
uniformly with new, light grease.
Attach wheel in reverse order to
“Detach wheel”.
Replacing brushes
(Fig. 8)
English
Carefully pull out the gear unit (3).
Make sure the drive pin (4) is not lost
while doing so.
Check whether the drive pin slides
lightly backwards and forwards. If
necessary, clean and lubricate the drive
pin and its surroundings.
Clean and apply fresh grease to the gear
unit (3) and gear shaft (5).
Put on gear unit (3), washer (2) and
retaining ring (1).
Clean and grease driving parts (refer to
“Greasing driving parts”).
Tighten the hexagon screws and
retaining nut.
Attach the grass bag.
Maintaining the gear unit
(Fig. 9)
C
183
175
Width in cm
127
114
89
Height in cm
66
66
69
Weight in kg
31,8
26,8
25,9
Maximum
permissible
speed in km/h
10
10
10
Recommended
speed in km/h
5
5
5
The warranty terms issued by the
Company or the importer shall apply in
the country concerned.
Troubleshooting
Remove the brush from the holders and
replace with new ones (brush overlap
on same side as before.
B
170
Make a check: The wheel can be rotated
in either direction; the brushes should
only be driven when the wheel is
rotated forwards. If the check fails, visit
a specialist workshop.
Note: Replace brushes separately.
Mark the side of the brush overlap (4).
A
Length in cm
Warranty
If necessary, perform the steps for the
other wheel.
Remove the hexagon screws (1) and
retaining nut (2) from the holders (3) of
one brush.
Model
Replace wheel (refer to “Greasing
driving parts”).
Contact your salesperson to order
replacement brushes.
Remove all bolts and splints attaching
the grass bag to the sweeper and
remove the grass bag.
Specifications
GB
We remedy faults on your sweeper free
of charge under the terms of the
guarantee providing that a material or
manufacturing defect is responsible for
the fault. In the event of a claim under
the guarantee, please contact the sales
person or the closest branch office.
If the wheels brake during sweeping,
you can sometimes remedy the cause
yourself. If in doubt, visit a specialist
workshop.
Possible causes
Brushes penetrate the grass too
deeply: Set the sweeper so that the
brushes do not penetrate the grass by
more than 1.5.
Brushes clog: Bring the sweeper to a
halt and remove material clogging the
brushes.
Wheels block: Determine cause, refer
to “Maintaining gear unit”; or visit
specialist workshop as necessary.
Note: Remove only one wheel at a time
so that left and right parts cannot be
confused. Mark the parts.
Remove wheel (refer to “Greasing
driving parts”).
Remove retaining washer (1) and plain
washer (2).
9
F
Agrifab_A4_Lawn_sweeper.book Seite 49 Freitag, 4. März 2005 5:30 17
49
Agrifab_A4_Lawn_sweeper.book Seite 50 Freitag, 4. März 2005 5:30 17
50
Agrifab_A4_Lawn_sweeper.book Seite 51 Freitag, 4. März 2005 5:30 17
51
Agrifab_A4_Lawn_sweeper.book Seite 52 Freitag, 4. März 2005 5:30 17
52
Agrifab_A4_Lawn_sweeper.book Seite 53 Freitag, 4. März 2005 5:30 17
53
Agrifab_A4_Lawn_sweeper.book Seite 54 Freitag, 4. März 2005 5:30 17
54
Agrifab_A4_Lawn_sweeper.book Seite 55 Freitag, 4. März 2005 5:30 17
55