1
SQL2report
User Manual
Version 0.4.1
User Manual
User manual
Document: Sql2report User Manual.docx
Content of the document
1.
Versions............................................................................................................................. 3
2.
Installation ......................................................................................................................... 5
3.
Use Manual ........................................................................................................................ 8
3.1. Sql2report Manager ........................................................................................................ 8
3.1.1. Reports. ................................................................................................................... 8
3.1.2. Filters. .................................................................................................................... 14
3.1.3. Groups. .................................................................................................................. 18
3.1.4. Links. ..................................................................................................................... 19
3.1.5. Plugin Setup. ......................................................................................................... 22
3.1.6. Export and Import. ................................................................................................. 24
3.2. Sql2report Viewer. ........................................................................................................ 28
3.2.1. Load and execute a report. .................................................................................... 28
3.2.2. Report Display. ...................................................................................................... 30
4.
HOWTO ............................................................................................................................ 32
4.1.
4.2.
4.3.
Configure a user with only permission to run reports. .................................................. 32
Magento CRON active .................................................................................................. 34
Active cron of a report ................................................................................................... 35
Version plugin 0.4.1
Page: 2 / 37
User Manual
User manual
Document: Sql2report User Manual.docx
1.
Versions
Version control
Version Date
Changes
0.1.0
23/10/2013
Original Version
0.1.1
26/10/2013
•
BUGFIX: Dynamic links to images, using Mage::getBaseUrl
0.1.2
02/10/2014
•
BUGFIX: Handle database with prefixes.
•
•
•
•
•
•
•
NEW FEATURE: When changes are made, a save icon is shown on the
menu (in case you forget to save)
NEW FEATURE: Permissions to see/edit by roles
NEW FEATURE: Informs with charts.
NEW FEATURE: Import and export reports.
CHANGE: In informs and filters the description is now the tittle.
NUCLEO: Code ordinance cleanliness and improves updating system.
BUGFIX: Exportation of reports without filters.
•
•
NEW FEATURE: Import zip.
BUGFIX: Installation Script.
•
NEW FEATURE: Type of evaluated filter, where you can put a PHP and the
result of this evaluation will be replaced by the parameter chosen. For
example you can use the username registered with the sentence.
Mage::getSingleton(‘admin/session’)->getUser()->getUsername() and use it in
the parameter :USER_NAME in a SQL sentence.
NEW FEATURE: Type of visualization with list of filters. Filters such as select
or set where shown in the view reports as pull-down menu and you could only
choose one. Now it is possible to configure it as a list; if you want to, also as a
radio buttons or by check with multiples choices.
NEW FEATURE: Links: It is possible create links to drive the reports data to
webpages depending value. For example, if a report is displayed products,
can be set up so that if you link to a product go to the page of Magento editing
of that product, you can configure row links as well as column links, and also
choose if you want the link to open in new windows or in the same one.
NEW FEATURE: SVN parameter text qualifier: New parameter in export
parameter where it is possible to indicate when data is exported in SVN and
which symbol includes the text.
NEW FEATURE: SQL visualization when the data of a report is seen. Before,
to see the SQL button, beside the “Show Report” bottom. Now is shown in a
pull-down bar.
NEW FEATURE: Totals in reports consults: when a report is launched, if the
data of a column are numbers, at the bottom of the report an addition with all
the values is shown.
0.2.0
03/04/2014
0.2.1
12/04/2014
•
•
0.3.0
21/08/2014
•
•
•
0.3.1
29/09/2014
•
•
•
BUGFIX: The codes of the reports and the filters allow again capital letters.
BUGFIX: The table’s prefix parameter is replaced before the rest of the filter
parameters.
BUGFIX: Solution to the problem that didn’t allow to create new filters.
Version plugin 0.4.1
Page: 3 / 37
User Manual
User manual
Document: Sql2report User Manual.docx
•
0.4.0
12/05/2015
•
•
•
0.4.1
17/08/2015
•
•
•
•
•
NEW FEATURE: Possibility of configure a styles format when you are going
to export an excel data, being allowed to configure the header style, pair and
impair rows. Columns now are auto-adjustable with respect to the width of the
data
NEW FEATURE: Periodically auto-execution of reports, sending by email the
exportation selected (Excel or CSV).
NEW FEATURE: Association of columns with equal values from left to right.
NEW FEATURE: Report market
NEW FEATURE: Pagination of results
NEW FEATURE: Filter results
NEW FEATURE: New filter select with search option
NEW FEATURE: Improvements in cron: log, sending email per row and new
parameters to insert the values of the results.
NEW FEATURE: Running Reports in another database
Version plugin 0.4.1
Page: 4 / 37
User Manual
User manual
Document: Sql2report User Manual.docx
Installation
2.
After purchasing the plugin you will obtain zip file with a name like Serpini_Sqlreport-X.X.X.tgz.
For being able to unzip that file, it is necessary to use an unzip program such us WinRAR from
the company Rarlab.
Install Files.
The Serpini_Sqlreport-X.X.X.tgz Zip file has every plugin file. To install it, you must copy all the
files in the root of the installation of Magento.
1. Unzip the file in a folder.
2. Upload the file to the server: We will take this step with a ftp client such as FileZilla
and we will connect to Magento installation root. We’ll only upload folders, we don’t
have to upload neither the zip file nor the package.xml file.
Configure Magento.
On this step, we’ll update Magento’s cache so that it can detect the new plugin and we will start
up the plugin for the first time.
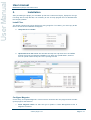
1. Flush magento cache: for that we’ll go to System-> Cache Management menu in
Magento’s backend.
Version plugin 0.4.1
Page: 5 / 37
User Manual
User manual
Document: Sql2report User Manual.docx
We will press “Flush Magento Cache” and “Flush Cache Storage”
It will appear a message telling that the Magento cache storage has been flushed.
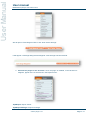
2. Execute the plugin for the first time: Once the plugin is installed, in the backend of
Magento, appear two new submenus in the Reports menu.
Sql2Report: Report Viewer.
Sql2Report Manager: Reports manager.
Version plugin 0.4.1
Page: 6 / 37
User Manual
User manual
Document: Sql2report User Manual.docx
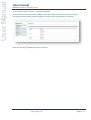
We’ll select this option: Reports -> Sql2Report Manager
As we enter for this first time in the manager screen, this system will create as tables as it needs
and will import the example reports indicating if everything went as expected by a message.
We’ll have the plugin installed and ready to be used.
Version plugin 0.4.1
Page: 7 / 37
User Manual
User manual
Document: Sql2report User Manual.docx
Use Manual
3.
Sql2report has two main units:
•
•
Sql2report Manager: Plugin creator, where you can create reports, filters, groups,
links, export, import and configure the plugin parameters.
Sql2report Viewer: Report Viewer, where you can execute a report to see the data, its
chart and export data to Excel or CSV files.
To enter in each one of the units, in Mangento’s Backend you will see both options in Report
menu.
3.1. Sql2report Manager
In this unit you can configure the plugin, create reports, filters, groups, links, export and import
reports.
Once you enter the unit, you can display the reports list and the menu on the left side.
3.1.1. Reports.
Once you click in the menu REPORT Reports manager it will be appear a list with all the
reports, and from here we can select a report to edit or delete.
Version plugin 0.4.1
Page: 8 / 37
User Manual
User manual
Document: Sql2report User Manual.docx
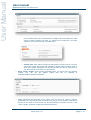
3.1.1.1. Create Report
Once you click in the menu REPORTS Add report will display a screen to create a report, the
screen is grouped by the most important parts of a report:
•
General information: information that identifies the reports, which values are:
•
o Code: Unique code of report, its value is a text without spaces.
o Title: Report’s tittle, it will appear on the reports list.
o Group: Where the report belong.
SQL: SQL sentence of the report, in which you can use the following metatags.
o
@ (at): It will be replaced by the prefix of the tables of Magento, for installations
whose tables of Magento have prefix, it is good to put a @ in front of the names
of the tables, for example
FROM @sales_flat_quote
o
: (two points): When you use SQL sentences with filters, it is necessary to
place two points in front of the name of the filter’s parameter in case of for
Version plugin 0.4.1
Page: 9 / 37
User Manual
User manual
Document: Sql2report User Manual.docx
example “Start Date” filter has this parameter STARTDATE configured, in the
SQL sentence it can be used this way
WHERE DATE_FORMAT (A.created_at,'%Y-%m-%d') BETWEEN:STARTDATE AND:ENDDATE
A recommendation to the hour of filter by dates is trunc the date, but it will also be
filtered by hour and minute, this could cause that does not take the data of the
day :ENDDATE.
•
Filters: Filters that you can use in the SQL sentence. To add a filter, we select it on the
top list and press “Add Combo” button, and the filter will appear on the list below. To
delete a filter we select it from the list below and press “Remove Combo”. You can also
indicate the order in which display module will appear by clicking arrows.
•
Chart: Chart of the report. We can choose between those option:
o Linear.
o Areas.
o Bars.
o Multibars.
o Horizontal bars.
o Cake.
o Donut.
Once the type of chart is selected, pressing on its image, it will appear the option to
indicate which data column will fill up the data of X axis and Y axis. You only have to put
the column number starting by one. On charts that it’s possible to add more axis, such
as areas or donut, we can add a new column pressing “Column number”.
•
Links: Links on the report data. There are two insert options:
Version plugin 0.4.1
Page: 10 / 37
User Manual
User manual
Document: Sql2report User Manual.docx
o
Row link: Each report can only have one row link. We select a row link from the
list of possible links. Once it’s selected we configure each link parameter, what
column number includes the value. To unselect the created link, we press
“unselect” and it’ll show the list of possible links.
Column links: Each report can have as many links as columns it has. To use a
column link, on the left of each link, indicate (in which column it will be used, in
which the possible parameters will be filled up with the column value) and so
you can use them in the URL or in the link title
Excel export format: Excel format generated when you export from the display
module. You can use the default setting that can be modified in
SYSTEM Admin Export Parameters.
o
•
•
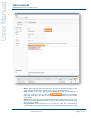
Cron: Periodical auto-execution of the report. You can set up a report to execute
periodically. So if we want a report to execute every day at 10 a.m and the result data to
be sent to our email in Excel format. For that we will have to activate the Cron in the
“active” square. And we’ll configure the following sections:
Version plugin 0.4.1
Page: 11 / 37
User Manual
User manual
Document: Sql2report User Manual.docx
o
o
o
o
When: When will the report be executed, will have to indicate the days of the
week, the months, the days of the month, the hour and the minutes.
Filter’s value: If the report has any associated filters here we will indicate of
each one of them. If you do click on
button, the parameter
insert into email part, the value of de parameter will be replaced in the content
of the email.
Email: When the report is executed an email with the data will be sent. We will
indicate if the data should be sent as a CSV or an Excel and the message body
which can be in HTML
File generated: When the report is run, an Excel or CSV file is generated as
we indicated in the previous section, the "Path" field will indicate where to build
Version plugin 0.4.1
Page: 12 / 37
User Manual
User manual
Document: Sql2report User Manual.docx
o
it and Save this file will indicate if we want to store or deletion. The file format is
generated name codigoInforme_YYYYMMDDHHmm.
Log: At the end of the section Cron, we can see the history of past executions
executed by cron
Once we have set up all the sections, we will press the button “Add report” and then a “Report
added” message will be shown.
3.1.1.2. Report Editing
Once you click in REPORTS
Report Manager will show us a list of the reports.
To edit a report, we will click the report we want to modify and a similar window to the one for
adding reports will appear, but now with the following options:
Version plugin 0.4.1
Page: 13 / 37
User Manual
User manual
Document: Sql2report User Manual.docx
•
•
•
•
•
•
Back: Goes back to the report list window.
View: Opens the report display module with the selected report.
Delete: Deletes the report, it doesn’t delete the filters, nor the links associated the
report.
Duplicate: Loads the add report window filling up the blank, with the save data of the
current report.
Export: Generate a file .json so it can be imported or do a backup.
Save: Save the changes.
3.1.2. Filters.
When you click in the menu FILTERS Filters manager will show us a list with all the filters,
from here we will be able to select a filter to edit it or delete it.
3.1.2.1. Create Filter.
When you click in the menu FILTERS Add filter will show us the screen to create a filter and
the next values will have to be filled up.
Version plugin 0.4.1
Page: 14 / 37
User Manual
User manual
Document: Sql2report User Manual.docx
•
•
•
•
Code: Unique code of the filter, it has to be written without spaces.
Parameter: Associated parameter, this parameter will be associated in the SQL
sequence, been replaced by its value when a value is selected in the display module.
The value has to be a text without spaces.
Title: Tittle of the filter.
Type: Type of the filter which can be:
o Date: Date selector. In the display module you will be able to select a date.
o
Select: SQL sentence. It is used when the values are directly taken from the
database. The output result has to be two columns; the first one being the value
that will be a sign to the parameter and the second one a description of the
value. In the SQL sentence you can also use the tag @ in front of the tables
and to be replaced by the prefix of the Magento tables.
The list that will be shown in the display module can be of three types:
•
Select list unique value: A dropdown will be shown in which you can
only select one value.
•
Select list unique value with search: A dropdown will be shown in
which you can only select one value and a field appears to search
among the possibilities.
Version plugin 0.4.1
Page: 15 / 37
User Manual
User manual
Document: Sql2report User Manual.docx
o
•
Radio unique value: All the values will be shown with a selector to the
left and only one value could be chosen.
•
Checkbox multiple values: All the values will be shown and several of
them could be selected. The value list will be assigned separated by
coma, each value in quotation marks and with parentheses at the
beginning and end mostly used with an IN
Text: Free text field. In the display module a field where we can put the text we
want will be shown. The value will be replaced with quotation marks
Version plugin 0.4.1
Page: 16 / 37
User Manual
User manual
Document: Sql2report User Manual.docx
o
Set: List of static values. For the list where we don’t want the values the picked
up by the DDBB because we want to set them up manually, we will go one by
one through all the values indicating in the table which value we want to replace
in the parameter and the description. To add a new value to the table we just
have to press tabulation in the last value and a new row will be added to the
table. Just like in the filter type “select” we can indicate have we want the
values to be shown (Select list unique value, Radio unique value, Checkbox
multiple value).
o
Evaluated: For more experienced Magento users, it is possible to indicate a
PHP expression for the result of the expression to be assigned to the
parameter. The filter won’t show up on the display module and it will not
possible to change it in that module. For example if we just want a report to my
show us a list of products depending on the user that is logged in, we can insert
the expression.
Mage::getSingleton('admin/session')->getUser()->getUsername()
The value of the expression will be replaced by the parameter, so if the result,
we will have to put quotation marks between the parameter in the SQL
Version plugin 0.4.1
Page: 17 / 37
User Manual
User manual
Document: Sql2report User Manual.docx
Once we have set up all the data of the filters we press the bottom “Save” and a message
saying “combo added” will appear, and we will now be able to use that filter in the reports.
3.1.2.2. Filter Editing
When you click in FILTERS
Filter Manager will Shaw us a list of the filters..
To edit a filter, we will just have to click in the filter that we want to edit and a similar window to
the add filters are will be shown, but now with the following options:
•
•
•
Back: Goes back to the filter list.
Save: Saves the changes.
Delete: Deletes the filter.
3.1.3. Groups.
We can gather u the reports in groups, using the option GROUP Group manager, we can
create, edit and delte groups, once we enter the section the list of avariable groups will appear.
Version plugin 0.4.1
Page: 18 / 37
User Manual
User manual
Document: Sql2report User Manual.docx
3.1.3.1. Create Group
To create a group in the section GROUP Group manager we press the button “Add Group”, a
new line will appear in the group table, there we will fill up the group code, which has to be
unique and without spaces, the description and then we will push the tick button
.
The group will be able already to be selected in the reports.
3.1.3.2. Edit Group.
To edit a group in the section GROUP Group manager we press the pencil button
next to
the group that we want to edit, we will only be able to edit the group description, when we finish
the change, we press the tick button
successfully saved” will appear.
and the “Save” button, and a message saying “Groups
3.1.4. Links.
When the data of a report is shown on the display module, by default if all the data is of the
correct type a link to send an email will be inserted:
Version plugin 0.4.1
Page: 19 / 37
User Manual
User manual
Document: Sql2report User Manual.docx
It is possible, that link in the example where data from orders and products is shown, when you
click on a row, you can see that order or when you push on the product ID, you can see the
product.
Because of that, they are two kinds of links:
•
•
Row Links: To from the URL, they can use data from several columns and the link is
done when you click over the whole row.
Column Links: To from the URL, it picks up the value of each cell, this way the link is
done over each cell like with the email.
3.1.4.1. Row Links
To add a row link, we go to LINK
Link manager, where we can see the list with the row links
We click on the button “Add row link” and a new row will show up on the table, where we fill up:
•
•
•
ID: Unique code of link, it has to be text without spaces.
Description: Link’s description, it will also appear as the title of the link when you leave
the cursor on the row. You can create new parameters for the tittles to look nice.
URL: Link’s route. If a parameter is needed for the route like the ID of the product or the
order, put the value of the order between curly brackets, for example,
“adminhtml/catalog_product/edit/id/<PRODUCT_ID>”
To add the link, we click on the save button
.
To edit a link, we click over the value that we want to edit, the field will enter edit mode, to exit
you just have to click anywhere outside and the link will be saved.
In the display module, when a report has a row link associated, if we click on any part of the
row, it will take us to the page that we had set up, so in the example if we click on the row with
order_ID 44, it will take us to the edit screen of that order.
Version plugin 0.4.1
Page: 20 / 37
User Manual
User manual
Document: Sql2report User Manual.docx
3.1.4.2. Column Links.
To add a column link, we go to LINK
Link manager, where we can see the list of column links.
We click on the button “Add column link” and a new row will appear on the on the table, where
we will fill up:
•
•
•
ID: Unique code of the link, it has to be text without spaces.
Description: Link’s description. It will also appear as the tittle of the link when you leave
the cursor on the row.
URL: Link’s route.
To add the link we click on the save button
.
To edit a link, we click on the value that we want to edit, the field will enter edit mode, to exit
you just have to click anywhere outsides and the like will be saved.
In the display module, when a report has a column link associated, if we click on the value of
the cell, it will take us to the page that we had set up.
Version plugin 0.4.1
Page: 21 / 37
User Manual
User manual
Document: Sql2report User Manual.docx
3.1.5. Plugin Setup.
They are certain parameters that are set up by default, like the Excel formats and certain
configurations that we might want to change.
Also if we want to create an intelligent permission system, in which one report con only be seen
by a few users, it can be done in the permissions.
3.1.5.1. Parameters.
To set up the default plugin parameters, we have to click on SYSTEM Admin, it will show the
parameters sorted by groups.
Version plugin 0.4.1
Page: 22 / 37
User Manual
User manual
Document: Sql2report User Manual.docx
•
•
•
•
•
General Parameters
o Prefix Parameter: prefix that identifies a parameter in a SQL.
o Prefix Table: Prefix that identifies the name of a table, the prefix will be replaced
by the prefix of the Magento tables.
o Date mask: Format of the dates, both in date filters and in SQL.
Export parameters
o Decimal separator: Decimal and integer numbers separator when the data is
exported.
o SVN Column delimiter: Character separator of the columns when the SVN is
exported.
o SVN export header: We will give the value “true” to allow the names of the
columns to be exported and “false” to get the opposite result.
o SVN text qualifier: Character that is put at beginning and end of a text when is
exported in SVN.
o Excel Header format: Format of the header when is exported by Excel,
o Excel Odd Row format: Format of the impair rows.
o Excel Even Row format: Format of the pair rows.
Chart Parameters
o Height default: Chart height on display mode.
Link Parameter
o Target: indicates how the will open when a report has rows links or column
links, set up with 4 different options (Black, Self, Parent, Top).
Database connection: In cases in which the reports are to be run on another database,
specify connection parameters. You can test the connection by pressing the button
"Test Connection" where a message will show whether it has been connected or in
error, the error message.
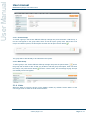
3.1.5.2. Permissions.
For each Magento’s role you can set up which options, it can visualize, so you can create roles
with permissions of visualization for only some pre-defined reports.
By default, all the roles have whole permission.
Version plugin 0.4.1
Page: 23 / 37
User Manual
User manual
Document: Sql2report User Manual.docx
To restrict the permissions of a role, we will choose that role in the selector "Role" and
"Resource Access" we’ll choose "Custom", it will show us a list of all the reports with the
options.
•
•
•
•
: The role can see the report on display module.
: The role cannot see the report on display module.
: The role can edit the report.
: The role cannot edit the report.
When we choose “Custom” by default the role is set up not to have permissions for any report.
When we have already set up the role with the permissions we want, press the “Save” button to
save the changes.
3.1.6. Export and Import.
On EXPORT/IMPORT menu we can export reports, its setup or the associated filters and links
just like import reports.
Version plugin 0.4.1
Page: 24 / 37
User Manual
User manual
Document: Sql2report User Manual.docx
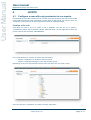
3.1.6.1. Export.
To expert a report, we will go to the EXPORT/IMPORT Export, and the list of every report will
be shown.
If we press any of them, a new window will appear to download the file .json with the report
setup; the name of the file will be its code.
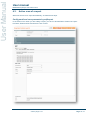
3.1.6.2. Import.
To import a report that must have been previously exported from the plugin we will go to
EXPORT/IMPORT Import, this window will ask which file we want to import.
Version plugin 0.4.1
Page: 25 / 37
User Manual
User manual
Document: Sql2report User Manual.docx
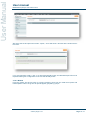
We select the file and press the button “Import”, and it will show a list with all the actions that it
has done.
If you are importing a filter, a link, or a report that already exists, the filter/link/report will not be
imported leaving the configuration of the one that already exists.
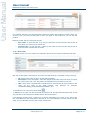
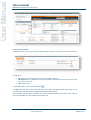
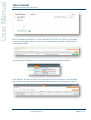
3.1.6.3. Market
From the market, we have access to a report repository where we can install new reports and
install updates. When we go we all reports appear grouped by groups.
Version plugin 0.4.1
Page: 26 / 37
User Manual
User manual
Document: Sql2report User Manual.docx
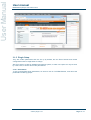
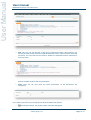
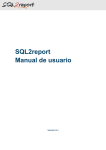
For each report the market, we can install the new reports, update reports with new versions or
delete the report from our system.
New reports
When there is a report on the market that you do not have in your system, it appear in the
Actions column the "Install" button, when you pressed, the report will be installed on your
system.
Update reports
When there is a report with a higher version installed that on your system, It appear in the
Actions column the "Update" button, when you pressed, the report will be updated.
Version plugin 0.4.1
Page: 27 / 37
User Manual
User manual
Document: Sql2report User Manual.docx
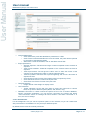
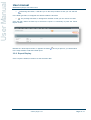
Unchanged
For market reports that already are installed, it appear in the Actions column the "Delete" button
which when pressed, the report will be deleted from your system.
Notifications
When we enter the market, if there are changes since the last time you enter, we will appear in
orange the name of the groups to which the report belongs and on new report title image of
"New" appears.
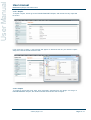
3.2. Sql2report Viewer.
On this module, you can see and execute reports.
3.2.1. Load and execute a report.
Once you enter the module, a pull-down menu will show the reports list. To load a report,
choose the report that you want to load and press the button “GO!”
Once the report is loaded, it will show two sections:
Version plugin 0.4.1
Page: 28 / 37
User Manual
User manual
Document: Sql2report User Manual.docx
•
SQL: Here you can see the SQL of the report. Pressing the button “Show Values” you
will see the SQL sentence with the replaced parameters if the report has been executed
previously. If it is the first time the report is loaded, the parameters will be replaced for
an empty value.
Once the values of the parameters are shown, pressing the button “Show Params” we
will see the SQL sentence with the parameters.
•
Filter: Here you can give value the report parameters, all the parameters are
compulsory
In the Select type filters, they will appear two buttons besides the selector.
•
: Pressing this button, the sentence SQL of the filter will appear.
Version plugin 0.4.1
Page: 29 / 37
User Manual
User manual
Document: Sql2report User Manual.docx
•
: Pressing this button, it will take you to the setup module so that you can edit this
filter.
In the Date type filters, it will appear this button beside the text field:
•
: On pressing this button, it will appear a calendar so that you can choose one date.
Once the filter values are filled up to execute the report it is necessary to press the “Show
Report” button.
Besides the “Show Report” button, it appears the button
to the setup module to edit the loaded report.
, and if you press it, you will be taken
3.2.2. Report Display.
Once a report is loaded, it will show us the execution data.
Version plugin 0.4.1
Page: 30 / 37
User Manual
User manual
Document: Sql2report User Manual.docx
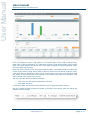
If the has assigned a chart, it will appear a new section called “Chart” with a chart drawing.
Each type of chart is interactive; we could show and hide result without setting up the report
again. The graph displays the data on the current page, to display the graph of all data, select
"all" in the filter rows per page.
Down the “Filter” section we can see a square with the data. In the tables header it will show the
names of the columns, being able to press on them to order them on that field, under the name,
it will show boxes to filter data by that column. At the bottom of the table, it will appear a totals
row, where we can see the total of the rows and if the values of the column are numbers, it will
show the total of the values of the column.
We can export the data in two different formats:
•
•
CSV: Plan files with values separated by character.
Excel XML: Excel file.
To export the data, we will choose the exportation type and press the button “Export”.
We can navigate through the pages of results by clicking on the arrows, also can change the
number of rows per page.
Version plugin 0.4.1
Page: 31 / 37
User Manual
User manual
Document: Sql2report User Manual.docx
HOWTO
4.
4.1. Configure a user with only permission to run reports.
Occasionally we need that certain users of our shop have only access to see one file and create
reports without having access to Magento’s private area. In this tutorial, I’m going to show you
configurate a user that only will have permissions inside the sql2report plugin.
Creation of the role.
First thing we have to do is to create a role in Magento. For that we go to System >Permissions->Roles and we press the button “Add New Role”. On the page that is shown we
put the name of the role ROLE_SQL2REPORT.
In the “Role Resources” section, we select only the sections
•
•
Reports
Reports
Sql2report: to be able to see the reports.
Sql2report Manager: to be able to setup reports.
Depending on the level of permissions that we want, we select one, the other or both.
Once the new role is configured, we create it clicking “Save Role”.
Version plugin 0.4.1
Page: 32 / 37
User Manual
User manual
Document: Sql2report User Manual.docx
Creation of the user.
Now we have to create a user that can only see and set up report, for that we will go to System>Permissions->Users and we press the button “Add new User”.
In the information section, we create a user with these parameters:
•
•
•
•
•
User Name: sql2report
First Name: User
Last Name: Sql2report
Email: [email protected]
Password: sql2report
In the roles section, we assigned the sole that was just created ROLE_SQL2REPORT.
Once the new user is configured, we created it clicking “Save User”.
Acceso con el nuevo usuario
If we Access now with the new user credentials, we will only have Access to the following
sections on the menu, reports section and the sub-sections, Sql2report y Sql2report Manager.
Version plugin 0.4.1
Page: 33 / 37
User Manual
User manual
Document: Sql2report User Manual.docx
4.2. Magento CRON active
If you are going to use the auto running reports, we must activate Magento cron, for it
depending on the server where we installed Magento will be made one way or another.
The key to activate the Magento Cron idea is that the "cron.php" file in the root of Magento
installation run every 5 minutes.
To do this we create a scheduled task, depending on the server, if a Linux create a task that
runs this judgment:
/usr/bin/php -q /var/www/vhosts/domain.com/httpdocs/magento/cron.php
Obviously we will have to locate in our server the path where the file is.
If this error appears when you turn on cron in the system log
ERR (3): Warning: shell_exec() has been disabled for security reasons
/var/www/vhosts/domain.com/httpdocs/magento/cron.php on line 67
in
This is because the server hasn’t enabled the shell_exec function, but there is a bug in the file
cron.php file does not detect this, so it can activate the function or edit the cron.php file and add
a line when disabled features are detected, for it if the original file has this part:
umask(0);
$disabledFuncs = explode(',', ini_get('disable_functions'));
$isShellDisabled = is_array($disabledFuncs)
$disabledFuncs) : true;
?
in_array('shell_exec',
Add the line in bold:
umask(0);
$disabledFuncs = explode(',', ini_get('disable_functions'));
$disabledFuncs = array_map('trim', $disabledFuncs );
$isShellDisabled = is_array($disabledFuncs)
$disabledFuncs) : true;
?
in_array('shell_exec',
There is a plugin very useful and necessary to check the scheduled tasks and magento know
what time they are to run, called AOE Scheduler, which you can find on this page:
http://www.magentocommerce.com/magento-connect/aoe-scheduler.html
Version plugin 0.4.1
Page: 34 / 37
User Manual
User manual
Document: Sql2report User Manual.docx
4.3.
Active cron of a report
When we want to run a report automatically, we follow these steps.
Config email and cron parameter by sql2report
In the section Cron when you are editing a report, you have to fill data Filter's Value if the report
has filters, Email and File and active the tick "Active".
Version plugin 0.4.1
Page: 35 / 37
User Manual
User manual
Document: Sql2report User Manual.docx
In the example we have set the "CUSTOMER_GUEST" report to run every day at 10 am, will
generate an Excel report that will be sent to the e-mail [email protected]. We have also
indicated that the generated file is not deleted from the server.
When we have completed all the data, the report and we will keep this message:
Enable Autorun in magento by AOE Scheduler
Thanks to AOE Scheduler plugin, we can see the execution and planning begins.
You have to go to System Scheduler Schedule Configuration
In the list, we see our report, in the example called "sqlreport_CUSTOMER_GUEST".
Select the task, select "Run now" on Actions and click Submit, the report will run and send a
mail to the address you have configured, and check that the execution is correct.
Version plugin 0.4.1
Page: 36 / 37
User Manual
User manual
Document: Sql2report User Manual.docx
Now we schedule executions for it in the same window, we select our report, in the example
"sqlreport_CUSTOMER_GUEST" in actions select "Schedule Now" and click on Submit, we see
the following message
The autorun will be scheduled, you can see it going to System Scheduler List View
From the table, we select our task in the Code field and see two executions, one SUCCESS
that is what we have executed to test PENDING works and other programming that is next run.
Version plugin 0.4.1
Page: 37 / 37