1
Mentype® AMLplexQS
Manual
Novel detection of chromosomal aberrations in
acute myeloid leukemia
In-Vitro-Diagnostics
25
100
400
Version April 2015
45-31220-0025
45-31220-0100
45-31220-0400
Batch Code
Biotype Diagnostic GmbH
Moritzburger Weg 67
D-01109 Dresden
Germany
Made in Germany
Mentype® AMLplexQS
April 2015
LEUGAAMLv2en
2
Biotype Diagnostic GmbH develops, produces and markets their PCR-based rapid
Mentype® Detection Kits. Our products provide customers with fast and reliable
testing methods for professional medical diagnostics.
Our Mentype® Test Kits guarantee highest quality standards for clinical research
and diagnostics.
For information and enquiries about the Mentype® AMLplexQS
PCR Amplification Kit, please do not hesitate to get in touch or visit
www.biotype.de/en/home.html
Mentype® AMLplexQS
April 2015
LEUGAAMLv2en
Mentype® AMLplexQS PCR Amplification Kit
3
Product description
The verification of specific chromosomal aberrations has high prognostic value in nearly
all types of acute leukemia. Molecular biological evidence of chromosomal aberrations
(translocations) represents an important diagnostic completion. Detecting specific
translocations enables subtype-classification of leukemic diseases and provides
essential information for the risk-directed therapy of patients.
Mentype® AMLplexQS facilitates detection of the most common chromosomal
aberrations yet observed in acute myeloid leukemia (AML) and represents a simple-touse, routine-fit and reliable screening tool.
Mentype® AMLplexQS contains optimised reagents for high resolution detection of 11
fusion gene transcripts (AML1-ETO, BCR-ABL, CALM-AF10, CBFB-MYH11, DEK-CAN,
MLL-AF6, MLL-AF9, MLL-ELL, MLL-PTD, NPM1-MLF1 and PML-RARA) with 34
transcript variants in total (Table1).
The test is performed by fragment analysis using capillary gel electrophoresis. One
primer for each transcript is fluorescence-labelled with 6-FAM, BTG, BTY.
The test kit includes an internal PCR-Control (Quality Sensor “QS-Control”) and a “cDNA
Control” (ABL-Control) providing helpful information about PCR efficiency, quality of
applied cDNA templates, and presence of PCR-inhibitors.
Mentype® AMLplexQS was validated and evaluated for GeneAmp® 9700 Silver
Thermocycler, Eppendorf Mastercycler ep-S, Biometra T1, ABI PRISM® 310,
ABI PRISM® 3130 and 3500 Genetic Analyzer running POP-4™ and POP-7™.
The development, manufacture and distribution of Biotype® products are certified
according to DIN EN ISO 13485.
Mentype® AMLplexQS
April 2015
LEUGAAMLv2en
4
Content
1. Description of the Mentype® AMLplexQS .......................................................... 5
2. Outline of required working stages .................................................................. 8
3. PCR amplification .......................................................................................... 9
3.1 Master mix preparation ............................................................................ 9
3.2 PCR amplification parameter .................................................................. 10
4. Electrophoresis using the ABI PRISM® 310 Genetic Analyzer .......................... 11
4.1 Matrix generation .................................................................................. 11
4.2 Sample preparation ............................................................................... 15
4.3 Setting up the Data Collection Software .................................................. 15
5. Electrophoresis using the ABI PRISM® 3100-Avant/3100 Genetic Analyzer ..... 16
5.1 Spectral calibration / matrix generation ................................................... 16
5.2 Sample preparation ............................................................................... 18
5.3 Setting up the Data Collection Software .................................................. 19
6. Electrophoresis using the ABI PRISM® 3130/3130xl Genetic Analyzer ............ 21
6.1 Spectral calibration / matrix generation ................................................... 21
6.2 Sample preparation ............................................................................... 24
6.3 Setting up the Data Collection Software .................................................. 25
7. Electrophoresis using the ABI PRISM® 3500/3500xL Genetic Analyzer ........... 27
7.1 Spectral calibration / matrix generation ................................................... 27
7.2 Sample preparation ............................................................................... 30
7.3 Setting up a run .................................................................................... 31
8. Analysis ...................................................................................................... 34
8.1 Analysis parameters / analysis method ................................................... 34
8.2 Biotype® template files .......................................................................... 36
8.3 Controls ................................................................................................ 37
8.4 Fragment lengths and aberration variants ............................................... 37
9. Interpretation of results ................................................................................ 41
10. References................................................................................................ 43
11. Explanation of Symbols .............................................................................. 44
Mentype® AMLplexQS
April 2015
LEUGAAMLv2en
5
1. Description of the Mentype® AMLplexQS
Table 1. Detected Chromosomal Aberrations and Variants
Gene-Fusions
AML1-ETO
BCR-ABL
Chromosomal Aberration
t(8;21) (q22;q22)
t(9;22) (q34;q11)
CALM-AF10
t(10;11) (p13;q14)
CBFB-MYH11
inv(16) (p13;q22)
DEK-CAN
MLL-AF6
MLL-AF9
t(6;9) (p23;q34)
t(6;11) (q27;q23)
t(9;11) (p22;q23)
MLL-ELL
t(11;19) (q23;p13.1)
MLL-PTD
Partial Tandem Duplication
NPM1-MLF1
PML-RARA
t(3;5) (q25.1;q34)
t(15;17) (q22;q21)
Variants
e1a3
e1a2
b3a2
b3a3
b2a2
b2a3
AF10_240-CALM_1987
AF10_240-CALM_2092
Type A
Type B
Type C
Type D
Type E
Type F
Type G
Type H
Type I
Type J
6A_(THP-1)
7A_(10A)
8A_(MM6)
6B_(9B)
e10e2
e10e3
e9e3
e10e3
e11e3
bcr1 (PR-L)
bcr2 (PR-V)
bcr3 (PR-S)
Table 2. Quality Sensors of the Mentype® AMLplexQS
Quality Sensors
Internal PCR-Control (QS-Control)
cDNA-Control (ABL-Control)
Mentype® AMLplexQS
Meaning
Reflects quality of PCR performance
Reflects quality of cDNA templates
April 2015
LEUGAAMLv2en
6
Kit content
Mentype® AMLplexQS PCR Amplification Kit (100 Reactions)
Nuclease-free water
Reaction mix A
Primer mix
Multi Taq2 DNA Polymerase
Control cDNA KASUMI-1 (500 ng/μl)
DNA Size Standard 550 (BTO)
Allelic ladder
3.0 ml
500 μl
250 μl
40 μl
10 μl
50 μl
25 μl
Ordering information
Mentype® AMLplexQS
Mentype® AMLplexQS
Mentype® AMLplexQS
25
100
400
reactions
reactions
reactions
Cat.No.
Cat.No.
Cat.No.
45-31220-0025
45-31220-0100
45-31220-0400
Storage
Store all components at -20 °C and avoid repeated thawing and freezing. Primer mix
and allelic ladder must be stored protected from light. The DNA samples and post-PCR
reagents (allelic ladder and DNA size standard) should be stored separately from PCR
reagents. The expiry date is indicated on the kit cover.
Additionally required reagents
Additional reagents are needed in order to use the Biotype® PCR Amplification Kit:
Reagent
Hi-Di™ Formamide, 25 ml
Matrix Standards BT5
single-capillary instruments (5x25 μl)
Matrix Standards BT5
multi-capillary instruments (25 μl)
Matrix Standards BT5
multi-capillary instruments (50 μl)
Mentype® AMLplexQS
Supplier
Life Technologies
Corporation
Order number
Biotype Diagnostic GmbH
00-10411-0025
Biotype Diagnostic GmbH
00-10421-0025
Biotype Diagnostic GmbH
00-10421-0050
April 2015
4311320
LEUGAAMLv2en
7
Warnings and safety instructions
The PCR Amplification Kit contains the following potentially hazardous chemicals:
Kit component
Reaction mix
Chemical
Sodium azide NaN3
Hazards
toxic if swallowed, develops toxic gases
when it gets in contact with acids
Observe the Material Safety Data Sheets (MSDS) for all Biotype® products, which are
available on request. Please contact the respective manufacturers for copies of the
MSDS for any additionally needed reagents.
Quality assurance
All kit components undergo an intensive quality assurance process at Biotype Diagnostic
GmbH. The quality of the test kits is permanently monitored in order to ensure
unrestricted usability. Please contact us if you have any questions regarding quality
assurance.
Trademarks and Patents
Mentype® is a registered trademark of Biotype Diagnostic GmbH.
ABI PRISM®, GeneMapper®, GeneAmp® and Applied Biosystems® are registered
trademarks of Applied Biosystems LLC.
Under the law of Europe POP-4® is a registered trademark of Applied Biosystems LLC.
POP-4™, POP-7™are registered as trademark of Life Technologies Corporation in the
US.
The PCR is covered by patents. Patentees are Hoffmann-La Roche Inc. and
F. Hoffmann-La Roche (Roche).
Mentype® AMLplexQS
April 2015
LEUGAAMLv2en
8
2. Outline of required working stages
sampling
RNA isolation
cDNA synthesis
multiplex PCR amplification
fragment length analysis
Mentype® AMLplexQS
analysis of results
Fig. 1 From sample to analysis – detection of fusion gene transcripts performed with the
Mentype® AMLplexQS PCR Amplification Kit
Mentype® AMLplexQS
April 2015
LEUGAAMLv2en
7
Protocols for amplification, electrophoresis and analysis
3. PCR amplification
3.1 Master mix preparation
The table below shows volumes of applied reagents per 1.0 μl sample volume
(template-cDNA) in a total reaction volume of 25 μl. The number of reactions to be set
up shall be determined taking into account positive and negative control reactions. Add
one or two reactions to this number to compensate pipetting errors.
Component
Nuclease-free water
Reaction mix A*
Primer mix
Multi Taq2 DNA Polymerase (hot start, 2.5 U/μl)
Volume of master mix
Volume
16.1 μl
5.0 μl
2.5 μl
0.4 μl
24.0 μl
* contains Mg2+, dNTPs, BSA
All components should be mixed (vortex) and centrifuged for about 10 s before
preparing the master mix.
Since performance of the Mentype® AMLplexQS analysis is mostly depending on
quality and quantity of applied cDNA, we recommend standardised and already
validated methods for sampling, RNA isolation and RNA to cDNA transcription e.g. of
the Europe Against Cancer Program (EAC, see references p.33).
The amount of cDNA used for the assay depends on the concentration and quality of
prior isolated and applied RNA. For reference samples generated from cell culture the
use of 1 μl cDNA will be sufficient if 1 μg of respective RNA was initially transcribed in
a RT-PCR reaction volume of 20 μl. The amount of applied template can be extended
in case of critical clinical samples. The maximum template amount should not exceed
1/10 of the RT-reaction volume. Adjust the final reaction volume to 25 μl with
nuclease-free water.
The primer mix is optimised to result in sufficient peak-heights if 25 PCR cycles in
25μl reaction volume are performed. The ABL-Control should not exceed the specified
measuring range of the used instrument herein.
Positive control
Dilute Control cDNA KASUMI-1 to 250 ng/μl in appropriate volume. Instead of template
cDNA pipette diluted Control cDNA into reaction-tubes containing the PCR master mix.
Negative control
Nuclease-free water serves as negative control. Pipette respective volume instead of
the cDNA template into reaction tubes containing the PCR master mix.
Template cDNA
Sometimes, measured value of the cDNA concentration varies depending on the
quantification method used. In this instant it may be necessary to adjust the optimal
cDNA amount.
Mentype® AMLplexQS
April 2015
LEUGAAMLv2en
10
3.2 PCR amplification parameter
Perform a “hot start” PCR in order to activate the Multi Taq2 DNA Polymerase and to
prevent the formation of non-specific amplification products.
The number of PCR cycles depends on the amount of applied cDNA. 25 PCR cycles are
recommended for all samples. For highly concentrated reference samples from cell
cultures a reduction to 22 PCR cycles is recommended. In case of critical samples, we
suggest to increase the number of PCR cycles to a maximum of 28 cycles.
The internal ABL-Control may serve as point of reference to evaluate the optimal
number of required PCR cycles. The optimal range of the internal ABL-Control should
not exceed the specified measuring range of the used instrument herein (e.g. 500 to
5000 RFU on ABI3130)
Very small amounts of cDNA may result in statistical dropouts and imbalances of the
peaks. Increasing numbers of PCR cycles raise the risk of cross contamination caused
by minimal amounts of impurities. Furthermore, unspecific amplification products could
appear.
Note: To provide an optimal kit balance the ramping rate of the thermal cycler should
be adjusted to 4 °C/s.
Standard method - Recommended for all cDNA samples:
Temperature
96 °C
96 °C
61 °C
72 °C
68 °C
10 °C
Time
4 min (hot start to activate Multi Taq2 DNA Polymerase)
30 s
120 s
25 cycles
75 s
10 min*
∞
hold
Optional
Recommended for cDNA positive controls from cell culture
Temperature
96 °C
96 °C
61 °C
72 °C
68 °C
10 °C
Time
4 min (hot start to activate Multi Taq2 DNA Polymerase)
30 s
120 s
22 cycles
75 s
10 min*
∞
hold
Optional
Recommended for critical cDNA samples
Temperature
96 °C
96 °C
61 °C
72 °C
68 °C
10 °C
Time
4 min (hot start to activate Multi Taq2 DNA Polymerase)
30 s
120 s
max. 28 cycles
75 s
10 min*
∞
hold
* If a higher amount of minus-Adenine peaks is observed, extension up to 60 min is possible.
Mentype® AMLplexQS
April 2015
LEUGAAMLv2en
11
4. Electrophoresis using the ABI PRISM® 310 Genetic Analyzer
For general instructions on instrument setup, matrix generation and application of the
GeneMapper®software, please refer to the ABI PRISM® 310 Genetic Analyzer User’s
Manual. Electrophoresis using the GeneMapper ID-X software is described below.
The virtual filter set G5 shall be used for combined application of the five fluorescent
labels 6-FAM, BTG, BTY, BTR, and BT0 (the matrix standard will be called BT5
hereinafter).
Material
Capillary
Polymer
Buffer
47 cm / 50 μm (green)
POP-4™ for 310 Genetic Analyzer
10x Genetic Analyzer Buffer with EDTA
4.1 Matrix generation
Prior to conducting DNA fragment size analysis with the filter set G5, a matrix with the
five fluorescent labels 6-FAM, BTG, BTY, BTR, and BTO must be generated.
Color
Blue (B)
Green (G)
Yellow (Y)
Red (R)
Orange (O)
Matrix standard
6-FAM
BTG
BTY
BTR
BTO
Five electrophoresis runs shall be conducted, one for each fluorescent label, 6-FAM,
BTG, BTY, BTR, and BTO; under same conditions as for samples and allelic ladders of
the Biotype® test kit to generate suitable matrix files.
Matrix sample
Matrix sample 1
Component
Hi-Di™ Formamide
Matrix standard 6-FAM
Volume
12.0 μl
1.0 μl
Matrix sample 2
Hi-Di™ Formamide
Matrix standard BTG
12.0 μl
1.0 μl
Matrix sample 3
Hi-Di™ Formamide
Matrix standard BTY
12.0 μl
1.0 μl
Matrix sample 4
Hi-Di™ Formamide
Matrix standard BTR
12.0 μl
1.0 μl
Matrix sample 5
Hi-Di™ Formamide
Matrix standard BTO
12.0 μl
1.0 μl
- Denaturation for 3 min at 95 °C
- Cool down to 4 °C and place samples on the autosampler tray
- Create a Sample Sheet, choose 5 Dyes and enter a sample designation
Mentype® AMLplexQS
April 2015
LEUGAAMLv2en
12
Injection list for matrix generation
Parameter
Module File
Matrix File
Size Standard*
Injection [s]
Injection [kV]
Run [kV]
Run [°C]
Run Time [min]
Set up
GS STR POP-4 (1 ml) G5
NONE
NONE
5
15.0
15.0
60
24
* Prepare matrix standards always without DNA Size Standard (BTO)
Analysis of the matrix samples
- Run the GeneMapper® software
- File Add Sample to Project (open folder of current run)
- Select a matrix sample in the Sample File column
- Sample Raw Data
- Check the matrix samples for a flat baseline. As shown in the figure below there
should be at least five peaks with peak heights about 1000-4000 RFU (Y-axis) for
each matrix sample (optimal range: 2000-4000 RFU)
▼ 2900 Data Points (X)
5400▼
Fig. 1 Electropherogram with raw data of the matrix standard 6-FAM
- Select an analysis range with flat baseline and re-inject the matrix sample if
necessary
- Note down start and end value (data points) of the analysis range, e.g. start value
2900, end value 5400
- Calculate the difference, e.g. 5400-2900 = 2500 data points
Mentype® AMLplexQS
April 2015
LEUGAAMLv2en
13
Generation of a new matrix
- Tools GeneMapper Manager Matrices New
- Create the matrix name, e.g. Matrix BT5
- Import matrix samples for all dyes (B, G, Y, R, O) (Click on the symbol)
Fig. 2 Matrix sample selection
- Enter a Start At value, e.g. 2900
- Enter the calculated difference under Points, e.g. 2500
Mentype® AMLplexQS
April 2015
LEUGAAMLv2en
14
Fig. 3 New matrix BT5
- Calculate the matrix with Create
- Click on OK to save the new matrix
Matrix check
Check the new matrix with current samples.
- File Add Samples to Project (open folder of the respective run)
- Select sample(s) in the Sample File column
- Select the new matrix in the Sample Table
- Re-analyse your samples
There should be no pull-up peaks between the dye panels (B, G, Y, R, O) with the new
matrix.
Mentype® AMLplexQS
April 2015
LEUGAAMLv2en
15
4.2 Sample preparation
Component
Hi-Di™ Formamide
DNA Size Standard 550 (BTO)
prepare 12 μl of the mix (formamide + DNA size standard) for all samples
add 1 μl PCR product (dilute if necessary) or allelic ladder
- Denaturation for 3 min at 95 °C
- Cool down to 4 °C and place samples on the autosampler tray
Volume
12.0 μl
0.5 μl
Room temperature may influence the performance of PCR products on instruments, so
that shoulder peaks or split peaks occur especially at low temperatures. Pay attention
to keep ambient conditions as recommended by the instrument manufacturer. Optimal
settings were reported >22 °C room temperature.
Signal intensities
Options to increase the signal intensity:
- Reduce the volume of the DNA Size Standard 550 (BTO) to peak heights of
about 500 relative fluorescent units (RFU)
- Purify the PCR products before starting the analysis
4.3 Setting up the Data Collection Software
- Create a Sample Sheet and enter sample designation
Injection list
Parameter
Module File
Matrix File
Size Standard
Injection [s]*
Injection [kV]
Run [kV]
Run [°C]
Run Time [min]**
Set up
GS STR POP-4 (1 ml) G5
e.g. Matrix BT5
e.g. SST-BTO_60-550bp
5
15.0
15.0
60
28
* Deviating from the standard settings, the injection time may range between 1 and 20 s depending on the type
of sample. If reference samples with very high signal intensities are recorded, a shorter injection time may be
selected in order to avoid pull-up peaks. For samples with low cDNA content or critical patient samples an
injection time of up to 20 s may be necessary.
** Depending on the analysis conditions, the run time for Mentype® AMLplexQS should be modified in order to
analyse fragments with lengths of up to 550 bp.
Mentype® AMLplexQS
April 2015
LEUGAAMLv2en
16
5. Electrophoresis using the ABI PRISM® 3100-Avant/3100 Genetic
Analyzer
For detailed instructions on instrument setup, spectral calibration, application of the
Data Collection software and the GeneScan software, please refer to the ABI PRISM ®
3100-Avant/3100 Genetic Analyzer User’s Manual. This chapter describes the use of
ABI PRISM ® 3100-Avant/3100 Genetic Analyzer in combination with Data Collection
software version 1.0.1 and 1.1. For systems with Data Collection software 2.0 or 3.0
refer to chapter 6.
The system with 4 capillaries is named ABI 3100-Avant, and the system with 16
capillaries is named ABI 3100.
The virtual filter set G5 shall be used for combined application of the five fluorescent
labels 6-FAM, BTG, BTY, BTR and BT0 (the matrix standard will be called BT5
hereinafter).
Material
Capillary*
Polymer*
Buffer
36 cm Capillary Array for 3100-Avant/3100
POP-4™ Polymer for 3100
10x Genetic Analyzer Buffer with EDTA
*other instrument settings possible
5.1 Spectral calibration / matrix generation
Proper spectral calibration is critical to evaluate multicolor systems with the
ABI PRISM® 3100-Avant/3100 Genetic Analyzer and shall be done prior to conducting
fragment length analysis. The calibration procedure creates a matrix that is used to
correct the overlap of fluorescence emission spectra of the dyes.
Spectral calibration comprises the following steps:
- Preparation of spectral calibration standards
- Loading standards to the 96-well reaction plate (one sample per capillary)
- Entering the plate composition
- Performing a spectral calibration run and checking the matrix
Setting up the spectral calibration standard
Example for 4 capillaries / ABI 3100-Avant
Component
Hi-Di™ Formamide
Matrix standard BT5
- Load 12 μl of the mix to a 96-well reaction plate, e.g. position A1-D1
- Denaturation for 3 min at 95 °C
- Cool down to 4 °C and place samples on the autosampler tray
Volume
60.0 μl
5.0 μl
Example for 16 capillaries / ABI 3100
Component
Volume
Hi-Di™ Formamide
204.0 μl
17.0 μl
Matrix standard BT5
- Load 12 μl of the mix to a 96-well reaction plate, e.g. position A1-H1 and A2-H2
- Denaturation for 3 min at 95 °C
- Cool down to 4 °C and place samples on the autosampler tray
Mentype® AMLplexQS
April 2015
LEUGAAMLv2en
17
Performing a spectral calibration run
First of all, the parameter file for DyeSetG5 must be modified once to achieve
successful calibration with the Data Collection software version 1.0.1 or 1.1.
Spectral parameter
To change settings in the parameter file go to the following path:
D:\AppliedBio\Support Files\Data Collection Support Files\CalibrationData\Spectral
Calibration\ParamFiles
- Select MtxStd{Genescan_SetG5} to open the PAR-file
- Change Condition Bounds Range to [1.0; 20.0]
- Select File Save As to save the parameter file under a new name, e.g.
MtxStd{Genescan_SetG5_BT5}.par
Always use this parameter file for spectral calibration runs using Biotype® matrix standard
BT5.
Plate Editor for spectral calibration (I)
- Place the 96-well plate on the autosampler tray
- Run the ABI PRISM® 3100 Data Collection software
- In Plate View click New to open the Plate Editor dialog box
- Enter a name of the plate
- Select Spectral Calibration
- Select 96-Well as plate type and click on Finish
Plate editor for spectral calibration (II)
Parameter
Sample Name
Dye Set
Spectral Run Module
Spectral Parameters
Set up
Enter name for the matrix samples
G5
Default (e.g. Spect36_POP4)
MtxStd{GeneScan_SetG5_BT5}.par (parameters created before)
- Click into the column header to select the entire column, select Edit → Fill Down to
apply the information of the selected samples and confirm with OK
- Link your reaction plate on the autosampler tray with the created plate ID and start
the run
- On completion of the run check in the Spectral Calibration Result dialog box if all
capillaries have successfully passed calibration (label A). If individual capillaries are
labelled X, refer to ABI PRISM ®Genetic Analyzer User’s Manual
- Click on OK to confirm completion of the run
Mentype® AMLplexQS
April 2015
LEUGAAMLv2en
18
Matrix check
- Select Tools → Display Spectral Calibration → Dye Set → G5 to review the
spectral calibration profile for each capillary
- The quality value (Q value) must be greater than 0.95 and the condition number
(C value) must be between 1 and 20. Both values must be within the previously
determined range
- Check the matrix samples for a flat baseline. There should be five peaks with peak
heights of about 1000-5000 RFU (Y-axis) in each matrix sample (optimal range:
2000-4000 RFU)
- Check the new matrix with your current samples. There should be no pull-up peaks
between the dye panels (B, G, Y, R, O) with the new matrix
- If all capillaries have passed the calibration, the last calibration file for Dye Set G5
must be activated manually under Tools → Set Active Spectral Calibration.
Rename the calibration file under Set Matrix Name (e.g. BT5_Date of calibration)
- If calibration was not successful, try to re-inject the samples with higher injection
voltage or injection time. The editing of the Spectral Run Module will be necessary.
You can re-inject the same samples up to three times. Otherwise use more matrix
standard for spectral calibration
5.2 Sample preparation
Component
Hi-Di™ Formamide
DNA Size Standard 550 (BTO)
Prepare 12 μl of the mix (formamide + DNA size standard) for all samples
Add 1 μl PCR product (dilute if necessary) or allelic ladder
- Denaturation for 3 min at 95 °C
- Cool down to 4 °C and place samples on the autosampler tray
Volume
12.0 μl
0.5 μl
Since injections take place simultaneously on all capillaries, 4 or 16 samples must be
pipetted on the plate of multi-capillary analyzers. If fewer samples are analysed, the
empty positions must be filled with 12 μl Hi-Di™ Formamide.
Run several ladders to ensure a reliable allelic assignment on multi-capillary analyzers.
Room temperature may influence the performance of PCR products on multi-capillary
instruments, so that shoulder peaks or split peaks occur especially at low
temperatures. Pay attention to keep ambient conditions as recommended by the
instrument manufacturer. Optimal settings were reported >22 °C room temperature.
Signal intensities
Options to increase the signal intensity:
- Reduce the volume of the DNA Size Standard 550 (BTO) to peak heights of about 500
relative fluorescent units (RFU)
- Purify the PCR products before starting the analysis
Mentype® AMLplexQS
April 2015
LEUGAAMLv2en
19
5.3 Setting up the Data Collection Software
Edit the default run module in Dye Set G5 once for the first run.
- Select Module Editor to open the dialog box
- Select the appropriate Run Module as template from the GeneScan table
- Modify the Injection Voltage to 3 kV and the Injection Time to 10 s
Run Module 3kV_10s_550bp
Parameter
Run Temperature [°C]
Cap Fill Volume
Maximum Current [A]
Current Tolerance [A]
Run Current [A]
Voltage Tolerance [kV]
Pre Run Voltage [kV]
Pre Run Time [s]
Injection Voltage [kV]
Injection Time [s]*
Run Voltage [kV]
Number of Steps
Voltage Step Interval
Data Delay Time [s]
Run Time [min]**
Set up
Default
Default
Default
Default
Default
Default
Default
Default
3.0
10
Default
Default
Default
Default
26
* Deviating from the standard settings, the injection time may range between 1 and 20 s depending on the type
of sample. If reference samples with very high signal intensities are recorded, a shorter injection time may be
selected in order to avoid pull-up peaks. For samples with low DNA content or critical patient samples an
injection time of up to 20 s may be necessary.
** Depending on the analysis conditions, the run time for Mentype® AMLplexQS should be modified in order to
analyse fragments with lengths of up to 550 bp.
- Click on Save As, enter the name of the new module (e.g. 3kV_10s_550bp) and
confirm with OK
- Click on Close to exit the Run Module Editor
Starting the run
- Place the prepared 96-well plate on the autosampler tray
- Run the ABI PRISM® 3100 Data Collection software
- In Plate View click on New to open the Plate Editor dialog box
- Enter a name of the plate
- Select GeneScan
- Select 96-Well as plate type and click on Finish
Mentype® AMLplexQS
April 2015
LEUGAAMLv2en
20
Plate Editor
Parameter
Sample Name
Dyes
Color Info
Project Name
Dye Set
Run Module*
Analysis Module 1
Set up
Enter name for the samples
O
Ladder or sample
e.g. 3100_Project1
G5
3kV_10s_550bp
DefaultAnalysis.gsp
* parameter see above
- Complete the table in the Plate Editor and click on OK
- Click into the column header to select the entire column and select Edit → Fill
Down to apply the information of the selected samples
- Link your reaction plate on the autosampler tray with the created plate ID and start
the run
- On completion of the run, view data as Color Data in Array View of the 3100 Data
Collection software or as Analyzed Sample Files under
D:/AppliedBio/3100/DataExtractor/ExtractRuns
Mentype® AMLplexQS
April 2015
LEUGAAMLv2en
21
6. Electrophoresis using the ABI PRISM® 3130/3130xl Genetic Analyzer
For detailed instructions on instrument setup, spectral calibration, or application of the
ABI PRISM® Data Collection software version 3.0 and the GeneMapper® ID/ID-X
software, refer to the ABI PRISM ® 3130/3130xl Genetic Analyzers Getting Started
Guide.
The system with 4 capillaries is named ABI 3130 and the system with 16 capillaries is
named ABI 3130xl.
The virtual filter set Any5Dye shall be used for the combined application of the five
fluorescent labels 6-FAM, BTG, BTY, BTR, and BT0 (the matrix standard will be
called BT5 hereinafter).
Material
Capillary*
Polymer*
Buffer
36 cm Capillary Array for 3130/3130xl
POP-4™ Polymer for 3130
10x Genetic Analyzer Buffer with EDTA
* other instrument settings possible
6.1 Spectral calibration / matrix generation
Prior to conducting DNA fragment size analysis, it is necessary to perform a spectral
calibration with the four fluorescent labels 6-FAM, BTG, BTY, BTR, and BTO for each
analyzer. The calibration procedure creates a matrix which is used to correct the
overlap of fluorescence emission spectra of the dyes.
Spectral calibration comprises the following steps:
- Preparation of spectral calibration standards
- Loading the standards to the 96-well reaction plate (one sample per capillary)
- Creating the instrument protocol for spectral calibration (Protocol Manager)
- Defining the plate composition in the plate editor (Plate Manager)
- Performing a spectral calibration run and checking the matrix
Mentype® AMLplexQS
April 2015
LEUGAAMLv2en
22
Setting up the spectral calibration standards
Example for 4 capillaries / ABI 3130
Component
Hi-Di™ Formamide
Matrix standard BT5
- Load 12 μl of the mix to a 96-well reaction plate, e.g. position A1-D1
- Denaturation for 3 min at 95 °C
- Cool down to 4 °C and place samples on the autosampler tray
Volume
60.0 μl
5.0 μl
Example for16 capillaries / ABI 3130xl
Component
Volume
Hi-Di™ Formamide
204.0 μl
17.0 μl
Matrix standard BT5
- Load 12 μl of the mix to a 96-well reaction plate, e.g. position A1-H1 and A2-H2
- Denaturation for 3 min at 95 °C
- Cool down to 4 °C and place samples on the autosampler tray
Performing a spectral calibration run
- Place the 96-well plate on the autosampler tray
- In the Protocol Manager of the Data Collection software click on New in
Instrument Protocol to open the Protocol Editor dialog box
Instrument Protocol for spectral calibration
Protocol Editor
Name
Type
Dye Set
Polymer*
Array Length*
Chemistry
Run Module*
Set up
User (e.g. Spectral36_POP4_BT5)
SPECTRAL
Any5Dye
User (e.g. POP4)
User (e.g. 36cm)
Matrix Standard
Default (e.g. Spect36_POP4_1)
* Depends on the type of polymer and length of capillary used
- Click on OK to leave the Protocol Editor dialog box
- In the Plate Manager of the Data Collection software, click on New to open the
New Plate Dialog box
Plate Editor for spectral calibration (I)
New Plate Dialog
Name
Application
Plate Type
Owner Name / Operator Name
Set up
e.g. Spectral_BT5_date
Spectral Calibration
96-Well
…
- Click on OK. A new table in the Plate Editor will open automatically
Mentype® AMLplexQS
April 2015
LEUGAAMLv2en
23
Plate Editor for spectral calibration (II)
Parameter
Sample Name
Priority
Instrument Protocol 1
Set up
Enter name for the matrix samples
e.g. 100
Spectral36_POP4_BT5 (setting described before)
- Click into the column header to select the entire column, select Edit → Fill Down to
apply the information to all selected samples, and click on OK
- In the Run Scheduler click on Find All, select Link to link the reaction plate on the
autosampler to the newly created plate record (position A or B), and, start the run.
Fig. 5 Electropherogram of spectral calibration with matrix standard BT5 on an ABI 3130
Matrix check
- The quality value (Q value) of each capillary must be greater than 0.95 and the
condition number range (C value) must be between 1 and 20
- Check the matrix samples for a flat baseline. As shown in the figure above, there
should be five peaks with peak heights of about 1000-5000 RFU (Y-axis) in each
matrix sample (optimal range: 2000-4000 RFU)
- Check the new matrix with your current samples. There should be no pull-up peaks
between the dye panels (B, G, Y, R, O) with the new matrix
- If all capillaries have passed the test, the last calibration file for the Dye Set Any5Dye
is activated automatically in the Spectral Viewer. Rename the calibration file (e.g.
BT5_Date of calibration) using the respective button
- If calibration was not successful, try to re-inject the samples with higher injection
voltage or injection time. Editing of the Spectral Run Module will be necessary. You
Mentype® AMLplexQS
April 2015
LEUGAAMLv2en
24
can re-inject the same samples up to three times. Otherwise use more matrix
standard for spectral calibration
6.2 Sample preparation
Components
Hi-Di™ Formamide
DNA Size Standard 550 (BTO)
prepare 12 μl of the mix (formamide + DNA size standard) for all samples
add 1 μl PCR product (diluted if necessary) or allelic ladder
- Denaturation for 3 min at 95 °C
- Cool down to 4 °C and place samples on the autosampler tray
Volume
12.0 μl
0.5 μl
Since injections take place simultaneously on all capillaries, 4 or 16 samples must be
pipetted on the plate of multi-capillary analyzers. If fewer samples are analysed, the
empty positions must be filled with 12 μl Hi-Di™ Formamide.
Run several ladders to ensure a reliable allelic assignment on multi-capillary analyzers.
Room temperature may influence the performance of PCR products on multi-capillary
instruments. Shoulder peaks or split peaks could occur especially at low temperatures.
Pay attention to keep ambient conditions as recommended by the instrument
manufacturer. Optimal settings were reported >22 °C room temperature.
Signal intensities
Options to increase the signal intensity:
- Reduce the volume of the DNA Size Standard 550 (BTO) to peak heights of about 500
relative fluorescent units (RFU)
- Purify the PCR products before starting the analysis
Mentype® AMLplexQS
April 2015
LEUGAAMLv2en
25
6.3 Setting up the Data Collection Software
Edit the Run Module as follows for the first run:
- In the Module Manager of the Data Collection software click on New to open the
Run Module Editor dialog box
Run Module 3kV_10s_550bp
Parameter
Oven Temperature [°C]
Poly Fill Volume
Current Stability [μA]
PreRun Voltage [kV]
PreRun Time [s]
Injection Voltage [kV]
Injection Time [s]*
Voltage Number of Steps
Voltage Step Interval
Data Delay Time [s]
Run Voltage [kV]
Run Time [s]**
Set up
Default
Default
Default
Default
Default
3.0
10
Default
Default
Default
Default
1560
* Deviating from the standard settings, the injection time may range between 1 and 20 s depending on the type
of sample. If reference samples with very high signal intensities are recorded, a shorter injection time may be
selected in order to avoid pull-up peaks. For samples with low DNA content or critical patient samples an
injection time of up to 20 s may be necessary.
** Depending on the analysis conditions, the run time for Mentype® AMLplexQS should be modified in order to
analyse fragments with lengths of up to 550 bp.
- Click on Save As, enter the name of the new module (e.g. 3kV_10s_550bp) and confirm
with OK
- Click on Close to exit the Run Module Editor
Starting the run
- Place the prepared 96-well plate on the autosampler tray
- In the Protocol Manager of the Data Collection software, click on New in the
Instrument Protocol window to open the Protocol Editor dialog box
Instrument Protocol
Protocol Editor
Name
Type
Run Module*
Dye Set
Set up
e.g. Run36_POP4_BT5_26min
REGULAR
3kV_10s_550bp
Any5Dye
* parameter see above
- Click on OK to exit the Protocol Editor
Mentype® AMLplexQS
April 2015
LEUGAAMLv2en
26
Prior to each run, it is necessary to create a plate definition as follows:
- In the Plate Manager of the Data Collection software click on New to open the New
Plate Dialog box
Plate Editor (I)
New Plate Dialog
Name
Application
Plate Type
Owner Name / Operator Name
Set up
e.g. Plate_BT5_Date
Select GeneMapper Application
96-Well
…
- Click on OK. A new table in the Plate Editor will open automatically
Plate Editor (II)
Parameter
Sample Name
Priority
Sample Type
Size Standard
Panel
Analysis Method
Snp Set
User-defined 1-3
Results Group 1
Instrument Protocol 1
Set up
Enter name for the samples
e.g. 100 (Default)
Sample or allelic ladder
e.g. SST-BTO_60-550bp
e.g. AMLplex_Panels_v2
e.g. AMLplex_HID_3130_200rfu
(select results group)
Run36_POP4_BT5_26min (setting described before)
- Click into the column header to select the entire column, select Edit → Fill Down to
apply the information to all selected samples and click on OK
- In the Run Scheduler, click on Find All, select Link to link the reaction plate on the
autosampler to the newly created plate record (position A or B) and start the run
- During the run, view Error Status in the Event Log or examine the quality of the raw
data for each capillary in the Capillaries Viewer or the Cap/Array Viewer
- View data as overview in Run History or Cap/Array Viewer of the Data Collection
software. Run data are saved in the Run Folder of the previously chosen Result
Group
Mentype® AMLplexQS
April 2015
LEUGAAMLv2en
27
7. Electrophoresis using the ABI PRISM® 3500/3500xL Genetic Analyzer
For detailed instructions on instrument setup, spectral calibration, or application of the
Applied Biosystems 3500 Series Data Collection Software version 3.0 and the
GeneMapper® ID-X software version 1.4, refer to the Applied Biosystems
3500/3500xL Genetic Analyzers User Guide.
The system with 8 capillaries is named AB 3500 and the system with 24 capillaries is
named AB 3500xL.
The virtual filter set Any5Dye shall be used for the combined application of five
fluorescent labels 6-FAM, BTG, BTY, BTR, and BT0 (the matrix standard will be
called BT5 hereinafter).
Material
Capillary*
Polymer
Buffer
36 cm Capillary Array for 3500/3500xL
POP-4™ Polymer for 3500/3500xL
10x Genetic Analyzer Buffer with EDTA for 3500/3500xL
* other instrument settings possible
7.1 Spectral calibration / matrix generation
Prior to conducting DNA fragment size analysis, it is necessary to perform a spectral
calibration with the fluorescent labels 6-FAM, BTG, BTY, BTR, and BTO for each
analyzer. The calibration procedure creates a matrix that is used to correct the overlap
of fluorescence emission spectra of the dyes.
Spectral calibration comprises the following steps:
- Preparation of spectral calibration standards
- Loading the standards to the multi-well reaction plate (one sample per capillary)
- Preparation of instrument and creating a Dye Set BT5
- Performing a spectral calibration run and checking the matrix
Mentype® AMLplexQS
April 2015
LEUGAAMLv2en
28
Setting up the spectral calibration standards
Example for 8 capillaries / ABI 3500
Component
Hi-Di™ Formamide
Matrix standard BT5
- Load 12 μl of the mix to a 96-well reaction plate, e.g. position A1-H1
- Denaturation for 3 min at 95°C
- Cool down to 4°C and place samples on the autosampler tray
Volume
108.0 μl
9.0 μl
Example for 24 capillaries / ABI 3500xL
Component
Volume
Hi-Di™ Formamide
300.0 μl
25.0 μl
Matrix standard BT5
- Load 12 μl of the mix to a 96-well reaction plate, e.g. position A1-H1, A2-H2 and A3-H3*
- Denaturation for 3 min at 95°C
- Cool down to 4°C and place samples on the autosampler tray
* When using a 384-well plate, load 10 μl of the mixtures to columns 1, 3, and 5
in rows A, C, E, G, I, K, M, and O.
Performing a spectral calibration run
- Place the multi-well plate on the autosampler tray
- Now prepare the instrument and specific spectral calibration run settings
Preparation of the instrument
Before starting the spectral calibration process ensure that the spatial calibration has
been performed. This process is necessary if a new capillary array was installed before
and is described in detail in the Applied Biosystems 3500/3500xL Genetic Analyzers
User Guide.
Preparation of dye set BT5
Prior to the spectral calibration, a dye set for the matrix standard BT5 needs to
be setup.
1. To create a new dye set, go to Library and select Analyze,
followed by Dye Sets and click Create.
2. Enter a Dye Set Name, e.g. BT5.
3. Select Matrix Standard as a chemistry and AnyDye Template as a
dye set template.
4. Disable Purple in the field Arrange Dyes. Ensure that all other
colors are enabled.
5. Under Calibration Peak Order the colors need to be arranged as
follows: 5 – blue, 4 – green, 3 – yellow, 2 – red, and 1 – orange.
6. Do not alter the Parameter settings.
7. Click Save to confirm the changes.
Mentype® AMLplexQS
April 2015
LEUGAAMLv2en
29
Fig. 6 Setup for dye set BT5
Performing a spectral calibration run
Once the multi-well plate containing the spectral calibration mixture is placed
in the autosampler tray the spectral calibration process can be started.
1. To access the Spectral Calibration screen, select Maintenance on
the Dashboard of the 3500 Series Data Collection software.
2. The number of wells in the spectral calibration plate and their
location in the instrument must be specified.
3. Select Matrix Standard as a chemistry standard and BT5 for dye
set (defined before).
4. Enable Allow Borrowing (Optional).
5. Click Start Run.
Mentype® AMLplexQS
April 2015
LEUGAAMLv2en
30
Fig. 7 Electropherogram of spectral calibration with matrix standard BT5 on an ABI 3500
Matrix check
- The quality value (Q value) of each capillary must be greater than 0.8 and the
condition number range (C value) must be between 1 and 20
- Check the matrix samples for a flat baseline. As shown in the figure above, there
should be five peaks with peak heights of about 1000-5000 RFU (Y-axis) in each
matrix sample (optimal range: 2000-4000 RFU)
- A successful calibration will be displayed in green in Overall and for each capillary
- If all capillaries have passed the test, Accept Results
- If calibration failed, Reject Results and refer to the “spectral calibration
troubleshooting” section in the Applied Biosystems 3500/3500xL Genetic Analyzer
User Guide.
7.2 Sample preparation
Component
Hi-Di™ Formamide
DNA Size Standard 550 (BTO)
prepare 12 μl of the mix (formamide + DNA size standard) for all samples
add 1 μl PCR product (dilute if necessary) or allelic ladder
- Denaturation for 3 min at 95 °C
- Cool down to 4 °C and place samples on the autosampler tray
Volume
12.0 μl
0.5 μl
Since injections take place simultaneously on all capillaries, 8 or 24 samples must be
pipetted on the plate of multi-capillary analyzers. If fewer samples are analysed empty
positions need to be filled with 12 μl Hi-Di™ Formamide.
To ensure a reliable allelic assignment on multi-capillary analyzers, several ladders
should be run.
Room temperature may influence the performance of PCR products on multi-capillary
instruments, so that shoulder peaks or split peaks occur especially at low
temperatures. Pay attention to keep ambient conditions as recommended by the
instrument manufacturer. Optimal settings were reported >22 °C room temperature.
Mentype® AMLplexQS
April 2015
LEUGAAMLv2en
31
Signal intensities
Options to increase the signal intensity:
- Reduce the volume of the DNA Size Standard 550 (BTO) to peak heights of about 500
relative fluorescent units (RFU)
- Purify the PCR products before starting the analysis
7.3 Setting up a run
For the first run using the Mentype® AMLplexQS you will need to setup a number of
protocols within the 3500 Series Data Collection Software.
Create Instrument protocol
- Go to Library and select Analyze / Instrument protocol and click Create
- Change the parameters according the table below
Instrument protocol for Mentype® AMLplexQS
Parameter
Application Type
Capillary Length
Polymer
Dye Set
Run Module
Protocol Name
Oven Temperature [°C]
Run Voltage [kV]
Injection Voltage [kV]
Run Time [s]**
PreRun Time [s]
Injection Time [s]*
Data Delay Time [s]
Advanced Options
Set up
HID or Fragment
Default
Default
BT5
Default
e.g. Mentype AMLplexQS
Default
Default
3.0
1560**
Default
8*
Default
Default
* Deviating from the standard settings, the injection time may range between 1 and 20 s depending on the type
of sample. If reference samples with very high signal intensities are recorded, a shorter injection time may be
selected in order to avoid pull-up peaks. For samples with low DNA content or critical patient samples an
injection time of up to 20 s may be necessary.
** Depending on the analysis conditions, the run time for Mentype® AMLplexQS should be modified in order to
analyse fragments with lengths of up to 550 bp.
- Click on Save to confirm the settings
Mentype® AMLplexQS
April 2015
LEUGAAMLv2en
32
Create Size Standard
- Go to Library and select Analyze / Size Standards and click Create
- Change the parameters according the table below
Parameter
Size Standard
Dye Color
Set up
BTO_550
Orange
The DNA Size Standard 550 (BTO) should be used with the following lengths of fragments:
60, 80, 90, 100, 120, 140, 160, 180, 200, 220, 240, 250, 260, 280, 300, 320, 340,
360, 380, 400, 425, 450, 475, 500, 525, and 550 bp.
- Click on Save to confirm the settings
Create QC or Size Calling Protocol
- Go to Library and select Analyze / QC or Size Calling Protocol and click Create
- Change the parameters according the table below
Parameter
Protocol Name
Size Standard
Sizecaller
Set up
enter a name
BTO_550 (from above)
Size Caller v.1.1.0
- Go to Analysis Settings / Peak Amplitude Threshold and disable purple. All
other colors should be enabled
- Keep all other settings as Default
- Click on Save to confirm the settings
Create an Assay
- Go to Library and select Manage / Assays and click Create
- Change the parameters according the table below
Parameter
Assay Name
Color
Application Type
Instrument Protocol
QC (Size Calling) Protocol
Set up
e.g. Mentype AMLplexQS
Default
HID or Fragment
e.g. Mentype AMLplexQS
e.g. BTO_550
- Click on Save to confirm the settings
Mentype® AMLplexQS
April 2015
LEUGAAMLv2en
33
Starting the run
- Place the prepared multi-well plate on the autosampler tray
- In the Dashboard of the Data Collection software, click Create New Plate
- Go to Define Plate Properties and select Plate Details
- Change the parameters according the table below
Plate Details
Property
Name
Number of Wells
Plate Type*
Capillary Length
Polymer
Set up
e.g. Mentype AMLplexQS
96 or 384
HID or Fragment
36cm
POP4
- Click Assign Plate Contents to confirm the settings
- Define well position of each sample or ladder for data collection and processing by
entering sample names
- Assign an Assay (required), a file name conventions, and a result group to all named
wells in the plate
- Click Link the plate for Run and enter Run Name
- Click Start Run
Mentype® AMLplexQS
April 2015
LEUGAAMLv2en
34
8. Analysis
For general instructions on automatic sample analysis, please refer to the GeneScan or
GeneMapper® ID/ID-X Software User’s Manual.
8.1 Analysis parameters / analysis method
The recommended analysis parameters are:
Peak Detection Algorithm
Allele
Ranges
Smoothing and Baselining
Size Calling Method
Peak Detection
Peak Quality
Advanced
No specific stutter ratio, set all to 0.0
Amelogenin cut off: 0.0
Analysis: Full Range
Sizing: All Sizes
Smoothing: Light
Baseline Window: 51 pts
Local Southern Method
Peak Amplitude Thresholds
B:200 Y:200
G:200 R:200
O:50
Min. Peak Half Width: 2 pts
Polynominal Degree: 3
Peak Window Size: 15 pts**
Slope Thresholds: 0.0
Heterozygote Balance: 0.0
Max expected alleles: 22
* The peak amplitude threshold (cut-off value) corresponds to the minimum peak height that will be detected by
the GeneMapper® ID software. For the Mentype® AMLplexQS 200 RFU is recommended and should be
determined individually by the laboratory. Recommendation: The minimal peak height should be three times as
high as the background noise of the baseline.
** If necessary, Peak Window Size can be minimised to 11 pts to improve peak detection.
Note: Within the Mentype® AMLplexQS the red panel should be faded out.
Finding the exact lengths of the amplified products depends on the device type, the
conditions of electrophoresis, as well as the DNA size standard used. Therefore,
determining the size should be based on evenly distributed references. The DNA Size
Standard 550 (BTO) shall thus be used with the following lengths of fragments: 60, 80,
90, 100, 120, 140, 160, 180, 200, 220, 240, 250, 260, 280, 300, 320, 340, 360, 380,
400, 425, 450, 475, 500, 525, and 550 bp.
Fig. 8 Electropherogram of the DNA Size Standard 550 (BTO), fragments with lengths in bp.
Mentype® AMLplexQS
April 2015
LEUGAAMLv2en
35
Note: The provided template file for the DNA size standard SST-BTO_60-550bp can
be applied for the evaluation and analysis of the Mentype® AMLplexQS using the
GeneMapper® ID/ID-X Software.
Mentype® AMLplexQS
April 2015
LEUGAAMLv2en
36
8.2 Biotype® template files
Allocation of fusion gene transcripts and variants should be carried out with suitable
analysis software, e.g. GeneMapper® ID/ID-X software in combination with the
Mentype® AMLplexQS template files from Biotype. The Biotype® template files with the
respective manual are available on our homepage (www.biotype.de) for download or as
CD-ROM on request.
Recommended Biotype® templates for GeneMapper® ID/ID-X Software are:
Panels
BinSets
Size Standard
Analysis Method
Plot Settings
Table Settings
AMLplex_Panels_v2/v2X
AMLplex_Bins_v2/v2X
SST-BTO_60-550bp
AMLplex_HID_310_200rfu
AMLplex_HID_3130_200rfu
PlotsBT5_4dyes
Table for 10 Alleles
Table für 22 Alleles
or higher version
or higher version
recommended
recommended
Panels and BinSets have to be used at any time, whereas other template files are
optional.
Important Note: Import and allele calling with provided template files is only
guarantied using GeneMapper® ID/ID-X software. If GeneMapper® software is applied
you may experience import problems using some template files. You may have to
adjust Panels and Bins with one ore more runs of the allelic ladder on your specific
instrument setup. Contact us for support (support@biotype,de).
General procedure for the analysis
1. Check the DNA size standard
2. Check the allelic ladder
3. Check the positive control
4. Check the negative control
5. Analyse and interpret the sample data
Mentype® AMLplexQS
April 2015
LEUGAAMLv2en
37
8.3 Controls
The Mentype® AMLplexQS PCR Amplification Kit includes a cDNA Control that
represents the following aberrations:
Table 3. Allocation with the Mentype® AMLplexQS
cDNA from cell culture*
KASUMI-1 (Asou et al. 1991)
Aberration
AML1-ETO
*Cell culture for preparation of cDNA was purchased from DSMZ - Deutsche Sammlung von
Mikroorganismen und Zellkulturen GmbH, Braunschweig, Germany.
Use of provided cDNA is restricted to Mentype® AMLplexQS only.
8.4 Fragment lengths and aberration variants
Table 4 shows fragment lengths of the individual variants that refer to the DNA Size
Standard 550 (BTO). All analyses have been performed on an
ABI PRISM® 3130 Genetic Analyzer with POP-4® polymer. Different analysis
instruments, DNA size standards or polymers may result in different fragment lengths.
Due to instrument specific differences individual fine tuning of actually measured
fragment sizes (home-based apparatus) is recommended.
In addition, a visual alignment with the allelic ladder is also recommended.
Scaling
Horizontal: 55-550 bp
Vertical: Depending on signal intensity
Mentype® AMLplexQS
April 2015
LEUGAAMLv2en
Figure 9
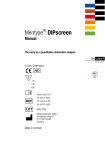
Fig. 9 Electropherogram of the Mentype® AMLplexQS using 250 ng cDNA Control KASUMI-1. Analysis was
performed using the ABI PRISM® 3130 Genetic Analyzer and the DNA Size Standard 550 (BTO). Assignment
was done with GeneMapper® ID Software and the Mentype® AMLplexQS template file.
Mentype® AMLplexQS
April 2015
LEUGAAMLv2en
39
Figure 10
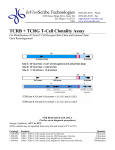
Fig. 10 Electropherogram of the Mentype® AMLplexQS allelic ladder. Analysis was performed using the
ABI PRISM® 3130 Genetic Analyzer and the DNA Size Standard 550 (BTO). Assignment was done with
GeneMapper® ID Software and the Mentype® AMLplexQS template file.
Mentype® AMLplexQS
April 2015
LEUGAAMLv2en
40
Table 4. Fragment lengths of the Mentype® AMLplexQS allelic ladder measured using the
ABI PRISM® 3130 Genetic Analyzer with POP-4® polymer. Please consider note under
chapter 8.3.
Panel/Variants
Size [bp]*
Others
AMLplex Blue
Panel/Variants
Size [bp]*
Others
AMLplex Green
CBFB-MYH11_TypeG
63
DEK-CAN
CBFB-MYH11_TypeI
66
MLL-PTD_e9e3
78
87
QS-Control
72
MLL-AF9_6A_S‡
113
BCR-ABL_b2a3
107
MLL-AF9_6B
191
CBFB-MYH11_TypeJ
141
MLL-PTD_e10e3
218
CBFB-MYH11_TypeC
146
MLL-ELL_e10e3
242
CBFB-MYH11_TypeD
160
MLL-AF9_7A
245
CBFB_MYH11_TypeH
165
MLL-ELL_e10e2
289
CBFB_MYH11_TypeF
175
MLL-AF6
303
BCR-ABL_b3a3
183
MLL-PTD_e11e3
333
BCR-ABL_e1a3
206
MLL-AF9_8A
360
AF10_240-CALM_2092
265
MLL-AF9_6A_L‡
498
CBFB-MYH11_TypeA
271
BCR-ABL_b2a2
282
AML1-ETO
301
PML-RARA-bcr1
220
BCR-ABL_b3a2
358
PML-RARA_bcr3
288
CBFB-MYH11_TypeE
365
AF10_240-CALM_1987
371
BCR-ABL_e1a2
380
NPM1-MLF1
389
CBFB-MYH11_TypeB
486
ABL-Control
518
AMLplex Yellow
PML-RARA_bcr2**
* rounded to integer
** Although this variant is detectable with Mentype® AMLplexQS primers, the varying length of the amplicon
(apprx. 173 bp) prevents automated allocation.
‡
Two amplicons for variant MLL-AF9_6A
Mentype® AMLplexQS
April 2015
LEUGAAMLv2en
41
9. Interpretation of results
As mentioned above, post PCR analysis and automatic allele assignment with suitable
analysis software ensure a precise and reliable discrimination of fusion gene
transcripts and variants. Please check for correct allelic ladder assignment within each
run.
Detection limit
Applying plasmids, experimental data showed that 1000 copies resulted in peaksheights > 200 RFU.
Please note that Mentype® AMLplexQS was designed, validated and certified as a
screening tool for subtype classification of AML. This application is not suited to
quantify copy numbers or monitor Minimal Residual Disease (MRD).
Pull-up peaks
Pull-up peaks may occur if peak heights of the PCR product are outside the linear
detection range of the instrument, or if an incorrect matrix was applied. They appear at
positions of specific peaks in other color channels, typically with lower signal
intensities. If necessary please dilute the PCR product to confirm results. In case pullup effects persist despite optimal peak heights, a new matrix run should be performed.
Template-independent addition of nucleotides
Because of its terminal transferase activity, the Multi Taq DNA Polymerase tends to
add an adenosine radical at the 3’-end of the amplified DNA fragments. The artefact
peak is one base shorter than expected (-1 bp peaks). All Biotype® primers are
designed to minimise these artefacts. Artefact formation is further reduced by the final
extension step of the PCR protocol at 68°C for 10 minutes. Peak height of the artefact
correlates with the amount of cDNA. Laboratories should define their individual limits
for analysis of the peaks.
Artefacts
Room temperature may influence the performance of PCR products on multi-capillary
instruments, shoulder peaks or split peaks occur. Furthermore, automated assignment
could be influenced in some cases. If these effects occur we recommend injecting the
sample again at higher room temperature and maybe using more than one allelic
ladder sample per run. Pay attention to keep ambient conditions as recommended by
the instrument manufacturer. Optimal settings were reported >22 °C room
temperature.
Influence of polymer types
The Mentype® AMLplexQS kit was validated and certified for the analysis on POP-4™
polymer. The use of other polymers (e.g. POP-7™ or POP-6™) might influence the
run behaviour of specific PCR products. In case Biotype® Templates (Panels and
BinSet) may have to be adjusted. Please contact our technical support
Mentype® AMLplexQS
April 2015
LEUGAAMLv2en
42
([email protected]). Furthermore background noise might increase through different
behaviour of free fluorescent dyes.
Mentype® AMLplexQS
April 2015
LEUGAAMLv2en
43
10. References
Asou H, Tashiro S, Hamamoto K, Otsuji A, Kita K, Kamada N (1991)
Establishment of a human acute myeloid leukemia cell line (Kasumi-1) with 8;21
chromosome translocation. Blood 77(9): 2031-2036.
Beillard E, Pallisgaard N, van der Velden VHJ, Bi W, Dee R, van der Schoot E,
Delabesse E, Macintyre E, Gottardi E, Saglio G, Watzinger F, Lion T, van
Dongen JJM, Hokland P, Gabert J (2003) Evaluation of candidate control genes for
diagnosis and residual disease detection in leukemic patients using ‚real-time’
quantitative reverse-transcriptase polymerase chain reaction (RQ-PCR)- a Europe
against cancer program. Leukemia 17:2474-2486.
Van Dongen JJM, Macintyre EA, Gabert JA, Delabesse E, Rossi V, Saglio G,
Gottardi E, Rambaldi A, DOtti G, Griesinger F, Parreira A, Gameiro P, Gonzalez
Diaz M, Malec M, Langerak AW, San Miguel JF, Biondi A (1999) Standardized
RT-PCR analysis of fusion gene transcripts from chromosome aberrations in acute
leukemia for detection of minimal residual disease - Report of the BIOMED-1
Concerted Action: Investigation of minimal residual disease in acute leukemia.
Leukemia 13:1901-1928.
Mentype® AMLplexQS
April 2015
LEUGAAMLv2en
44
11. Explanation of Symbols
Manufacturer
Date of manufacture
Batch code
<N>
Contains sufficient reagents for
<N> tests
Consult instructions (handbook)
for use
Use by
Temperature limitations
Catalogue number
In-Vitro-Diagnostics
Mentype® AMLplexQS
April 2015
LEUGAAMLv2en
45
Notes
Mentype® AMLplexQS
April 2015
LEUGAAMLv2en
46
Notes
Mentype® AMLplexQS
April 2015
LEUGAAMLv2en
47
Notes
Mentype® AMLplexQS
April 2015
LEUGAAMLv2en