1
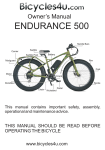
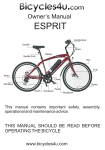
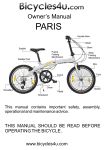
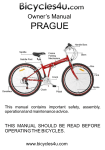
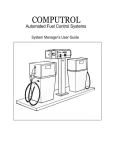
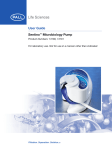
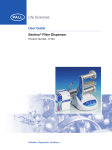
Owner’s Manual
ELEGANCE
Handle Bars
Saddle
Stem
Saddle Post
Battery
Mudguard
Fork
Motor
Shaft drive
Rim
Spoke
Kickstand
Pedal
This manual contains important safety, assembly,
operational and maintenance advice.
THIS MANUAL SHOULD BE READ BEFORE
OPERATING THE BICYCLE
www.bicycles4u.com
User Security
1) Do not operate the e-bike before reading this user manual thoroughly. The manufacturer will not be
held responsible for any damage or accident due to improper use.
2) For your safety and others please follow the traffic regulations. This bicycle is not suitable for children
under thirteen and the disabled. This e-bike is not recommended for competition, stunts or off-road riding.
3) Do not lubricate the brakes.
4) The braking length of a dry state surface/road is 4 meters at 25km/h, while 15 meters in wet state. So,
move slowly, keep a safe distance from other vehicles/objects around you and brake in advance where
necessary while riding downhill and in rain, snow & wet road.
5) To ensure your safety please use helmets, check brakes & tyres, handlebars and rims before riding.
6) Maximum rider weight: 115 Kg.
Maximum carrier weight: 15 Kg.
7) Improper use could cause harm, please check the connection of the frame, stem and suspension
periodically. Every mechanical part has friction and pressure. Different materials and parts have different
frictions and pressures. If a mechanical part has exceeded its service life, resultant damage could hurt the
user.
8) Do not ride in water where the depth exceeds the controller. The motor or directly flush water to
electrical components.
9) Avoid prolonged exposure to the sun or rain and exposure to humid places. Aggressive gases may
cause parts to corrode or electrical parts to fail. This can lead to malfunctioning or accidents.
10) This product contains advanced electrical components built in to the structure. Please do not
disassemble or modify any part of it.
11) The performance and mileage of the unit will be varied depending on the battery condition,
temperature, terrain, wind speed, tyre pressure, rider weight and the maintenance, etc. To get the best
mileage we propose that:
(1). Ride for 3-5m in power mode when starting.
(2). Try to reduce frequent braking or restarts.
(3). Ride in PAS mode while on uneven road conditions, uphill or headwind.
(4). Avoid carrying people or overloading
(5). Check the tyres before riding to ensure they have the correct pressure.
Regular check’s for safety before riding
1) Check if the handlebar stem and saddle post are safely inserted. Take note of the maximum height
markings (MIN. INSERTION) on the tube.
2) Check the brake shoes for excess wear. If there is wear, you should replace them before riding.
3) Check if the nuts on the front and rear axis are securely fixed.
4) Check the pedals and other fixtures for any signs of damage. Check if the rotary parts move freely.
5) Check the tyre pressure in accordance with the markings and check for ample treads on the tyre. If they
are excessively worn replace them immediately.
6) Make sure that you know how to operate the e-bike and clearly know all the traffic regulations.
7) Check if the brake and the power function are working well.
(1). Stand the bike on the kickstand, switch to the electric mode and then slowly turn the throttle. If the
motor does not work, then the kickstand can cut the power efficiently.
(2). Close the kickstand, switch to the electric mode and then apply the brake. If the motor does not work,
then the brake can cut the power efficiently.
9) Check if the grip throttle functions well. Check if it goes back into place immediately after releasing it.
10) Check all electrical connections and mechanical parts are securely locked, check all cables, connector
plugs and sockets must be dry and undamaged.
Battery and charging
Instructions on the bike operation
2) Press the power button and the
LCD display will turn on.
1) To turn the power ON and OFF
use the power button which is under
the battery.
LCD display
Press the positive
to go up the menu.
Hold then press to toggle
through settings (0-4).
LCD Display Homepage
Battery Voltage
Remaining Battery Capacity
Press to turn on LCD
Display.
Press the negative
to go down the menu.
BMS
MODE
Power
Normal
Eco
MODE
v
POWER
NORMAL
ECO
Travelling speed in KM/H or
MPH (units can be changed)
KM/H
INFO
PAS
Pedal Assist Mode (PAS)
If PAS is set to the PAS mode
is disabled = throttle mode only.
- defines level of PAS. Higher
the number the more PAS.
ODO
TIME
INFO - trip computer
TRIP 1 TRIP 2
ODO - odometer, total KM or M
travelled since bikes was first used
(non-resettable).
C600E
TIME - time on bike.
TRIP 1 - first distance trip setting.
TRIP 2 - second distance trip setting.
LCD Display Settings (0-4)
MODE
POWER
NORMAL
ECO
KM/H
KM/H
MPH
SET
SET
C600E
C600E
Setting 0 (SET 0).
By pressing the set
button you can
toggle through
P o w e r, N o rm a l
and Eco mode.
TRIP 1 TRIP 2
Setting 1 (SET 1).
Here you can reset
your trips 1 and 2.
SET
SET
SET
C600E
C600E
C600E
Setting 2 (SET 2).
Here you can set
maximum speed .
Setting 3 (SET 3).
Here you can set
tyre / rim type.
700C or 26/28in.
Setting 4 (SET 4).
Here you can set
the units - MPH or
KM/H.
Steps to charge the battery
1) Confirm that the local power supply corresponds with the requirement of the charger.
The input voltage is between 100V-240V.
2) The battery can be charged on the e-bike or removed from the e-bike and charged
separately.
3) Connect the charger plug and charging port of the battery first and then connect the
power plug and the power source.
4) When the red light turns on, the charging starts.
Power Plug
Charge Plug
Safe charging
Taking care of the battery is vital to ensure your safety
and to maximize its long term performance. Battery fault,
fire or explosion hazards will occur if the instructions are
not followed:
Ensure that the charger plugs are dry
and securely connected to the charger port of the
battery case.
Do not cover the battery or charger while charging. Do not use
the battery charger near flammable products or in unventilated
places. The ambient temperature should not exceed 40°C.
Keep the battery away from water to prevent shocks or shorting.
Only use the charger provided to charge the battery.
Do not disassemble or modify the battery.
Do not expose the battery to fire or extreme temperatures.
Do not allow impact or force against the battery pack.
Pull out the power plug first and then the charger plug after charging. Connecting the
power plug and the power source for a long time while not charging is not recommended.
If any abnormal conditions occur, like overheating or strange smells, stop charging
immediately and contact your authorized dealer for help.
Keep the charger in a safe place and away from children.
Regular use - if you are commuting significant distances, it is advisable to recharge the
battery before the return journey.
Occasional use - Recharge the battery at least once a week, even if the e-bike is not
used.
Always recharge the battery after use.
The manufacturer will not be responsible for any damage or injury due to
improper or unsafe use of the battery charger
LED Indication
1) LED (GREEN) - Power on, when not connected to the batteries.
2) LED (RED) - Charging
3) LED (GREEN) - Fully charged, when connected to the batteries
How to Ride the Electric Bike
Turn the power ON
Use the power button under the battery. Turn the throttle slowly to drive the bike forward.
The remaining battery power is displayed on the panel after turning the power on.
Power cut during braking
To ensure the rider’s safety, the motor will stop working when braking and restart after the brake
lever is released.
Riding
Test each of the functions before riding to get used to the functions of the e-bike like, controlling
the brake, throttle and handlebar.
Turn the throttle slowly, then sit back and enjoy the ride.
Every cyclist should obey the traffic rules.
How to Remove
the Battery
1) To remove the battery you must
unlock the key lock which is located on
the side of the battery.
How to Replace
the Battery
1) Unlock the battery and remove it from
the frame
2)Insert the new battery in and lock it in
place.
2) Remove the battery from the frame.
Adjusting the height of the seat
In order to adjust the height of the seat you’ll have to unlock the lever that can be seen in the picture
below, adjust the saddle height to the desired position without exceeding the mark carved onto the
saddle’s tube. Lock the lever in place and you’re done.
The saddle’s height must be set so that you can place your feet at the ground comfortably.
1)In order to ensure long term service of your e-bike, please use genuine parts.
2)Make sure the waterproof connection is properly connected.
3)Do not use the battery if it has outlived its life expectancy.
Troubleshooting
PROBLEM
Battery gauge
LEDs with no
display.
Motor fails to
perform its
intended function
when power is
on.
Speed-adjust
failure
POSSIBLE CAUSE
Power switch is open
Battery case with no power
Circuited
Battery case not positioned in the right
place
Switch damaged
Being in power mode
Connection error
Battery case with no power
Being in power mode
Connection error or throttle failure
Poor tyre pressure
Poor travelling
range after each
charging.
Abnormal long
charging time
Charger fails to
perform its
intended
function.
Insufficient charge
Battery aging
Poor road conditions, slopes,
headwinds and frequent use of the
brakes
Battery failure
Battery aging
Connection error
Circuited
Charger failure
For other faults that can’t be solved or
motor, controller, charger, battery
failure, please contact your authorized
dealer for help. Any changes to these
parts will invalid your warranty.
SOLUTION
Close the switch on the battery
case
Charge the battery
Replace fuse
Remove battery case, put it in
right place and then lock it
Replace switch
Change the mode from assist to
electric
Check the connection parts or
have a professional fix it
Charge the battery
Change the mode from assist to
electric
Have a professional fix or replace
it
Pump up the tyre to its correct
pressure
Fully charge the battery
Replace with a new battery case
Change the power mode
Replace battery
Replace battery
Check if the cables are correctly
pluged in.
Replace fuse
Change charger
Other faults
We recommend having your e-bike serviced by a professional cycle engineer at least once a year to ensure
ongoing safe performance. Since these problems listed may not cover every problem that might occur during
the lifetime of your product. You can contact us for more detailed questions you might have.
General Maintenance Remarks
Cleaning and Maintenance
Regular maintenance guarantees you a longer durability and road worthy state of your bike.
Maintenance includes cleaning, lubricating and ride setting adjustments. Regular maintenance work
is required to sustain a warranty claim. This applies to special corrosion (surface rust) and other
damages, which by non-observance, would not be undertaken by us. Thus, please read through the
following section thoroughly.
Lubrication
Frequency
Weekly
Monthly
Every Six Months
Yearly
Component
Brake Calipers
Brake Levers
Shift Levers
Freewheel
Brake Cables
Bottom Bracket
Pedals
Wheel Bearings
Headset
Seat Post
Lubricant
Oil
Oil
Lithium Based Grease
Oil
Lithium Based Grease
Lithium Based Grease
Lithium Based Grease
Lithium Based Grease
Lithium Based Grease
Lithium Based Grease
How to Lubricate
3 drops from oil can
2 drops from oil can
Disassemble
2 squirts from oil can
Disassemble
Disassemble
Disassemble
Disassemble
Disassemble
Disassemble
Shaft Drive
Shaft drives operate at a very consistent rate of efficiency and performance, without
adjustments or maintenance.
Brakes
The brake-shoes which are fixed on the V-brake and roller-brake wear out in time causing
gap widening between the brake-shoes and the rim flank. This is indicated by the increase
of the leeway of the brake lever.
The left brake lever controls the rear and
the right brake lever controls the front brake.
You can modify it by adjusting the brake system
through the following steps:
Simply turn the adjusting screw on the brake
lever until the gap between the brake shoes and
the rim flank averages about 1.5-2 mm.
Adjust the brakes correctly by tightening or loosening
the crosshead screws on the side of the brake arms, until the brake shows are centered to
the rim. Through tightening of the screws, the spring will be prestressed and the brake-shoe
will move away from the rim.
Warranty
NAME
Frame
Front Fork
Handlebar, Stem and
Accessories
Spindle and Parts
Seat Post
Transmission, Shift Lever
and Brake Lever
Rim
Shaft skin, Flywheel, Gear,
and Crank
Chains, Mudguard, Hanger
and Kickstand
Speed control switch to,
Controller and Charger
Brush motor
Brushless motor
Battery
FAULT
Fracture, sealing off, or
open solder
Fracture, sealing off, or
open solder
Fracture
WARRANTY PERIOD
one year
Heat treatment parts
damaged or broken
Fracture
Fracture, broken
one year
Cracking
Fracture
one year
one year
Fracture
one year
Performance Failure
one year
Performance Failure
Performance Failure
failure
one year
one year
one year
one year
one year
one year
one year
When does the warranty not apply?
?
When the bicycle is used negligently or has damage resulting from a traffic accident.
?
Normal wear and tear.
?
Poor maintenance or modifications that no longer complies with regulations or original specifications.
?
Damage due to external causes.
?
When the bicycle is used for rental.
?
Compensatory costs arising from damages or accidents, or cost incurred by loss of the bicycle’s usage.
?
Bulbs, brake blocks, tyres etc. - Are regarded consumables, therefore when replacements are required,
these need to be purchased from your local cycle shop or store.