1
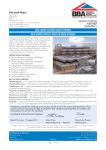
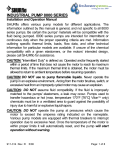
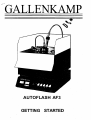
GALLENKAMP
AUTOFLASH AF3
GETTING STARTED
SANYO GALLENKAMP PLC
Health and Safety at Work
Sanyo Gallenkamp is required under the Health and Safety at work, etc. Act, 1974 and other UK legislation as
designers, manufacturers, suppliers and importers of articles for use at work to ensure that, as far as is reasonably
practicable, articles which we design, produce, supply or import are safe and without risk to health.
We are required to provide information on the safety and handling precautions to be observed when installing, operating,
maintaining and servicing our products. Such advice is contained in this manual. We are also obliged to update this
information should circumstances change and to operate a system to this end.
We should also like to point out, however that you as users have an important responsibility in the provision and
maintenance of safe working practices and conditions.
Accordingly, we draw the following matters to your attention:
1.
This apparatus should only be used as intended and within its design parameters by suitably
qualified and trained personnel who have read and understood the relevant sections of this
manual.
2.
This manual should be readily available to such personnel at all times.
3.
In addition to that which is written in the manual, normal common-sense safety precautions must
be taken at all times to avoid the possibility of accidents. Particular care is required when working
with apparatus at high temperature or pressure.
4.
Installation, maintenance, servicing and connection to electrical supplies should only be carried
out by suitably trained personnel.
TECHNICAL SUPPORT
If you are in any doubt whatsoever regarding the correct use of this apparatus, or if you require any technical data or
assistance, please contact the Sanyo Gallenkamp Customer Technical Support Department at;
Park House
Telephone :
(0116)2630530
Meridian East
Fax:
(0116)2630353
Telex:
347269 MSE G
Meridian Business Park
Leicester LE3 2UZ
WARRANTY SERVICE AND MAINTENANCE
Telephone :
(01293) 561222
Fisons Instruments
Sussex Manor Park
Fax:
(01293) 561980
Gatwick Road
Crawley
West Sussex RH10 2QQ
OVERSEAS CUSTOMERS: Should contact their local Sanyo Gallenkamp Distributor
ELECTRICITY SUPPLIES: Voltage and frequency
Sanyo Gallenkamp electrical apparatus is offered and labelled for one, or for a choice of two or more voltage ranges
ind, where necessary, different frequencies of mains supply. Sanyo Gallenkamp does not accept any responsibility for
he operation of any such apparatus should it be connected to electricity supplies which are normally outside, or vary
outside, the stated voltage and frequency values for which it is designed, nor for any consequential loss, damage or
njury, howsoever caused.
Read This Before Use!
Operating Guide to The
Gallenkamp Autoflash AF3.
This Operating Guide should be used in conjunction with the Operating Manual
supplied with the unit.
Fig 1
Fig 2
Getting Started
1. Turn on Gas, Water and Electricity Supplies to the unit.
2. Switch ON Main Switch (rear of unit adjacent to power cord). The unit will
perform a self check routine.
3. Light the pilot flame (Fig 2, Item B). Check that the flame extends to the
reference bead (Fig 2, Item C). If necessary adjust, using the gas valve on the
rear of the unit (Fig 1, Item A).
4. If necessary adjust the dip mechanism valve (Fig 2, Item D) such that the
test flame is the same size as the reference bead.
5. Clean and dry the test cup. Being careful not to wet the cup above the mark,
fill with the test sample as far as the scribed line. Alternatively measure out 70 ml
of sample into the test cup from a cylinder or a syringe.
6. Assemble the lid to the cup. Place into the heating block. Swing the test
mechanism (Fig 2) into place and engage the stirrer drive (Fig 2, Item E). Connect
the thermometer probe (Fig 2, Item F).
You are now ready to begin testing.
All tests can be aborted at any time by pressing the reset button.
Test A. - For Samples of Known Flashpoint.
1. Set the expected Flashpoint on the Set panel.
2. Press the Start button. The test cycle will now begin. Dipping will commence
about 20°C below the expected flashpoint temperature.
CONTENTS CHECK LIST
Please ensure that the following items have been delivered:One Gallenkamp Autoflash Apparatus (240V, 220V, 110V or 120V)
consisting of:One Test Unit complete with Test Cup
and Probe
One Control Unit
One Moulded Mains Lead
One Thermometer Test Lead
Set of 3 calibration resistors (100 ohms, 212.02 ohms, 138.5 ohms)
One User Manual
If any of the items are missing please contact your Gallenkamp Sales
Coordinator immediately (distributor for overseas customers) quoting your order
number.
NB
Ensure that the correct voltage has been ordered before connecting power to the
unit. The voltage can be found on the ratings plates at the rear of the Autoflash.
Test B. - For Samples of Known Flashpoints Above 100°C.
To reduce the time taken to perform the test a rapid heat function is available.
NOTE - This feature cannot be operated in conjunction with the Search Function.
1. Set the Expected flashpoint on the Set panel.
2. Press the Rapid Heat button, the light will illuminate.
3. Press Start. The temperature will rise rapidly to 60°C below the set
Flashpoint. The rapid heat light will then go out and the heating rate will
slow. At about 20°C below the set flashpoint dipping will commence.
Test C. - For Samples of Unknown Flashpoint.
This function cannot be used in conjunction with the rapid heat facility.
1. The expected flashpoint should be set to a high guess on the Set panel.
2. Press the Search Button, the light will illuminate.
3. Press Start Button. The light will illuminate and the test commence.
Flashpoint dipping will commence.
4. When a flash is detected the Flash Light will illuminate and the alarm will
sound. Press the alarm button to silence the alarm. Record the Flashpoint
temperature. Press the reset button. Allow the sample to cool. Check that the
pilot light is still alight. Relight and reset the flame if necessary.
5. Clean, dry and refill the cup with a fresh sample.
6. Use the recorded flashpoint as the Known flashpoint and continue as in
Test A.
When The Test is Finished . . .
The test will finish when either a Flashpoint is detected, or no Flash has
occurred up to about 20°C above the expected flashpoint.
If a Flashpoint is detected then the Flash light will illuminate, the alarm will
sound and the Flash temperature will be displayed. The unit will automatically
cool the sample. Silence the alarm by pressing the alarm button (alarm light will
go out). Record the Flashpoint. Press the reset button. Check that the pilot light
is still alight. If necessary, relight and reset the pilot and test flames. The unit is
now ready for the next test.
If no flash is detected the No Flash light will illuminate and the alarm will
sound. Silence the alarm by pressing the alarm button (alarm light will go out).
Determine why no flash occurred, e.g. Test flame out, Expected flashpoint set
too low, etc. Repeat test with a fresh sample.
When You Have Finished.
When all tests are complete turn off the Main Power switch. Turn off the Water,
Gas and Electricity at the supplies.
Clean and dry cup. Check that the sliding mechanism on the lid is clean and
dry.
SANYO Gallenkamp PLC
GETTING STARTED
1.
Install the Autoflash - AF3
Refer to Chapter 2 in the User Manual and install the unit.
2.
Test Cup, Probe and Test Flame
Refer to Chapter 3 in the User Manual and familiarise yourself with the
test cup, probe and test flame assembly. Ensure at all times that the
sliding faces on the shutter mechanism are kept clean.
3.
Power up the AF3
Switch on at the mains switch. This is situated at the right hand rear of the
control unit when viewed from the front. The unit will run through a quick
self test.
4.
Light the Test Flame
Turn on the gas using the valve situated to the lower left hand rear of the
test unit. Light the gas and adjust the pilot flame until it just extends to
the reference bead. Adjust the valve on the test flame block itself until the
flame is the same size (4mm dia) as the reference bead.
5.
Fill the Test Cup
Ensure that the test cup is clean and dry. Fill the cup with sample to the
scribed mark. Alternatively use a measuring cylinder to transfer 70ml of
sample. Take care neither to overfill nor wet the cup above the mark.
6.
Fit the Cup into place
Assemble the Cup and lid and place the assembly into the heating block.
Ensure that it is seated correctly. Swing the Test Flame dipping mechanism
into place. Ensure that the stirrer drive is engaged. Insert the connecting
plug into the resistance thermometer probe. Check that the plug is fully
engaged. Always disconnect by pulling the plug not the lead.
7.
Set the Expected Flashpoint
Use the Temp Set button to set the expected flashpoint temperature. Press
each button repeatedly, or hold each button down, until the desired setting
is displayed. Care must be taken not to set the expected flashpoint at too
high a temperature because of the danger of combustion/boil over of highly
flammable substances.
Note that the maximum permissible temperature setting is 399°C (750°F).
Any illegal flashpoint settings will be detected and registered as an error.
For a list of error codes see the appendix in the User Manual. To recover
from an error condition press Reset.
ii)
The No Flash LED is Illuminated
No Flash has occurred. If a flash is not detected within +_ 20°C of the
set Expected Flashpoint the Autoflash will stop the test. Determine
the reason for a No Flash situation, e.g. Test Flame out, Expected
Flashpoint set too low etc. (See section 6.6.4 in the User Manual).
Repeat the test with a fresh sample.
For more detailed information on the operation of the Autoflash-AF3 and
the method of test refer to Chapters 5 and 6 in the User Manual.