1
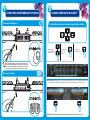
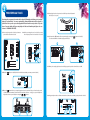
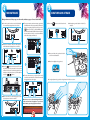
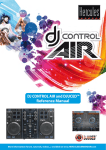
GETTING STARTED WITH
DJ CONTROL AIR AND DJUCED™
More information (forum, tutorials, videos...) available at www.HERCULESDJMIXROOM.com
1
CONNECTING HEADPHONES AND SPEAKERS
Front panel: headphones
2
LOADING YOUR MUSIC IN DJUCED™
Use the following buttons to browse through folders and files.
Browse through
the list of folders
or through files:
!
When connecting headphones, make sure that the volume level is
suitable for listening with headphones: start playing a music track
before putting on the headphones, and turn down the volume if it
seems that the sound coming from the headphones is too loud.
Expand/collapse
a folder's tree
structure:
Access the list
of files in a folder:
2.1 Browse to the location where your music files are stored on your computer.
Rear panel: speakers
2.2 After highlighting a track, press Load A to load the track on deck A, or press Load B to load the track on deck B.
DJUCED™ automatically analyzes the BPM (number of beats per minute) of the track you have loaded.
DJUCED™ supports the most commonly-used audio file formats: mp3, wav, wma, aac, aif...
3
PREVIEWING A TRACK
3.5 Start playing the track to be previewed on deck B. Prepare the track (beatmatch
the track, place a Cue point...).
Previewing lets you prepare the next track to be played (following the track that you are currently
playing for your audience). You can use previewing to beatmatch the next track to be played, or
pause the track at a precise spot so that playback will start from this exact position. Or you can
place a Cue point, which will let you start playback of the track from that point (please also see
section 8 – PLACING A CUE POINT).
3.1 You are playing a track on deck A, and want to
preview the next track on deck B.
B
3.2 Before previewing the track on deck B, you must
first completely lower the volume fader on deck B.
3.6 Synchronize the BPM (number of beats per minute) by pressing the
Or set the same BPM as on Deck A using the pitch fader (2).
Magic
B
B
Rec
Magic
A
2
1
Rec
button on deck B (1).
B
B
3.7 When you're ready to play the track on deck B, progressively raise the volume fader on deck B.
3.3 Press the
button on deck B (the deck on which the track that you want to preview is loaded).
Load B
Rec
Magic
3.4 Press the
button before you start playing the track to be previewed. Since you have already set the
volume fader to the minimum, the track won't be heard by the audience – only by you, on your headphones.
Adjust the volume on your headphones using the
buttons.
B
3.8 Progressively move the crossfader to the deck B side, where the track that you just previewed is loaded.
A
B
4
5
MIXING TRACKS
SCRATCHING ON A TRACK
Mixing tracks means to link up songs, one after another, without any gaps or silences between them.
4.1 You have loaded a track onto each deck (A and B).
You start off by playing the track on deck A.
A
4.5 To ensure a transition at the same tempo, synchronize
the BPM (number of beats per minute) of the track
that you are getting ready to play. Here, press the
button on deck B (1), so that the BPM value of
this track will match the BPM of the track that is
about to finish (on deck A). Or set the same BPM as
on Deck A using the pitch fader (2).
5.1 Press the
button to enable Scratch mode.
5.2 Start playing a track loaded on deck A, for
example.
A
B
4.2 Set the crossfader to the side of the deck on
which the track is playing (here, to the left).
A
1
5.3 Place your hand on the jog wheel on deck A,
as shown in the illustration.
B
B
5.4 Press down slightly on the jog wheel...
2
4.3 Press the
button on the front panel. The sound
that will be played for your audience on the speakers
will be the same as the sound being played on your
headphones. Adjust the volume on your headphones
using the
buttons.
4.6 To make the transition, progressively move the
crossfader toward the deck on which the new track is
being played (here, to the right).
A
4.4 Before the end of the track being played, start
playing the track loaded on deck B.
B
B
When there are 30 seconds remaining until the end
of the track, an alert is displayed to let you know
that it's time to get ready to play the next track.
!
< 30s
5.5 ... and gently turn the jog wheel to the right and to the left, in succession.
6
USING THE PADS
6.3 Creating and playing a loop from a track that has been loaded and is
being played
Press the
Effects, loops and samples are triggered
using the pads.
Loops
Loops
Effects
Sample
6.1 Applying an effect on a track that has been loaded and is being played
Press the
Loops
Effects
button.
Effects
Lightly tap on one or more of the
pads to trigger the effect(s).
Loops
button.
Effects
Sample
When a track is being played, tap on pad 1 to create the start of the loop (or “Loop in” point), and then
tap on pad 2 at the moment where you want to mark the end of the loop (or “Loop out” point).
Use the vertical lines in DJUCED™ (1 line = 1 beat), as well as the music being played, to help you
determine the best place for the end of the loop.
DJUCED™ plays a part of the track as a loop. Tap on pad 2 to exit the loop and return to normal
playback.
1
2
The corresponding effect is displayed
in DJUCED™, and is applied to the track
being played.
Sample
Tap on pad 3 to divide the loop length in half, and tap on pad 4 to double the length of the loop.
6.2 Playing a sample on a track that has been loaded and is being played
Press the
Loops
Sample
button.
Effects
Sample
Tap on one or more pads to trigger the
samples (a short snippet of music or
sound). The more pressure you apply on
the pad, the louder the volume of the
sample played will be. When a sample is
triggered on a pad, the pad stays lit up
the same amount of time as the sample
length: perhaps one second, for a short
sound like a drum hit; a few seconds, for
a sample of music (for example).
÷2
X2
7
8
USING THE AIR CONTROL
PLACING A CUE POINT
A Cue point is a marker that you can place in a music track. It lets you start
playback of the track from that point.
8.1 Press the
Loops
7.1 Press the
Effects
Effects
Sample
A
button.
7.2 Press on a pad and, while maintaining pressure
on the pad, move your hand above the proximity
sensor to modulate the effect.
button to place a Cue point in the track loaded on deck A, for example.
SENSOR + PAD
Min
Max
Loops
Effects
Sample
8.2 Press the
Click on the
button again to start playback from the Cue point you have placed in the track.
button (in the DJUCED™ software) to delete the Cue point.
9
CREATING
PLAYLIST
CRÉER UNEALISTE
DE LECTURE
A
playlist
is lecture
a set of-ou
tracks
thatest
you
to group
together
as part
of a
Une
liste de
playlistunchoose
ensemble
de morceaux
que– vous
pouvez
specific
genre
(electro,
rock...)
or theme
(favorites,
birthday,
80s...).
regrouper
sous
un genre
(électro,
rock,...)
ou party,
un thème
(favoris,
soirée,
anniversaire, 80s,...) précis.
9.1 Highlight
of the tracks
thatmorceaux
you want que
to
Mettez enone
surbrillance
l’un des
add
the playlist,
usingà these
voustosouhaitez
ajouter
la listebuttons:
de lecture en
utilisant les boutons suivants :
The
appearsdésormais
on the left.à gauche.
Le bouton buttonapparaît
9.2 Click
Cliquez
pour créer
une liste de lecture.
9.2
thesur le bouton
button to create
a playlist.
Saisissez
un
nom
pour
la
liste
de
lecture,
Enter a name for the playlist, then click puis
OK. cliquez sur OK.
La nouvelle
liste de
lecture
dansfolder.
le dossier Playlists.
The
new playlist
appears
inapparaît
the Playlists
GETTING STARTED WITH
DJ CONTROL AIR AND DJUCED™
Retournez
aufolder
dossier
contenant
votre
9.3 Return
9.3
to the
containing
your
music,
musique
en utilisant
using
these
buttons:les boutons suivants :
9.4 In
Dans
DJUCED™,
sélectionnez
un tracks
ou plusieurs
morceaux
avec la souris.
9.4
DJUCED™,
select
one or more
using your
mouse.
En holding
maintenant
appuyée
la touche
votre clavier,
vous pouvez
sélectionner
plusieurs
fichiers
By
down
the SHIFT
key onMAJ
yourde
computer's
keyboard,
you can
select several
consecutive
files.
consécutifs.
Drag
and drop the selected files into the playlist you have created (here, “My Playlist”).
Faites glisser les fichiers sélectionnés vers la liste de lecture créée. Ici, “My Playlist”.
Hercules is a division of
Guillemot Corporation
More information (forum, tutorials, videos...) available at www.HERCULESDJMIXROOM.com


![[English] 450 KB](http://vs1.manualzilla.com/store/data/005878868_1-e5f7783ea728201c5d3bf440f5f55954-150x150.png)