1
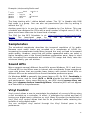
Mixxx Digital DJ
Version 1.8.0 User Manual
This manual is also available in:
• German (Deutsch)
• Spanish (Español)
www.mixxx.org
Copyright© 2010 Mixxx
Table of Contents
1. Beginner's Guide
2. Introduction
3. Installation
1. Windows
2. Linux
3. OS X
4. User Interface Overview
1. Playback Controls
2. Tempo Controls
3. Headphone and Flanger
4. Volume and EQ
5. Waveform
6. Waveform Overview
7. End of Track Mode
8. Master and Crossfader Controls
9. Library
5. Configuration
1. Master and Headphone Outputs
2. Latency
3. Samplerates
4. Sound APIs
5. Vinyl Control
6. DJing with Mixxx
1. Loading Tracks
2. Waveform Displays
3. Beatmatching and Mixing
4. Headphone Cueing
7. Keys and Hardware Controllers
1. Keyboard Shortcuts
2. MIDI Controllers
8. Getting Involved
1
Introduction
Mixxx is software designed for DJs that allows you to mix songs live. Mixxx
natively supports MP3, OGG, FLAC, WAVE, and AIFF playback (with plugins to
support additional formats) and can be controlled by numerous DJ MIDI
controllers. Turntables with timecoded vinyl can also be used to control Mixxx
through the vinyl control feature.
Installation
Windows
Windows users can install Mixxx by double-clicking on the Mixxx installer
executable. Mixxx is supported on Windows XP, Vista, and Windows 7, with
native 32 and 64 bit versions. (It may also run on Windows 2000.)
Linux
Linux users can often find Mixxx included with their favourite distribution. For
example,
Ubuntu
users
can
install
Mixxx
through
the
Applications→Add/Remove… menu item. If Mixxx is not packaged for your
distribution, you can compile Mixxx from scratch. For details on compiling
Mixxx, see: Compiling on Linux
OS X
OS X (Intel) users can install Mixxx by double-clicking the Mixxx zip archive,
and then dragging-and-dropping the Mixxx bundle into their Applications folder.
Mixxx requires an Intel Mac running OS 10.4 or newer.
2
User Interface Overview
Mixxx's user interface is designed to be simple and easy to use when DJing live.
This section outlines the main features of Mixxx's interface.
Playback and Hot Cue Controls
The playback controls allow you pause, play, and otherwise
manipulate the playback of a song. The REV button toggles
reverse playback when pressed during regular playback.
When playback is stopped, pressing the CUE button places a
cue-point at the current position on the waveform. A cuepoint is marked by a white vertical line in the waveform view.
If the CUE button is pressed during playback, the song will
seek to the cue-point and stop. Holding down the CUE button
while the song is positioned on the cue-point will result in the
song temporarily playing back, and seeking back to the cuepoint upon release of the CUE button. This describes the “CDJ
Mode” cue behaviour, which is modifiable in the preferences
under Interface→Default cue behaviour.
The Hot Cue buttons allow you to place additional cue-points
inside a song, which immediately start playback when
triggered. Clicking a Hot Cue button the first time will place a
hot cue at the current position in the song, and pressing it
again will begin playback from that position. Hot cues are
useful for marking different sections of a song for easy access
and for manipulating a song. Placing hot cues at the start of
different drum sounds in a song allows you to use the Hot Cue
buttons as a mini drumkit. Try placing hot cues on different
parts of a melody, and use that to remix songs on-the-fly.
3
Tempo and Looping Controls
The tempo controls allow you to slow down and speed up a
song. This is frequently useful for beatmatching songs when
mixing. The RATE slider changes the tempo of a song when
it is moved. The PERM buttons apply fine adjustment to the
RATE slider, and the TEMP buttons apply a temporary pitchbend when depressed. The amount by which the PERM and
TEMP buttons alter the pitch of the track can be changed in
the Options→Preferences→Interface menu. The SYNC button
attempts to automatically match the tempo of the song in
the corresponding channel with tempo of the song in the
other channel, based on the calculated BPM.
The IN, OUT, and RELOOP/EXIT buttons let you create a loop
within a song. The IN button places a starting marker for a
loop at the current playback position, and the OUT button
places an ending marker and begins looping. The
RELOOP/EXIT button is used to break out of a loop if you're in
one, or seek back inside the loop if you're outside of it. Loops
can be very useful when you're approaching the end of a
song, but you don't have the next song ready yet. Try
placing a loop in a song's outro during your next mix.
See also the SYNC button below.
Headphone, Flanger, and Tempo
Synchronization
When toggled, the HEADPHONE button sends the selected
channel's audio to the Headphones output audio device
selected in the preferences under Sound Hardware. This
feature is commonly used when headphone cueing and
beatmatching.
The FLANGER button enables a built-in flanger effect on the
selected channel. A flanger effect applies a “sweeping”
sound to the channel and can add extra depth to a mix when
used tactfully.
The tempo SYNC button SYNC will change the tempo of the
song in the current channel to match the song in the
opposite channel. SYNC can be used to beatmatch songs
quicker, and is useful for DJs of all skill levels.
4
Volume and EQ
The VOL slider controls the volume of the selected channel.
The GAIN knob can be used to apply extra amplification to a
quiet song, which can be used to match its volume with the
song in the other channel. The HIGH, MID, and LOW knobs
perform equalization on the channel, reducing or increasing
high, mid and low frequencies accordingly. The light at the
top of the VU meter indicates when the audio in the selected
channel is clipping. If this light goes on, reduce the gain or
EQs for this channel to eliminate distortion.
Waveform
The waveform display shows the loaded tracks' waveforms near the playback
position. On songs with certain dynamics, the waveform displays will visibly
show the beats in the song. When a cue mark is placed, it is drawn on the
waveform as a vertical white line. Clicking and dragging on a waveform allows
you to seek through a song.
Waveform Overview
The waveform overview provides some important
information about the song currently loaded in the
corresponding channel. From left to right, these
are: Track tempo in BPM, current playback position,
and track duration. The more interesting part
however, is the waveform visualisation of the song,
which is useful for seeing breaks or other important
changes in the track so that you don't get surprised
when they occur while DJing. It also allows you to
jump to an arbitrary position in the track by clicking
somewhere on the waveform.
End of Track Mode
The end of track mode determines the Mixxx's behaviour when it
reaches the end of a track. The end of track mode is changed by
5
clicking the block to toggle between the three available options; each
channel has it's own end of track mode setting that can be changed
independently. Stop mode will do nothing further once the end of the
track is reached until you load a new track into the channel or seek
backwards through the current track. Loop will return to the
beginning of the finished track and play it again from the start. Next
will automatically load and play the next song in the 'play queue'.
Master and Crossfader Controls
The crossfader (in the center of the picture) enables you to smoothly fade
between the two channels and defines what you hear through the master
output. When set all the way to the left, only channel 1 is heard, and set to the
right, only channel 2 will be heard. Every position in between gives you the
mixed output of both channels. (Note: The actual volume of each channel
depends on the crossfader curve, defined in the Crossfader preferences pane.)
The Volume and Balance knobs control the volume and the balance (stereo
distribution) of the master output. The Pre/Main knob controls what you hear
on the headphone output. It works like the crossfader but instead of
crossfading between channel 1 and 2, it crossfades between the Master and
Cueing signal. If the Pre/Main knob is set to the left, one only hears the cueing
signal, which can be useful for prelistening tracks. The HeadVol knob controls
the volume of the headphone output.
The Depth, Delay and LFO knobs control the flanger. A flanger is an effect that
mixes the input signal with a delayed copy of itself which leads to
interferences in the signal and creates a comb-filter like effect. By routing the
output of the effect back into the input (feedback), this effect can be
enhanced. In Mixxx, the volume of the output signal that is routed back into
the input can be controlled with the depth knob, which controls the intensity of
the effect. The delay knob sets the initial value for the delay length. Inside the
effect however, this value is not constant but modulated by an LFO (low
frequency oscillator), controllable with the corresponding knob. If this is too
technically for you just play around with it and see how the different
parameters affect the sound. :)
6
Library
The library manages all your music files. This is where you can find the tracks
you want to play and load them into a channel. Alternatively, you can also use
your external filemanager and drop files onto the waveform display. The
sidebar on the left contains different collections of music. The view on the right
displays the songs in those collections.
The Search box in the top-left the current view for songs that match your
query.
The Library is displays a sortable list of all the songs in your music library.
Mixxx imports your music library automatically when it is run for the first time,
and automatically detects newly added songs on each subsequent run. If you
want to manually refresh your library without exiting (for example because you
added or moved files) you can do this with Library→Rescan Library in the
menu.
To load a track into a player, you can either simply drag it to the waveform
display or use the context menu (right-click on a track). The right-click context
menu also allows you to add a track to the Auto DJ queue, playlists, or crates.
The Missing Songs view is accessible by expanding Library tree item in the
sidebar. Any songs that were previously loaded into your library, but were later
detected to be missing from your hard disk by Mixxx will appear here. Mixxx
does not automatically delete records of missing songs so that extra metadata
Mixxx might have (such as hot cues and the BPM) will not be lost if the file is
replaced.
The Featured Artists view contains free promotional music that may come
bundled with your version of Mixxx. These songs are DJ friendly, and you are
licensed to perform live with these songs at any event you'd like.
The Auto DJ queue is a special playlist that contains extra controls for enabling
7
automatic mixing. Toggling the “Enable Auto DJ” button within this view will
tell Mixxx to automatically load the next song from this playlist when the
current song is nearly finished, and crossfade into it. Mixxx will continue to
automatically mix until the Auto DJ playlist is empty.
Playlists can be created by right-clicking on the “Playlists” sidebar item, and
selecting “New Playlist”. Songs can be added to a playlist by finding them in
the Library, and drag-and-dropping them onto the name of a playlist in the
sidebar, or by selecting a song in the library and right-clicking on it. Playlists
are not directly loadable into Mixxx's players as Mixxx is primarily intended for
live, attended performance use. However, you can add the contents of a
playlist to the Auto DJ queue, and use automatic mixing.
Crates are unordered collections of songs, and are similar to playlists. A crate
can be created by right-clicking on “Crates” in the sidebar, and selecting “New
Crate”.
Browse mode works like a file-manager and allows you to load songs that are
not necessarily already in your Mixxx library.
The Analyze view allows you to see a list of recently added tracks, and to run
BPM detection on them in advance.
The iTunes (Windows and Mac OS X only) and Rhythmbox (Linux only) views
allow you to view the music libraries you have created in 3rd party
applications.
8
Configuration
The first time Mixxx is started, you are asked to select a directory containing
your music library. This directory will be scanned and any music found will be
indexed in Mixxx's internal library. The music library path can be changed at
any time in the preferences, via the Library and Playlists pane.
Mixxx's preferences can be accessed by selecting Options→Preferences.
When Mixxx is launched, it tries to select a reasonable sound device for output.
You can check which device Mixxx has selected in the Sound Hardware pane in
the preferences.
Master and Headphone Outputs
Mixxx has two audio paths: The Master output and the Headphones output.
The Master output is what a DJ should have connected to their main speakers,
while the Headphones output should be connected to their personal
headphones. The headphone output is optional, and can be used for
Headphone Cueing.
To configure the Master and Headphones outputs, enter Mixxx's preferences
and select the Sound Hardware pane. In order to select a headphone device,
either a soundcard with at least 4 channels of output (two stereo outputs, as
featured on 5.1 soundcards) or two separate stereo soundcards is required.
The output channel mapping, which determines the physical jack on the
soundcard that the audio comes out of, can be selected under “Channel”.
Example Soundcard Configurations
Single audio device (4 Channel Soundcard)
Master device:
Echo Digital AudioFire4
Headphone device: Echo Digital AudioFire4
Channels: 1/2
Channels: 3/4
Dual audio devices (Two Stereo Soundcards)
Master device:
ElCheapo USB Audio
Headphone device: SoundBlaster Live!
Channels: 1/2
Channels: 1/2
Using External Mixers
Currently, Mixxx has no special mode for routing the output of a single deck to
a separate output, which is what you need when using an external mixer.
However, this behaviour can be achieved with a simple trick. Move the
crossfader all the way to the left and turn the “Pre/Main” knob all the way left
as well. This will give you only the pre-listen signal on the headphone output.
Now, enable Cueing for the second channel by toggling channel 2's
HEADPHONE button. With this setup, channel 1 will be playing on the master
output and channel 2 will be playing on the headphone output. The master and
headphone outputs of your soundcard should then be plugged into channel 1
and channel 2 of your external mixer.
9
Latency
The latency in Mixxx indicates the amount of time it will take for the audio to
respond to any change in a control. For example, a latency of 36 ms indicates
that it will take approximately 36 ms for Mixxx to stop the audio after you
toggle the play button. Generally speaking, the lower the latency, the more
responsive Mixxx will be. A latency between 36-64 ms is acceptable if you are
using Mixxx with a keyboard/mouse or a MIDI controller. A latency below 16 ms
is recommended when vinyl control is used because Mixxx will feel
unresponsive otherwise.
In order to tweak your latency, reduce the latency slider in the Sound
Hardware preferences pane and experiment until you can reliably run Mixxx
without hearing any crackles, pops, or dropouts in the audio. Changing
your Sound API to ASIO on Windows or JACK on Linux may allow you to reduce
your latency setting, but this depends on your hardware configuration.
Keep in mind that lower latencies require better soundcards and faster
CPUs and that zero latency DJ software is a myth (although Mixxx is
capable of < 10 ms operation).
Some tips for reducing latency on linux
For detailed information on latency in Linux, you should consult the Web, as it's
quite a complex topic. The Jack FAQ is recommended reading, especially the
section on “How should I configure my Linux 2.6 Operating System?”. Other
useful resources are the Linux Realtime guide and Gentoo's documentation on
the subject.
The first thing to try if using ALSA is to set your Master output hardware to just
“default” instead of specific hardware. (This made a huge difference on a test
system with integrated Intel soundcard.) The drawback to this is that system
sounds (KDE beeps and such) will now be mixed in and will come out the main
output.
The second thing one can try to reduce system latency is getting a realtime
kernel. If you're using a binary kernel, this might be as simple as installing a
realtime enabled kernel with your package manager (if your package system
offers one of course). Otherwise download kernel sources and the realtime
patch for your kernel version. The patch can be found here. Untar the patch to
your kernel source directory, apply it and configure/install the kernel as usual.
There are basically two options for configuring the use of realtime-capabilities.
The first and simplest one is to use the realtime-lsm modul. This only requires
to install the kernel-modul with your package manager. After that you can load
it and grant realtime privileges to particular users/groups by setting uid/gid as
module options (for example: “modprobe realtime gid=18” gives realtime
permissions to the audio group on my system). Unfortunately, this method is
deprecated and doesn't work any longer since Linux kernel version 2.6.24). In
current kernels you have to use rlimits with PAM to enable realtime priority
support. (Note: This is also the prefered method for older 2.6 kernels that
might still work with the realtime-lsm modul). To use this method, edit
/etc/security/limits.conf :
10
Example: /etc/security/limits.conf
*
* soft
@audio
@audio
@audio
hard
rtprio
- rtprio
- memlock
- nice
rtprio 0
0
99
unlimited
-19
The lines starting with * define default values. The ”@” in @audio tells PAM
that audio is a group. One can also set permissions per user by writing it
without the ”@”.
Another great tip is to use the new BFS scheduler by Con Kolivas. This new
scheduler was designed for CPUs with a small number of logical cores (1-16). It
gives much lower latencies for these kinds of setups.
The FAQ for the BFS Scheduler is at: http://ck.kolivas.org/patches/bfs/bfsfaq.txt.
The
launchpad
page
for
a
PPA
by
Darxus
is
at:
https://launchpad.net/~darxus/+archive/bfsbfq.
Samplerates
The soundcard samplerate describes the temporal resolution of its audio.
Because most audio tracks are encoded at a samplerate of 44100 Hz,
increasing the samplerate inside Mixxx beyond this may not lead to increased
audio quality. However, users that still prefer upsampled audio can select a
higher sampling rate in the Sound Hardware preferences pane. Keep in mind
that increasing the samplerate will increase CPU usage and likely raise the
minimum latency you can achieve.
Sound APIs
Mixxx supports several different Sound APIs across Windows, OS X, and Linux.
A Sound API is a tool Mixxx uses to interact with soundcards. Some soundcards
come with drivers that are provide lower latency with certain Sound APIs, so
different APIs can be selected from Sound Hardware preferences pane.
On Windows, ASIO is generally the lowest latency API. On OS X, CoreAudio is
the best choice, and on Linux, JACK or ALSA provide the best compatibility
and performance. Linux users wishing to use JACK should ensure they run
the jackd daemon before launching Mixxx, otherwise JACK will not appear
as a Sound API in the preferences.
Vinyl Control
Vinyl control allows a user to manipulate the playback of a song in Mixxx using
a real turntable as a controller. In effect, it simulates the sound and feel of
having your digital music collection on vinyl. Many DJs prefer the tactile feel of
vinyl, and vinyl control allows that feel to be preserved while retaining the
benefits of using digital audio.
You can configure vinyl control through the Vinyl Control pane in the
preferences.
11
More information about Mixxx's vinyl control and supported hardware
configurations is available on the vinyl control wiki page.
Input Device Selection
Mixxx can be controlled by up to 2 decks with either timecoded vinyl or
timecoded CDs. In the “Deck 1” and “Deck 2” drop-down boxes, select the
soundcard(s) which your decks are plugged into. In the channel selection dropdown menu, select the channel pairs corresponding to the plug on your
soundcard that your deck(s) are plugged into.
Mixxx supports vinyl control input through a single soundcard with 4-channels
of input (two stereo line-in jacks), or through two separate soundcards which
each have 2-channels of input (a single stereo line-in jack). Vinyl control
requires the use of stereo line-in jacks - Mono or microphone inputs will not
work.
Turntable Input Preamp
Many turntables provide unamplified “phono level” output, which must be
boosted to a “line level” signal. Normally, a mixer provides this amplification,
but if you're plugging a turntable's phono output directly into your soundcard,
Mixxx can do the amplification. The “Turntable Input Preamp” slider allows you
to adjust the level of preamplification applied to your decks' signal.
12
Vinyl Configuration
Several different types of time-coded media can be used to control Mixxx.
Configure the “Vinyl Type” drop-down menu to match what type of time-coded
vinyl or CD you are using on your deck(s).
The “Lead-in Time” setting allows you to set a dead-zone at the start of your
vinyl or CD, where the time code will be ignored. This is useful in situations
where the time code begins very close to the edge of a vinyl, which can make
back-cueing over the first beat in a song tricky to do without your turntable's
needle falling off the vinyl. Setting a lead-in time of 20 seconds or more helps
alleviate this by giving you more room on the vinyl to cue with. It's also useful
when you've worn the grooves at the edge of a control record to the point that
it no longer works reliably: you simply set the lead-in so that the start of the
songs begin in good groove area. You can keep doing this until you run out of
groove area, thereby decreasing your record replacement frequency.
Control Mode
Mixxx supports three control types on all of the timecodes we support.
“Absolute Mode” provides Mixxx with both pitch and position information from
the timecode, and allows you to seek by needle dropping on your vinyl or
seeking on your CDJ. “Relative Mode” takes the position to be relative to your
deck's starting point, and only controls the pitch in Mixxx. It is not possible to
seek using your deck in relative mode. “Scratch Mode” is an enhanced version
of relative mode, and only applies to FinalScratch vinyl. Scratch mode improves
performance slightly while scratching, but is not necessary for better
performing timecodes like Serato. Finally, “Needle-skip Prevention” allows
Mixxx to detect and ignore small changes in needle position, such as when
you've accidentally bumped your turntable. This can be advantageous in a live
performance environment, but the downside is that it reduces responsiveness
during scratching. Consequently, disabling needle-skip prevention is
recommended for scratch performances.
Signal Quality
A successful vinyl control setup hinges on good signal quality. Many factors can
affect signal quality, but the most important one is ensuring the volume level
of your timecode signal is moderate. A signal that is too loud or too quiet will
cause adverse performance, often characterized by a loss of position data
causing absolute mode to behave like relative mode. For more information on
improving signal quality and troubleshooting, please see the vinyl control wiki
page.
Mixxx represents your timecode signal quality as a pair of real-time bar graphs.
The two graphs correspond to your “Deck 1” and “Deck 2” input devices. The
left-most column in each graph represents the overall status of the timecode
signal. A full bar with an “OK!” indicates everything is working well. The latter
two columns in the graph represent the raw, unprocessed stereo signal coming
from your decks. A good signal will appear as a pair of fluctuating green bars,
each of which will be out of phase. Red bars indicate the volume is too low or
13
two high, and the “Turntable Input Preamp” setting can be adjusted to boost
the volume.
14
DJing with Mixxx
Mixxx was designed to be easy to learn for both novice and experienced DJs.
The user interface mimics a hardware DJ mixer, but also includes several extra
elements to gives DJs a better user experience, such as the parallel waveform
displays.
Loading tracks
Songs can be loaded into a player in several ways:
• Right-click the library track table: Right-clicking on a track in the table will
present the options “Load in Player 1” and “Load in Player 2”, among others.
Making either selection will load a track into a player.
• Drag-and-drop from library track table: Dragging-and-dropping a song from
the track table onto a waveform display will load a track into a player.
• Drag-and-drop from external file browser: Dragging-and-dropping a song
from an external file browser directly onto a waveform display in Mixxx will
load that song. This function is also known to work on some platforms with
other applications. For example, on OS X, dragging-and-dropping a track from
iTunes onto one of Mixxx's waveform displays will load that song into a
player.
Waveform displays
There are two main waveform displays in Mixxx that are used to display the
waveform of the songs you are mixing. These are useful because they allow
you to see features in a song (like a breakdown) before you hear them. The
waveform displays are aligned parallel to each other in order to make beat
matching easier, as it is possible to beatmatch visually by aligning the beats
that appear in each waveform.
Clicking and dragging on a waveform allows you to seek through a song in both
directions. The waveform display is updated in realtime upon seeking. There
are two smaller waveform summary displays located adjacent to the main
waveform displays. These smaller displays show the waveform envelope of the
entire song, and are useful because they allow DJs to see breakdowns far in
advance. Vinyl DJs will find this familiar because quiet sections of songs can be
visually distinguished when looking at a vinyl record, and this is a useful tool
when planning your mixes on-the-fly.
Beatmatching and Mixing
Beatmatching is the process of adjusting the playback rate of a song so that
it matches the tempo of another song. Beatmatching also involves adjusting
the phase of the beats in a song so that they are aligned with the beats in the
other song. Matching the tempo and aligning the beats are the two things a DJ
must do to beatmatch.
15
In Mixxx, you can match the tempo of two songs by adjusting the playback
rate sliders on left and right side of the user interface. You can adjust the
phase of the beats by clicking-and-dragging on either waveform display to
temporarily slow down one of the songs until the beats are aligned. The
temporary pitch bend buttons can also be used to momentarily adjust the
playback rate, allowing you to “shuffle” the beats in a song forwards or
backwards, so they can be aligned with another song.
Once the tempos are matched and the beats aligned between two songs, they
are said to be beatmatched. A “perfect” beatmatch is near impossible - there
will always be some tiny difference in the playback rates. A keen DJ will keep
his or her ears open and listen for the beats drifting out of alignment. This has
a distinct “double bass kick” sound which is often preceded by the kick
weakening in intensity (as the two kicks drift out of phase). When this happens,
the beats can be realigned by simply tapping one of the temporary pitch bend
buttons a few times in the appropriate direction. Now get out there and make
Tiesto jealous!
Headphone Cueing
Headphone cueing is a technique DJs use to listen to the next track they want
to play in their headphones before playing it out the main speakers. Mixxx
allows a DJ to route audio from either player to their headphones by toggling
either of the “HEADPHONE” buttons located on the far left/right sides of Mixxx's
interface. Headphone cueing is useful because it allows a DJ to beatmatch the
next song in their headphones before bringing it into their mix by sliding the
crossfader.
Recording your mix
You can record Mixxx's master output in real time to an uncompressed linear
PCM WAV (RIFF) sound file by doing the following:
1. On the menu bar, click “Options”
2. Click “Record Mix”
3. Choose where to save it and what to call it then click OK
4. Mixxx will then wait until you start playing some music before it begins
recording. The recording will begin about two seconds after that. (If you want
it to get your first sounds, just press Play then Cue (or Pause) to start it, then
begin mixing two seconds later. You can remove the initial silence with an
audio editing program like Audacity after you finish mixing.)
16
Keyboard and MIDI Controllers
Keyboard Shortcuts
Function
Crossfade Left
Crossfade Right
Playback
Set Cuepoint
Seek Backwards
Reverse Playback
Seek Forwards
Cue
Cue Go-to-and-stop
Tempo (BPM) Sync
Tempo Adjust Down
Tempo Adjust Up
Small Tempo Adjust
Down
Small Tempo Adjust Up
Temporary Tempo
Adjust Down
Temporary Tempo
Adjust Up
Small Temporary
Tempo Adjust Down
Small Temporary
Tempo Adjust Up
Headphone Cue (PFL)
Low EQ Kill
Mid EQ Kill
High EQ Kill
Flanger
BPM Tap Tempo Adjust
Hotcue 1
Hotcue 2
Hotcue 3
Hotcue 4
Clear Hotcue 1
Clear Hotcue 2
Clear Hotcue 3
Clear Hotcue 4
Deck 1
Deck 2
Master
H
G
D
Shift+D
A
Shift+A
S
E
Shift+E
1
F1
F2
Shift+F1
L
Shift+L
J
Shift+J
K
O
Shift+O
0
F5
F6
Shift+F5
Shift+F2
F3
Shift+F6
F7
F4
F8
Shift+F3
Shift+F7
Shift+F4
Shift+F8
T
5
4
3
2
Q
Z
X
C
V
Shift+Z
Shift+X
Shift+C
Shift+V
Y
6
7
8
9
U
M
,
.
/
Shift+M
Shift+<
Shift+>
Shift+?
17
Quick Reference
Printable (large) keyboard reference sheet
Customizing
The shortcuts are defined in a text file, and can be changed by the user Linux: /usr/share/mixxx/keyboard/Standard.kbd.cfg
MacOS X: <Mixxx bundle>/keyboard/Standard.kbd.cfg
Windows: <Mixxx directory>\keyboard\Standard.kbd.cfg
MIDI Controllers
MIDI controllers are external hardware devices used that can be used to control
audio applications, like Mixxx. Many DJs prefer the “hands-on” feel of a MIDI
controller with Mixxx because it can feel similar to using a real mixer and
turntables.
Mixxx can work with any MIDI controller that has drivers for your OS, as long as
there is a MIDI mapping file to tell Mixxx how to understand it. Mixxx comes
bundled with a number of MIDI mapping presets for the devices listed below.
Often times these mappings are contributed by users, but the Mixxx team has
no way of judging the quality of the mappings because we don't own the
devices ourselves. There are two different levels of support for devices in
Mixxx: Mixxx Certified Support and Community Support. Mixxx Certified
mappings are verified by the Mixxx Team. Community Supported mappings are
mappings provided by the Mixxx Community, but the Mixxx team is unable the
verify their quality.
Mixxx Certified Mappings
• Hercules DJ Console RMX
• Hercules DJ Console MK2
• Hercules DJ Control MP3 e2
18
• Stanton SCS.3d
• Stanton SCS.3m
• Stanton SCS.1m
• M-Audio X-Session Pro
• DJ TechTools MIDIFighter
Community Supported Mappings
These mappings have been verified as working by the Mixxx community.
However, they might have bugs or rough edges. If you run into issues with
these mappings, please file a bug on our bug tracker or tell us about it on our
mailing list, forums, or IRC channel.
• Hercules DJ Console MP3
• Hercules DJ Control Steel
• Hercules DJ Console Mac Edition
• Mixman DM2
• Tascam US-428
• M-Audio Xponent
• Evolution X-Session
• Ecler NUO4
• FaderFox DJ2
• Vestax VCI-100
• Numark Total Control
• Behringer BCD3000
• Akai MPD24
Before purchasing a controller to use with Mixxx, please consult our Hardware
Compatibility wiki page. It contains the most up-to-date documentation on
which controllers work with Mixxx and what the caveats of each device are.
Device support varies for each supported OS, so please make sure to consult
the documentation.
19
Getting Involved
Mixxx is a community-driven project involving many DJs worldwide. Without the
contributions from these DJs, Mixxx would not exist, and we're constantly
looking for more contributors.
If you're interested in getting involved with Mixxx, send our Developer's Mailing
List an email or hop on our IRC channel (#mixxx on Freenode).
If you're interested in coding (C++):
• Take a look at our specs/projects page on the Mixxx Wiki and see if anything
catches your eye. If you want to start coding one of these, go right ahead!
• We're always willing to mentor and help out new coders
• Take a look at our bug tracker, try to fix a bug!
• Send patches to mixxx-devel or post them as bugs on Launchpad!
If you're not interested in coding, there are still many ways to help our project:
• Test beta and trunk versions of Mixxx to make sure new features and fixes
work well in all cases.
• Create mappings for MIDI controllers Mixxx doesn't yet support. (Advanced
functionality requires some Javascript-like programming.)
• Help answer questions in the forum.
• Help promote Mixxx - If you've got a blog, write an article about Mixxx. Blog
about our new releases when they come out. Any exposure on the web and in
print helps our project grow, and is much appreciated.
• Send us some photos of you using Mixxx at a gig!
20