1
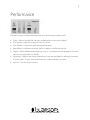
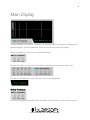
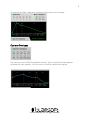
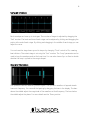
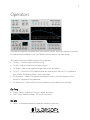
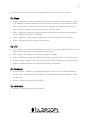
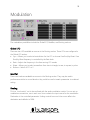
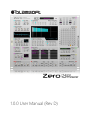
1.0.0 User Manual (Rev D)
2
Overview
Zero packs additive, subtractive, FM, and RM synthesis into one very flexible and powerful
synth. At the heart of Zero are six additive waveform generators, or operators. The operators
can modulate each other through frequency or ring modulation. There are two multi-mode
filters for subtractive synthesis. Low frequency modulation is available through dedicated LFOs
and envelopes in the operators, two global LFOs, and a routable mod matrix. Three onboard
effects; chorus, delay, and reverb, complete the signal path. There is also a lot of fun to be
had when experimenting with Zero.
Color Coding
The synth is divided into sections that are labeled with a color that has a meaning.
•
Cyan – Operator controls (per operator)
•
Magenta – Low frequency modulation, unison, and performance
•
Black – Envelope selection
•
Orange – Audio rate modulation matrix and amp
•
Green – Filter 1
•
Yellow – Filter 2
•
Red - Effects
© 2015 Blamsoft, Inc. All rights reserved.
3
Performance
The Main section includes parameters found on almost every modern synth.
•
Glide – Adjusts the rate that the pitch updates when a new note is played
•
Pitch Range – Adjusts the range of the pitch wheel
•
Pitch Wheel – Controls the pitch during performance
•
Mod Wheel – Performance control that is routable in the Routing section
•
Legato – When enabled and polyphony is set to 1, envelopes do not retrigger if notes are
continuously played with no breaks
•
Polyphony – Adjusts how many simultaneous notes can be played by setting the number
of synth voices. A synth voice is active when its amp envelope is not zero.
•
Volume – Sets the output volume
© 2015 Blamsoft, Inc. All rights reserved.
4
Main Display
This is an area you will use a lot. It displays the operator harmonics, operator envelopes, and
global envelopes. These are selectable from the buttons surrounding the display.
Above the display you can access the global envelopes.
Below the display you can access the operator envelopes and the operator harmonics.
The text in the lower right corner shows you what is being displayed.
Global Envelopes
There are three global envelopes, filter 1 frequency, filter 2 frequency, and the amp volume.
© 2015 Blamsoft, Inc. All rights reserved.
5
For example, the filter 1 frequency envelope is being shown on the display.
Operator Envelopes
The panning, volume, RM/FM modulation amount, pitch, and phase all have separate
envelopes for each operator. Click the button to show the particular envelope.
© 2015 Blamsoft, Inc. All rights reserved.
6
Using an Envelope
Each envelope can have up to six stages. The number of stages is adjusted by dragging the
“End” number. The level and time of each stage can be adjusted by clicking and dragging the
points at the end of each stage. By clicking and dragging in the middle of each stage you can
adjust the curve.
You can have the stage times synced to tempo by changing “Time” control to Div, meaning
beat divisions. The sustain stage is set using the “Sust” number. The “Loop” parameter can be
used to loop the envelope and set the loop time. You can also choose Sync or Free to decide
whether the loop is synced to the song transport.
Operator Harmonics
The operators have an additive synthesis engine. The operator waveform is layered at each
harmonic frequency. You can edit the layering by dragging the bars in the display. The bars
above the middle adjust the magnitude of the waveform at that frequency. The bars below
the middle adjust the phase. For more details see the Theory section.
© 2015 Blamsoft, Inc. All rights reserved.
7
Operators
There are six operators, selectable from the Operator buttons. When an operator is selected
its parameters are available in the Cyan labelled sections and on the main display.
Each section controls a different aspect of the Operator:
•
Op Freq – Controls coarse and fine tuning
•
Op Mix – Adjusts noise mix and output volume
•
Op Shape – Affects the waveform shape, harmonics, and phase
•
Op LFO – Controls the LFO waveform and rate, and amount that the LFO is applied to
pan, volume, FM/RM modulation, pitch, and phase
•
Op Envelopes – Selects the operator envelope for view on the main display and the
amount it is applied to the parameter
•
Op Harmonics – Selects which harmonic frequencies are editable on the display
Op Freq
•
Coarse Tuning - Adjusts the tuning in whole semitones.
•
Fine Tuning- Adjusts between -0.5 and 0.5 semitones
Op Mix
•
Noise – Crossfades between the operator waveform and noise
© 2015 Blamsoft, Inc. All rights reserved.
8
•
Volume - Adjusts the volume of the operator for FM amount or output volume
Op Shape
•
Wave – Allows you to select a waveform from sine to triangle, to saw, to square, to pulse.
This waveform is layered at each harmonic frequency according to the Harmonics editor.
•
Num – Selects the number of harmonics used to generate the waveform. Reducing this
value uses less sinusoids. See the Theory section for more details.
•
Ratio – Adjusts the frequency spacing between the harmonic sinusoids of the waveform.
See the Theory section for more details.
•
Phase Coherence – Adds random phase amounts to the sinusoids of the waveform
•
Reset – Adjusts the starting phase of the operator
Op LFO
•
Sync – Allows you to select a beat division for the LFO or choose Free Run/Key Reset. Free
Run/Key Reset frequency is controlled by the Rate knob.
•
Rate – Adjusts the frequency in the free running LFO modes.
•
Wave – Allows you to select a waveform from sine to triangle, to saw, to square, to pulse.
•
Amount Knobs – Applies the LFO to pan, volume, FM/RM modulation amount, pitch, and
phase. A negative amount can be applied to invert the waveform.
Op Envelopes
•
Amount Knobs – Applies the parameter envelope for pan, volume, FM/RM modulation
amount, pitch, and phase to the parameter. A negative amount can be applied to invert
the envelope
•
Buttons – Selects the envelope for editing
Op Harmonics
•
Buttons – Selects the harmonics for editing
© 2015 Blamsoft, Inc. All rights reserved.
9
Keyboard Tracking
On the back, there are knobs that control how each operator responds to MIDI notes. You can
adjust the frequency spacing between notes in semitones. For normal operation, the tracking
is set to 1 semitone per MIDI note.
© 2015 Blamsoft, Inc. All rights reserved.
10
Matrix
The matrix is where the FM/RM action takes place, as well as panning, output volumes and
routing to the filters.
Frequency/Ring Modulation
When the FM button is selected, the matrix shows the frequency modulation matrix for the
operators. Likewise, RM shows ring modulation. The button simply selects the mode for
editing. The FM and RM processing are always both enabled. Each row represents an
operator. When the knob is turned in one of the columns, the column number operator is
modulating the row operator.
In this example, operator 1 is being modulated by operator 2. In FM terminology, operator 1 is
the carrier and operator 2 is the modulator.
© 2015 Blamsoft, Inc. All rights reserved.
11
Operator Pan and Volume
The right two columns control pan and volume of each operator in the output mix.
Filter Routing
The bottom two rows represent the filter inputs. The operator columns control the amount
that that operator is mixed into the filter input. The pan and output knobs control the panning
and volume of each filter in the output mix.
© 2015 Blamsoft, Inc. All rights reserved.
12
Filters
There are two filters in Zero. Both have the same 16 modes but there are some slight
differences. See the filter appendix for frequency response graphs of the filter modes. Audio is
routed to the filters using the bottom two rows of the matrix. See the Matrix section for details.
Filter 1
Filter 1 has a decimation (downsampling) effect that can be used to reduce the sample rate.
This acts as a simple bit crusher. The effect can be before or after the filter.
•
Post – Set the decimation to occur after the filter
•
Decimation – As this knob is turned up the sample rate is reduced
•
Resonance – Adjusts the resonance of the filter
•
Envelope Amount – Controls how much the filter envelope affects the cutoff frequency
•
Frequency – Adjust filter frequency from 20 Hz to 20 kHz
Filter 2
Filter 2 has a saturation effect that can be used to add warmth to the sound. It also has an
input from filter 1 that can be used to connect the filters in series.
•
Filter 1 – Input amount from filter 1
•
Saturation – Saturation increases as the knob is turned up
•
Resonance – Adjusts the resonance of the filter
•
Envelope Amount – Controls how much the filter envelope affects the cutoff frequency
•
Frequency – Adjust filter frequency from 20 Hz to 20 kHz
© 2015 Blamsoft, Inc. All rights reserved.
13
Modulation
The modulation possibilities include the Global LFO, Modifier, and Routing sections.
Global LFO
There are two LFOs available as sources in the Routing section. These LFOs are configured in
the Global LFO section.
•
Sync – Allows you to select a beat division for the LFO or choose Free Run/Key Reset. Free
Run/Key Reset frequency is controlled by the Rate knob.
•
Rate – Adjusts the frequency in the free running LFO modes.
•
Wave – Allows you to select a waveform from sine to triangle, to saw, to square, to pulse.
•
Buttons – Selects LFO 1 or 2
Modifier
These two knobs are available as sources in the Routing section. They may be used in
performance similar to a mod wheel or they could be used to tweak a parameter to a desired
setting.
Routing
This is a “mod matrix”, not to be confused with the audio modulation matrix. You can set up
modulation connections, one in each row. Source selects the input source for the modulation.
Destination is the controlled parameter. Scaling controls how much the source affects the
destination and defaults to 100%.
© 2015 Blamsoft, Inc. All rights reserved.
14
Some sources have separate “+” and “+-“ entries. “+” means unipolar and affects destinations
so that they are at or above their current value. “+-“ means bipolar and affects destinations so
that they are both above and below their current value.
In this example, LFO 1 is modulating the pitch of operator 1. Modifier X is used as a scale so
that it controls the amount of modulation that occurs.
Some destinations in the mod matrix result in scaling while others result in a sum. The rates
are scaled in octaves. Here is a table of the different modulation results.
Pan, Volume, Pitch, Cutoff, Resonance
Sum
All Rates
2^n Multiplied
Filter Parameters:
Sum
Pan, Volume, Frequency, Decimation,
Saturation, Resonance
Filter Envelope Amount
Scaled
Operator Parameters:
Sum
Pan, Pitch, Volume, Phase
Operator Parameters:
Scaled
Mod, LFO Amounts, Envelope Amounts
Chorus Feedback
Scaled
Chorus Rate
2^n Multiplied
All other effect parameters
Sum
© 2015 Blamsoft, Inc. All rights reserved.
15
Unison
The Unison setting creates duplicate operators that are detuned and summed. The Voices
setting controls how many operator sets are enabled. Detune adjusts the tuning of the
operators away from their normal pitch. This setting is useful for creating thicker, chorused,
sounds.
© 2015 Blamsoft, Inc. All rights reserved.
16
Effects
Chorus
The chorus effect is based on the Roland Dimension D Chorus with the addition of a feedback
control.
•
Delay – Adjusts the mid-point for the delay taps
•
Rate – Adjusts how fast the delay taps move
•
Depth – Adjusts how far the delay taps move
•
Feedback – Adjusts feedback in the delay lines
•
Mix – A wet/dry control for the effect
Delay
The delay effect offers a repeating echo. It has quite a few parameters that can spice it up a
bit.
•
Left – Adjusts the delay time for the left channel
•
Rate – Adjusts the delay time for the right channel
•
Feedback – Controls how fast the echoes decay
•
Delay Mode
o
Normal - Left and right delay times are independent
o
Ping Pong Left – Echoes bounce between left and right channels starting with left
o
Ping Pong Right – Echoes bounce between left and right channels starting with
right
•
Delay Width – Controls the stereo width of the left and right channels
© 2015 Blamsoft, Inc. All rights reserved.
17
•
Feedback Tone – Adjust filtering inside the feedback path. Turning the knob to the left of
center creates lowpass filtering. Turning the knob to the right of center creates highpass
filtering.
•
Feedback Pan – Adjusts panning in the feedback path
•
Mod Amount – Turning up the Mod Amount creates a changing delay time with a slight
offset between left and right delay times
•
Mod Rate – Adjusts the rate of the modulation set by Mod Amount
•
Mix – A wet/dry control for the effect
Reverb
The reverb effect adds a hall like spatialization effect to the sound.
•
Mid Time – Adjusts the T60 decay time for the mid-range frequencies
•
Low Time – Adjusts the T60 decay time for the low-range frequencies
•
Crossover – Adjusts the cross-over frequency between mid and low range
•
Damping – Sets the frequency of high frequency damping
•
Delay – Adds a delay to the signal to simulate a larger space
•
Mix – A wet/dry control for the effect
© 2015 Blamsoft, Inc. All rights reserved.
18
Theory
Harmonics Editor
The Harmonics Editor lets you duplicate the operator waveform shape at multiples of the
fundamental frequency. The duplicated waveforms are summed to create the final waveform.
For example, if you play an A4 on the keyboard, the fundamental frequency is 440 Hz. This is
harmonic 1 on the display. The harmonics further to the right are multiples of the harmonic 1
frequency.
A4 Harmonic Frequences:
Harmonic 1
1*440 = 440 Hz
Harmonic 2
2*440 = 880 Hz
Harmonic 3
3*440 = 1320 Hz
Harmonic n
n*440 Hz
© 2015 Blamsoft, Inc. All rights reserved.
19
In the following plot there is a sawtooth with two harmonic frequencies enabled in the editor.
The blue sawtooth is at the fundamental frequency. The green sawtooth is at the harmonic 2
frequency, twice the fundamental. When these two waveforms are summed they result in the
red waveform. In Zero, the summed waveform is scaled to be between -1 and 1.
2
1.5
1
0.5
0
-0.5
-1
-1.5
-2
0
0.5
1
1.5
2
2.5
3
3.5
4
5
4.5
-3
x 10
Here you can see the settings that correspond to this plot for one of Zero’s operators.
The lower area of the Harmonics Editor adjusts the phase of that particular harmonic. In the
following plot, harmonic 2, the green sawtooth, has had its phase changed to 58 degrees. It
has in effect been shifted to the left compared to the blue one, so the first peak is now outside
the plot area. When the two sawtooths are summed they create a different final waveform.
© 2015 Blamsoft, Inc. All rights reserved.
20
2
1.5
1
0.5
0
-0.5
-1
-1.5
-2
0
0.5
1
1.5
2
2.5
3
3.5
4
5
4.5
-3
x 10
In Zero’s settings, the phase for harmonic 2 has been adjusted by adding a lower bar.
Op Shape Settings
There are some special additive synthesis settings that affect the final operator waveform. The
Number of Harmonics knob controls how many harmonics are in the final waveform. And the
Ratio knob adjusts the harmonic frequencies. In this case, harmonics are thought of strictly as
sine waves. Any waveform besides a sine wave has other frequencies besides the fundamental
frequency. Some basic waveforms consist of sine waves at only multiples of the fundamental,
called harmonics. For example, a sawtooth has harmonics that scale with the harmonic
number. Below you can see the harmonics for sawtooth, triangle, and square waveforms.
© 2015 Blamsoft, Inc. All rights reserved.
21
http://hyperphysics.phy-astr.gsu.edu/hbase/audio/geowv.html
The sawtooth waveform can be thought of as a sum of scaled sine waves at the harmonic
frequencies. As you sum more of the harmonic sine waves, you get closer to the exact
sawtooth. The following plot shows how adding more harmonics results in a more exact
sawtooth. The sum of harmonics is plotted for harmonics 1 through 10.
1.5
1
0.5
0
-0.5
-1
-1.5
0
0.5
1
1.5
2
2.5
3
3.5
4
5
4.5
-3
x 10
© 2015 Blamsoft, Inc. All rights reserved.
22
Here is the same plot for a pulse.
1.5
1
0.5
0
-0.5
-1
-1.5
0
0.5
1
1.5
2
2.5
3
3.5
4
5
4.5
-3
x 10
Now that you are thinking about sums of sine waves, the Ratio knob will make more sense.
The harmonic amplitudes stay the same, but instead of each harmonic being at the harmonic
number times the fundamental, they will be spaced by the ratio times the fundamental. So for
an A4 note with a ratio of 3 the following frequencies result.
A4 Frequences:
Harmonic 1
440 = 440 Hz
Harmonic 2
440 + 3*1*440 = 1760 Hz
Harmonic 3
440 + 3*2*440 = 3080 Hz
Harmonic n
440 + 3*(n-1)*440 Hz
When the operator waveform is simply a sine wave, the Number of Harmonics and Ratio
knobs will have no effect because a sine wave is only the fundamental frequency, aka
harmonic 1.
© 2015 Blamsoft, Inc. All rights reserved.
23
Frequency Modulation
Frequency Modulation Synthesis was originally developed by John Chowning at Stanford
University in 1967-1968 and was made popular in Yamaha synthesizers. Many FM synths are
limited to using sine waves in the operators, but the flexible waveforms in Zero give it
powerful sound generation capabilities. The basic principle of FM is that the output of one
operator adds to the frequency control of a second operator. In musical terms, this is vibrato,
only it is happening very fast. The first operator is called the carrier, and the modulator is
simply called the modulator. Frequency modulation creates what are called “side bands” in the
output spectrum that give it its characteristic sound.
Ring Modulation
In ring modulation one operator output is multiplied by another operator output. Yes, it really
is that simple. But it produces a sum and difference of frequencies in the two waveforms that
make for an interesting sound.
© 2015 Blamsoft, Inc. All rights reserved.
24
Connections
Performance CV In
The Performance CV In group lets you control Zero with an external triggering device such as
Blamsoft Distributor or the Matrix Pattern Sequencer. Zero supports the PolyCV protocol for
polyphonic triggering.
•
Gate – Controls triggering velocity
•
Note – Controls triggering note
•
PW – Pitch Wheel input
•
MW – Mod Wheel input
•
AT – Aftertouch input
•
Sust – Sustain pedal input
Routable CV In
The Routable CV In group provides CV inputs that are selectable as sources in the Routing
section mod matrix.
Global CV In
© 2015 Blamsoft, Inc. All rights reserved.
25
The Global CV In group lets you control Zero’s output and filters.
•
Vol – Output volume
•
Pan – Output pan
•
Cutoff – Filter 1 and 2 frequency
•
Res – Filter 1 and 2 resonance
Operator CV In
The Operator CV In group lets you control pan, volume, FM/RM modulation amount, pitch,
and phase for the six operators.
Audio Out
Connect this directly to the mixer or to external effects.
© 2015 Blamsoft, Inc. All rights reserved.
26
LFO CV Out
The two global LFOs are available as outputs.
LFO CV Out
The global envelopes are available as outputs. Note that these outputs are typically used with
monophonic sounds.
© 2015 Blamsoft, Inc. All rights reserved.
27
CPU Usage
There are several ways to reduce CPU usage.
•
Reduce Polyphony – This can help with sounds that have long release tails
•
Use less unison voices – Unison is a common cause of high CPU
•
Use only operators 1 to 4 – If you avoid using both operators 5 and 6 it reduces the
amount of computation
•
Use fewer filters – If the filter output amount is zero and it is not routed in series it will not
be processed
© 2015 Blamsoft, Inc. All rights reserved.
28
Credits
•
Andrew Best – Concept, Design, DSP, Programming, Graphic Design
•
Daniel Thiel – Design, Graphic Design
Sound Design
The initials in the preset name let you know who designed it:
•
AZ - Sami Rabia (Aiyn Zahev)
•
EX - Daniel Thiel (eXode)
•
NR - Navi Retlav
•
ND - Nicolas Delmotte (odharmonix)
•
AP - Ariel Proska
•
AB - Andrew Best
© 2015 Blamsoft, Inc. All rights reserved.
29
Software Licenses
Faust Audio Effect Library
Copyright (c) 2015 Julius O. Smith III
Permission is hereby granted, free of charge, to any person obtaining
a copy of this software and associated documentation files (the
"Software"), to deal in the Software without restriction, including
without limitation the rights to use, copy, modify, merge, publish,
distribute, sublicense, and/or sell copies of the Software, and to
permit persons to whom the Software is furnished to do so, subject to
the following conditions:
The above copyright notice and this permission notice shall be
included in all copies or substantial portions of the Software.
Any person wishing to distribute modifications to the Software is
asked to send the modifications to the original developer so that they
can be incorporated into the canonical version. This is, however, not
a binding provision of this license.
THE SOFTWARE IS PROVIDED "AS IS", WITHOUT WARRANTY OF ANY KIND,
EXPRESS OR IMPLIED, INCLUDING BUT NOT LIMITED TO THE WARRANTIES OF
MERCHANTABILITY, FITNESS FOR A PARTICULAR PURPOSE AND NONINFRINGEMENT.
IN NO EVENT SHALL THE AUTHORS OR COPYRIGHT HOLDERS BE LIABLE FOR ANY
CLAIM, DAMAGES OR OTHER LIABILITY, WHETHER IN AN ACTION OF CONTRACT,
TORT OR OTHERWISE, ARISING FROM, OUT OF OR IN CONNECTION WITH THE
SOFTWARE OR THE USE OR OTHER DEALINGS IN THE SOFTWARE.
© 2015 Blamsoft, Inc. All rights reserved.
30
Fastapprox
Copyright (c) 2011, Paul Mineiro
All rights reserved.
Redistribution and use in source and binary forms, with or without
modification, are permitted provided that the following conditions
are met:
* Redistributions of source code must retain the above copyright notice,
this list of conditions and the following disclaimer.
* Redistributions in binary form must reproduce the above copyright notice,
this list of conditions and the following disclaimer in the documentation
and/or other materials provided with the distribution.
* Neither the name of Paul Mineiro nor the names of its contributors
may be used to endorse or promote products derived from this software
without specific prior written permission.
THIS SOFTWARE IS PROVIDED BY THE COPYRIGHT HOLDERS AND CONTRIBUTORS "AS IS"
AND ANY EXPRESS OR IMPLIED WARRANTIES, INCLUDING, BUT NOT LIMITED TO, THE
IMPLIED WARRANTIES OF MERCHANTABILITY AND FITNESS FOR A PARTICULAR PURPOSE
ARE DISCLAIMED. IN NO EVENT SHALL THE COPYRIGHT HOLDER OR CONTRIBUTORS BE
LIABLE FOR ANY DIRECT, INDIRECT, INCIDENTAL, SPECIAL, EXEMPLARY, OR
CONSEQUENTIAL DAMAGES (INCLUDING, BUT NOT LIMITED TO, PROCUREMENT OF
SUBSTITUTE GOODS OR SERVICES; LOSS OF USE, DATA, OR PROFITS; OR BUSINESS
INTERRUPTION) HOWEVER CAUSED AND ON ANY THEORY OF LIABILITY, WHETHER IN
CONTRACT, STRICT LIABILITY, OR TORT (INCLUDING NEGLIGENCE OR OTHERWISE)
ARISING IN ANY WAY OUT OF THE USE OF THIS SOFTWARE, EVEN IF ADVISED OF
THE POSSIBILITY OF SUCH DAMAGE.
© 2015 Blamsoft, Inc. All rights reserved.
31
Filter Appendix
Low Pass Filters
40
1 Pole
2 Pole
3 Pole
4 Pole
20
Magnitude (dB)
0
-20
-40
-60
-80
2
10
3
10
Frequency (Hz)
4
10
High Pass Filters
40
1 Pole
2 Pole
3 Pole
4 Pole
20
Magnitude (dB)
0
-20
-40
-60
-80
2
10
3
10
Frequency (Hz)
© 2015 Blamsoft, Inc. All rights reserved.
4
10
32
Band Pass Filters
40
2 Pole
4 Pole
20
Magnitude (dB)
0
-20
-40
-60
-80
2
10
3
10
Frequency (Hz)
4
10
2 Pole Notch
40
20
Magnitude (dB)
0
-20
-40
-60
-80
2
10
3
10
Frequency (Hz)
© 2015 Blamsoft, Inc. All rights reserved.
4
10
33
3 Pole Phase
3 Pole Allpass Magnitude
40
20
Magnitude (dB)
0
-20
-40
-60
-80
2
10
3
10
Frequency (Hz)
4
10
3 Pole Allpass Phase
5
4.5
4
Phase (radians)
3.5
3
2.5
2
1.5
1
0.5
0
2
10
3
10
Frequency (Hz)
© 2015 Blamsoft, Inc. All rights reserved.
4
10
34
2 Pole Highpass + 1 Pole Lowpass
40
20
Magnitude (dB)
0
-20
-40
-60
-80
2
10
3
10
Frequency (Hz)
4
10
3 Pole Highpass + 1 Pole Lowpass
40
20
Magnitude (dB)
0
-20
-40
-60
-80
2
10
3
10
Frequency (Hz)
© 2015 Blamsoft, Inc. All rights reserved.
4
10
35
2 Pole Notch + 1 Pole Lowpass
40
20
Magnitude (dB)
0
-20
-40
-60
-80
2
10
3
10
Frequency (Hz)
4
10
3 Pole Allpass + 1 Pole Lowpass Magnitude
40
20
Magnitude (dB)
0
-20
-40
-60
-80
2
10
3
10
Frequency (Hz)
© 2015 Blamsoft, Inc. All rights reserved.
4
10
36
3 Pole Allpass + 1 Pole Lowpass Phase
5
4.5
4
Phase (radians)
3.5
3
2.5
2
1.5
1
0.5
0
2
10
3
10
Frequency (Hz)
© 2015 Blamsoft, Inc. All rights reserved.
4
10