1
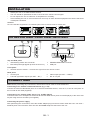
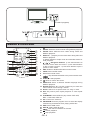
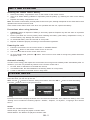
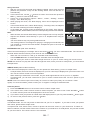
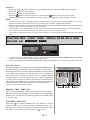
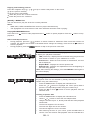
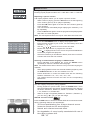
CONTENT
CONTENTS---------------------------------------------------------------------------------------------------------------------------------------1
PACKAGE------------------------------------------------------------------------------------------------------------------------------------------1
SAFETY--------------------------------------------------------------------------------------------------------------------------------------------1
IMPORTANT SAFETY INSTRUCTIONS-------------------------------------------------------------------------------------------------2
INSTALLATION ----------------------------------------------------------------------------------------------------------------------------------3
TOP AND SIDE PANEL/ FRONT PANEL / BACK PANEL---------------------------------------------------------------------------3
CONNECTIONS -----------------------------------------------------------------------------------------------------------------------------3-4
REMOTE CONTROL---------------------------------------------------------------------------------------------------------------------------4
GETTING STARTED----------------------------------------------------------------------------------------------------------------------------5
SYSTEM SETUP------------------------------------------------------------------------------------------------------------------------------5-6
PLAYING AN iPod--------------------------------------------------------------------------------------------------------------------------6-8
PLAYING MP3 / JPEG / WMA / MPEG4 FILES ON A USB DEVICE OR MEMORY CARD----------------------------8-10
AUX IN FUNCTION---------------------------------------------------------------------------------------------------------------------------11
TROUBLESHOOTING GUIDE-------------------------------------------------------------------------------------------------------------11
TECHNICAL SPECIFICATIONS-----------------------------------------------------------------------------------------------------------12
PACKAGE
•
•
•
Multimedia docking station
Remote Control
AV cable
•
•
•
SAFETY
GB - 1
iPod universal dock adapters (5x)
AC/DC adapter
Instruction manual
IMPORTANT SAFETY INSTRUCTIONS
CAUTION: RETAIN THIS BOOKLET FOR FUTURE REFERENCE.
This set has been designed and manufactured to ensure personal safety. Improper use can result in an electric
shock or fire hazard. The safeguards incorporated in this unit will protect you if you observe the following
procedures for installation, use and servicing. This unit does not contain any parts that can be repaired by the
user.
•
•
•
•
•
•
•
•
•
•
•
•
•
•
•
•
•
Read these instructions.
Keep these instructions.
Heed all warnings.
Follow all instructions.
Do not use this device near water.
Clean only with a dry cloth.
Do not block any ventilation openings. Install
in accordance with the manufacturer’s
instructions.
Do not install near any heat sources such as
radiators, heat registers, stoves, or other devices
(including amplifiers) that produce heat.
Prevent the power cord from being walked on or
pinched. Pay particular attention to the plug and
connections.
The AC/DC adapter plug of the apparatus should
remain easily accessible.
To completely disconnect the power input, the
AC/DC adapter plug of the apparatus must be
disconnected from the mains.
Do not expose the battery to excessive heat
such as sunshine, fire or the light.
Only use accessories specified by the
manufacturer.
Unplug this device during lightning storms or
when unused for long periods of time.
Ensure that the surface on which you place the
unit is stable
The apparatus must not be exposed to dripping
or splashing and no objects filled with liquids,
such as vases, must be placed on the device.
Burden
Do not place any heavy objects on the product.
•
a)
b)
c)
d)
e)
f)
a)
•
•
•
Damage Requiring Service
Unplug this product from the wall outlet and refer
servicing to qualified service personnel under the
following conditions:
When the power-supply cord or plug is damaged.
If liquid has been spilled, or objects have fallen into
the product.
If the product has been exposed to rain or water.
If the product does not operate normally by
following the operating instructions. Adjust only those
controls that are covered by the operating
instructions. Improper adjustment of other controls
may result in damage and will often require extensive
work by a qualified technician to restore the product
to its normal operation.
If the product has been dropped or damaged in any
way.
When the product exhibits a distinct change in
performance - this indicates a need for service.
Servicing
Do not attempt to service this product yourself as
opening or removing covers may expose you to
dangerous voltage or other hazards. Refer all
servicing to qualified service personnel.
Replacement Parts
When replacement parts are required, be sure the
service technician has used replacement parts
specified by the manufacturer or have the same
characteristics as the original part. Unauthorized
substitutions may result in fire, electric shock, or
other hazards.
Safety Check
Upon completion of any service or repairs to this
product, ask the service technician to perform safety
checks to determine that the product is in proper
operating condition.
This product complies with CE requirements.
GB - 2
INSTALLATION
Install your unit on a stable and flat surface.
The unit should be positioned so that it can receive the remote control signal.
•
Do not expose the unit to extremes of temperature or humidity.
•
Avoid standing the unit on a hot surface such as on top of other electrical equipment and ensure that there
is adequate ventilation.
Caution:
Do not install this equipment in a confined space such as a book case or similar unit!
•
•
TOP AND SIDE PANEL / FRONT PANEL / BACK PANEL
1
2
3
5
4
6
7
Top and Side panel
1.
iPod docking station and connector
2.
Blue LED power light (lights up when the unit is on)
9
3.
4.
8
SD/MMC/MS/MS PRO card slot
USB port
Front panel
5.
Infrared receiver window – receives the signal from the remote control
Back panel
6.
AUX IN jack
7.
Left and right audio outputs (AV OUT – R/L)
8.
9.
Video output (AV OUT – VIDEO)
DC 9V 1A jack
CONNECTIONS
Note: Before performing any connections, switch off the unit in order to avoid malfunction.
Connecting to an external video/audio device (e.g. a TV)
Connect the external video/audio jacks of an external audio/video device, such as TV, to the AV OUT jacks on
the unit with an AV cable (supplied).
Connecting to an external audio device (e.g. an MP3 player)
Connect the line out or headphones socket of an external audio device (such as an MP3 player) to the unit’s AUX
IN jack using the AUX IN cable (not supplied).
Connecting the power supply
After performing the connections, insert the AC/DC adapter plug into the AC mains outlet with a AC 110-240V ~
50/60Hz power source and the other end into the DC 9V 1A jack at the back of the unit.
GB - 3
AV CABLE (Supplied)
REMOTE CONTROL
1
11
2
12
1.
2.
3.
: Switch between On and standby mode.
AUDIO: Select the audio channel during MPEG4 playback.
ZOOM: Select different zoom ratios during JPEG and
MPEG4 playback.
DISPLAY - 1) Display current information during MP3 and
MPEG4 playback.
2) Switch between simple mode and extended mode for
iPod playback.
/ / /
Navigation buttons: 1) Use these buttons to
move the cursor within the menus.- 2) Use these buttons
to flip or rotate a picture. -3) Use these buttons to pan a
picture in zoom mode.
SRS: Enable or disable SRS-3D surround sound.
CARD: Select CARD mode.
iPod: Select iPod mode.
/ : Skip backward/forward to the previous/next track.
3
13
4.
14
15
4
16
5
17
6
5.
18
7
19
8
20
9
21
10
22
23
6.
7.
8.
9.
10. PLAY
11.
: Start playback.
: Mute or restore the sound.
12. SUBTITLE: Select a different subtitle language during
MPEG4 playback.
13. Number keys (0 - 9): Use the number keys to enter the
track number or time during a search.
14. GOTO: Search for a specific time in a song or video.
15. A-B: Set point-to-point repeat playback or clear repeat
mode.
16. PLAYMODE: Select different play modes: REP OFF,
REP 1, REP DIR, REP ALL.
17. OK: Confirm the selection.
18. PROGRAM: Enter the program menu or select the display
mode during a slideshow when playing JPEG files.
19. USB: Select USB mode.
20. AUX IN: Select AUX IN mode.
: Fast search backward or forward.
21.
22.
: Pause playback.
23.
: Stop playback
GB - 4
GETTING STARTED
Installing the remote control battery
1.
2.
Remove the battery compartment cover on the bottom of the remote control.
Insert a 3V lithium battery (CR2025 or equivalent) with the polarity (+) matching the mark on the battery
cover.
3. Replace the battery compartment cover.
Note: The remote control battery normally lasts for about one year, although it depends on how often and for what
operations the remote control is used.
If the remote control fails to work even when it is operated near the unit, replace the battery.
Precautions when using batteries
1.
2.
3.
4.
CAUTION: Danger of explosion if battery is incorrectly replaced. Replace only with the same or equivalent
type of battery.
Ensure you follow the correct polarity when installing the battery (see battery compartment cover). A
reversed battery may damage the remote control.
An exhausted battery must be removed as it may leak.
Dispose of batteries properly according to environmental regulations.
Powering the unit
1.
Finish the connections for the unit as shown in “CONNECTIONS”.
2.
3.
Press the
button on the remote control to turn on the unit.
Turn on the TV and set to the correct video source.
4.
To go to standby mode, press the
the power cord.
button. If the unit is not to be used for a long time, please disconnect
Automatic standby
In order to save energy and respect the environment, this unit goes into standby mode automatically after 10
minutes if you have not pressed any buttons on the remote control and if:
1. No card, iPod or USB device is inserted into the unit;
2. In extended mode, the iPod installed on the docking station is in stop mode;
3. A card or USB device is inserted and is in stop mode.
SYSTEM SETUP
In order to get the best performance from your unit, please complete the following system setup. You only need
to do this when you first set up the unit.
button to enter the setting.
Note: Use the / buttons to select a setting in the menu. Press the OK or
Press the button to return to the previous menu.
Home Entertainment System
Home
1/4
iPod
USB
Card
AUX-IN
Home Entertainment System
iPod
3/5
Shuffle Off
Music
Video
Setting
Shuffle Songs
Now Playing
Home Entertainment System
Setting 1/5
Shuffle Off
Shuffle
Repeat
TV System
Language
Screen Saver
Setting
Press the iPod button to display the Home menu and select the iPod mode. Then, select the “Setting” menu. The
“Setting” menu contains the following options: “Shuffle”, “Repeat”, “TV System”, “Language” and “Screen
Saver”.
Shuffle
Shuffle Off: Disable shuffle function.
Shuffle Songs: The songs are played in random order.
Shuffle Albums: The albums are played in random order.
GB - 5
Repeat
Repeat Off: Disable repeat function.
Repeat One: Repeat the single track.
Repeat All: Repeat all the tracks.
TV System
NTSC: Select this system if your television supports the NTSC color system used in North America.
PAL: Select this system if your television supports the PAL color system used in Europe and Asia.
Language
Select the On-Screen-Display language.
Screen Saver
Use this setting to turn the screen saver option on or off. If you turn the screen saver on, the screen saver image
appears when you leave the player in Pause or Stop mode for more than 3 minutes. It can prevent the television
screen from being damaged.
On: To turn the screen saver on.
Off: To turn the screen saver off.
PLA
YING AN iP
od
PLAYING
iPod
Install the iPod dock adapter
1. Select the iPod dock adapter corresponding to your iPod model from the table
below.
2. Install the adapter with the two tabs facing the front, by pushing it down in the iPod
dock at the top of the unit.
3. To remove the adapter, press at the back of the adapter and pull it up.
Adapter No.
3
4
5
6
7
8
9
10
iPod description
iPod mini
4G iPod & U2 iPod
4G iPod
iPod photo & Color U2 iPod
iPod with color display
iPod photo
iPod with color display
iPod nano
5G iPod & U2 iPod with video
5G iPod with video
iPod classic
Capacity
Supplied with this unit
(yes/ no)
4GB & 6GB
yes
20GB
yes
40GB
yes
20GB & 30GB
20GB
yes
40GB & 60GB
60GB
yes
2GB & 4GB
no
30GB
no
60GB & 80GB
160GB
no
11
iPod nano (2nd generation)
2GB, 4GB, 8GB
no
13
iPod nano (3rd generation)
4GB & 8GB
no
14
iPod touch
8GB & 16GB
no
Note:
1. Only adapters 3 to 7 are supplied with this unit since adapters 8 to 14 should be supplied with your iPod.
1.
You must have the correct adapter in place before fitting your iPod to avoid any poor
electrical contacts that may damage the unit and iPod.
GB - 6
Using the iPod
1. With the correct iPod universal dock adapter installed, gently dock the iPod
(without the protective cover) into the docking station. The unit will turn on
automatically.
2. In the Home menu, use the / buttons to select “iPod” and then press the
button to enter the iPod menu.
OK or
3. Select one of the following options: “Music”, “Video”, “Setting”, “Shuffle
Songs”, and “Now Playing”.
4. When playing the music, the “Now Playing” menu can be displayed on the
screen.
•
In iPod mode Home menu, select “Now Playing”. The song name, the elapsed
time and the remaining time will be displayed.
•
In the status bar, function logos are displayed on the screen: Play (Pause),
Repeat, Shuffle, SRS and Mute, when the corresponding functions are enabled.
Note:
•
When docked, the internal iPod battery will be charged until it is fully charged.
•
Adjust to the desired volume directly on your TV or amplifier when using an
amplifier.
•
The menu features may vary among different iPods.
•
The docking station is not designed for playing or charging an iPod Shuffle, but
it is possible to connect the iPod shuffle’s headphones jack to the AUX IN
jack on the unit.
Home Entertainment System
iPod
1/5
Music
Video
Setting
Shuffle Songs
Now Playing
Home Entertainment System
iPod
1/5
Music
Video
Setting
Shuffle Songs
Now Playing
Shuffle
Play Repeat
SRS Mute iPod抯 name
HSMM iPod nan o
Home Entertainment System
Now Pl ayin g 1/18
Where Are You Now
Avril Lavigne
Let Go 2
0:49
-3:53
EXTENDED mode (with video interface)
If the iPod screen displays a message “OK to disconnect
“, you are in extended mode. The controls on
the iPod will be switched off and you will need to use the remote control.
•
When the unit is turned on, it will go to extended mode automatically.
•
Use the DISPLAY button to switch between extended mode and simple mode.
•
You can select your audio or video files though the menu on your TV screen using your remote control.
NOTE: Not all iPods can play the video files through this mode, and if you want to view photos, you must switch
to simple mode.
SIMPLE mode (without video interface)
If the iPod screen displays the menu and you can operate the iPod directly, you are in simple mode.
•
In simple mode, the menu will not be displayed on your TV. It will only be displayed on your iPod screen. You
can use the remote control or iPod for operation.
•
When listening to audio files in this mode, only the audio signal will be sent to your TV or amplifier.
•
In simple mode, you can view a video file on your TV screen. Please ensure the “TV OUT” option on your
iPod is ON.
NOTE: Some TVs cannot output sound if they do not have a video input (if they do not receive a video
signal). For more information, please contact your TV supplier or change to extended mode.
View the photos
1) Press the DISPLAY button on the remote control to select simple mode.
2) In the home menu, select “Photos” and then select the photo you want to view. Press the OK or button
to confirm and the photo will be displayed on the iPod’s screen.
3) If you want to view your photos as a slide-show and display them on your TV, press the OK or button again.
4) To return to the previous menu, press the button.
Playing an iPod touch
In extended mode: You can only listen to audio files via your TV or amplifier. If you want to view your photos
and videos, please select simple mode.
In simple mode: First, select music, movies or photos via the touch screen on your iPod touch. To select an
audio or video file, use the remote control or the controls on your iPod touch. To read photos, only use the controls
on your iPod Touch. The remote control is not activated
GB - 7
Operation
•
Use the / / / buttons to select the file you want to play, then press the OK button to confirm.
•
Press the button to stop playback.
•
Press the
button to pause playback.
•
Press the
button to play the next track, and press the
button to play the previous track.
•
Press the
button to fast forward the track, and press the
button to fast reverse the track.
NOTE:
•
In order to be perfectly compatible with the docking station, ensure that your iPod firmware is up to date.
Please consult the instruction manual of your iPod to find out how to upgrade the firmware.
•
When you insert an iPod on the unit, the unit will automatically identify the iPod model and the name will appear
on the screen. All files in the iPod can now be played.
•
If identification of the iPod is unsuccessful, remove the iPod from the docking station and insert it again.
•
If you want to view your video on your TV, make sure the “TV OUT” option is ON.
•
If you want to view your photos on your TV, make sure the “TV OUT” option is ON and the unit is in simple
mode.
PLAYING MP3 / JPEG / WMA / MPEG4 FILES ON A USB
Y CARD
DEVICE OR MEMOR
MEMORY
Home Entertainment System
Home
2/4
Home Entertainment System
Home
3/4
iPod
USB
Card
AUX-IN
1.
2.
iPod
USB
Card
AUX-IN
In the Home menu, select “USB” or “Card” on the screen or press the USB or CARD button on the remote
control to select the USB or CARD mode respectively.
Insert your USB device or SD/MMC/MS/MS PRO card into the USB port or card slot on the side of the unit.
Selection Menu
The Selection Menu will appear when MP3/ WMA/JPEG/MPEG4 files
are read. All folders will appear on the left and will be numbered in
ascending order. When one of the folders is highlighted, all the contents
of the folder will be displayed on the right side. You can display one
type of files (music, pictures or movies). Use the navigation buttons
to highlight the icon corresponding to the type of files you would like
to select (music, pictures or movies) at the bottom of the Selection
Menu and press the OK button to confirm. Then select a file using the
navigation buttons and press the OK button to start playback or
simply use the number buttons (0-9).
[MUSIC]--- MP3 / WMA Files
The unit will play the MP3 / WMA file currently selected. It will then
play all the files in the subfolders contained within the selected folder.
After that, the unit will play the remaining folders on the USB device
or memory card.
[PICTURE]--- JPEG Files
Press PLAY
, to start the slideshow from the JPEG file currently
selected. Then you can zoom or rotate the displayed pictures. You
can also select a folder and display all the files in that folder. Select
the folder of your choice and press the PLAY
button.
GB - 8
Flipping and Rotating pictures
Press the navigation keys ( / / / ) to flip or rotate a still picture on the screen.
: flip the picture vertically.
: flip the picture horizontally.
: rotate the picture 90° counter-clockwise.
: rotate the picture 90° clockwise.
[MOVIE] --- MPEG4 Files
The unit will start to play the whole file currently selected.
Notes:
•
WMA, MP3, JPEG and MPEG4 files cannot be played simultaneously.
•
The highlighted icon at the bottom of the menu indicates what kind of file is playing.
Playing MP3/WMA/MPEG4 files
Press the PLAY
button to start playback and the
playback.
button to pause playback. Press the
button to stop
Search and Skip functions
•
During playback, press the
buttons to search forward or backward. Each time these buttons are
button to
pressed, the speed of the forward or backward search changes accordingly. Press the PLAY
resume playback.
•
During playback, press the
/
buttons to skip to the previous/ next track.
DISPLAY function
While the MP3/WMA/MPEG4 file is playing, press the DISPLAY button
to display the playback information.
•
TRK (Track Info) - Displays the track number being played and the
total number of tracks on your USB device or card.
•
Unmute Icon - When the mute function is switched off, this icon
will be displayed.
•
Repeat Mode - Displays the current repeat mode.
•
Elapsed time - Displays the elapsed time from the beginning of
the track being played.
Note: After checking the settings, press the DISPLAY button again to
turn off the display.
GOTO function
Selecting a Specific Track
Any specific track can be selected by directly selecting the track
number using the number keys.
•
Press the GOTO button to display the information bar.
•
Press the or buttons to highlight the “TRK” (track) field or
press the corresponding number using the number keys.
•
Press the OK or PLAY
selected track.
button to launch playback from the
Locating a Specific time
•
Press the GOTO button to display the information bar.
•
Use the or button to select the time elapsed field.
•
Using the numeric keys 0 - 9, directly enter the time when playback
should start.
The first two digits are for the hours.
The next two digits are for the minutes.
The last two digits are for the seconds.
•
After entering the time of your choice, press the OK button to
confirm. The unit will then start playback from the selected time.
GB - 9
REPEAT function
During playback, press the PLAYMODE button to select one of the
following repeat playback modes: OFF > REP DIR > REP 1 > REP All.
Repeating a specific section
A-B repeat playback allows you to repeat a specific section.
•
While a track is playing, press the A-B button to set the beginning
of the section (point A) to be played repeatedly.
•
Press the A-B button again to set the end of the section (point B)
to be repeated.
•
The unit will then immediately begin replaying the selection ( A to
B) repeatedly.
•
Press the A-B button again to clear the programmed repeat playback
and return to normal playback.
Note: The A-B repeat function can only be used within the same track.
PROGRAMMING
PROGRAM
•
•
•
•
•
•
Press the PROGRAM button to display the program menu.
Enter the track number of your choice. You must always enter two
numbers (- e.g. 01).
Use the / / / buttons to move to the next field.
Repeat the steps above to program the next files.
Press
or highlight PLAY on the screen and press the OK button
to start the programmed playback.
Select the field that you would like to delete, then select “CLEAR”
to delete the track that was entered.
Selecting an audio/subtitle language in MPEG4 mode
During playback of an MPEG4 file, press the AUDIO button
repeatedly to select the desired audio language.
Note: The AUDIO button will not function if only one audio language is
available.
•
When playing MPEG 4 files with external subtitles playback, press
the SUBTITLE button to turn the subtitles on or off.
•
Please download or create the subtitle files with the following
filename extensions .srt, .smi, .sub, .ssa, .ass.
•
The subtitle filename must be the same as the corresponding
MPEG4 file.
•
ZOOM function (for JPEG and MPEG4 files)
You can magnify the picture during playback.
•
During playback or pause mode, press the ZOOM button. Each
time the ZOOM button is pressed, the ZOOM settings are changed
as follows: ZOOM x 2, ZOOM x 3, ZOOM x 4, ZOOM x 1/2, ZOOM
x 1/3, ZOOM x 1/4, ZOOM OFF.
•
While an image is magnified (ZOOM x 2, ZOOM x 3, ZOOM x 4),
you can use / / or to pan the image.
SRS-3D surround sound
Press the SRS button to enable or disable SRS-3D surround sound that
has the following features and advantages:
•
•
•
•
3D Sound spatialization from a stereo channel source.
Immersive sound and 3D sound effects.
Natural and coherent surround effect.
No degradation of sound quality associated with use of
time delay or phase shift.
GB - 10
AUX IN FUNCTION
This unit has an AUX IN jack which allows you to connect it to an external audio device such as an MP3 player,
earlier iPod model, or portable CD player.
1.
2.
Plug the AUX IN cable (not supplied) into the AUX IN jack. In order to do this, refer to “CONNECTIONS”.
In the Home menu, select AUX IN on the screen or press the AUX IN button on the remote control to select
the AUX IN mode.
3. Operate your external audio device as usual to select and playback the music.
4. Adjust the volume control on your external audio device to desired volume level.
Note: In AUX IN mode, this unit display cannot show any music information (e.g. track number.) for your external
audio device.
TROUBLESHOOTING GUIDE
If it appears that the unit is faulty, first consult this checklist. It may be that something simple has been
overlooked.
Note: Under no circumstances should you try to repair the unit yourself as this will void the warranty. Only qualified
service personnel can remove the cover or service this unit.
Problems
Recommendations
1.1 Press the
1. The unit does not work properly
2. No sound, No picture
button to go to standby mode and
press it again to turn on the unit.
1.2 Reset by unplugging the power cord for few
seconds and plugging it back in.
2.1 Check the audio connections. In order to do this, refer
to “CONNECTIONS” .
2.2 Ensure your TV set to AV mode.
3. The unit will not read the USB device
4. No sound/ video in iPod mode
3.1 Some external hard disks may not be supported. Hard
disks that have a built-in power supply should be
favored.
3.2 Check if the USB device file system is in FAT or FAT32.
3.3 Due to different formats, some models of USB storage
devices or MP3 players may not be read.
4.1 Check that you have chosen the correct iPod
adapter.
4.2 Ensure that the “TV OUT” setting on your iPod
is set to “ON”.
4.3 Ensure that you have selected the correct mode:
simple mode or extended mode.
GB - 11
TECHNICAL SPECIFICATIONS
Power supply (AC/DC adapter)
Input: 110-240V ~ 50/60Hz
Output: DC 9V 1A
Power Consumption
TV system
Video out
Audio out
Connections
10 W
PAL/NTSC
Composite video 1.0 Vp-p 75 ohm
Analog audio out 700mV (RMS) / 10k ohm load
Audio/Video (composite) Output x 1
AUX Input x 1
USB devices/Cards
Files supported
USB port type
Maximum capacity
MP3, JPEG, WMA, MPEG4
2.0
8 GB
Card type
Maximum capacity
SD/MMC/MS/MS PRO
8 GB
Dimension
Unit Weight
98 (L) X 132 (W) X 21 (H) mm
Approximately 0.26 Kg
If at any time in the future you should need to dispose of this product please note that
waste electrical products should not be disposed of with household waste. Please recycle
where facilities exist. Check with your Local Authority or retailer for recycling advice.
(Waste Electrical and Electronic Equipment Directive)
GB - 12