1
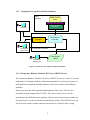
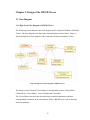
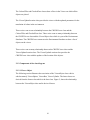
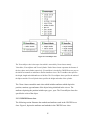
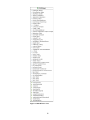
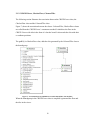
CO-OPERATIVE ROBOTICS SIMULATOR
3D VIEWER
By
ARUN PRAKASH GANESAN
B. E, Bharathiar University, India, 2002
A REPORT
submitted in partial fulfillment of the
requirements for the degree
MASTER OF SCIENCE
Department of Computing and Information Sciences
College of Engineering
KANSAS STATE UNIVERSITY
Manhattan, Kansas
2004
Approved by:
Major Professor
Scott A Deloach, Ph.D
ABSTRACT
This project describes the design and implementation of a Viewer, which is used to view
the simulation of robots in an environment. The viewer is a part of the Cooperative
Robotics Simulator project, where in simulations of many heterogeneous types of robots
are performed, all working within a single, virtual environment.
The viewer uses the Java 3D API to graphically simulate the interaction among robots in
a given environment. The viewer is designed to run independent of the platform and on
multiple machines. The Viewer has “Record” and “Replay” options in order to save a
scenario as a script file and replay the scenario to study the behavior or robots.
TABLE OF CONTENTS
LIST OF FIGURES……...……………………………………………………………...iv
LIST OF TABLES……...………………………………………………………………..v
ACKNOWLEDGEMENT…...…………………………………………………………vi
Chapter 1: Introduction ................................................................................................... 1
1.1
Introduction....................................................................................................... 1
1.2
Background of the Cooperative Robotics Simulator..................................... 1
1.2.1
Components Co-operative Robotics Simulator...................................... 2
1.2.1.1
Cooperative Robotics Simulator 3D Viewer (CRS3D Viewer)......... 2
1.2.1.2
Environment Model Building tool....................................................... 3
1.2.1.3
Robot Simulator .................................................................................... 3
1.2.1.2.1 Robots.................................................................................................. 3
1.2.1.2.2 Sensors ................................................................................................ 3
1.2.1.2.3 Actuators (Effectors) ......................................................................... 4
1.2.1.4
Environment Simulator........................................................................ 4
1.2.1.5
Environment Control Panel (ECP) ..................................................... 5
1.3
Sequence Diagram of the Cooperative Robotics Simulator.......................... 5
1.4
Requirement of the CRS3D Viewer ................................................................ 6
1.5
Java 3D............................................................................................................... 6
1.5.1 SimpleUniverse................................................................................................. 7
1.5.2 GraphicsConfiguration.................................................................................... 8
1.5.3 Canvas............................................................................................................... 8
1.5.4 View................................................................................................................... 8
1.5.5 ViewingPlatform .............................................................................................. 9
1.5.6 BoundingSphere............................................................................................... 9
1.5.7 DirectionalLight ............................................................................................... 9
1.5.8 AmbientLight ................................................................................................... 9
1.5.9 Transform3D .................................................................................................. 10
1.5.10 TransformGroup.......................................................................................... 10
1.5.11 Primitive........................................................................................................ 10
i
1.5.11.1 Box.......................................................................................................... 10
1.5.11.2 Cylinder ................................................................................................. 10
1.5.11.3 Sphere..................................................................................................... 11
1.5.12 Appearance................................................................................................... 11
1.5.12.1 Material.................................................................................................. 11
1.5.13 Vector3d........................................................................................................ 12
1.5.14 OrbitBehavior .............................................................................................. 12
Chapter 2: Design of the CRS3D Viewer...................................................................... 13
2.1 Class Diagram ....................................................................................................... 13
2.1.1 High Level Class Diagram of CRS3D Viewer ..................................... 13
2.1.2 Components of the class diagram......................................................... 14
2.1.2.1 Viewer Object.......................................................................................... 14
2.1.2.2 CRS3DViewer class ................................................................................ 15
The following section illustrates the methods and attributes used in the
CRS3DViewer
2.1.2.2.1 setInitialGraphicParameters()............................................................ 17
2.1.2.2.2 setLightParameters() ........................................................................... 17
2.1.2.2.3 setOrbitParameters()........................................................................... 17
2.1.2.2.4 drawObjects()....................................................................................... 17
2.1.2.2.5 setShape().............................................................................................. 17
2.1.2.2.6 getAppearance() ................................................................................... 18
2.1.2.2.7 connect()................................................................................................ 18
2.1.2.2.8 connectclose()........................................................................................ 18
2.1.2.2.9 setFrame()............................................................................................. 18
2.1.2.2.10 showFrame()....................................................................................... 18
2.1.2.3 CRS3DViewer, CheckerFloor, ColouredTiles ..................................... 19
The following section illustrates the association between the CRS3DViewer
class,
Figure 7, shows the association between the classes. ....................................... 19
2.1.2.3
CRS3DViewer, ViewerUpdateLocation............................................ 20
2.1.2.3
CRS3DReplay...................................................................................... 22
ii
2.2
Use Case Diagram ........................................................................................... 23
2.3
Sequence Diagram representing interaction between the CRS3DViewer,
Chapter 3: Evaluation .................................................................................... 27
Chapter 4: Conclusion................................................................................................ 31
Chapter 5: Future Work ............................................................................................ 32
5.1 Mouse Behaviors in Java 3D................................................................................ 32
5.2 Picking in Java 3D ................................................................................................ 32
5.3 Collision Detection using Java 3D ....................................................................... 32
5.4 Representing Composite Objects and Sounds.................................................... 33
References........................................................................................................................ 35
Appendix.......................................................................................................................... 36
User Manual ................................................................................................................ 36
iii
LIST OF FIGURES
Figure 1: Architecture of Cooperative Robotics Simulator.......................................... 2
Figure 2: Sequence Diagram of Cooperative Robotics Simulator................................ 5
Figure 3: Java API Hierarchy ......................................................................................... 7
Figure 4: High Level Class Diagram of CRS3D Viewer ............................................. 13
Figure 5: ViewerObject class ......................................................................................... 15
Figure 7: Association between CRS3DViewer and ColouredTiles, CheckerFloor... 19
Figure 8: ViewerUpdateLocation .................................................................................. 20
Figure 9: Protocol between Environment and Viewer ................................................ 21
Figure 10: CRS3DReplay ............................................................................................... 22
Figure 11: Use Case Diagram for CRS3DViewer ........................................................ 23
Figure 13: CRS3D Viewer, Requirements.................................................................... 31
Figure 14: Collision detection in Java 3D ..................................................................... 33
Figure 15: Complex Spline............................................................................................. 34
Figure 16: Environment Control Panel (SnapShot) .................................................... 36
Figure 17: CRS3D Viewer (SnapShot).......................................................................... 37
Figure 18: CRS3D Viewer (SnapShot).......................................................................... 38
Figure 19: CRS3D Viewer (SnapShot).......................................................................... 39
Figure 20: CRS3D Viewer (SnapShot).......................................................................... 40
iv
LIST OF TABLES
Table 1: Use Case Template for CRS3DViewer........................................................... 24
Table 2: Comparison of VRML vs. Java 3D ................................................................ 27
Table 3: Test Case 1........................................................................................................ 29
Table 4: Test Case 2........................................................................................................ 30
v
ACKNOWLEDEMENT
This project is one of the most significant accomplishments in my academic career. I owe
all my success to my mentors Dr.Scott A. Deloach, Dr. David A. Gustafson, Dr. Bill
Hankley who have guided me towards this accomplishment.
I also would like to thank my project members who coordinated with me and have played
a major role in making this project a success. I would like to specially thank Esteban
Guillen, Scott Joseph Harmon, Aaron Chavez and Venkata Prashant Rapaka for being
with me during the development of various phases of this project and providing me with
the valuable guidance.
vi
Chapter 1: Introduction
1.1 Introduction
This project describes the design and implementation of a Viewer, which is used to view
the simulation of robots in an environment. The viewer is a part of the Cooperative
Robotics Simulator project, where in simulations of many heterogeneous types of robots
are performed, all working within a single, virtual environment.
The viewer uses the Java 3D API to graphically simulate the interaction among robots in
a given environment. It is designed to run independent of the platform and on multiple
machines. The Viewer has “Record” and “Replay” options in order to save a scenario as a
script file and replay the scenario to study the behavior of robots.
The viewer allows the user to view the environment from different camera positions and
helps the user to zoom-in and zoom-out of the view.
1.2 Background of the Cooperative Robotics Simulator
The Cooperative Robotics Simulator can be used to perform simulations of many (one or
more) heterogeneous types of robots all working within a single, virtual environment.
The following section illustrates the components of the Cooperative Robotics Simulator
project and the Java 3D API’s used in developing the viewer and the requirements of the
Cooperative Robotics Simulator Viewer.
1
1.2.1
Components Co-operative Robotics Simulator
Robot
Simulator
Robot Control
Code
Hardware SimulatorAPI
Robot Hardware
Simulator
User
3D Viewer
Communications
Controller
Sim
Controller
Environment
Control Panel
Environment
Controller
Environment Simulator
Environment
Designer
Environment
Model
Environment
Building Tool
Figure 1: Architecture of Cooperative Robotics Simulator
1.2.1.1 Cooperative Robotics Simulator 3D Viewer (CRS3D Viewer)
The Cooperative Robotics Simulator 3D Viewer (CRS3D Viewer) is a viewer to view the
simulations in Cooperative Robotics Simulator environment. It is developed to run on a
multi platform environment. Multiple instances of the viewer can be run on different
machines.
This project describes the design and implementation of the viewer. The viewer is
developed using the standard Java 3D API’s. The viewer can be used to view the
environment from different camera positions. Mouse zoom-in and zoom-out features are
also provided to view the environment from different positions. The CRS3D Viewer can
also be used to record a scenario and store the scenario as a script for later viewing.
2
1.2.1.2 Environment Model Building tool
The Environment Model Building is an independent tool used to create Virtual
environments and robots for studying the interaction between robots. The Environment
Model Building is developed using Java and Java 3D and generates an XML file which is
used by the Environment Simulator to initialize the environment.
1.2.1.3 Robot Simulator
The following section illustrates the components in a Robot Simulator. A Robot
Simulator simulates the working of the Scout Robot. The Robot Simulator consists of the
following components:
1.2.1.2.1 Robots – The Robot Simulator consists of three parts: a robot hardware
simulator, a robot control program, which is supplied by the user, and an environmentbased robot object. A standard API is defined between the robot control program and the
robot hardware simulator. This API allows robot control programs to work with various
robot hardware simulators. Robot hardware simulators will be defined by the set of
standard sensors and actuators that they contain.
The robot hardware simulator interfaces with the environment via requests for data from
its sensors or requests for action from its actuators. The environment-based robots are
responsible for controlling the individual sensors, based on robot hardware simulator
requests, and providing the appropriate data to the sensors for feedback to the robot
hardware simulator.
1.2.1.2.2 Sensors – There are separate sensor models for each hardware sensor available
to a robot hardware simulator. Sensor models include sonar’s, bump sensors, and heat
sensors. The sensors will be coded to take data from the environment model and return
that data as interpreted by the sensor.
3
For instance, a sonar sensor model takes inputs such as current location, orientation, and
environment model data and would output a value related to the distance of the closest
object in its view.
1.2.1.2.3 Actuators (Effectors) – There are actuator models for each hardware actuator
available on a real robot. Possible actuators are movement actuators, motors, grippers,
arms, etc. The actuator models take actuator requests from robot hardware simulators
and, based on environment model data and degradation parameters, provide the actual
effect on the environment. This output is used to update the environment.
1.2.1.4 Environment Simulator
The Environment Simulator (ES) is the central component in the system. The
environment simulator is responsible for keeping track of the actual state of the
environment, including each robot.
The Environment Simulator receives the co-ordinates from the Environment Model
Building tool and updates the CRS3DViewer with the co-ordinates.
The Environment Simulator receives requests from simulated robots to read sensors,
initiate actuators, and to send and receive communications. The environment will provide
sensor data to simulated robots by passing requests to the appropriate environment-based
robot object, which uses sensor models that transform environment model information
into the appropriate sensor output data.
The environment updates the environment model by taking requests from simulated
robots to perform actions on the environment via environment robot actuators. Again, the
Environment simulator determines the effect on the environment model using the output
of actuator models. The environment is also responsible for handling message passing
between robot simulators. The environment simulator will take requests to send messages
to other robot simulators and pass them to the correct robot simulator with the appropriate
4
delay. The Environment Simulator will also control degradation of robots in terms of
sensors and actuator capabilities.
1.2.1.5 Environment Control Panel (ECP)
The Environment Control Panel (ECP) will be a standalone system that connects to the
ES to monitor and control the current simulation. Specifically, the Environment Control
Panel is capable of starting up the CRS3D viewer to view the simulations in the
environment.
The Environment Control Panel also monitors all communications and is capable of
shutting down all or some communications. The control panel will also allow the user to
select and monitor/change the status of individual robots within the environment.
1.3 Sequence Diagram of the Cooperative Robotics Simulator
This section illustrates the sequence diagram of the Cooperative Robotics Simulator.
Figure 2, shows the interaction between the various components of the Cooperative
Figure 2: Sequence Diagram of Cooperative Robotics Simulator
5
Robotics Simulator. The interaction among the various components occurs as follows:
The user starts up the Environment Control Panel. The Environment Control Panel in turn
starts the Environment Simulator, Robot Simulator and CRS3D Viewer. The Robot
Simulator sends the sensor information to the Environment Simulator at regular intervals.
The Environment Simulator specifies the moves instructions and conveys the robot
simulator and the robot makes the corresponding moves. The Environment Simulator also
sends the translated parameters to the CRS3D Viewer.
1.4 Requirement of the CRS3D Viewer
The CRS3D Viewer is to be able to draw the environment generated by the Environment
Model Building tool. It should also be able to show the changes in the environment on a
real time basis. The user must be able to zoom-in and zoom-out to get the desired view.
The user should also be able to view the environment from different camera angles.
The viewer also should be capable enough of running on any platform, with minimal
memory usage. The viewer should also be designed to run on multiple machines at the
same time.
1.5 Java 3D
Java 3D is used to meet the requirement of the CRS3D Viewer. Java 3D is built on Java
API. Java 3D is a full-featured 3D graphics API. It employs a scene-graph programming
model in which the application program describes a scene. Taking into consideration the
requirements of platform independence, multiple threading, distributed rendering and
device independent hardware usage Java 3D is a suitable development language.
Figure 3, illustrates the API hierarchy used to create the scene graph. The API hierarchy
follows a tree structure. The arrows represent the sequence of compilation.
6
Figure 3: Java API Hierarchy
The API’s [1] used in the viewer include:
1.5.1 SimpleUniverse
This class sets up a minimal user environment to quickly and easily get a Java 3D
program up and running. This utility class creates all the necessary objects on the "view"
side of the scene graph. Specifically, this class creates a locale, a single ViewingPlatform,
and a Viewer object (both with their default values). Many basic Java 3D applications
will find that SimpleUniverse provides all necessary functionality needed by their
applications. More sophisticated applications may find that they need more control in
order to get extra functionality and will not be able to use this class.
7
1.5.2 GraphicsConfiguration
The GraphicsConfiguration class describes the characteristics of a graphics destination
such as a printer or monitor. There can be many GraphicsConfiguration objects
associated with a single graphics device, representing different drawing modes or
capabilities. The corresponding native structure will vary from platform to platform.
1.5.3 Canvas
The Canvas3D class provides a drawing canvas for 3D rendering. It is used either for onscreen rendering or off-screen rendering. Canvas3D is an extension of the AWT Canvas
class that users may further subclass to implement additional functionality.
The Canvas3D object extends the Canvas object to include 3D-related information such
as the size of the canvas in pixels, the Canvas3D's location, also in pixels, within a
Screen3D object, and whether or not the canvas has stereo enabled.
Because all Canvas3D objects contain a reference to a Screen3D object and because
Screen3D objects define the size of a pixel in physical units, Java 3D can convert a
Canvas3D size in pixels to a physical world size in meters. It can also determine the
Canvas3D's position and orientation in the physical world.
1.5.4 View
The View object contains all parameters needed in rendering a three dimensional scene
from one viewpoint. A view contains a list of Canvas3D objects that the view is rendered
into. It exists outside of the scene graph, but attaches to a ViewPlatform leaf node object
in the scene graph.
The View object is the main Java 3D object for controlling the Java 3D viewing model.
All of the components that specify the view transform used to render to the 3D canvases
8
are either contained in the View object or in objects that are referenced by the View
object.
1.5.5 ViewingPlatform
This class is used to set up the "view" side of a Java 3D scene graph. The
ViewingPlatform object contains a MultiTransformGroup node to allow for a series of
transforms to be linked together. To this structure the ViewPlatform is added as well as
any geometry to associate with this view platform.
1.5.6 BoundingSphere
This class defines a spherical bounding region which is defined by a center point and a
radius.
1.5.7 DirectionalLight
A DirectionalLight node defines an oriented light with an origin at infinity. It has the
same attributes as a Light node, with the addition of a directional vector to specify the
direction in which the light shines. A directional light has parallel light rays that travel in
one direction along the specified vector. Directional light contributes to diffuse and
specular reflections, which in turn depend on the orientation of an object's surface but not
its position. A directional light does not contribute to ambient reflections.
1.5.8 AmbientLight
An ambient light source object. Ambient light is that light that seems to come from all
directions. The AmbientLight object has the same attributes as a Light node, including
color, influencing bounds, scopes, and a flag indicating whether this light source is on or
off. Ambient reflections do not depend on the orientation or position of a surface.
Ambient light has only an ambient reflection component. It does not have diffuse or
specular reflection components.
9
1.5.9 Transform3D
A generalized transform object represented internally as a 4x4 double-precision floating
point matrix. The mathematical representation is row major, as in traditional matrix
mathematics. A Transform3D is used to perform translations, rotations, and scaling and
shear effects. The matrix represents a spatial orientation of object in 3D space.
A transform has an associated type, and all type classification is left to the Transform3D
object. A transform will typically have multiple types, unless it is a general,
unclassifiable matrix, in which case it won't be assigned a type.
The Transform3D type is internally computed when the transform object is constructed
and updated any time it is modified.
1.5.10 TransformGroup
TransformGroup is a Group node that contains a transform. The TransformGroup node
specifies a single spatial transformation, via a Transform3D object, that can position,
orient, and scale all of its children.
1.5.11 Primitive
1.5.11.1 Box
Box is a geometry primitive created with a given length, width, and height. It is centered
at the origin. By default, it lies within the bounding box, [-1,-1,-1] and [1, 1, 1].
1.5.11.2 Cylinder
Cylinder is a geometry primitive defined with a radius and a height. It is a capped
cylinder centered at the origin with its central axis aligned along the Y-axis.
When a texture is applied to a cylinder, the texture is applied to the caps and the body
different. A texture is mapped CCW from the back of the body. The top and bottom caps
10
are mapped such that the texture appears front facing when the caps are rotated 90
degrees toward the viewer.
1.5.11.3 Sphere
Sphere is a geometry primitive created with a given radius and resolution. It is centered at
the origin.
When a texture is applied to a Sphere, it is mapped CCW from the back of the sphere.
1.5.12 Appearance
The Appearance object defines all rendering state that can be set as a component object
of a Shape3D node. The rendering state consists of the following:
Coloring attributes - defines attributes used in color selection and shading. These
attributes are defined in a ColoringAttributes object.
1.5.12.1 Material
The Material [2] object defines the appearance of an object under illumination. If the
Material object in an Appearance object is null, lighting is disabled for all nodes that
use that Appearance object.
The properties that can be set for a Material object are:
Ambient color - the ambient RGB color reflected off the surface of the material. The
range of values is 0.0 to 1.0. The default ambient color is (0.2, 0.2, 0.2).
•
Diffuse color - the RGB color of the material when illuminated. The range of
values is 0.0 to 1.0. The default diffuse color is (1.0, 1.0, 1.0).
•
Specular color - the RGB specular color of the material (highlights). The
range of values is 0.0 to 1.0. The default specular color is (1.0, 1.0, 1.0).
•
Emissive color - the RGB color of the light the material emits, if any. The
range of values is 0.0 to 1.0. The default emissive color is (0.0, 0.0, 0.0).
•
Shininess - the material's shininess, in the range [1.0, 128.0] with 1.0 being
not shiny and 128.0 being very shiny. Values outside this range are clamped.
The default value for the material's shininess is 64.
11
The Material object also enables or disables lighting.
1.5.13 Vector3d
A 3-element vector that is represented by double-precision floating point x, y, z
coordinates.
1.5.14 OrbitBehavior
OrbitBehavior [3]moves the View around a point of interest when the mouse is dragged
with a mouse button pressed. It includes rotation, zoom, and translation actions.
This behavior must be added to the ViewingPlatform using the
ViewingPlatform.setViewPlatformBehavior method.
The rotate action rotates the ViewPlatform around the point of interest when the mouse is
moved with the main mouse button pressed. The rotation is in the direction of the mouse
movement, with a default rotation of 0.01 radians for each pixel of mouse movement.
The zoom action moves the ViewPlatform closer to or further from the point of interest
when the mouse is moved with the middle mouse button pressed (or Alt-main mouse
button on systems without a middle mouse button). The default zoom action is to
translate the ViewPlatform 0.01 units for each pixel of mouse movement.
12
Chapter 2: Design of the CRS3D Viewer
2.1 Class Diagram
2.1.1 High Level Class Diagram of CRS3D Viewer
The following section illustrates the class diagram of the Cooperative Robotics Simulator
Viewer. The class diagram also depicts the relationship between the classes. Figure 4,
shows the high level class diagram of the Cooperative Robotics Simulator Viewer.
Figure 4: High Level Class Diagram of CRS3D Viewer
The classes involved include ViewerObject, ViewerUpdateLocation, CheckerFloor,
ColouredTiles, ViewerSphere, ViewerCylinder and ViewerBox.
The ViewerObject class provides the initial objects and their parameters and their
corresponding coordinates in the environment for the CRS3DViewer class to draw the
initial environment.
13
The ColoredTiles and CheckerFloor classes draw a floor in the Viewer on which all the
objects are placed.
The ViewerUpdateLocation class provides the viewer with the updated parameters for the
translation of robots in the environment.
There exists a one to one relationship between the CRS3DViewer class and the
ColoredTiles and CheckerFloor class. There exists a one to many relationship between
the CRS3DViewer class and the ViewerObject class which is a part of the Environment
Simulator. The CRS3DViewer connects to the Environment Simulator to draw a list of
objects on the viewer.
There exists a one to many relationship between the CRS3DViewer class and the
ViewerUpdateLocation class. The ViewerUpdateLocation class provides the
CRS3DViewer class with the updates of the location of the objects.
2.1.2 Components of the class diagram
2.1.2.1 Viewer Object
The following section illustrates the association of the ViewerObject class with its
subclass namely ViewerSphere, ViewerBox, ViewerCylinder. The latter classes are
derived from the former class which is the base class. Figure 5, shows the relationship
between the ViewerObject class and its derived classes.
14
Figure 5: ViewerObject class
The ViewerObject class is the super class which is extended by 3 base classes namely
ViewerBox, ViewerSphere and ViewerCylinder. Each of these classes represents the features of
the box, sphere and cylinder respectively. ViewerObject is invoked by CRS3DViewer to pass on
the initial environment co-ordinates to the Environment viewer. The ViewerBox class specifies
the height, length and width attributes of the Box. The ViewerSphere class specifies the radius of
the Sphere and the ViewerCylinder class specifies the height and radius of the cylinder.
The 3 base classes extend the main class which includes attributes which depict the
position, rotation, type and name of the object being initialized in the viewer. The
attributes depicting the position include xpos, ypos , zpos. The ViewerObject class also
specifies the color of the object.
2.1.2.2 CRS3DViewer class
The following section illustrates the methods and attributes used in the CRS3DViewer
class. Figure 6, depicts the attributes and methods in the CRS3DViewer class.
15
Figure 6: CRS3DViewer class
16
The CRS3DViewer class includes the following methods:
2.1.2.2.1 setInitialGraphicParameters()
The GraphicsConfiguration, SimpleUniverse and Canvas3D classes are initialized in this
method. These methods are responsible for rendering the Java3D objects in the screen.
It also initializes the BranchGroup and TransformGroup instances in order to add various
geometrical objects, light sources, appearances of objects on screen.
2.1.2.2.2 setLightParameters()
The BoundingSphere, AmbientLight and DirectionalLight parameters are set in the
following method. Each of these parameters to attached to the BranchGroup object.
2.1.2.2.3 setOrbitParameters()
OrbitBehavior parameters are initialized here to enable mouse zoom in and zoom out. It
also initializes the ViewingPlatform and View parameters to enable clipping Distance, so
that mouse zoom out takes place without much of the scene being clipped.
It also specifies, the location of the camera by specifying the location of the camera and
angle and point to which the camera is focusing on.
2.1.2.2.4 drawObjects()
The CRS3D Viewer connects to the Environment Simulator to draw the initial objects
and environment on the screen. The co-ordinates are also written to a stream to enable
Replay options to study the behavior of robots.
2.1.2.2.5 setShape()
This method draws the objects, places it in their respective positions and sets an
appearance color to each of them. The orientation, rotation and position of the objects are
17
initialized here using the Vector3d and Translate Classes. These objects are then included
in the TransformGroup, which are in turn included in the BranchGroup.
2.1.2.2.6 getAppearance()
The following method sets the Material Color of the objects. The material color of the
object specifies the color of the object during illumination.
2.1.2.2.7 connect()
The connect method specifies the connection parameters to the Environment Simulator.
The viewer can be allowed to run on multiple machines independent of the platform the
machines use.
2.1.2.2.8 connectclose()
This method indicates the close of the connection.
2.1.2.2.9 setFrame()
This frame initializes the frame. It also adds panels to the frame. The panels specify the
canvas3D, combobox and Record, Replay buttons.
2.1.2.2.10 showFrame()
The floors are added to the BranchGroup and the instance of BranchGroup specified is
compiled to render the objects on the screen.
18
2.1.2.3 CRS3DViewer, CheckerFloor, ColouredTiles
The following section illustrates the association between the CRS3DViewer class, the
CheckerFloor class and the ColouredTiles class.
Figure 7, shows the association between the classes. ColouredTiles, CheckerFloor classes
are called from the CRS3DViewer’s constructor method. It initializes the floor in the
CRS3D Viewer with tiles in the form of a checker board. It also marks the tiles with their
co-ordinate positions.
The getBG() in CheckerFloor class, adds the tiles generated by the ColouredTiles class to
the branchgroup.
Figure 7: Association between CRS3DViewer and ColouredTiles, CheckerFloor
When the branchgroup in the CRS3DViewer class is compiled it generated the floor and
the tiles in the viewer.
19
2.1.2.3
CRS3DViewer, ViewerUpdateLocation
The following section illustrates the interaction of ViewerUpdateLocation class of
Environment with CRS3DViewer. Figure 8 depicts the high level association of the two
classes.
Figure 8: ViewerUpdateLocation
20
Figure 9: Protocol between Environment and Viewer
Figure 9, gives a detailed description of the attributes and methods involved during the
translation of objects. The ViewerObject class interacts with the CRS3DViewer to draw
the initial objects in the environment generated by the Environment Model Building
Tool. The ViewerUpdateLocation class specifies the Object Name to be translated and
the position it has to be translated to. The CRS3DViewer class interacts with the
ViewerObject class by means of the drawObjects(). When the initial objects are created
in the viewer, the objects are stored by means of a name which has a value in the
Hashtable.
21
The ViewerUpdateLocation class passes the name of the object and the translation
parameters and the CRS3DViewer class refers to the Hashtable to get the id of the object
to be translated.
2.1.2.3
CRS3DReplay
The following section illustrates the class diagram of the CRS3DReplay class. Figure 10
depicts the attributes and methods in use during the replay.
Figure 10: CRS3DReplay
22
The CRS3DReplay class gets the data from the script file generated during the
simulation. It reads the data as a stream using the DataInputStream class and shows the
translation. The methods and attributes used in the CRS3DReplay class are similar to that
used in CRS3DViewer.
The scenario script is written whenever the user intends to view the replay the simulation
and generates a script file by recording the simulation.
2.2
Use Case Diagram
Figure 11: Use Case Diagram for CRS3DViewer
Figure 9, shows the Use Case diagram for the CRS3D Viewer. The User is the actor and
the Environment Control Panel, the robot simulator, the environment simulator and the
CRS3DViewer are the use cases.
The CRS3DViewer is started by the Environment Control Panel, which also starts up the
Robot Simulator and the Environment Simulator. The Robot Simulator provides the
23
updates about the targets through the heat sensors and bump sensors and the Environment
Simulator correspondingly issues commands for the movement of the robot and
simultaneously sends the coordinates to the Viewer to show the translation. The Use case
template of the CRS3DViewer is show below, it describes in detail the capabilities and
interaction of the CRS3DViewer.
Table 1: Use Case Template for CRS3DViewer
Use Case Template
Name
CRS3D Viewer
Description
CRS3D Viewer is used to view the simulations in the
environment of the Cooperative Robotics Simulator
Actors
User
Include
None
Extends
None
Pre-conditions
The Environment Simulator should be started
Details
1. The user starts up the environment control panel
2. The environment control panel is used to start up the
Robot Simulator, Environment Simulator and the CRS3D
Viewer
3. Robot simulator sends the target information by keeping
track of it through the bump and heat sensors to the
Environment Simulator.
4. The Environment Simulator issues commands for the
movement of the robot and notifies the Viewer about the
change in the coordinates of a particular object.
Post-conditions None
Exceptions
None
Constraints
None
Variants
None
Comments
CRS3DViewer flushes the parameters of translation into a file to
enable replay.
24
2.3
Sequence Diagram representing interaction between the
CRS3DViewer, Environment Control Panel and CRS3DReplay.
Figure 12: Sequence diagram representing interaction of CRS3DViewer class with
Environment Simulator class
25
The user on instantiation of the CRS3DViewer invokes the setinitialGraphicsParameter()
method, which initializes the SimpleUniverse, Canvas3D, GraphicsConfiguration
parameters to show up the objects on the screen.
The setFrame() method initializes the window in which the Canvas3D is embedded.
The setLightParameters() method initializes the light source to view objects in the
universe. The light parameters are attached to the branchgroup. The setOrbitParameters()
method initializes the mouse behavior for zoom-in and zoom-out of the viewer.
The drawObjects method initializes the viewer by getting the objects from the
Environment Control Panel. It also simultaneously flushes the objects and their
coordinates along with their parameters on to a DataOutputStream which is written to a
file at regular intervals in order to enable replay.
The showFrame() method displays the window on the screen.
The translateObject() method gets the updates from the environment control Panel and
translates the objects by keeping track of object names by the Hashtable. It also flushes
the translated parameters to an output stream at regular intervals.
If the replay button is clicked it shows up the replay. This enables the viewer to study the
behavior of robots and its interaction with other robots.
The sequence goes on until the user closes the viewer.
26
Chapter 3: Evaluation
The CRS3D Viewer was evaluated with various test cases. This section illustrates the
various tests performed. The CRS3D Viewer had the following requirements:
1. To be able to draw the environment generated by the Environment Model
Building tool.
2. To be able to show the changes in the environment on a real time basis.
3. To be able to provide the user with zoom-in and zoom-out to get the
desired view.
4. The user should also be able to view the environment from different
camera angles.
5. The viewer also should be capable enough of running on any platform,
with minimal memory usage. The viewer should also be designed to run
on multiple machines at the same time.
The CRS3D Viewer was primarily developed in Virtual Reality Modeling Language
(VRML). The following table shows the comparison of VRML and Java 3D.
Table 2: Comparison of VRML vs. Java 3D
Properties
Virtual Reality Modeling
Java 3D
Language
Platform Independence
No
Yes
Support for Java API’s
Yes, but minimal
Yes, Complete support
No
Yes
Yes
No
Camera Angles
Yes
Yes
Zoom in and Zoom out
Yes
Yes
Very Minimal
High
Support for Socket
Communication
Interfaces
Support for Microsoft
Virtual Machine
Memory Usage
27
Taking into consideration the following comparisons the CRS3D viewer was completely
developed using Java 3D and Java API’s. Java 3D is a fully featured 3D graphics API. It
employs a scene-graph programming model in which the application program describes a
scene; Java 3D then manages the display of that scene. Java 3D’s scene graph allows the
program to focus on what happens to the object in the scene while the Java 3D runtime
invokes the rendering engines to draw the scene and display as fast as possible.
This feature is used in the CRS3D viewer to enable translation of robots instantaneously
once the parameters are received from the Environment Control Panel.
Java 3D includes the most essential features found in the other popular 3D graphic API’s
such as OpenGL and Direct3D. Java 3D falls somewhere in the middle, with capabilities
more like those of rendering API’s than file formats. It offers a high-level, scene graph
programming model that shields programmers from low-level rendering details and
permits low-level rendering control like OpenGL and Direct3D which Viewer does not
provide.
Java 3D allows scalable performance. In recent years, the power of graphics hardware
has been growing faster than CPU power. Java 3D is structures based on the scene graph
model which allows much of the work to be offloaded to the graphics hardware. As a
result, developers don’t need to recompile the Java 3D programs to keep up with the
advances in the hardware.
Java3D inherently supports multithreading. Threads also known as lightweight processes
allows a program to be divided into an umber of smaller tasks that can be executed
independent of one another. When run on multiprocessor system, the threads can be
concurrently executed on different processors. The result is a performance increase as
program execution is spread across CPU’s.
Java 3D is optimizes for bother the single CPU and multiprocessor configurations. When
run on a single CPU, Java 3D partitions its work to maximize performance and
28
interactivity. On multiprocessor systems, Java 3D changes its partition to take advantage
of the extra processors. The speed up is dramatic on systems with multiples displays
where Java 3D can partition the rendering to make each processors render to particular
display.
Java 3D supports objects called behaviors that allow program logic to be embedded into a
scene graph. This allows objects n the virtual world to make dramatic changes to the
scene graph instantaneously.
Java 3D aloes allows developers to compress scene geometry. Java 3D supports binary
compression of specific object geometry through the API.. Java 3D’s binary Compression
format is typically used to reduce the bandwidth required to transmit geometric data over
a network.
The advantages of binary compression, platform independence, distributed rendering,
multithreading makes development of CRS3D viewer using Java 3D very effective.
The Viewing platform of Java 3D enables the viewer to see the environment from
different angles.
•
Test Case 1:
Table 3: Test Case 1
Environment Model Building Tool sample
Complex-3r.xml
Number of Objects
32 Box + 3 Robots
Zoom- in and Zoom –out
Worked perfectly
Camera Angles
HardCoded
Platform Independence
Yes
Multiple Viewers
Yes
Real Time change on Viewer
Yes, no time lapse
29
•
Test Case 2:
Table 4: Test Case 2
Environment Model Building Tool sample
Proto-two-robots.xml
Number of Objects
4 box + 2 Robots
Zoom- in and Zoom –out
Worked perfectly
Camera Angles
HardCoded
Platform Independence
Yes
Multiple Viewers
Yes
Real Time change on Viewer
Yes, no time lapse
30
Chapter 4: Conclusion
The Cooperative Robotics Simulator was designed to study the behavior of robots by
performing simulations on one more heterogeneous types of robots all working with a
single environment.
The CRS3D Viewer is completely designed using Java 3D. Java 3D has the following
advantages: platform independent support, Graphics acceleration capabilities,
Representation of composite objects and shapes, Database Interaction Support.
Also Java 3D is built on a lower level interfaces and leverages and the hardware
acceleration provided by DirectX, QuickDraw3D or OpenGL. Java 3D has superior
rendering, texturing, 3D geometry and many other programmable features.
The CRS3D Viewer features all the advantages provided by Java 3D and Java. The
viewer is platform independent and can be run on multiple machines to view the
simulation due to the multithreading capabilities provided by Java 3D.
The scene graph used in Java 3D enables effective rendering of images during run-time.
This feature has helped represent the translation of robots in the environment effectively.
All the requirements of the CRS3D Viewer have been successfully met. The
requirements completely satisfied by the viewer include:
Figure 13: CRS3D Viewer, Requirements
31
Chapter 5: Future Work
5.1 Mouse Behaviors in Java 3D
Java 3D [4] provides behavior classes to control transformations using the mouse. The
subclasses of MouseBehavior change a transform for TransformGroup when the mouse is
moved when a button is pressed. The subclasses are MouseRotate, MouseTranslate and
MouseZoom.
5.2 Picking in Java 3D
Picking is sort of the opposite of viewing. Picking is the process of selecting shapes in the
3D virtual world using the 2D coordinates of the mouse on the Canvas3D. The
PickCanvas class is used to turn the mouse location into an area of space or PickShape,
the projects from the viewer through the mouse location into the virtual world. Pick
Canvas extends the more general PickTool that defines Picking operations.
Picking behavior could be used to specify the details about the object being picked.
5.3 Collision Detection using Java 3D
Collisions are considered a form of behavior, so the first thing that the runtime does is
organize the data in spatial groups. The viewpoint has an activation region surrounding it,
and each of the objects marked as collidable have a region surrounding them. If these two
32
areas intersect then these are added to the list of active areas to watch for.
Figure 14: Collision detection in Java 3D
The basic collision areas and the user views. The grey areas are removed from the
collision detection because they do not intersect with the user's view area
To do this first part relatively quickly, J3D uses a spatially organized tree (which is
apparently used for all geometric operations - behavior culling, rendering culling etc).
The efficiency is dependent on how well balanced this tree is i.e. how well objects are
distributed around the virtual world relative to the user's position and how many child
items are there.
5.4 Representing Composite Objects and Sounds
The present version of the Viewer is capable of representing both composite objects and
simple objects. However, wrapper classes could be defined to draw composite shapes like
robots and rooms using the present viewer.
Java 3D could also be used to represent elevations over the floor.
33
Figure 15: Complex Spline
Writing Java 3D code to create complex 3D worlds from scratch is certainly nontrivial.
Realizing that such limits aren't good for the success of Java 3D, Sun has made it easy to
import from standard 3D file formats into Java 3D using loaders.
A loader knows how to read content from a standard 3D file format -- say, for instance,
Wavefront's Object file format (OBJ) -- then construct a Java 3D scene from it. There are
a variety of loaders available on the Web, including several provided by Sun within the
Java 3D release itself. All of them are documented at the Java 3D Loaders archive .As of
this writing, 17 publicly known Java 3D file loaders are currently available, supporting
such common formats as AutoCAD's Drawing Interchange File (DXF), LightWave's
Scene Format (LWS) and Object Format (LWO), 3D-Studio's 3DS, and applicationspecific formats like the Protein Data Bank's PDB. The world is full of free or
commercial archives of 3D content. Complex 3D shapes can be created using these file
formats.
Java 3D also supports sound and multimedia content. It is possible to integrate the sound
features of the robot using Java 3D’s sound API.
34
References
[1] Aaron E. Walsh, Dough Gehringer,” Java 3D API Jump Start”, Sun Microsystems
Press, 1999,242 pages.
[2] Author unknown,”Sun Java API Manual”, Copyright by Sun Microsystems
, ” http://java.sun.com/products/java-media/3D”, 198 pages.
[3] Henry Sowizral, Kevin Rushforth, Michael Deering, “The Java 3D(TM) API
Specification”, Sun Microsystems Press, 2000, 292 pages.
35
Appendix
User Manual
Figure 16: Environment Control Panel (SnapShot)
The CRS 3D viewer can be started as follows:
1. Start the Environment Control Panel
Step 2: Starting
the environment
2. File->Open->Select an XML file (XML file is the one created by the Model
Building tool).
3. Click Run Loaded File
4. Start the Java 3D viewer and robot simulator.
36
Figure 17: CRS3D Viewer(SnapShot)
37
Figure 18: CRS3D Viewer(SnapShot)
38
Figure 19: CRS3D Viewer(SnapShot)
39
Figure 20: CRS3D Viewer(SnapShot)
40