1
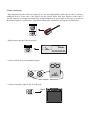
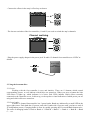
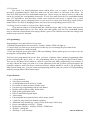
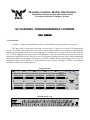
N-audio Custom Guitar Electronics
Handbuilt boutique pedals and custom stuff
Proudly handcrafted in Bulgaria, Europe
12 CHANNEL PROGRAMMABLE LOOPER
User manual
1. Introduction
N-audio 12-channel programmable looper is a floor-based switching system for musicians.
This devise has 3 banks and each bank can store up to 12 presets, to a total of 36 independent
presets. In addition, this looper has a special Free mode which enables you to quickly and dynamically
modify the programmed presets. You can input up to 11 effects and two amp control circuits, with the
last 3 effects plugged in the send-return of the amplifier. All loop commutation circuits are based on
high-quality gold-plated relays. This gives you True bypass switching between effects while maintaining
the optimal sound of your guitar. If required, besides the standard passive guitar input, you can use the
additional buffered input, based on a high-quality low-noise opamp, working at 15VDC for maximum
headroom without any sound distortion.
Top panel view
12
11
10
9
8
Active loop
Amp ctrl.2
Amp ctrl.1
Fx3
Fx2
Fx1
Active preset
Bank
A
B
C
7
Program
Free mode
Bank
6
5
4
3
2
1
Active loop
Custom Design
Active preset
MUTE
/cancel/
Bottom panel view
N-AUDIO
12 CHANNEL CUSTOM PROGRAMMABLE LOOPER
INPUT
In
Buffered
Passive
Out
7
To
Amp Amp
send
In
8
FX
1
TUNER
In
1
Out
In
2
Out
In
3
Out
Out
In
In
9
FX
2
4
Out
Out
To
In
10
FX
3
Wah From
Wah
Out
In
Amp
rtrn
5
Amp
ctrl 1
Out
In
Amp
ctrl2
6
Out
18VDC/600mA
2. Basic connection:
- Plug the guitar into one of the two inputs. If you are using high-quality cables and you don’t want any
additional devices in the way of the signal, use the passive input. Note that, because of the cable’s
specific capacity, you might experience loss of high frequencies in your sound. In this case, you can use
the buffered input. It is your choice. Experiment and decide which of the two inputs you find better.
INPUT
Buffered
Passive
- Plug the tuner into the Tuner input jack.
TUNER
Tuner
- Connect effects in the corresponding inputs.
In
1
Out
Effect
- Connect your amp’s input to the To Amp jack.
To
Amp
Input
- Connect the effects in the amp’s effect loop as shown:
Amp
send
Amp
rtrn
Send
Return
- The last two switches of the foot controller (11 and 12) are used to switch the amp’s channels.
Channel switcing
Amp
ctrl 1
Amp
ctrl2
- Plug the power supply adapter in the power jack. N-audio 12 channel foot controller uses 18VDC at
600mA.
18VDC/600mA
Power supply
adapter
18VDC/600mA
3. Using the footcontroller:
3.1 Presets
Working with the foot controller is easy and intuitive. There are 12 buttons which control
corresponding presets, as well indicate which loops are turned on. When you press a button the blue
LED above it lights up, which indicates it is active. Red LEDs indicate which effects currently
connected to the controller are on. In this way you always have visual indication of which preset you are
using and which effects are turned on.
3.2 Preset banks
N-audio 12 channel footcontroller has 3 preset banks. Banks are indicated by a small LED in the
upper right corner. Each bank has 12 presets, and with 3 banks with 12 presets each, you have a total of
36 independent presets. Changing banks is done by rapidly pressing the Free mode/Bank button twice.
The order of changing banks is fixed at: Bank A -> Bank B -> Bank C -> Bank A -> Bank B -> Bank
C…. etc.
3.3 Free mode
Free mode is a useful functional option which allows you to remove or add effects to a
previously programmed preset. With Free mode you can also remove or add loops to the preset. To
enter Free mode press the Free mode/Bank button once. Choose loops you want to remove or add to the
circuit by pressing the corresponding footswitch. To exit Free mode press the Free mode/Bank button
once. It’s important to note that loops remain active until the next preset is applied. For a visual
indication whether you are changing presets or you are in Free mode, note that in Free mode all three
banks LED are lit, while if changing presets, only one of the corresponding presets LED is lit.
3.4 Going from Free mode to a preset from a different bank
If you want to jump to a different bank and a different preset while in Free mode, first press the
Free mode/Bank button once to exit Free Mode, after that rapidly press the Free mode/Bank button
twice to select the required bank, then simply choose a preset. The controller stores the last settings until
another loop or preset is activated.
4. Programming:
Programming is easy and is done in a few steps:
1. Hold the Program button for more than 3 seconds. All blue LEDs will light up
2. Choose loops you want to use in the preset. In this step you can change the preset bank if the
controller is currently in a different bank.
3. Press the Program preset again. Blue LEDs start flashing. Choose which preset you want to save by
pressing the corresponding footswitch.
You have now programmed the preset. Now you have 2 options: either continue programming other
presets following the above steps, or exit programming mode by pressing the Mute/Cancel button.
You can use the Mute/Cancel button to return to a previous step while programming. For example, if
you have chosen the loops you want to be in the particular preset and you have pressed Program, the
controller stands by until you choose which preset these settings should be saved to. By pressing the
Mute/Cancel button once, you can return to programming mode to edit your presets. Exit programming
mode by pressing Mute/Cancel button again.
5. Specifications:
•
•
•
•
•
•
•
•
•
•
•
•
•
•
•
•
12 loop channels
True bypass switching
36 independent presets stored in 3 banks
Free mode for faster and more flexible work
Fast and easy programming with just one button
Double reinforced heavy duty footswitches
High quality gold plated relays
Passive and buffered guitar inputs
Tuner output
External pedal insert point between effects loops 4 and 5
2 jacks for amp control for channel switching
Additional loop channels for 3 more effects in the amp’s effect loop
Power consumption at 18VDC – 350mA
Dimensions: 500(W) x 160(D) x 55(FH) x 70(RH) mm
Weight 3.3 kilograms
Warranty: 3 years warranty
www.n-audio.net