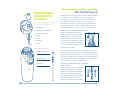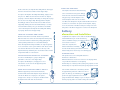
1
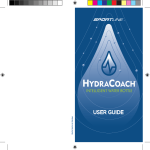
USER GUIDE
PRINTED IN HONG KONG
TABLE OF CONTENTS
1. Introduction ..................................................................... 3
2. Hydration Education and Information .............................. 4
3. The Heartbeat Behind HydraCoach ................................ 7
Congratulations! As a new owner of the
4. HydraCoach Description of Parts ................................... 8
5. Disassembling and Reassembling the HydraCoach ......... 9
6. Battery Information and Installation ................................ 11
HydraCoach, you recognize the importance
of proper daily hydration to a healthy, active
7. HydraCoach Button/Display Description ........................ 12
8. HydraCoach Initial Setup Mode ...................................... 15
9. HydraCoach Functions .................................................... 17
lifestyle. The HydraCoach is the world’s first
interactive water bottle. It calculates your
10. HydraCoach Screen Display Sequence .......................... 18
11. HydraCoach Operation ................................................... 19
12. HydraCoach Reset ........................................................... 20
personal hydration needs, tracks your real-time
fluid consumption, paces you throughout the
13. HydraCoach NOM Setup Modes ..................................... 22
14. Helpful Tips ..................................................................... 23
15. Warnings and Cautions ................................................... 24
day and motivates you to achieve and maintain
optimal hydration. Doctors, Nutritionists and
16. Proper Care and Cleaning ................................................ 25
17. Troubleshooting ................................................................ 26
18. HydraCoach Disclaimer ................................................... 27
19. Warranty and Service ..................................................... 27
For an online version of the HydraCoach User Guide go to:
www.sportline.com
Sportline is a wholly owned subsidiary of E&B Giftware, LLC
© 2007 E&B Giftware LLC
Corporate Headquarters • 4 Executive Plaza • Yonkers, NY 10701
Tel: (914) 964-5200 • Fax: (914) 964-1283 • Toll Free 1-800-338-6337
U.S. Patent No. 6,212,959
SP3906ISOISPORA
Fitness Trainers all recommend that we drink
more water yet there has never been a device
to help individuals adhere to the expert’s
recommendations. The HydraCoach is the only
product of its kind and an evolutionary leap in
personal hydration monitoring.
3
what are the benefits
of proper
hydration?
who should use the
HydraCoach?
Water is the most fundamental nutrient to the human
Well, just about everyone. Proper
body. We can survive weeks without food but only
hydration is critical to the health and
days without water. Nearly every bodily function and
well-being of all people regardless
cellular action requires water. At birth we are roughly
of age, sex or fitness level. This is
particularly true for athletes and active
individuals, anyone trying to lose
weight, aging adults and children.
However, most find it difficult to simply
75% water but less than 50% water by adulthood.
Proper hydration has been linked to everything from
increasing metabolism to reducing the risks of some
types of cancer. The health benefits of water are too
great to list but include the following:
remember to drink fluids on a regular
Transports nutrients and oxygen to cells
basis, let alone calculate and track their
Ensures adequate blood volume
daily intake. The HydraCoach will provide
Protects against heat exhaustion
immediate benefits by monitoring
Acts as insulation in the cold
your personal consumption rate and
Regulates body temperature
motivating you to drink steadily through
Cushions joints
the day. Serious athletes to everyday
Suppresses appetite
health conscious individuals can now
Assists the body in metabolizing stored fat
interactively manage their own fluid
Relieves fluid retention problems
consumption to maximize the benefits of
Reduces sodium buildup in the body
hydration while proactively preventing
Helps to maintain proper muscle tone
the ill-effects of both dehydration and
over-hydration (Hyponatremia).
Rids the body of waste and toxins
Helps convert food into energy
Maintains strength and endurance
Protects organs
4
5
how much water
do we need on a daily
the Heartbeat behind
HydraCoach:
basis?
Proper hydration is personal and determined by many
factors such as gender, age, weight, environmental
conditions and activity level. To ensure you are
consuming the correct amount of fluids, our best advice
is to consult your doctor.
The HydraCoach prompts you to enter your weight into
the patented Hydration Monitor. With this information it
automatically sets your Personal Hydration Goal (PHG)
which is calculated as half your body weight (lbs.)
displayed as ounces. For example, if you weigh 140 lbs.,
your PHG would be 70 ounces. This consumption goal
is simply a baseline and may not reflect what’s right for
you. Toggle the PHG calculation up or down to reach
your desired hydration goal.
The Craig and Kelly
Perkins story
HydraCoach was founded by world-renowned
climbers, Craig and Kelly Perkins, who
conceived the idea out of personal necessity.
In September, 1996, Craig and Kelly were making
their way down Half Dome in Yosemite after reaching
its summit. This was Kelly’s first serious hike following
a heart transplant operation only ten months earlier.
Using a concealed hydration backpack, Kelly was
unable to gauge her rate of fluid intake during the
climb. Disastrously, she ran out of water four miles
from the nearest stream. Severe dehydration put
what the experts daily water
say about consumption.
Kelly back in the hospital where she fortunately made
The National Research Council (NRC) uses a sliding
Knowing proper hydration is critical to fitness and
scale of 1 milliliter of water for every calorie burned.
health, Craig and Kelly set out to devise a tool to help
The NRC says the average man who burns about
individuals quantify, achieve and maintain optimal
2,900 calories daily needs 2,900 milliliters, or about
hydration. The HydraCoach is the result of their
12 cups, of water each day. The average woman who
experience and vision, and an evolutionary leap in
burns 2,200 calories daily needs about 2,200 milliliters,
hydration monitoring. As a tribute to Kelly and other
or about 9 cups, of water each day1. For your own
organ transplant recipients, a portion of the proceeds
calculations: One measuring cup (8 ounces) of water
generated from this product will be used to support
equals 236 milliliters of water.
organ donation.
1Mayo
6
a full recovery.
Clinic, Consumer Health Tips and Products, June 25, 2002
.
7
Disassembling and Reassembling
HYDRACOACH
1
DESCRIPTION
OF PARTS
Please read instructions thoroughly
3
to change the battery, refill the bottle, replace a part, or to
clean. There are seven main components to the HydraCoach.
The exploded view illustration shows where each of these
1. Mouthpiece
2. Upper Cap with Finger Ring
UPPER CAP ASSEMBLY AND BOTTLE
3. Impeller Assembly
To remove the Upper Cap from the
4. Tubing
5. Bezel
6. Computer
4
The HydraCoach can be easily disassembled, and reassembled,
parts locate in relation to one another, and explains how they
all fit together. To ensure that the system works properly, it is
important that these components join to one another properly.
before using the HydraCoach.
2
the HydraCoach
7. Bottle
Bottle, simply twist the outer threaded
Finger Ring in a counter-clockwise
direction. When the Finger Ring has
been unscrewed completely, you will be
able to lift the Upper Cap, along with
the attached Impeller/Tube Assembly,
up and off of the Bottle.
IMPELLER ASSEMBLY
Short Connector Tube
5
6
Impeller Housing
Draw Tube
7
To replace the Upper Cap, position the Mouthpiece at the front
of the Bottle. The tabs on the Plug will automatically align with
the slots in the Bottle. Gently press the cap downward to ensure
that the tabs engage the slots, and then twist the Finger Ring in
a clockwise direction until the Upper Cap is fully screwed down
onto the Bottle for a snug and watertight fit.
UPPER CAP AND IMPELLER ASSEMBLY
WITH TUBING
To remove the Impeller Assembly with
Tubing, simply grasp the hard plastic
housing of the Impeller Assembly and
pull it down and away from the Upper
Cap. The tabs in the rail of the Impeller
Assembly will disengage from the
notches on the rails of the Upper Cap.
8
9
At the same time, the Impeller Assembly will also disengage
COMPUTER AND BEZEL
from the short Connector Tube and the Upper Cap.
The Computer detaches from the Bezel by
means of a tab and notch system. Simply
Assembly up and into the short Connector Tube and the
Upper Cap making sure that the barbed fitting is securely
inserted within. At this point, you should hear an audible
“click” indicating that the Impeller Assembly with Tubing
is properly attached to the Upper Cap.
Bezel. Note: The Computer only fits within the Bezel from the
rear and in one orientation. To replace the Computer, simply
place it into the back of the Bezel and press until you feel the
locking tabs of the Bezel engage the notches in the Computer.
Battery
Information and Installation
The HydraCoach computer comes with an installed CR2032
3 Volt Lithium battery. To ensure the battery
retains its maximum charge, an insulation tab has
been inserted. In order to
R 2032
activate the computer, this
insulation tab must be manually
removed and the battery reinstalled. To remove
insulation tab, please follow steps on following page.
3VO
IMPELLER ASSEMBLY AND TUBING
Both the Short Connector Tube and the Longer Draw
Tube that attach to either end of the Impeller Housing may
be removed and then reattached by simply pulling them
off and pushing them back on to the barbed fittings.
Note: The Impeller Housing and Tubes can only fit together
in one orientation or the system will not work. Please make
sure that the Short Connector Tube is at the top of the
Impeller Housing (defined by the check valve inside) and the
Longer Draw Tube is at the bottom.
gently pressing on the Computer’s face,
and the Computer will come free from the
LT
L
properly so that the Impeller Assembly’s locking tabs engage
the notches in the Upper Cap. Gently push the Impeller
pinch both sides of the Bezel inward while
EL
this process. Make sure that both of the rails are aligned
C
To replace the Impeller Assembly with Tubing, simply reverse
LITHIUM C
MOUTHPIECE AND UPPER CAP ASSEMBLY
To remove the Mouthpiece, grasp it firmly and
pull until it comes free of the Upper Cap.
To replace the Mouthpiece, simply press it over
and down on to the stem of the Upper Cap until
it is properly seated.
IMPORTANT NOTE
• This product uses non-rechargeable batteries
• Do Not use old batteries
• Exhausted batteries need to be removed - the display will be
very weak when batteries need replacing
• Do Not dispose of battery in fire; battery may explode or leak
• Do Not dispose of product in fire; battery may explode or leak
BEZEL WITH COMPUTER AND PC BOTTLE
With the Upper Cap removed from the Bottle,
the Bezel with attached Computer may be lifted up
and off the Bottle as a single piece. To replace,
simply reverse the process and press the Bezel with
Computer back down and onto the Bottle.
Under normal circumstances the battery should
last approximately 6 months. When it is time to
replace the battery, a Low Battery Icon
will
appear in the upper right hand corner of the
display and flash. Note: Always recycle or dispose of dead
batteries properly, and in accordance with your local laws.
10
11
PROCEDURE FOR REMOVING AND REINSTALLING
THE BATTERY IS AS FOLLOWS:
After installing a new battery, you will need to re-program the
HydraCoach. Please follow initial set-up mode instructions on
page 15.
STEP 1: Remove the screw from the battery door on the
back of the computer using an appropriate screwdriver. Note:
The screw will come free when unfastened, so be careful not
to lose it during this process.
MAIN DISPLAY
A Function Abbreviations
(TAC, TET, PHG, %DG, CLK, DAY)
STEP 2: Using a fingernail within either of the two pry slots,
B Upper Line Display
gently lift the battery door open and remove the battery from
the battery compartment.
C Lower Line Display
STEP 3: To reinstall the battery, simply place it down into
E Tertiary Line Function/Unit Abbreviations
D Tertiary Line Display
the battery compartment with the positive (+) side facing
out. Note: Be careful not to touch or bend any of the battery
(AVG, L/HR, OZ/HR)
F Upper/Lower Line Unit Abbreviations
contacts within the battery compartment during installation.
STEP 4: Replace the battery door making sure that the o-ring
seal does not get pinched or distorted, and refasten the screw
to ensure that the computer is water-resistant. Note: The screw
should be snug. However, to avoid damage to the battery door
and fastener system, do not over-tighten the screw.
HydraCoach
Button/Display Description
START/STOP/RESET
BUTTON
SETUP BUTTON
(PM, KG, LB, L, OZ)
ABBREVIATION AND ICON DEFINITIONS
TAC
Total Amount Consumed
TET
Total Elapsed Time
PHG
Personal Hydration Goal
%DG
Percent of Daily Goal
CLK
Clock
DAY
Date
AVG
Average Consumption
L/HR
Liters Per Hour
A
OZ/HR Ounces Per Hour
F
B
C
E
D
MODE BUTTON
12
PM
PM Time Designation
LB
Pounds
KG
Kilograms
L
Liters
OZ
Ounces
Low Battery Icon
Stop Watch Icon
13
HydraCoach
Initial Setup Mode
After battery installation, the computer displays the program’s
master screen briefly, and then automatically enters into the
Initial Setup Mode. This Initial Setup Mode may be accessed in
The Intelligent Water Bottle
two ways: 1) After a battery insertion (the program will display
factory default settings), or 2) When both the Setup and Start/
Stop/Reset buttons are pressed and held simultaneously for 2
Personal Hydration Calculator
seconds (the program will display user preset settings).
Automatically calculates a recommended
daily Personal Hydration Goal.
Average Consumption
Displays the average amount of fluid
consumed per hour.
The Initial Setup Mode allows you to select operational units
and enter personal data in order to customize the HydraCoach
Hydration Program to meet your needs. All steps in the Initial
Setup Mode have been preprogrammed. If an entry error is
made, complete the Initial Setup Mode program and then reenter from the Normal Operating Mode as described above to
revise the setting(s).
SETUP MODE BUTTON OPERATIONS
Drink Monitor
Monitors the total amount of fluid
consumed throughout the day.
Mode Button – Toggles through units and advances digits.
Hold down for fast advance.
Setup Button – Sets units or digits and advances to the next
item or screen.
Start/Stop/Reset Button – Has no function in Setup Mode.
Sip Tracker
Displays the percentage of fluid
consumed relative to your Personal
Hydration Goal.
Time Tracker
Displays the amount of time elapsed for
the day to reinforce proper pacing.
14
INITIAL SETUP MODE PROGRAM
Units of Fluid Measure
Select OZ (Ounces) or L (Liters)
as the program’s default unit of
fluid measure. Note: The default
setting for Units of Fluid Measure is
Ounces (OZ).
15
Units of Weight
Select LB (Pounds) or KG (Kilograms) as the
program’s default unit of weight. Note: The
default setting for Units of Weight is Pounds (LB).
Current Weight
Enter your current weight into the computer one digit at a time.
HydraCoach Functions
TOTAL AMOUNT CONSUMED (TAC)
This function displays the total amount of
fluid that has been consumed since the
HydraCoach was started. Value resolution
for Ounces is in whole numbers, and in
Liters to tenths.
Personal Hydration Goal (PHG)
Based on your previously programmed weight, the computer
will automatically calculate your recommended daily Personal
Hydration Goal (PHG) value and display it on the screen. This
value may be accepted or adjusted up or down to meet your
personal daily fluid requirements.
Clock Format
Select 12 or 24 Hour clock
format. Note: The default setting
for Clock Format is 12 Hour.
Current Time
Enter the current time into the computer in hours and minutes.
Note: There is only a PM time designation in 12 Hour format;
there is no AM time designation.
Current Date
Enter the current month, day and year into the computer.
16
TOTAL ELAPSED TIME (TET)
This function is a count-up timer that
displays the total elapsed time since the
HydraCoach was started.
AVERAGE CONSUMPTION (AVG)
This function displays the average hourly
rate of fluid consumption. Data displays
after one minute of total elapsed time.
Note: Values that are out of the program’s
operating range will display as dashes on the
screen. Real-time values will replace these dashes as soon as
they fall within the program’s operating range.
PERSONAL HYDRATION GOAL (PHG)
This function displays your Personal
Hydration Goal for the day. The PHG
value is defined as the amount of fluid
that an individual should consume over the
course of a 24-hour day to maintain optimal
hydration. Based on your current weight, this value is
automatically generated by the HydraCoach program in the
Setup Mode. The PHG value should be adjusted up or down to
meet your specific needs.
17
PERCENT OF DAILY GOAL (%DG)
HydraCoach Operation
This function displays, in real-time, the total
amount of fluid consumed, expressed as a
percentage of your daily PHG.
Starting and Stopping the Hydration Program
All Hydration Program operations are executed by means of
the Start/Stop/Reset button and may only be performed from
within either of the two Hydration Program screens (TAC/TET/
CLOCK (CLK)
This function displays, in 12 or 24-Hour
AVG or PHG/%DG/AVG). Note: The Hydration Program may
format, the current time.
never be started or stopped, or a NOM reset performed, from
the Clock and Date screen (CLK/DAY).
DATE (DAY)
To start the HydraCoach, make sure that you are in either
the TAC/TET/AVG or PHG/%DG/AVG screen, and press
This function displays, in Month/Day/Year
format, the current calendar date.
the Start/Stop/Reset button. A Stopwatch icon
HydraCoach
Screen Display Sequence
When you have completed the Initial Setup Mode, the
computer will automatically enter into the Normal Operating
Mode (NOM). There are three NOM function screens. The
first two are specific to the Hydration Program, while the third
displays the time and date.
Normal Operating Mode (NOM) Function Screens
HYDRATION PROGRAM
SCREEN 1
HYDRATION PROGRAM
SCREEN 2
TOTAL AMOUNT
CONSUMED (TAC)
PERSONAL HYDRATION
(PHG)
TOTAL ELAPSED TIME
(TET)
PERCENT OF DAILY
GOAL (%DG)
AVERAGE CONSUMPTION
(AVG)
AVERAGE CONSUMPTION
(AVG)
CLOCK AND DATE SCREEN
will begin
running in the lower right hand corner of the display. This
indicates that the Hydration Program is active, and that you
may begin drinking at any time.
To stop the HydraCoach, make sure that you are in either the
TAC/TET/AVG or PHG/%DG/AVG screen, and press the
Start/Stop/Reset button. The Stopwatch icon will pause,
and all Hydration Program functions will cease updating. The
HydraCoach will display the information that was last recorded
before the computer was stopped. To resume the Hydration
Program, press the Start/Stop/Reset button again in either the
TAC/TET/AVG or PHG/%DG/AVG screen, and all functions
will pick up where they last left off.
CLOCK (CLK)
DATE (DAY)
Press the Mode button to cycle through the
NORMAL OPERATING MODE (NOM) function screens.
18
START
STOP
19
HydraCoach Reset
Press the Mode Button to cycle through the NORMAL OPERATING
MODE function screens.
will stop automatically. All NOM function screens will begin
flashing to notify you that the 24-hour time limit has been
reached. At this point, you may either toggle through the NOM
function screens to review your end-of-day data by means of
the Mode button, or you may reset the computer and begin a
new Hydration Program.
To reset the Hydration Program after the 24-hour time limit has
HOLD THE
START/STOP/RESET
BUTTON
FOR 2 SECONDS
HOLD THE
START/STOP/RESET
BUTTON
FOR 2 SECONDS
been reached, simply press and hold the Start/Stop/Reset
button for 2 seconds in any of the flashing NOM function
screens. Note: This is the only case in which the Hydration
Program may be reset from the Clock and Date screen (CLK/
DAY). All Hydration Program functions will reset to zero or their
last set default values. The computer is now ready to start a
new Hydration Program.
Press the Mode Button to cycle through the NORMAL OPERATING
MODE function screens.
NOM RESET
The HydraCoach may be reset at any time. To do this, the
HydraCoach must first be stopped as described in the previous
section. From either the TAC/TET/AVG or PHG/%DG/AVG
screen, press and hold the Start/Stop/Reset button for
2 seconds. All Hydration Program functions will reset to zero or
their last set default values. The computer is now ready to start
a new Hydration Program.
HOLD THE
START/STOP/RESET
BUTTON
FOR 2 SECONDS
HOLD THE
START/STOP/RESET
BUTTON
FOR 2 SECONDS
HOLD THE
START/STOP/RESET
BUTTON
FOR 2 SECONDS
24-HOUR LIMIT RESET
The HydraCoach monitors the amount of fluid that an individual
consumes over the course of a 24-hour day. When the Total
Elapsed Time (TET) function reaches 24 hours, the HydraCoach
20
21
HydraCoach
Helpful Tips
NOM Setup Modes
Some useful information and insights to help you make
the most of your HydraCoach experience…
SET/ADJUST
COMPUTER
GENERATED PHG
SET CORRECT
CURRENT DATE
Drinking from the HydraCoach using the Mouthpiece is a
two-step process. With your lips around the mouthpiece,
locate your teeth on the indents at the tip and bite down to
SET CORRECT
CURRENT WEIGHT
SET CORRECT
CURRENT TIME
HOLD THE
HOLD THE
SETUP BUTTON
SETUP BUTTON
FOR 2 SECONDS
FOR 2 SECONDS
TOTAL AMOUNT
CONSUMED (TAC)
PERSONAL HYDRATION
GOAL (PHG)
TOTAL ELAPSED
TIME (TET)
PERCENT OF DAILY
GOAL (%DG)
AVERAGE CONSUMPTION
(AVG)
AVERAGE CONSUMPTION
(AVG)
HYDRATION PROGRAM
1
SCREEN
HYDRATION PROGRAM
2
SCREEN
CLOCK (CLK)
DATE (DAY)
CLOCK AND DATE SCREEN
Press the Mode Button to cycle through the NORMAL OPERATING MODE function screens.
There are two NOM Setup Modes. Each may be accessed
directly from within specific NOM function screens whether the
Hydration Program is active or not. These NOM Setup Modes
enable quick and convenient program setting changes without
having to stop the HydraCoach. Changes made while in the
NOM Setup Modes will be realized immediately once you return
back to the Normal Operating Mode. To enter into either of the
NOM Setup Modes, press and hold the Setup button for
2 seconds while in the appropriate NOM function screen.
WEIGHT AND PHG SETUP
The first NOM Setup Mode allows you to adjust your weight
and manipulate your PHG value, and is accessed via the
TAC/TET/AVG or PHG/%DG/AVG function screens. Note:
The NOM Setup Mode button operations are the same as in the
Initial Setup Mode.
CLOCK AND DATE SETUP
The second NOM Setup Mode allows you to adjust the time
and date, and is accessed via the CLK/DAY function screen.
22
open the slit. To ensure accuracy take a good suck in, just
like you would with a straw, to draw the fluid from the bottle
up in to your mouth. When finished, simply remove your
mouth from the Mouthpiece and the slit will automatically
seal itself to protect against accidental spillage.
The PHG value may be adjusted throughout the day to
accommodate your personal hydration needs. The PHG
value may be adjusted up to address greater fluid needs
as a result of exercise, the environment, illness or health
conditions, pregnancy or other variables. The PHG value
may also be adjusted down to account for fluids consumed
from alternate sources other than the HydraCoach. Before
embarking on a custom hydration program, please consult
your doctor on all issues related to your personal hydration
requirements.
The Bottle should be refilled when the water line reaches
the ----REFILL---- mark on the lower back portion of the
bottle. This ensures that no air is sucked through the
system resulting in erroneous readings. The accuracy of
the HydraCoach relies on maintaining a “closed system” in
which water is captured within the Impeller Assembly and
Tubing at all times.
Do not tip the bottle too far forward while you drink. Think
of it more like drinking from a straw in a cup. Keep the bottle
oriented in a vertical position for it to work most effectively.
The bottle may be slightly tipped forward while drinking for
ease of use. Do not tip it upside down to drink as you would
with open lid or squirt style bottles.
23
It is perfectly all right to put ice in the bottle to keep your
drink cold.
When adding water to the bottle, DO NOT fill to the very
top. When the Upper Cap is screwed down, water will be
displaced and spill out.
Proper Care and Cleaning
The HydraCoach disassembles into seven main components.
(See Disassembling and Reassembling the HydraCoach) This
allows you to clean the system easily and thoroughly. The best
methods for cleaning the individual components are as follows:
When transporting a filled HydraCoach, especially within a
bag or other confined space, make sure that the Mouthpiece
Bottle – The Bottle may be placed in a dishwasher or
does not become compressed or deformed in any way, or
water will be released from the system.
washed by hand in warm soapy water. It may then be wiped
dry with a soft cloth or left to air dry. DO NOT place the
electronic module in the dishwasher.
Warnings and Cautions
Important things to be aware of when using your HydraCoach…
DO NOT place boiling or very hot liquid into the HydraCoach
bottle as it could potentially damage or compromise some of
the seals and/or components located within the system.
The use of fluids other than water within the HydraCoach
could potentially damage or compromise some of the seals
and/or components located within the system, especially if
left to sit and dry.
DO NOT allow air to be sucked up into the system, as this
will produce erroneous readings.
The Computer is water-resistant and sealed to withstand
wet conditions. However, DO NOT deliberately place or
submerge the HydraCoach into water.
Avoid leaving the HydraCoach exposed to extremely hot or
cold conditions.
WARNING: The HydraCoach is NOT microwave safe.
Although designed and manufactured for durability and
performance, the HydraCoach contains sensitive electronic
and magnetic components. Care should be taken when
handling to minimize any risks, due to extreme impacts or
shock, which might damage the unit.
24
Computer – The Computer may be polished with a soft
cloth in most cases. However, a slightly damp cloth may be
used if necessary. Note: Be careful not to scratch the lens
area. Never use solvents, abrasives, or harsh chemicals
or materials to clean the Computer. Never submerge the
Computer in water or other liquid medium. DO NOT place
in the dishwasher.
Impeller Assembly and Tubing – To thoroughly clean the
Impeller Assembly and Tubing, they should first be soaked in
warm soapy water, making sure that no air is trapped within
the components. Next, flush the system with a stream of
warm running water through the bottom end, or the end that
the longer Draw Tube attaches. Once flushed thoroughly,
it is now ready for use. To dry, the Tubing should be
disconnected from the Impeller Assembly, air blown through
the components to rid the system of excess water, and then
left to air dry.
Mouthpiece, Upper Cap and Bezel – These components
are best washed by hand in warm soapy water and then
rinsed clean. However, they may be placed in a dishwasher’s
upper rack and away from heating elements if absolutely
necessary. They may then be wiped dry with a soft cloth or
left to air dry.
When not in use, the HydraCoach should be allowed to dry
completely and then stored away for safe keeping until you
want to use it again.
25
HydraCoach Disclaimer
Troubleshooting
The HydraCoach seems to be reading low.
You may be sucking too lightly. Try sucking a little harder through the
Mouthpiece. (See the Helpful Tips section in this manual for more details)
The HydraCoach seems to be reading high.
Make sure that you are not sucking any air through the system. Ensure that
there is always water contained within the Impeller Assembly and Tubing
while in use. (See the Helpful Tips section in this manual for more details)
The Computer does not register my fluid intake after I drink
from the HydraCoach.
The Hydration Program has not been started, or is paused. (See the
HydraCoach Operation section in this manual for more details)
The HydraCoach is assembled improperly. (See the Disassembling and
Reassembling the HydraCoach section in this manual for more details)
The Impeller may be bound or seized. Check to make sure that the Impeller
spins freely within its housing.
The HydraCoach is not a medical tool and should not be used as one. The
Personal Hydration Goal calculation offers only a general guideline for daily
fluid consumption and may not be an appropriate recommendation for many.
Neither HydraCoach nor Sportline make any medical claims or instruction
with respect to individual hydration requirements. Please consult your doctor
on all issues related to your own hydration requirements.
Warranty and Service
For purchases made in the U.S. If at any time within one (1) year from
the purchase date of this product, it fails to perform properly because of
defects in material or manufacturing, return it prepaid to:
E&B GIFTWARE, LLC, 585 Oak Ridge Road, Hazleton, PA 18202
Complete this Guarantee Certificate and enclose it (or a copy of it) with the
product. (PLEASE PRINT CLEARLY)
NAME
The Computer behaves erratically, experiences “lock-ups” or the
display is weak or fades in and out.
The Battery may be weak and/or dying. Check to see if the Low Battery
Icon is flashing on the display to indicate replacement. (See the Battery
Information and Installation section in this manual for more details)
The Computer’s LCD and other sensitive components do not operate well
in extremely hot or cold conditions. Return the HydraCoach to a less
extreme environment.
Check the components for cracks or breaks, and the fit of all assemblies to
ensure that the system is air and water tight. A system that is compromised
by air or water leaks will cause the HydraCoach to malfunction. Tighten any
loose fittings.
The Computer’s display is blank or does not light up.
The Battery is completely dead, not installed or the factory installed
Insulation Tab may still be inside the battery compartment. (See the Battery
Information and Installation section in this manual for more details)
It is difficult to suck water through the tubing and mouthpiece.
The Mouthpiece and/or Air Check Valve may not be fully cut through. Try
pinching and rolling the Mouthpiece between your thumb and index finger
to open the slit completely. Run a fingernail across the Air Check Valve to
separate the four triangular shaped flaps from one another to allow air to
more easily pass through.
26
TEL
ADDRESS
CITY
STATE
ZIP
STORE PURCHASED FROM
DATE OF PURCHASE
PURCHASE PRICE
PROBLEM WITH PRODUCT
REPLACEMENT
This product has been carefully designed, manufactured and packaged.
If any parts are missing or damaged, please contact us at the address
above and we will replace the unit at no charge. (Guarantee does not cover
crystal or battery.)
For purchases made in the UK:
Should you experience problems with this item, please return it to the point
of purchase. This will not affect your statutory rights. Alternatively return it
to the address shown below for a repair/replacement.
StarCase (UK) Ltd, Berkeley Business Park, Wainwright Road,
Worcester WR4 9FA.
www.hydracoach.com
www.sportline.com
27