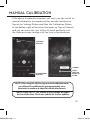
1
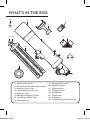
IW0502
STAR FINDING
SPOTTING SCOPE
0502S01EBU.indd 1
USER GUIDE
8/29/14 10:19 A
W
WELCOME
GET READY TO UNLOCK
THE WONDERS OF THE
NIGHT SKY!
15
13
Thank you for purchasing our Space Navigator
by Invintiv Star Finding Spotting Scope.
Powered by the SkyView® app, you will be able to
easily locate the moon, stars, constellations, and more
in your spotting scope! You will reveal details of the
night sky unseen by your naked eye, and even track
space objects overhead. Have fun exploring!
TM
IMPORTANT-PLEASE READ:
Please follow the instructions on the included insert card for
installing the SkyView app as well as registering your device before
use to ensure the app syncs correctly with your spotting scope.
If you are already a SkyView user, you will still need to follow
the directions on the card to sync the app with your product.
1
0502S01EBU.indd 2
WARNING: Viewing the Sun may cause permanent
eye damage. Do not view the Sun with your spotting scope.
Adult supervision is recommended.
8/29/14 10:19 A
WHAT’S IN THE BOX
15
11
4
2
13
14
5
7
6
12
16
3
10
1
8
9
1.) Objective Lens Cap
2.) Removable, Adjustable Phone Mount
3.) Mounting Screw Caps
4.) 12mm Eyepiece (with case)
5.) Eyepiece Screw
6.) 90 Degree Diagonal Viewer
7.) Main Body (Optical Tube)
8.) Focusing Knob
0502S01EBU.indd 3
9.) Focusing Tube Screw
10.) Mounting Screws
11.) Objective Lens
12.) Tabletop Tripod
13.) Tripod Knob
14.) Tripod Head
15.) Tripod Nut
16.) Tripod Bracket (on Main Body)
8/29/14 10:19 A
SECURING THE MOUNT
TO YOUR SPOTTING SCOPE
SE
The adjustable smartphone mount has been designed to
easily attach to as well as remove from your spotting scope
when not in use. Place the mount onto the two mounting
screws on the main body of the spotting scope, threading
through the two holes at the base of the mount. Then,
using the mounting screw caps, turn each one clockwise to
tighten by hand. Tools are not necessary and be careful not
to overtighten the screw cap. To remove, turn the mounting
screw caps counterclockwise to take them off the mounting
screws and remove the mount.
NOTE: The mount expands from 2.25” to 3.50” to fit all
Apple® iPhones® and most Android smartphones.
TM
3
0502S01EBU.indd 4
ADDITIONAL NOTE: When the mount is not in use, put the
mounting screw caps on the mounting screws to protect the user.
8/29/14 10:19 A
SETTING UP YOUR SPOTTING SCOPE
Before following the steps below, take all components out
of the box and lay them out on a tabletop or other flat
surface to make sure you have everything needed to set
up your spotting scope.
1
2
3
4
0502S01EBU.indd 5
The spotting scope tripod comes pre-assembled, so
assembling the spotting scope is easy. Lay the main body of
the spotting scope on its side. You will note that one side of
the tripod bracket is slightly different than the other side –
one side has a recessed area for the tripod nut. Place this
side facing down.
Line up the
holes on the
tripod head
with the holes
in the tripod
bracket of the main body,
and then thread the tripod
knob through these holes.
Flip the main body of the
spotting scope and the tripod
over. Pull the tripod knob out
slightly, so you can align the
tripod nut in the recessed area. It is
properly aligned when it drops into
this area.
Once aligned, turn the tripod knob
clockwise to thread it through the
tripod nut to hand tighten.
4
8/29/14 10:19 A
5
6
7
8
5
0502S01EBU.indd 6
FIN
WI
Expand the tripod legs
to stand the spotting
scope up on a tabletop.
Loosen the focusing
tube screw. Insert the
end of the 90 degree
diagonal viewer into
the focusing tube and
tighten the screw
to hold it in place.
Loosen the eyepiece
screw on the 90 degree
diagonal viewer. Insert the
12mm eyepiece into the
90 degree diagonal viewer,
and then tighten the
eyepiece screw.
SK
Remove the protective cover
on both sides of the focusing knob.
The assembly is
now complete!
8/29/14 10:19 A
FIND SPACE OBJECTS
WITH YOUR SPOTTING SCOPE
Now that your scope is set up, it’s time to go out and
find stars, constellations and other space objects in the sky!
Before starting the SkyView app, please ensure that your
smartphone is securely positioned in the mount in order to
protect it during use.
When launching SkyView for the first time, it may ask you for
permission to use certain features on your smartphone, such
as your geographic location, to provide an accurate view of
the sky.
An introductory tutorial will appear, highlighting
common features. This tutorial will not appear the next
time you launch the app (although the tutorial is available
on the help screen).
SKYVIEW SCREEN OVERVIEW
0502S01EBU.indd 7
Depending on your smartphone, the main screen will
look similar to the following:
SETTINGS
BUTTON
SEARCH
BUTTON
SPACE
OBJECTS
CENTER
RETICLE
OBJECT
INFORMATION
OBJECT
NAME
6
8/29/14 10:19 A
SEARCHING FOR SPACE OBJECTS
When using SkyView, there are two ways to search for
space objects in the sky:
1
Scanning for space objects – The screen shows a real-time
view of the sky overhead. By simply rotating the scope or
adjusting its altitude, various space objects will come into
view onscreen. Each space object that passes within the
‘Center Reticle’ will be highlighted and its name will appear.
and tracking specific space objects – You can
2 Locating
target a desired space object in the sky by pressing the
Search Button. Depending on your smartphone,
a screen will appear similar to the following:
7
0502S01EBU.indd 8
You can tap on one of the various categories of objects
and choose from the list, or you can type in the name of
any space object you want to find. Objects that are above
the horizon and/or overhead (visible) will appear in
bold onscreen.
8/29/14 10:19 A
0502S01EBU.indd 9
Once a space object is
selected, an arrow will appear
onscreen to navigate you in
the direction of the object.
Simply rotate and adjust
the altitude of the scope to
align the targeted space
object in the Center Reticle.
If the volume is turned up on
your smartphone, an audible
homing signal will be heard
until the selected space
object is aligned within
the Center Reticle.
To get detailed
information about a
space object, simply
tap on it onscreen.
Interesting information
will appear at the bottom
of the screen, and can
be scrolled to show more
details and fun facts.
TYPE
IN THE
SPACE
OBJECT
NAME TO
LOCATE
FOLLOW
THE ARROW
UNTIL THE
SPACE
OBJECT
IS IN VIEW
Make sure the tripod
is placed on a flat and
stable surface. Use the
SkyView app first to locate the target space object, and
move the spotting scope accordingly to align it. You can
slightly loosen the tripod knob to adjust the altitude of the
spotting scope. Gently turn the focus knobs slowly to adjust
the sharpness of the image through the scope.
8
8/29/14 10:19 A
SEARCHING FOR SPACE OBJECTS (cont.)
MA
NOTE: Even when the spotting scope and app are well
synced, you may need to make some minor adjustments with
the scope to fully align the space object in your field
of view. Space objects will appear to slowly drift across
your spotting scope’s field of view due to the Earth’s rotation.
To keep the targeted space object centered,
you may need to nudge the scope.
CALIBRATING SKYVIEW
If SkyView seems inaccurate, then the digital compass in
your smartphone is likely experiencing interference and
needs to be calibrated. First, make sure you are away from
large metal objects or objects that can produce strong
magnetic fields. Then, remove your smartphone from the
mount, hold it in front of you and swing your smartphone in
a looping ‘figure 8’ motion. Put your smartphone back in the
mount. Repeat this until the objects onscreen appear to be
in the correct location.
For best results, always reset the compass as described
above when you open SkyView. If you consistently see the
interference screen and it will not go away, it is possible
that the compass is in a bad state. To clear this issue,
please reset your smartphone.
9
0502S01EBU.indd 10
8/29/14 10:19 A
MANUAL CALIBRATION
If the above troubleshooting does not work, you can switch to
manual calibration to compensate for outside interference.
Tap on the Settings Button and then the Calibration Button
at the bottom right of the menu that pops up. Tap on Manual,
and you can move the view of the sky back and forth with
the slider onscreen to align with the view in the hardware.
SETTINGS
BUTTON
MANUAL
CALIBRATION
BUTTON
SLIDE
LEFT OR
RIGHT TO
ALIGN
NOTE: When using the SkyView app in manual calibration mode,
you will need to recalibrate the app approximately every
30 minutes to continue to adjust for outside interference.
0502S01EBU.indd 11
ADDITIONAL NOTE: This feature is only available on Apple®
devices at this time. Check our website for further updates.
10
8/29/14 10:19 A
ADDITIONAL SETTINGS AND HELP
Additional settings options
and other helpful information
can be viewed by pressing
the Settings Button and then
pressing the Toolbar Button
similar to the following screen:
PRESS TOOLBAR
BUTTON FOR HELP
TIPS AND TRICKS
• Daytime Activities – Your spotting scope is great for viewing
daytime activities too, like nature, mountain ranges,
and landscapes! You can easily remove the phone
mount when not in use.
• Outside Interference – Sometimes the image shown
on your app screen and what you see through your
spotting scope does not sync up by a wide margin,
which is due to outside interference. Some examples
are cell phone towers, an abundance of metal, such
as a full parking lot, and magnets, which will affect the
instruments within your phone. In this case, switch to
manual calibration to compensate for this interference
or move to a new location.
11
0502S01EBU.indd 12
8/29/14 10:19 A
0502S01EBU.indd 13
• Getting your Bearings in the Night Sky – We recommend
that when first trying to locate space objects in the night sky,
use the Moon, North Star (Polaris), and/or the Little Dipper
(Ursa Minor). These space objects are very easy to find,
and will also let you know if you need to switch to manual
calibration due to the spotting scope’s field of view and the
app screen not syncing from outside interference.
NOTE: Even when the spotting scope and app are well synced,
you may need to make some minor adjustments with the
scope to fully align the space object in your field of view.
• Observing the Moon – A great space object to begin
stargazing is the Moon. Although the Moon is brightest
when it is full, one of the best times to observe the Moon
is during its crescent to half moon phases. Shadows will
provide contrast and reveal more detail on the lunar
surface.
• Nighttime Visibility – Atmospheric conditions and artificial
light pollution are usually the key limiting factors
regarding how much detail will be visible in the night sky.
Avoid observing space objects when they are low on the
horizon, when they are directly over a source of radiating
heat, such as a rooftop, when it is hazy, cloudy, or foggy,
and in areas that give off a lot of light pollution, such as a
streetlamp or city skyline, in your field of view.
• Learn more at: invintiv.com/spacenavigator
12
8/29/14 10:19 A
CARING FOR YOUR SPOTTING SCOPE
CU
ON
•Protect the spotting scope from impact and do not force
any of the moving parts of the spotting scope nor mount
beyond their limits.
•Protect your spotting scope’s optics by putting on the lens
cap when not in use.
•Store your spotting scope in a cool, dry place when not
in use. Do not leave nor store in direct sunlight.
•Store your spotting scope’s eyepiece in the supplied case
when not in use.
•Clean your spotting scope’s optics with a lens cleaning
cloth (not included) to avoid scratching the lenses.
Dirty lenses obstruct the amount of light transmitted
through the lens and will affect your overall
viewing experience.
UPGRADE TO THE
PREMIUM VERSION
FOR MORE STARS, CONSTELLATIONS, SATELLITES & OTHER SPACE OBJECTS!
13
0502S01EBU.indd 14
8/29/14 10:19 A
CUSTOMER SUPPORT AND
ONE-YEAR LIMITED WARRANTY
• If you have any questions setting up or using your product,
please visit www.invintiv.com/spacenavigator to learn
more, read our related FAQs, and for any customer support
& warranty service information.
• This product is warranted against defects in materials or
workmanship, under normal use and service, only to the
original purchaser for a period of one year from the date
of purchase. If the product is damaged due to accident,
improper or unreasonable use or maintenance, has been
modified in design or function, subjected to abuse, misuse,
mishandling or unauthorized repair, this damage is not
covered by the warranty. Further, product malfunction or
deterioration due to normal wear is not covered by this
warranty.
• For customer service in the USA, please call 866-324-4438
or email [email protected]
• For customer service in the UK, please call 01905 342900
or email [email protected]
COMPATIBILITY REQUIREMENTS
• Compatible with Apple® iPhone® and iPod touch® running iOS 7.0 or iOS 8.0.
• Compatible with Google® Android™ devices running version 4.0.3 (Ice Cream Sandwich) up to 4.4 (KitKat)*.
• Compatible with Apple® & Android™ devices 2.25” to 3.50” wide.
* Dalvik™ runtime required, Android Runtime (ART) is not supported. Android devices require a digital compass, gyroscope,
and accelerometer. Check invintiv.com/spacenavigator for the most up to date compatibility information.
0502S01EBU.indd 15
14
8/29/14 10:19 A
Made in China
© 2014 EB Brands
Designed and Engineered by EB Labs.
All rights reserved. Distributed by Invintiv,
A Division of EB Brands. Hazleton, PA 18202
For customer service in the USA, please call
866-324-4438 or email [email protected]
Distributed in the United Kingdom by:
Invintiv, A Division of EB Brands UK, Worcester WR4 9FA
For customer service in the UK, please call 01905 342900
or email [email protected]
0502S01EBU.indd 16
PATENT PENDING
SPACE NAVIGATOR™ and INVINTIV™ brands and logos
are trademarks of EB Brands. All rights reserved.
Terminal Eleven, the Terminal Eleven logo, and SkyView
are trademarks of Terminal Eleven LLC., registered in the U.S.
Apple, the Apple logo, iPhone, and iPod touch are
trademarks of Apple Inc., registered in the U.S. and
other countries. App Store is a service mark of Apple Inc.
Android is a trademark of Google Inc.
Google Play is a trademark of Google Inc.
Product specifications and colors may vary.
IW0502S01EBU
8/29/14 10:19 A