1
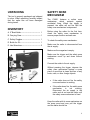
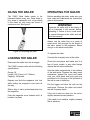
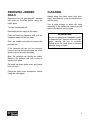
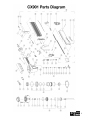
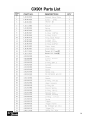
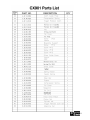
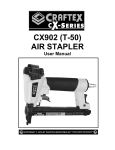
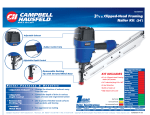
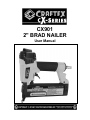
CX901 2" BRAD NAILER User Manual TABLE OF CONTENTS General Safety Instructions for Pneumatic Tools ................................................... 3 CX901 Specific Safety Instructions ........................................................................ 4 CX901 Features ..................................................................................................... 5 Unpacking .............................................................................................................. 6 Inventory................................................................................................................. 6 Safety Nose Mechanism ........................................................................................ 6 Oiling the Nailer...................................................................................................... 7 Loading the Nailer .................................................................................................. 7 Operating the Nailer ............................................................................................... 7 Removing the Jammed Nails.................................................................................. 8 Cleaning ................................................................................................................. 8 Parts Diagram ........................................................................................................ 9 Parts List................................................................................................................. 10 Warranty ................................................................................................................. 12 2 GENERAL SAFETY INSTRUCTIONS FOR PNEUMATIC TOOLS Extreme caution should be used when operating all pneumatic tools. Know your tool, be familiar with its operation, read through the user manual and practice safe usage procedures at all times. Keep all guards and safety devices in place and in working order. Always make sure to remove all the keys and wrenches before operation. Always keep your work area clean and well lighted. Do not use the pneumatic tools in damp or wet locations, or where flammable or noxious fumes may exist. Always keep bystanders away or at a safe distance from your work area. Always use the right tool. Do not attach any part to the tool for which it is not designed. Always check the hose for any damage before using the pneumatic tool. Disconnect the tool before servicing, changing accessories, or moving to another location. Always check the tool for damaged or broken parts, loosen screws or bolts or any other unsafe condition that may affect the tool operation. Repair the damaged parts before operation. Disconnect the power source when changing drill bits, hollow chisels, router bits, shaper heads, blades, knives or making other adjustments or repairs. Do not overreach. Always keep proper footing and balance. Never leave a tool unattended while it is in operation. Always keep your tool lubricated and clean for best and safest performance. Do not force the tool. It will do a better and safer job at the rate for which it is designed. Be alert! Do not use prescription or other drugs that may affect your ability or judgment to safely use your tool. Always use safety glasses and a dust mask while operation. 3 CX901 – 2" BRAD NAILER SPECIFIC SAFETY INSTRUCTIONS Read and follow all the instructions and safety precautions in the user manual before operation. For the protection of your eyes, always wear safety glasses, goggles or face shield while operating this tool. Do not connect the nailer to compressed air that exceeds 120 PSI. Never point the nailer at others. Always carry the nailer by handle. Do not use a check valve or any other fitting that allows air to remain in the tool. If used, the tool can remain charged with air after disconnecting and this will be able to drive a fastener even after the air hose is disconnected, possibly causing injury. Do not connect the nailer to pressurized oxygen or other combustible gases as a power source. Only use regulated compressed air. Make sure the air hose is good condition and long enough to read your work area without stretching. Do not use gasoline or any other flammable liquids to clean the nailer, vapors in the nailer will ignite by a spark and cause it to explode. Always keep bystanders away at a safe distance while operation. Always use the fasteners for which the tool is designed. Make sure not to drive one nail on the top of the other. The nail may deflect and cause injury. If the nailer is leaking air, damaged or not working properly, do not use it before repairing. Do not drive fasteners close to the edge of the work-piece as the wood may split, allowing the fastener to be deflected possibly causing injury. Do not use the nailer, if you are not sure about its indented operation. Always disconnect the air hose before installing nails, clearing a jam, moving to another work area, performing maintenance or when the tool is not in use. Make sure you have read and understood all the safety instructions in the manual and you are familiar with your shaper, before operating it. If you fail to do so, serious injury could occur. WARNING! The safety instructions given above can not be complete because the environment in every shop is different. Always consider safety first as it applies to your individual working conditions. 4 CX901 – 2" BRAD NAILER FEATURES MODEL CX901 –2" BRAD NAILER As part of the new line of Craftex CX-Series Pneumatic Tools, we are proud to offer the CX901 2" Brad Nailer. By following the instructions and procedures laid out in this user manual, you will receive years of excellent service and satisfaction. The CX901 is a professional tool and like all pneumatic tools, proper care and safety procedures should be adhered to. TOOL AIR FITTING This tool uses a 1/4" NPT male plug OPERATING PRESSURE 60 to 100 PSI (MAX. 120 PSI) AIR CONSUMPTION 1.45 SCFM @ 90 PSI NAILER DIMENSIONS Length 10.5" (27cm) x 9.5" (24cm) x 2.5" (6.5cm) FASTENER SIZE Gauge: 18 Length: 5/8" (15mm) to 2" (50mm) Capacity: 100 pcs TOOL WEIGHT Weight: 5 lbs 5 UNPACKING The tool is properly packaged and shipped in a box. When unpacking, carefully inspect that the nailer has not been damaged during transit. INVENTORY A. 2" Brad Nailer -------------------------------- 1 B. Carrying Case -------------------------------- 1 C. Safety Goggles ------------------------------ 1 SAFETY NOSE MECHANISM The CX901 features a safetu nose mechanism which protects against accidental firing. When the trigger is pressed, the nailer will not fire until the safety nose mechanism is depressed. Before using the nailer for the first time, check the safety nose mechanism to ensure proper function and safe use. To check the safety nose mechanism: D. Bottle for Oil ---------------------------------- 1 E. Hex Wrenches -------------------------------- 2 Make sure the nailer is disconnected from the air supply. Make sure the magazine is empty. Make sure the trigger and the safety nose mechanism move up and down without sticking. Connect the nailer to the air supply. Without pressing the trigger, depress the safety nose mechanism against a scrap piece of wood that is clean and free of any knots, nails, or other foreign objects. If the nailer does not fire, the safety nose mechanism is working. If the nailer does fire, the safety nose mechanism is not working. Disconnect the air supply to the nailer and do not use the nailer until the safety nose mechanism is fixed. Figure-1 Inventory Keep the nailer with its nose mechanism on the scrap wood and now, pull the trigger and the nailer should fire. 6 OILING THE NAILER OPERATING THE NAILER The CX901 Brad Nailer needs to be lubricated before every use. Place three to four drops of pneumatic tool oil (provided) in the nailer air inlet every two hours of continuous use. See figure-2. Before operating the nailer, make sure you have read and understood the instructions given in this manual. WARNING! Lubricate the nailer with a few drops of oil as instructed in the manual, before operating it. Failure to do so could result in internal damage to the nailer and will void the warranty. Always use the nailer first on a piece of scrap wood; thick enough for the length of the nails, loaded in the magazine, before using it on the actual work-piece. Figure-2 Lubricating the nailer To operate the nailer: LOADING THE NAILER Connect the air supply hose to the nailer. Disconnect the nailer form the air supply. Check the work-piece and make sure it is free of knots, metals, or any other foreign objects that will cause deflection. The CX901 accepts nails with the following specifications: Gauge: 18 Length: 5/8" (15mm) to 2" (50mm) Capacity: 100 pieces Depress and hold the magazine lock lock while pulling the magazine cover back all the way. Slide a strip of nails, pointed-end down into the magazine. Push the magazine cover forward until it is locked in its place. Hold the nailer perpendicular to the surface of the work-piece. Depress the safety nose mechanism against the wood and make sure your other hand and body parts are positioned out of the way of the potential of the nail in case of deflection. Pull the trigger and drive the nail into the work-piece. Remove the nailer and check the nail for proper depth. If the nail is shot too deep into the wood, slightly decrease the air pressure. If the depth is too shallow, slightly increase the air pressure. 7 REMOVING JAMMED NAILS Sometimes the nail gets jammed. Jammed nail must be removed before using the nailer again. To clear the jammed nail: CLEANING Always keep the nailer clean from dust, chips, sand and etc, in the air connectors or into the body. Use a good solvent to clean the nose assembly of the nailer and make sure the nailer is dry before using it again. Disconnect the air supply to the nailer. Push and hold the magazine lock, pull the magazine loader all the way back. Now, use needle nose pliers to remove the jammed nail. WARNING! Do not use gasoline or flammable liquids to clean this tool. Vapours in the tool may ignite, causing the tool to explode. Failure to do so could result in serious personal injury or death. If the jammed nail can not be removed, remove the cap screws securing the driver guide cover to the nose assembly. Now, the jammed nail should be visible. Remove the jammed nail with a pair of needle nose pliers. Re-install the driver guide cover, and load a new nail stick. Check the safety nose mechanism, before using the nailer again. 8 9 10 11 WARRANTY CRAFTEX 3 YEARS LIMITED WARRANTY Craftex warrants every product to be free from defects in materials and agrees to correct such defects where applicable. This warranty covers three years for parts and 90 days for labour (unless specified otherwise), to the original purchaser from the date of purchase but does not apply to malfunctions arising directly or indirectly from misuse, abuse, improper installation or assembly, negligence, accidents, repairs or alterations or lack of maintenance. Proof of purchase is necessary. All warranty claims are subject to inspection of such products or part thereof and Craftex reserves the right to inspect any returned item before a refund or replacement may be issued. This warranty shall not apply to consumable products such as blades, bits, belts, cutters, chisels, punches etceteras. Craftex shall in no event be liable for injuries, accidental or otherwise, death to persons or damage to property or for incidental contingent, special or consequential damages arising from the use of our products. RETURNS, REPAIRS AND REPLACEMENTS To return, repair, or replace a Craftex product, you must visit the appropriate Busy Bee Tools showroom or call 1800-461-BUSY. Craftex is a brand of equipment that is exclusive to Busy Bee Tools. For replacement parts directly from Busy Bee Tools, for this machine, please call 1-800-461-BUSY (2879), and have your credit card and part number handy. All returned merchandise will be subject to a minimum charge of 15% for re-stocking and handling with the following qualifications. Returns must be pre-authorized by us in writing. We do not accept collect shipments. Items returned for warranty purposes must be insured and shipped pre-paid to the nearest warehouse Returns must be accompanied with a copy of your original invoice as proof of purchase. Returns must be in an un-used condition and shipped in their original packaging a letter explaining your reason for the return. Incurred shipping and handling charges are not refundable. Busy Bee will repair or replace the item at our discretion and subject to our inspection. Repaired or replaced items will be returned to you pre-paid by our choice of carriers. Busy Bee reserves the right to refuse reimbursement or repairs or replacement if a third party without our prior authorization has carried out repairs to the item. Repairs made by Busy Bee are warranted for 30 days on parts and labour. Any unforeseen repair charges will be reported to you for acceptance prior to making the repairs. The Busy Bee Parts & Service Departments are fully equipped to do repairs on all products purchased from us with the exception of some products that require the return to their authorized repair depots. A Busy Bee representative will provide you with the necessary information to have this done. For faster service it is advisable to contact the nearest Busy Bee location for parts availability prior to bringing your product in for repairs. 12