1
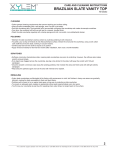
LINN LINGO
OWNERS MANUAL
Year 2000 Compliance
Linn has used all reasonable endeavours to ensure
that the software in the products manufactured by it
is capable of normal operation before, during and after
1 January 2000 and in respect of past, present and
future dates without replacement, alteration or upgrade
(“Year 2000 Compliant”). Linn, however, gives no express
warranties, representations or undertakings and to the
maximum extent permitted hereby excludes any terms,
warranties, representations or undertakings implied by
law to that effect. Linn cannot give any warranties,
representations or undertakings that non Linn software is
or will be Year 2000 Compliant or that Linn’s software
will be Year 2000 Compliant if used in conjunction with
non Linn products, systems or software. The Purchaser,
Installer, Retailer or Distributor will be solely responsible
for ensuring that Linn’s software will be Year 2000
Compliant when used in conjunction with such non
Linn software, systems or products and for any failure if
it is not Year 2000 Compliant in such circumstances.
Except to the extent implied by law and which by law
cannot be excluded, Linn shall not be liable to any party
for any costs, claims, losses (including indirect and
consequential losses) or liabilities arising from the failure
of Linn’s software to be Year 2000 Compliant if used in
conjunction with non Linn products, systems or software.
General Safety Instructions:
1. Read Instructions. Read the safety and operating instructions before operating the appliance.
2. Retain Instructions. Retain the safety and operating instructions for future reference.
3. Heed Warnings. Observe all warnings on the appliance and in the operating instructions.
4. Follow Instructions. Follow all operating and use instructions.
5. Water and Moisture. Don not use the appliance near water, for example near a bathtub, washbowl, kitchen sink, laundry tub,
in a wet basement or near a swimming pool and the like.
6. Carts and Stands. Use only with a a cart or stand that is recommended by the manufacturer.
6a. An appliance and cart combination should be used with care. Quick stops, excessive force and uneven surfaces may
cause the appliance and cart combination to overturn.
7. Wall or Ceiling Mounting. Mount to a wall or ceiling only as recommended by the manufacturer.
8. Ventilation. Site the appliance so that its location or position does not interfere with its proper ventilation. For example the
appliance should not be situated on a bed, sofa, rug or similar surface that may block the ventilation openings; or placed in a
built-in installation such as a bookcase or cabinet that may impede the flow of air through the ventilation openings.
9. Heat. Site the appliance away from heat sources such as radiators, heaters, stoves or other appliances (including
amplifiers) that produce heat.
10. Power Sources. Connect the appliance to a power supply only the type described in the operating instructions or marked
on the appliance.
11. Grounding or Polarisation. Do not defeat the safety purpose of the polarized or grounding-type plug. A polarized plug has
two blades with one wider than the other. A grounding type plug has two blades and a third grounding prong. The wide blade
or the third prong are provided for your safety. When the provided plug does not fit your outlet consult an electrician for
replacement of the obsolete outlet.
12. Power Cord Protection. Route power cords so that they are not likely to be walked on or pinched by items placed upon or
against them, paying particular attention to cords at plugs, power sockets and at the point where they exit from the appliance.
13. Protective Attachment Plug. As a safety feature the product is equipped with an attachment plug containing overload
protection. See the instruction manual about resetting or replacing the plug. Should the plug need replacing ensure that a
replacement is used which has the same overload protection as the original.
14. Cleaning. The product should be cleaned only as recommended by them manufacturer.
15. Power Lines. An outdoor antenna should be located away from power lines.
16. Outdoor Antenna Grounding. If an outdoor antenna is connected to the tuner/receiver ensure that the antenna system is
grounded to provide some protection against voltage surges and static build up. In the USA see article 810 of the National
Electrical Code ANSI/NFPA 70 concerning installation requirements
17. Non use periods. Unplug the power cord from the outlet in the event of lightning storms or if the product will be unused for
a long period of time.
18. Objects an d liquid entry. Take care not to let objects or liquids fall into the product.
19. Damage requiring Service. The product should be serviced by qualified personnel if:
a. the power cord or plug has been damaged.
b. objects have fallen into the product.
c. the product has been exposed to rain.
d. the product does not appear to operate normally or exhibits a marked change in operation.
e. the product has been dropped or the enclosure damaged.
20. Servicing. Don’t attempt to service the product beyond that described in the operating instructions. All other servicing
should be referred to qualified service personnel.
Mains plug replacement:
Should your mains plug need replacing and you are competent to do this proceed as follows.
If you are in doubt contact your Linn retailer or a competent electrician.
a) Disconnect the plug from the mains supply.
b) Cut off the plug and dispose of it safely. A plug with bared conductors is dangerous if engaged in a live socket.
c) Only fit a 13 Amp BS1363A approved plug with a 5 Amp fuse (for countries using 220V / 240V main supply).
d) The cable wire colours or a letter will be marked at the connection point of most quality plugs. Attach the wires securely to
their respective points. The Brown wire must go to the Live pin, the Blue wire must go to the Neutral pin and the Green/Yellow
wire must go to the Earth pin.
e) Before replacing the plug top ensure that the cable restraint is holding the outer sheath of the cable firmly and that the
wires are correctly connected.
WARNING: THIS APPLIANCE MUST BE EARTHED.
IMPORTANT SAFETY INFORMATION
Explanation of symbols used in this manual and on the product :
This symbol is intended to alert the user to the presence of uninsulated dangerous voltages within the
enclosure of sufficient magnitude to cause electric shock.
This symbol is intended to alert the user to the presence of important maintenance and servicing
information in the instruction and service manuals.
CAUTION:
TO REDUCE THE RISK OF ELECTRIC SHOCK DO NOT REMOVE THE COVER.
NO USER SERVICEABLE PARTS INSIDE. REFER SERVICING TO QUALIFIED SERVICE PERSONNEL.
WARNING: SHOCK HAZARD. DO NOT OPEN.
AVIS:
RISQUE DE CHOC ELECTRIQUE. NE PAS OUVRIR.
7
CAUTION: REPLACE FUSE WITH SAME TYPE AND RATING.
ATTENTION: UTILISER UN FUSIBLE DE RECHANGE DE MEME TYPE.
CAUTION: DISCONNECT SUPPLY CORD BEFORE CHANGING FUSE.
ATTENTION: DEBRANCHER AVANT DE REMPLACER LE FUSIBLE.
WARNING: TO REDUCE THE RISK OF FIRE OR ELECTRIC SHOCK DO NOT EXPOSE THIS APPLIANCE TO RAIN OR
MOISTURE.
Mains plugs:
This appliance is supplied with a n on rewireable mains plug for the intended country.
Replacement mains leads can be obtained from your Linn dealer.
Should you need to change the plug please dispose of it carefully.
A plug with bared conductors is dangerous if engaged in a live socket.
The Brown wire must be connected to the Live (Line) supply pin.
The Blue wire must be connected to the Neutral supply pin.
The Green/Yellow wire must be connected to the Earth (Ground) supply pin.
Please contact your retailer or a competent electrician if you are in any doubt.
User Manual Information:
NOTE:
This equipment has been tested and found to comply with the limits for a Class B digital device,
pursuant to Part 15 of the FCC rules. These limits are designed to provide reasonable
protection against harmful interference in a residential installation. This equipment generates,
uses and can radiate radio frequency energy and, if not installed and used in accordance with
the instructions, may cause harmful interference to radio communications. However, there is
no guarantee that interference will not occur in a particular installation. If this equipment does
cause harmful interference to radio or television reception, which can be determined by
turning the equipment off and on, the user is encouraged to try to correct the interference by
one or more of the following measures:
..
.
.
Reorient or relocate the receiving antenna.
Increase the separation between the equipment and receiver.
Connect the equipment into an outlet on a circuit different from that to
which the receiver is connected.
Consult the dealer or an experienced radio/TV technician for help.
I
NTRODUCTION. Linn products have always said that the turntable is the
most important part of a high fidelity system. If you don’t get a good signal
off the record then it doesn’t matter how good the rest of your system is, the sound
will be bad.
It is important that you were given a fair A/B demonstration of the LP12 against
other turntables prior to purchase. the turntables compared should have had the
same arm and cartridge. All comparisons should take place in a single speaker
demonstration room. We want our customers to hear the difference the LP12 makes
for themselves and make their own informed decision.
When upgrading your system there is a strict hierarchy to observe. After the
turntable, the next most important component is the arm., followed by the cartridge.
Once the turntable system has been optimised, the next component to choose is the
amplifier. finally the last link in the chain is the loudspeaker
INSTALLATION AT HOME. If your LP12 was not manufactured with the LINGO
kit, the Linn LINGO upgrade kit should be fitted to your deck at home by an
authorised linn dealer. If this is impossible the deck should be taken to your dealer
for installation.
The deck should be re-placed in its original packing. The outer platter must be
removed and placed in the bottom packing tray, the inner platter removed and placed
in the top tray. Remove the counterweight before removing the arm and cartridge.
NOTE Under no circumstances should the deck be shipped with the arm fitted
to the turntable.
The red bearing cap should be re-fitted to prevent oil spillage from the
bearing housing.
See diagram for packing assembly.
IMPORTANT When re-packing the turntable remove the two bottom cover screws
which are located between the turntable feet. If these screws are left in position
during shipping, they will damage the rim of the platter.
CONNECTION
To connec t the LINGO to the LP12, hold the 8 pin din plug by the black plastic
portion and push into the 8 pin din socket on the LINGO back panel, until the
aluminium lock ring snaps into lock.
To disconnect, first make sure the mains are switched off, then gripping the 8 pin din
plug by the aluminium lock ring, pull back to remove the plug.
OPERATION
The switch on the LP12 provides a trigger to the electronics to start, stop or change the
speed of the motor. It does not break any mains connection. The power switch on
the LINGO power supply isolates mains. However, to prevent electric shock, never
remove the bottom cover from the turntable with the LINGO connected, or the case
from the LINGO power supply while it is connected to the mains
TOP SPACER
LID
CARDBOARD LAYER PAD
TONEARM, ARM LEAD
COUNTERWEIGHT, INNER PLATTER
TOP TRAY
INTERMEDIATE SPACER
TURNTABLE
FELT MAT
OUTER PLATTER
BELT
BOTTOM TRAY
CARDBOARD BOX
The circuitry should be given a few seconds to settle down before switching
the motor on.
The LP12 with LINGO power supply has been designed to give optimum performance
at both 331⁄3rpm and 45rpm.
SPEED SELECTION
33 1⁄3rpm. The LP12 has electronic speed change. To engage 331⁄ 3rpm press the
switch on the LP12 once and the red LED on the switch will light, indicating
331⁄3rpm. To stop press the switch once again.
45rpm. Press and hold the switch on the LP12. The red LED will light, then the green,
indicating 45rpm. To stop press the switch once again. Note, if the platter is
deliberately stopped while in operation at 45rpm, the turntable will not automatically
re-start. To re-start it is necessary to switch off the turntable, wait a few seconds and
re-select the speed or manually spin the platter.
NOTE The platter will take a few seconds to reach 45rpm. (The LED will dim when
correct speed is attained).
SITING
In most cases, installation of the LP12 will be completed by the retailer, but the
following points should be noted.
POWER SUPPLY SITING The LINGO power supply is mains powered and has a
torodial mains transformer. The hum filed from this transformer is extremely low;
however, care should be taken not to position the LINGO too close to signal leads or
preamp. Your dealer should be able to help you get the best position.
FLOOR MOUNTING Place the deck on a small, light, rigid table, e.g., small coffee
table. Ensure that the table is sitting level on the floor and not rocking.
WALL MOUNTING Wall mounting may be preferable where a highly sprung floor
exists or where there is a risk of damage by children. The shelf used should be
light and rigid, and it should be supported by, but not firmly screwed or glued to its
brackets.
To open the lid requires a clearance of 3” (7.5cm) behind the plinth and at least 13”
(33cm) above.
It is quite normal for the deck suspension to settle slightly afetr installation. This
will not affect performance.
TURNTABLE MAINTENANCE
The LP12 is designed for a long operational life. To preserve the appearance and
maintain the performance of your deck, you should note the following points.
PLINTH The plinth is constructed from solid kiln-dried hardwood and should not
therefore be subjected to extremes of temperature or direct sunlight. Some finishes
will darken slightly with age. A damp cloth is ideal for cleaning dust or stains from
the plinth; polish, particularly wax-based can be hard to remove from the grooves.
PLATTER The platter will darken with age. Resist the temptation to repolish the rim,
as this removes the protective lacquer and results in a rapid degredation of the finish.
Clean with a dry, soft cloth. DO NOT USE ANY ABRASIVE CLEANER.
MAT The felt mat can be cleaned with masking tape. If the mat becomes really dusty
you can beat it like a carpet or rug. If you have problem with static and the mat clings
to your records, you can use some double-sided tape to secure it.
MOTOR The motor pulley should be cleaned periodically to remove deposits of rubber
shed by the belt. Remove the outer platter and belt, and gently apply a damp cloth
(impregnated with isopropyl alcohol or other non-residue solvents) against rotating
motor pulley until clean.
STAINLESS STEEL TOP PLATE This is best cleaned with a damp cloth.
ARMBOARD This can be cleaned with a light duster or slightly damp tissue - make
sure the stylus guard is in place before you start.
BELT The belt should last for at least five years of regular use. The belt can be
cleaned by pulling it through a damp cloth.
OIL The oil supplied for the bearing provides life-long protection. If oil is lost from
the bearing housing, it should be replaced by factory-supplied oil (available from
your dealer). The turntable should never be operated without oil.
LID The best method is to remove any dust with a damp cloth without any
rubbing action and then use a soft duster. Lids are more often damaged in cleaning
than in use.
GENERAL SYSTEM INSTALLATION
STYLUS CLEANING It is important that the stylus is kept scrupulously clean. The
traditional soft stylus brush is completely useless. We have found dry vibrating pad
cleaners to be effective devices. Alternatively Linn Dealers can supply cleaning
paper which is easy to use and gives excellent results.
TRACKING WEIGHT AND BIAS Correct tracking and weight bias: every arm and
cartridge combination has an optimum tracking weight. This easily set by ear.
Increments of 0.1g can produce significant differences. Test records are of no use in
establishing this. Temperature can alter this value, which will be lower in hot weather
and higher in cold.
CLEAN CONTACTS It is important that the electrical contacts in a hi-fi system are
kept mechanically sound and clean. A poor contact, especially at the first connection
in the system between the cartridge and the arm will degrade the signal substantially.
Check on all contacts should be performed periodically.
INTER CONNECT LEADS The correct cables should be used. We recommend and
supply good quality copper cable for interconnect leads and advise 4mm sq.
multicore copper cable, such as Linn K20, for speaker leads.
SPEAKER PLACEMENT The speakers should be positioned correctly (Linn
speakers are designed to be placed close to the wall) and they should be mounted on
rigid stands which are sitting very firmly on the floor and should not be subject to any
rocking movement.
RECORD CLEANING Most record cleaning devices do more harm than good. We
feel the best method is to let the stylus remove any dirt which may be in the
groove, then clean the stylus.
GUARANTEE AND SERVICE
This product is guaranteed under the conditions which apply in the
country of purchase.
To help us, please ask your retailer about the Linn warranty scheme
in operation in your country.
In Europe, America and other markets, extended warranty is offered
to customers who register their purchase with Linn. A Registration
Card can be obtained from your retailer and should be stamped by
him. This will also enable you to receive the Linn RECORD Newsletter
and details of music available from Linn.
WARNING Refer all enquiries to authorised dealers only.
Unauthorised servicing or dismantling of the product invalidates the
manufacturer's warranty.
For full warranty details, please refer to the card enclosed.
If you are in any doubt, please contact your nearest Linn dealer. For
information on your nearest dealer, contact the Linn factory in
Scotland or your national distributor.
IMPORTANT Please keep a copy of the sales receipt to establish
the purchase date of the product.
Please ensure that your equipment is insured by you during any
transit or shipment for repair.
LINN PRODUCTS LTD., FLOORS ROAD, WATERFOOT,
EAGLESHAM, GLASGOW G76 0EP, SCOTLAND, U.K.
TELEPHONE: ++44 (0)141 307 7777
FACSIMILE: ++44 (0)141 644 4262
E-MAIL: [email protected]
INTERNET: http://www.linn.co.uk/linn
CUSTOMER SERVICES, U.K.: FREECALL 0500 888 909
CUSTOMER SERVICES, GERMANY: FREECALL 0130 82 21 56
CUSTOMER SERVICES, U.S.A.: TOLLFREE 888-671-LINN
DEALER INFORMATION SECTION
FUSE/MAINS VOLTAGE SELECTION:
Open the fuse-holder door with a small flat-blade screwdriver. Select the correct
fuse (200mA for 220/240V, 300mA for 100/120V). Fit it into the fuse-holder and
install in the inlet filter.
CAUTION: Remove the selector barrel BEFORE rotating it.
Set the correct voltage on the voltage selector in the mains input module, and snap
the filter shut.
Tick off the appropriate box next to the right fuse on the LINGO bottom-label and
DISCARD the two incorrect fuses.
LINGO/LP12 CONVERSION PROCEDURE:
NOTE: This conversion should be carried out by authorised dealers ONLY.
Conversion by unauthorised personnel can be dangerous, and could invalidate the
warranty.
A WARNING: DISCONNECT THE MAINS SUPPLY FROM THE
TURNTABLE.
Remove the base from the LP12 and remove all the wires from the VALHALLA board
terminal blocks, and remove the old switch assembly. Take out the VALHALLA
board by squeezing the stand-off clips with a pair of long-nose pliers.
B Install the interface board (PCAS 101), snapping it onto the same inserts that
held the VALHALLA.
C Connect the interconnect lead by pushing on the multi-way connector. Fix this
into the turntable exactly as you would the mains lead.
D Push the new switch through the top-plate, and connect the flexible PCB to
the connector as with the VALHALLA.
E Connect the motor to the terminal block. Note, the red and blue wires go on
the other way round from the VALHALLA (see printed legend on PCB).
F
Remove the motor end-cap, spring etc, including thrust-pad if fitted.
G Set arm-lead, check set-up etc, and replace base-board.
The turntable is now ready to go.
PACK 461