1
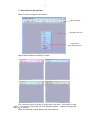
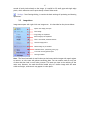
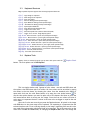
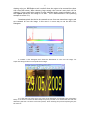
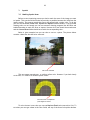
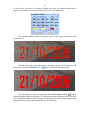
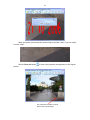
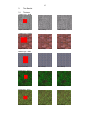
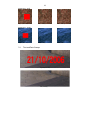
1
Magic Inpainter Express
Version 2.1
User Manual
Date Released: 30 June 2010
2
Content:
1.
2.
2.1
2.2
2.3
2.4
2.5
3.
3.1
3.2
4.
5.
5.1
Introduction
Description of the Interface
Toolbar buttons
Image Menu
Keyboard Shortcuts
Replace Tools
Color-Pick Tool
Inpainting
Marking Inpaint Area
Start Inpaint
Settings
Test Results
Textures
3
1 Introduction
Magic Inpainter Express is a image inpainting tool which removes text, date stamps,
stains,scratches and any unnecessary information from images in such a way that the
background texture is preserved. It has user friendly design which is described in the
sections below.
The tool uses unique context based image restoration algorithm. The purpose of the
inpainting algorithm is to restore noisy regions of the image in a natural way. The
algorithm works better for textures but it had also been tested successfully on various kind
of photos. It can remove any kind of small and large monocolor regions from images. As
long as they do not obscure unique and non-repeating important information they are
restored, in most cases, without visual damage of the image. The algorithm preserves the
background texture pattern, it preserve also contours and edges.
As was pointed above the restoring algorithm is context based. It first describes the
region of each non-noice pixel with a multi-dimensional key. This key should contain
enough information about the pixel neighbourhood. Pixels too close to image boundary or
with too many noisy neighbours are excluded. All keys are sorted in special indexed array
and then similar procedure is repeated for the noice pixels. For each noice pixel a similar
multi-dimensional key is obtained. The keys describing the noisy pixels are then also
sorted depending of their non-noisy neighbor’s number. The pixels on the noise region
boundary are put in the beginning of the list. When inpaint procedure starts, these pixels
are first restored. Then algorithm updates all keys with the new pixel values and resorts
the noisy keys list. This repeats until all pixels are restored or if procedure is canceled
from the user. The missing pixels values are calculated from the pixels with most similar
keys. To find these pixels the algorithm performs multi-dimensional search in the image
keys list. In this way Magic Inpainter fills the missing pixels as first transforms the 2D image
pixels to a multi-dimensional pixels in the feature-space, and then, when find the closest
to it neighbours, replace its value with their color values.
The advantage of this approach is that it is very general. It can be used on any kind
of images and even for large stains. It preserves the background texture pattern and in
most cases the contours and edges. The algorithm can also be modified for other purposes
– textures extraction and generation, CBIR – Content Based Image Retrieval, effective
search in image databases, image and pattern recognition and etc.
The main limitations are :
- the multi-dimensional nearest neighbour search is quite slow
- results are not always great if inpaint settings are not optimal
Magic Inpainter also performs several standard image processing tecniques which
makes the outlining of the noice region quite easy, even if it contain several colors. How to
do this is described in details in the next section.
4
2. Description of the Interface
Below is shown the program main window:
Buttons toolbar
Drag image file here
Pop-up menu
Opens with right click
Magic Inpainter Express is available in 4 skins:
First, you need to open an image. It can be done in two ways – from button or menu
‘Open’, or as drag and drop image file from Windows Explorer. Supported formats are
bmp, jpg, gif and png.
Below are described all other buttons and menu functions.
5
2.1
Toolbar Buttons:
Open Image File: Opens Open Image window.
Save Image: Opens Save Image window.
Start Inpaint: Starts inpaint image procedure, it inpaints all pixels marked with the
current draw color. If there is selection it works only for the selection, otherwise it works
for the whole image. In the second case the image should not be much bigger then 128 x
128 pixels, otherwise the inpaint procedure can become very slow. If it is so you can press
Cancel button from the Inpaint Progress window, which pops up when the button is
pressed.
Select Color: Shows current draw color and select color window, when pressed
displays a color-picker, if the current color box of the picker is pressed the draw color is
changed.
Get Color: When pressed over the image obtains the color in this point and changes
the current draw color.
Select Rectangle: When pressed enables the Select Rectangle mode of the mouse
over the image. Permits to select a rectange on the screen. Do not works in detail view.
Erase: It switches the mouse when it is over the main image window to Erase
Mode, when the left mouse button is pressed and mouse is moved it sets the color of the
pixels beneath the mouse pointer to the current draw color. If the right mouse button is
pressed it restore back the pixels beneath the mouse pointer to their original colors. The
Erase procedure works for all 3 display modes.
Draw Line: When pressed enables the Draw Line mode of the mouse, thickness of
line is set from Settings window.
Zoom In : When pressed and there is selected rectangle over the image, it becomes
the main image.
Zoom Out : When pressed and if the main image was loaded with Zoom In it places
the image back on the old rectangle and returns the old image. Both zoom buttons can be
used to modify more easy part of the image. It is also the recommended way to impaint
parts of the image, to do so you shoul select small region around the region to remove,
make it main image with Zoom In, and after inpaint procedure completes return it back
with Zoom Out.
Replace Pixels: When pressed opens popup menu with 2 replace options – RGB and
HSV Histogram. First replaces all pixels within the min and max selected colors with the
current draw color. HSV color histogram allows to select the colors range as selecting a
pick in the H-curve. Replace Tools are described in section 2.3. You can use Replace Pixels
button together with Expand button to quickly mark the region for inpainting.
Expand: When pressed performs expand (dilate) opperation on the main image
using the current draw color. The dilate procedure places pixels with current draw color
6
around all such pixels already on the image. It is usefull to fill small gaps and single edge
pixels, which otherwise can be quite handy in Detail View mode.
Settings: Start Settings dialog, it contain the basic settings of inpainting and drawing
operations.
2.2
Image Menu
Image menu opens with right click over image area. It is described on the picture below:
Opens new image from file.
Save image
Copy image to clipboard
Paste image from clipboard
Load / Save mask, described below
Several image filters
Resize image to fit window
Available skins: pink,blue,green,grey
List with recently opened files
Settings window
Note: The Save/Load mask is useful when you had many similar images with equal regions
to remove, as is the case with photos containing date. You can make a mask for only one
of them and then load it to all other pictures. This saves you time in the outlining of the
noise area. However, the mask should be loaded only to a similar image with the same
width and height, otherwise it may appear in other place.
7
2.3
Keyboard Shortcuts
Magic Inpainter Express supports the following keyboard shortcuts:
Ctrl+C - Copy Image to clipboard
Ctrl+V - Paste Image from clipboard
Ctrl+O - Open File Dialog
Ctrl+S - Save File Dialog (need opened image)
Ctrl+Q - Open Mask File Dialog (need opened image)
Ctrl+W - Save Mask File Dialog (need opened image)
Ctrl+R – Open Replace RGB Tool
Ctrl+H – Open Replace HSV Histogram Tool
Ctrl+G – Toggle Color Select Tool
Ctrl+E – Perform Expand Filter (same as button Expand)
Ctrl+F – Toggle ‘Fit to screen’ image display option
Left Arrow – Move Selection 1 pixel left (need opened image)
Right Arrow – Move Selection 1 pixel right (need opened image)
Up Arrow – Move Selection 1 pixel up (need opened image)
Down Arrow – Move Selection 1 pixel down (need opened image)
Shift+Left Arrow – Resize Selection 1 pixel left (need opened image)
Shift+Right Arrow – Resize Selection 1 pixel right (need opened image)
Shift+Up Arrow – Resize Selection 1 pixel up (need opened image)
Shift+Down Arrow – Resize Selection 1 pixel down (need opened image)
Page Down – Zoom In (need selection)
Page Up – Zoom Out (need selection)
2.4
Replace Tools
Replace Tools are started from the pop-up menu hich opens with the
Replace Pixels
button. The first replace tool is RGB Replace:
This is a simple window with 3 groups of color values – min and max RGB colors and
the replace color RGB values (the 3-rd column. All three colors can be set either by typing
the values in the text boxes, by choosing the colors from the standard color dialog (it
opens with click over the color boxes below) or by using the color picker buttons
. To
use the color-picker buttons you need to press one of the buttons and then to press the
left mouse button while it moves over the image. Since the first two colors are limits of
color range it is important that all 3 values in the max color are bigger or equal to the min
color values.
After the 3 colors are correctly set press the Replace button. All pixels in the image
with RGB colors in the given range will be replaced. For inpainting it is important that the
selected replace color is not occurring already in the image. Inpainting filter use this color
as a mask color to determine which pixels had to be removed. This is the same color as the
draw color of Erase and Draw Line, so changing the Replace With color will change the
8
drawing color too. RGB Replace tool is usefull when the region to be removed has colors
with close RGB values. When selecting large enough color interval most pixels will be
replaced. If some small holes remains or some individual pixels remain unmarked, one or
two Expand operations are enough to fix that. This is demonstrated in the inpainting
example in section 3.1).
Sometimes pixels that had to be removed are not from one monochrome region and
are scattered all over the image. In this case it is more easy to use the HSV Color
Histogram:
It contains a color histogram ehich shows the distribution of colors over the image. For
exaple the histogram above corresponds to the image:
It is clear that the yellow color pick in the of the histogram corresponds to the yellow date
stamp. If we wich to remove the date stamp the yellow pick had to be marked with min and max
delimiters (just how it is shown on the first picture). After selecting the pick and replacing the pick
the result is:
9
After replace the date stamp is colored in blue. It should be noted that in real-life photos
produced by digital cameras there is almost never anything colored in one RGB value. Although it
seems on the first picture that the yellow date stamp is colored in one color – pure yellow (RGB –
255,255,0) it is actually a bunck of yellow colors between (255,255,10) and (255,255,60). However
for inpainting it is necessary only one color and that is why it is important these colors to be
replaced.
2.5
Color Picker Toolbox:
When Select Color button
is pressed the following color-picker toolbox pops up:
Current Draw Color
The Select Color box, click
on it to set the draw color
To set custom color
use the color sliders
or type RGB values
here
Custom Colors
Color History
Note: To change the current draw color (this is the color of drawing and inpainting) you
had to click on the Select Color Box, this is the second box from above (colored in orange
on above picture).
10
3.
Inpaint
3.1 Marking Inpaint Area
Before to start inpainting process you had to mark the area of the image you want
to inpaint. This area should be marked as precisely as possible because this influences the
inpaint quality. The program needs this area to be painted with a single color. To do this
you can use the Erase, Draw Line, Expand and Replace Colors buttons. If the provided
drawing tools are not enough you can use external drawing programs like MS Paint and
Adobe Photoshop to mark the area to inpaint. However this area should be monochrome
and the Current Draw Color should be set with the corresponding color.
Below is given example how you can color a text on a photo. The picture below
contains a date text that had to be removed:
text to be removed
This text seems monochrome – a uniform yellow color. However if you look closely
at the text, it is a bunch of different yellow colors:
The text color is composed
from different colors
To color the text in one color you can use Replace Pixels tools (see seclion 2.4). To
set colors you can type values in the color fields, use any of the three color picker buttons
11
or click over a color box. The choosed replace color (the 3-th column) should not be
present in the picture. In this case the following 3 colors are appropriate:
After pressing Replace button the yellow colors in the range are replaced with
single red color:
However, some small gaps and pixels on the edge remains. To fill them with red
press once or twice the Expand button -
. After this the text will look like this:
Now the picture is ready for inpainting. Press Start Inpaint button
to start
inpaint procedure. Keep in mind that if it is too big the inpaint process can take a lot time,
so it is sometimes better to split the image in sub regions with zoom. During inpainting the
program shows you the progress and the result from inpainting:
12
When the inpaint process ends the Inpaint Progress window closes. If you are satisfy
from the result:
Use the Zoom Out button
picture:
to return the inpainted rectangle back to the original
The inpainted rectangle is placed
back to the original image
13
If the results was not so good or inpainting was canceled you can try it with
different settings. If you want to repeat the descibed above procedure for other similar
images you do not need to open Replace Pixels tool again. The color ranges are saved and
you only had to press the Replace button
3.2
.
Start Inpaint :
Inpaint process starts with the button Start Inpaint
window shows the inpaint progress:
. The Inpaint Progress
The inpaint passes through 3 stages:
- Get Image Keys – obtain keys for all non-noice pixels in the image; they should
have enough non-noice neighbours (its number can be set from Minimal
Neighbours in Inpaint Settings window) , if this number is 0 the algorithm exits
-
Get Noice Keys – obtains a ordered list for all noise pixels colored with the
current draw color. In the list pixels are ordered by their number of non-noise
pixels, thus the pixels closest to noise region edge are in the beggining of the
list and will be inpainted first
-
Inpaint Image – replace noise pixels with pixels from the image-keys list, the
noise-pixels list is updated during the process
In order the inpainting to work corectly several things should be noted. The inpaint
will not work or will work bad in the following cases:
- when the ratio - noise pixels / all pixels is too small, e.g. there is too little
image keys and non-noice pixels, generally the inpaint works well when the
noisepixels are not more then 30% from all pixels
- when the image-keys list is too big, if the image to be inpaint is too big several
problems arise – the algorithms is slowed because it has to search in bigger list,
the inpaint image stage has bigger probability to miss the right pixels, the
memory use rises too much and program can stucks , and etc. Thus, the inpaint
works best for images not much bigger then 128 x 128 pixels, if the image is
and
buttons to select smaller image. If the noise
bigger you can use
area is too large it is better to split it in several smaller areas, than to inpaint
it in one-step.
The Inpaint Progreess window allows you to stop the filter. If you notice that first
two steps – the obtaining of image keys and noice pixels ordering, takes too much time it is
better to stop the filter and try with different settings. If after inpainting, some of the
pixels are not as it is desired, you can mark them again and try with different settings.
Also, it should be noted that inpainting require existing of a pattern in the image. If
some unique part of the image is missing, such that do not exist somewhere else in the
image the inpaint procedure of course will never fill it as it should. The inpainting works
best for well described repetitive patterns like textures.
14
Settings :
Settings window is opened from
appears:
Settings button. The following window
Draw Settings:
- Eraser Size – This is the size of the eraser rectangle in pixels.
- Line Width – This is the width of the drawed lines.
- Draw Color – This is the current drawing, erase and mask color.
Inpaint Settings:
- LOD /Level Of Details/ - This sets the inpaint quality calculations, if LOD = 0 the best
quality is obtained but inpaint is slowest, maximal value is 4. For most images the
recomended value is 1.
- RGB Mode – If this option is unchecked the algorithm takes the image as grayscale, the
color is not taken in acount when creating the keys. The keys are created only from pixels
intensity. This option significantly fastens the speed of inpainting, however without it
sometimes pixels with different colors may be erroneous choosed.
- RAD /Kernel Radius/ – This slide control sets the kernel size of the context rectangle
which will be used for image and noise keys. Usually this radius is limited between 1 and
10 because beyond R=10 the algorithm becomes too slow. This radius may be varied for
each image until the optimal radius is founded. For most images the recomended value is
5.
15
5.
Test Results
5.1
Textures
texture type : cloth
Original (128 x128)
LOD 1, RGB off
LOD 0, RGB off
texture type : bricks
Original (128 x128)
LOD 1, RGB off
LOD 0, RGB off
LOD 1, RGB off
LOD 0, RGB off
LOD 1, RGB off
LOD 0, RGB off
LOD 1, RGB off
LOD 0, RGB off
texture type : cloth
Original (128 x128)
texture type : grass
Original (128 x128)
texture type : grass
Original (128 x128)
16
texture type : rock
Original (128 x128)
LOD 1, RGB off
LOD 0, RGB off
LOD 0, RGB off
LOD 0, RGB on
texture type : ocean
Original (100 x100)
5.1
Text and Date Stamps
Original (641 x 207)
LOD 1, RGB off