1
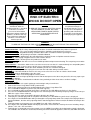
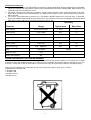
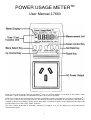
POWER USAGE METERTM
User Manual L7663
Thank you for purchasing the Power Usage MeterTM. This user manual provides an overview of the product safety
instructions, a quick start guide, and detailed instructions for its correct operation.
NOTE: Please take the time to completely review these instructions and all safety warnings The Power Usage MeterTM is
an easy to use device that accurately measures and displays the power consumption of any appliance connected to a
standard 10 Amp General Purpose Outlet (GPO). Many other useful measurements can be displayed on the large LCD
including Power Cost, Volts, Amps, Watts, and more.
The unit is RoHS (Reduction of Hazardous Substances) compliant so it can be disposed of safely with minimal
environmental impact.
1
CAUTION
RISK OF ELECTRIC
SHOCK DO NOT OPEN
The lightning flash with
arrowhead, within an
equilateral triangle, is intended
to alert the user to the
presence of uninsulated
"dangerous voltage" within the
product's enclosure that may
be of sufficient magnitude to
constitute a risk of electric
shock to persons
CAUTION
TO REDUCE THE RISK OF ELECTRIC SHOCK,
DO NOT REMOVE COVER. NO USERSERVICEABLE PARTS INSIDE. REFER
SERVICING TO QUALIFIED SERVICE
PERSONNEL
The exclamation point within
an equilateral triangle is
intended to alert the user to
the presence of important
operating and maintenance
instructions in the literature
accompanying the appliance
WARNING
TO REDUCE THE RISK OF FIRE OR ELECTRICAL SHOCK, DO NOT EXPOSE THIS APPLIANCE
TO RAIN OR MOISTURE.
Read Instructions - All the safety and operating instructions should be read before the product is operated.
Retain Instructions - The safety and operating instructions should be retained for future reference.
Observe Warnings - All product warnings should be observed in accordance with the operating instructions.
Follow Instructions - All operating instructions should be followed.
Cleaning - Unplug this product from the wall outlet before cleaning. Do not use liquid or aerosol cleaners.
Accessories - Do not plug unapproved accessories into this device.
Water and Moisture - Do not operate this product near water.
Ventilation - Ventilation slots in the case ensure reliable operation and prevent overheating. These openings must not be
blocked or covered.
Power Sources - Consult the label on the rear of the meter to ensure that it is connected only to a compatible power
source at your location. If you are unsure of this, please consult the electricity supplier.
Extension cord protection - Extension cords should be placed so as not to be damaged.
Lightning - For added protection unplug the meter from the wall outlet during electrical storms.
Overloading - Do not overload the meter as this may create a fire risk or result in an electric shock hazard.
Liquid Hazard -Never allow liquid to enter the meter.
Shock Hazard - Never insert foreign objects into the meter.
Servicing - Refer all servicing to qualified personnel. Do not attempt to service the meter yourself as this may expose you
to dangerous voltages.
Overheating -The device should not be installed in close proximity to either heat sources or direct sunlight.
Quick Start Guide:
These instructions will assist you in getting up and running in only a few minutes.
1. Connect the Power Usage Meter TM to a power outlet:
2. Connect the appliance to be measured/monitored to the Power Usage Meter TM.
3. Press and hold the RESET key on the unit until "rESt" appears.
4. Press and hold the SET rate button until "Rate" is displayed. The kWh billing rate flashes in the display.
5. Press the UP and DOWN buttons to change the rate. For example; if the Electricity Company charges 15.6 cents per
kWh then set the "Rate" at $0.156.
6. Press the SET key again and "SAVE" will appear briefly in the display.
7. To display the actual or projected cost of power consumed; press the MENU key until "Cost" is displayed.
8. Pressing the UP and DOWN buttons will cycle through the cost projection periods. For example; if the display indicates
$2.34 and "Month", then the unit is projecting that the attached appliance will consume $2.34 worth of electricity in one
month.
9. To display power measurements press the MENU key until "Volt" is displayed.
10. Pressing the UP and DOWN buttons will display the various measurements made by the meter including "Amps",
"Watts", "VA", "Hz", "PF" and "Volts".
11. To display the accumulated measurement totals, press the MENU key until the desired unit to be viewed is displayed.
The available units include the accumulated running cost of the attached appliance, kWh rate, total kWh consumed
2
and the elapsed time that the Power Usage Meter TM has been operating.
NOTE: Please refer to the detailed operating instructions for a thorough description concerning all aspects of operating
the Power Usage MeterTM.
Installation:
1. Remove the protective film covering the LCD meter display.
2. Turn off the appliance to be measured and disconnect it from the power outlet. Plug the Power Usage MeterTM into
the outlet and then plug the appliance into the Power Usage Meter TM. If the outlet is inconveniently located, then
install a suitably rated and approved extension cord.
3. Turn the appliance on to confirm normal operation. If the appliance does not function correctly, then please recheck
your installation.
4. Refer to the Quick Start Section for instructions on how to configure the Power Usage Meter TM.
Rate setting:
1. To calculate the cost of energy consumed by an appliance connected to the Power Usage Meter TM or to project future
costs, you must first enter the kWh rate. The rate is typically charged as cents per kilowatt-hour (kWh) consumed. You
can find this rate on your last-electricity bill or you can contact your electricity supplier for this information. Some utilities
charge two or more rates depending on consumption, time of day, or the season.
Note: The Power Usage Meter TM determines cost calculations using a single kWh rate.
2. Press and hold the SET button on the meter. "Rate" will be displayed and the current kWh rate will flash.
3. Press the UP and DOWN buttons as required to set the desired kWh rate. Holding the UP or DOWN button will rapidly
change the rate. The settings range from $0.000 to $9.999 per kWh. For example, if your electricity supplier charges
10.6 cents per kWh then set the rate at $0.106.
4. Press the SET button and "SAVE" will appear briefly in the display. The desired rate is now set and the unit will return
to the Measurements mode.
Cost display:
1. To display the cost of power consumed by the appliance plugged into the Power Usage Meter "", press the MENU
button until "Cost" is displayed.
2. Initially, the cost will appear and "Total" will be displayed. This amount represents the total cost of power consumed
by the connected appliance since the Power Usage Meter TM was reset.
This cost is calculated based on kWh consumed and the set kWh rate that is entered.
3. Don't be surprised if the initial total cost displayed is 0.00. It may take time for the Power Usage Meter TM to
accumulate enough data to make a calculation. The longer that the appliance is attached to the meter, the more
accurate the calculation becomes. This is especially true for appliances that cycle on and off such as refrigerators and
televisions. For example if a television is used 4 hours a day, it is important to also measure the 20 hours a day that
the television is not in use in order to get an accurate projection of it's running cost over a year.
4. Pressing the UP or DOWN buttons will cycle through the cost projection periods of "Hour", "Day", "Week", "Month",
and "Year". The display now indicates the projected cost of running the appliance connected to the Power Usage Meter
M. For example if the display indicates $2.34 and "Month" then the unit is projecting that the attached appliance will
consume $2.34 worth of electricity in one month.
Measurement display:
1. To display the various available power measurements press the MENU button until "Volt" is displayed. The Power
Usage MeterTM shows Volts, Current, Watts, Frequency, Power Factor, and VA.
2. To navigate these measurements, press the UP or DOWN button.
3. Volts and current are displayed as True RMS values, Watts as active power, VA as apparent power (VA=Vrms*Arms).
Frequency is displayed in Hertz (Hz), Power Factor (P.F.) as (WattsNrms*Arms). Detailed explanations of these
measurements and their meanings can be found at www.solarinverters.com.au
1. Rate display:
1. To display the rate used to calculate cost, press the MENU key until "Rate" is indicated in the display.
2. The rate is displayed in dollars and' cents. For example a rate of 10.6 cents per kWh is displayed as $0.106.
3. To change the rate, please refer to the section titled "Rate Setting".
2. Kilowatt-Hour display:
1. To read the total kWh consumed by an attached appliance press the MENU button until "kWh" is displayed.
2. Consumption is displayed in Kilowatt-Hours (from 0.01 kWh to 9999 kWh).
3. To reset the accumulated kWh measurement, press and hold the RESET button on the unit until "rESt" is
displayed. Release the RESET button and the display confirms that all previous measurements including the total
accumulated kWh, Elapsed Time and Cost measurements have been reset to zero.
3. Elapsed Time display:
1. To display the total elapsed time that the Power Usage Meter has been connected to power since the last reset,
press the MENU key until "Elapsed Time" is displayed.
2. Time is displayed in 24hr format and will initially be set to 00:00 (hours: minutes).
3. To reset the elapsed time measurement; Press and hold the RESET button until "rESt" is momentarily
displayed. Release the RESET button and the display confirms that all previous measurements including the total
accumulated kWh, Elapsed Time and Cost measurements have been reset to zero.
3
Retained measurements:
1. When power to the Power Usage MeterTM is interrupted, the display will go blank and the unit will stop measuring both
power consumption and elapsed time. However all accumulated measurements including kWh, Elapsed Time, and
actual total cost are retained by the meter.
2. This allows measurements to be taken anywhere, and the meter moved to a more convenient location to be read.
NOTE: Data should be retrieved immediately as the Elapsed Time counter restarts, and cumulative measurements
will be affected.
3. To reset the accumulated measurements press and hold the RESET button on the unit until "rESt" is displayed.
Release the RESET button and the display confirms that - all previous measurements including the total accumulated
kWh, Elapsed Time and Cost measurement have been reset to zero.
Accuracy
Function
Range
Typical error
Max. Error
RMS Voltage
216.0~253.0 V RMS
0.2%
1%
RMS Current
0~10 A RMS
0.3%
1%
Active Power
2530 Watt
0.5%
2%
Apparent Power
2530 VA
0.5%
2%
Line Frequency
47~63 Hz
0.1 Hz
2%
Power Factor
0.00~1.00
0.01
4%
0.00 ~ 9999 kWh
0.5%
2%
Electrical Energy
kWh
Measure Time
Power Consumption
0.00~9999
30 ppm
1 Sec.
2W
POWER USAGE METERTM L7663 LIMITED WARRANTY
Rainbow Power Company Ltd warrants to the original retail purchaser only, that the product is free of defects in material
or workmanship under conditions of normal use and service for a period of six (6) months from the date of purchase. This
warranty is strictly and exclusively limited to the replacement or repair of any defective product or component part(s).
If you experience difficulty in the operation of your unit or if your unit requires repair, please contact:
Rainbow Power Company Ltd
p. 02 6689 1430
f. 02 6689 1109
[email protected]
www.rpc.com.au
4