1
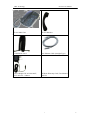
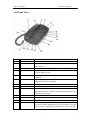
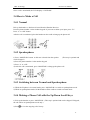
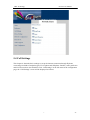
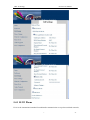
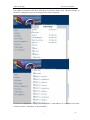
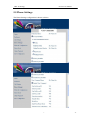
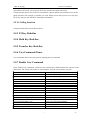
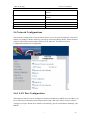
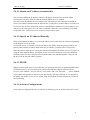
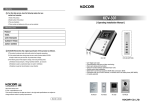
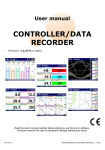
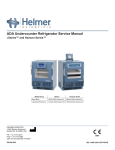
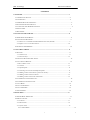
DBL Technology
EP-636 User Manual
CONTENTS
1 OVERVIEW ........................................................................................................................................4
1.1 GENERAL INFORMATION..................................................................................................................4
1.2 COMPLIANCE...................................................................................................................................4
1.3 HARDWARE CHARACTERISTICS .......................................................................................................5
1.4 SOFTWARE CHARACTERISTICS ........................................................................................................5
1.5 UNPACKING THE IP PHONE PACKAGE ..............................................................................................5
1.6 FRONT VIEW ...................................................................................................................................7
1.7 REAR VIEW .....................................................................................................................................8
2 INSTALLING THE IP PHONE .........................................................................................................8
2.1 PREPARING THE IP PHONE ...............................................................................................................8
2.2 CONNECTION DIAGRAMS ................................................................................................................9
2.2.1 Home User with ADSL/Cable Broadband Connection (PPPOE) ...........................................9
2.2.2 Office User in a LAN Environment........................................................................................10
2.3 STARTING THE IP PHONE ...............................................................................................................10
3 USING THE IP PHONE ................................................................................................................... 11
3.1 KEYPAD......................................................................................................................................... 11
3.1.1 Number Keys ......................................................................................................................... 11
3.1.2 Function Keys........................................................................................................................12
3.2 VIEWING THE LCD IN IDLE STATE.................................................................................................12
3.3 CALL STATUS DISPLAY ..................................................................................................................12
3.4 How to Make a Call .................................................................................................................13
3.4.1 Normal ..................................................................................................................................13
3.4.2 Speakerphone ........................................................................................................................13
3.4.3 Switching between Normal and Speakerphone .....................................................................13
3.4.4 Making a Phone Call with the Up/Down Scroll Keys ...........................................................13
3.4.5 Making a Phone Call via Call List........................................................................................14
3.4.6 Making a Phone Call via the Phone Book.............................................................................14
3.5 ANSWERING AN INCOMING CALL ..................................................................................................14
3.6 ANSWERING A WAITING CALL .......................................................................................................15
3.7 CALL HOLD ...................................................................................................................................15
3.8 CALL CONFERENCE .......................................................................................................................15
3.9 CALL TRANSFER............................................................................................................................16
3.10 VOICE MAIL ................................................................................................................................16
4 PHONE MENU .................................................................................................................................17
4.1 PHONE MENU OPERATION .............................................................................................................17
4.2 MENU CONTENT............................................................................................................................17
4.2.1 Call List.................................................................................................................................17
4.2.2 Phone Book ...........................................................................................................................18
4.2.3 System Tools ..........................................................................................................................19
4.2.3.1 Phone Status................................................................................................................................... 19
•
1
DBL Technology
EP-636 User Manual
4.2.3.2 SYSTEM VERSION...................................................................................................................... 19
4.2.3.3 RING VOLUME............................................................................................................................ 19
4.2.3.4 LCD CONTRAST.......................................................................................................................... 20
4.2.3.5 RESET CONFIG............................................................................................................................ 20
4.2.4 DEVICE CONFIG.................................................................................................................20
4.2.5 VOICE MAIL.........................................................................................................................20
5 CONFIGURATION ..........................................................................................................................21
5.1 START CONFIGURATION .................................................................................................................21
5.1.1 To Retrieve an IP Address .....................................................................................................21
5.1.2 To Login to the Phone ...........................................................................................................21
5.2 PHONE STATUS ..............................................................................................................................22
5.2.1 Phone Information ................................................................................................................23
5.2.2 Network Information .............................................................................................................23
5.3 PREFERENCE..................................................................................................................................23
5.3.1 Language...............................................................................................................................24
5.3.2 User Password ......................................................................................................................24
5.3.3 Administrator Password........................................................................................................24
5.3.4 Time Zone ..............................................................................................................................24
5.3.5 Auto Dial Time ......................................................................................................................25
5.3.6 Title........................................................................................................................................25
5.3.7 Disable # as Dial Key ...........................................................................................................25
5.3.8 Auto Configurations ..............................................................................................................25
5.3.9 Advance… .............................................................................................................................25
5.4 CALL SETTINGS.............................................................................................................................26
5.4.1 H.323 Phone..........................................................................................................................27
5.4.1.1 Gatekeeper Mode ........................................................................................................................... 28
5.4.1.2 Direct Mode ................................................................................................................................... 28
5.4.1.3 Advance Settings............................................................................................................................ 28
5.4.2 SIP Phone..............................................................................................................................30
5.4.2.1 SIP Proxy ....................................................................................................................................... 31
5.4.2.2 SIP Registrar .................................................................................................................................. 31
5.4.2.3 SIP Phone Number ......................................................................................................................... 31
5.4.2.4 Display Name................................................................................................................................. 31
5.4.2.5 Home Domain ................................................................................................................................ 32
5.4.2.6 Authentication ................................................................................................................................ 32
5.4.2.6 Advance settings............................................................................................................................. 32
5.4.3 Codec Preference ..................................................................................................................35
5.4.4 NAT Traversal .......................................................................................................................35
5.4.4.1 None............................................................................................................................................... 36
5.4.4.2 Port-forwarding.............................................................................................................................. 36
5.4.4.3 Relay Proxy.................................................................................................................................... 36
5.5 PHONE SETTINGS...........................................................................................................................37
5.5.1 Prefix Dial Timer...................................................................................................................38
5.5.2 F1 Key Redefine ....................................................................................................................38
•
2
DBL Technology
EP-636 User Manual
5.5.2.1 Prefix.............................................................................................................................................. 38
5.5.2.2 Speed Dial...................................................................................................................................... 38
5.5.2.3 Calling Function............................................................................................................................. 39
5.5.3 F2 Key Redefine ....................................................................................................................39
5.5.4 Hold Key Redefine.................................................................................................................39
5.5.5 Transfer Key Redefine ...........................................................................................................39
5.5.6 User Command Timer ...........................................................................................................39
5.5.7 Enable User Command .........................................................................................................39
5.6 NETWORK CONFIGURATIONS.........................................................................................................40
5.6.1 LAN Port Configuration........................................................................................................40
5.6.1.1 Obtain an IP Address Automatically............................................................................................... 41
5.6.1.2 Specify an IP Address Manually .................................................................................................... 41
5.6.1.3 PPPOE............................................................................................................................................ 41
5.6.1.4 Advance Configurations................................................................................................................. 41
5.6.2 PC Port Configurations ........................................................................................................42
5.6.2.1 Bridge Mode .................................................................................................................................. 42
5.6.2.2 Specify an IP Address Manually .................................................................................................... 42
5.6.2.3 Disable ........................................................................................................................................... 43
5.6.2.4 Advance Configurations................................................................................................................. 43
5.6.3 Primary DNS.........................................................................................................................43
5.6.4 Secondary DNS .....................................................................................................................43
5.6.5 Timer Server ..........................................................................................................................44
5.7 PHONE BOOK.................................................................................................................................44
5.7.1 View the Phone Number Record............................................................................................44
5.7.2 Maintain Phonebook .............................................................................................................45
5.8 ONLINE UPGRADE .........................................................................................................................46
5.9 SAVE CONFIGURATION ..................................................................................................................47
•
3
DBL Technology
EP-636 User Manual
1 Overview
1.1 General Information
EP-636 is a low-priced IP telephone developed by DBL Technology himself. It is compatible
with H.323 V4 and SIP V2, possessing single file of English letters and single file of digital LCD
displayer and achieving full dulplex hands-free call. When it is disposed into H.323, EP-636 can
cooperate with GK and GW of most H.323. It also has perfect H.450 protocol to complete all
telecom value-added services such as call transfer, call forward, call waiting, etc.. Cooperating
with soft exchange system, it can totally replace traditional PBX or KEY LINE PHONE. It can
also be used as LAN phone or hot-line phone. When it is disposed into SIP, EP-636 can cooperate
with most SIP system. Besides having popular g.723 and g.729, it can use low-priced GSM voice
compression algorithms. This model is the first-selected one for telecom operators and the main
type exported by DBL Technology.
1.2 Compliance
SIP 2.0
H323 V4 Standard
Transmission Control Protocol/ User Datagram Protocol/ Internet Protocol (TCP/UDP/IP)
Real Time Protocol (RTP)
Hyper Text Transfer Protocol (HTTP)
Address Resolution Protocol (ARP)
Domain Name System (DNS)
Dynamic Host Control Protocol (DHCP)
Network Time Protocol (NTP)
G.711 a-law and u-law, GSM, G.723, G.729a/b/ab Voice Codec
Caller ID Display or Block, Call Waiting, Call Hold, Call Transfer, Call Forward, in-band and
out-of-band DTMF (RFC2833), and Dial Plans
Conferencing, hands-free loudspeaker, phonebook, last number redial, call log, volume
control, and voicemail message indicator
BASIC and DIGEST authentication (MD5, MD5-sess)
Proprietary Firewall-Pass-Through Technology
Simple Traversal of UDP over NAT (STUN)
Web-base Management
PPP over Ethernet (PPPoE)
PPP Authentication Protocol (PAP)
Internet Control Message Protocol (ICMP)
TF TP Client
User account authentication using MD5
Out-band DTMF Relay: RFC 2833 and SIP Info
•
4
DBL Technology
EP-636 User Manual
1.3 Hardware Characteristics
ARM9 133MHZ Processor for high performance
DSP for voice codec and voice processing
Two 100BaseT Ethernet ports in comply with IEEE 802.3 for both LAN and PC connection.
LEDs for Ethernet port status
128x64 dot-matrix LCD display for manual access and phone operation.
Ethernet Bridge
RAM (16M)
FLASH (4M)
Power Adaptor (120V DC/500mA)
Working Temperature (0-45 degree centigrade)
Working Humidity (40%-90% not congealed)
Weight (650g)
Authentication (FCC CE)
1.4 Software Characteristics
LINUX OS
Built-in HTTP, TELNET, COM Port, Phone Manual for accessing internal parameters
PPPoE dial up
NAT Broadband Router functions
DHCP Client
DHCP Server
Firmware On-line upgrade
Phone Book
Memory Dial
Caller ID
Multiple Language Support
1.5 Unpacking the IP Phone Package
Your IP phone box should include the following items:
•
5
DBL Technology
EP-636 User Manual
EP-636 Main Unit
EP-636 Handset
Coiled Phone Cord
One Ethernet Cable (Straight Type)
Power Adaptor: IN: AC100-240V;
OUT: DC12V,500mA
IP Phone Warranty Card, User Manual
and CD
•
6
DBL Technology
EP-636 User Manual
1.6 Front View
Number
Name
1
2
Main Unit
Handset
3
4
5
6
7
8
9
10
11
12
13
Description
This is the main unit of the EP-636.
This part is the hardest receiver and microphone, used for phone
conversation.
LCD
This is the LCD of the IP phone.
Up/Down
The scroll keys are used to browse the menu list. Press Up key
to view outgoing calls.
OK
This key is used to confirm information input or phone
operation.
ESC
Press this key to exit the current menu selection or entry and
return to the previous condition.
MESSAGE(LED) It illuminates when there is an unanswered call or voicemail.
MENU
Press this key to enter Menu mode.
F1(BACKSPACE) Press this key to move the cursor on the LCD one position
backward. This key is used for deleting a phone number entry or
other phone setup entry.
F2(CONFERENCE) Press this key to initiate a three-way conference.
PHONEBOOK
Press this key to view and edit the phonebook.
Number/Letter key Refer to Section 3.1.1.
HOLD
When endpoint type uses SIP Phone, press this key to hold the
current call. When endpoint type uses H323 Phone, press this
key to answer a waiting call or hold the current call and enter
•
7
DBL Technology
15
TRANSFER
MUTE
16
FLASH
17
REDIAL
18
MONITOR
SPEAKER(LED)
HOLD (LED)
14
19
20
EP-636 User Manual
dial mode.
Press this key to transfer a call to another phone terminal.
Press this key to mute the voice signal transmitting to the other
part. LCD shows “Mute” status. Press this key again to resume
the voice signal transmission.
When endpoint type use SIP Phone, Press this key to answer a
waiting call or hold the current call and enter dial mode.
Press this key to redial the last outgoing call.
Press this key for hands free dial or call monitoring.
It illuminates while the call is in “speakerphone” status.
It illuminates when a call is in hold.
1.7 Rear View
2 Installing the IP Phone
2.1 Preparing the IP Phone
It is important to follow the installation procedures below in order to make sure the correction of
operation and to avoid damages to the IP Phone.
1) Connect the Coiled Phone Cord to the Handset and to the IP Phone Main Unit as shown in
the Front View.
2) Plug the AC Power Adaptor supplied to the Power Port of the IP Phone Main Body. Plug the
other end of the AC Power Adaptor to a wall outlet. Make sure that the wall outlet voltage
matches the specified input voltage on the Adaptor. Incorrect AC Voltage supply may damage
the Adaptor or cause the IP Phone not to function properly.
3) Connection to the LAN port allows the IP Phone to access the internet. You need to prepare
an Ethernet Cable for this connection.
Depending on your network environment, the IP Phone can be set to function as one of the
following two modes:
1) Non-Router Mode – Connect the LAN port to your broadband router or broadband
HUB/Switch.
2) Router Mode – Connect the LAN port to your broadband modem (ADSL/Cable), LAN
Hub/Switch or Virtual PC port.
For more detailed information, refer to the connection diagrams as shown below.
•
8
DBL Technology
EP-636 User Manual
2.2 Connection Diagrams
There are mainly two modes of connection: home environment and office environment as follows:
2.2.1 Home User with ADSL/Cable Broadband Connection
(PPPOE)
INTERNE
Broadband Modem
LAN Port
PC Port
PC or Laptop
IP Phone
A. LAN Port
This configuration is very typical for home environment whereas a Broadband modem (ADSL or
Cable) is installed and PPPOE dialup is used to connect to the ISP. Use Ethernet cable to connect
the LAN port of your IP phone to broadband modem (ADSL/Cable), which is connected to
internet directly. Configure it into PPPOE.
B. PC Port
Use Ethernet cable to connect the PC port of your IP phone to a PC or Laptop. Configure it into
“Obtain a Fixed IP Mode” and enable DHCP service.
•
9
DBL Technology
EP-636 User Manual
2.2.2 Office User in a LAN Environment
INTERNET
Router
LAN Port
PC Port
PC or Laptop
PC or Laptop
A. LAN Port
This is a very typical office environment with a Broadband Router and Switch Hub already
installed. Normally, DHCP service of the router is also enabled. Use Ethernet cable to connect the
LAN Port of your IP phone to a Router or Switch Hub, which is connected to internet directly.
Enable “Obtain an IP Address Automatically”.
B. PC Port
Use Ethernet cable to connect the PC port of your IP phone to a PC or Laptop. Bridge Mode is the
recommended setting for the IP Phone. In the Bridge Mode, the IP Phone allows a PC connected
to the phone to pass through to the network.
Note: NAT Traversal in Call Settings mode has to be enabled.
2.3 Starting the IP Phone
After connecting all the cables and ports, the IP phone LCD will display the following screen:
•
10
DBL Technology
EP-636 User Manual
If it’s the first time to start the phone, the following screen will appear.
The phone is trying to detect your network environment.
If your phone is not connected with network, the LCD will display:
If your phone is connected with network, the LCD will display the following information orderly
instead:
Note: the options may be varied in different environment.
3 Using the IP Phone
3.1 Keypad
3.1.1 Number Keys
The following table presents the number keys and their definition. If you need to select numbers,
press the number key one time. If you need to select the letters and other symbols displayed on the
keys, press the key continuously within 1.5 seconds until the one you need appears.
Key
Representation
0
0、+、-
1
1
2
2、a、b、c、A、B、C
3
3、d、e、f、D、E、F
•
11
DBL Technology
EP-636 User Manual
4
5
4、g、h、I、G、H、I
5、j、k、l、J、K、L
6
6、m、n、o、M、N、O
7
7、p、q、r、s、P、Q、R、S
8
8、t、u、v、T、U、V
9
9、w、x、y、z、W、X、Y、Z
*
* .
#
# @ % &
, ! ?
: Space
3.1.2 Function Keys
Refer to the table in Section 1.6 for the description of the function keys.
3.2 Viewing the LCD in Idle State
A. Date and Time
The date and time will then be displayed. At this time the date and time is not correct. Once the IP
phone is connected to the internet, it will receive the date and time information from the internet
and display the current date and time. There is no need for manual setting of the date and time. If
it is showing an incorrect date and time, it means that it have not accessed the internet yet. If the
phone settings are correct, it usually can obtain the date and time information within a few
minutes.
B. Title
The title displayed on the LCD such as IP211 can be set by the user as he or she likes.
3.3 Call Status Display
Once a call is answered, the LCD displays the information in the table below:
A. Date and Time
It is the date and time when the call occurs.
B. Phone Number
It is the phone number of the other side.
C. Duration Time
It displays the period from the time when the connection is successful or the conversation starts to
the end of the call.
•
12
DBL Technology
EP-636 User Manual
Once a call is terminated, the LCD displays “Call Ended”.
3.4 How to Make a Call
3.4.1 Normal
Pick up the handset. A dial tone is heard from the Handset Receiver.
Press the phone number via the number keypad. If you want to delete your input, press “F1”.
Press “#” or “OK” button
After the call is terminated, place the handset on the cradle to hang up the phone call.
3.4.2 Speakerphone
1) Press “MONITOR” button. A dial tone is heard from the speaker.
(This step is optional and
can be skipped.)
2) Press the phone number via the number keypad
3) Press “#” or “OK”.
4) After the call is terminated, press “MONITOR” to hang up the phone call.
3.4.3 Switching between Normal and Speakerphone
1) While the IP phone is in normal mode, press “MONOTOR” to switch to speakerphone mode.
2) While in speakerphone mode, lift the handset off the cradle to switch to normal mode.
3.4.4 Making a Phone Call with the Up/Down Scroll Keys
1) Pick up the handset or press “MONITOR”. (This step is optional and can be skipped. If skipped,
the call will be in Speakerphone mode only.)
2) Press
to view the outgoing calls’ history.
•
13
DBL Technology
EP-636 User Manual
3) Highlight the phone number to be dialed out.
4) Press “OK”.
3.4.5 Making a Phone Call via Call List
There are three types of phone history: Received Calls, Unanswered Calls, and Outgoing Calls.
1) Pick up the handset or press “MONITOR”.
2)Press “MENU” button to view the call list. Press “OK” button.
3)Press “1” to select “MISSED CALLS” history. Press “2” to select “RECEIVED CALLS”
history. Press “3” to select “OUTGOING CALLS” history. (You can also press “OK” button to
select one item.)
4)Use
to select one phone number to be dialed out.
5)Press “OK” button to dial out the number you want.
3.4.6 Making a Phone Call via the Phone Book
1) Pick up the handset or press “MONITOR”.
2) Press “MENU”, and use
to select “PHONE BOOK”. Press “OK”. (Or you can press
“PHONEBOOK” button directly.)
3) Press “1” to select “VIEW”.
4) Use
to select one phone number to be dialed out.
5) Press “OK” to dial out the number you want.
3.5 Answering an Incoming Call
1) The IP Phone rings.
2) The caller ID is displayed on the LCD.
3) Pick up the handset or press “MONITOR”.
•
14
DBL Technology
EP-636 User Manual
3.6 Answering a Waiting Call
When you are in the process of a call and another call comes in, a short tone sounds in your
handset and the LCD displays an incoming call message.
There are two methods for you to select:
(1) First hang up the current call, then picks up the handset and press “FLASH” or “HOLD” key.
(2) Press “FLASH” or “HOLD” key directly during the current conversation.
When endpoint type uses SIP Phone, press “FLASH” key. When endpoint type uses H323 Phone,
press “HOLD” key.
3.7 Call Hold
“Call Hold” lets you put a caller on hold for a certain period of time.
1) When you are in the process of a call, if the endpoint type uses H323 Phone, press “HOLD”
key to hold the current call and enter dial mode by hearing a dial tone. If the endpoint type uses
SIP Phone, press “HOLD” key to hold the current call without hearing a dial tone, or press
“FLASH” key to hold the current call and enter dial mode by hearing a dial tone.
2) Enter a new phone number to make another call.
3) After finishing the second call, you can press “HOLD”(H323) or “FLASH” (SIP) again to
return to the former call on hold.
Besides, when another call is incoming during the process of your present call, you can also press
“HOLD” to put the present call on hold and answer the new incoming call. After pressing
“HOLD”, you can also do something else such as opening the door, or meeting a guest. Press this
key again to return to the former call on hold.
3.8 Call Conference
You can initiate a call conference under the following two circumstances:
When endpoint type uses SIP Phone, press “FLASH” key. When endpoint type uses H323 Phone,
press “HOLD” key.
Initiate a Call Conference during a Call
1) Press “FLASH” (SIP) or “HOLD” (H323) to hold the current call in process and to start a new
dial tone.
2) Dial a phone number and wait for the called party to answer the call.
•
15
DBL Technology
EP-636 User Manual
3) Press “F2” to enter a three-way conference.
Note: If the call conference initiator hangs up, the call conference will be terminated immediately
by hanging up both calls. If one of the called parties hangs up, the three-way conference will be
terminated but the call with the other part is not affected.
3.9 Call Transfer
If A and B are in the process of a call, A can transfer A-B call to B-C call. There are two kinds of
transfer, which are attended transfer and unattended transfer.
A. Unattended Transfer
When a call is in process and you agree with him/her to have a call transfer, press “TRANSFER”,
and when you hear dial tone, dial another phone number. When you hear ring tone, just hung up
your phone without a conversation with the third party. The detailed steps are described as
follows:
1) You and the other party are in the process of a call. After announcing transfer to B, press
“TRANSFER”.
2) When you hear dial tone, dial the third party’s phone number
3) Hang up your phone without announcing transfer to C.
B. Attended Transfer
When a call is in process and you agree with him/her to have a call transfer, press “TRANSFER”,
and when you hear dial tone, dial another phone number to announce a transfer. If the third party
agrees, hang up your phone.
3.10 Voice Mail
In idle state, if there is the function of voice mail, press “OK” to listen to your voicemail messages.
(Or press “MENU” and
to select “5. VOICE MAIL” by pressing “OK”.)
A. To listen to your voicemail messages
If you have new voice messages, a little envelop will appear in your phone’s LCD. Pick up the
handset or press “MONITOR”, then press “OK”, and then follow the guide of the phone to listen
to your voice messages.
B. To transfer an incoming call directly to the voicemail system
If you call the other party without an answer, press “OK” to transfer the call into the voice
mailbox. Then follow the guide of the phone to send a voice mail.
•
16
DBL Technology
EP-636 User Manual
4 Phone Menu
4.1 Phone Menu Operation
Press “MENU”, the screen will display the menu list page by page. Select any item you need by
pressing
to select it and pressing “OK”. If you want to go back to the former screen, press
“ESC”.
4.2 Menu Content
Note: each item of the menu contents is displayed page by page. The diagram below shows the
menu structure.
4.2.1 Call List
A. Press “MENU” and then “OK” to enter the “CALL LIST” menu shown as below.
•
17
DBL Technology
Select any item by using
EP-636 User Manual
and then pressing “OK”.
1) Select “1.MISSED CALLS” as shown below.
2) Press “2” to view the “RECEIVED CALLS”.
3) Press “3” to view the “OUTGOING CALLS”.
B. The call history of the selected category will be displayed in a chronological order with the
latest called numbers displayed first. Press
to move the highlighted number up and down the
list. There are 50 numbers stored for each category. Press “OK” to view the action menu for the
highlighted number. For example,
1) Select “1” to dial out the displayed number immediately.
2) Select “2” to save the displayed number to phone book memory.
3) Select “3” to delete the number stored.
4.2.2 Phone Book
1) Press “MENU” and select “2. PHONE BOOK” by using and pressing “OK”. The following
items will be displayed page by page.
2) Select “1” to view the existing records. If there is no record entered, the LCD displays a “NO
NUMBER” message. If there are records in the phone book, the number of each phone record will
be displayed as below.
A. Press
to browse through the “PHONE LIST”.
B. Select “1.2238128” by pressing “OK” to see the operation menu of the number as below. There
are three choices: DIAL, EDIT, and DELETE.
a) Press “1” to dial out the phone number displayed immediately.
b) Press “2” to edit the phone record. You will be prompted to enter the name and the number
again.
c) Press “3” to delete the number record.
3) Select “2. ADD NEW” to see the contents to be edited shown as below:
•
18
DBL Technology
EP-636 User Manual
4.2.3 System Tools
Press “MENU” and then select “3. SYSTEM TOOLS” by using and pressing “OK”. And you
will see the following items.
4.2.3.1 Phone Status
Select “1” to enter the “PHONE STATUS” menu.
1)Select “1” to view the LAN port IP address. If it is configured, the LCD will display
.
If it is not configured, the LCD will display
2)Select “2” to view the PC port IP address. If it is configured, the LCD will display
If it is not configured, the LCD will display
3)Select “3” to view the phone number such as
.
4.2.3.2 SYSTEM VERSION
Select “2” to see the “SYSTEM VERSION” such as
.
4.2.3.3 RING VOLUME
Select “3” to see the “RING VOLUME” menu. There are four levels to adjust.
•
19
DBL Technology
EP-636 User Manual
4.2.3.4 LCD CONTRAST
There are four levels for you to adjust from“*”to “****”by using
.
4.2.3.5 RESET CONFIG
Select “4” to see the “RESET CONFIG” menu. You need to input login ID and password. This
will reset the internal settings to their default values. Refer to the default setting for the default
values. The following parameters will only be affected.
1) LAN Port
2) PC Port
3) Gateway Address
4) Primary and Secondary DNSs
5) Time Zone
6) Endpoint Mode
7) H.235 Authentication
8) Firewall
9) Codec Preference
10) FastStart
11) Network Tones
12) Dialup Network
13) DHCP Service
14) On-line upgrade
4.2.4 DEVICE CONFIG
Select “4. DEVICE CONFIG” in “MENU” list. You need to input “LODGIN” ID and
“PASSWORD” in order to configure the device by menu mode. The ID for user is “user” and the
password is “1234”. The ID for administrator is “admin” and the password is “dbl#admin”.
4.2.5 VOICE MAIL
Select “5. VOICE MAIL” in “MENU” list. And then press “OK” to start this function.
•
20
DBL Technology
EP-636 User Manual
5 Configuration
5.1 Start Configuration
Before starting configuration, you have to do two things: to retrieve an IP address and to log in to
the phone.
5.1.1 To Retrieve an IP Address
When you connect to the network, an IP address is the first key to achieve connection in network.
In order to access the IP Phone web configuration menu, you must have the phone’s IP address,
which can be obtained through phone menu following the steps as below:
1) Press “MENU” and then select “3. SYSTEM TOOLS”. Press “OK”.
2) Select “1. PHONE STATUS” by pressing “OK”..
3) Select “1. LAN PORT” by pressing “OK” to obtain the LAN port IP address such as
192.168.2.211. If you configure your phone to PPPOE, you have to select “2. PC PORT” to obtain
the PC port IP address.
5.1.2 To Login to the Phone
Besides, in order to enter the further step of configuration, you have to log in to the phone
including your ID and Password. Once the IP address (for example, 192.168.2.239) is entered in
the address bar of the web browser, the computer responds with a login window promptly shown
as below. You have to enter your ID and password. The ID for user is “user” and the password is
“1234”. The ID for administrator is “admin” and the password is “dbl#admin”.
•
21
DBL Technology
EP-636 User Manual
5.2 Phone Status
This chapter describes phone status from phone information and network information. The status
window displays the basic information of the system. It is also the first window while logging in
to the web configuration utility. You can also bring up this window by clicking “Status” in the left
menu bar. The configuration page will be shown as follows.
•
22
DBL Technology
EP-636 User Manual
5.2.1 Phone Information
Phone Information includes Phone Number, Serial Number, Firmware Version and Hardware
Version.
Phone Number is the telephone number (or extension) you assigned to the IP Phone. It is a
sequence of decimal digits that is used for identifying a telephone line in a telephone network. For
example, 87957 is a valid phone number.
Each IP Phone comes with a unique Serial Number assigned by the factory. This number is
important for centralized configuration, technical support, and warranty repair. This number is
printed on the bottom of your IP phone and is associated with your software license. This field is
read-only.
The Firmware Version is used to identify the software version.
The Hardware Version is used to identify the hardware prototype.
5.2.2 Network Information
Network information is about the environment in which IP phone works orderly and formally,
including LAN Port Configuration, PC Port Configuration, Dial Up, Default Route, and
Name Server.
LAN Port Configuration shows the current IP address used by LAN port. The IP Phone LAN
port can be configured to obtain its IP address by DHCP or the IP address can be set statically,
used mainly while using the phone with a DSL line.
PC Port Configuration shows the current IP address used by PC port. In the Bridge Mode, the IP
Phone allows a PC connected to the phone to pass through to the network. No other PC
configuration settings are set; the Advanced, Gateway, Primary and Secondary DNS field settings
are not required and can be ignored.
Dial Up (PPPOE) shows the status and IP address of your broad band connection. Dial-up
networking in the IP Phone has not been enabled. The IP phone is designed to be used over the
internet with a broadband connection.
Default Route is the IP address of a router that is used when a device sends a packet to another
subnet or when a device sends a packet to an unknown destination.
Each zone is served by at least one Name Server, which contains the complete data for the zone.
(To make the DNS tolerant of server and network failures, most zones have two or more
authoritative servers.) A name server retains the address and routing information for IP users.
5.3 Preference
Click “Preference” on the left menu and the preference configuration page will be displayed as
follows.
•
23
DBL Technology
EP-636 User Manual
5.3.1 Language
Click “Language” to select one language according to your need. For example, if your present
language used is English, click “English” in the “Language” menu, and your phone will display all
information in English.
5.3.2 User Password
The IP phone supports multiple levels of user administration. The user password is set to allow
you to configure the phonebook and other user administrative tasks. The default is “1234”.
5.3.3 Administrator Password
The administrator password is set to allow you to modify all configuration items assigned to the IP
phone. The default is “dbl#admin”.
5.3.4 Time Zone
The IP phone uses Network Time Protocol (NTP) to retrieve date and time information from an
NTP server. The time is in GMT ± offset. For example, Pacific Standard Time is GMT -8, and
Pacific Daylight Time is GMT -7.
•
24
DBL Technology
EP-636 User Manual
5.3.5 Auto Dial Time
Auto dial time refers to the time limit of auto dial.
5.3.6 Title
It is the title displayed on the IP phone LCD.
5.3.7 Disable # as Dial Key
If you click this item, when you press “#” key, it will not act as a symbol for ending the entry but
as a number input.
5.3.8 Auto Configurations
Auto-configuration is the automatic configuration of devices without manual intervention, without
any need for software configuration programs or jumpers. Ideally, auto-configuring devices should
just "Plug and Play". Auto configuration has been made common because of the low cost of
microprocessors and other embedded controller devices. It includes auto config server and auto
config refresh.
5.3.9 Advance…
The network tone is the dial tone one hears when he or she picks up the handset to make a call,
and the ring back tone when he or she dial a number. You can select network tones for the IP
phone, depending on the country where the phone is located. If you are in China, select “China” as
your network tone.
Click “Advance” in the preference configuration page. The network tones configuration page will
be displayed as follows.
•
25
DBL Technology
EP-636 User Manual
5.4 Call Settings
This chapter is about the basic settings to set up the internet connection through IP phone,
concerning two kinds of endpoint types: H.323 phone and SIP phone. Besides, codec preference
and NAT traversal are also included. Click “Call Settings” in the left menu of the configuration
page, the “Call Settings” screen will be displayed as follows.
•
26
DBL Technology
EP-636 User Manual
5.4.1 H.323 Phone
H.323 is the international standard for multimedia communication over packet-switched networks,
•
27
DBL Technology
EP-636 User Manual
including LANs, and the Internet. It is a standard approved by the International
Telecommunication Union (ITU) in 1996 to promote compatibility in videoconference
transmissions over IP networks. It is now considered to be the standard for interoperability in
audio, video and data transmissions as well as Internet phone and voice-over-IP (VoIP) because it
addresses call control and management for both point-to-point and multipoint conferences as well
as gateway administration of media traffic, bandwidth and user participation.
If you are the H.323 phone user, you have to refer to the items as follows: Direct Mode,
Gatekeeper Mode, and Advance Settings. Refer to the figure above for the configuration page.
5.4.1.1 Gatekeeper Mode
The Gatekeeper (GK) is an H.323 entity on the network that provides address translation and
controls access to the network for H.323 terminals, Gateways and MCUs. The Gatekeeper may
also provide other services to the terminals, Gateways and MCUs such as bandwidth management
and locating Gateways.
If you select the gatekeeper mode, there will be several items needed to be set up as follows:
Gatekeeper Address, Phone Number, Display Name, Unconditional Forward Number, No
Reply Forward Number, Busy Forward Number and Enable AUTH (Auth ID and
Password).
Gatekeeper Address is used for finding the correct gatekeeper. It may be an IP address such as
192.168.2.1 or a domain name like gk.yourisp.com. On the Call Settings screen, enter the
gatekeeper address in the “Gatekeeper Address” field.
Phone Number is a sequence of decimal digits that is used for identifying a telephone line in a
telephone network. For example, 5551234 is a valid phone number. On the Call Settings screen,
enter the phone number in the “Phone Number” field.
Display Name is the parameter name to be displayed on the called IP phone for identification like
caller ID such as "John Smith”.
Unconditional Forward Number is the number for unconditional forward.
No Reply Forward Number is the number for no reply forward.
Busy Forward Number is the number for busy forward number.
If you click the “ENABLE AUTH” field, you will have to configure the Auth ID and Password. A
pair of authentication ID and password is usually needed to use the IP phone.
5.4.1.2 Direct Mode
In direct mode, communication between two IP phones can be achieved directly without
gatekeeper.
5.4.1.3 Advance Settings
Advance settings include the items as follows: H.323 ID, FastStart, Ras Port, Calling Signaling
•
28
DBL Technology
EP-636 User Manual
Port, Media Control Ports, RTP Ports, RTP QOS, and Transfer Mode. Click “Advance Settings” in
the H.323 configuration page, the following screen will be displayed.
H.323 ID is an alphanumeric string representing names, e-mail address, etc. It may be a user name,
conference name, e-mail name, or other identifier.
•
29
DBL Technology
EP-636 User Manual
Disable the Fast Start procedure is described in H.225.0. This option is mainly used for testing and
solving compatibility problems. If not sure, let this option unselected.
Ras Port is connected to an unreliable channel, which is used to convey the registration,
admissions, bandwidth change, and status messages between two H.323 entities.
Call Signaling Port is connected to a reliable channel used to convey the call setup and teardown
messages between two H.323 endpoints.
Media control port is the port or port range used by the H.245 media control protocol. Note: the
H.245 media control protocol uses TCP.
RTP (Real Time Protocol) Port is the target transport address for the RTP audio stream to be sent
to.
RTP QOS is a service field in UDP IP packets carrying a RTP data. Enter RTP QOS if your
network supports “DiffServ” and can prioritize the packets to maintain voice quality. It includes
three modes: None, IP TOS and DiffServ. As to TOS Value, there are six kinds: Routing, Priority,
Immediate, Flash, Flashoverride and Critic/Ecp. Diffserv Class refers to the following items: Best
Effort, FWD C1 – from Low Drop to High Drop, FWD C2 – from Low Drop to High Drop, FWD
C3 – from Low Drop to High Drop, FWD C4 – from Low Drop to High Drop, and Expedited
FWD.
Transfer Mode is set to confirm the way of call transferring.
5.4.2 SIP Phone
SIP (Session Initiation Protocol) is a relatively new Internet standard. It is a simple, low-level
protocol for initiating interactive communication sessions between users. These sessions can
involve two or more users. Such sessions include voice, video, chat, interactive games, and virtual
reality. If you are the SIP phone user, select “SIP Phone” in the configuration page and the SIP
phone configuration screen will be displayed.
•
30
DBL Technology
EP-636 User Manual
5.4.2.1 SIP Proxy
The SIP Proxy acts as the call manager of all the incoming or outgoing calls to and from the SIP
phone. The proxy address is the IP address or domain name of your IP-PBX or VoIP Service
Switch. For example, sip.yourisp.com or 192.168.2.197 may be a proxy address.
5.4.2.2 SIP Registrar
SIP Registrar is a SIP server responsible for keeping track of where a user is contactable, and
providing that information to callers.
5.4.2.3 SIP Phone Number
The SIP Phone Number is the telephone number (or extension) you assigned to the VoIP SIP
Phone such as 123456.
5.4.2.4 Display Name
Display Name is what the call party sees on his phone LCD when you call them such as “John
Smith”.
•
31
DBL Technology
EP-636 User Manual
5.4.2.5 Home Domain
5.4.2.6 Authentication
Authentication mainly is the identification of the user. The IP messages between two parties use an
authentication mechanism based on IDs and passwords. The authentication IDs and passwords are
the credentials to determine whether the “IP Proxy” should accept or reject a session invitation.
5.4.2.6 Advance settings
Advance settings include DTMF Payload Type, Register Expiry, SIP Local Port, SIP
Outbound Proxy, SIP Stun Server, SIP Operation Mode, DTMF Relay, Enable Call Forward,
RTP Port, and RTP QOS. The configuration screen is shown below.
•
32
DBL Technology
EP-636 User Manual
•
33
DBL Technology
EP-636 User Manual
DTMF Payload Type is used to carry telephony tones and telephony signals. By using a distinct
dynamic RTP payload type in the same RTP stream as the media, it is possible to carry DTMF
tones, fax-related tones, standard subscriber line tones, country-specific tones and trunk events.
Register Expiry is the deadline for the validity of your registration. If you miss this date, you will
have to register again.
SIP Local Port is the local UDP port used by the SIP client to communicate with SIP proxy and
other SIP user agents.
In most cases, the SIP Outbound Proxy is placed alongside the firewall and is the way to let SIP
traffic pass from the internal network to the Internet. Ask your network administrator for these
parameters.
STUN stands for Simple Traversal of UDP over NAT. It is a protocol which enables the SIP phone
to detect the presence and type of NAT behind which the phone is placed. SIP Stun Server refers
the SIP address of the Stun Server.
Voice Mail Num is the number for voice mail.
SIP Operation Mode is to enable some vendor specific support. Your service provided will
provide the appropriate value if needed, otherwise let it be empty.
DTMF Type is used for telephone signaling over the line in the voice frequency band to the call
switching center. It includes two types: Inband and Outband (RFC2833 and SIP Info).
Enable MWI.
Disable Keep Alive.
Disable Call Wait.
Forward Type includes three types: Not Forward, Unconditional Forward, and Forward on
Busy.
Call Forward Number is the number for call forward.
•
34
DBL Technology
EP-636 User Manual
RTP Port is the target transport address for the RTP audio stream to be sent to.
RTP QOS is a service field in UDP IP packets carrying a RTP data. Enter RTP QOS if your
network supports “DiffServ” and can prioritize the packets to maintain voice quality. It includes
three modes: None, IP TOS and DiffServ. As to TOS Value, there are six kinds: Routing, Priority,
Immediate, Flash, Flashoverride and Critic/Ecp. Differserv Class refers to the following items:
Best Effort, FWD C1 – from Low Drop to High Drop, FWD C2 – from Low Drop to High Drop,
FWD C3 – from Low Drop to High Drop, FWD C4 – from Low Drop to High Drop, and
Expedited FWD.
5.4.3 Codec Preference
Codec preference is the order of voice codec. The default one is up transmitting, which is the set
mode for common users. The below figure is the codec preference configuration page.
5.4.4 NAT Traversal
NAT Traversal can make and receive calls through any type of NAT device. Click “NAT
Traversal” and the following screen will be displayed.
•
35
DBL Technology
EP-636 User Manual
5.4.4.1 None
None means there is no traversal mechanism supported.
5.4.4.2 Port-forwarding
Port-forwarding is the action of forwarding network ports on the LAN interface to PCs or servers
in LAN network. Virtual servers use this technique to allow external users, in most cases via
internet, to reach services provided by internal servers such as FTP, HTTP, Telnet, etc.
Port-forwarding Support includes Gateway Address and Echo Server Address. Gateway is a
communication device that connects two different networks. Echo server is a standard service
implementing the ECHO protocol.
5.4.4.3 Relay Proxy
Relay Proxy is HyberTone's proprietary NAT traversal technology which enables HyberTone's
VoIP terminals to achieve successful deployment in most LAN environments. It includes Address,
Ports, User Name, and Password.
•
36
DBL Technology
EP-636 User Manual
5.5 Phone Settings
The Phone Settings configuration is shown as below:
•
37
DBL Technology
EP-636 User Manual
5.5.1 Prefix Dial Timer
Prefix dial timer is the time limit of dialing the prefix number. The default is 30 seconds.
5.5.2 F1 Key Redefine
There are three hold key define modes as below.
5.5.2.1 Prefix
Prefix Num refers to the first several numbers of the phone number. For example, if you define it
to 123. When you dial a phone number as 12345, you only need to press the F1 key and then dial
the back two numbers 45.
Calling Function Num refers to the star command or a phone number you predefine to use in the
phone operation. For example, you define it to *42, which you define for call transfer. When you
are in the process of a call, press the F1 key and you will send the transfer command.
5.5.2.2 Speed Dial
Speed Dial Num is the number for speed dial. If you define it to 12345, when you want to make a
•
38
DBL Technology
EP-636 User Manual
speed dial to call 12345, you just press the F1 key to make the speed connection.
Calling Function Num refers to the star command or a phone number you predefine to use in the
phone operation. For example, you define it to 1234. When you are in the process of a call, press
the F1 key and you will send the 1234 number information.
5.5.2.3 Calling Function
Calling Function Num is described as above.
5.5.3 F2 Key Redefine
5.5.4 Hold Key Redefine
5.5.5 Transfer Key Redefine
5.5.6 User Command Timer
User Command Timer is the time limit of inputting the star command.
5.5.7 Enable User Command
Click “Enable User Command”, and set the star commands for different functions as shown in the
table below. The values in the table are just examples, and you can set them as you like.
Press *01 to get LAN port IP address.
Get LAN Port IP (*01)
Press *02 to get PC port IP address.
Get PC Port IP (*02)
Press *03 to set LAN port IP address.
Set LAN Port IP (*03)
Set PC Port IP (*04)
Get Phone Number (*05)
Transfer key (*41)
Hold key (*42)
Dial From Phone Book (*50)
Dial Last Receive Call Number (*51)
Press *04 to set PC port IP address.
Press *05 to get phone number.
Press *41 to transfer a call.
Press *42 to hold a call.
Press *50 to dial from phone book.
Press *51 to dial last receive call number.
Dial Last Missed Call Number (*52)
Dial Last Dial Number (*53)
Get Last Receive Number (*54)
Get Last Missed Call Number (*55)
Get Last Dial Number (*56)
Reset Network Config (*09987456)
RESET Syscfg (*09987654)
Press *52 to dial last missed call number.
Press *53 to dial last dial number.
Press *54 to get last receive number.
Press *55 to get last missed call number.
Press *56 to get last dial number.
Press*09987456 to reset network configuration.
Press *09987654 to reset system configuration.
•
39
DBL Technology
EP-636 User Manual
Do Not Disturb (*80)
Enable All Caller ID Send (*82)
Disable Next Caller ID Send (*83)
Press *80 to start the function of “Do Not
Disturb”.
Press *85 to disable the function of “Do Not
Disturb”.
Press *81 to disable all caller ID send.
Press *82 to enable all caller ID send.
Press *83 to disable next caller ID send.
Enable Next Caller ID Send (*84)
Press *84 to enable next caller ID send.
Disable Do Not Disturb (*85)
Disable All Caller ID Send (*81)
5.6 Network Configurations
The Network Configurations screen as follows allows you to set up the IP addresses of the LAN
and PC port, Bridge or Router mode (by selecting or deselecting Bridge Mode), default Gateway
Address, and Primary and Secondary DNS server IP addresses. It includes LAN Port
Configuration and PC Port Configuration.
5.6.1 LAN Port Configuration
The IP phone LAN port can be configured to obtain its IP address by DHCP or the IP address can
be set statically (used mainly when using the phone with a DSL line). There are three modes to
configure LAN port: Obtain an IP Address Automatically, Specify an IP Address Manually, and
PPPOE.
•
40
DBL Technology
EP-636 User Manual
5.6.1.1 Obtain an IP Address Automatically
This selection enables the IP phone to obtain an IP address from the LAN network. When
selecting this selection, make sure that the network DHCP server is enabled.
Note that certain broadband service providers may offer a direct LAN connection with DHCP
Service. The address obtained from the network may or may not be a public address. Consult your
service provider for more information on this. If the IP address obtained is a private address, you
will have to use relay proxy server in order to establish VOIP calls. Port forwarding is normally
not possible since you have no access to the service provider’s router.
5.6.1.2 Specify an IP Address Manually
Either a fixed public IP address or a private IP address can be entered for the LAN port depending
on the network service provided.
If a fixed IP service is available, enter the IP address, the subnet mask, the gateway address, the
primary DNS, and the secondary DNS which are provided by your network service provider.
Make sure that no other device is using the same fixed IP address for internet access. If your PC is
using the same fixed IP address for internet access, you need to change it to a private IP address
and then connect it to the LAN port of the IP phone. Make sure that the IP phone LAN port and
the PC are in the same IP address segment.
5.6.1.3 PPPOE
PPPOE, point-to-point protocol over Ethernet, is a network protocol for encapsulating PPP frames
in Ethernet frames. It is used mainly with cable modem and DSL (Digital Subscriber Line)
services. Click “PPPOE”, and you will see “User Name” and “User Password”.
Select “PPPOE”,
if you require the IP phone to dial-up to your ISP directly. This type of dial-up is very popular in
the ADSL and AN/PC access service. In this mode, the IP phone will also function as a router for
internet sharing.
5.6.1.4 Advance Configurations
Click Advance Configurations and you will see the following items as shown in the below screen:
•
41
DBL Technology
EP-636 User Manual
Hardware Address is an address used to enter the MAC address in XX: XX: XX: XX: XX: XX
format.
Broadcast Address is an address used to communicate with the other computers connected to the
PC side of the SIP Phone.
Click “VLAN Enable”, and you will have to input VLAN ID and VLAN QoS.
5.6.2 PC Port Configurations
PC port is configured to make a connection of the network and telephone. There are two modes to
configure a PC port: Bridge Mode and Specify an IP Address Manually.
5.6.2.1 Bridge Mode
In the Bridge Mode, the IP Phone allows a PC connected to the phone to pass through to the
network. No other PC Configuration settings are set; the Advanced Settings, Gateway, Primary
and Secondary DNS field settings are not required and will be ignored.
5.6.2.2 Specify an IP Address Manually
Click “Specify an IP Address Manually”, and enter “IP Address” and “Subnet Mask”.
To Enable DHCP Service, you have to know the starting address, which is used to start the service;
and the ending address, which is used to end this service.
•
42
DBL Technology
EP-636 User Manual
5.6.2.3 Disable
Click this item to disable the PC port.
5.6.2.4 Advance Configurations
Click Address Settings and you will see the following items as shown in the below screen:
Hardware Address and Broadcast Address.
5.6.3 Primary DNS
DNS is the abbreviation for domain name server, domain name system. A database of Internet
names and addresses that translates the names to the official Internet Protocol numbers and vice
versa; the distributed name-and-address mechanism used in the Internet. Primary DNS is the
primary DNS server IP address. You can obtain this from your ISP (For example: 202.67.156.221).
If PPPoE Dialup Networking is used, the Primary DNS will be obtained automatically from the
ISP. This entry can be left blank.
5.6.4 Secondary DNS
It is the secondary DNS server IP address that will be used in the event that the primary DNS
•
43
DBL Technology
EP-636 User Manual
server IP address fails or is not available. You can obtain this from your ISP (For example:
202.67.156.222). If PPPoE Dialup Networking is used, the Secondary DNS will be obtained
automatically from the ISP.
This entry can be left blank.
5.6.5 Timer Server
Time Server is the Network Time Protocol server where the IP Phone retrieves date and time
information.
5.7 Phone Book
Users are able to store up to 50 phone numbers by pressing the “Phone Book” button. For each of
the 50 phone book numbers, the user can store both a number and name for display. The
configuration web of phone book is shown as follows.
5.7.1 View the Phone Number Record
In the “Phone Book” window, Name, Phone number, IP and Email are displayed.
When there are more than 10 records, use “Prev.” and “Next” to view the other records.
•
44
DBL Technology
EP-636 User Manual
5.7.2 Maintain Phonebook
A. To Add a New Record
Press “Add” button to add a new record. Then the screen will be displayed as follows.
After entering all items, click the “Save” button to save the information you have entered.
B. To Modify or Delete a Record
Click “Name” to modify the record content. The screen as follows will be displayed.
•
45
DBL Technology
EP-636 User Manual
After entering the items you want to modify, click the “save” button to save your modification. If
you want to delete this record, just click the “DELETE” button and this record will be deleted
from the phone book menu.
5.8 Online Upgrade
WARNING! Performing an online upgrade is for experienced users or administrators only!
Click “Online Upgrade” button in the left menu of the configuration page. Enter the IP address or
domain name of
the upgrade
server and package
name (for
example, http:
//192.168.2.1/update/T32HS-3.05.pkg) and then click
“Start”.
•
46
DBL Technology
EP-636 User Manual
5.9 Save Configuration
When you make any configuration changes to your IP phone, you must save the configuration you
have done. Otherwise, your configuration will not take effect. Just click “Save Configuration” in
the left menu of the configuration page and you will see the following screen, which means your
configuration has been saved.
•
47
DBL Technology
EP-636 User Manual
•
48