1
Brady High School GeoPod Project
Team members: Michael Hughes, Han Tran, and Kyle
Tucker
Client: Troy Braley, of Brady High School
June 6th, 2013
1
2
Table of Contents
Introduction ................................................................................................................................ 5
Client Description ................................................................................................................... 5
Product Vision ........................................................................................................................ 5
Requirements ............................................................................................................................ 6
Functional Requirements: ....................................................................................................... 6
Non - Functional Requirements: ............................................................................................. 6
Potential project risks: ............................................................................................................ 6
System Architecture ................................................................................................................... 7
Architecture and Flow Decisions............................................................................................. 7
Technical Design ....................................................................................................................... 9
KML .......................................................................................................................................10
Design & Implementation Decisions ..........................................................................................11
Liquid Galaxy Decision ..........................................................................................................11
Hardware Decisions ..............................................................................................................11
LAN Configuration .................................................................................................................12
Development Language Decisions ........................................................................................12
Results ......................................................................................................................................13
Appendix A: Program Detail ......................................................................................................14
Appendix B: Hardware Cost ......................................................................................................16
Displays.................................................................................................................................16
Host Computer ......................................................................................................................16
Game Controller ....................................................................................................................17
Headphone splitter ................................................................................................................17
Webcam ................................................................................................................................17
Cost List ................................................................................................................................17
Appendix C: User Manual .........................................................................................................18
Program Start ........................................................................................................................18
Teacher control system .........................................................................................................18
Add students .........................................................................................................................19
Select Assignment .................................................................................................................19
3
Lesson Description ................................................................................................................20
Start Assignment ...................................................................................................................21
Explore Google Earth ............................................................................................................21
Edit Lesson Description .........................................................................................................21
Help .......................................................................................................................................21
Logout ...................................................................................................................................22
Creating a new placemark .....................................................................................................22
Setting Default starting Location ............................................................................................22
Appendix D: Installation Instructions .........................................................................................23
Installation .............................................................................................................................23
Installation of Google Earth ...................................................................................................23
Installation of BradyBlaster ....................................................................................................23
Configuration of Liquid Galaxy ...............................................................................................23
Computer 1: Far Left ..........................................................................................................24
Computer 2: Near Left........................................................................................................25
Computer 3: Center (Master) .............................................................................................26
Computer 4: Near Right .....................................................................................................26
Computer 5: Far Right........................................................................................................27
Local Firewall changes ..........................................................................................................28
Joystick Controls ...................................................................................................................28
Installing and checking the joystick. .......................................................................................28
Common Installation Problems ..............................................................................................28
4
Introduction
Client Description
Brady High School is an alternative school in Jeffco Public Schools. Their
mission is to find students who have dropped out, been expelled, or are not attending
school and get them a diploma and off to college. If they cannot hook the students
within a 3 week window, they will most likely not be successful with them. They have
been very successful with their mission to educate the students, but could use another
tool to further excite the students and engage them in learning. The principal Troy
Braley has developed an idea to use Google Earth in a flight simulator type setup to
allow the students to explore the world, and foster a desire to continue learning and
coming to school. The client has also requested the aid from the educators that will be
using the program, and has had them develop ideas and functionality requests for the
project.
Product Vision
The Brady GeoPod is for Brady High School who need for a way to capture the
student’s attention and promote staying in school, while delivering a system that allows
the students to learn and experience social science classes in a fun and exciting way.
The Brady GeoPod will utilize Google Earth to allow the students to explore the Earth in
various places and allow them to enjoy the learning process though the program and
technology. The GeoPod will allow the educators of various classes to develop
interactive lessons that engage the student, as well as creating a positive learning
environment for the students through the use of the Google Earth implementation. The
students and educators will also have access to a control panel to assist in controlling
the software and also features that can be used to facilitate the students learning and
interest in education.
5
Requirements
Functional Requirements:
The Geo-Pod program will allow users through the use of Google Earth, to
experience the exploration of the earth through the use of a flight simulator as well as
incorporate history elements for the students learning.
Specific Functionality:
●
●
●
●
●
●
Allow users to interface with Google Earth through the use of a Joystick controller
Secure access, with each student having a unique login to use the system
Allow the use of Program Plans/Lesson Plans
Use a minimum three screens to immerse the students
Synchronized sound effects
Ability to land the simulator at the site
Non - Functional Requirements:
To complete the Geo-Pod project many requirements were made that would be
deemed nonfunctional but important to the completion of this project.
Specific Functionality:
● The program must be simple and durable, as no support will be used after
delivery
● The students login data must be secure
● Must allow the educators to develop lessons for specific classes
● Ensure that Microsoft Group Policy and Active Directories are correct and allow
for the project to be run
Potential project risks:
● The project will be delivered as a complete package that requires no
maintenance or patching
● There will be no one to maintain the project, so it must be able to tolerate future
OS patches and version releases
● Aspect ratios of the side monitors may drive up the costs
● Physical durability must be considered
● We must plan for frequent changes by the clients request
6
● Student’s Personally Identifiable Information (PII) must be secured
System Architecture
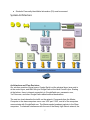
Architecture and Flow Decisions
Our solution consists of three layers: Google Earth is at the physical layer; java code is
at the control layer, and KML files join Google Earth at the Java Control Layer. Starting
at the bottom, there is internet connectivity to GoogleEarth.com, panaramio.com,
YouTube.com, and other Google Earth-related external destinations.
The next two levels describe the traffic on the network. Commands from the Master
Computer to the slave computers occur over UDP port 21567, and all of the computers
communicate with GoogleEarth.com. The Master sends broadcast packets to the Slave
computers. To eliminate interference with the rest of the Brady High School network, the
7
Google Earth computers are on their own IP subnet. The Master broadcasts about 11
datagrams a second, where each datagrams contains a counter, latitude, longitude,
altitude, heading, tilt, roll, time start, time end, and planet name.
The next level is the Google Earth level. An independent copy of Google Earth is loaded
on each computer, and there is one computer per display. To make them work as a unit,
the program’s “drivers.ini” file has some additional lines added that control Master or
Slave, and the geometry of each display. “ViewSync” instructions are added to the files.
This is the first level that requires modifications to the Windows Operating System.
“Drivers.ini” is a protected system file, and the system administrator requires the rights
to modify it.
At a sub-level above Google Earth is the customized XML (Extensible Markup
Language) code the interfaces the joystick to Google Earth. The XML code programs
the joystick to provide some of the features that Brady High School asked for, as well as
basic flight simulator capability.
The Keyhole Markup Language (KML) layer is where the lesson plans for Google Earth
are added. The KML files are created by the instructor with Google Earth and are stored
for later use by the students.
Alongside the KML layer is the Microsoft layer. Several modifications needed to be
made to the computers. Jeffco Group Policy blocks JAR files, so an exception had to be
added for the Google Earth System. The Google Earth system administrator needed
rights to modify protected files, and ports needed to be opened in the local firewall.
The top level is the Java Control Layer that the CSM team created to tie all of the
elements together. The system uses flat text files for a user database, where the
database has user ID, password and user type. For the missions database, the program
opens a Windows file dialog box. Other elements include the ability to edit lesson plans
and edit the user database.
Languages and technologies used: Java, KML, ViewSync, XML, .INI, Microsoft Active
Directory, Microsoft Group Policy.
8
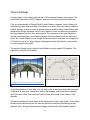
Technical Design
An early aspect of our design was the use of 36.5 degrees between each screen. The
next section describes how 36.5 degrees was done, and this section describes why.
First, an understanding of Google Earth’s Liquid Galaxy is needed. Liquid Galaxy is a
methodology rather than a product. Its purpose is to skew, offset and warp the data on
multiple displays so that an array of screens gives a realistic image. Liquid Galaxy was
designed by Google engineers on 20% time, which is a time slot where the engineers
are encouraged to work on their own projects. The engineers built Liquid Galaxies in
several corporate offices, and it was so popular that they shared it with the rest of the
world. But, Liquid Galaxy is not a Google Corporate product, and there is no support for
it. That fact is one of our larger design challenges because after delivery, there will be
no one to support the system.
The next two figures show a typical Liquid Galaxy array the spans 180 degrees. This
example is using 40 inch displays.
Physical Geometry at Brady High School
http://www.google.com/earth/explore/showcase/liquidgalaxy.ht
ml
In the photograph on the left side, you can notice a bit of distortion where the curvature
of the earth is seen as a straight line. And on the drawing, notice that the far displays
don’t face each other. The horizontal Field-of-View at the ends of the screen is 180
degrees.
The perceived distortion goes away as the viewer gets closer to the screen. If only three
screens were used around the arc then the distortion would be overwhelming at any
distance. Also, the angle between each display would be about 60 degrees, and the
9
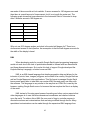
rear ends of the arc would not look realistic. If seven screens for 180 degrees are used
then there is a small amount of improvement, but it is not worth the extra cost. The
following graph shows that improvements to the horizontal Field-of-View start to drop
after 5 screens around a 180 degree arc.
Number of screens
Angle between screens
3
60.5
5
36.5
7
25.5
9
20.5
11
16.5
Why not use 36.0 degree angles, and what is the extra half degree for? There is no
documented answer to that question. An assumption is that the half degree accounts for
the width of the display’s bezel.
KML
When developing code for use with Google Earth typical programing languages
would not work due to the lack of spatial data needed to interact with two dimensional
and three dimensional maps. So to solve this lack of support Google developed the
Keyhole Markup Language, or better known as KML.
KML is an XML based language that details geographic data and allows for the
inclusion of points, lines, images, polygons, and models to be read by Google Earth as
well as Google Maps and other applications. This file format to manage Google Earth
leaves users easily able to take their own custom KML files and easily use them with
the software. This language is very similar to the way that an HTML file is read by the
browser, making Google Earth more of a browser that can explore the files in a display
of the world.
KML instead of focusing upon browser formatting and other various aspects that
other languages do it uses the three dimensional coordinates and relative locations
upon the earth. To achieve this a KML file uses a set of tags in a similar manner to
denote the actions and customizations that are being modified through the file. Many
specialized customizations can be made through the expansive KML language from
10
denoting a fly by tour of a location to the inclusion of data to allow the user to get a
better understanding of the location.
Google Earth functions the same as a browser with the KML file and reads these
tags to set up the mapping environment to suit the specifications made with the KML
file. This makes this language ideal for displaying information that involves geographic
data in a way that is easy to understand and view. And example of what can be
accomplished would be adding overlays to countries or the entire earth showing
population or any other statistic fathomable. Without this language the effectiveness of
communicating geographic data to many users would be drastically decreased, as well
as the ease in which these files can be distributed and run.
Although KML is the default and only language that Google Earth can recognize,
the effectiveness of this language to convey the data and information to the public
makes it an ideal choice to use when a three dimensional representation of earth is
used.
Design & Implementation Decisions
Liquid Galaxy Decision
To try and meet the client’s requirements for an immersive simulator we explored many
options to accurately display the screen presented though Google Earth. One of the
major issues when trying to display a picture upon multiple monitors is the aspect ratio.
If a curved setup is used, like the design we decided to choose this image becomes a
static flat image. To fix this aspect we decided to use Google’s Liquid Galaxy program.
This implementation was developed by Google and has details to modify the viewing
angles on each screen. Once these are modified the picture can be shown with the
correct aspect ratio. This seemed to be the correct design decision for us, as it was
created by the same company as the program, and also accurately addresses our
problems in a concise and functional way.
Hardware Decisions
The original request was to run Google Earth on three 60-inch monitors that were at 90
degree angles to each other, all controlled by one computer. The three monitors were to
give the students a 180 degree field of view. After evaluation, Google Earth’s Liquid
Galaxy methodology was proven to be the only viable solution. Liquid Galaxy requires
one computer per monitor, and each monitor’s horizontal Field of View spans 36.5
11
degrees. A total of five computers and monitors are needed to achieve a realistic 180
degree field of view.
Liquid Galaxy needs a vertical orientation on its monitors, but the computers that are
being provided by Brady High School all use Windows XP. Tests were conducted and
the installed copy of XP is aware of vertical monitors, but the monitors will not be
delivered until after this project ends on July 21.
LAN Configuration
By school policy, Brady’s computer room only allows wireless computer connectivity.
Initial tests showed erratic motion when the computers were connected via a wireless
connection. Brady High School staff is discussing the possibility of changing their policy
to allow wired connections to the GeoPod system.
Liquid Galaxy uses broadcast packets to communicate instructions from the master
computer to the side computers. To isolate the traffic, Jefferson County IT department
allocated a private IP subnet for the system.
Development Language Decisions
Google Earth has a direct interaction with Keyhole Markup Language (KML) files, and
can be controlled by Java, JavaScript and JQuery. The CSM team chose Java as the
language for the control layer because it is better suited for a contained package of user
interfaces, instructor controls, and student activity.
JQuery and JavaScript were originally the languages that were proposed for this
project. With our beginning idea, the thought to use the Browser version of Google
Earth was decided but later changed due to the understanding of the KML language. To
use the KML files which store the lesson plans and description, a desktop application of
Google Earth would need to be run. Because of this the use of two web based
languages did not fit our design. This is the reason that java was selected for the final
languages used.
12
Results
This project has been tested on Windows XP, Windows 7 and Windows 8, and worked
well on all three - but java JAR files do not run on computers that were provided for the
simulation. The problem was corrected when the computers were upgraded to Windows
7.
To date, the functional requirements have passed tests on the development computers
and our XP test computer.
At one point during the demonstration, we showed one of the teachers how to create an
example lesson with various features, and he was comfortable with the structure and
had a good understanding of the mechanism under the system. A detailed document is
provided to make sure future users are clear on what to do.
We also showed the client the main program interfacing between users and Google
Earth. They agreed that the program is user friendly and easy to understand. In
addition, the program covered exactly what they want and they requested a couple
more features. By the final delivery day, we had all the required features implemented.
There were several requested features that could not be implemented - The ability to
land on the site could not be done because of limitations within Google Earth. Another
requirement was a webcam to monitor student’s behavior, but the main equipment has
not arrived yet. The webcam should be relatively easy for the school to set up by
themselves, as they have plenty of existing surveillance technology in place.
Lessons learned: The problem with the JAR files caught us by surprise. We should have
tested the ability to run them. Also, we realized that client communication is very crucial
in reaching to the final design. In last couple meetings, we were able to ask the right
questions and determine specific features that the client wants.
13
Appendix A: Program Detail
GoogleEarth Class – Control most interaction with Google Earth
VOID
openGE()
- Check current system (x86 or x64) then open Google Earth with the
corresponding path.
VOID
openGE(File f)
- Open the KML file provided, this will bring up Google Earth with settings
from the KML file
VOID
flightMode()
- Send the combination Ctrl-Alt-A to Google Earth in order to open Flight
Simulator Mode
VOID
closeGE()
- Shut down Google Earth process
PROCESS getProcess ()
- Return the process handler of Google Earth
SoundThread Class – Responsible for the sound layer on the background of Google
Earth
INT
load()
- Load the audio clip into the system, return 0 if succeed
VOID
run()
- Play the audio clip continuously until receive a stop signal
VOID
stopSignal()
- Send out the signal to stop playing the audio clip
User Class – Define a user for the database
CONSTRUCTOR User(String name, String password, Boolean right)
- Set up a user with name, password, and right (true for student, false for
teacher)
UserDatabase Class - The core of the authorization system
CONSTRUCTOR UserDatabase()
- Load users’ info into the system from a pre-determined file
14
INT
authorize(String user, String pass)
- Look for a certified user, return 2 for a valid student account, 3 for a valid
teacher account
UserInterface Class – Manage all the interfaces that users will encounter
CONSTRUCTOR UserInterface()
- Set up basic components and settings
VOID
loginLayout()
- Display and respond to actions in login screen
VOID
eraseLogin()
- Destroy the login screen
VOID
studentLayout()
- Display and respond to actions in student’s screen
VOID
teacherLayout()
- Display and respond to actions in teacher’s screen
VOID
lessonReader()
- Read the description from a KML file
VOID
setFile(File f)
- Save the file name and make it available to the whole class
Development Environment
System:
IDE:
Joystick:
Other:
Windows 7 (also tested on Windows XP, Windows 8)
Eclipse SDK 4.2.0
Logitech Extreme 3D Pro
Java JDK 7u13 (JRE also worked)
Google Earth 7.1 (Desktop version)
Wave audio file (other audio formats are not tested)
15
Appendix B: Hardware Cost
Displays
Several display types were evaluated. The project requires that the student have
displays in front and on both sides in order to simulate an aircraft cockpit. The displays
that represent the side windows should be as close as possible to a 90 degree angle in
respect to the front display.
The first evaluation was a curved glass display that Samsung-Corning is still trying to
design. The display is not ready for market yet – so far, all they have is a small,
transparent screen that they are showing at trade shows.
Another type of display is a curved projection screen. We were not able to find a screen
with a listed price of under $15,000. Also, the screens won’t surround the students on
three sides; they only have about 20 degrees of curve.
The third option was multiple 60 inch monitors, with one screen in front and one to
either side of the students. There are two ways to drive the monitor: the first is with
graphics expansion module that splits the video display across three screens. The
second is to use three separate video adapters in the host computer. The expansion
module is the least expensive solution and is the best choice if Google Earth does not
offer separate side views. A note about 60 inch monitors: they don’t accept VGA or DVI
computer signals; they only accept HDMI or s-video. The graphics expansion module
only outputs DVI, so three DVI to HDMI adapters will be needed. They are not
expensive.
A major problem with a single video output is the aspect ratio. The side displays may
not look like side displays. In other words, Google Earth may not have the option for 90
degree displays. We still need to research the aspect ratios. It is possible that Google
Earth Pro or the graphics expansion card may have the aspect ratio settings that we
need.
The fourth solution, and the one we selected, was to use one computer per screen, with
synchronization between the computers.
Host Computer
The remainder of the cost analysis involves the third option. Physically, the host
computer should have at least three PCI Express slots and a 450 watt power supply in
order to operate the three video cards. If the graphics expansion module is used then
any in-house computer will probably work. It is our understanding that Brady High
School will provide the computer.
16
Game Controller
A sturdy game controller is the Logitech Extreme 3D Pro. This is a joystick-type of
controller that can be mounted to the table in front of the students.
Headphone splitter
A headphone splitter will be needed for the three sets of headphones. The splitter will
impedance-match the headphones and allows them to be operated from one
headphone jack on the computer.
Webcam
A camera is required to monitor the students in the flight simulator. The webcam will be
on top of front display.
Cost List
The following list assumes three 60 inch monitors and the graphics expansion module.
Qty
Item
Estimated Cost, Qty * individual price
1
Joystick
$ 35
1
Headphone splitter
$ 10
3
60 inch LCD display screens
$ 4,500
1
Graphics Expansion module
$ 350
3
mounting brackets
$ 390
1
USB Webcam
TBD
Total estimated electronic hardware
cost:
$ 5, 285
17
Appendix C: User Manual
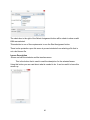
Program Start
To access Google Earth start up the Java program by clicking on the Brady Blaster
icon:
After opened enter the teacher login that is provided for you:
The Students will access the GeoPod though the same method using their given login.
Teacher control system
Please refer to the section of the desired information. A description of its use and
operation will be detailed. There is also reference material to working in Google Earth
as well as setting up the joystick.
18
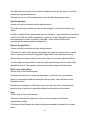
Add students
-Shown only on the teachers menu
Input the student’s logins and passwords:
To manually update a student/teacher's name go to the data.txt file.
Using a text editor, you can adjust a student’s name:
The third line denotes a student or teacher.
0 is the Teacher 1 is the students
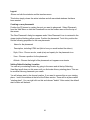
Select Assignment
-Shown on both the students and the teachers menu
This is the button that is used to select the KML file for the lesson. Using this
button, select the specific lesson and click open:
19
The check box to the right of the Select Assignment button will be check to show a valid
KML was selected.
This selection is one of the requirements to use the Start Assignment button
There is also protection upon this menu to prevent students from selecting a file that is
not a kml lesson file.
Lesson Description
-Shown on both the students and the teachers menu
This is the button that is used to read the description for the selected lesson.
Using this button you can read about what is needed to do. It can be useful to leave this
screen up:
20
The check box to the right of the Lesson Description button will be check to show the
student has read the description.
This selection is one of the requirements to use the Start Assignment button
Start Assignment
-Shown on both the students and the teachers menu
This is the main way in which you can use the program to run the lessons that you
create.
In order to use this button and actually start the simulator with a lesson two conditions
must be met. Both the Select Assignment, as well as Lesson Description must have
been assessed to ensure you have a valid KML. It also verifies that the user
understands the lesson needs and objectives.
Explore Google Earth
-Shown on both the students and the teachers menu
This button is used to start google earth without the need for a lesson plan. It can be
used to create your lessons by using the Google Earth tools to develop a lesson.
When saving your lesson make sure to select Save As, and then select a KML file.
It is also highly recommended to save the newly created lesson into the class folder
that will be using it. This prevents issues from students trying to find the lesson.
Edit Lesson Description
-Shown only on the teachers menu.
This menu will allow you to make the description of the lesson for your students:
When you are satisfied with the description that you want, click the Enter Lesson
Description button:
By editing the description of the lesson text for the file, you will be overwriting the
previous entry. Keep this in mind while editing the description for the lesson.
Help
-Shown only on the teachers menu
This button will open the help menu. Here you have access to the System
Administration button.
Clicking on this will display the setup configuration needed to produce the 5 screen
setup.
21
Logout
-Shown on both the students and the teachers menu
This button simply closes the entire interface and all associated windows that have
been created.
Creating a new placemark
Position the 3D viewer to contain the spot you want to placemark. Select Placemark
from the 'Add' Menu or click the Placemark icon on the toolbar menu at the the top of
the screen
The 'New Placemark' dialog box appears and a 'New Placemark' icon is centered in the
viewer inside a flashing yellow square. Position the placemark. To do this, position the
Set the following properties for the new placemark:
·
Name for the placemark
·
Description, including HTML text (this is how you would embed the videos)
·
Style, Color - Choose a color, scale (size) and opacity for the placemark icon
·
View - Choose a position for the placemark.
·
Altitude - Choose the height of the placemark as it appears over terrain
Setting Default starting Location
You can set your starting location by going to the menu and at the top Selecting
View.Next scroll down on this menu until you find make this my starting place. This can
be modified like any placemark you create.
You will always start in the chosen location. If you want to remove this as your starting
place... look in the sidebar at the left at the Places section. There will be a place called
"starting place". You can right click on this and choose "delete". After restart, the default
start location will be back.
22
Appendix D: Installation Instructions
Installation
This chapter covers the initial installation of Google Earth Liquid Galaxy, BradyBlaster,
and the Joystick software. The installer needs the have local or domain administrator
rights in the computers.
Liquid Galaxy is not a product. It is a method of configuring Google Earth to surround
the viewer with a realistic visual geographic display.
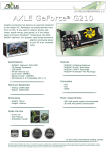
Recommended Minimum Hardware requirements
8 GB RAM
quad-core i5
80 GB SSD
Nidia g210GPU or equivalent.
One computer and one display per 36.5 degrees of rotation around an arc.
A game controller – Logitech Extreme 3D pro is used in this simulation.
Connectivity to the Internet is also needed to operation Liquid galaxy.
The computer/display at zero degrees is the front computer and covers 36.5 degrees of
horizontal Field of View. Four more computer/displays are needed to achieve 180
degrees around an arc. The displays must be in a vertical orientation. Information about
the physical positioning of the displays is discussed later.
Installation of Google Earth
Google Earth is part of Jefferson County default computer build, and should not have to
be downloaded or installed.
Installation of BradyBlaster
The master computer needs a folder at the root of C:, “BradyBlaster” is a good name to
call it. The files from the CD should be copied into the new folder, and all of the
instructors need to be able to Modify and Write to the files and subfolders. After the files
are copied, click on the JAR file and make a shortcut to the desktop.
Configuration of Liquid Galaxy
23
Each computer must have its own configuration, and the installer must have the rights
to modify the files that are shown on the next five pages. These configurations will also
have to be re-added if Google Earth is re-installed.
Computer 1: Far Left
Configuration files to modify – both are identical:
C:\Program Files [(x86)]\Google\Google Earth\client\drivers.ini
C:\Program Files [(x86)]\Google\Google Earth\plugin\drivers.ini
Add security rights to these files for the installer: Modify, Write.
SETTINGS { ; existing line
; ViewSync settings
ViewSync/send = false
ViewSync/receive = true
; For video caves, we typically want the slave screens to look to the left
; or right (yawOffset) of where the master is looking.
ViewSync/yawOffset = -73.0 ; center angle
ViewSync/pitchOffset = 0.0
ViewSync/rollOffset = 0.0
ViewSync/horizFov = 36.5 ; field of view
; end of ViewSync settings
24
Computer 2: Near Left
Configuration files to modify – both are identical:
C:\Program Files [(x86)]\Google\Google Earth\client\drivers.ini
C:\Program Files [(x86)]\Google\Google Earth\plugin\drivers.ini
Add security rights to these files for the installer: Modify, Write.
SETTINGS { ; existing line
; ViewSync settings
ViewSync/send = false
ViewSync/receive = true
; For video caves, we typically want the slave screens to look to the left
; or right (yawOffset) of where the master is looking.
ViewSync/yawOffset = -36.5 ; center angle
ViewSync/pitchOffset = 0.0
ViewSync/rollOffset = 0.0
ViewSync/horizFov = 36.5 ; field of view
; end of ViewSync settings
25
Computer 3: Center (Master)
Configuration files to modify – both are identical:
C:\Program Files [(x86)]\Google\Google Earth\client\drivers.ini
C:\Program Files [(x86)]\Google\Google Earth\plugin\drivers.ini
Add security rights to these files for the installer: Modify, Write.
SETTINGS { ; existing line
; ViewSync settings
ViewSync/send = true
ViewSync/receive = false
; If send = true, sets the IP where the datagrams are sent. Use a broadcast
; address for more than one slave display.
ViewSync/hostname = x.x.x.255
;where x is the first three octets of ; ;
ViewSync/port = 21567
; the IP subnet.
; For video caves, we typically want the slave screens to look to the left
; or right (yawOffset) of where the master is looking.
ViewSync/yawOffset = 0.0 ; center angle
ViewSync/pitchOffset = 0.0
ViewSync/rollOffset = 0.0
ViewSync/horizFov = 36.5 ; field of view
; end of ViewSync settings
Computer 4: Near Right
26
Configuration files to modify – both are identical:
C:\Program Files [(x86)]\Google\Google Earth\client\drivers.ini
C:\Program Files [(x86)]\Google\Google Earth\plugin\drivers.ini
Add security rights to these files for the installer: Modify, Write.
SETTINGS { ; existing line
; ViewSync settings
ViewSync/send = false
ViewSync/receive = true
; For video caves, we typically want the slave screens to look to the left
; or right (yawOffset) of where the master is looking.
ViewSync/yawOffset = 36.5 ; center angle
ViewSync/pitchOffset = 0.0
ViewSync/rollOffset = 0.0
ViewSync/horizFov = 36.5 ; field of view
; end of ViewSync settings
Computer 5: Far Right
Configuration files to modify – both are identical:
C:\Program Files [(x86)]\Google\Google Earth\client\drivers.ini
C:\Program Files [(x86)]\Google\Google Earth\plugin\drivers.ini
Add security rights to these files for the installer: Modify, Write.
SETTINGS { ; existing line
; ViewSync settings
ViewSync/send = false
27
ViewSync/receive = true
; For video caves, we typically want the slave screens to look to the left
; or right (yawOffset) of where the master is looking.
ViewSync/yawOffset = 73.0 ; center angle
ViewSync/pitchOffset = 0.0
ViewSync/rollOffset = 0.0
ViewSync/horizFov = 36.5 ; field of view
; end of ViewSync settings
Local Firewall changes
Add UPD port 21567 as an allowed outbound and inbound rule.
Joystick Controls
The driver software for the joystick needs to be installed on the master computer, and
can be downloaded at:
www.logitech.com/support/extreme3dpro
Click the downloads tab, and then click the “download software” button.
“lgs510_x64.exe” should appear in the Downloads folder. If you have a 32-bit system
then the file name may end with “x32.”
Double-click “igs510-x64.exe” to install the joystick software, and follow the on-screen
instructions for
Installing and checking the joystick.
After the program finishes its checks, load the BradyBlaster configuration file by clicking
File, Import.
Browse to the C:\BradyBlaster\Joystick folder and select BradyBlaster.XML, and click
the OK button. The joystick will stay configured.
Common Installation Problems
A common problem is a lack of communication between the master and the slave computers.
1. Check the IP addresses. They must all be on the same subnet.
2. Check the master’s broadcast address in its drivers.ini file.
28
3. Check the spelling of “ViewSync/receive” in the drivers.ini files.
4. Check and make sure the firewall port is open.
5. The drivers.ini in both the clients and plugins subfolders need to be identical.
29