1
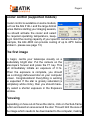
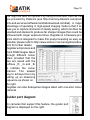
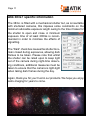
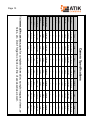
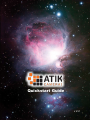
Quickstart Guide
v 2.2
From Wikipedia: “The Orion Nebula (also known as
Messier 42, M42, or NGC 1976) is a diffuse nebula
situated south of Orion’s Belt. It is one of the brightest
nebulae, and is visible to the naked eye in the night sky.
M42 is located at a distance of 1,344±20 light years
and is the closest region of massive star formation to
Earth. The M42 nebula is estimated to be 24 light years
across.”
Image by Rui Tripa (Atik 4000)
Page Introduction
Thank you very much for your purchase of an Atik camera.
Atik cameras represent the most affordable way to capture highquality astronomical images, whilst delivering superior performance and unparalleled ease-of-use. Your Atik camera is the
result of extensive research and development, and it has been
designed and built with the requirements of the most demanding
astrophotographer in mind. A wide range of accessories is also
available in order to answer the needs of even the most ambitious
astro-imaging applications.
Your Atik camera incorporates state-of-the-art design and materials, and it will be your trusted astrophotography companion for
a long time to come. However, modifications to the camera and/
or accessories which are undertaken without the manufacturer’s
written permission will void the warranty. Repairs, servicing and
upgrades are available through your local dealer or at www.atikcameras.com.
This guide will help you to get your Atik camera up and running in
just a few minutes: please take the time to read it thoroughly, and
you will be ready to discover new worlds...
Page Setting up your camera
Installation of the camera is very straightforward, and by following
this guide you will be up and running with a minimum of effort.
Your camera is supplied with a 3 metre USB cable and a 1.8 metre
power cable with a car lighter plug. The car lighter plug will allow
you to connect the camera to most power tanks and emergency
battery packs available on the market today for field use.
An optional universal mains adaptor is also available, allowing you
to run the camera from a 110/220V mains supply. We recommend
that you purchase the approved mains adaptor if you intend to
power the camera this way.
If you wish to supply your own adaptor, make sure it’s of good
quality, with a 2.1mm type plug, center positive, and capable of
supplying a minimum of 1.5 amp (Atik Titan/314/320), or 2.5 amp
(Atik 383/4000/11000).
WARNING: Mains power adaptors are intended for indoor or
observatory use only. There is a risk of electric shock if the adaptor
is used in damp environments or outside. If in doubt do not use the
adaptor and consult a trained electrician.
Page Installing the camera in 3 steps:
1 - Power the camera on. The fan should start rotating immediately.
The Titan is USB powered, so no need to have external power unless you need to turn on the cooler.
2 - Plug the USB cable into the camera, then into your computer. A
“New hardware found” message should immediately be visible.
3 - When asked for the drivers, point to the \Drivers folder on your
CD-ROM drive.
That’s it! The camera is now installed and ready to use.
Installing the Capture application
Your camera comes with a simple and easy-to-use application called
“Artemis Capture”, which provides functions for image capture and
display; camera configuration; telescope focusing; autoguiding;
and image sequencing with an optional filter wheel. Images can be
saved in several popular formats for further processing with your
favorite image processing application.
To install Artemis Capture, ‘simply run the installation file SetupArtemisUniversal on your CD and follow the prompts. During installation, you will be asked if you want to install optional plug-ins for
popular image capture applications. Plug-ins are supplied for Maxim
DL™, AstroArt, and CCDSoft™.
Page Using the camera and software for the first time
Full instructions for using the software are given in the user manual
which is provided on the installation folder in PDF format. However,
the following information will help you get your first image with a
minimum of effort.
After loading Artemis Capture, you will see this screen:
Operation is very simple. The top window controls exposure duration, binning and other camera options. You can leave most of the
settings at their default settings.
The bottom window controls the way the image is displayed. Keep
in mind that the settings here only affect the display, not the data
in the image itself.
Page The above image shows the main menu and tool bar. From left to
right, the tool bar buttons are:
Save: Saves the current image
Autosave: Auto saves all captured images, according to the settings in the Exposure window
Display: Toggles the display window on/off
Exposure: Toggles the Exposure window on/off
Cooler control: Controls the camera cooler and temperature (on
supported models)
Focus and Autoguider: Toggles focus-assist and autoguider
window on/off
Sub-frame: Selects a specific area of the image instead of the full
frame. Very useful for focusing.
Lock settings: Locks all exposure control settings
Expose: Initiates an exposure with duration as specified in the
Exposure window
Loop: Toggles the loop exposure on/off. Useful for focusing and
capturing sequences
Sequencer: Allows programming a sequence of images, which
can use different exposures/filters
Filter Wheel control: Controls the optional Atik EFW-U/EFW2 filter wheel
Page Cooler control (supported models)
Cooler control is available on some models,
such as the Atik 314L+ and the large-format
series. Before starting your imaging session,
you should activate the cooler and select
the required operating temperature, keeping in mind the cooling capacity of your specific camera model (for
example, the Atik 4000 can provide cooling of up to 40ºC below
ambient - please see page 13).
The first image
To begin, centre your telescope visually on a
moderately bright star. Put the camera on the
telescope’s focuser and press the F1 key. This
will immediately initiate an exposure of 0.1s.
When the exposure is complete, you should
see a strongly defocused star on your computer
screen. Congratulations! Everything is working
as expected. If the star is grossly saturated (a
completely white circle), then you should manually select a shorter exposure in the Exposure
window.
Focusing
Depending on how out-of-focus the star is, click on the Sub-frame
button and select an area around the star. This will limit the size of
the image which needs to be downloaded to the computer, making
Page the display update more rapidly. Click on the Loop button and then
on the Expose button. This will start an exposure that will repeat
until the Loop button is pressed again. Adjust your telescope focus
until the star image is sharp, rather than a large circle.
Artemis Capture offers a simple tool
to help you find the best focus. To
activate it, simply double-click on a
star, and the Star Tracking window
will pop up, showing the brightness level and FWHM of the star.
Best focus is the point at which the
FWHM is smallest and the brightness level is highest. Keep in mind
that this feature works best when
the image is not saturated, so if the star has a brightness level
approaching 65000, you should either shorten your exposures or
select a fainter star.
Display Options Window
This window allows you to adjust the way
in which the 16-bit image is mapped to the
PC’s display. Basically, it compresses the
65000 brightness levels into a range which
can be displayed on a computer monitor.
Always keep in mind that the settings in this
window only affect the way the image is displayed, not the data in the image itself.
Hint: Use the reticle function to assist with
centring the reference stars of your Go-To mount.
Page Centering and final exposure
Assuming that your target object is already in the field of view of
the CCD, you should now do a longer exposure to assist with centring. Choice of exposure length will depend a lot on your telescope
configuration and the object being observed, but 5 seconds should
be enough to record the position of most bright deep-sky objects.
Binning is also very useful, since it greatly enhances the sensitivity, and it also leads to a dramatic reduction in the time taken to
download the full frame. Try binning 3x3 (in the Exposure window)
or more to see the difference.
After centring, it is time for the final exposure. For this the exposure
duration will also depend on the telescope and object, but you’ll
want to do the longest exposure that your system can achieve,
depending of course on the object being observed. For example,
a 5 minute exposure on the Andromeda galaxy will burn out the
core for sure, but it will nicely record the outer arms. You can do
two exposures of different lengths, and then combine them using
image processing software.
An installer for Dawn is included on your CD, together with some
introductory videos.
Page Planetary (high-speed) Imaging
The Titan can take up to 15 frames per second and store them in
uncompressed 16-bit format on a standard hard disk drive.
In order to operate in high-speed mode, the following steps must
be taken:
● check the Pre checkbox in the Exposure dialog – this
enables the fast download mode;
● set the exposure time in the Exposure dialog – note that
high frame rates require short exposure times;
● check the Autosave Images checkbox in the Exposure
dialog;
● enter a suitable folder and file name prefix in the text box
below the Autosave Images checkbox (or use the browse
button alongside it);
● select a suitable suffix scheme from the Seq fmt. dropdown list;
● enter your desired starting sequence number in the Seq
No. text box;
● start imaging by selecting the Camera | Loop menu option or else by clicking on the Loop toolbar item;
● stop imaging by deselecting the Camera | Loop menu option or by clicking on the Loop toolbar item again.
Please ensure that your hard disk has enough space for your
proposed observing run – in high-speed mode the Titan eats up
disk space very quickly! Performance will be improved by minimizing the number of other processes running on the system. If
the frame rate is reduced by hard disk performance limitations,
Page 10
you might be able to improve it by using a RAM disk, such as the
one provided by Dataram (see http://memory.dataram.com/products-and-services/software/ramdisk/download-ramdisk). A major
advantage of operating in high-speed imaging mode is that it allows you to capture moments of steady seeing, which can then be
selected and stacked to produce far sharper images than could be
achieved with longer exposure times. Registax is a freeware program which is designed to make this post-processing as easy as
possible: please refer to http://www.astrono mie.be/registax/index.
html for further details.
Registax will process and
stack RGB images taken
through different colour
filters provided that the
files are saved with the
suffixes _R, _G and _B,
to indicate the colour
channel. The easiest
way to achieve this is by
setting up an observing
sequence as shown on
the right.
Registax can also debayerize images taken with one-shot colour
cameras.
Guider port diagram
On cameras that support this feature, the guider port
diagram is displayed on the right.
Page 11
Atik 383L+ specific information
The 383L+ is fitted with a mechanical shutter but, as is inevitable
with shuttered cameras, this imposes some constraints on the
minimum advisable exposure length owing to the time it takes for
the shutter to open and close. A minimum
exposure time of at least 200ms is recommended in order to minimize the effects of
vignetting.
The “Dark” check box causes the shutter to remain closed during exposures, allowing dark
frames to be taken. Please note that whilst
the shutter can be relied upon to keep light
out of the camera during night-time observing conditions, additional measures must be
taken to ensure that the camera is light-tight
when taking dark frames during the day.
Again, thank you for your trust in our products. We hope you enjoy
astro-imaging for years to come.
Page 12
Notes:
Page 13
Sony ICX424
Titan
1620x1220
Sony ICX274
320E
1392x1040
Sony ICX285
314L+
3362x2504
Kodak KAF-8300
383L+
2048x2048
Kodak KAI4022
4000LE
2048x2048
Kodak KAI4022
4000
4008x2672
Kodak KAI11002
11000
Camera Specifications
659x494
9x9
Image sensor
Resolution
16 bit
-38
13e
16 bit
-40
11e
7,4x7,4
-33
11e
Yes
16 bit
7e
Yes
7,4x7,4
-40
Yes
16 bit
4e
Yes
5,4x5,4
-27
No
Yes
16 bit
3e
No
Yes
6,45x6,45
-25
No
Yes
16 bit
7e
No
4,4x4,4
-20
No
16 bit
Readout noise
No
7,4x7,4
Cooling Delta
No
Pixel size (um)
Regulated cooler
ADC
Water assist
0,001s
Unlimited
USB2
0,001s
12VDC, 2A
Unlimited
USB2
0,001s
12VDC, 2A
Unlimited
USB2
0,2s
12VDC, 1,5A
Unlimited
USB2
0,001s
12VDC, 2A
Unlimited
USB2
18mm
0,001s
12VDC, 900mA
18mm
990g
M54x0,75
Unlimited
USB
18mm
990g
M42x0,75
0,001s
12VDC, 800mA
17mm
900g
M42x0,75
Unlimited
USB
12mm
700g
M42x0,75
Maximum exposure
12VDC, 550mA
13mm
400g
M42x0,75
Minimum exposure
Power requirements
13mm
350g
M42x0,75
PC Interface
Backfocus distance
350g
M42x0,75
Thread on front
Weight
Visit www.atik-cameras.com for complete information, sample images,reviews, articles, etc. Don’t forget to check our line of accessories as well.
Page 14
Declaration of Conformity
EU Declaration of Conformity.
This product carries the CE Mark in accordance with the related European Directive. CE Marking
is the responsibility of:
Perseu, SA
R. Dr. Agostinho Neto, 1D
2690-576 Sta Iria da Azoia
Portugal
Critical Applications.
This product is not designed for any “critical applications”. “Critical applications” means life support systems, medical applications , connections to medical devices, commercial transportations,
nuclear facilities or systems or any other applications where product failure could lead to injury to
persons or loss of life or catastrophic property damage.
This product is not a toy.
This is a class A product. In a domestic environment this product may cause radio interference in
which case the user may be required to take adequate measures.
Disposal of the camera
When no longer required do not dispose of this electronic device with general household waste. To minimise pollution and protect the environment the camera should be
recycled. Local recycling drop off points available under the Waste from Electrical and
Electronic Equipment (WEEE) regulations which will accept the camera. For further
information contact Perseu SA at the above address, or the shop from which the camera was bought.
This equipment has been tested and found to comply with the limits for a Class A digital device,
pursuant to part 15 of the FCC Rules. These limits are designed to provide reasonable protection
against harmful interference when the equipment is operated in a commercial environment. This
equipment generates, uses, and can radiate radio frequency energy and, if not installed and used
in accordance with the instruction manual, may cause harmful interference to radio communications. Operation of this equipment in a residential area is likely to cause harmful interference in
which case the user will be required to correct the interference at his own expense.
Modifications not expressly approved by the manufacturer could void the user’s authority to operated the equipment under FCC rules.
Page 15
Warranty
The equipment is guaranteed against defective design, manufacture or materials for a period of one year from the date of purchase This means that Atik
Cameras will repair or replace the equipment at its sole option, at no charge to
the purchaser for parts or for labour, if the fault is reported within the guarantee
period, provided however that Atik Cameras is able to duplicate the defect or
problem at its facilities. This warranty does not apply to damage that occurred
as a result of abuse or misuse, abnormal service or handling, damage which
may have been caused either directly or indirectly by another product, or if
the equipment has been altered or modified in any way, or if the damage was
caused by repairs or service provided or attempted by anyone other than Atik
Cameras. This warranty does not include or provide for incidental or consequential damages.
To exercise your rights under this warranty, you must return the equipment to
the dealer from whom it was purchased together with proof of purchase and a
clear description of the fault. If it’s not possible to return the equipment to your
dealer, you should contact Atik Cameras. Equipment returned to Atik Cameras
must be sent in appropriate packaging and at your expense (insurance is recommended), together with proof of purchase, a return address and a clear description of the fault.
This does not affect your statutory rights.
Page 16
This page was left blank on purpose
From Wikipedia: “The Triangulum Galaxy (also known as
Messier 33 or NGC 598) is a spiral galaxy approximately 3
million light-years away in the constellation Triangulum. The
galaxy is also sometimes informally referred to as the Pinwheel Galaxy by some amateur astronomy references and in
some public outreach websites.”
Image by Paulo Bénard Guedes (Atik 16HR)
Imaging the Universe