1
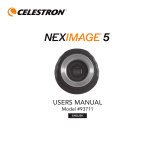
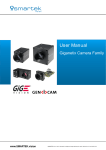
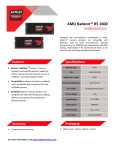
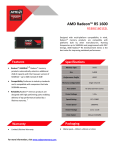
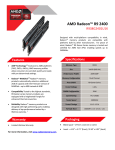
Atik Titan User Manual Version 1.3 – July 2015 Contents 1 Introduction ................................................................................................................................. 3 1.1 Further information ............................................................................................................ 3 2. Pack Contents.................................................................................................................................. 4 3. Getting to know your camera ......................................................................................................... 5 3.1 Camera Parts ....................................................................................................................... 5 3.2 Sensor..................................................................................................................................... 5 3.3 Optical Window ...................................................................................................................... 5 3.4 Analog to Digital Converter (ADC).......................................................................................... 5 3.5 Power Consumption............................................................................................................... 6 3.6 USB Port ................................................................................................................................. 6 3.7 Cooling ................................................................................................................................... 6 4. Technical Information Summary...................................................................................................... 6 5. Planetary (high-speed) Imaging....................................................................................................... 7 6. Declaration of Conformity............................................................................................................... 8 6.1 Disposal of the camera.............................................................................................................. 9 7. Servicing and Repairs ...................................................................................................................... 9 8. Warranty ....................................................................................................................................... 10 Page 2 1 Introduction Congratulations on your purchase of an Atik Titan. This three-in-one camera is your perfect observing partner whether you want to do planetary imaging, deep-sky work or autoguiding. This manual will help you get the most out of your Atik camera so please take the time to read it thoroughly and you’ll soon be ready to discover new worlds. Atik Cameras provide exceptional value for money, superior performance and unparalleled ease of use. They are the result of extensive research and development, each one having been designed and built with the requirements of the most demanding astroimager in mind. Your Atik camera incorporates state-of-the-art design and materials, and will be your trusted astrophotography companion for a long time to come. 1.1 Further information For installation instructions and other useful information please refer to the Quickstart guide which was shipped with the camera. Information on the software is given in the ArtemisCapture guide, a PDF file of which is copied to your computer hard drive by the software installer. Further information, including a number of 'Getting Started' tutorial videos, is available on our website at http://www.atik-cameras.com. Page 3 2. Pack Contents 1. 2. 3. 4. 5. Atik Titan USB cable Car lighter type power cable CD with software and manuals Quick start guide Page 4 3. Getting to know your camera 3.1 1. 2. 3. 4. 5. 6. Camera Parts ST-4 compatible autoguider port 2.1mm centre-positive 12V DC input USB port Cooling outlet 1.25” nosepiece with T2 (M42 x 0.75mm pitch) thread Cooling inlets 3.2 Sensor The sensor inside your camera is a Sony ICX424. 3.3 Optical Window The 2mm-thick optical window is BK7 glass with BBAR coatings on both sides to minimize unwanted reflections. 3.4 Analog to Digital Converter (ADC) Your Atik Titan is equipped with a 16-bit ADC, allowing it to record subtle levels of grey which will provide you with enhanced dynamic range when capturing an image. Page 5 3.5 Power Consumption Your Atik Titan was designed to have very low power consumption, drawing only 550mA at 12V DC with the cooler running. It is possible to run the camera without cooling using the USB power alone. The 2.1mm centre- positive DC input is compatible with a wide range of 12V DC supplies. WARNING: If you have purchased the optional mains power adaptor, please note that it is for indoor or observatory use only. There is a risk of electric shock if the adaptor is used in damp environments or outside. If in doubt do not use the adaptor and consult a trained electrician. 3.6 USB Port The Atik Titan uses a USB 2.0 high-speed interface, allowing for a full-frame download in approximately 100ms when using the supplied Artemis Capture application. Artemis Capture also provides a higher speed “preview” mode, which allows a full frame to be downloaded in approximately 50ms. 3.7 Cooling Your Atik Titan is equipped with a Peltier thermoelectric element which cools the camera to approximately 20º C below ambient temperature. The cooler is only active when the 12V power is applied. After switching on the camera it is advisable to allow at least 2 minutes before taking images, in order to allow the temperature to stabilize. 4. Technical Information Summary Image sensor Resolution Pixel size (um) ADC Readout noise (Typ.) Cooling Delta Regulated cooler Water assist Maximum exposure Minimum exposure Maximum Frame Rate PC Interface Power requirements Backfocus distance Thread on front Weight Mono or OSC Page 6 Titan Sony ICX424 659x494 7,4x7,4 16 bit 7e -20 No No Unlimited 0,001s 15 fps USB2 12VDC, 0.55A 12mm M42x0,75 350g Either Autoguider port pinout 5. Planetary (high-speed) Imaging The Atik Titan can take up to 15 frames per second and store them in uncom- pressed 16bit format on a standard hard disk drive. In order to do high-speed imaging using Capture, the following steps must be taken: check the Pre checkbox in the Exposure dialog – this enables the fast download mode; set a suitable exposure time in the Exposure dialog – note that high frame rates require short exposure times; check the Autosave Images checkbox in the Exposure dialog; enter a suitable folder and file name prefix in the text box below the Autosave Images checkbox (or use the browse button alongside it); select a suitable suffix scheme from the Seq fmt. drop-down list; enter your desired starting sequence number in the Seq No. text box; start imaging by selecting the Camera | Loop menu option or else by clicking on the Loop toolbar item; stop imaging by deselecting the Camera | Loop menu option or else by clicking on the Loop toolbar item again. Please ensure that your hard disk drive has enough space available for your proposed observing run – in high-speed imaging mode the Titan eats up disk space very quickly! Performance will be improved by minimizing the number of other processes running on the system. If the frame rate is reduced by hard disk performance limitations, you might be able to improve it by using a RAM disk, such as the one provided by Dataram (see http://memory.dataram.com/products-andservices/software/ramdisk/download-ramdisk). Page 7 A major advantage of operating in high-speed imaging mode is that it allows you to capture moments of steady seeing, which can then be selected and stacked to produce far sharper images than could be achieved with longer exposure times. Registax is a freeware program which is designed to make this post-processing as easy as possible: please refer to the Registax website (http://www.astronomie.be/registax/index.html) for further details. Registax will process and stack RGB images taken through different colour filters provided that the files are saved with the suffixes _R, _G and _B, to indicate the colour channel. The easiest way to achieve this is by setting up an observing sequence as shown on the right. Registax can also debayer images taken with one-shot colour cameras. 6. Declaration of Conformity EU Declaration of Conformity This product carries the CE Mark in accordance with the related European Directive. CE Marking is the responsibility of: Perseu, SA R. Dr. Agostinho Neto, 1D 2690-576 Sta Iria da Azoia Portugal Critical Applications This product is not designed for any “critical applications”. “Critical applications” means life support systems, medical applications , connections to medical devices, commercial transportations, nuclear facilities or systems or any other applications where product failure could lead to injury to persons or loss of life or catastrophic property damage. This product is not a toy. This is a class A product. In a domestic environment this product may cause radio interference in which case the user may be required to take appropriate measures. Page 8 6.1 Disposal of the camera When no longer required do not dispose of this electronic device with general household waste. To minimise pollution and protect the environment the camera should be recycled. Local recycling drop off points available under the Waste from Electrical and Electronic Equipment (WEEE) regulations which will accept the camera. For further information contact Perseu SA at the above address, or the shop from which the camera was bought. 7. Servicing and Repairs Repairs, servicing and upgrades are available through your local dealer or by emailing [email protected] Please note that modifications to the camera and/or accessories which are undertaken without the manufacturer’s written permission will void the warranty. Page 9 8. Warranty The equipment is guaranteed against defective design, manufacture or materials for a period of one year from the date of purchase. This means that Atik Cameras will repair or replace the equipment at its sole option, at no charge to the purchaser for parts or for labour, if the fault is reported within the guarantee period, provided however that Atik Cameras is able to duplicate the defect or problem at its facilities. This warranty does not apply to damage that occurred as a result of abuse or misuse, abnormal service or handling, damage which may have been caused either directly or indirectly by another product, or if the equipment has been altered or modified in any way, or if the damage was caused by repairs or service provided or attempted by anyone other than Atik Cameras. This warranty does not include or provide for incidental or consequential damages. To exercise your rights under this warranty, you must return the equipment to the dealer from whom it was purchased together with proof of purchase and a clear description of the fault. If it’s not possible to return the equipment to your dealer, you should contact Atik Cameras. Equipment returned to Atik Cameras must be sent in appropriate packaging and at your expense (insurance is recommended), together with proof of purchase, a return address and a clear description of the fault. This does not affect your statutory rights. Page 10