1
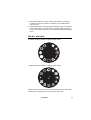
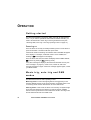
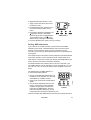
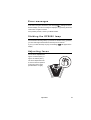
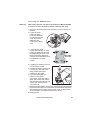
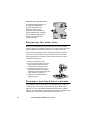
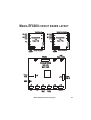
Mania
EFX500/EFX600
user manual
DIMENSIONS
Measurements are expressed in millimeters.
500
180
410
230
© 2005 Martin Professional A/S, Denmark.
All rights reserved. No part of this manual may be reproduced, in any form or by any means,
without permission in writing from Martin Professional A/S, Denmark.
P/N 35000168, Rev. D
CONTENTS
Overview . . . . . . . . . . . . . . . . . . . . . . . . . . . . . . . . . . . . . . . . . . . . . 4
Introduction . . . . . . . . . . . . . . . . . . . . . . . . . . . . . . . . . . . . . . . . . . 5
Safety information . . . . . . . . . . . . . . . . . . . . . . . . . . . . . . . . . . . . 5
Unpacking . . . . . . . . . . . . . . . . . . . . . . . . . . . . . . . . . . . . . . . . . . 7
Installation . . . . . . . . . . . . . . . . . . . . . . . . . . . . . . . . . . . . . . . . . . . 8
AC power . . . . . . . . . . . . . . . . . . . . . . . . . . . . . . . . . . . . . . . . . . . 8
Physical installation . . . . . . . . . . . . . . . . . . . . . . . . . . . . . . . . . . . 9
Creating a data link for DMX and synchronized operation . . . . . 11
Gobo wheels . . . . . . . . . . . . . . . . . . . . . . . . . . . . . . . . . . . . . . . 13
Operation . . . . . . . . . . . . . . . . . . . . . . . . . . . . . . . . . . . . . . . . . . . 14
Getting started . . . . . . . . . . . . . . . . . . . . . . . . . . . . . . . . . . . . . .
Music trig, auto trig and DMX modes . . . . . . . . . . . . . . . . . . . . .
Synchronized music trig and auto trig operation . . . . . . . . . . . .
DMX controller operation . . . . . . . . . . . . . . . . . . . . . . . . . . . . . .
Fixture control menu . . . . . . . . . . . . . . . . . . . . . . . . . . . . . . . . .
Error messages . . . . . . . . . . . . . . . . . . . . . . . . . . . . . . . . . . . . .
Striking the EFX600 lamp . . . . . . . . . . . . . . . . . . . . . . . . . . . . .
Adjusting focus . . . . . . . . . . . . . . . . . . . . . . . . . . . . . . . . . . . . . .
14
14
15
16
19
21
21
21
Service and maintenance . . . . . . . . . . . . . . . . . . . . . . . . . . . . . 22
Cleaning . . . . . . . . . . . . . . . . . . . . . . . . . . . . . . . . . . . . . . . . . . .
Lamp replacement and adjustment . . . . . . . . . . . . . . . . . . . . . .
Replacing the main fuse . . . . . . . . . . . . . . . . . . . . . . . . . . . . . . .
Firmware and hard boot uploads . . . . . . . . . . . . . . . . . . . . . . . .
22
23
26
27
Mania EFX500 circuit board layout . . . . . . . . . . . . . . . . . . . . . 28
Mania EFX600 circuit board layout . . . . . . . . . . . . . . . . . . . . . 29
Troubleshooting . . . . . . . . . . . . . . . . . . . . . . . . . . . . . . . . . . . . . 30
Control menu . . . . . . . . . . . . . . . . . . . . . . . . . . . . . . . . . . . . . . . . 31
Mania EFX500 DMX protocol . . . . . . . . . . . . . . . . . . . . . . . . . . 32
Mania EFX600 DMX protocol . . . . . . . . . . . . . . . . . . . . . . . . . . 34
Mania EFX500/600 specifications . . . . . . . . . . . . . . . . . . . . . . 36
OVERVIEW
A
B
C
D
F
G
E
A: Power inlet
B: Voltage selector switch
(EFX500 all models & EFX600 EU models)
C: DMX in
D: DMX out
E: Display and control buttons
F: Safety cable attachment point
G: Power on/off switch
4
Mania EFX500 & EFX600 user manual
INTRODUCTION
Thank you for selecting a Martin Mania EFX series dynamic lighting
fixture. The Mania EFX500 and EFX600 are DJ lighting effects with a
motorized rotating parabolic mirror dish, a motorized rotating gobo wheel
(gobos are outlines or masks placed in a light beam to create different
patterns) and a mirror drum with motorized pan (swivel) and tilt (rotation).
The Mania EFX500 and EFX600 offer the following features:
• Stand-alone single fixture and synchronized (master/slave) operation in
auto and music triggering modes
• DMX control
• Two DMX modes: DMX mode 2 gives extended functionality on
additional channels
• 180° pan and 360° tilt
• Adjustable focus
• Adjustable music triggering sensitivity
• The EFX500 has 11 colored gobos plus blackout, and the EFX600 has
12 colored gobos
The Mania EFX500 is supplied with a long-life 250 watt halogen lamp.
The Mania EFX600 is supplied with a long-life 150 watt discharge lamp.
Safety information
Warning!
This product is not for household use. It presents risks of
lethal or severe injury due to fire and heat, electric shock,
ultraviolet radiation, lamp explosion and falls.
This product presents risks of lethal or severe injury due to fire and heat,
electric shock, ultraviolet radiation, lamp explosion, and falls. Read this
manual before installing or powering the fixture, follow the safety
precautions listed below and observe all warnings in this manual and on
the fixture. If you have any questions about how to operate the fixture
safely, please contact your Martin dealer or call the Martin 24-hour service
hotline.
Introduction
5
Prot ecting yourself and others from electric shock
a n d i nj ur y
• Ensure that the fixture’s voltage setting matches your local AC power
supply before applying power.
• Disconnect the fixture from AC power before removing or installing the
lamp, fuse, or any part, and when not in use.
• Always ground (earth) the fixture electrically.
• Use only a source of AC power that complies with local building and
electrical codes and has both overload and ground-fault protection.
• Do not expose the fixture to rain or moisture.
• Refer all service not described in this manual to a Martin service
technician.
• Do not operate the fixture if any covers or components are missing,
damaged or deformed.
• Do not use the product if the power cable is damaged. Replace the
cable with a Martin item only (available from your Martin dealer).
Prot ecting yourself and others from burns and fire
Warning!
Hot lamp. The exterior of the fixture can become hot. Allow to
cool for at least 10 minutes before handling or opening.
• Surface temperature under steady state condition = 100°C (212° F).
• Do not operate the fixture if the ambient temperature (Ta) exceeds 40° C
(104° F).
• Never attempt to bypass the thermostatic switch or fuses. Always
replace defective fuses with ones of the specified type and rating.
• See serial label for replacement fuse size and lamp type.
• Keep all combustible materials (for example fabric, wood, paper) at
least 0.3 meters (4 inches) away from the fixture. Keep flammable
materials well away from the fixture.
• Do not illuminate surfaces within 1 meter (3.3 feet) of the fixture.
• Provide a minimum clearance of 0.1 meters (4 inches) around fans and
air vents and ensure that air flow through and around vents is free and
unobstructed.
• Never place filters or other materials over the lens or in the optical path.
• Do not look directly into the light.
• Change the lamp immediately if it becomes damaged or thermally
deformed.
• Do not operate the fixture if any optical components or shields are
missing, damaged or deformed: an unshielded discharge lamp emits
dangerous UV radiation that can cause burns and eye damage.
• Do not modify the fixture or install other than genuine Martin parts.
6
Mania EFX500 & EFX600 user manual
P r e v en ti ng i nj ur i es du e to fal ls
• When suspending the fixture above ground level, verify that the
structure can hold at least 10 times the weight of all installed devices.
• Ensure that all external covers and rigging hardware are securely
fastened and use an approved means of secondary attachment such as
a safety cable.
• Block access below the work area and work from a stable platform
whenever installing or removing the fixture.
Unpacking
Important! Do not lift or carry the fixture by holding the plastic mirror
drum motor housing. It is not designed for this purpose. You
could injure yourself or others, and you could cause damage
that is not covered by the product guarantee.
The packing material is carefully designed to protect the fixture during
shipment - always use it to transport the fixture.
Mania EFX fixtures are supplied with the following items:
•
•
•
•
•
•
3-wire IEC power cable.
5m (16.4 ft.) DMX cable.
Mounting plate (installed).
User manual.
EFX500: 250 watt halogen lamp (installed).
EFX600: 150 watt discharge lamp (the EFX600 discharge lamp is
supplied separately to avoid damage during shipping and must be
installed before use – see “Installing the EFX600 lamp” on page 25).
Removing pr otective packaging
Important! The mirror drum is secured with
packaging and white plastic ties for
shipment. Wearing gloves to avoid
cutting yourself on the mirrors, cut
and remove the plastic ties. Check
that the drum can be swivelled
through 180° and rotated through
360° before operating the fixture. If
it cannot, you may have missed one
of the plastic ties.
Remove the clear protective film
from the mirror drum before operating.
Introduction
7
INSTALLATION
AC power
Warning!
Ensure that the fixture’s voltage setting matches your local AC
power supply before applying power.
For protection from fire and electric shock, the fixture must be grounded
(earthed). The power supply must have both overload and ground-fault
(earth fault) protection.
Check that power cables are undamaged and rated for the current
requirements of all connected devices before use.
Important! Do not connect the fixture to a dimmer system, as this may
cause damage that is not covered by the product guarantee.
Mania EFX500 power settings
All Mania EFX500 models must be set to 115 V, 60 Hz or 230 V, 50 Hz AC
power using the red voltage selector switch on the connections panel.
• Set the switch so that 115 V is visible if you have110-120 V, 60 Hz AC
power.
• Set the switch so that 230 V is visible if you have 220-240 V, 50 Hz AC
power.
Mania EFX600 power settings
• Mania EFX600 EU models must be set to 230 or 240 V, 50 Hz AC power
using the voltage selector switch on the connections panel.
• Mania EFX600 US models do not have a voltage selector switch and
are supplied set up for 110-120 V, 60 Hz AC power.
Warning!
Do not operate the fixture on a power supply that falls outside
of these ranges.
Installing a cord cap (plug) on the power cable
The fixture’s power cable may require a grounding-type cord cap (earthed
mains plug) that matches your power distribution system. Consult a
qualified electrician if you have any doubts about proper installation.
8
Mania EFX500 & EFX600 user manual
Following the cord cap manufacturer’s instructions, connect the
appropriate wires to ground (earth), live, and neutral. The table below
shows some common wire identification schemes.
Function
Wire (EU)
Wire (US)
Marking
Screw color
live
brown
black
“L”
yellow or brass
“N”
silver
neutral
blue
white
ground
yellow/green
green
green
Table 1: Cord cap wiring
Physical installation
The Mania EFX500/600 must be either:
• fastened to an overhead structure by means of its mounting plate and a
Martin rigging clamp (available from your Martin dealer), or
• fastened to a surface by means of its mounting plate and suitable bolts.
Do not install the fixture by any other means, as this can cause the fixture
to overheat.
Ensure that the mounting structure or surface and all fasteners used can
support at least 10 times the weight of all installed fixtures, clamps,
cables, auxiliary equipment, etc.
Ensure that the fixture is located:
• at least 1 meter (3.3 ft.) away from the surface to be illuminated,
• at least 0.1 meters (4 in.) from any combustible materials (wood, fabric,
paper, etc.) and
• well away from any flammable materials.
Ensure that the clearance around the fan and air vents is at least 0.1
meters (4 in.) and that airflow is free and unobstructed.
Warning!
Block access below the work area and work from a stable
platform when installing or servicing the fixture.
Always use a secure means of secondary attachment that can
hold at least 10 times the weight of the fixture, looping it
through the attachment point shown at F in “Overview” on
page 4. Do not simply pass the secondary attachment around
the mounting plate, as this will leave the fixture unsecured.
Installation
9
Surface mounting
To mount the Mania EFX500/600 on a
surface, you will need four grade 8.8
(minimum) 8mm diameter, 13mm head hex
screwbolts (or similar type fasteners of the
same grade and size) and an eyebolt for the
safety cable.
Installing the mounting plate
separately
Surface mounting is easiest if you detach
the mounting plate from the fixture, bolt the
mounting plate to the surface, and then reattach the fixture. If you choose
this method, access for reattachment and adjustment can be easier if you
remove the swivel locks and replace them with two M8 hexagonal lock
nuts, P/N 08132701. Install an eyebolt and safety attachment once the
fixture is mounted.
Installing the fixture and mounting plate as a unit
If you prefer to install the fixture and mounting plate without separating
them:
1. Using the inside back cover of this manual as a guide, drill three holes
in the positions marked A.
2. Screw three grade
8.8 (minimum)
8mm diameter,
13mm head hex
A
screwbolts or bolts
into the holes at A,
Ø8mm
but do not tighten
max 13
them fully –allow
mm /
½"
enough clearance
between the bolt
head and surface
A
for the 3mm thick
mounting plate.
3. Fold the mounting
plate so that it lies flat against the back of the fixture and tighten the
swivel locks. For easier access for adjustment, it is possible to remove
the swivel locks and replace them with two M8 hexagonal lock nuts,
P/N 08132701).
10
Mania EFX500 & EFX600 user manual
4. Hold the fixture up to the surface so that the screwbolt heads pass
through the centers of the keyholes A in the mounting plate, and slide
the fixture to engage the screwbolt heads in the mounting plate.
5. Using one of the remaining holes in the mounting plate as a guide,
mark a position for a fourth hole to accept a screwbolt that will lock the
fixture in place.
6. Remove the fixture from the surface, drill the fourth hole and replace
the fixture on the surface as described in point 4 above. Screw the
fourth screwbolt through the mounting plate into the surface to lock the
fixture in place, using a washer on the screwbolt if necessary.
7. Install an eyebolt and safety attachment once the fixture is mounted.
Overhead mounting
To hang the Mania EFX on an overhead structure:
1. If using a rigging clamp, ensure that the clamp is undamaged and can
bear at least 10 times the fixture’s weight. Bolt the clamp securely to
the fixture’s mounting plate with a grade 8.8 (minimum) M12 bolt and
lock nut through one of the 13 mm holes provided, or as recommended
by the clamp manufacturer. The clamp must be attached centrally in
the mounting plate to distribute the load evenly.
2. Working from a stable
platform, clamp or fasten the
fixture to the structure.
3. Install a safety cable that can
hold at least 10 times the
weight of the fixture.
4. Loosen the swivel locks, tilt
the fixture to the desired
angle, and retighten.
Important! Check to make sure that the mirror drum cable does not rub
on the mounting plate. If it does, reverse the mounting plate
(see illustration).
Creating a data link for DMX and
synchronized operation
You need a serial data link to:
• run light shows on one or more fixtures using a DMX controller, or
• run synchronized light shows on two or more fixtures (master/slave
operation).
Installation
11
Fixtures on a serial data link must be daisy-chained in one single line,
maximum 500 meters (1640 ft.) long, with maximum 32 fixtures. If you
wish to exceed 32 fixtures or 500 meters, or to split the link into branches,
use an optically isolated amplifier-splitter such as the Martin RS-485 OptoSplitter (P/N 90758060).
Reliable data connection requires suitable cable. Standard microphone
cable cannot transmit DMX data reliably over long runs. For best results,
use cable with at least one twisted pair specifically designed for RS-485
applications. Your Martin dealer can supply suitable high quality cable in
various lengths.
Connecting the serial data link
The Mania EFX’s data connections are XLR type, wired with pin 1 to
ground, pin 2 to signal - (cold), and pin 3 to signal + (hot). This is the
standard configuration for DMX devices.
One or more adaptor cables may be required to connect the Mania EFX to
the controller and/or other types of fixture, because some devices may
have 5-pin XLR connectors, and others may have reversed signal polarity
(pin 2 hot and pin 3 cold). Connector polarity is normally specified on the
device or in the device’s user manual.
5-pin to 3-pin
Adaptor
3-pin to 5-pin
Adaptor
Male
Female
Male
Female
Male
Female
1
2
3
4
5
1
2
3
1
2
3
1
2
3
4
5
1
2
3
1
2
3
P/N 11820005
3-pin to 3-pin
Phase-Reversing
Adaptor
P/N 11820004
P/N 11820006
Male
Termination Plug
Female DMX
Termination Plug
Male XLR
Female XLR
1
2 120 Ohm
3
P/N 91613017
1
2
3 120 Ohm
P/N 91613018
DMX connectors and polarity
To connect the data link:
1. Power all devices off.
2. If you intend to use a DMX controller, run a data cable from the DMX
controller’s data output to the first fixture’s data IN socket. If the
controller has a 5-pin output, use a 5-pin male to 3-pin female adaptor
cable (P/N 11820005).
3. If you intend to run fixtures in master/slave operation, insert a female
DMX termination plug (P/N 91613018) in the first fixture’s data IN
socket.
12
Mania EFX500 & EFX600 user manual
4. Plug a data cable into the OUT socket of the first fixture and the IN
socket of the next one. Continue connecting up to 32 Mania EFXs
output-to-input.
5. Terminate the link by inserting a male termination plug (P/N 91613017)
into the data output of the last fixture. A termination plug is simply an
XLR connector with a 120 Ohm, 0.25 W resistor soldered across pins 2
and 3.
Gobo wheels
The Mania EFX500 contains the following gobo wheel.
The Mania EFX600 contains the following gobo wheel.
Note that it is the whole wheel, and not the individual gobos, that rotates.
Rotating gobo image effects are created by the mirror dish.
Installation
13
OPERATION
Getting started
The Mania EFX500/600 is supplied in DMX mode with its DMX address
set to 1. If you want to operate the fixture without a DMX controller, you
need to set the fixture to music trig or auto trig mode before use (see
“Selecting DMX, music trig or auto trig operating modes” on page 15).
Powering on
Once the fixture is correctly and safely installed, power on at the fixture’s
power on/off switch. The fixture will start up and reset.
If the fixture resets successfully, the software version installed will appear
in the display. For example, if software version 1.00 is installed, the
message 1 00 should appear in the display.
Once the fixture has reset, the fixture will display either its DMX address,
9 0 1 (music trig mode) or 9 00 (auto trig mode).
If any other message is displayed, the fixture has detected an error (see
“Error messages” on page 21). If this occurs, switch off, wait a few
seconds and switch on again. If the error message appears again, consult
your Martin dealer.
Music trig, auto trig and DMX
modes
The Mania EFX has three main operating modes:
Music trig mode: In this mode, lighting effects are triggered by music
intensity. Multiple fixtures can be synchronized if one master fixture is set
to music trig mode and the other fixtures are set to DMX mode.
Auto trig mode: In this mode, the fixture runs a factory-set dynamic light
show that uses all the fixture’s effects in a random program. Multiple
fixtures can be synchronized if one master fixture is set to auto trig mode
and the other fixtures are set to DMX mode.
14
Mania EFX500 & EFX600 user manual
DMX mode: In DMX mode, fixtures receive control instructions via the
serial data link. They will respond to control signals from a DMX controller
(or from another fixture set as master).
Selecting DMX, music trig or auto trig op erat ing
modes
The Mania EFX is supplied set to DMX mode with DMX address set to 1.
If you intend to operate the fixture without a DMX controller, you need to
set the fixture to music trig or auto trig mode.
To switch between DMX, auto trig and music trig modes:
1. Apply power to the fixture and wait
while it resets. If the fixture is in DMX
mode, the display will show the
fixture’s DMX address.
2. Press the [Mode] button once. The
fixture enters auto trig mode and 9 0 0
appears in the display.
3. Press the [Mode] button again once.
The fixture enters music trig mode,
and 9 01 appears in the display.
4. Press the [Mode] button again once to
return to DMX mode. The fixture’s
DMX address appears in the display.
DMX Address
X100
X10
X1
Mode
[Mode] button
The fixture will return to the mode you have set when it is powered off and
on.
If you set the fixture to music trig mode but it does not respond
satisfactorily to the music beat, adjust the music trig sensitivity level (see
“Adjusting music trig sensitivity” on page 20).
Synchronized music trig and auto
trig operation
You can set multiple fixtures on a serial data link to respond together to a
music trig or auto trig signal from one fixture. This feature allows
synchronized operation without a DMX controller. The fixture sending the
signal is the ‘master’ fixture and the fixtures that receive the signal are the
‘slave’ fixtures.
Important! Set only one fixture as master: damage can occur if two
masters, or a master and a DMX controller, are linked.
Operation
15
Setting up synch roni zed operation
To set up Mania EFX fixtures for synchronized operation:
1. Ensure that all fixtures on the data link are in DMX mode.
2. Select one fixture to be the master and set it to auto trig or music trig
mode (see “Selecting DMX, music trig or auto trig operating modes” on
page 15)
3. When a slave fixture receives signals from the master, it will
automatically begin operating in slave mode. 9 1 0 will appear in its
display and the green Data LED will light to show that the fixture is
receiving control data.
Slave mode
DMX Address
X100
X10
X1
Data LED lit
Mode
[Mode] button
Fixtures return to their DMX/auto trig/music trig settings when powered off
and on, so you should only need to set fixtures as masters/slaves once.
DMX controller operation
S et tin g DMX mo de 1 or 2
Two DMX modes are available: DMX mode 1 (normal) and DMX mode 2
(extended). Mode 2 uses two extra DMX channels that allow you to select
pre-programmed macros and set the speed of effects movement from the
DMX controller. The fixture is supplied set to DMX mode 2.
• The Mania EFX500 uses seven DMX channels in DMX mode 1 and nine
channels in DMX mode 2.
• The Mania EFX600 uses six DMX channels in DMX mode 1 and eight
channels in DMX mode 2.
16
Mania EFX500 & EFX600 user manual
To toggle between DMX modes 1 and 2:
1. Apply power to the fixture and wait for
the fixture to reset.
2. Hold the [Mode] button pressed in for 5
seconds to enter the fixture control
DMX Address
menu.
3. Press the [X100] button repeatedly until
X100 X10
X1
Mode
0 appears in the left of the display.
DMX mode 2
Press the [X1] button to toggle between
1 (to set DMX mode 1) and 2 (to set
DMX mode 2) in the right of the display.
4. Press the [Mode] button again to save your setting.
Setting DMX addresses
If you intend to use a DMX controller, you will need to set the DMX
address for each fixture. The DMX address, also known as the start
channel, is the first channel used to receive instructions from the
controller. It is set using the three addressing buttons on the Mania EFX’s
control panel.
For individual control, each fixture must be assigned its own DMX address
and control channels. Control channels must not overlap with those of
other fixtures. Fixtures of the same type with the same DMX address will
receive the same instructions and behave identically.
If a Mania EFX500 is set to DMX mode 2, it will use 9 channels. If you
give it DMX address 100, for example, it will use channels 100, 101, 102,
103, 104, 105, 106, 107 and 108. Channel 109 is available for the next
fixture.
The default factory-set DMX address is ‘1’.
To set a fixture’s DMX address:
1. Decide on suitable DMX addresses for all
the fixtures on the data link. 512 channels
are available in one DMX universe.
DMX Address
2. Apply power to the fixture and wait while it
resets.
X100 X10
X1
3. Use the three addressing buttons on the
fixture’s control panel to enter the DMX
DMX addressing
address. The [X1] button increases the
buttons
last digit in the DMX address, the [X10]
button increases the address by 10 and
the [X100] button increases the address by 100.
Mo
Mode
Fixtures remember their DMX address when they are powered off and on.
Operation
17
DMX co nt rol o pti on s
See also the DMX protocols starting on page 32 for an overview of DMX
commands and channels.
In DMX modes 1 and 2, the following functions can be controlled:
Strobe effect: A strobe effect with variable flash rate can be selected.
Auto trig: While in DMX mode, the Mania EFX can be remotely set to
auto trig.
Reset: All effects can be reset to their index positions from the controller
using channel 1. The reset command must be sent for 5 seconds before it
takes effect.
When a fixture is reset via DMX, 8 0 0 should appear in the digital display.
Dimming: The Mania EFX500 can be dimmed from 0% (blackout) up to
100% intensity using channel 2. The Mania EFX600 can be dimmed from
0% to 100% using the shutter on channel 1.
Gobo wheel position, rotation and music trig: The gobo wheel can be
positioned to project one of the colored gobos or at blackout. The gobo
wheel can also be spun in either direction or set to music trig, in which
gobos change with the music beat but the other effects are still controlled
via DMX.
Mirror dish rotation and music trig: The mirror dish can be spun in
either direction for dynamic projection effects or set to music trig.
Pan: The mirror drum pans (swivels) approx. 180°. A pan position can be
selected, pan can be set to narrow or wide shake, or pan can be set to
music trig.
Tilt: The mirror drum tilts (rotates) 360°. The drum can be held in a
stationary position, set to rotate in either direction, set to narrow or wide
shake, or set to music trig.
In DMX mode 2, the following additional functions can be controlled on
two extra channels:
Macros: On the first extra channel, you can select one of twelve factoryset macros. Macros are pre-programmed dynamic shows that use all the
fixture’s effects.
Effect speed: On the second extra channel, you can either select the
speed at which effects change or select tracking. Selecting a speed allows
you to adjust fade times when using DMX controllers that do not feature
fade time programming (a fade time is the time taken for effects to change
18
Mania EFX500 & EFX600 user manual
from one scene to the next). If you select tracking, the DMX controller
defines fade times.
Unsure about speed and tracking ?
Set the fixture to tracking if you are using programmed fade times or
macros on your DMX controller. Select an effects speed if you are not
using programmed fade times or macros on your DMX controller.
However, if you are using fade times on your controller and have set the
fixture to tracking, but effects movement is rough and irregular, setting
fade times on your controller to zero and selecting an effects speed may
give smoother movement.
Effects movement is set to ‘tracking’ if the fixture is in DMX mode 1 and by
default.
D MX si gn al in di cato r
When the Mania EFX
receives a valid DMX
signal, the green Data
LED will light to show that
the fixture is receiving
control data.
DMX signal received
Data LED
lit
DMX Address
X100
X10
X1
Mode
Fixture control menu
You can change various personality settings by holding the [Mode] button
pressed in for 5 seconds and then using the buttons on the control panel.
Changing the DMX mode is described in “Setting DMX mode 1 or 2” on
page 16.
Inverting pan an d tilt for symmetrical action
You can create symmetrical action across multiple fixtures in
synchronized and DMX operation by inverting pan and/or tilt on some
fixtures so that they ‘mirror’ the action of others. When one fixture pans
left, for example, a fixture on the other side of the dance floor can bet set
to pan right.
Operation
19
Inverting pan
To invert pan (mirror drum swivel) on a Mania EFX:
1. Power the fixture on.
2. Hold the [Mode] button pressed in for 5
seconds to enter the control menu.
3. Press the [X100] button repeatedly until
1 appears on the left of the display.
4. Press the [X1] button to change the pan
setting on the right of the display from 0
(normal pan) to 1 (inverted pan).
5. Press the [Mode] button again to save
your setting and exit the control menu.
DMX Address
X100
X10
X1
Mode
Inverting tilt
To invert tilt (mirror drum rotation) on a Mania EFX:
1. Power the fixture on.
2. Hold the [Mode] button pressed in for 5
seconds to enter the control menu.
3. Press the [X100] button repeatedly until
2 appears on the left of the display.
4. Press the [X1] button to change the tilt
setting on the right of the display from 0
(normal tilt) to 1 (inverted tilt).
5. Press the [Mode] button again to save
your setting and exit the control menu.
DMX Address
X100
X10
X1
Mode
Ad ju s tin g mu si c tri g sen s iti vi ty
To adjust sensitivity for optimum synchronization with the music:
1. With the fixture powered on and in music
trig mode, play a typical music track at
typical volume for your location.
2. Hold the [Mode] button pressed in for 5
seconds to enter the control menu.
DMX Address
3. Press the [X100] button repeatedly until
3 appears on the left of the display.
X100 X10
X1
Mode
4. Press the [X1] button to select a music
trig sensitivity setting on the right of the
display from 1 (minimum sensitivity) to 9 (maximum sensitivity). The
default setting is 6 .
5. Press the [Mode] button again to save your setting and exit the control
menu.
20
Mania EFX500 & EFX600 user manual
Error messages
In the event of a gobo wheel error, the message 7 0 1 will appear in the
fixture’s display. If an error message is displayed, try powering the fixture
off and then on again to reset it.
If the problem persists, contact your Martin dealer.
Striking the EFX600 lamp
If the EFX600’s discharge lamp is powered off via DMX during operation,
you must wait eight minutes before the lamp can be restruck.
If you try to strike the lamp anyway, the message 7 02 will appear in the
display.
Adjusting focus
Focus can be adjusted from
approx. 2 meters (6.6 ft.) to
approx. 20 meters (66 ft.).
The focus adjustment knob
is close to the lens aperture
in the mirror drum cutout
(see illustration on right).
Operation
21
SERVICE AND MAINTENANCE
The Mania EFX requires simple routine maintenance. The maintenance
schedule depends heavily on the operating environment. Please consult a
Martin service technician for recommendations.
Refer any service procedure not described here to a qualified technician.
Warning!
Disconnect the fixture from power and allow it to cool for at
least 10 minutes before removing any cover.
Cleaning
Important! Excessive dust, grease, and smoke fluid buildup degrades
performance and causes overheating and damage to the
fixture that is not covered by the warranty. Check and, if
necessary, clean fixtures at regular intervals.
Cleaning the fan and air vents
To maintain adequate cooling, dust must be cleaned from the fan and air
vents periodically.
1. Disconnect the fixture from power and allow it to cool for at least 10
minutes.
2. Loosen the lamp cover release thumbscrew and slide and lift the lamp
cover out of the fixture housing. Let the cover hang on its safety strap.
3. Remove the four torx
screws holding the main
cover (see illustration on
right) and slide and lift
the cover out of the
housing. Let the cover
hang on its safety strap.
4. Remove dust and dirt
from the fan blades and
vent grills using a soft
brush, cotton swab,
vacuum, or compressed air.
22
Mania EFX500 & EFX600 user manual
5. Reinstall the main cover and lamp cover securely before reapplying
power.
Cleaning optical componen ts
Use care when cleaning
optical components. The
coated surfaces are fragile
and even small scratches
may be visible in the
fixture’s light output.
EFX600
1. Disconnect the fixture
from power and allow it to
cool for at least 10
minutes.
EFX500
2. Open the covers as
described in “Cleaning
the fan and air vents”
above.
3. Blow or vacuum away
loose dust. Remove dirt
Optical path
from lenses, gobos and
mirror wheel with a soft
cloth or cotton swabs
wetted with isopropyl alcohol. Regular glass cleaner may also be used,
but no residues may remain. To avoid scratches, do not rub. Instead,
press repeatedly to lift dirt off surfaces.
4. Any remaining residues or streaking can be removed with distilled
water. Mixing the water with a small amount of wetting agent such as
Kodak Photoflo will help prevent streaking and spotting.
5. Dry with a clean, soft, lint-free cloth or compressed air.
6. Reinstall all covers before reapplying power.
Lamp replacement and
adjustment
Warning!
Wear safety glasses and gloves and allow the fixture to cool
for at least 10 minutes before replacing lamps.
Mania EFX500 lamp
The Mania EFX500 uses a 250 W halogen lamp. Replace the lamp when
it reaches the average life specified by the manufacturer.
Service and maintenance
23
Important! Use only this type of lamp. See “Accessories” on page 38 for
details of replacement lamps. Installing any other lamp may
damage the fixture.
Replacing the EFX500 lamp
1. Disconnect the fixture
from power and allow it to
cool for at least 10
minutes.
2. Loosen the lamp cover
release thumbscrew
enough to slide and lift the
lamp cover out of the
fixture housing. The lamp
cover is attached to the
housing with a safety
strap.
3. Remove the old lamp and
socket from the
lampholder clip and, being
careful not to strain any
wires, gently pull the lamp off its ceramic socket.
4. Hold the new lamp by its base (do not touch any other part of the lamp).
Push the lamp pins squarely into the ceramic socket.
5. If you touched the bulb, the reflector or any optical components, clean
them with a clean, soft, lint-free cloth wetted with isopropyl alcohol and
dry with a clean, soft, lint-free cloth or compressed air.
6. Replace the lamp and socket in the lampholder clip, ensuring that the
reflector sits flat against its plate and is held securely in place. When
installed correctly, the rim of the reflector locates under the heads of
two stop screws so that the reflector is held firmly between these
screws and the lampholder clip.
7. Close the lamp cover, checking that no wires are trapped, and retighten
the thumbscrew.
Mania EFX600 lamp
The Mania EFX600 uses a 150W long-life discharge lamp.
For optimum lamp life, always allow discharge lamps to warm up for at
least 5 minutes before dousing.
Restriking the EFX600 lamp
Note that, when the Mania EFX600’s discharge lamp is powered off, it
must be allowed to cool for 8 minutes before it is restruck.
24
Mania EFX500 & EFX600 user manual
Installing the EFX600 lamp
Warning!
Wear safety glasses and gloves and allow the Mania EFX600
to cool for at least 10 minutes before replacing the lamp.
1. Disconnect the fixture from power and allow it to cool for at least 10
minutes.
2. Loosen the screw
holding the lamp
cover (see illustration
on right) and open the
cover. The cover is
attached to the
housing with a safety
strap.
3. Loosen the four small
screws (see illustration on right)
holding the lampholder and pull
the lampholder gently out of the
fixture. Note which edge faces
outwards, as the lampholder must
be reinstalled in the same
position.
Lamp
adjustment
This edge
faces out
Lamp
adjustment
Lamp
adjustment
4. If replacing an old lamp, remove it
from its ceramic socket.
5. Hold the new lamp by its base (do
not touch any other part of the
lamp). Push the lamp pins
squarely into the socket.
6. If you touched the bulb, the
reflector or any optical
components, clean them with a
clean, soft, lint-free cloth wetted
with isopropyl alcohol and dry with
a clean, soft, lint-free cloth or
compressed air.
7. Replace the lampholder in the housing, making sure that the edge with
the semicircular cutout in its center faces out towards the edge of the
and reinstall the four screws. Close the lamp cover, checking that no
wires are trapped, and replace the lamp cover screw.
8. Reapply power.
Service and maintenance
25
EFX600 lamp adjustment
The EFX600 lamp alignment can
be adjusted to optimize the
projected image using the
adjustment screws on the
lampholder (see illustration on
right). Experiment with turning the
screws until the brightest part of
the beam is centered in the
projected images.
Lamp
adjustment
Lamp
adjustment
Lamp
adjustment
Replacing the main fuse
The Mania EFX500/600 uses a slow-blow fuse for protection against
current overload. An indication that the fuse may have blown is that when
power is applied and the lamp is switched on, no light is produced.
If the fuse blows repeatedly, there is probably a fault. Disconnect the
fixture from power and data and contact a Martin service technician.
Never bypass the fuse or replace it with one of another type or rating.
To replace the main fuse:
1. Disconnect the power cable.
2. Pry open the fuse holder next to the
power cable inlet with a flat-head
screwdriver and remove the fuse.
3. Replace the fuse with one of the
same type and rating. Fuse ratings
are listed on serial number labels and
under “Electrical” on page 37.
4. Replace the fuse holder before
reapplying power.
Firmware and hard boot uploads
It is possible to upload new firmware to the Mania EFX via the data IN
connector using, for example, an uploader such as the Martin MP-2
Uploader, or a PC using a Martin DABS interface device and suitable
software. The latest version of the Mania EFX firmware is available in the
Support area of the Martin website at http://www.martin.com
26
Mania EFX500 & EFX600 user manual
If the Mania EFX will not accept normal firmware uploads, it can be forced
to accept an upload by starting it in hard boot mode. To start in hard boot
mode, hold both the [Mode] button and the [X100] button pressed in while
powering on the fixture. When the Mania EFX is in hard boot mode, the
data LED blinks.
If you are not sure how to carry out uploads, your Martin dealer will be
able to give advice or carry out the upload for you.
Service and maintenance
27
M ANIA EFX500 CIRCUIT BOARD LAYOUT
Voltage
Selecter
Switch
Main
PCB
/J13
Main PCB
/ J12
J13
J6
J5
Lamp
Power
PCB
J9
J3 Transformer
J1
J8 J7
Fan Transformer
Display
J3
J1
DMX
J11
Main PCB
Power
PCB J9
J13
J10
J12 Power PCB J6
J8
J7
J6
J5
J4
Tilt
Pan
Mirror
Dish
Color / Gobo
Hall
Color /
Gobo
Mania EFX500 PCB Label
P/N: 33120063-A
28
Mania EFX500 & EFX600 user manual
M ANIA EFX600 CIRCUIT BOARD LAYOUT
Fan
J6
Main PCB
(J12)
Main PCB
(J13)
J2
J9 Mania EFX600
US
Power PCB
J7
J5
Fan
Ballast
Main PCB
(J12)
Main PCB
(J13)
Voltage Select Switch
J8
J6
J9 Mania EFX600
J7
EU
Power PCB
J5
J8
J1
J3
J2
J1
J3
Mains filter
Transformer 15
Fuse Toroidal transformer
5A 250V
Fuse Toroidal transformer
5A 250V
Hall
Color / Gobo
Display
J1
J10
J8
Mania EFX600
EU / US
Main PCB
Power
PCB
DMX
J12
J13
Power
PCB J9
J3
J7
J6
J2
J4
Tilt
Pan
Mirror
Dish
Color /
Gobo
J15
Mania EFX600 circuit board layout
J16
Shutter
29
TROUBLESHOOTING
Problem
Possible cause(s)
Suggested remedy
No power to the fixture
Check connections
Blown fuse
If power is applied and the
lamp is switched on but
does not light, check and
replace fuse if necessary
Burned out lamp
Install new lamp
No light
Allow to cool.
Fixture too hot
Improve air flow around
fixture
Adjust music level
sensitivity.
No action in music trig mode
Sound too low to activate
control circuit
Increase music volume.
Reduce distance between
fixture and loudspeakers
No action in music trig and
auto trig modes
Electrical malfunction
Refer to a Martin service
technician
Fixtures incorrectly linked
Check data link connections
between fixtures
More than one fixture set as
master
Check that all slave fixtures
are set to DMX mode
Poor action in a new fixture
Some transport packaging
has not been removed
Remove all plastic ties from
mirror drum until drum
rotates freely
Fuse blows repeatedly
Electrical malfunction
Refer to a Martin service
technician
EFX600: Impossible to
restrike lamp after dousing
via DMX.
8 minute restrike protection
delay activated.
Wait 8 minutes before
restriking a hot lamp.
Data link not terminated
Insert DMX termination plug
in output of last fixture on
link. In synchronized
operation, insert DMX
termination plug in input of
first fixture.
Unsatisfactory action in
synchronized operation
Fixtures reset correctly but
behave erratically or do not
respond during DMX or
synchronized operation
30
Mania EFX500 & EFX600 user manual
CONTROL MENU
• Hold the [Mode] button pressed in for 5 seconds to access the control
menu.
• Use the [X100] button to select the personality feature.
• Use the [X1] button to change the setting for that feature.
Personality feature
X100
X10
Personality feature
0
DMX mode
1
Pan (swivel) invert
2
Tilt (rotation) invert
3
Music trig sensitivity
Setting
DMX Address
X1
Mode
Setting*
1
Mode 1 (normal)
2
Mode 2 (extended)
0
Pan normal
1
Pan inverted
0
Tilt normal
1
Tilt inverted
1
Minimum
↓
Maximum
↓
9
*Default settings are shown in bold type.
MANIA EFX500 DMX PROTOCOL
Channel
1
2
3
Value
0-4
5 - 68
69 - 100
101 - 132
133 - 249
250 - 255
0-1
2 - 26
27 - 39
40 - 51
52 - 97
98 - 100
Strobe effect, auto trig, music trig, reset
No function
Strobe (fast to slow)
Remote stand-alone, auto trig
Remote stand-alone, music trig
Reserved, no function
Reset fixture (value must be held for 5 seconds)
0 - 255
0 - 100
Intensity
0 - 100%
240 - 244
245 - 249
250 - 255
Colored gobo wheel positions, gobo wheel rotation,
gobo wheel music trig
Full gobo positions
0-3
Gobo 1
4-7
Gobo 2
8 - 11 Gobo 3
12 - 15 Gobo 4
16 - 19 Gobo 5
20 - 23 Gobo 6
24 - 26 Gobo 7
27 - 30 Gobo 8
31 - 35 Gobo 9
36 - 38 Gobo 10
39 - 42 Gobo 11
43 - 46 Gobo 12 (blackout)
47 - 68 Reserved, (Gobo 12 - blackout)
Continuous Rotation
69 - 81 Clockwise (fast → slow)
82 - 93 Counterclockwise (slow → fast)
Music function
94 - 95 Gobo wheel music trig fast
96 - 97 Gobo wheel music trig slow
98 - 100 Gobo wheel music trig dynamic
0-1
2 - 128
129 - 255
Colored gobo wheel shake
No function
0
1 - 50 Narrow shake (slow → fast)
51 - 100 Wide shake (slow → fast)
0-1
2 - 65
66 - 129
130 - 192
193 - 208
209 - 239
0
1 - 25
26 - 50
51 - 75
76 - 81
82 - 93
240 - 244
245 - 249
250 - 255
94 - 95 Mirror dish music trig, fast
96 - 97 Mirror dish music trig, slow
98 - 100 Mirror dish music trig, dynamic
0-9
10 - 19
20 - 29
30 - 39
40 - 49
50 - 59
60 - 69
70 - 79
80 - 89
90 - 99
100 - 109
110 - 119
120 - 175
176 - 207
208 - 239
4
5
Percent Function
Mirror dish rotation, shake and music trig
Stop
Counterclockwise rotation (fast → slow)
Clockwise rotation (slow → fast)
Shake (slow → fast)
Random shake
Reserved, stop
Channel
6
7
8*
9*
Value
Percent Function
0
63
127
128 - 182
183 - 239
240 - 244
245 - 249
250 - 255
Pan (mirror drum swivel) position, shake and music
trig
Maximum left pan
0
Neutral
24
Maximum right pan
50
51 - 71 Narrow shake (slow → fast)
72 - 93 Wide shake (slow → fast)
94 - 95 Music trig pan, fast
96 - 97 Music trig pan, slow
98 - 100 Music trig pan, dynamic
0-1
2 - 63
64 - 65
66 - 127
128 - 129
130 - 184
185 - 239
240 - 244
245 - 249
250 - 255
Tilt (mirror drum rotation) rotation, shake and music
trig
No rotation
0
1 - 24 Clockwise rotation (slow → fast)
25
No rotation
26 - 49 Counterclockwise rotation (fast → slow)
50
No rotation
51 - 72 Narrow shake (slow → fast)
73 - 93 Wide shake (slow → fast)
94 - 95 Mirror drum rotation music trig, fast
96 - 97 Mirror drum rotation music trig, slow
98 - 100 Mirror drum rotation music trig, dynamic
0 - 15
16 - 31
32 - 47
48 - 63
64 - 79
80 - 95
96 - 111
112 - 127
128 - 143
144 - 159
160 - 175
176 - 191
192 - 207
208 - 255
0-5
6 - 11
12 - 18
19 - 24
25 - 30
31 - 37
38 - 43
44 - 49
50 - 55
56 - 62
63 - 68
69 - 74
75 - 81
82 - 100
Macros (DMX mode 2 only)
No Macro
Macro 1
Macro 2
Macro 3
Macro 4
Macro 5
Macro 6
Macro 7
Macro 8
Macro 9
Macro 10
Macro 11
Macro 12
Reserved. No function
0-1
2 - 255
0
1 - 100
Effects speed (DMX mode 2 only)
Tracking (default)
Fast → slow
* Channels 8 and 9 are available in DMX mode 2 only. In DMX mode 1, effects speed
is set to ‘tracking’.
MANIA EFX600 DMX PROTOCOL
Channel
Value
1
0-4
5 - 122
123 - 129
130 - 189
190 - 199
200 - 209
210 - 219
220 - 239
240 - 249
250 - 255
2
0-1
2 - 47
48 - 50
51 - 74
75 - 78
79 - 82
83 - 86
87 - 94
95 - 98
99 - 100
Intensity, strobe effect, auto trig, reset, lamp off
Blackout (shutter closed)
Intensity 0-100%, lamp on
Shutter open
Strobe (fast to slow)
Shutter closed
Random strobe
Remote stand-alone, auto trig
Blackout (shutter closed)
Reset fixture (value must be held for 5 seconds)
Lamp off (value must be held for 5 seconds and channels
2 & 3 must be set to more than 252 / 99%). Note that
there is a five-minute delay before lamp can be restruck.
240 - 244
245 - 249
250 - 255
Colored gobo wheel position, rotation and music trig
Full gobo positions
0-3
Gobo 1
4-7
Gobo 2
8 - 11 Gobo 3
12 - 15 Gobo 4
16 - 19 Gobo 5
20 - 23 Gobo 6
24 - 26 Gobo 7
27 - 30 Gobo 8
31 - 35 Gobo 9
36 - 38 Gobo 10
39 - 42 Gobo 11
43 - 46 Gobo 12
47 - 68 Reserved (gobo 12)
Continuous Rotation
69 - 81 Clockwise (fast → slow)
82 - 93 Counterclockwise (slow → fast)
Music function
94 - 95 Gobo wheel music trig fast
96 - 97 Gobo wheel music trig slow
98 - 100 Gobo wheel music trig dynamic
0-1
2 - 128
129 - 255
Colored gobo wheel shake
0
No function
1 - 50 Narrow shake (slow → fast)
51 - 100 Wide shake (slow → fast)
0-9
10 - 19
20 - 29
30 - 39
40 - 49
50 - 59
60 - 69
70 - 79
80 - 89
90 - 99
100 - 109
110 - 119
120 - 175
176 - 207
208 - 239
3
Percent Function
Channel
4
5
6
7*
8*
Value
Percent Function
Mirror dish rotation, shake and music trig
Stop
Counterclockwise rotation (fast → slow)
Clockwise rotation (slow → fast)
Shake (various shakes)
Random shake
Reserved, stop
0-1
2 - 65
66 - 129
130 - 192
193 - 208
209 - 239
0
1 - 25
26 - 50
51 - 75
76 - 81
82 - 93
240 - 244
245 - 249
250 - 255
94 - 95 Mirror dish music trig, fast
96 - 97 Mirror dish music trig, slow
98 - 100 Mirror dish music trig, dynamic
0
63
127
128 - 182
183 - 239
240 - 244
245 - 249
250 - 255
Pan (mirror drum swivel) position, shake and music
trig
Maximum left pan
0
Neutral
24
Maximum right pan
50
51 - 71 Narrow shake (slow → fast)
72 - 93 Wide shake (slow → fast)
94 - 95 Music trig pan, fast
96 - 97 Music trig pan, slow
98 - 100 Music trig pan, dynamic
0-1
2 - 63
64 - 65
66 - 127
128 - 129
130 - 184
185 - 239
240 - 244
245 - 249
250 - 255
Tilt (mirror drum rotation) rotation, shake and music
trig
No rotation
0
1 - 24 Clockwise rotation (slow → fast)
25
No rotation
26 - 49 Counterclockwise rotation (fast → slow)
50
No rotation
51 - 72 Narrow shake (slow → fast)
73 - 93 Wide shake (slow → fast)
94 - 95 Mirror drum rotation music trig, fast
96 - 97 Mirror drum rotation music trig, slow
98 - 100 Mirror drum rotation music trig, dynamic
0 - 15
16 - 31
32 - 47
48 - 63
64 - 79
80 - 95
96 - 111
112 - 127
128 - 143
144 - 159
160 - 175
176 - 191
192 - 207
208 - 255
0-5
6 - 11
12 - 18
19 - 24
25 - 30
31 - 37
38 - 43
44 - 49
50 - 55
56 - 62
63 - 68
69 - 74
75 - 81
82 - 100
Macros (DMX mode 2 only)
No Macro
Macro 1
Macro 2
Macro 3
Macro 4
Macro 5
Macro 6
Macro 7
Macro 8
Macro 9
Macro 10
Macro 11
Macro 12
Reserved. No function
0-1
2 - 255
0
1 - 100
Effects speed (DMX mode 2 only)
Tracking (default)
Fast → slow
* Channels 7 and 8 are available in DMX mode 2 only. In DMX mode 1, effects speed
is set to ‘tracking’.
M ANIA EFX500/600 SPECIFICATIONS
Physical
Size with mounting plate (LxWXH) . . . . . .410 x 500 x 230mm (16.2 x 19.7 x 9.1 in.)
Mania EFX500 weight with mounting plate . . . . . . . . . . . . . . . . . . . 12.5 kg (27.6 lb)
Mania EFX600 EU model weight with mounting plate . . . . . . . . . . . . . . 14 kg (31 lb)
Mania EFX600 US model weight with mounting plate . . . . . . . . . . . 16.5 kg (36.5 lb)
Installation
Orientation. . . . . . . . . . . . . . . . . . . . . . . . . . . . . . . . . . . . . . . . . . . . . . . . . . . . . . . any
Minimum distance to combustible material . . . . . . . . . . . . . . . . . . . . . . . 0.1 m (4 in.)
Minimum distance to illuminated surface . . . . . . . . . . . . . . . . . . . . . . . 0.3 m (12 in.)
Minimum clearance around air vents . . . . . . . . . . . . . . . . . . . . . . . . . . . . 0.1 m (4in)
Suitable for mounting on combustible surfaces (wood, etc.) using
mounting bracket and plate and respecting specified minimum distances
Construction
Housing . . . . . . . . . . . . . . . . . . . . . . . . steel and aluminum, rubber corner protectors
Source
Mania EFX500 . . . . . . . . . . . . . . . .24 V, 250 W halogen lamp with integral reflector
Mania EFX500 lamp socket . . . . . . . . . . . . . . . . . . . . . . . . . . . . . . . . . . . . . . .GX5.3
Mania EFX600 . . . . . . . . . . . . . . . . . . . . . . . . . . . . . . . . . . . . 150 W discharge lamp
Mania EFX600 lamp socket . . . . . . . . . . . . . . . . . . . . . . . . . . . . . . . . . . . . . . . . G12
Control and programming
DMX control . . . . . . . . . . . . . . . . . . . . . . . . . USITT DMX-512 (1990) DMX protocol
Mania EFX500: number of DMX channels . . . . . . . . . . . . . 7 (mode 1) or 9 (mode 2)
Mania EFX600: number of DMX channels . . . . . . . . . . . . . 6 (mode 1) or 8 (mode 2)
Data I/O connections. . . . . . . . . . 3-pin locking XLR, pin 1=shield, pin 2 (-), pin 3 (+)
Stand-alone music trig (single fixture and synchronized master-slave)
Stand-alone auto trig (single fixture and synchronized master-slave)
Individual effects can be set to music trig remotely via DMX
Dynamic effects
Motorized rotating parabolic mirror dish
Motorized rotating gobo wheel, 11 colored gobos plus blackout (EFX500), 12 colored
gobos (EFX600)
Motorized rotating & swivelling mirror drum
Pan . . . . . . . . . . . . . . . . . . . . . . . . . . . . . . . . . . . . . . . . . . . . . . . . . . . . . . . . . . . 180°
Tilt . . . . . . . . . . . . . . . . . . . . . . . . . . . . . . . . . . . . . . . . . . . . . . . . . . . . . . . . . . . . 360°
Electrical
Mania EFX500 all models
Input . . . . . . . . . . . . . . . . . . . . . . . . . . . . . . . . . . . . . . . . . . 3-prong IEC male socket
AC power . . . . . . . . . . . . . . switch-selectable, 110-120 V, 60 Hz / 220-240 V, 50 Hz
Main fuse. . . . . . . . . . . . . . . . . . . . . . . . . . . . . . . . . . . . . . . . . . . . . . . . . . . . .3.15 AT
Typical power and current*
@ 110 V, 60 Hz. . . . . . . . . . . . . . . . . . . . . . . . . . . 229 W, 2.1 A, PF = 0.997
@ 115 V, 60 Hz. . . . . . . . . . . . . . . . . . . . . . . . . . . 248 W, 2.2 A, PF = 0.997
@ 120 V, 60 Hz . . . . . . . . . . . . . . . . . . . . . . . . . . 264 W, 2.2 A, PF = 0.997
@ 220 V, 50 Hz . . . . . . . . . . . . . . . . . . . . . . . . . . 229 W, 1.1 A, PF = 0.995
@ 230 V, 50 Hz . . . . . . . . . . . . . . . . . . . . . . . . . . 247 W, 1.1 A, PF = 0.995
@ 240 V, 50 Hz . . . . . . . . . . . . . . . . . . . . . . . . . . 265 W, 1.2 A, PF = 0.994
Mania EFX600 EU model
Input . . . . . . . . . . . . . . . . . . . . . . . . . . . . . . . . . . . . . . . . . . 3-prong IEC male socket
AC power . . . . . . . . . . . . . . . . . . . . . . . . . . .switch-selectable, 230 V / 240 V, 50 Hz
Main fuse. . . . . . . . . . . . . . . . . . . . . . . . . . . . . . . . . . . . . . . . . . . . . . . . . . . . . . . 2 AT
Typical power and current*
@ 220 V, 50 Hz . . . . . . . . . . . . . . . . . . . . . . . . . . 181 W, 0.9 A, PF = 0.950
@ 230 V, 50 Hz . . . . . . . . . . . . . . . . . . . . . . . . . . 197 W, 1.0 A, PF = 0.926
@ 240 V, 50 Hz . . . . . . . . . . . . . . . . . . . . . . . . . . 204 W, 1.0 A, PF = 0.923
Mania EFX600 US model
Input . . . . . . . . . . . . . . . . . . . . . . . . . . . . . . . . . . . . . . . . . . 3-prong IEC male socket
AC power . . . . . . . . . . . . . . . . . . . . . . . . . . . . . . . . . . . . . . . . . . . . 115-120 V, 60 Hz
Main fuse. . . . . . . . . . . . . . . . . . . . . . . . . . . . . . . . . . . . . . . . . . . . . . . . . . . . .3.15 AT
Typical power and current*
@ 110 V, 60 Hz. . . . . . . . . . . . . . . . . . . . . . . . . . . 189 W, 1.8 A, PF = 0.963
@ 115 V, 60 Hz. . . . . . . . . . . . . . . . . . . . . . . . . . . 207 W, 1.9 A, PF = 0.964
@ 120 V, 60 Hz . . . . . . . . . . . . . . . . . . . . . . . . . . 226 W, 2.0 A, PF = 0.957
* V = volts, Hz = hertz, W = watts, A = amps, PF = power factor
Allow for a deviation of +/- 10% from typical figures listed above.
Measurements made at nominal voltage. Local supply voltages can vary by +/-10%.
Thermal
EFX500: maximum exterior surface temperature, steady state . . . . . 100°C (212°F)
EFX600: maximum exterior surface temperature, steady state . . . . . . 80°C (176°F)
Time required to cool before handling. . . . . . . . . . . . . . . . . . . . minimum 10 minutes
Maximum ambient temperature (Ta) . . . . . . . . . . . . . . . . . . . . . . . . . . . 40°C (104°F)
Approvals
EU EMC . . . . . . . . . . . . . . . . . EN 55015, EN 61547, EN 61000-3-3, EN 61000-3-2
EU safety. . . . . . . . . . . . . . . . . . . . . . . . . . . . . . . . . . . . EN 60598-1, EN 60598-2-17
US safety. . . . . . . . . . . . . . . . . . . . . . . . . . . . . . . . . . . . . . . . . . . . . . . . . . . . UL 1573
Canadian safety . . . . . . . . . . . . . . . . . . . . . . . . . . . . . . . . . . . . ..CSA C22.2 NO 166
Included items – EFX500 all models
Long-life 250 W halogen lamp
3 m (9.8 ft) EU mains cable 3x1.0mm2 with Schuko male connector
3 m (9.8 ft) EU mains cable 3x1.0mm2 with no male connector
2 m (6.5 ft) US mains cable 18AWG with US male connector (UL approved)
5 meter (16.4 ft.) RS-485 XLR cable for data link . . . . . . . . . . . . . . . . P/N 11820008
User manual . . . . . . . . . . . . . . . . . . . . . . . . . . . . . . . . . . . . . . . . . . . . P/N 35000168
Included items – EFX600 EU (230 V) models
Long-life 150 W discharge lamp
3 m (9.8 ft) EU mains cable 3x1.0mm2 with Schuko male connector
3 m (9.8 ft) EU mains cable 3x1.0mm2 with no male connector
5 meter (16.4 ft.) RS-485 XLR cable for data link . . . . . . . . . . . . . . . . P/N 11820008
User manual . . . . . . . . . . . . . . . . . . . . . . . . . . . . . . . . . . . . . . . . . . . . P/N 35000168
Included items – EFX600 US (115 V) models
Long-life 150 W discharge lamp
2 m (6.5 ft) US mains cable 18AWG with US male connector (UL approved)
5 meter (16.4 ft.) RS-485 XLR cable for data link . . . . . . . . . . . . . . . . P/N 11820008
User manual . . . . . . . . . . . . . . . . . . . . . . . . . . . . . . . . . . . . . . . . . . . . P/N 35000168
Accessories
Philips ELC 10H 250 W halogen lamp (EFX500) . . . . . . . . . . . . . . . . P/N 97000109
Philips CDM SA-T 150 W discharge lamp (EFX600) . . . . . . . . . . . . . P/N 97010111
Osram HSD 150/70 150 W discharge lamp (EFX600) . . . . . . . . . . . . P/N 97010117
DMX termination plug (end of link), XLR male . . . . . . . . . . . . . . . . . . P/N 91613017
DMX termination plug, (start of link, master/slave), XLR female. . . . . P/N 91613018
G-clamp. . . . . . . . . . . . . . . . . . . . . . . . . . . . . . . . . . . . . . . . . . . . . . . . P/N 91602003
Half-coupler clamp . . . . . . . . . . . . . . . . . . . . . . . . . . . . . . . . . . . . . . . P/N 91602005
5-pin male to 3-pin female XLR adaptor cable . . . . . . . . . . . . . . . . . . P/N 11820005
5 meter (16.4 ft.) RS-485 XLR cable for data link . . . . . . . . . . . . . . . . P/N 11820008
Mania EFX500 (all models) main fuse, 3.15 AT . . . . . . . . . . . . . . . . . .P/N 05020043
Mania EFX600 (EU models) main fuse, 2 AT . . . . . . . . . . . . . . . . . . . .P/N 05020009
Mania EFX600 (US models) main fuse, 3.15 AT. . . . . . . . . . . . . . . . . .P/N 05020043
Ordering information
Mania EFX500, 115/230 V, 50/60 Hz . . . . . . . . . . . . . . . . . . . . . . . . . P/N 90430050
Mania EFX600 EU model, 220-240 V, 50 Hz . . . . . . . . . . . . . . . . . . . P/N 90430052
Mania EFX600 US model, 110-120 V, 60 Hz . . . . . . . . . . . . . . . . . . . P/N 90430053
Ø13.5
A
40
Ø9
40
Ø18
A
A
50
50
www.martin.com • Olof Palmes Allé 18 • 8200 Aarhus N • Denmark
Tel: +45 8740 0000 • Fax +45 8740 0010