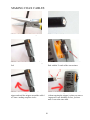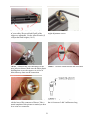
1
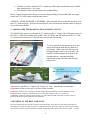
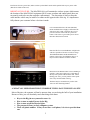
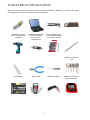
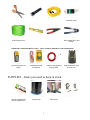
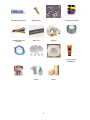
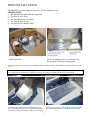
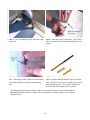
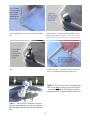
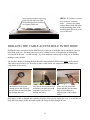
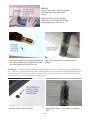
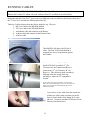
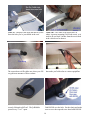
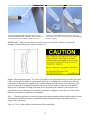
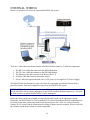
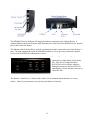
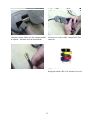
MAGELLAN MSS - Mobile Satellite Internet System
HARDWARE INSTALLATION MANUAL
For Internal Use Only
Updated January 2006
1
Table of Contents
HARDWARE INSTALLATION INTRODUCTION......................................................................... 3
PRE-INSTALLATION – BEFORE THE INSTALL ......................................................................... 3
TOOLS FOR AN INSTALLATION.................................................................................................... 6
SUPPLIES – ITEMS YOU NEED TO KEEP IN STOCK ................................................................ 7
DISH INSTALLATION ........................................................................................................................ 9
DRILLING THE CABLE ACCESS HOLE IN THE ROOF .......................................................... 13
RUNNING CABLES ........................................................................................................................... 15
INTERNAL WIRING ......................................................................................................................... 18
MAKING COAX CABLES ................................................................................................................ 20
CONNECTING THE DISH POWER SUPPLY ............................................................................... 23
FINAL THOUGHTS ........................................................................................................................... 23
TROUBLESHOOTING ...................................................................................................................... 24
MAGELLAN SPECIFICATIONS ..................................................................................................... 25
2
HARDWARE INSTALLATION INTRODUCTION
The installation of a MAGELLAN MSS (Mobile Satellite System) will normally take a full working day, and probably
two if this if your first installation. This manual is an important guide that will show you everything you need to know
about performing a quality installation and help keep you from making costly mistakes.
The most common problems that can be avoided are being ill preparation before an installation. Having to go to the
store for needed hardware, or to the shop for a missing tool can add hours, if not days to your installation. It can not be
stressed enough that paying close attention to the steps as laid out will make your installation far more productive… and
pleasant.
MANUALS ASSOCIATED WITH THE MAGELLAN
•
MAGELLAN MSS HARDWARE INSTALLATION Describes the installation of the hardware of
the MAGELLAN System, both external and inside the vehicle. (The manual you are currently reading)
•
•
MAGELLAN MSS SYSTEM ACTIVATION MANUAL Guide to use after the hardware is
installed for activating the MAGELLAN system so that it becomes a fully functional, internet surfing machine.
Covers dish calibration, DW6000 Direcway modem commissioning, and router configurations.
MAGELLAN MSS USERS MANUAL – The Users Manual instructs the customer in the normal
operation of a MAGELLAN system.
PRE-INSTALLATION – BEFORE THE INSTALL
1. OBTAINING A “SAN & PIN” NUMBER FROM GROUND CONTROL
Play it safe and request your “San & Pin” number from Ground Control to commission your
DW6000 satellite modems BEFORE you go on an installation. Please visit this Ground Control
Partners page to download the “Bandwidth Request Form”.
BANDWIDTH ACTIVATION FORM
This form will ask what satellite you are
turning your customer on to, and what
grade of service he is purchasing.
You will need to know these following items before you may request a San & Pin from Ground
Control.
•
•
•
•
•
Customer Name, Address, Phone Number
The DW6000 Serial Number
They type of bandwidth service requested
If the customer wishes a Public IP address or not
Which satellite they wish to commission to (there are several).
3
•
•
Whether or not they want DirecTV* (which may affect which satellite Direcway Satellite
they commission to…See *note)
The customer credit card information for monthly billing
Please Contact Ground Control Dealer Services for help in filling out your Bandwidth Activation
form at 805-783-4620 during normal business hours.
* DIRECTV / DISH NETWORK CUSTOMERS – Must order the Universal bracket mount for your
DirecTV / Dish reception. This universal mount will work with most any satellite within 10 degrees
of your Direcway satellite.
2. MAKING SURE THE ROOF HAS ENOUGH SPACE ON TOP
The MAGELLAN requires a minimum of 49” inches long by 41” inches wide of flat space on top of
the vehicle. While the mounting plate width is only 28” inches, the dish reflector itself is 39” wide,
we recommend a minimum of 1 inch tolerance on each side for stowing.
Try to be generous in the amount of space you
can put between the dish and any obstacle it
may contact. When raised, the dish arm will
be high enough to rotate over most items. Be
watchful of radio antennas in the path of the
Azimuth rotation. Antennas should be
repositioned on the roof rather than the dish
swing into it.
When stowed, the dish is 13” high by 48” long by 39” wide. Note that the recommended
requirements in the previous give you about a inch clearance.
WARNING – This unit uses a compass to find the satellite. Before installation, scan the intended area of the
installation with a compass to verify that there are no interfering magnetic fields. (i.e. a speaker, air
Conditioning (turned on), electrical wiring, heaters, etc). The compass should point north, no matter where it is
placed, on the surface of the intended area of installation."
3. DECIDING ON THE BEST CABLE RUN
The most important decision from the customer is the location they wish to have the cable drop in from the roof.
Normally this is inside of a cabinet, but there are numerous locations. Remember where the cable enters the vehicle
may not be the location of where the dish is mounted. All MAGELLAN systems come with 50’ of cable. To avoid
4
interference from AC power lines, make sure that you DO NOT run the cables parallel with any AC power cable
(that also be inside of the roof).
IMPORTANT FEATURE - The MAGELLAN is self-contained a wireless system, which means
the location of the MAGELLAN equipment (Wi-Fi router, modems and control panel) does not
necessarily need to be near the computer workstation(s). The discussion of where to drop the
cable into the vehicle may be inside of a cabinet on the opposite side of the rig. It’s important to
fully educate your customer before a decision is made.
It is recommended to have all items (Modems,
Router and Dish Power Supply) connected to the
same power bar so that a customer may recycle
power to all items at the touch of a power bar
button. This assures a good “full system” reboot
that takes about 80-90 seconds.
Place the Wi-Fi Access Point/Router as high in the
vehicle as possible to increase its effective range.
The DW6000 modems and the MAGELLAN
connect to the router via an Ethernet cable, so it
may be located a distance from the modems.
Placement of the Remote Panel is also something to
consider. It does not require power, and connects
directly from a phone cable from the dish. When
running your wires, you may run the remote panel
wire to any location inside of the rig.
The Panel may be mounted to any surface with
Velcro or other fastening method.
4. WHAT YOU NEED FROM THE CUSTOMER IF THEY LEAVE THE INSTALL SITE
Most of the time, the customer will not be present when you are doing the bulk of your installation.
Because of this, you will absolutely need some things from them.
•
•
•
•
•
Keys to the Rig (in case you need to move it).
How to turn on and off power in the Rig
How to turn on/off the interior lights.
The password (if any) to their computer system.
Their cell phone number. If they do not have a cell phone, it is wise to provide them
one.
5
TOOLS FOR AN INSTALLATION
Below are the tools you will need to perform a mobile installation. Making sure you have the proper
installation tools will save you hours on your installation.
A cell phone is a
necessity to call for
help, or to question the
customer
A laptop is not required
for hardware installation,
but it can be useful
during modem
commissioning
Coax Crimpier… This
tool is supplied to you
by Ground Control when
you become certified
Coax Stripper
Power Screwdriver
Hole Saw
Drill Bits
Long Drill Bit (for the
pilot hole through the
roof)
Long ladder
Wire Cutters
Small Screw Driver
Assortment of long and
short screwdrivers
Ratchet Wrench Set
Open End Wrench Set
Pocket Knife
Tape Measure
6
Scissors
Flashlight
Extension Cord
Power Bar (for the
extension cord)
Rope – To help lift
heavy things to roof
Level
Wire cutters
Etherent and Phone
cable crimper (RJ11 and
RJ45)
OTHER RECOMMENDED TOOLS – These could be helpful for your installations.
Handheld GPS (when
you do not have a zip
code)
Multimeter – to help
troubleshoot wiring
connections
Fish Tape Spring Steel
– helps in running wires
through walls
Stud Finder – for finding
support beams on roof
to screw into.
SUPPLIES – Items you need to keep in stock
Dicor Roof Sealant –
Can be purchased ad
any RV supply store.
Bulk Coax Cable (for TV
or long runs)
7
Compression Coax
Connectors
Cable Clamps
Dielectric Grease –Auto
Parts stores carry this.
Self-Tapping Sheet
Metal Screws
Assorted hardware
Colored Electrical Tape
– To help mark cables
Cable Ties (small, black
and white are most
common)
Split Loom – For long
cable runs
Packing Tape for
shipping.
Tape- Assorted
Extra Ethernet Cables
Ethernet Connectors
Bulk Ethernet Cable
Sunscreen for those hot
all-day outside
installations.
Batteries
Windex and Paper
Towels
Twine for unknown
issues.
8
DISH INSTALLATION
The MAGELLAN comes shipped in one box (120 lbs) with these items:
SHIPPED ITEMS
• The MAGELLAN ships with this equipment:
• The MAGELLAN Dish
• The DW6000 Direcway Modems
• The Linksys Wi-Fi Router
• The MAGELLAN Remote Panel
Step 1 – Check to make sure everything has been
shipped in the box.
Step 2 – Remove the bolts that hold the mounting
plate to the shipping crate, as well as the bolts
that attach the dish to the mounting plate
The mounting plate is far easier to move and mount to the roof without the dish. The MAGELLAN Dish (with plate) weighs
75 Lbs.
RAISE-LOWER DISH TRICK – If nothing is connected to the MAGELLAN, and you just supply the 15VDC power to the
system, then after 90 seconds after you plug it in, you may raise and lower the dish with the remote control panel.
Step 3 – Unscrew the bolts that hold the MAGELLAN on
the mounting plate and position the mounting plate on the
vehicle roof. (Make sure there are no magnetic disturbances
on roof from a stereo speaker in the ceiling. Use a compass
Step 4 – Make sure that the plate is mounted in the
direction of vehicle travel. The mounting bolts (that hold the
Dish on the plate) should be toward the front of the vehicle.
9
to help determine if a disturbance exists .)
STEP 5 – Use a measuring tape to center the plate
on the roof.
Step 6 – Mark the corners of the dish. This is used
later on to accurately lower the mounting plate onto
sealant.
STEP 7 – Mark all screw holes for drilling pilot
holes. Note that you don’t need to use the factory
holes, and can drill your own in the mounting
plate.
STEP 8 – The drill bit used to create pilot holes
must be smaller than the threads of the screwbolts
used…but the size can’t be too small or you could
crack fiberglass roofs. The size the drill should
be is the size of the shank of the screwbolt.
Self-Tapping screwbolts (as shown by the silver screwbolt in Step 8) are recommended for
installations because of their “cutting” edge. Pilot holes are always required, especially on
fiberglass roofs.
10
STEP 9 – Drill all marked pilot holes. Make sure
that you only drill down only for the distance of the
length of the bolt to avoid hitting any wires that are
traveling inside the roof.
STEP 10 – Clean off the roof surface… Make
sure that there is no residue that will keep the
sealant from working.
STEP 11 – Dicor White Sealant is the standard STEP 12 – Put a dab of Dicor Sealant over the top
for all roof top installations for the industry. It of each of the pilot holes you drilled. Be sure that
stays pliable and has proven to be unmatched
you do not miss any holes to avoid a bad leak.
in sealing roofs. It can be purchased at any RV
supply store.
11
STEP 13 – Using the marking you made earlier, gently
lower the mounting plate on top of the dicor & pre-drilled
holes.
STEP 14 – The dicor should bubble out (slightly) from
each of the holes. Use liberal amounts of paper towels to
clean up excess Dicor. WARNING – Do not step in Dicor
because it will track on the roof create unsightly footprints.
STEP 15 – Place all the screwbolts into their respective
holes
STEP 16 – Using a ratchet wrench, tighten all of the
screwbolts into place. If you do it by hand, you are less
likely to over-tighten and avoid stripping the screw.
STEP 18 – Clean your work area and make sure
that you do not use Dicor just yet to cover the
exposed bolts. This will help keep you from
stepping in the Dicor and tracking it on the roof.
STEP 17 – Now lower the MAGELLAN back
onto the 6 mounting plate over the six exposed
bolts and tighten the nuts to secure the dish into
place.
12
TRICK - If you have a curved
roof, such as a Airstream
trailer… you may use rubber
washers between the dish plate
and the mounting plate so the
mounting plate may bow to the
curve of the roof.
DRILLING THE CABLE ACCESS HOLE IN THE ROOF
Drilling the large access hole for the MAGELLAN Cable run to inside the vehicle should be a process
taken with great care. For many, this step is nerve racking because of the potential of drilling into
wires inside of the roof… a valid concern! Pay close attention to these steps to help you in avoiding
making a costly mistake.
The location chosen for drilling the hole should be chosen and pre-drilled from inside of the vehicle.
This makes sense because it is far easier to make a cable run to any location on the roof than to run
cable inside of the vehicle.
One neat trick is to use an
existing hole in the ceiling to
use as a place to start your pilot
hole through the roof.
You can see any exposed wires
and make your pilot hole with
confidence you won’t be
drilling into wires.
Later, you can pull cables
down and then use the same
hole to feed cables to a
different part of the vehicle.
Nifty!
Most often, a cable is dropped into a cabinet where the wires are not exposed to view. You will need a
long drill bit at least 6 inches in length to make the first pilot hole through the roof.
13
STEP 19
Use of a long, narrow drill bit is needed
to drill the hole from inside of the
vehicle.
Before you start your pre-drill hole,
make sure that you will not be drilling
into anything on top of the roof.
STEP 20 - You will be using a hole saw to make
a hole large enough to run the cables through the
roof. Note how the hole you drilled from inside
will be the guide hole for your hole saw.
STEP 21 – Be patient while you are drilling and
only drill as far as there is resistance to your
drilling.
WARNING - Be careful in not drilling into foam insulation or open space under the roof with the hole
saw. The idea is to not drill into any cables running in the space between the ceiling inside and the roof.
Use a pocket knife to remove any other materials. Use your finger to move any cable(s) out of the way
from the hole you will be making in the ceiling panel.
STEP 22 – Use sandpaper or a file to remove any
burrs that could cut into the cables.
STEP 23 – Use the same hole saw to drill from
inside of the vehicle. This makes for a cleaner
hole.
14
RUNNING CABLES
IMPORTANT NOTE FOR DIRECTV USERS – The MAGELLAN works with the Universal
Bracket Kit for DirecTV which will work with most DirecTV and Dish Network Satellites.
Remember that the Coax for TV may need to run different on the roof than for the Internet cable run if
the TV receiver is located in a different part of the RV.
There are 5 cables that run from the dish to inside the rig. They are:
1. RX Coax Cable to the DW6000 Modem
2. TX Coax Cable to the DW6000 Modem
3. An Ethernet cable that connects to the Router
4. A phone cable that connects to the Remote Panel
5. A power cable
The MAGELLAN ships with 50 feet of
cable. The first 20 feet from the dish is
wrapped in a sleeve for protection against
the weather.
For those who desire TV, the TV port for
the MAGELLAN is marked “V” (for
Video) next to the Transmit and Receive
connections (“T” for Transmit, “R” for
Receive). This cable may make an entirely
different cable run on top of the rig…
normally to where the TV equipment is
located.
If you wish to add a second TV cable, you will need to
drill a hole in the mounting plate next to the TV outlet, and
simply run a second coax cable along side the first TV
cable from the LNB.
If you remove a coax cable from this connector,
or add a new cable, make sure that you put DiElectric Grease inside of the fitting for a water
tight seal. (You may purchase Di-Electric Grease
from any Auto Parts store).
15
STEP 24 – Drop the cable from the MAGELLAN
down the hole you’ve just drilled in the roof.
STEP 24B – The cable wrap (shown here in
white) is porous (meaning it will leak water), so it
needs to be cut back 2 inches from the access hole
in the vehicle roof as shown.
STEP 24C – Tie Wrap the end of the cable wrap.
The exposed area of the cables are where you will
use generous amounts of Dicor sealant.
STEP 25 – Strip off any unused cable casing, and
then make your cable runs to various equipment.
Cable clamps are very good at keeping cables
securely fastened to the roof. They should be
spaced every 2” to 3” apart.
STEP 26 – Pre-drill all holes for screws, and then
Dab DICOR over the hole. Set the clamp and make
sure to cover the exposed screw head with DICOR.
16
STEP 27 – Once the clamps are in place, seal the entry hole
with a liberal amount of DICOR. Make sure to squeeze
DICOR BEWTWEEN THE CABLES. Make sure there are
no holes exposed, or you will have a leak in the roof!
STEP 28 – Now cover all exposed screwheads on the
mounting plate with DICOR. Do this step last when you
know you won’t be on the roof any longer (to avoid stepping
in the wet sealant).
IMPORTANT – Make one last check to see there are no “missed holes” that are exposed to the
elements. The last thing anyone wants is a leaky roof.
Step 29 – Mount the Caution Sign to the ladder of the RV.
Hughes Network Systems states: “If a roof access ladder or any other means of access to the roof exists
on the vehicle, then the ladder or access must be blocked by a suitable rope or other barrier while the
earth station is deployed or in operation. The installer must provide this rope or barrier directly to the
end user at the time of installation and advise the user to use it at all times when the earth station is
deployed or in operation. Warning signs must also be provided by the installer to the end user to be
posted on the rope or other barrier warning all persons not to attempt to access the roof of the vehicle
while the earth station is deployed or in operation.”
Also… “Warning signs must be posted at prominent locations on and around the mobile satellite system
informing all persons of the danger of potential harmful radiation from the earth station while it is
deployed or in operation.”
That’s it! You’re done with the outside portion of the installation!
17
INTERNAL WIRING
Below is a schematic of a correctly connected MAGELLAN system.
There are 5 cables that come down from the MAGELLAN that connect to 3 different components.
1.
2.
3.
4.
5.
The RX Coax Cable that connects to the DW6000 Modem
The TX Coax Cable that connects to the DW6000 Modem.
The Ethernet Cable that connects to the Router (Port 1-4).
A Phone Cable that connects the remote control.
Power Cable that supplies the dish with 15VDC power (via a supplied 15V Power Supply)
The MAGELLAN was designed to work well when all components are turned off and on from a
power bar switch. Note that a computer is not part of the MAGELLAN system.
DRYDOCKING - For those who need to draw as little power as possible, the customer may turn off
just the MAGELLAN (by simply unplugging it) and it will not affect Internet connectivity. Of course
the dish must have acquired satellite before it can be unplugged.
Before the cables can be cut to length, you must decide where in the rig all equipment is going.
Remember, the MAGELLAN is a self-contained Wi-Fi system which means that all components may
be located in the same cabinet and connected to the same power bar. Also, it is wise to mount the
Linksys Wi-Fi Access Point in cabinet near the ceiling for better exterior reception. Please work with
the customer for the best location of system components.
18
The DW6000 Direcway Modems will supply the Internet connection to the Linksys Router. A
standard Ethernet cable runs from the single Ethernet port on the back of the DW6000 to the “Internet”
port on the back of the Router.
The Ethernet cable from the dish is used for communication and is connected to one of the Routers 4
ports. The dish communicates with the DW6000 modems as well as gives any connected computer
access to the MAGELLAN Administrative screen.
The small Remote Control Panel is
connected to a single phone wire from the
dish. This device is optional and the
MAGELLAN will work fine without it,
although you must use the MAGELLAN
Administrative Screen through a browser to
control the dish.
The Remote’s small size (6 ¼ inches wide) allows it to be mounted almost anywhere or on any
surface. Some of your customers may use this panel almost exclusively.
19
MAKING COAX CABLES
STEP 1 – Cut the Coax cable to length.
Make sure the cut is clean
STEP 2 – Place the Coax Use the Coax Stripper
Tool
Note where the red arrow shows the coax end is
flush with the V notch of the coax stripper.
STEP 3 – Place a finger in the hole of the coax
stripper and twirl the stripper around the cable 4
or 5 times...making complete circles.
STEP 4 – Pull the stripper away from the cable
(without opening the stripper) so that you remove
a segment of coax shielding. In fact, you have
made 2 cuts at the same time.
20
If you are having trouble making the perfect cut
on your cables, the razor blades inside of the
stripper are adjustable. Use the Allen Wrench (3)
to adjust the blade heights (1 & 2).
Note here the Allen Wrench in one of the blade
height adjustment screws.
STEP 5 - Fold back the wire shielding over the
STEP 6 - Twist the connector onto the coax cable
outer jacket as shown. Make sure the white plastic
shielding that covers the copper wire is free of
debris that may short out the connection.
So that the white plastic shielding comes is flush
STEP 7 - Cut off any excess of the connector so
with the base of the connector as shown. Take a
that it is between 2 and 3 millimeters long
mental snapshot of this picture to remind you how
far to twist on a connector.
21
STEP 8 - Place the coax connector into the
Grip the handles and crimp the fitting tightly…
connector crimper. Make sure the crimper handles You may now removed the “compressed” coax
are opened…and then close the head handle.
connector.
The finished connector.
STEP 9 - Don’t forget to use colored tape to
distinguish which cable is for transmit or receive.
22
CONNECTING THE DISH POWER SUPPLY
The MAGELLAN system is powered by a 15VDC power supply that is included with the system.
Locate the power wire from the dish and attach it to the provided connector.
The MAGELLAN Dish connects to a power
15VDC power supply. It ships with blue
connectors that you will need to remove before
you run the wires from the roof to inside the
vehicle.
Unscrew an end of the connectors and remove
the wire from power supply. You may now
feed the cables through the small access hole
on the roof. Of course you’ll need to reattach
these connectors after
FINAL THOUGHTS
Congratulations in successfully completing your MAGELLAN installation. In the next manual
“MAGELLAN System Activation” you will learn how to commission the Direcway DW6000
modems, configure the Wi-Fi router, and get the whole system operational.
23
TROUBLESHOOTING
Ground Control Technical Support is available 24-7 at 805-542-0688 or by email at
[email protected]
24
MAGELLAN SPECIFICATIONS
BANDWIDTH SERVICE (Via Direcway)
Download Speed……………………..
Normally 400 to 1500 Kbps
Upload Speed…….…………………..
Normally 30 to 100 Kbps
Public IP Address…………………….
Optional
Protocol……………………………….
TDMA
VOIP Phone Service…………………
Included
SATELLITE DISH
Satellite Acquire Time (from stowed)..
Automated Cross Poll acquisition……
Reflector Type………………………..
Mount Geometry……………………..
Polarization…………………………...
Deployment Sensors………………….
Normally between 2-5 minutes
Normally between 30 seconds to 2 minutes
.74 Meter Effective Area Elliptical Offset
3 Axis Motor Drive (Elevation, Azimuth & Skew)
Dish Rotation Cross-Pol Isolation automated
GPS, Compass
MAXIMUM MOUNT ROTATION
Azimuth………………………………
Elevation……………………………...
Elevation Look Angles……………….
Skew………………………………….
-25 to +385 (410 degrees total)
152.5 degrees
0 to 76 Degrees from vertical
+/- 80 Degrees
NETWORK
DHCP…………………………………
NAT………………………………….
Port Mapping…………………………
Networkable………………………….
Wi-Fi Access Point…………………..
Ethernet Port…………………………
Supported by included router
Supported by included router
Supported by included router
Yes, no per-seat charges
Yes, included at no additional cost
10/100 Mbps
RF INTERFACE
Transmit Power………………………
Receive Frequency……………………
1 Watt
Range 950-1450 mhz
DIMENSIONS
Dish Mounting Plate………………….
Dish Stowed Dimensions…………….
Deployed Dish Height………………...
Dish Weight (with mounting plate)…..
Dish Weight without mounting plate…
Shipping Weight………………………
22” wide x 48” long
13” high x 39” wide x 48” long
Stands approximately 41” when deployed
75 lbs
65 lbs
120 lbs
ENVIRONMENT
Wind Deployed………………………..
Wind Stowed…………………………..
Temperature……………………………
40 MPH
140 MPH
Approx –20 degrees F to 120 degrees F
25